If you’ve just installed iOS 17, here’s a list of the best iOS 17 tips and tricks that will enhance your overall experience while you use your iPhone.

iOS 17 brings a number of new features and changes to the iPhone experience, including ones that turn your iPhone into a bedside smart display, transform your favorite photos and videos into animated stickers, and even reproduce your voice via artificial intelligence, but with so many changes on offer, where do you start?
I’ve been testing iOS 17 for a few months and rounded up the 31 best iOS 16 hacks, tips, tricks and hidden software tweaks that you’ll want to test out as soon as you get iOS 17 up and running on your iPhone.
These iOS 17 tips and tricks will surely improve the productivity levels when you use your iPhone. So without any further delay, let’s have a look at these tips and tricks in iOS 17.
Best iOS 17 tips and tricks
Here is a list of the Best iOS 17 Tips and Tricks in 2023:
1. Automatically delete all those verification codes in Messages and Mail
These days, many websites and services use one-time passcodes sent via SMS or over email for verification purposes, but these one-time codes can quickly clog up your Mail inbox and Messages app. Sure, you can always manually delete each code, but that takes too much time. iOS 17 now has a setting that automatically deletes your verification codes after you’ve entered them. Apple should ask you if you want to enable this when you use the autofill feature after upgrading to iOS 17, but you can toggle it on manually by following these steps.
- Open Settings on your iPhone.
- Scroll down and tap Passwords (you’ll be prompted to use Face ID to authenticate the next screen).
- Tap Password Options.
- Under "Verification Codes," toggle on the switch next to Clean Up Automatically so that it is in the green ON position.
2. Use Apple Maps even if you don’t have internet service

Maps can be downloaded so that you can use them offline in iOS 17, which is useful when there is no cellular or Wi-Fi connection.
To get started, open Apple Maps, tap the circle with your photo or initials to the right of the search box and choose Offline Maps in the menu. On the next screen, go to Download New Map.
Apple Maps will ask you to type the name of the city, region or general area you want to download. The app will show you a preview of the map you looked for and a cropping box which you can resize to select how much of it you want to download–just pinch to zoom in or out and select a bigger or smaller area.
Pinch the map in and out to make sure your offline map contains everything you need. When you’re satisfied, tap Download and your device will do its thing.
3. Use Interactive Widgets
If I have to choose the best iOS 17 trick that I absolutely love, it has to be Interactive Widgets. Prior to iOS 17, all tapping widgets ever did was take you to the related app in question (or a section thereof), rendering them little more than glorified app shortcuts.
That’s where Interactive Widgets come in. You can now control the app directly from the widget. For example, in the Apple Music widget, you can pause and play songs as well as browse through your recently played music.
- Long-press on a blank area of your home screen until existing app icons and existing widgets start to jiggle
- Tap the ‘ ‘ icon that appears in the top left corner of your screen
- This should bring up the widgets menu, which you can scroll to browse or use the search bar at the top to find widgets for a specific app already installed on your iPhone
- Once you’ve found the widget you’re looking for, tap the ‘ Add Widget’ button at the bottom of the screen
- Your chosen widget will then appear on your home screen. You can drag it around to place itwhere you’d like
- Once you’re happy with the placement of your new interactive widget, you can either tap on a blank area of your home screen, or you can tap ‘Done’ in the top right of the screen, and that’s it
4. Crossfade Between Songs in Apple Music
Another exciting and super-cool iOS 17 trick is the ability to cross fade between tracks in Apple Music. Instead of a jarring or silent jump from one song to another, you can smoothly transition between songs so that the music never stops. If you’re on aux duty, this iOS 17 trick is a must-have.
To enable crossfade for Apple Music on iPhone, simply do the following:
- Launch the Settings app on your device.
- Scroll down and tap Music.
- Scroll down to the "Audio" section, then toggle the switch next to Crossfade so that it’s in the green ON position.
- Now you can adjust the slider below to choose the number of seconds in which the crossfade is active across consecutive songs (from 1 up to 12 seconds).
Now go into the Music app and try playing an album, personalized radio station, or playlist, and you should hear the smooth transition between tracks immediately.
5. Use Visual Look Up tool to identify laundry codes…
Some clothing tags provide the symbols alongside care instructions, such as "Don’t bleach," "Don’t iron," or "Dry-clean only." However, some tags only have the symbols without the instructions, which makes it confusing to follow the proper laundry instructions.
This iOS 17 trick can come to the rescue in that situation, as the Photos app can now recognize and provide explanations for laundry symbols. Here’s how to use it.
- First, take a photo of a laundry tag with symbols, such as a circle with an X over it or a black triangle.
- In the Photos app, swipe up on the photo or tap on the "info" symbol at the bottom that looks like an "i" inside a circle.
- It may take a few seconds to appear, but you’ll see "Look Up Laundry Care" under the caption text field.
- Tap on that, and it will show a list of websites suggested by Siri that explains what each symbol means on the clothing tag.
6. …and figure out what all those lights on your car dashboard mean
Visual Look Up doesn’t only identify laundry codes — it also can analyze any possible warning lights on the dashboard of your car. Again, all you need to do is take a picture of your car’s dashboard and open it in the Photos app. If Visual Look Up is able to identify the symbols, you’ll see a steering wheel icon below the image. Tap the “Look Up Auto Symbol” button to find out what VLU has to say about your warning lights. Maybe it’s time to get those brakes checked.
7. Don’t read articles — listen to them
If you tend to be put off by the thought of reading long-form articles on the web on a small screen, then this iOS 17 trick is for you. Siri can now read the articles out loud for you, meaning all you have to do is listen.
One way to get Siri to read the selected article to you is to hold your iPhone’s side button which will activate Siri. Then say ”Read this to me.” Alternatively, simply say ”Siri, read this to me,” hands-free.
Another way to get Siri talking is to tap the Aa icon in the address bar, then choose the Listen to Pageoption in the pop-up menu. Siri will immediately begin reading the page to you.
Please note: you need to be using Apple’s Safari when browsing webpages, otherwise it won’t work.
8. Issue multiple commands to Siri on iPhone
Next on our best iOS 17 tips and tricks is the ability to issue multiple commands to Siri.
After activating Siri, you can issue multiple commands in succession without needing to reactivate the assistant. For example, you could say something like, ”Siri, give me directions to the gym and play my gym playlist.”
9. If you forget your new iPhone passcode, don’t sweat it
In iOS 17 and iPadOS 17, it is now possible to reset an iPhone or iPad’s new passcode with the previous passcode you used for up to three days after the change is made. In other words, this iOS 17 trick lets you use your old passcode within 72 hours of setting a new one, which is handy if you’re someone who is likely to forget a newly created passcode.
When you enter an incorrect passcode on a device running iOS 17 after making a change, simply tap on the Forgot Passcode? option at the bottom of the display to use the Try Passcode Reset option. Tapping it allows you to use your old passcode to create yet another new passcode.
10. Easily Share Passwords With Friends and Family
If you’re tired of copying and pasting passwords in your text messages to share with your loved ones, simply use this iOS 17 trick to create a group and quickly share passwords and passkeys with, across their devices.
Using the new feature, passwords and passkeys for shared media accounts, utilities, bills, and more can be provided to multiple people, and each person in the group can access, add to, and change passwords that are shared.
Here’s how to create your first Family Passwords group in iOS 17 and iPadOS 17.
- Open the Settings app on your iPhone.
- Scroll down and tap Passwords.
- Under the "Family Passwords" card, tap Get Started.
- Tap Continue.
- Add a Group Name for your shared group, then tap the Add People option to select trusted people from your contacts.
- When you’re done, tap Create.
- Choose the passwords and passkeys you would like to move to the newly created group, then tap Move.
Once you’ve moved passwords to the group, you can access them any time on your device by going to Settings -> Passwords -> Family Passwords. Here you can also manage the shared passwords, add or remove people from the group, and delete the group if it’s no longer needed.
11. Find Messages Faster Using Search Filters
You need to find a specific message, in a thread filled with thousands of messages — on a phone with hundreds of message threads. Sure, you could scroll and scroll and scroll, but a cool iOS 17 trick has made searching in the Messages app way more powerful.
You can now filter your searches by contact, link, photo, location and more, to quickly find what you’re looking for. If you’re looking for images from a certain person, for example, you can type in "photos" and then the person’s name, tapping to select each search filter to narrow down your search results.
- From all messages: Simply type Photo, Location, Link, or Document in the Messages app search box and select it from suggestions. For example, if you type Photo and select it, it should show all your photos. You can tap one and jump to that spot in the conversation or tap See All to view all pictures in your Messages app.
12. Keep your private browsing private
If you lend your phone to a family member, particularly a kid, you may well want to see what they’ve been browsing. Really sneaky kids might know that private browsing doesn’t record a history.
On iOS 17, you can now enable a setting to require Face ID or a passcode to access private browsing in Safari.
- First off, open Safari on your iPhone or iPad.
- After that, scroll down and tap Safari.
- Now, scroll down to the Privacy and Securitysection.
- Finally, turn on the toggle next to Require Face ID or Touch ID to Unlock Private Browsing.
13. If you’re always losing your Apple Watch, you’ll love this iOS 17 trick
For some time now, it’s been possible to ping your misplaced iPhone with your Apple Watch. Thanks to iOS 17 trick, you can now do the reverse and ping your Apple Watch with your iPhone if you forgot where you put it down.
Apple doesn’t include the new Ping My Watch button in the default Control Center set, but you can add it manually by following these simple steps.
- Open the Settings app on your iPhone.
- Tap Control Center.
- Under "More Controls," tap the button next to Ping My Watch.
- Now, swipe down diagonally from the top-right corner of the screen (or swipe up from the bottom on a device with a Home button) to open Control Center.
- Tap the Ping My Watch button to make your watch audibly beep.
Note that this iOS 17 trick works if your watch is locked and/or charging, and even if your watch is on your wrist.
14. Stop getting distracted by GIFs in Safari
GIFs can be wildly distracting when you’re browsing through your phone — browse through an article (even ours sometimes) and sometimes you’ll be attacked with animations from all sides.
If you’re looking to minimize the madness on your iPhone, iOS 17 now has a setting that allows you to stop GIFs from autoplaying in Safari, making it easier to read without being distracted.
- Launch the Settings app on your iPhone.
- Tap Accessibility.
- Under Vision section, tap Motion.
- On the following page, locate the new Auto-Play Animated Images option and tap the toggle beside it to disable the feature on your iPhone.
15. Zoom in to quickly crop photos
Cropping a photo or video is relatively simple on the iPhone — but the process is now easier thanks to this iOS 17 trick. Instead of going into edit mode, you can now simply zoom into a photo and then hit the new Crop button that appears to resize an image to exactly what you see on your screen.
- Open the Photos_ app_
- Find a photo you’d like to crop and view it
- Do a two-finger expand gesture on the photo
- Tap the Crop button in the top right corner (or long press on the Crop button to change the aspect ratio then tap Crop again)
- If you like how it is (including the new aspect ratio), tap Done, if not you can further edit your crop.
16. Save Long-Form Web Articles and Other Scrollable Content to Photos
With this iOS 17 trick, you can save scrollable content in one long vertically scrolling image as well. The following steps show you how to make use of it, using Safari as an example.
- Launch the Safari app on your iPhone or iPad.
- Navigate to the web page that you wish to save as a scrollable image file.
- Press the Home button and the Sleep/Wake button simultaneously to capture a screenshot. If your device doesn’t have a Home button — if it’s a 2018 iPad Pro or later, for example — press the power button and the volume up button at the same time.
- A preview of the screenshot will pop up in the lower left of the display. Tap it to open up the Instant Markup interface. You’ll have about five seconds before it disappears.
- Tap the Full Page tab in the upper right corner of the Markup interface.
- To save the scrolling content as a single image, tap Done, then tap Save to Photos.
17. Enable Sensitive Content Warnings
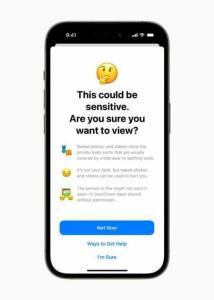
With Sensitive Content Warnings enabled in iOS 17, incoming files, videos, and images are scanned on-device and blocked if they contain nudity. The opt-in blurring can be applied to images in Messages, AirDrop, Contact Posters for the Phone app, FaceTime messages, and third-party apps. Sensitive Content Warnings can be enabled by following the steps below.
- Open up the Settings app.
- Tap Privacy & Security.
- Scroll down and tap Sensitive Content Warning.
- Tap the switch next to Sensitive Content Warning to enable the feature.
18. Control Which Apps Have Access to Your Calendars
In iOS 17, Apple offers finer-grained control over what apps can see in terms of your calendars. You can give apps Full Access to your calendars, allow them to Add Events Only, or revoke access completely with a None option.
- Open the Settings app.
- Tap Privacy & Security.
- Tap Calendars.
- Tap the app that you want to change access for. (Note that this section also details how many calendars you have and how many accounts you’re signed in to.)
- Choose from None, Add Events Only, and Full Access.
19. Make Haptic Touch Faster on iPhone
In iOS 17, setting Haptic Touch to the new Fast option makes a noticeable difference in how quick haptic menus pop up under the finger when an icon or on-screen element is long pressed. The speed brings Haptic Touch interactions closer to 3D Touch interactions. Here’s how to enable this hidden iOS 17 trick on your iPhone.
- Open the Settings app.
- Tap Accessibility.
- Under "Physical and Motor," tap Touch.
- Tap Haptic Touch.
- Select from Fast, Default, and Slow.
20. Use Predictive Autocorrect
After using iOS 17 for a few weeks, you should notice that the autocorrect suggestions are much better at predicting what you want to say and presenting words for you to tap to autofill.When autocorrect changes a word, a blue line will appear underneath the corrected word.
You can tap the blue line to see the original word that you typed (indicated by an arrow), and tap to reinstate that word instead. If there are other possible autocorrect options for what you typed, those will also be displayed for you to select.
21. set multiple timers on your iPhone
You always could set multiple timers on your iPhone, but you had to use a third-party app to do it in. So for instance the recipe app Paprika has long had a way for you to set one timer for the potatoes and another for the turkey at Thanksgiving.
Now you can do exactly that with the regular Clock app on the iPhone.
- Open the Clock app on iPhone
- Tap on Timers
- Set the hours, minutes, seconds for a timer, and tap Start, or
- Scroll down to see Recents, if you have any, and tap the Play button
You can also type a label for the timer, which is often handy but pretty much essential if you don’t want to be staring at three timers wondering what each one is.
There’s also the option to set what tone sounds When Timer Ends.
Set a tone if you want to, label the timer if you need, but you’re done and that timer is running.
Once you have set a timer, a plus sign is added to the top right of the Clock’s Timers page. Tap on that and you get what at the top looks like the same options you had for the first timer.
22. Use your Personal Voice with iOS 17
In iOS 17, you can create a Personal Voice that when used in conjunction with Live Speech can help you communicate with others by reading text and phrases. Here’s how to set it up:
- Open the Settings app on your iOS 17 device
- Head to Accessibility > Personal Voice > Create a Personal Voice
- Record the 150 phrases with the iPhone directly in front of your face in a quiet room
- Lock your phone and place it on a charger to create your voice.
Apple says it may take overnight for your voice to be created.
Once your voice is done processing, let’s look at how to use the voice to speak.
Enable Live Speech and select your voice
- Go to Settings > Accessibility > Live Speech
- Toggle on Live Speech
- Tap Voices and choose your created Personal Voice which will appear at the top of the list
If your voice doesn’t show on the list, give it time or try restarting your iPhone.
Speak phrases and text with your voice
With Live Speech enabled and your voice selected, you can triple-tap the sleep/wake button to open the Live Speech text-to-speech tool.
You can type in the box or choose any of your predefined favorite phrases.
23. Turn photos into stickers in iOS 17
Using this iOS 17 trick, you can transform their photos into stickers and conveniently share them through iMessage. Here’s how:
- Open the Messages app on your iPhone and tap the icon with a plus sign positioned to the left of the text field.
- Select the Stickers option and tap on the sticker icon, which is the one on the left next to the clock symbol.
- Tap on New Sticker to make one from a photo. It will open a window from the photos app to make a selection.
- After finding a photo, it will automatically detect an object in the image, and you can tap Add Sticker on the bottom right.
- You can add various effects to it, such as making it look like a comic or adding an outline.
- Finally, drag it into the text field or onto a message already in the chat area.
24. Quickly access your photos in Messages
There’s a new way to access your applications directly from Messages, with a icon that quickly brings up options like camera, stickers, location and more. However, if you’re only interested in accessing your photos, to send via text, you can just press and hold down on the to quickly access your most recent photos.
25. Use Live Voicemail in iOS 17
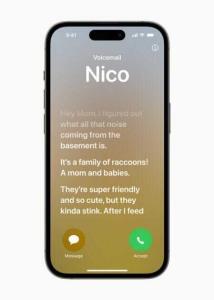
Live Voicemail displays the caller’s spoken words on the screen in real time. The feature is helpful when you’re uncertain about whether to answer a call or not, as it allows you to preview the message and screen the call before making a decision. By default, Live Voicemail is activated in iOS 17.
26. Create Links Between Apple Notes
If you use the default Notes app, you’re going to love this hidden iOS 17 trick. With just a few taps, you can create links between notes in iOS 17, making it easy to jump from one idea to another. One way of adding a new link is by long pressing on a space in any note. Another way is to double-tap a word. You can link just this word, or use the highlight anchors to select a whole phrase.
Then tap the new "Add Link" option in the pop-up menu that appears. This will let you link to another note by searching its title or entering a URL. Using the "Name" field, you can create an optional alternative title for the link, or just stick with the original title for clarity.
Once you’re done, the link appears as hyperlink-style underlined text in your note, and tapping it snaps you straight into the note you linked to.
27. Activate Siri by saying "Siri"
Instead of "Hey Siri," you can simply say "Siri" to activate the voice assistant on your iPhone.
The voice assistant will respond to both "Siri" and "Hey Siri" by default, so you don’t have to do anything to shorten the voice command.
28. Use Apple’s Check In Feature in Messages
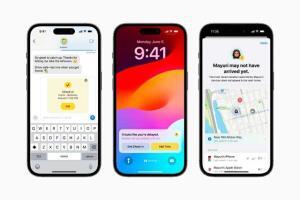
Whether you’re walking home after dark or heading out for an early morning run, you can start Check In with a family member or friend right within Apple’s Messages app to let them know when you get home safely.
To get started with this iOS 17 trick, you’ll need to select a conversation with a trusted person, tap on the " " button left of the text input field, and choose the Check In option.
From there, you can input the location that you’re going to and the time you’re set to arrive.
You can customize the amount of data that you share.
When you arrive at your destination, your friend or family member is notified that you got there safely and the Check In will end successfully.
29. Check previous Day’s Weather
Thanks to this iOS 17 trick, you can view the actual conditions for the previous day, such as how much rain you really got at the location or how many feet of snow dropped. So, you no longer have to use a third-party app or visit a weather website for historical data for the previous day.
Just tap on today’s forecast or the 10-day forecast for the city of your choice and select the previous day in the top calendar view. The wording will change to reflect that it’s historical data, and you will be able to see most of yesterday’s metrics except for things like air quality.
30. Open Camera app modes with new Shortcuts actions
The slew of the best iOS 17 tips and tricks doesn’t end there. You could now use the Shortcuts app to create actions to quickly open other Camera app modes, like Video and Portrait, rather than the default Photo mode. That means no fumbling through the Camera app to take a video of something cool happening in front of you, only to miss it.
Here’s how to create Shortcut actions for your Camera app, and how to get those Shortcuts on your home screen.
- Open the Shortcuts app.
- Tap the plus ( ) sign in the top-right corner of your screen.
- Tap Add Action.
- Search for Camera.
- Tap the Camera mode you want to create a Shortcut for from the carousel under Camera Mode.
- Across the top of your screen, tap **Open Camera **to open a dropdown menu.
In the dropdown menu, you can rename this Shortcut to whatever Camera mode this Shortcut opens by tapping **Rename. **You can also add this shortcut to your home screen from this menu by tapping Add to Home Screen.
31. Autofill email verification codes
The same way that you can autofill text verification codes now from your keyboard, with iOS 17 you can also do that but with email verification codes. You must set up your email with the Mail app for this to work.
Your favorite iOS 17 tips and tricks
So these were some of the best iOS 17 tips and tricks you would love to try on your iPhone today. My favorite iOS 17 tips and tricks include ability to crossfade between songs in Apple Music, issue multiple commands to Siri, and the ability to download maps to use without mobile data. There’s surely more hidden iOS 17 tips and tricks to discover, so I’ll keep tapping, swiping and noting anything I find. Did we miss out on something important that needs to be added to the list? Which are your favorite iOS 17 tips and tricks? Drop a comment and let us know.