Got a tip for us?

Apple Watch

Siri is often the easiest way to start using accessibility features with your Apple Watch. Use Siri to open apps, turn many settings on or off, or act as your intelligent personal assistant.

You can set how long Siri waits for you to finish speaking. And you can use Siri without speaking at all, by typing your requests instead.

Here’s how to use accessibility features with Siri on Apple Watch.

Siri: Ask Siri something like, “Turn on VoiceOver.” See Control your Apple Watch and smart home accessories with Siri.

Set how long Siri waits for you to finish speaking

  1. Start the Settings app on your Apple Watch.
  2. Go to Accessibility, tap Siri, scroll down, and tap Default, Longer, or Longest below Siri Pause Time.

Type instead of speaking to Siri

You can use Siri without speaking. Follow these steps to type rather than speak Siri requests.

  1. Start the Settings app on your Apple Watch.
  2. Go to Accessibility, tap Siri, and turn on Type to Siri.

See also

You can see information on the stocks you follow on your iPhone. You can also add, remove, or reorder stocks right from your wrist.

It’s the same list. Your watch shows the stocks found in the Stocks app on your iPhone, and when you change the order on one device, the other changes to match. You can also choose which data metrics appear, like Price Change, Percentage Change, or Market Cap.

Here’s how to track stocks on Apple Watch.

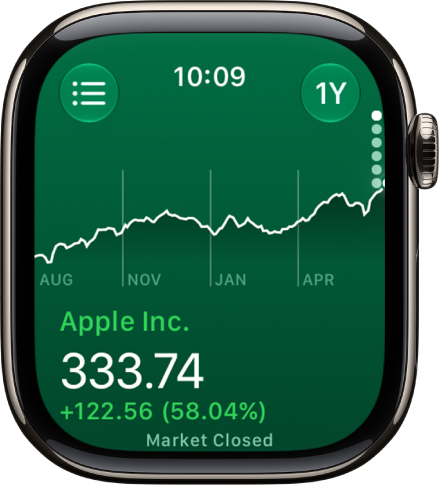
Information about a stock in the Stocks app. A large graph showing the stock’s price over a year appears in the center.

See stock data on Apple Watch

  1. Start the Stocks app on your Apple Watch.
  2. Turn the Digital Crown to browse the stocks in the list.

Add and remove stocks

The stocks in the Stocks app on your iPhone show up on your Apple Watch, and you can add and remove stocks right on your Apple Watch too.

  1. Start the Stocks app on your Apple Watch.
  2. Tap the List button. Do any of the following:
    • Add a stock: Tap the Add button and then enter the stock name. Tap the name of the stock in the list.
    • Remove a stock: Swipe left on the stock you want to remove, then tap the Delete button.
    • Reorder stocks: Touch and hold a stock and drag it to a different position.

You can also open the Stocks app on your iPhone, tap the More Options button, tap Edit Watchlist, drag a stock into your preferred position, then tap Done.

Change the order on one device, and the other changes to match.

Choose data metrics

Do the following to choose the metrics that show up in the Stocks app and in Stocks complications:

  • Change the data metric in the Stocks app: Go to the Stocks app on your Apple Watch, tap the List button, tap the View Options button, then choose Price Change, Percentage Change, or Market Cap.
  • Change the data metric for Stocks complications: Go to the Settings app on your Apple Watch, tap Stocks, tap Data Metric, then choose a metric.

    You can also go to the Apple Watch app on your iPhone, tap My Watch, tap Stocks, then choose a metric.

See also

Tag: Stocks

Use the Mail app to read and reply to messages, write new ones, and archive, flag, or delete the ones you don’t need. You can also adjust Mail settings to match how you work.

You can send a smart reply from a list of suggested phrases, or compose your own by dictating or typing. Swiping left on a message lets you flag or delete it, and swiping right archives it.

WARNING: For important information about avoiding distractions that could lead to dangerous situations, see Important safety information for Apple Watch.

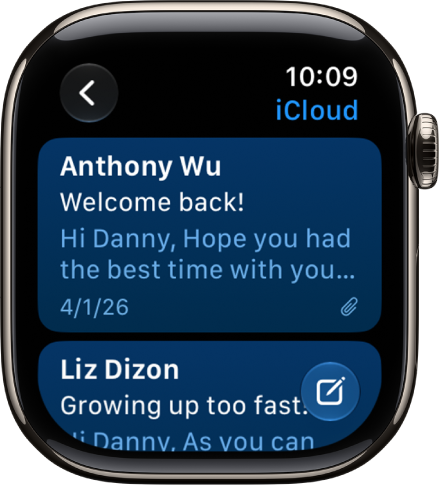
An inbox in the Mail app showing two emails. The back button is at the top-left and the compose button is at the bottom-right.

Read an email message

  1. Open the Mail app on your Apple Watch.
  2. Turn the Digital Crown to scroll through the message list.
  3. Tap a message to read it.
  4. To jump to the top of a long message, tap the top of the screen.

Send a quick reply

  1. Open the Mail app on your Apple Watch.
  2. Scroll to the bottom of a message you’ve received and tap Reply. Then do either of the following:
    • Send a smart reply: Scroll to see a list of suggested phrases and tap a phrase.
    • Compose a reply: Tap the Add Message field. Then dictate or type a reply.

Archive, flag, or delete a message

  1. Open the Mail app on your Apple Watch.
  2. In the list of messages, do any of the following:
    • Archive: Swipe right on a message. Then tap the Archive button.
    • Flag: Swipe left on a message and then tap the Flag button.
    • Delete: Swipe left on a message and tap the Trash button.

Write a new email

  1. Open the Mail app on your Apple Watch.
  2. Tap the New Message button and then do the following:
    • Add a recipient: Tap Add Contact. Tap the Add Member button to choose a recipient from your contacts, or tap the Dictation button to dictate a name.
    • Choose an account to send the email from: Tap From and then tap an account.
    • Add a subject: Tap Add Subject, then enter a subject.
  3. Tap Create Message, then dictate or type your message.

Change Mail settings

Choose which mailboxes appear, customize alerts, organize by thread, turn remote images on or off, change your signature, and more.

  1. Open the Apple Watch app on your iPhone.
  2. Tap My Watch, tap Apps, and tap Mail.

See also

Tag: Mail

Handoff lets you move from one device to another without losing focus on what you’re doing. For example, even though you can reply to email using the Mail app on Apple Watch, you might want to switch to your iPhone so you can reply using the onscreen keyboard.

Handoff is on by default, and you pick up the task from the App Switcher on your iPhone. You can turn it off, too.

Note: Handoff is available on an Apple Watch you set up for yourself, but not on an Apple Watch you set up for a family member.

Continue a task on your iPhone

  1. Unlock your iPhone.
  2. Do one of the following:
    • On an iPhone with Face ID: Swipe up from the bottom edge and pause to show the App Switcher.
    • On an iPhone with a Home button: Double-click the Home button to show the App Switcher.
  3. Tap the button that appears at the bottom of the screen to open the same item on your iPhone.

Quick tip: No button in App Switcher? Check that Handoff is on for your iPhone in Settings > General > AirPlay & Handoff.

Handoff is on by default. To disable it, go to the Apple Watch app on your iPhone, tap My Watch, tap General, then turn off Enable Handoff.

Handoff works with Activity, Alarm, Calendar, Home, Mail, and Maps, along with Messages, Music, News, Phone, Podcasts, and Reminders. Settings, Siri, Stocks, Stopwatch, Timers, Wallet, Weather, and World Clock work with it too. Handoff needs Apple Watch connected to your paired iPhone.

With OS X 10.10 or later installed on your Mac, you can also hand off from Apple Watch to your Mac.

See also

Use the Notes app to create, view, pin, and delete notes, and keep them up to date on all your devices with iCloud.

With iCloud, your notes and any changes you make appear on your paired iPhone and other devices. Pinned notes stay at the top, and the rest are sorted by date. Editing existing notes happens on your iPhone, iPad, or Mac, though.

Here’s how to take notes on Apple Watch.

Note: Use your iPhone, iPad, or Mac to edit existing notes; your changes sync with iCloud.

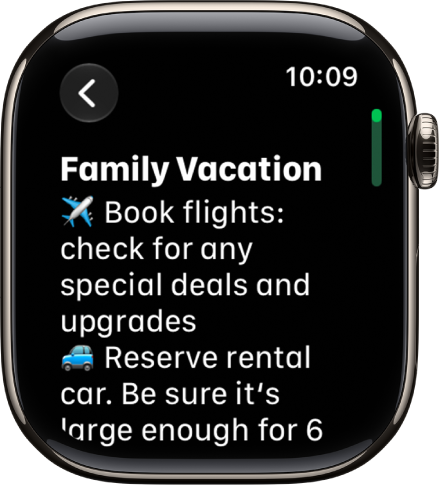
A note for a family vacation.

Keep your notes up to date on all your devices with iCloud

Through iCloud, your notes appear on your paired iPhone, along with any changes you make to them, and on other devices where you’re signed in to your Apple Account.

Create a new note

  1. Start the Notes app on your Apple Watch.
  2. Tap the New Note button.

View a note

Note: Notes on Apple Watch don’t show some formatting and certain attachments, like tables and audio recordings.

  1. Start the Notes app on your Apple Watch.
  2. Turn the Digital Crown to scroll through your notes list.

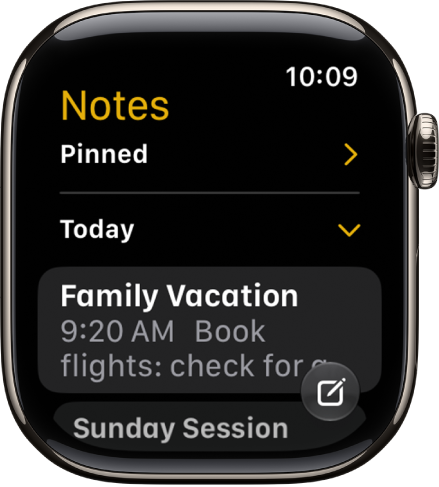
    Pinned notes appear at the top, followed by notes sorted by date.

    A list of notes with pinned notes at the top.

  3. Tap a note to open it.

Pin a note

Notes you access often can stay at the top of the list for convenience.

  1. Start the Notes app on your Apple Watch.
  2. Swipe right on the note and tap the Pin button.

Delete a note

  1. Start the Notes app on your Apple Watch.
  2. Swipe left on the note you want to remove and tap the Delete button.

If you change your mind, you can recover the note. Deleted notes remain in Recently Deleted for 30 days. On your iPhone, open the Notes app, go to the Recently Deleted list, swipe left on the note, then tap Move and choose a folder.

See also

Tag: Notes

In the Reminders app, you can set reminders, make grocery lists, create checklists, and organize to-do lists. With iCloud, you can keep your reminders up to date on all your devices.

Any changes you make appear on your paired iPhone and other devices signed in to your Apple Account. You can mark an item as complete with a tap, and hide or show completed reminders.

Here’s how to use reminders on Apple Watch.

Keep your reminders up to date on all your devices with iCloud

Your iCloud reminders appear on your paired iPhone, plus any other devices where you’re signed in to your Apple Account, and so do any changes you make to them.

View a list

  1. Open the Reminders app on your Apple Watch.
  2. Tap a list to open it.

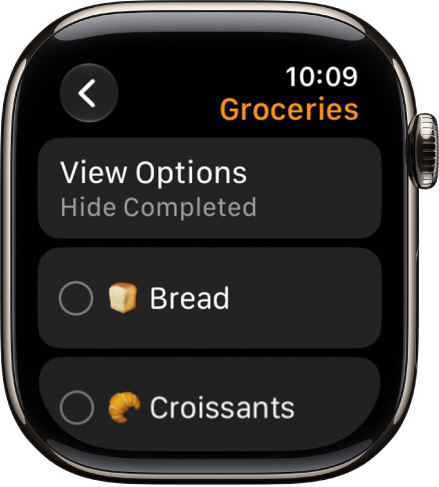
    The Reminders app showing a grocery list.

  3. Do any of the following:

    • Mark an item as complete: Tap the Reminder Completed button next to the item. Or tap the reminder and then tap Mark as Completed.
    • Hide or show the completed reminders: Tap View Options, then choose an option.
    • Return to the list view: Tap the Back button in the top-left corner.

Add an item to a list

  1. Open the Reminders app on your Apple Watch.
  2. Scroll to the bottom of a list, then tap Add Reminder.

Edit an item

To edit details, you can add a date, time, note, location, flag, tag, and priority, or move the item to a different list instead.

  1. Open the Reminders app on your Apple Watch.
  2. Tap the reminder you want to edit and tap Edit.

Delete an item

  1. Open the Reminders app on your Apple Watch.
  2. Swipe left on the item you want to remove and then tap the Delete button.

If you change your mind, you can recover the item. On your iPhone, open the Reminders app, go to the Recently Deleted list, swipe left on the item, then tap Move and choose a folder.

See also

AssistiveTouch helps you use Apple Watch if you have difficulty touching the screen or pressing the buttons. The built-in sensors on Apple Watch can help you answer calls, control an onscreen pointer, and launch a menu of actions—all through hand gestures.

There’s also the Motion Pointer, for controlling your Apple Watch by tilting it, plus quick actions that help you respond whenever your Apple Watch shows an alert. With gestures in AssistiveTouch, you can perform these and other actions:

  • Tap the display
  • Press and turn the Digital Crown
  • Swipe between screens
  • Hold the side button
  • Access Notification Center, Control Center, and the App Switcher
  • Show apps
  • Use Apple Pay
  • Confirm double-clicks of the side button
  • Activate Siri
  • Run a Siri shortcut

Note: The universal double tap gesture stops being available when you turn on AssistiveTouch.

Set up AssistiveTouch

  1. Start the Settings app on your Apple Watch.
  2. Go to Accessibility, tap AssistiveTouch, and turn on AssistiveTouch.
  3. Tap Hand Gestures, then turn on Hand Gestures.

    Tip: To learn how to use hand gestures, tap “Learn more” below the Hand Gestures switch, then tap each gesture. When you tap a gesture, an interactive animation shows you how to perform and perfect the gesture.

You can also go to the Apple Watch app on your iPhone, tap My Watch, go to Accessibility > AssistiveTouch, then turn on AssistiveTouch.

Use AssistiveTouch with Apple Watch

With AssistiveTouch and Hand Gestures on, use the following default gestures to navigate your Apple Watch:

  • Tap: Forward
  • Double tap: Back
  • Clench: Tap
  • Double clench: Show the Action Menu

For example, with the Meridian watch face showing, use AssistiveTouch with the Activity app by following these steps:

  1. Double-clench to activate AssistiveTouch.

    A highlight appears around the Music complication.

  2. Tap three times to move to the Activity complication and then clench to tap it.
  3. When the Activity app opens, double-clench to show the Action Menu.
  4. Tap once to select the System action, tap again to select the Scroll Up action, and then clench to choose it.
  5. Clench to scroll to the next screen.
  6. Double-tap to show the Action Menu.

    Tap to move forward through the actions; double-tap to move back.

  7. Select the Press Crown action. Clench once to return to the watch face.

Use the Motion Pointer

In addition to tapping and clenching, with the Motion Pointer you can control your Apple Watch by tilting the watch up and down and side to side. For example, use the Motion Pointer to navigate the Stopwatch app by following these steps:

  1. With the watch face showing, double-clench to activate AssistiveTouch.
  2. Double-clench again to show the Action Menu.

    The Press Crown action is selected.

  3. Clench to choose the Press Crown action and open the Home Screen.
  4. Double-clench to show the Action Menu, tap to move to the Interaction action and then clench to tap it.

    Motion Pointer is selected.

  5. Clench to turn on the Motion Pointer.

    A cursor appears on the screen.

  6. Tilt the watch to place the cursor at the bottom edge of the screen to scroll down.
  7. Hold the cursor over the Stopwatch app for a short time to open it.
  8. Hold the cursor over the start button to tap it.
  9. To return to the watch face, double-clench to show the Action Menu, tap to select the Press Crown action and then clench to tap it.

Use quick actions

Quick actions help you respond when your Apple Watch shows an alert. For example, when you have an incoming call, a prompt lets you know that you can double-tap to answer it. You can also use quick actions to snooze an alarm or stop a timer, start a workout when Apple Watch detects workout-like activity, and take a photo when the viewfinder and shutter button are showing in the Camera app. To turn quick actions on or off, follow these steps:

  1. Start the Settings app on your Apple Watch.
  2. Go to Accessibility and tap Quick Actions. Choose an option.

    You can choose to have quick actions available at all times, available only when AssistiveTouch is enabled, or off. You can also choose Full appearance (a banner appears and the action button is highlighted) or Minimal appearance (the action button is highlighted with no banner).

Quick tip: To practice the quick actions gesture, tap “Try it out.”

Adjust AssistiveTouch settings

You can change the actions assigned to tap, clench, and the Motion Pointer gestures, as well as adjust the sensitivity of the Motion Pointer.

Go to the Settings app on your Apple Watch, go to Accessibility > AssistiveTouch, then do any of the following:

  • Customize gestures: Tap Hand Gestures, tap a gesture, then choose an action or a Siri shortcut.
  • Customize the Motion Pointer: Tap Motion Pointer, then adjust settings for sensitivity, activation time, movement tolerance, and hot edges.
  • Scanning style: Choose between Automatic scanning, where actions are automatically highlighted one after the other, or Manual, where you use gestures to move between actions.
  • Appearance: Turn on High Contrast to make the highlight bolder. Tap Color to choose a different highlight color.
  • Customize Menu: Add favorite actions, adjust the position and size of the Action Menu, and change autoscroll speed.
  • Confirm with AssistiveTouch: Turn on to use AssistiveTouch to confirm payments with the passcode or any time double-clicking the side button is required.

You can also go to the Apple Watch app on your iPhone, tap My Watch, tap Accessibility, then tap AssistiveTouch.

See also

With your eligible cards stored in the Wallet app, you can use Apple Pay at contactless payment terminals, in stores, online, and in apps. You can also set your default card and payment preferences.

Using Apple Pay can be simpler and safer than using a physical card. Your actual card number is never shared with merchants, and each transaction uses a unique security code. You can use it in stores, restaurants, ticket terminals, gas stations, and more. The merchant must accept your payment card and payment network, though.

Note: Apple Pay and its features aren’t available in all countries or regions.

Make contactless payments in stores

Apple Pay works in stores, restaurants, gas stations, ticket terminals, and more.

Note: In addition to accepting Apple Pay, the merchant must accept your payment card and payment network. In other countries and regions, you may see different contactless payment symbols.

  1. Double-click the side button.
  2. Scroll to choose a card.
  3. Hold Apple Watch near the contactless card reader—with the display facing the reader—until a gentle tap and beep confirm that the payment information was sent.

Note: If you have Location Services turned on, the location of your iPhone at the time you make a payment may be sent to Apple and the card issuer to help prevent fraud.

Use Apple Pay for purchases online and in apps

Wherever you see the Apple Pay button in supported apps and websites, you can make purchases.

  1. At checkout, tap the Apple Pay button.
  2. Review the payment, shipping, and billing information.
  3. Double-click the side button to complete the payment.

Set your default card, address, and preferences for Apple Pay

  1. Open the Apple Watch app on your iPhone.
  2. Tap Wallet & Apple Pay and tap Apple Pay Defaults.
  3. Set any of the following:
    • Transaction defaults: Set the default card, your shipping address, email, and phone number.
    • Allow Payments on Mac: Use Apple Pay on your Apple Watch to confirm payments on your nearby Mac.

In the U.S., Apple Pay is a service provided by Apple Payments Services LLC, a subsidiary of Apple Inc. In other countries and regions, Apple Pay is a service provided by certain Apple affiliates, as designated by the Apple Pay privacy notice. Neither Apple Inc. nor Apple Payments Services LLC nor any Apple affiliate is a bank. Any card used in Apple Pay is offered by the card issuer.

See also

Use the Wallet app to keep your eligible debit and credit cards, passes, transit cards, identity cards, keys, and more—all in a secure and convenient place. Many cards and passes in Wallet on your iPhone are also available on your Apple Watch.

With Apple Cash in the U.S., for example, you can send money with Tap to Cash, and transit cards let you breeze through transit gates. You can rearrange your cards, keys, and passes, too.

Note: Apple Wallet requires eligible and supported cards and passes. Apple Wallet, Apple Pay, and its features aren’t available in all countries or regions.

What can I keep in Apple Wallet?

  • Payment cards
  • Identity cards
    • Government-issued IDs: Show proof of age or identity in person, online, and in app at select businesses and venues.
    • Employee badges: Access your workplace.
    • Student IDs: Access your dorm and other places around campus.
  • Transit and tickets
  • Keys
    • Home: Unlock your compatible smart lock with just a tap of your iPhone or Apple Watch.
    • Apartment building or condominium: Access your apartment building, condominium, or other shared living space.
    • Hotel room: Check in without going to the lobby and unlock your room with a digital key from a participating hotel’s app.
    • Car: Lock, unlock, and start your compatible car with a car key in Wallet.
    • Scooter: Lock, unlock, and start your compatible scooter with a scooter key in Wallet.
  • Passes: Keep event tickets, coupons, membership cards, and more in one convenient place. You can even use a pass created on iPhone. See Use cards and passes in Wallet on Apple Watch.

Quick tip: For more on what Wallet can hold, go to the Wallet app on your iPhone, then tap the More button, and tap Discover.

Add a card or pass

Look for “Add to Apple Wallet” in an app, email, message, or web page.

The Add to Apple Wallet button.

Supported debit, credit, and transit cards can also go into the Wallet app directly.

  1. Start the Wallet app on your Apple Watch.
  2. Tap the More Options button, then tap Add Card.
  3. Choose a category and then follow the onscreen instructions. This might include receiving a text message, answering security questions, or confirming through the card issuer’s app.

You can also go to the Apple Watch app on your iPhone, tap My Watch, tap Wallet & Apple Pay, then tap Add Card.

Rearrange your cards, keys, and passes

  1. Start the Wallet app on your Apple Watch.
  2. Touch and hold a card, then drag it to a new position.

    Tip: To make a credit or debit card your default payment card, drag it to the top of the card stack.

See also

Tag: Wallet