Before taking a photo, you can use the camera tools on your iPhone to customize and improve your shot.
Flash and Live Photo sit above the camera frame for quick access, and you can add or edit the tools there, too. You can also manually adjust focus and exposure, track a moving subject, and lock the exposure setting.
Here’s how to use iPhone camera tools to set up your shot.
Customize the camera tools
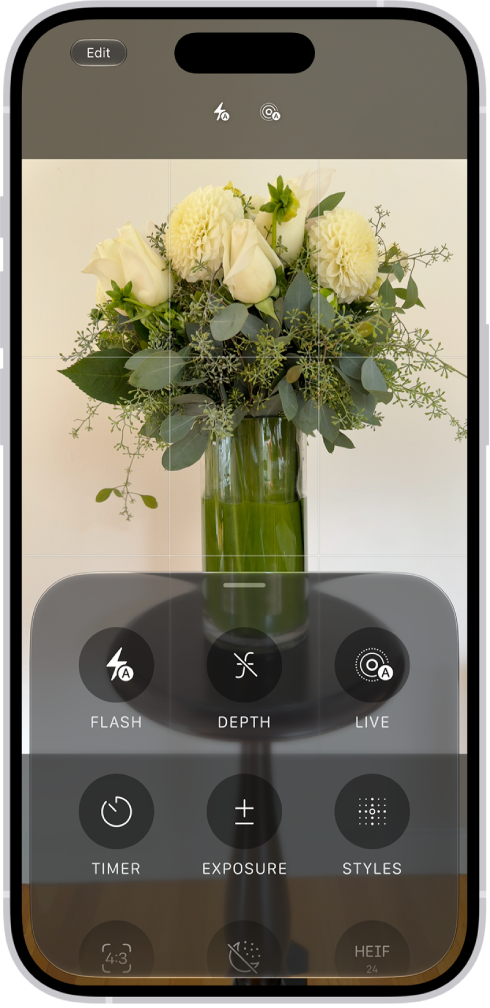
For quick access, the Flash and Live Photo tools sit above the camera frame. Add or edit the tools that show up there, and the ones you use most are always available.
- Open Camera on your iPhone.
- Tap the Camera Controls button, then tap Edit to reveal the tools.
- Tap a tool in the menu to add it above the camera frame, or tap the Minus button next to a tool above the camera frame to remove it.
Quick tip: Tap Reset to Essentials to return to the default tools.
- Tap Done, then swipe down on the tool menu to close it.
Manually adjust focus and exposure
Before you take a photo, the iPhone camera automatically sets the focus and exposure, and face detection balances the exposure across many faces. If you want to manually adjust the focus and exposure, do the following:
- Open Camera on your iPhone.
- Tap the screen where you want to move the focus area.
- Next to the focus area, drag the Adjust Exposure button up or down to adjust the exposure.
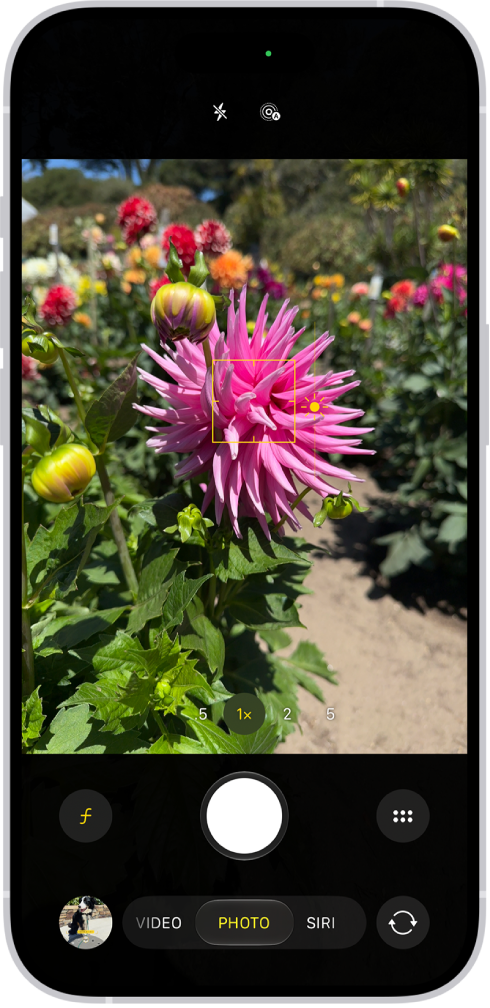
Quick tip: Touch and hold the focus area until AE/AF Lock appears to lock your manual focus and exposure settings for upcoming shots. Tap the screen to undo it.
On supported models, lightly double-press the Camera Control to open an overlay that shows the available camera settings. Slide your finger on the Camera Control to the Exposure setting, then lightly press to select it. Slide your finger to adjust the exposure.
Manually adjust focus on iPhone 18 Pro models
iPhone 18 Pro models let you manually adjust the focus to a specific point, and you can even lock which camera is used.
Note: The Focus tool isnʼt available in all camera modes.
- Open Camera on your iPhone.
-
Do either of the following:
- Tap the Camera Controls button, then tap Focus.
- Optionally, add the Focus control to the camera tools above the camera frame, then tap it.
-
If you want to use a specific camera, tap Ultra Wide, Main, or Telephoto.
The camera you choose stays selected for your next shots.
- Drag the slider to set the focus distance.
-
Areas that are in focus are outlined.
To return to automatic focus, tap A.
Track a moving subject
The camera on iPhone 18 Pro models can keep a moving subject in focus, tracking it even as the distance to the subject changes.
- Open Camera on your iPhone.
- Tap a subject to show a yellow frame around it.
- Double-tap the frame to start tracking.
The frame follows the subject as it moves.
To stop tracking, tap Focus Tracking .
Lock the exposure setting
You can adjust and lock the exposure setting for upcoming photos.
- Open Camera on your iPhone.
- Tap the Camera Controls button or swipe up from the camera modes at the bottom of the screen.
- Tap Exposure and drag the slider to adjust the level.
The exposure locks until the next time you open Camera. To save the exposure control so it’s not reset when you open Camera, go to Settings > Camera > Preserve Settings, then turn on Exposure Adjustment.
Quick tip: Tap the Undo button to reset the exposure.
- Tap the Back button and swipe down on the camera tools menu to close it.
Turn the flash on or off
Your iPhone camera is set to automatically use the flash when needed. To manually control the flash before you take a photo, tap the Flash control above the camera frame to switch between Auto, On, or Off. Or, do the following:
- Open Camera on your iPhone.
- Tap the Camera Controls button or swipe up from the camera modes at the bottom of the screen.
- Tap Flash, then tap to switch between Auto, On, or Off.
- Tap the screen to close it.
Quick tip: The Flash button can always show on the camera screen. To set that up, go to Settings > Camera > Indicators and turn on Flash.
Take a photo with a filter or Photographic Style
Before you take photos, you can change how they look with a filter or a Photographic Style, depending on your iPhone model.
-
Open Camera on your iPhone.
Make sure Camera is in Photo or Portrait mode.
- Tap the Camera Controls button or swipe up from the camera modes at the bottom of the screen.
-
Do one of the following:
- On iPhone 12 models or earlier: Tap Filter and swipe left or right to preview the options.
- On models that support Photographic Styles: Tap Styles and then swipe left or right to preview the styles.
- Tap the Shutter button to take your shot.
- Tap the Close button to close the menu.
To stop using a filter, follow the steps above, then in step 3, select Original. You can remove or change a photo’s filter in the Photos app.
A Photographic Style applies to every photo you take until you change it or close Camera. To keep using the same style the next time you open Camera, go to the Settings app , tap Camera, tap Preserve Settings, then turn on Photographic Style. You can fine-tune its tone, color, and intensity. On iPhone 18 Pro models, you can also change the texture and add film grain.
Use the timer
Setting a timer on your iPhone camera gives you time to get in the shot.
- Open Camera on your iPhone.
- Tap the Camera Controls button or swipe up from the camera modes at the bottom of the screen.
- Tap Timer, then tap 3, 5, or 10.
- Tap the Shutter button to start the timer and get in the frame.
- To stop using the timer, tap the Camera Controls button and tap Timer. Then tap the timer icon to turn it off.
- Tap the screen to close it.
Change the aspect ratio
You can choose between 1:1, 4:3, and 16:9 aspect ratios.
- Open Camera on your iPhone.
- Tap the Camera Controls button or swipe up from the camera modes at the bottom of the screen.
- Tap Aspect and then tap a ratio.
- Tap the screen to close it.
Use a grid and level to straighten your shot
A grid or level on the camera screen can help you straighten and compose your shot.
- Open the Settings app on your iPhone.
- Tap Camera, then turn on Grid and Level.
Once you’ve taken a photo, the editing tools in the Photos app can further align shots and adjust horizontal and vertical perspective.