Got a tip for us?

iPhone

The iPhone is a smartphone from Apple that runs the iOS mobile operating system. Between its apps, communication features, the camera, mobile internet access, and other functionalities, the iPhone has quickly become an integral part of many peoples tech lives.

In the Files app, you can organize documents, images, and other files in folders.

You can create a folder in a location or an existing folder, then copy, compress, and make other changes to a file or folder. You can also rename a file or folder, zip or unzip a file or folder, tag a file or folder, and mark a folder as a favorite. If you don’t see New Folder, though, you can’t create a folder in that location.

Create a folder

  1. Start the Files app on your iPhone.
  2. Open a location or an existing folder.
  3. Tap the More button, then tap New Folder.

Note: If New Folder doesn’t appear, you can’t create a folder in that location.

Copy, compress, and make other changes to a file or folder

  1. Start the Files app on your iPhone.
  2. Open a location or an existing folder.
  3. Touch and hold the file or folder. Choose an option: Copy, Move, Compress, Duplicate, or Delete.

Depending on the item you select, some options may not be available. You can’t delete or move an app library, for example, which is a folder labeled with the app name.

To modify multiple files or folders at the same time, tap the More button, tap Select, tap to select the files or folders you want to modify, then tap an option at the bottom of the screen (for example, Share, Move, or Delete).

Rename a file or folder

  1. Start the Files app on your iPhone.
  2. Open a location or an existing folder.
  3. Touch and hold the file or folder and choose Rename.

With Apple Intelligence, Files recommends a name above the keyboard when you rename a file.

Note: Apple Intelligence on iOS 27 or later is available on an Apple Intelligence-enabled iPhone 15 Pro, iPhone 15 Pro Max, or iPhone 16 model or later. Apple Intelligence is not available in all languages or regions. Usage limits may apply.*

Zip or unzip a file or folder

Zipping a file or folder compresses it so it takes up less storage space on your iPhone, and unzipping a compressed file or folder works, too.

  1. Start the Files app on your iPhone.
  2. Touch and hold the file or folder you want to zip. Then tap Compress.

To unzip a compressed file or folder, touch and hold it, then tap Uncompress.

Tag a file or folder

  1. Start the Files app on your iPhone.
  2. Open a location or an existing folder.
  3. Touch and hold the file or folder, tap Tags, and then tap one or more tags.
  4. Tap Done.

To find tagged items, tap Browse, then tap an item below Tags.

To remove a tag, tap it again.

Mark a folder as a favorite

  1. Start the Files app on your iPhone.
  2. Open a location, touch and hold the folder, and tap Favorite.

To find Favorites, tap Browse.

*Apple Intelligence is available with Siri and device language set to Chinese (Simplified), Chinese (Traditional), Danish, Dutch, English, French, German, Italian, Japanese, Korean, Norwegian, Portuguese, Spanish, Swedish, Turkish, or Vietnamese. Some features may not be available in all regions or languages. Some devices may not be available in all regions. Siri AI is available in beta in iOS 27, iPadOS 27, macOS 27, watchOS 27, and visionOS 27 and requires an Apple Intelligence–enabled device set to a supported language. Available in English to start. Siri AI will not be initially available in the EU on iOS, iPadOS, and watchOS. Certain Apple Intelligence features that rely on server-side models are subject to daily usage limits, including but not limited to Siri AI, Intelligent Photo Editing Tools, Image Playground, and AFM 3 Cloud models in Shortcuts. Daily limits may vary by feature, request complexity, system demand, system policies, and other factors. Expanded access to such features will be available for a fee in the future. Use of these features is subject to the Apple Intelligence Terms and Conditions.
Tag: Files

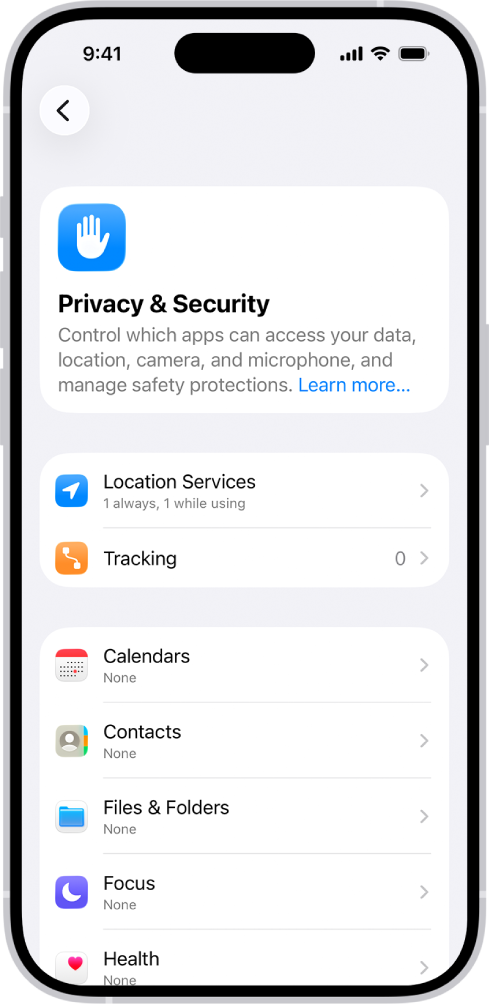
Apps ask for permission the first time they want to use something on your iPhone. You can control which apps can access your data, location, camera, and microphone, and manage safety protections in Privacy & Security.

A messaging app, for example, might ask for your contacts to find friends who use the same app. It’s also where you control which apps can track you across websites or other apps. And you can review how apps are using the permissions you grant them.

The Privacy & Security screen, with settings for Location Services and Tracking, and settings to control which apps can access your data.

Control which apps have access to information on your iPhone

To help you get things done more quickly, you can let third-party apps use information in your iPhone apps, such as Contacts, Photos, and Calendar. A messaging app might ask for access to your contacts, for instance, so it can find friends who are on the same app. And for any individual app, you can turn access on or off.

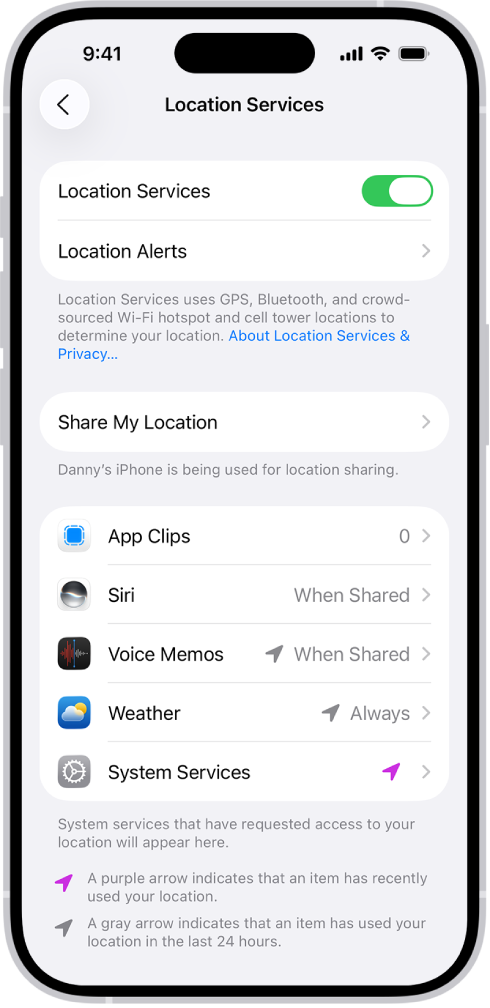
The Location Services screen, with settings to share the location of your iPhone with apps.

Control which apps can use the location of your iPhone

Apps with access to the location of your iPhone can help you receive assistance in an emergency, get directions, and more. A ride-sharing app, for example, may request your location so it can pick you up. You’ll see the Location Services icon in the status bar while an app is using Location Services.

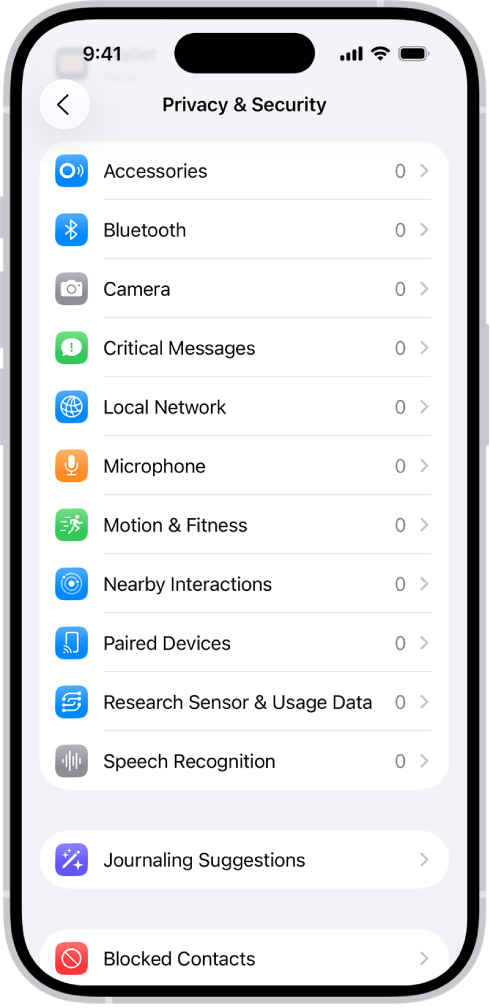
The Privacy & Security screen, with settings to control whether apps can use the camera, microphone, and other parts of your iPhone.

Control which apps have access to the camera and microphone on your iPhone

Letting apps use the camera and microphone makes it easier to upload content directly to those apps. A social networking app may ask to use your camera, for instance, so you can take pictures and post them to that app. Whenever an app uses the camera, a green indicator appears, and that includes when the camera and microphone are used together.

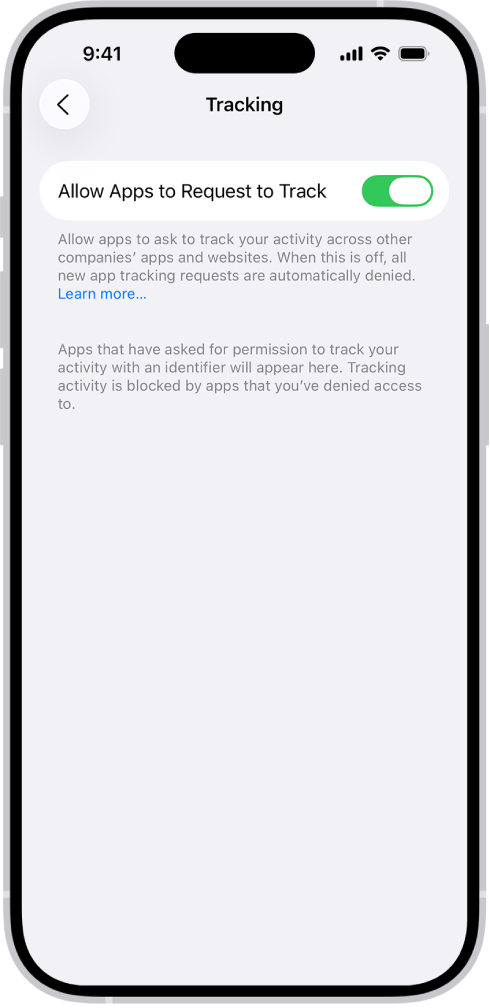
The Tracking screen, with a setting to control whether apps can request to track you across websites or apps owned by other companies.

Control which apps can track you or your iPhone across websites or other apps

Every app has to ask your permission before tracking you or your iPhone across websites or apps owned by other companies, such as for advertising or to share your information with data brokers. Once you’ve granted or denied permission to an app, you can change it later. And you can stop all apps from requesting permission altogether.

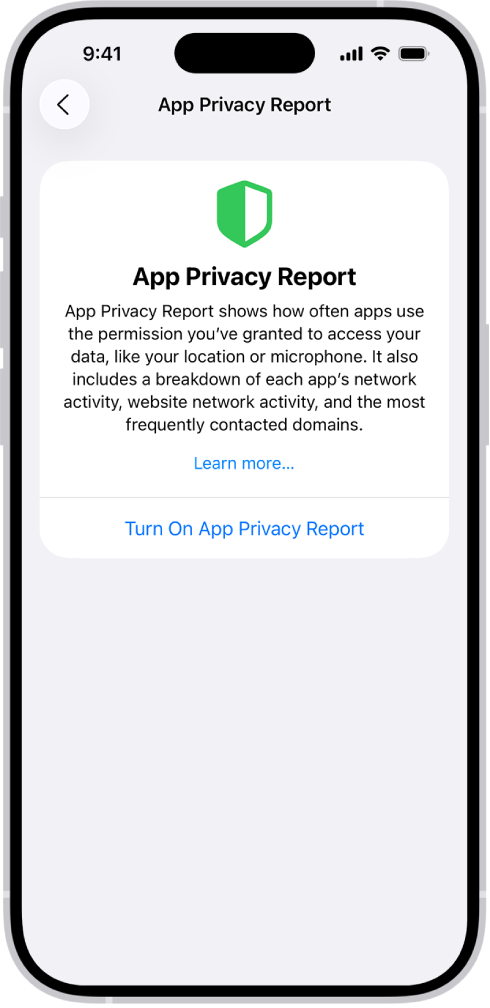
An App Privacy Report listing information about apps for the category Data & Sensor Access, and information about apps for the category App Network Activity.

Review how apps are using the permissions you grant them

An App Privacy Report shows how apps are using the permissions you’ve granted them, plus their network activity.

You can use the volume buttons on the side of iPhone to adjust media volume while audio is playing, and ringer and alert volume at other times. You can also adjust the volume in Control Center or Settings.

In Settings, you can set separate volumes for alarms and timers, and for alerts and system sounds. With Change with Buttons off, the volume buttons control only media playback, and you can limit the maximum volume of sound through headphones or the built-in speaker. Siri can turn the volume up or down for you, too.

Use the volume buttons or Siri to adjust volume

Press the volume up or volume down button on the side of iPhone. The button you press controls the volume for what’s currently playing—media, ringtones, or alerts.

Note: While audio is playing, the volume buttons control media volume. When no audio is playing, they control ringer and alert volume instead.

Siri can also turn the volume up or down.

Siri: Ask Siri something like, “Turn down the volume.”

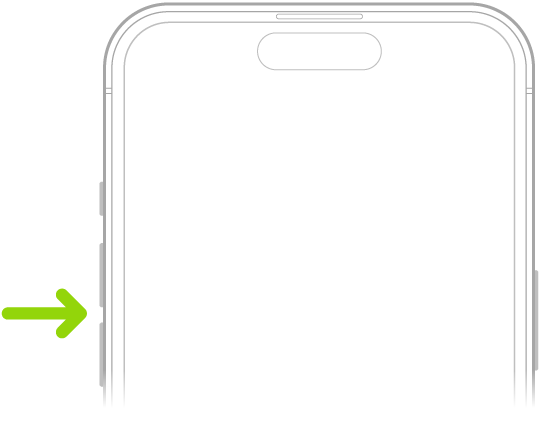
The upper portion of the front of iPhone with the volume up and volume down buttons on the upper left.

Adjust the volume in Control Center

In Control Center, you can adjust the volume while iPhone is locked or when you’re using an app.

Open Control Center, then drag the volume slider.

Lock the alert volume

You can stop the volume buttons from changing the volume of alerts and notifications.

  1. Open the Settings app on your iPhone.
  2. Tap Sounds & Haptics. Turn off Change with Buttons.

Media playback is the only thing the volume buttons control when the Change with Buttons setting is off.

Limit the speaker and headphone volume

For sound that plays through the built-in speaker on your iPhone or through headphones, you can set a limit on the maximum volume.

  1. Open the Settings app on your iPhone.
  2. Tap Sounds & Haptics and then do any of the following:
    • Limit speaker volume: Under Built-In Speaker, tap Volume Limit, turn on Limit Maximum Volume and then drag the slider.
    • Soften loud sounds from the speaker: Under Built-In Speaker, turn on Reduce Loud Sounds.
    • Limit headphone volume: Under Headphones, tap Headphone Safety, turn on Reduce Loud Audio. Drag the slider.

Note: With Screen Time set up for a family member, you can stop them from changing the Speaker Volume Limit level. To do it, go to the Settings app and tap Screen Time. Next, tap Content & Privacy Restrictions, turn on Content & Privacy Restrictions, then tap Speaker Volume Limit and select Don’t Allow.

Tag: iPhone

If you experience discomfort when you use iPhone while riding as a passenger in a car or other on-road vehicle, you can turn on Vehicle Motion Cues—onscreen cues that may help reduce motion sickness. Vehicle Motion Cues appear as animated dots on the edges of the screen that represent how the vehicle is moving without interfering with what you’re doing on iPhone.

You can customize the pattern, color, and visibility of the dots, like using larger dots or more dots.

Note: Vehicle Motion Cues should not be used while operating a moving vehicle and in other situations requiring attention to safety.

Vehicle Motion Cues work best when you’re seated facing forward in the vehicle.

Use iPhone more comfortably while riding in a vehicle

  1. Open the Settings app on your iPhone.
  2. Tap Accessibility, then tap Motion.
  3. Tap Vehicle Motion Cues and tap an option. If you choose Automatic, animated dots appear on the screen when iPhone detects that you’re riding in a car or other on-road vehicle; the dots are hidden when the motion stops.
  4. To manually show or hide Vehicle Motion Cues, open Control Center and tap the Vehicle Motion Cues button. Tap an option.

Quick tip: Another way to turn Vehicle Motion Cues on or off is to set up a shortcut.

Customize Vehicle Motion Cues

  1. Open the Settings app on your iPhone.
  2. Tap Accessibility, then tap Motion.
  3. Tap Vehicle Motion Cues and tap Customize Appearance.
  4. Customize any of the following:
    • Pattern: Select Regular for a stable and predictable pattern, or Dynamic for a more engaging visual experience.
    • Color: Select a color. Color saturation will automatically adjust to maintain contrast with the content behind each dot.
    • Visibility: Select Larger Dots to increase the size of the dots or More Dots to increase the number of dots.

You can browse the web, view websites, preview website links, translate webpages, and add the Safari app back to your Home Screen if it gets removed. Sign in to iCloud with the same Apple Account on multiple devices to keep your open tabs, bookmarks, history, and Reading List up to date across all your devices.

A few small tricks make browsing easier, too. You can jump back to the top of a long page in one move, or preview a link without opening the page.

Go to a webpage

  1. Start the Safari app on your iPhone.
  2. Enter the name or web address (URL) of the webpage in the search field.

View websites with Safari

  1. Start the Safari app on your iPhone.
  2. Do any of the following:

    • Get back to the top: Tap the top edge of the screen. Then tap it again to quickly return to the top of a long page.
    • See more of the page: Turn iPhone to landscape orientation.
    • Refresh the page: Pull down from the top of the page
    • Share links: At the bottom of the page, tap the Page Menu button, then tap Share.

      If your Tabs layout is Bottom or Top, tap the Share button.

Preview website links

  1. Start the Safari app on your iPhone.
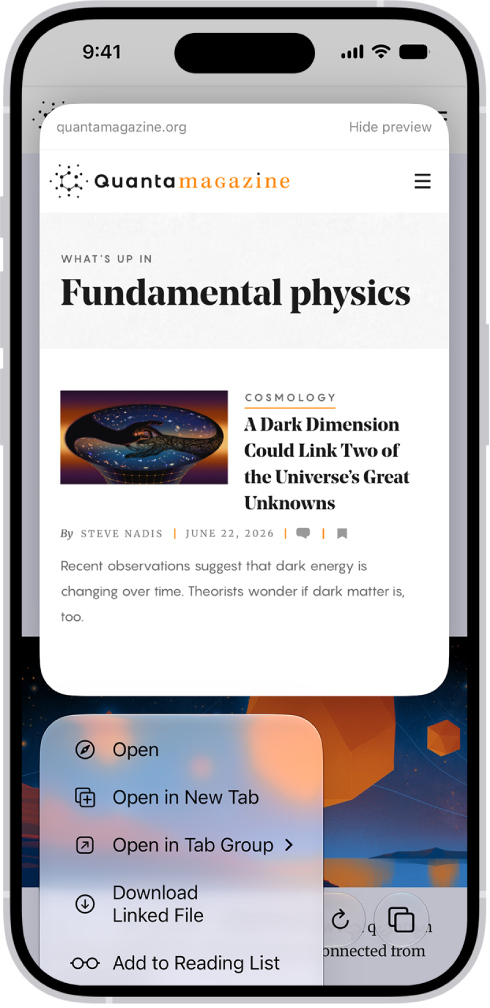
  2. Touch and hold a link in Safari to see a preview of the link without opening the page.

To open the link, tap the preview, or choose Open. To close the preview and stay on the current page, tap anywhere outside the preview.

A preview of a website followed by a list of possible actions: Open, Open in New Tab, Open in Tab Group, Download Linked File, and Add to Reading List.

Translate a webpage or image

Safari can translate the text of a webpage or image that’s in another language when you view it, though this isn’t available in all languages or regions.

  1. Start the Safari app on your iPhone.
  2. Go to a webpage.
  3. Tap the Page Menu button and tap Translate to [language] (if translation is available).

Use Apple Intelligence to summarize a webpage

The Safari app can generate summaries of webpages with Apple Intelligence.

Note: Apple Intelligence on iOS 27 or later is available on an Apple Intelligence-enabled iPhone 15 Pro, iPhone 15 Pro Max, or iPhone 16 model or later. Apple Intelligence is not available in all languages or regions. Usage limits may apply.*

  1. Go to a website in the Safari app on your iPhone.
  2. Go to a webpage.
  3. Tap the Page Menu button, then tap Summarize.

The Summarize menu item only appears when the website supports it, but Writing Tools can also summarize webpages.

Get notified when a website changes

Safari can use Apple Intelligence to let you know when a website updates content you’re interested in, like a price or item change.

Note: Apple Intelligence on iOS 27 or later is available on an Apple Intelligence-enabled iPhone 15 Pro, iPhone 15 Pro Max, or iPhone 16 model or later. Apple Intelligence is not available in all languages or regions. Usage limits may apply.*

  1. Start the Safari app on your iPhone.
  2. Go to a webpage.
  3. Tap the Page Menu button, then tap Notify Me.
  4. Enter details about what Safari should look for.
  5. If necessary, tap Edit to adjust how often Safari should check for updates and tap the checkmark button.

If Safari detects that a website has been updated, a notification appears on your iPhone at the time interval you set.

Add Safari back to your Home Screen

Safari missing from your Home Screen? Find it in App Library and add it back.

  1. On the Home Screen, swipe left until you see the App Library.
  2. Enter “Safari” in the search field.
  3. Touch and hold the Safari app icon. Then tap Add to Home Screen.

*Apple Intelligence is available with Siri and device language set to Chinese (Simplified), Chinese (Traditional), Danish, Dutch, English, French, German, Italian, Japanese, Korean, Norwegian, Portuguese, Spanish, Swedish, Turkish, or Vietnamese. Some features may not be available in all regions or languages. Some devices may not be available in all regions. Siri AI is available in beta in iOS 27, iPadOS 27, macOS 27, watchOS 27, and visionOS 27 and requires an Apple Intelligence–enabled device set to a supported language. Available in English to start. Siri AI will not be initially available in the EU on iOS, iPadOS, and watchOS. Certain Apple Intelligence features that rely on server-side models are subject to daily usage limits, including but not limited to Siri AI, Intelligent Photo Editing Tools, Image Playground, and AFM 3 Cloud models in Shortcuts. Daily limits may vary by feature, request complexity, system demand, system policies, and other factors. Expanded access to such features will be available for a fee in the future. Use of these features is subject to the Apple Intelligence Terms and Conditions.
Tag: Safari

Use the Notes app to jot down quick thoughts or organize detailed information with checklists, images, web links, scanned documents, handwritten notes, and sketches. You can even organize your note with sections and headings.

The first line of a note becomes its title. From there, you can format text with styles like headings, bold, and highlights, make a checklist, or add a table or divider line.

Here’s how to create and format notes on iPhone.

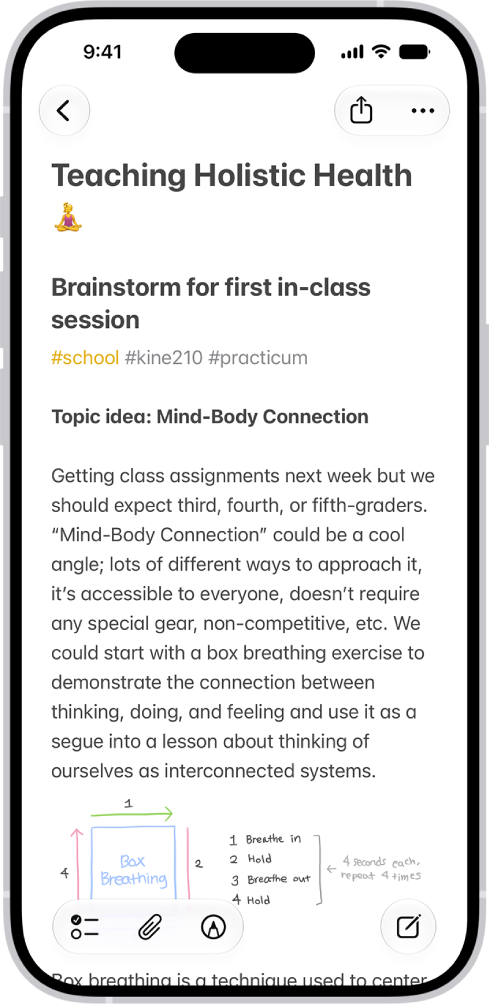
A note for a class brainstorm with tags such as #school and #kine210. The note features a hand-drawn diagram of a box breathing exercise, which illustrates a four-step breathing cycle.

Create a new note

  1. Start the Notes app on your iPhone.
  2. Tap the New Note button, then enter your text.
  3. The first line of the note becomes the note’s title.
  4. To save the note, tap the Done button.

Add formatting, checklists, tables, and divider lines

  1. Start the Notes app on your iPhone.
  2. When writing a note, do any of the following:
    • Format text: Tap the Format button and choose a style such as Heading, bold or italic font, highlight, and more. You can also swipe over the format bar options to quickly access commonly used styles.
    • Make a checklist: Tap the Checklist button.
    • Add a table: Tap the Add Table button.
    • Add a divider line: Tap to place the insertion point and tap the Expand button. Then choose Insert Divider Line.

Organize a note with sections and headings

Long notes are easy to manage and outline when you collapse and expand sections.

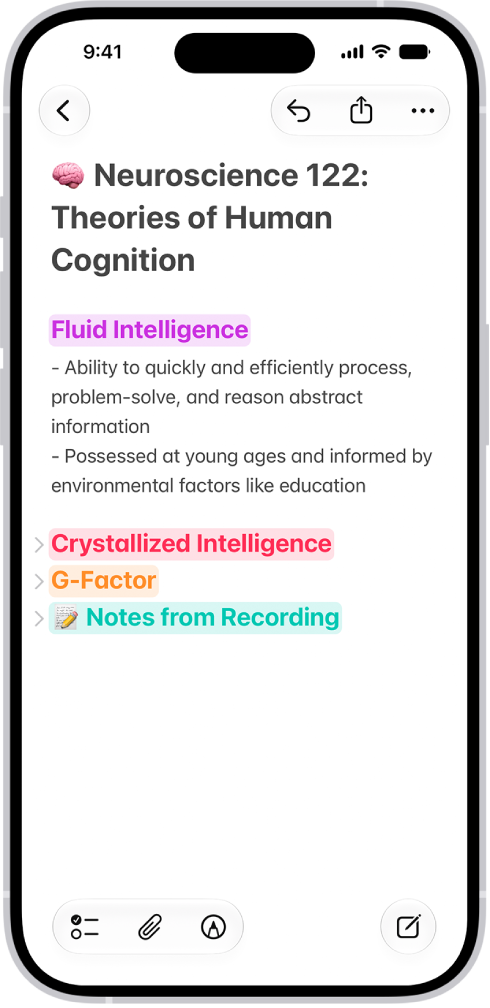
A note in the Notes app, with collapsible headings at the top of the screen.

  1. Start the Notes app on your iPhone.
  2. In a note, select the text for the heading.
  3. Tap the Format button and then tap Heading or Subheading.
  4. Add content to the section and then do any of the following:
    • Collapse a section: Tap the Collapse button.
    • Expand a section: Tap the Expand button.

Use Writing Tools in Notes

With Apple Intelligence, you can use Writing Tools to summarize selected text with a tap, proofread your work, and create different versions of the same text to help you find the right wording and tone. Note: Apple Intelligence on iOS 27 or later is available on an Apple Intelligence-enabled iPhone 15 Pro, iPhone 15 Pro Max, or iPhone 16 model or later. Apple Intelligence is not available in all languages or regions. Usage limits may apply.* *Apple Intelligence is available with Siri and device language set to Chinese (Simplified), Chinese (Traditional), Danish, Dutch, English, French, German, Italian, Japanese, Korean, Norwegian, Portuguese, Spanish, Swedish, Turkish, or Vietnamese. Some features may not be available in all regions or languages. Some devices may not be available in all regions. Siri AI is available in beta in iOS 27, iPadOS 27, macOS 27, watchOS 27, and visionOS 27 and requires an Apple Intelligence–enabled device set to a supported language. Available in English to start. Siri AI will not be initially available in the EU on iOS, iPadOS, and watchOS. Certain Apple Intelligence features that rely on server-side models are subject to daily usage limits, including but not limited to Siri AI, Intelligent Photo Editing Tools, Image Playground, and AFM 3 Cloud models in Shortcuts. Daily limits may vary by feature, request complexity, system demand, system policies, and other factors. Expanded access to such features will be available for a fee in the future. Use of these features is subject to the Apple Intelligence Terms and Conditions.
Tag: Notes

You can use a feature called Universal Clipboard to copy content from one of your Apple devices and paste it on another. For example, you can copy text on your iPad and paste it into a note on your iPhone, or copy an image from a Safari webpage on your iPhone and paste it into an email message on your Mac.

It works with your iPhone, iPad, and Mac, as long as both devices have Wi-Fi, Bluetooth®, and Handoff turned on and you’re signed in to the same Apple Account on both.

Before you begin

For this to work, both devices need to meet these conditions:

  • Both devices have Wi-Fi, Bluetooth®, and Handoff turned on.
  • You’re signed in to the same Apple Account on both devices.
  • Both devices meet minimum system requirements for Universal Clipboard.

A VPN configuration that prevents local networking may interfere with some Continuity features, so if you’re using a VPN, make sure its configuration doesn’t.

Copy and paste between your iPhone and other devices

There’s nothing to see with Universal Clipboard: It behaves just like copy and paste on your iPhone, except that you can paste to one of your other Apple devices, such as a Mac or an iPad.

  1. Select the text or image on your iPhone and then tap Copy.
  2. On your other device, either tap (on another iPhone or an iPad) or click (on a Mac) where you want to paste the text or image. Tap or click Paste. You can also use keyboard shortcuts.

Note: Content you copy is only available on your Clipboard for a short amount of time.

How to copy and paste on an iPhone or iPad

  • Select and copy text: Double-tap with one finger to select a word or triple-tap with one finger to select a paragraph. (You can also move the grab points to adjust your selection.) Then tap Copy.
  • Select and copy an image: Touch and hold to select an image, then tap Copy.
  • Paste text or an image: Tap where you want to paste the text or image, then tap Paste.

How to copy and paste on a Mac

  • Select text or an image: With your pointer, select the text or image you want to copy.
  • Copy text or an image: Press Command-C or choose Edit > Copy from the menu bar.
  • Paste text or an image: Move your pointer where you want to paste the text or image and click, then press Command-V or choose Edit > Paste from the menu bar.

If Universal Clipboard isn’t working

  • Make sure that you’re signed in to the same Apple Account on both devices.
  • Make sure that your iPhone and Mac have Wi-Fi, Bluetooth, and Handoff turned on.
  • Your devices must be within 30 feet (10 meters) of one another.
  • If you’re having difficulty getting Universal Clipboard to work, restart your devices and try again.

For sharing small selections of text or copied images between devices, Universal Clipboard works best.

In some countries and regions, you can record a phone call when you’re talking to one other person. In select regions and languages, you can view the transcript of the call in the Notes app. And with Apple Intelligence,* you can read a summary of the phone call in the Notes app.

It’s all saved for you. iPhone automatically saves call recordings in a Call Recordings folder in the Notes app, where you can play a recorded call or delete it, and you can turn off Audio Call Recording entirely.

Note: Call recording isn’t currently available in Azerbaijan, Bahrain, Egypt, the European Union, Iran, Iraq, Jordan, Kuwait, Morocco, Nigeria, Oman, Pakistan, Qatar, Russia, Saudi Arabia, South Africa, Turkey, United Arab Emirates, and Yemen. Apple Intelligence on iOS 27 or later is available on an Apple Intelligence-enabled iPhone 15 Pro, iPhone 15 Pro Max, or iPhone 16 model or later. Apple Intelligence is not available in all languages or regions. Usage limits may apply.*

Record a call

Before you begin, check the iOS and iPadOS Feature Availability website to see if call recording is available in your language and region, and make sure the other call participant is willing to be recorded.

  1. Open the Phone app on your iPhone.
  2. Make a call.
  3. During the call, tap the More button and then tap Call Recording.
  4. Both call participants hear an audio notice that the call is being recorded.
  5. To stop recording, tap the Stop button or just hang up.

iPhone automatically saves call recordings to a Call Recordings folder in the Notes app. To see the call in the Notes app, tap View Saved Call.

Play a recorded call

  1. Open the Notes app on your iPhone.
  2. Tap a note in the Call Recordings folder and tap the Play button.

View a call transcript

In select regions and languages, the transcript of a recorded call appears in the Notes app. It may not be available right away, though, and you may see a message that the transcription is in progress.

Note: A transcription might not be a perfect representation of the conversation, so verify its accuracy before relying on it.

  1. Open the Notes app on your iPhone.
  2. In the Call Recordings folder, tap a note. Tap the recording. Note: Spoken words in supported languages are automatically transcribed. If you don’t see a transcript, your iPhone doesn’t meet the minimum requirements or detect a supported language. In the transcript, the speaker of each statement is identified.
  3. While viewing the transcript, you can do any of the following:
    • Play the audio from a specific point: Select the text you want to hear.
    • Search the transcript: Tap the More button and then tap Find in Transcript.
    • Copy the transcript: Tap the More button and choose Add Transcript to Note or Copy Transcript.
    • Save the audio recording: Tap the More button and tap Save Audio Files. Then select where you want to save the recording.
    • Share the audio recording: Tap the More button, tap Share Audio, and select how you want to share the recording.
    • Delete the audio recording: Tap the More button and then tap Delete. Note: Deleting the audio recording also deletes the transcript.
    • View the waveform of the recording: Tap the Hide Transcript button.
    • View a summary of the voicemail: If your iPhone supports Apple Intelligence,* tap Summary. Tip: To copy or share a summary, tap the More button at the top of the summary.

Delete a recorded call

  1. Open the Notes app on your iPhone.
  2. Tap a note in the Call Recordings folder, tap the More button, and then tap Delete.

Note: Deleting the audio recording also deletes the transcript.

Turn off Audio Call Recording

You can turn off Call Recording, which is on by default.

  1. Open the Settings app on your iPhone.
  2. Tap Apps, then tap Phone.
  3. Tap Audio Call Recording, then turn it off.

*Apple Intelligence is available with Siri and device language set to Chinese (Simplified), Chinese (Traditional), Danish, Dutch, English, French, German, Italian, Japanese, Korean, Norwegian, Portuguese, Spanish, Swedish, Turkish, or Vietnamese. Some features may not be available in all regions or languages. Some devices may not be available in all regions. Siri AI is available in beta in iOS 27, iPadOS 27, macOS 27, watchOS 27, and visionOS 27 and requires an Apple Intelligence–enabled device set to a supported language. Available in English to start. Siri AI will not be initially available in the EU on iOS, iPadOS, and watchOS. Certain Apple Intelligence features that rely on server-side models are subject to daily usage limits, including but not limited to Siri AI, Intelligent Photo Editing Tools, Image Playground, and AFM 3 Cloud models in Shortcuts. Daily limits may vary by feature, request complexity, system demand, system policies, and other factors. Expanded access to such features will be available for a fee in the future. Use of these features is subject to the Apple Intelligence Terms and Conditions.
Your iPhone includes one of two charging cables: a USB-C Cable or a USB-C to Lightning Cable. With either one, you can plug iPhone into a power outlet using a compatible power adapter (sold separately), and your computer’s USB-C port works for charging, transferring files, and more.

Depending on the model, your iPhone comes with one of these charging cables:

USB-C Cable

With a compatible power adapter (sold separately) and the included cable, iPhone connects to a power outlet. The included cable also connects to your computer’s USB-C port for transferring files, charging, and more.

USB-C to Lightning Cable

Plug iPhone into a power outlet with the included cable and a compatible power adapter, sold separately. You can also use the included cable with your computer’s USB-C port to charge, transfer files, and more.

Tag: Battery

Widgets show you information from an app at a glance, like today’s headlines, weather, reminders, and battery levels. You can add them to your Home Screen, and turn an app icon into a widget. A Smart Stack, a widget with dots next to it, shows the most relevant widget based on the time and your location.

What are widgets?

With widgets, current information from an app is easy to view at a glance, whether it’s today’s headlines, the weather, reminders, or battery levels. You’ll find them in Today View, and you can add them to your Home Screen or Lock Screen to keep that information at your fingertips.

Quick tip: A widget with dots next to it is a Smart Stack. It’s a combined set of widgets that automatically shows the most relevant one at the appropriate time in your day, based on information such as the time, your location, and activity. You can add a Smart Stack to the Home Screen from the widget gallery, then swipe up and down through it to see the widgets inside.

Add a widget to your Home Screen

  1. Go to the Home Screen and then find the Home Screen page where you want to add the widget.
  2. Touch and hold the background until the apps begin to jiggle, tap the Edit button, and then tap Add Widget.
  3. Scroll or search to find the widget you want, tap it, and then swipe through the size and style options.
  4. When you see the size you want, tap Add Widget.
  5. While the apps are still jiggling, move the widget where you want it. Then tap the Done button.

Turn an app icon into a widget

An app icon can quickly become a widget.

  1. Touch and hold the app icon on your Home screen.
  2. To choose the size of the widget, tap one of the icons at the bottom of the pop-up menu.

To change the widget back to an app icon, touch and hold it, then tap the App Icon button.

Interact with widgets

You can perform tasks by tapping widgets on your Home Screen, Lock Screen, or StandBy. Tap an item in the Reminders widget to check it off, tap the Play button in the Podcasts widget to play an episode, or tap the Home widget to turn on your living room lights—all without opening an app.

Edit a widget on your Home Screen

You can adjust most widgets right from your Home Screen so they display the information you want to see. For example, for a Mail widget, you can tap the mailbox shown in the widget, then choose a different mailbox so the messages in that mailbox are displayed in the widget.

  1. Touch and hold the widget.
  2. Tap Edit Widget (or Edit Stack, if it’s a Smart Stack). Choose options.

    For a Smart Stack, you can reorder widgets by dragging them within the stack, drag a widget from the Smart Stack to the Home Screen, or remove a widget by tapping the Remove button in its upper-left corner.

  3. Tap Done.

View widgets in Today View

To view widgets in Today View, swipe right from the left edge of the Home Screen, then scroll up and down.

View widgets in Today View when iPhone is locked

  1. Open the Settings app on your iPhone.
  2. Tap Face ID & Passcode (on an iPhone with Face ID) or Touch ID & Passcode (on other iPhone models).
  3. Make sure Today View and Search is turned on (below Allow Access When Locked).