With AssistiveTouch on iPhone, you can adapt the touchscreen to fit your needs. If certain gestures don’t work for you, you can replace them with a tap or alternate gesture, or use a simple sound. You can also use AssistiveTouch when you need to press iPhone buttons.
AssistiveTouch works with or without a compatible adaptive accessory, such as a joystick. When it’s on, the AssistiveTouch menu button appears on the screen, and you can customize the top-level menu with up to eight icons.
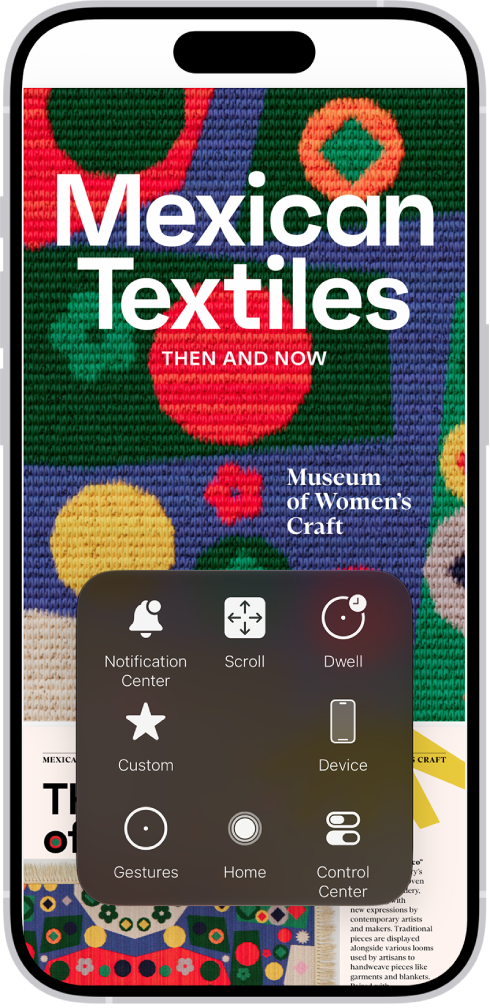
AssistiveTouch lets you perform actions such as these:
- Go to the Home Screen
- Double-tap
- Perform multifinger gestures
- Perform scroll gestures
- Activate Siri
- Access Control Center, notifications, the Lock Screen, or the App Switcher
- Adjust the volume on iPhone
- Shake iPhone
- Take a screenshot
- Use 3D Touch (on supported iPhone models)
- Use Apple Pay
- Use Emergency SOS
- Speak screen
- Adjust dwell settings
- Restart iPhone
Set up AssistiveTouch
Siri: Ask Siri something like, “Turn on AssistiveTouch.”
Or do the following:
- Open Settings, tap Accessibility, tap Touch, and then tap AssistiveTouch.
- Turn on AssistiveTouch. The AssistiveTouch menu button appears on the screen.
- To customize AssistiveTouch, tap any of the following:
- Customize Top Level Menu: Tap an icon to change its action. Tap the Decrement button or the Increment button to change the number of icons in the menu. The menu can have up to eight icons.
- Single-Tap, Double-Tap, Long Press, or 3D Touch: Assign custom actions that run when you interact with the menu button. 3D Touch is available only on supported iPhone models.
- Create New Gesture: Add your favorite gestures.
- Idle Opacity: Adjust the visibility of the menu button when not in use.
- Confirm with AssistiveTouch: On an iPhone with Face ID, confirm payments with Face ID by using AssistiveTouch instead of double-clicking the side button.
Quick tip: After you set up the Accessibility Shortcut, triple-click the side or Home button to turn AssistiveTouch on or off quickly.
Use AssistiveTouch
When AssistiveTouch is on, tap the AssistiveTouch menu button , then choose an action or gesture.
To return to the previous menu, tap the arrow in the center of the menu. To exit the menu without performing a gesture, tap anywhere outside the menu.
To move the AssistiveTouch menu button, drag it to a new location on the screen.
When you need to perform a multifinger gesture, do the following:
- Pinch and Rotate: Tap Custom, then tap Pinch and Rotate. When the two pinch circles appear, touch anywhere on the screen to move the pinch circles, then drag them in or out to perform a pinch or rotate gesture. When you finish, tap the menu button.
- Multifinger swipe or drag: Tap Device > More > Gestures, then tap the number of digits needed for the gesture. When the circles appear on the screen, swipe or drag in the direction required by the gesture. When you finish, tap the menu button.
Control iPhone with a pointer device
Assistive pointer devices can connect over Bluetooth® or USB. That includes trackpads, mouse devices, and game controllers.
- Open Settings, tap Accessibility, tap Touch, and then tap AssistiveTouch.
- Turn on AssistiveTouch.
- Below Pointer Devices, tap any of the following:
- Devices: Pair or unpair devices and customize buttons.
- Mouse Keys: Allow the AssistiveTouch pointer to be controlled using the keyboard.
- Pointer Style: Adjust the size, color, and auto-hide settings.
- Show Onscreen Keyboard: Display the onscreen keyboard.
- Sound on Click: Play a sound when the pointer device is clicked.
- Always Show Menu: Show the AssistiveTouch menu when a pointer device is connected.
- Tracking Sensitivity: Adjust how quickly the pointer moves when you drag the mouse or your finger on the trackpad.
Set up Dwell Control
When you keep the cursor still on a screen element or part of the screen, iPhone performs a selected action.
- Open Settings, tap Accessibility, tap Touch and tap AssistiveTouch. Turn on Dwell Control.
- Adjust any of the following:
- Fallback Action: Turn on to revert the dwell action to the selected fallback action after performing an operation.
- Movement Tolerance: Adjust the distance the cursor can move while dwelling on an item.
- Hot Corners: Perform a selected action—such as take a screenshot, open Control Center, activate Siri, scroll, or use a shortcut—when the cursor dwells in a corner of the screen.
- Extended Predictions: Under Keyboard, turn on Extended Predictions to get more word suggestions while typing.
- Key Dwell Time: Under Keyboard, adjust the amount of time it takes to tap on a keyboard key by tapping the Decrement button or the Increment button. You can also enter a number of seconds.
- Slide to Type: Under Keyboard, turn on Slide to Type to type by drawing a path with your cursor along the keyboard.
- Time needed to initiate a dwell action: Tap the Decrement button or the Increment button.
Use simple sounds to perform gestures
Make a simple sound, like a mouth pop or an S-sound, and AssistiveTouch can have iPhone perform a gesture or other action.
- Open Settings, tap Accessibility, tap Touch, tap AssistiveTouch, and turn AssistiveTouch on.
- Tap Sound Actions, then tap a sound.
- Select the gesture or other action you want performed when you make the sound.
- To perform the gesture or action, just make the sound.
Create custom gestures
You can add gestures you use often (such as touch and hold or two-finger rotation) to the AssistiveTouch menu. You can even create several gestures with, for example, different degrees of rotation.
- Open Settings, tap Accessibility, tap Touch, tap AssistiveTouch, and then tap Create New Gesture.
-
Perform your gesture on the recording screen. For example:
- Touch-and-hold gesture: Touch and hold your finger in one spot until the recording progress bar reaches halfway. Lift your finger. Be careful not to move your finger while recording, or the gesture will be recorded as a drag.
- Two-finger rotation gesture: Rotate two fingers on the iPhone screen around a point between them. (You can do this with a single finger or stylus—just create each arc separately, one after the other.)
If you record a sequence of taps or drag gestures, they’re all played back at the same time. For example, using one finger or a stylus to record four separate, sequential taps at four locations on the screen creates a simultaneous four-finger tap.
- If your gesture doesn’t turn out quite right, tap Cancel. Then try again.
- When you’re satisfied with your gesture, tap Save. Name the gesture.
To use your custom gesture, tap the AssistiveTouch menu button , tap Custom, then choose the gesture. When the blue circles representing your gesture appear, drag them to where you want to use the gesture, then release.