Got a tip for us?

accessibility

If you use Magic Keyboard with iPhone, you can use keyboard shortcuts to activate VoiceOver commands.

You can also use VoiceOver Help to learn the keyboard layout and the actions associated with various key combinations. It speaks keys and keyboard commands as you type them, without performing the associated action. And Quick Nav lets you use the arrow keys.

Here’s how to use VoiceOver on iPhone with an Apple external keyboard.

Choose the VoiceOver modifier

The modifier is a key or set of keys you press with one or more other keys to enter VoiceOver commands. You can set the modifier to be the Caps Lock key or the Control and Option keys pressed at the same time.

  1. Open Settings, tap Accessibility, tap VoiceOver, tap Typing, and then tap Modifier Keys.
  2. Choose the modifier for VoiceOver commands: the Caps Lock key or the Control and Option keys.

This modifier is abbreviated as “VO” below.

VoiceOver keyboard commands

You can control VoiceOver using key combinations.

(VO = modifier keys)

Action Shortcut
Turn on VoiceOver Help VO-K
Turn off VoiceOver Help Esc (Escape)
Select the next or previous item VO-Right Arrow or VO-Left Arrow
Activate the selected item VO-Space bar
Touch and hold the selected item VO-Shift-M
Read from the current position VO-A
Read from the top VO-B
Pause or resume reading Control
Copy the last spoken text to the clipboard VO-Shift-C
Search for text VO-F
Mute or unmute VoiceOver VO-S
Go to the Home Screen VO-H
Move to the status bar VO-M
Open the notifications screen Move to the status bar (VO-M), then Option-Up Arrow
Open Control Center Move to the status bar (VO-M), then Option-Down Arrow
Open Search Option-Up Arrow
Open the App Switcher VO-H-H
Open the Item Chooser VO-I
Change the label of the selected item VO-Slash
Start, stop, or pause an action VO-Hyphen
Swipe up or down VO-Up Arrow or VO-Down Arrow
Turn the rotor left or right VO-Command-Left Arrow or VO-Command-Right Arrow
Adjust the setting specified by the rotor VO-Command-Up Arrow or VO-Command-Down Arrow
Turn the screen curtain on or off VO-Fn-Hyphen (or VO-Globe key-Hyphen, depending on your keyboard)
Return to the previous screen Esc

Quick Nav using the arrow keys

Turn on Quick Nav to control VoiceOver using the arrow keys.

Action Shortcut
Turn Quick Nav on or off Left Arrow-Right Arrow
Select the next or previous item Right Arrow or Left Arrow
Select the next or previous item specified by the rotor Up Arrow or Down Arrow
Select the first or last item Control-Up Arrow or Control-Down Arrow
Tap an item Up Arrow-Down Arrow
Scroll up, down, left, or right Option-Up Arrow, Option-Down Arrow, Option-Left Arrow, or Option-Right Arrow
Adjust the rotor Up Arrow-Left Arrow or Up Arrow-Right Arrow

Single-key Quick Nav for web browsing

To navigate a webpage quickly, turn on Quick Nav (VO-Q), then press keys on the keyboard to navigate to specific item types, such as headings or links. To move to the previous item, hold the Shift key as you press a key for the item type.

Item type Shortcut
Heading H
Link L
Text field R
Button B
Form control C
Image I
Table T
Static text S
ARIA landmark W
List X
Item of the same type M
Level 1 heading 1
Level 2 heading 2
Level 3 heading 3
Level 4 heading 4
Level 5 heading 5
Level 6 heading 6

Text editing

Use these commands (with Quick Nav turned off) to work with text. VoiceOver reads the text as you move the insertion point.

Action Shortcut
Go forward or back one character Right Arrow or Left Arrow
Go forward or back one word Option-Right Arrow or Option-Left Arrow
Go up or down one line Up Arrow or Down Arrow
Go to the beginning or end of the line Command-Left Arrow or Command-Down Arrow
Go to the beginning or end of the paragraph Option-Up Arrow or Option-Down Arrow
Go to the previous or next paragraph Option-Up Arrow or Option-Down Arrow
Go to the top or bottom of the text field Command-Up Arrow or Command-Down Arrow
Select text as you move Shift + any of the insertion point movement commands above
Select all text Command-A
Copy, cut, or paste the selected text Command-C, Command-X, or Command-V
Undo or redo last change Command-Z or Shift-Command-Z

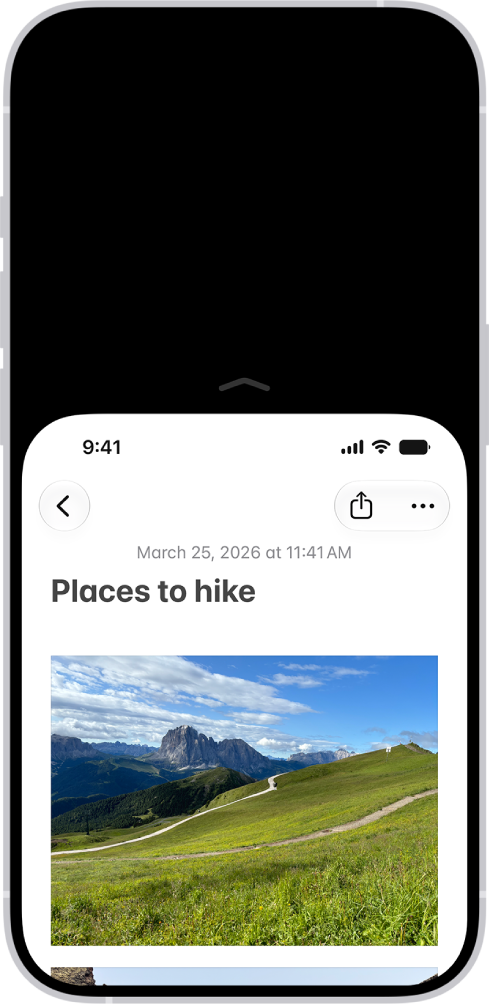
When you use iPhone with one hand in portrait orientation, you can use Reachability to lower the top half of the screen so it’s within easy reach of your thumb. It works on iPhone models with Face ID and with a Home button, and you turn it on in Accessibility settings.

The iPhone screen with Reachability activated. The top of the screen has moved down so it’s within easy reach of your thumb.

  1. Open Settings, tap Accessibility, tap Touch, and turn on Reachability.
  2. To lower the top half of the screen, do one the following:
    • On an iPhone with Face ID: Swipe down on the bottom edge of the screen.
    • On an iPhone with a Home button: Lightly double-tap the Home button.
    • While VoiceOver is on: Swipe up from the bottom of the screen with one finger, then, without lifting your finger, swipe down.
  3. To return to the full screen, tap the upper half of the screen.

There’s a set of accessibility settings for the side or Home button. You can choose the speed required to double-click or triple-click it, and whether Siri responds when you press and hold the button, and on an iPhone with Touch ID, you can even choose how it feels when you press it.

  1. Open Settings, tap Accessibility, and tap Side Button (on an iPhone with Face ID) or Home Button (on an iPhone with Touch ID).
  2. Set any of the following:
    • Click Speed: Choose the speed required to double-click or triple-click the button—Default, Slow, or Slowest.
    • Press and Hold to Speak: Choose whether Siri responds when you press and hold the button.
    • Rest Finger to Open: On an iPhone with Touch ID, you can unlock and open iPhone by resting your finger on Touch ID.
    • Home Button Haptic: On an iPhone with Touch ID, you can choose how it feels when you press it. Tap Home Button Haptic, tap an option, and then press the Home button to try it out. Tap Done when the option you like best is selected.
    • Side Button Confirmation: Choose AssistiveTouch or Switch Control to confirm payments with Face ID or anytime double-clicking the side button is required.

Instead of double-clicking the side button, you can also confirm payments with Face ID using AssistiveTouch or Switch Control on an iPhone with Face ID.

With Voice Control on your iPhone, you can speak commands to interact with what’s on the screen, perform gestures and button presses, dictate and edit text, and more. And with Apple Intelligence, you can describe onscreen elements in your own words instead of using exact labels—refer to an item by its name, what it does, its color, or where it appears on the screen.

You can pause or resume Voice Control, see what commands you can use, label onscreen items, and show a numbered grid on the screen.

Note: When Voice Control is on, you use Voice Control to dictate text; standard iOS Dictation isn’t available. Voice Control isn’t available in all languages.

Note: Apple Intelligence on iOS 27 or later is available on an Apple Intelligence-enabled iPhone 15 Pro, iPhone 15 Pro Max, or iPhone 16 model or later. Apple Intelligence is not available in all languages or regions. Usage limits may apply.* To use Apple Intelligence with Voice Control, you must have your system language and Voice Control language set to English.

Set up Voice Control

Before you turn on Voice Control for the first time, iPhone needs to be connected to the internet over a Wi-Fi network. Once iPhone finishes a one-time file download from Apple, Voice Control works without an internet connection.

  1. Start the Settings app on your iPhone.
  2. Tap Accessibility, tap Voice Control, tap Set Up Voice Control, and follow the onscreen instructions.

    When the download is complete, the Voice Control icon appears in the status bar to indicate that Voice Control is turned on.

  3. Set options such as the following:

    • Language: Set the language and download languages for offline use.
    • Commands: View the available commands and create new commands.
    • Vocabulary: Teach Voice Control to recognize new words and phrases. You can enter a word or phrase and teach Voice Control how you pronounce it, or import a vocabulary list.

      Note: Not all Voice Control languages support a custom vocabulary.

    • Show Confirmation: When Voice Control recognizes a command, a visual confirmation appears at the top of the screen.
    • Play Sound: When Voice Control recognizes a command, a sound plays.
    • Show Hints: See command suggestions and hints.
    • Flexible Item Names: With Apple Intelligence, you can refer to onscreen items in your own words instead of using their exact labels. This is turned on by default and can be turned off to use exact labels.
    • Continuous Overlay: Display numbers, names, or a grid over screen elements.
    • Attention Aware: On an iPhone with Face ID, Voice Control wakes up when you look at your iPhone and goes to sleep when you look away.
    • Prefer Bluetooth Headset: Use AirPods or Bluetooth® headsets when connected instead of the iPhone microphone.

    Note: Using Voice Control with AirPods and third-party headsets impacts audio quality and audio features like Siri announcements and Share Audio with AirPods.

Turn Voice Control on or off

With Voice Control set up, any of the following turns it on or off quickly:

  • Use Control Center if you’ve added Voice Control there.
  • Use Accessibility Shortcut if you’ve set it up to turn on Voice Control.

Siri: Ask Siri something like, “Turn on Voice Control.”

Start using commands

You just say a command to use Voice Control on your iPhone. And Apple Intelligence lets you describe the item you want to act on rather than use its exact label.

Voice Control: Say, for example, “Open Control Center,” “Go home,” “Tap item name,” or “Turn up volume.” Or with Apple Intelligence, say “Tap the button that sends the message” or “Tap the button at the bottom right.”

Quick tip: The interactive Voice Control Tutorial helps you get familiar with Voice Control and practice essential commands. To open it, go to Settings > Accessibility > Voice Control and tap Open Voice Control Tutorial.

Pause or resume Voice Control

Pausing Voice Control keeps the words you say from being interpreted as commands or dictation. Resume it when you’re ready for Voice Control to listen for commands and dictation again.

Voice Control: Say “Stop listening” or “Start listening.”

See what commands you can use

The list shows the available commands, which change based on the app you’re working in and what you’re doing. While writing a document, for example, you’ll see text formatting commands. Apple Intelligence also means you can describe an item in your own words rather than use its exact label.

Note: Voice Control: Say “Show commands.”

To browse the full list of supported commands and see examples of how to use them, go to Settings > Accessibility > Voice Control > Commands.

Label onscreen items

Not sure what to call something? Show a name or number next to each item on the screen, then use that name or number to interact with the item. With Apple Intelligence, you’re also free to describe an item in your own words, without its name or number.

Voice Control: Say “Show names,” “Show numbers,” or “Show text numbers.” Or with Apple Intelligence, say “Tap the blue button at the bottom.”

To interact with an item, say its name or number, or say a command—such as “Long press”—followed by the item’s name or number. The item names or numbers disappear after you say the command.

Show a numbered grid on the screen

Superimposing a grid makes it easier to interact with a precise area of the screen.

Voice Control: Say “Show grid.”

  • Interact with a location on the grid: If a number is at the location you want to interact with, say any command—such as “Tap”—followed by the grid number. The grid disappears after you say the command.
  • Drill down on an area of the grid: If you need to further refine the location, say a grid number to show a more detailed grid in that area.

Say “Hide names,” “Hide numbers,” or “Hide grid” to turn the overlay off.

Enter text

In a text input area, you can dictate character by character (with Spelling mode) or word by word (with Dictation mode). And so you don’t mistakenly enter a Voice Control command as text, you can have Voice Control respond only to commands (with Command mode).

When you’re in a text input area and label onscreen items with numbers, numbers are shown next to each line of text. Select a line or another section of the text to display a number for each word in the selection; select a single word to show a number for each character in the word. To interact with a text item (such as a line or a word), say a command followed by the item’s name or number. For example, you can say “Delete [item number]” or “Uppercase [item number].”

Command Description
Voice Control: Say “Dictation mode.” Dictate word by word. Any words you say that aren’t Voice Control commands are entered as text. Dictation mode is on by default. In some Voice Control languages, if several words phonetically match what you say, they appear onscreen. Tap to choose the one you want.
Voice Control: Say “Spelling mode.” Dictate character by character. Spelling mode is helpful when you need to enter a password, a web address, or another sequence of characters that wouldn’t be recognized as a word in Dictation mode. When Spelling mode is on, the Spelling Mode icon appears in the text input area. To increase accuracy when entering letters, you can use the letter’s phonetic alphabet code word (for example, say “Alfa Bravo Charlie” to enter “abc”). Note: Spelling mode isn’t available in all Voice Control languages.
Voice Control: Say “Command mode.” Voice Control responds only to commands. Words and characters that aren’t commands are ignored and aren’t entered as text. Command mode is helpful when you need to say a series of commands and don’t want them inadvertently entered in a text input area. When Command mode is on, the Command Mode icon appears in the text input area to indicate you can’t dictate to enter text.

Apple Intelligence is available with Siri and device language set to Chinese (Simplified), Chinese (Traditional), Danish, Dutch, English, French, German, Italian, Japanese, Korean, Norwegian, Portuguese, Spanish, Swedish, Turkish, or Vietnamese. Some features may not be available in all regions or languages, Apple says. Some devices may not be available in all regions.

Siri AI is available in beta in iOS 27, iPadOS 27, macOS 27, watchOS 27, and visionOS 27 and requires an Apple Intelligence–enabled device set to a supported language. Available in English to start. Siri AI will not be initially available in the EU on iOS, iPadOS, and watchOS. Certain Apple Intelligence features that rely on server-side models are subject to daily usage limits, including but not limited to Siri AI, Intelligent Photo Editing Tools, Image Playground, and AFM 3 Cloud models in Shortcuts.

Daily limits may vary by feature, request complexity, system demand, system policies, and other factors. Expanded access to such features will be available for a fee in the future. Use of these features is subject to the Apple Intelligence Terms and Conditions.

Some elements on the screen let you customize how they move. Turn Reduce Motion off, and you get more motion, like the fluid morphing effects of Liquid Glass. You can also set Vehicle Motion Cues to turn on automatically when you’re moving in a vehicle, and customize how the cues look. Here are the elements you can customize:

  • Motion effects for wallpaper, apps, and alerts
  • Screen transitions
  • Siri animations
  • Typing autocompletion
  • Animated full-screen and bubble effects in the Messages app
  • Animated images on the web and in apps

Customize onscreen motion

  1. Start the Settings app on your iPhone.
  2. Tap Accessibility, then tap Motion.
  3. Do any of the following:
    • Reduce Motion: Turn on. (When off, you’ll see more motion, like the fluid morphing effects of Liquid Glass.)
    • Vehicle Motion Cues: Turn on, off, or set to automatically turn on when you’re moving in a vehicle. You can also customize the appearance of the cues including the pattern, color, and visibility. (When on, dots appear and move on the screen to reduce or stop onscreen motion.)
    • Auto-Play Animated Images: Turn off. (When on, rapid animated images and moving elements such as GIFs in Messages and Safari play automatically.)
    • Auto-Play Video Previews: Turn off. (When on, it allows apps such as the App Store to automatically play video previews.)
    • Auto-Play Message Effects: Turn off. (When on, the Messages app automatically plays full-screen effects. If you turn this setting off, you can still manually play effects by tapping Replay below the message bubble.)
    • Prefer Non-Blinking Cursor: Turn on. (Stop the blinking of the vertical bar that appears at the insertion point where you’re typing. If you use a braille display with iPhone, the cursor indicator on the display also stops blinking.)
    • Limit Frame Rate: Turn on. (On models with ProMotion display technology, this limits the maximum frame rate of the display to 60 frames per second.)

Reduce flashing and strobing lights in videos

  1. Start the Settings app on your iPhone.
  2. Tap Accessibility, then tap Display & Text Size.
  3. Turn on Dim Flashing Lights.

Reduce bright effects of onscreen elements

Highlighting and flashing effects may appear when you interact with certain onscreen elements, like the keyboard, but you can reduce them.

  1. Start the Settings app on your iPhone.
  2. Tap Accessibility, then tap Display & Text Size.
  3. Turn on Reduce Bright Effects.

Smooth display dimming

To control brightness, your iPhone uses a technique called pulse width modulation (PWM), which can make the display appear to flicker for some people when it’s dim. On supported models, turning on Display Pulse Smoothing creates a smoother dimming experience at low brightness levels.

Note: Under certain conditions, turning off PWM may affect display performance at low brightness.

  1. Start the Settings app on your iPhone.
  2. Tap Accessibility, then tap Display & Text Size.
  3. Turn on Display Pulse Smoothing (PWM).

Important: Your iPhone uses an on-device algorithm to detect flashing or strobing lights included in supported media and automatically dims them on your iPhone in real time. Motion settings should not be relied upon in high-risk situations, or for the treatment of any medical condition.

If you have difficulties with hand tremors, dexterity, or fine motor control, you can adjust how the iPhone touchscreen responds to tap, swipe, and touch-and-hold gestures. You can have iPhone recognize faster or slower touches and ignore multiple touches.

You can also prevent iPhone from waking when you touch the screen, or turn off Shake to Undo if you unintentionally shake iPhone. Many of these settings come from Touch Accommodations, which gives you a personalized list of options like Hold Duration or Tap Assistance after a short setup.

Here’s how to adjust how iPhone responds to your touch.

Set up and adjust Touch Accommodations

  1. Start the Settings app on your iPhone.
  2. Tap Accessibility and tap Touch. Then tap Touch Accommodations.
  3. Tap Set Up Touch Accommodations and then follow the onscreen instructions.

    After you complete setup, you’ll see a personalized list of Touch Accommodations—like Hold Duration or Tap Assistance—that you can turn on.

  4. You can adjust any of your Touch Accommodations after setup. Tap Settings and then change any of the following:

    • Respond to longer or shorter touches: Turn on Hold Duration. Then tap the Decrement button or the Increment button to adjust the duration.

      Note: When you turn on Hold Duration, taps and swipes within the duration are ignored. You can turn on Swipe Gestures to make swiping easier when Hold Duration is on.

    • Make swiping easier while Hold Duration is on: Turn on Hold Duration, then tap Swipe Gestures. Turn on Swipe Gestures, then choose the required movement before a swipe gesture begins.
    • Treat multiple touches as a single touch: Turn on Ignore Repeat. Then tap the Decrement button or the Increment button to adjust the amount of time allowed between multiple touches.
    • Respond to the first or last place you touch: Under Tap Assistance, choose either Use Initial Touch Location or Use Final Touch Location.

      If you choose Use Initial Touch Location, iPhone uses the location of your first tap—when you tap an app on the Home Screen, for example.

      If you choose Use Final Touch Location, iPhone registers the tap where you lift your finger. iPhone responds to a tap when you lift your finger within a certain period of time. Tap the Decrement button or the Increment button under Tap Assistance Gesture Delay to adjust the timing. Your iPhone can respond to other gestures, such as a drag gesture, if you wait longer than the gesture delay.

      Note: When you turn on Tap Assistance, taps and swipes within the duration are ignored. You can turn on Swipe Gestures to make swiping easier when Hold Duration is on.

    • Make swiping easier while Tap Assistance is on: Choose either Use Initial Touch Location or Use Final Touch Location. Then tap Swipe Gestures. Turn on Swipe Gestures. Then choose the required movement needed before a swipe gesture begins.

At any time, you can recalibrate or reset Touch Accommodations.

Adjust settings for touch-and-hold gestures

You can use the touch-and-hold gesture to see additional options or actions you can perform, or to get a preview of content. If you have trouble performing this gesture, do the following:

  1. Start the Settings app on your iPhone.
  2. Tap Accessibility and tap Touch. Then tap Haptic Touch.
  3. Choose the touch duration—Fast or Slow.
  4. Test your new settings on the image at the bottom of the screen.

Recalibrate or reset Touch Accommodations

  1. Start the Settings app on your iPhone.
  2. Tap Accessibility and tap Touch. Then tap Touch Accommodations.
  3. Do either of the following:
    • Recalibrate your Touch Accommodations: Tap Recalibrate Touch Accommodations.
    • Reset your Touch Accommodations: Tap Reset Touch Accommodations.

Turn off Tap to Wake

If you have a supported iPhone model, you can stop touches on the screen from waking iPhone.

  1. Start the Settings app on your iPhone.
  2. Tap Accessibility, tap Touch, and then turn off Tap to Wake.

Turn off Shake to Undo

Turning off Shake to Undo helps if you tend to unintentionally shake iPhone.

  1. Start the Settings app on your iPhone.
  2. Tap Accessibility and tap Touch. Then turn off Shake to Undo.

Quick tip: To undo text edits, swipe left with three fingers.

If you’re blind or have low vision, you can use the Magnifier app to aim your iPhone camera at nearby text and have it spoken out loud. You can even point your finger at the specific text you want spoken.

It all happens in Detection Mode, which you can add to the Magnifier app on your iPhone if you don’t see its button. Text Detection and Point & Speak aren’t available in all languages, though.

Important: Detection Mode should not be relied on in high-risk or emergency situations, in circumstances where you may be harmed or injured, or for navigation.

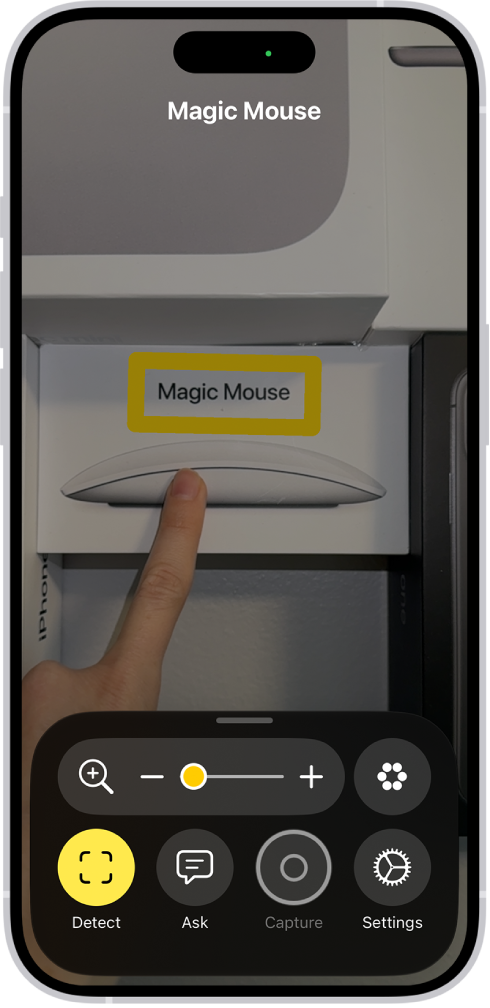
The Magnifier app detecting a finger pointing at text on a wall.

Detect text in the camera frame and have it read out loud

The Magnifier app can detect text in the field of view of your iPhone camera, then have it read out loud.

  1. Start the Magnifier app on your iPhone.
  2. Tap the Detection Mode button to start Detection Mode.

    If you don’t see the Detection Mode button, you can add it.

  3. Touch and hold the Detection Mode button and then make sure Text is selected.
  4. Position iPhone so the rear camera can detect text around you.

    If you don’t hear speech feedback, make sure Silent mode isn’t on.

  5. To temporarily pause detection, double-tap the screen with two fingers.

    Double-tap again with two fingers to resume detection.

  6. To stop Detection Mode, tap the Detection Mode button.

Point your finger at text to have it spoken

When you point your finger at text near you, the Magnifier app can have your iPhone speak it out loud.

It’s especially useful for interacting with objects that have text labels, like dials, buttons, or keypads on ATMs or household appliances, or a digital screen at a grocery store self-checkout.

  1. Start the Magnifier app on your iPhone.
  2. Tap the Detection Mode button to start Detection Mode.

    If you don’t see the Detection Mode button, you can add it.

  3. Touch and hold the Detection Mode button. Make sure Point & Speak is selected.
  4. Position iPhone so the rear camera can detect the text and then point your finger to identify which text to read.

    If you don’t hear sound or speech feedback, make sure Silent mode isn’t on.

  5. To temporarily pause detection, double-tap the screen with two fingers.

    Double-tap again with two fingers to resume detection.

  6. To stop Detection Mode, tap the Detection Mode button.

Customize settings for Text Detection or Point & Speak

  1. Start the Magnifier app on your iPhone.
  2. Tap the Settings button and then tap Detect.

    To detect text in other languages, turn on Detect Languages.

  3. Tap Text or Point & Speak and then customize any of the following: Detection Feedback: Turn on any combination of Labels and Speech.

    For Point & Speak, you can also turn on Sound and Haptic feedback.

    Location: For Point & Speak, tap Under (to read text under your fingertip) or Above (to read text directly above your finger).

    Automatic Flashlight: When your environment is too dark to detect text, have Magnifier turn the flashlight on for 10 seconds.

    Border and Color: For Point & Speak, outline the text you’re pointing to in a color of your choice.

  4. To return to the live Magnifier lens, tap the Back button, tap it again, and then tap the Done button.

    Text Detection and Point & Speak work with VoiceOver.

You can remotely control your other Apple devices with your iPhone, as long as each nearby device is signed in to the same Apple Account and on the same Wi-Fi network. Button names correspond to the controls on your device, and there’s a More button with options like media play controls.

  1. Open Settings, tap Accessibility and tap Control Nearby Devices. Tap Control Nearby Devices.

    The device you want to control must be signed in to the same Apple Account and connected to the same Wi-Fi network as your iPhone.

  2. Choose the device you want to control and then tap a button.

    Button names correspond to the controls on your device. Tap the More button to see your options, including media play controls.

Quick tip: Add this feature to Accessibility Shortcut to turn on Control Nearby Devices quickly.

To stop controlling the other device, tap the Close button.

iPhone can provide subtitles, closed captions, and transcriptions so you can follow along more easily with audio and video. On supported models, you can also get automatic subtitles, including in another language.

In a supported app, subtitles and closed captions can be turned on when they’re available, and you can customize how they look. You can also choose accessible captions, like subtitles for the deaf and hard of hearing (SDH). Subtitles transcribed from spoken audio are labeled in the list of subtitles, too.

Note: Generated subtitles and viewing subtitles in multiple languages is supported on iOS 27 or later and is available on iPhone 15 Pro, iPhone 15 Pro Max, and iPhone 16 models or later. Generated subtitles are available in English (U.S. and Canada) when the content doesn’t include them.

Turn on subtitles and captions in supported apps

If subtitles and closed captions are available, you can turn them on when you play video content in a supported app. iPhone usually shows standard subtitles and captions, though you can also choose special accessible captions if they’re available, such as subtitles for the deaf and hard of hearing (SDH).

Note: In supported apps, subtitles may appear automatically. The list of subtitles labels the ones transcribed from spoken audio “Transcribed” and the ones translated into another language “Translated”.

  1. While playing video content, tap the More Controls button. Tap Subtitles.
  2. Choose from the list of available subtitles and captions.

Customize the subtitles and captions in supported video apps

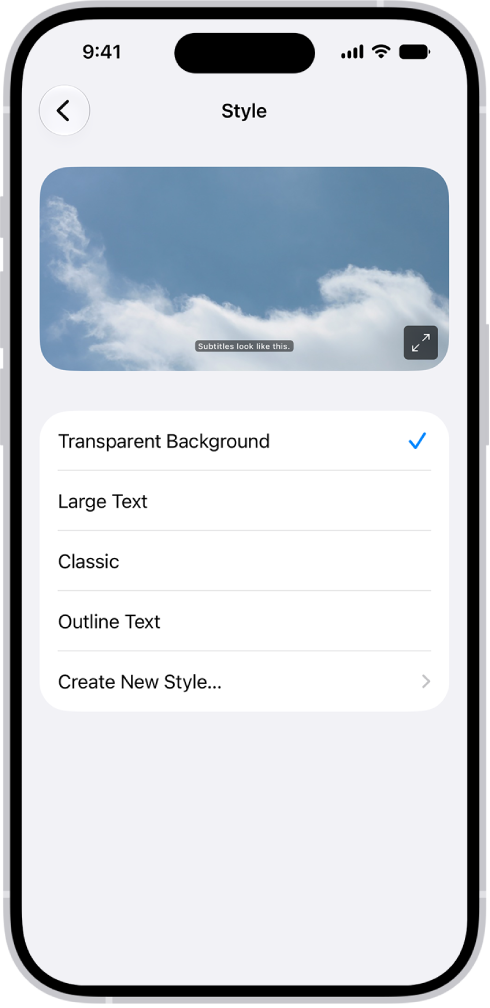
An iPhone showing an example of subtitles with a custom style.

  1. Open Settings, tap Accessibility, and then tap Subtitles & Captioning.
  2. If you prefer closed captioning or subtitles for the deaf and hard of hearing when available, turn on Closed Captions + SDH.
  3. Tap Style and choose an existing caption style or create a new style based on the following:
    • Font, size, and color
    • Background color and opacity
    • Text opacity, edge style, and highlight

Manage when subtitles automatically appear

In a supported app, subtitles may appear automatically if the video is in another language, if your iPhone is muted, or if you skip back a few seconds. Generated subtitles from videos in Photos and Messages can show up automatically, too.

  1. Start the Settings app on your iPhone.
  2. Tap Accessibility, tap Subtitles & Captioning, and tap Automatic Subtitles.
  3. Do any of the following:
    • Automatically show subtitles in your preferred language: Turn on When Languages Don’t Match.
    • Automatically turn on subtitles when volume is muted: Turn on Show When Muted.
    • Temporarily turn on subtitles when you skip back in a video: Turn on Show on Skip Back.

View generated subtitles in another language

Using on-device translation, your iPhone can generate subtitles in another language in supported apps. For that to work, the video needs English subtitles, and you need to have added more than one preferred language in Settings. Then you can view the subtitles translated into one of your other languages.

  1. While playing video content, tap the Captions button.
  2. Tap Languages, then choose the language you’d like to view subtitles in.

You can change the sounds iPhone plays when you get a call, message, and alert. Haptic feedback is the vibration you feel on your iPhone when you perform some actions, such as when you touch and hold any icon on the Home Screen.

Each alert sound has a paired vibration pattern, and you can change it or record your own. You can even give certain people their own ringtone and text tone.

Change ringtone settings

  1. Open the Settings app on your iPhone.
  2. Tap Sounds & Haptics and then do any of the following below Ringtone:
    • Change your ringtone: Tap Ringtone and tap a ringtone to preview it and select it.
    • Adjust ringer volume: Drag the volume slider.
    • Change the haptic pattern: Tap Haptics and then choose a pattern or tap Create New Vibration to record your own.
    • Control ringer volume with buttons: Turn Change with Buttons on or off.

You can also change the sounds iPhone plays for certain people. Go to the Contacts app, tap a person’s name, tap Edit, then choose a ringtone and text tone.

Change the sound for alerts and other actions

AirDrop, calendar alerts, reminder alerts, new mail, sent mail, new voicemail, and text messages can each have a different sound.

  1. Open the Settings app on your iPhone.
  2. Tap Sounds & Haptics.
  3. Tap a sound category, such as Text Tone or Calendar Alerts. Tap a sound to select it.

Change the vibration pattern for a sound

Every alert sound has a paired vibration pattern, and for any sound, you can change the vibration or create a custom pattern.

  1. Open the Settings app on your iPhone.
  2. Tap Sounds & Haptics.
  3. Tap a sound category, such as Text Tone or Calendar Alerts.
  4. Tap Haptics and then choose a pattern or tap Create New Vibration to record your own.

Set separate volumes for alarms and alerts

Alarms, timers, alerts, and system sounds all match your ringtone volume by default. If you’d rather, you can set two separate volumes, one for alerts and system sounds and one for alarms and timers.

  1. Open the Settings app on your iPhone.
  2. Tap Sounds & Haptics. Then turn off Match Ringtone Volume under Alarms and Timers or Alerts and System Sounds.
  3. Drag the slider to set the volume.

Change other sound settings

  1. Open the Settings app on your iPhone.
  2. Tap Sounds & Haptics and then do any of the following:
    • Play a click or vibration when you type on the keyboard: Tap Keyboard Feedback to choose Sound, Haptic, or both.
    • Play a sound when you lock iPhone: Turn Lock Sound on or off.
    • Play haptics for system controls and interactions: Turn System Haptics on or off.