You can manage your email in mailboxes on iPhone.
Right from a message list, you can move individual emails to the Trash or mark them as read, and you can choose the actions that appear in the menus. You can also choose which mailboxes to view, reorder them, create new ones, and rename or delete them, though some mailboxes can’t be changed.
Here’s how to organize email in mailboxes on iPhone.
Manage an email with a swipe
- While viewing a message list, you can use a simple swipe to move individual emails to the Trash, mark them as read, and more.
- Open the Mail app on your iPhone.
-
In a message list, do any of the following: Reveal a list of actions: Slowly drag a message to the left until the menu appears. Tap an item.
- Quickly use the rightmost action: Swipe all the way to the left.
- Reveal other actions: Swipe right.
To choose the actions you want to appear in the menus, go to Settings > Apps > Mail > Swipe Options (below Message List).
Organize your mail with mailboxes
You can choose which mailboxes to view, reorder your mailboxes, create new ones, or rename or delete mailboxes. (Some mailboxes can’t be changed.) Go to the Mail app on your iPhone.
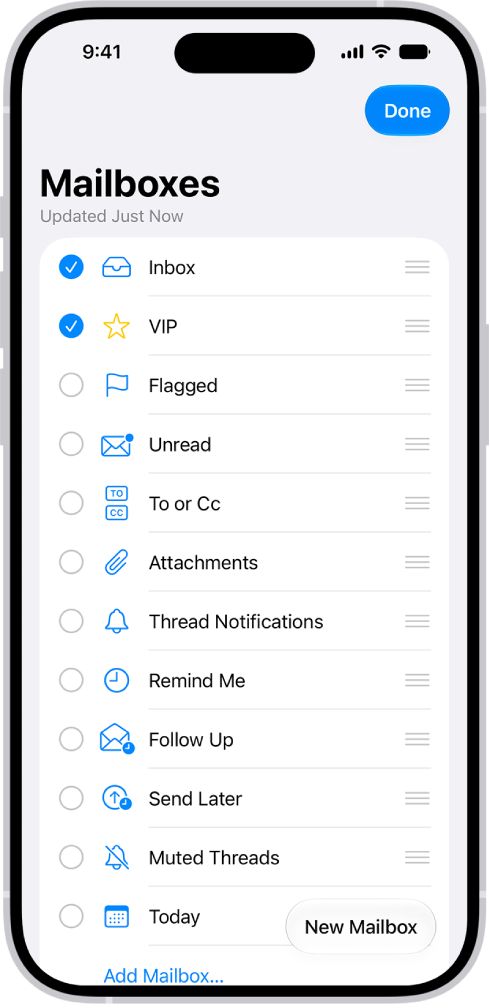
- To organize your mailboxes, tap the Mailboxes button until you see Mailboxes.
-
Tap Edit and then do any of the following: View mailboxes: Select the checkboxes next to the mailboxes you want to include in the mailboxes list.
- Reorder mailboxes: Touch and hold the Reorder button next to a mailbox until it lifts up and drag it to the new position.
- Create a new mailbox: Tap New Mailbox in the lower-right corner. Then follow the onscreen instructions.
- Rename a mailbox: Tap the mailbox and tap the title.
Delete the name, then enter a new name.
Delete a mailbox: Tap the mailbox, then tap Delete Mailbox.
Move emails to a mailbox
-
Open the Mail app on your iPhone.
Do any of the following: While viewing a Primary message: Tap the Mailbox button, then choose a mailbox.
- While viewing a message list: Tap Select, then select the messages you want to move by tapping their checkboxes.
-
Tap the Mailbox button at the bottom of the message list and choose a mailbox.
Important: When you select a Transactions, Updates, or Promotions message, you’re selecting all the messages in that category from the sender.
- While viewing a sender’s digest view: Swipe left on a message, tap the Reply Actions button, tap Move Message, and then choose a mailbox.
View emails from one account at a time
With multiple email accounts in the Mail app, the mailboxes list can show messages from one account at a time.
- Open the Mail app on your iPhone.
-
Tap the Mailboxes button until you see Mailboxes. Then tap a mailbox below the email account you want to access.
Each mailbox listed below a particular email account only displays messages from that email account.
For example, to view only messages sent from your iCloud account, tap iCloud, then tap Sent.
Move emails to Junk
-
Open the Mail app on your iPhone.
Do any of the following: While viewing a Primary message: Tap the Reply button, then tap Move to Junk.
- While viewing a message list: Tap Select, then select the messages you want to move by tapping their checkboxes.
-
Tap the Mark button at the bottom of the message list. Tap Move to Junk.
Important: When you select a Transactions, Updates, or Promotions message, you’re selecting all the messages in that category from the sender.
- While viewing a sender’s digest view: Swipe left on a message, tap the Reply Actions button, and then tap Move to Junk.