Got a tip for us?

iPad

The iPad is a tablet computer from Apple that runs the iOS mobile operating system. Similar in functionality to the iPhone, the iPads purpose is often quite different, sometimes even serving as a general desktop computer replacement.

You can change how your notes appear in the Notes app. Add lines or grids to your notes, view your notes as a list or a gallery, and see all the attachments in one place.

You can view a note in full screen, or see your accounts, notes list, and selected note all at once with the sidebar. Lines and grids can go in an existing note or in all new notes.

Change the Notes display on your iPad

  • View a note in full-screen: Tap the Enter Full Screen button.
  • See your accounts, notes list, and selected note all at once: Tap the Toggle Sidebar button.

    You may need to tap the Close Full Screen button first.

Show lines or grids in notes

  • In an existing note: Tap the Note Actions button, tap Lines & Grids, then choose a style.
  • In all new notes: Go to Settings > Apps > Notes, tap Lines & Grids, then choose a style.

View notes as a list or gallery

In the notes list, tap the Folder Actions button, then tap View as List or View as Gallery.

View all attachments

In the notes list, tap the Folder Actions button, then tap View Attachments.

See also

Tag: Notes

Use the Notes app to add drawings and handwriting: draw a sketch or jot a handwritten note with Apple Pencil (on supported models) or your finger. Choose from a variety of Markup tools and colors, and draw straight lines with the ruler.

As you write with Apple Pencil, your handwriting can be automatically refined in real time to be more legible while keeping your own style. You can also transcribe handwriting to typed text with the Scribble tool, as long as you’re writing in a supported language.
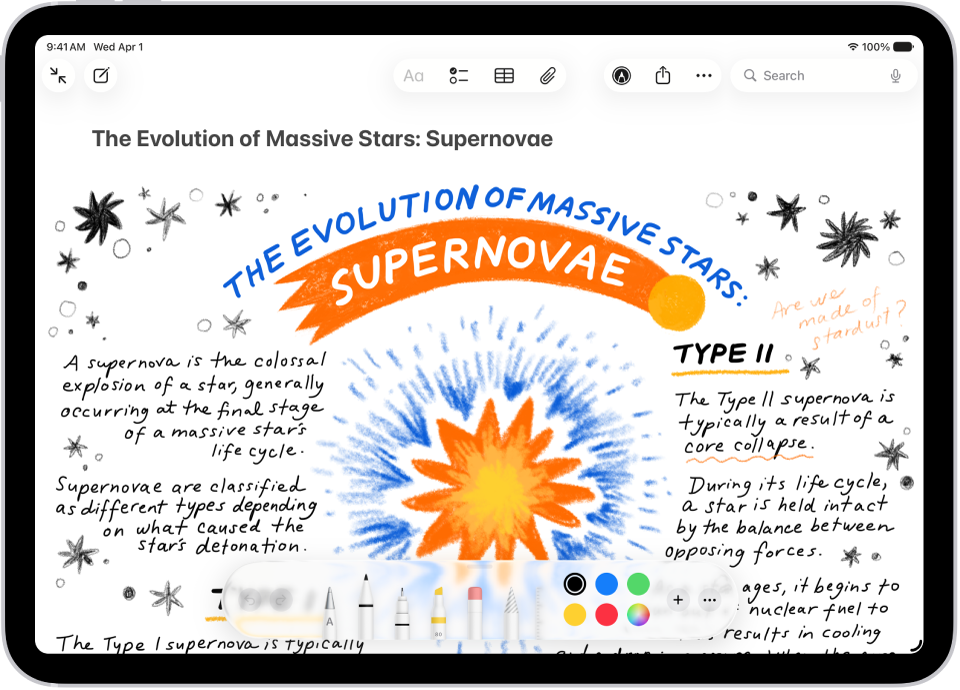
A note showing a drawing and Markup tools along the bottom of the screen.

Use drawing and handwriting tools

  1. Open the Notes app on your iPad.
  2. In a note, start drawing or writing with Apple Pencil. Or to draw or write with your finger, tap the Handwriting Tools button.
  3. Do any of the following:

    • Change color or tools: Use the Markup tools.
    • Adjust the handwriting area: Drag the resize handle (on the left) up or down.
    • Transcribe your handwriting to typed text as you write with Apple Pencil: Tap the Scribble tool (to the left of the pen). Start writing.

      Note: Scribble is available in supported languages. To learn more about writing notes with Apple Pencil, see Enter text with Scribble.

Quick tip: You can search handwritten text (in supported languages) in Notes. If the note doesn’t have a title, the first line of handwritten text becomes the suggested title. To edit the title, scroll to the top of the note, then tap Edit.

Select and edit drawings and handwriting

Smart Selection works on drawings and handwriting with the same gestures you use to select typed text. Within the note, you can move, copy, or delete what you’ve selected, and it can even go into another note or app as typed text.

Note: Smart Selection and handwriting transcription work if the system language of your iPad is set to a supported language in Settings > General > Language & Region > iPad Language.

  1. Open the Notes app on your iPad.
  2. In a note, select drawings and handwriting with your finger using any of the following methods:
    • With the Lasso tool: Tap the Handwriting Tools button, tap the Lasso tool (between the eraser and Image Wand in the tool palette), and then use your finger to outline the objects you want to select.
    • With gestures:
      • Touch and hold, then drag to expand the selection.
      • Double-tap to select a word.
      • Triple-tap to select a sentence.
      • Drag the handles to adjust the selection as needed.
  3. Tap the selection and choose an option.

Work with handwritten text

iPad can refine your handwriting so it’s smoother, straighter, and more legible. On top of that, you can move or delete handwriting, correct spelling inline, and paste or convert typed text in your handwriting.

  1. Open the Notes app on your iPad.
  2. In a note, select the handwriting.
  3. Do any of the following:

    • Refine: To make your writing smoother, straighter, and more legible, tap Refine1.

      To automatically refine your handwriting, tap the Handwriting Tools button, tap the More button, then turn on Auto-refine Handwriting.

    • Make your writing more level: Tap Straighten.
    • Correct spelling: Tap an underlined word and choose how you want to correct it. The fix appears in your own writing style.
    • Move handwriting: Touch and hold the selected text and then drag it to a new position.
    • Convert a text object to handwriting: Tap a text object in the drawing area and tap the More button. Tap Convert to Handwriting. (This feature2 requires previously saved notes in your handwriting with at least 10 unique lowercase characters.)
    • Paste typed text in your handwriting: Select and copy text from a webpage, document, or email; in a handwriting area in Notes and tap Paste. (This feature2 requires previously saved notes in your handwriting with at least 10 unique lowercase characters.)
  4. To erase text, scratch out the writing. Hold down your writing instrument (such as Apple Pencil or your finger) on iPad. (Supported when using a markup tool such as Pen, Mono line, or Marker.)

Drag images from other apps

You can drag images from other apps to a note and combine them with handwritten and drawn content. After you add an image to the drawing area, you can reposition and resize the image.

Use Image Wand

With Apple Intelligence turned on, Image Wand in Notes can turn your rough sketches into generated images. Select empty space, and it can also create an image from words and images in the surrounding area. For more, read our article, Use Image Wand with Apple Intelligence.

Note: Apple Intelligence on iPadOS 27 or later is available on an Apple Intelligence-enabled iPad mini (A17 Pro) and iPad models with M1 or later. Apple Intelligence is not available in all languages or regions. Usage limits may apply.*

  1. Handwriting refinement is available on iPad Pro (M4 and M5), iPad Pro 12.9-inch (5th generation and later), iPad Pro 11-inch (3rd generation and later), iPad Air (M2, M3, and M4), iPad Air 10.9-inch (4th generation and later), iPad (10th generation and later), iPad mini (6th generation), and iPad mini (A17 Pro); supported for English (Australia), English (Canada), English (India), English (Ireland), English (New Zealand), English (Singapore), English (South Africa), English (UK), English (US), French (Belgium), French (Canada), French (France), French (Switzerland), German (Austria), German (Germany), German (Switzerland), Italian (Italy), Italian (Switzerland), Portuguese (Brazil), Portuguese (Portugal), Spanish (Latin America), Spanish (Mexico), and Spanish (Spain).

  2. Handwriting reflow is supported for Cantonese (Traditional), Chinese (Simplified), Chinese (Traditional), English (Australia), English (Canada), English (India), English (Ireland), English (New Zealand), English (Singapore), English (South Africa), English (UK), English (US), French (Belgium), French (Canada), French (France), French (Switzerland), German (Austria), German (Germany), German (Switzerland), Italian (Italy), Italian (Switzerland), Japanese, Korean, Portuguese (Brazil), Portuguese (Portugal), Russian, Spanish (Latin America), Spanish (Mexico), Spanish (Spain), Thai (Thailand), Ukrainian, and Vietnamese.

*Apple Intelligence is available with Siri and device language set to Chinese (Simplified), Chinese (Traditional), Danish, Dutch, English, French, German, Italian, Japanese, Korean, Norwegian, Portuguese, Spanish, Swedish, Turkish, or Vietnamese. Some features may not be available in all regions or languages. Some devices may not be available in all regions. Siri AI is available in beta in iOS 27, iPadOS 27, macOS 27, watchOS 27, and visionOS 27 and requires an Apple Intelligence–enabled device set to a supported language. Available in English to start. Siri AI will not be initially available in the EU on iOS, iPadOS, and watchOS. Certain Apple Intelligence features that rely on server-side models are subject to daily usage limits, including but not limited to Siri AI, Intelligent Photo Editing Tools, Image Playground, and AFM 3 Cloud models in Shortcuts. Daily limits may vary by feature, request complexity, system demand, system policies, and other factors. Expanded access to such features will be available for a fee in the future. Use of these features is subject to the Apple Intelligence Terms and Conditions.

See also

Tag: Notes

You can pair and charge Apple Pencil by plugging it into the USB-C connector on your compatible iPad. It charges while it’s plugged in, and after you pair it, you can disconnect the cable, since it stays paired until you restart iPad. You can check its battery level, too.

Apple Pencil (USB-C).

Pair and charge Apple Pencil (USB-C)

  1. Slide open the end of Apple Pencil and connect it to the USB-C charge cable that came with your iPad.

    Apple Pencil with the end slid open to reveal the USB-C connector.

  2. Connect the other end of the USB-C charge cable to the USB-C connector on iPad.
  3. Do any of the following:

    • Pair Apple Pencil: Tap Tap to Connect.

      After you pair Apple Pencil, you can disconnect it from the USB-C charge cable. Apple Pencil stays paired until you restart your iPad, turn off Bluetooth®, or pair with another iPad. Just pair Apple Pencil again you’re ready to use it.

    • Charge Apple Pencil: Apple Pencil charges while it’s plugged into your iPad.

Quick tip: You can also use the USB-C charge cable and the power adapter that came with your iPad to charge Apple Pencil.

Check the battery level of Apple Pencil

Do any of the following:

See also

You can pair and charge Apple Pencil (1st generation) by plugging it into the Lightning or USB-C connector on your compatible iPad. The steps differ for an iPad with a Home button, and once you’ve paired it, Apple Pencil stays paired until you restart your iPad or turn off Bluetooth®.

Apple Pencil (1st generation).

Pair and charge Apple Pencil (1st generation) on an iPad with a Home button

  1. Remove the cap and plug Apple Pencil into the Lightning connector on your iPad.

    Apple Pencil (1st generation) with the cap removed, revealing the end that plugs into the Lightning connector on iPad.

  2. Do any of the following:

    • Pair Apple Pencil: When the Pair button appears, tap it.

      After you pair Apple Pencil, unplug it from iPad. Apple Pencil stays paired until you restart your iPad, turn off Bluetooth®, or pair with another iPad. Just pair Apple Pencil again when you’re ready to use it.

    • Charge Apple Pencil: Apple Pencil charges while it’s plugged into your iPad.

      If your pencil came with an Apple Pencil Charging Adapter, you can also charge it using the Lightning Cable and power adapter that came with your iPad.

Pair and charge Apple Pencil with iPad (10th generation) and iPad (A16)

  1. Remove the cap and plug Apple Pencil into the USB-C to Apple Pencil Adapter.
  2. Connect the other end of the adapter to your iPad using the USB-C charge cable that came with your iPad.

    Apple Pencil (1st generation) connected to the USB-C to Apple Pencil Adapter. The other end of the adapter is connected to a USB-C charge cable.

  3. Do any of the following:

    • Pair Apple Pencil: When the Pair button appears, tap it.

      After you pair Apple Pencil, unplug it from iPad. Apple Pencil stays paired until you restart your iPad, turn off Bluetooth, or pair with another iPad. Just pair Apple Pencil again when you’re ready to use it.

    • Charge Apple Pencil: Apple Pencil charges while it’s plugged into your iPad.

Quick tip: The USB-C charge cable and the power adapter that came with your iPad can charge Apple Pencil, too.

Check the battery level of Apple Pencil

See also

You can attach Apple Pencil (2nd generation) to the magnetic connector on the right side of your compatible iPad to pair and charge it. Bluetooth® needs to be turned on for it to charge, and you can check its battery level with the Batteries widget, too.

Apple Pencil (2nd generation).

Pair Apple Pencil (2nd generation) with iPad

Attach Apple Pencil to the magnetic connector on the right side of your iPad.

Charge Apple Pencil (2nd generation)

  1. Make sure that Bluetooth® is turned on in Settings > Bluetooth.
  2. Attach Apple Pencil to the magnetic connector on the right side of your iPad.

Check the battery level of Apple Pencil

To check the battery level of Apple Pencil, do any of the following:

See also

On supported models, you can use Apple Pencil (sold separately) to draw or sketch, mark up a photo, sign a document, and more. Compared to using your finger, Apple Pencil gives you extra control as you draw.

Apple Pencil can apply shading or vary the line thickness as you draw, and on most models, it can darken the line. Apple Pencil (2nd generation) and Apple Pencil Pro can also switch back to the tool you used last. And with Apple Pencil Pro, you can quickly perform an action like undo, or preview the angle of drawing tools with barrel roll.

Apply shading and darker lines

If you tilt your Apple Pencil while you draw or sketch, you can apply shading or vary the line thickness (depending on the drawing tool).

With Apple Pencil (1st and 2nd generations) and Apple Pencil Pro, you can also press more firmly to darken the line.

Double-tap to switch tools

With Apple Pencil (2nd generation) and Apple Pencil Pro, you can double-tap the barrel of the pencil to quickly switch back to the tool you used last. For example, you can switch from the marker back to the eraser. (The double-tap option is available in supported apps, such as Notes.)

To choose another action for the double-tap setting, go to Settings > Apple Pencil > Double Tap.

Squeeze Apple Pencil Pro to perform an action

Squeezing the barrel of Apple Pencil Pro quickly performs an action, like undo or show the tool palette.

To choose an action for the squeeze setting, go to Settings > Apple Pencil > Squeeze.

Use barrel roll on Apple Pencil Pro

You can rotate the barrel of Apple Pencil Pro to preview the angle of drawing tools like the fountain pen and highlighter.

In Apple apps like Freeform, Notes, and when you are using Markup, barrel roll works with the fountain pen and highlighter tools. Tools in select third-party apps may support it, too, so check with the app developer if you’d like more information.

Turn haptic feedback for Apple Pencil Pro off or on

When you squeeze or double-tap Apple Pencil Pro, you feel a light pulse, which is haptic feedback.

  1. Pair Apple Pencil Pro with your compatible iPad.
  2. Open Settings, tap Apple Pencil, and turn Haptics on or off.

Hover to preview tools and controls

In supported apps, Apple Pencil hover lets you quickly preview and switch between different tools and controls. You’ll see a drawing tool’s preview before it makes a mark on the canvas, and you can sketch, write, and make adjustments with greater precision.

Apple Pencil hover is available on the following models:

  • iPad Pro 11-inch (4th generation) and iPad Pro 12.9-inch (6th generation) with Apple Pencil (2nd generation)
  • iPad mini (A17 Pro), iPad Air 11-inch (M2, M3, and M4), iPad Air 13-inch (M2, M3, and M4), iPad Pro 11-inch (M4 and M5), and iPad Pro 13-inch (M4 and M5) with Apple Pencil Pro

Hold Apple Pencil up to 12 mm above the iPad display, and you can do things like these:

  • Explore the tool palette: Hold Apple Pencil over the tool palette, then move over the tools such as the pencil, brush, eraser, and colors. Touch the tool, color, and options you want to use.
  • Preview before you make a mark: Hold Apple Pencil over the drawing area. With some drawing tools, you can even tilt Apple Pencil and change the azimuth (lateral angle) for different effects. For example, in the Notes app, you can preview the color, line thickness, and opacity of the highlighter.

    With Apple Pencil Pro, you can rotate the barrel and preview the angle of drawing tools such as the highlighter and fountain pen.

  • Erase with precision: Select the eraser tool, then select options such as the pixel eraser size or the object eraser. Hold Apple Pencil over the drawing area to preview the effects of the eraser.

To turn off Apple Pencil hover, go to Settings > Apple Pencil, then turn off Hover.

See also

You can pair and charge Apple Pencil Pro by attaching it to the magnetic connector on the long side of your compatible iPad. To charge it, make sure that Bluetooth® is turned on. You can check the battery level of Apple Pencil in the Batteries widget, too.

Pair Apple Pencil Pro with iPad

Attach Apple Pencil Pro to the magnetic connector on the long side of your iPad.

Charge Apple Pencil Pro

  1. Make sure that Bluetooth® is turned on in Settings > Bluetooth.
  2. Attach Apple Pencil Pro to the magnetic connector on the long side of your iPad.

Check the battery level of Apple Pencil

See also

You can use Apple Pencil to quickly take a picture of the iPad screen, then mark it up to share with others or use in documents. You can draw on the screenshot with Apple Pencil and change drawing tools with the tool palette, then send it in a message or save it in a note.

  1. To capture the screen, swipe up with Apple Pencil from either corner at the bottom of your iPad.
  2. To mark up the screenshot, draw with Apple Pencil.

    Use the tool palette at the bottom of the screen to change drawing tools. See Draw and handwrite with Markup on iPad.

  3. To send the marked up screenshot to others (such as in a message), or to save it in a document (such as in a note), tap the Share button. Choose an option.
  4. When you’re finished, tap Done, then choose an option.

See also

You can use Apple Pencil to quickly write a note from anywhere on iPad, even while iPad is locked (supported models). You can create a Quick Note, and even wake iPad by drawing or writing a note on the Lock Screen. Whatever you create is saved in the Notes app.

Create a Quick Note

For the steps, see our article, Use Quick Notes on iPad.

Wake iPad by drawing or writing a note

Tap Apple Pencil on the Lock Screen, then begin drawing or taking notes.

Whatever you create is saved in Notes.

See also

On supported models, you can use Apple Pencil (sold separately) and Scribble to enter text. Without opening the onscreen keyboard, you can quickly reply to a message, write yourself a reminder, and more.

Scribble converts your handwriting to text directly on your iPad, so your writing stays private. Your handwriting can even go past the edges of the text field, and the actions you see depend on the app.

Here’s how to enter text with Scribble on iPad.

Note: Scribble is available in several languages.

Use Apple Pencil to enter text in any text field

  1. Write with Apple Pencil in any text field, and Scribble automatically converts your handwriting into typed text.

    Scribble even works when your handwriting extends beyond the edges of the text field.

  2. To use an action shortcut, tap the Scribble toolbar.

    Available actions depend on the app you’re using, and may include the Undo button, the Show Keyboard button, and more.

    To automatically minimize the toolbar when you’re entering text, tap the Ellipsis button, then turn on Auto-minimize. To show the full toolbar, tap the minimized version.

Use Apple Pencil to enter text in Notes and Freeform

  1. In Notes or Freeform, tap the Markup Switch button off to show the tool palette.
  2. In the tool palette, tap the Handwriting tool (to the left of the pen).
  3. Write with Apple Pencil, and Scribble automatically converts your handwriting into typed text.

Select and revise text with Apple Pencil

While you enter text with Apple Pencil and Scribble, you can do the following:

  • Delete a word: Scratch it out.
  • Insert text: Touch and hold in a text area, then write in the space that opens.
  • Join or separate characters: Draw a vertical line between them.
  • Select text: Draw a circle around the text or underline it to select it and see editing options. To change the selection, drag from the beginning or end of the selected text.
  • Select a word: Double-tap the word.
  • Select a paragraph: Triple-tap a word within the paragraph, or drag Apple Pencil over the paragraph.

Stop converting your handwriting to text

Go to Settings > Apple Pencil, then turn off Scribble.

See also













