Got a tip for us?

Notes

You can delete notes you no longer need. You can also recover recently deleted notes within 30 days.

A deleted note moves to the Recently Deleted folder in Notes, on iCloud.com, and on your other devices, and it stays there for 30 days before it’s permanently removed. If you don’t see Recently Deleted, there’s nothing to recover. Notes on iCloud.com and your other devices follow the same rules.

Here’s how to delete and recover notes in Notes on iPad.

Delete a note

  1. Go to the Notes app on your iPad.
  2. In the notes list, swipe left on the note and then tap Delete. Or touch and hold the note and then tap Delete.

When you delete a note, it moves to the Recently Deleted folder in Notes on iCloud.com, on your iPad, and on your other devices signed in to the same Apple Account.

Recover or permanently delete recently deleted notes

Deleted notes stay in the Recently Deleted folder for 30 days. After that, they’re permanently removed from iCloud, your iPad, and other devices signed in with your Apple Account. Until then, you’re free to recover them or delete them permanently any time within those 30 days.

  1. Open the Notes app on your iPad.
  2. In the folder list, tap Recently Deleted. You may need to tap the Toggle Sidebar button to show the folder list.

    If you don’t see Recently Deleted, you don’t have any notes in that folder, and there’s nothing to be recovered.

  3. Do one of the following:

    • Recover a note: Swipe left on the note, then tap Move. Move the note to a new or existing folder.
    • Permanently delete a note: Swipe left on the note, tap Delete, and tap Delete Note.

Note: If you delete a shared note you don’t own, it comes off your list only, not anyone else’s, and it won’t show up in Recently Deleted. Unless the owner stopped sharing, you can reopen it using the original shared link.

Tag: Notes

In the Notes app, you can open a note in the Pages app and continue working. You can also export the note as a PDF or print the note.

A locked note has to be unlocked first before you open it in Pages. You can export a note as a Markdown file, too, and a PDF uses the note’s current view settings for its attachments.

Here’s how to export or print notes on iPad.

Open a note in Pages

  1. Make sure your iPad has the latest version of Pages.
  2. Open the Notes app on your iPad.
  3. Open the note you want to export.
  4. Tap the Share button and then tap Open in Pages.

Note: You must unlock a locked note before you export its contents to Pages. Once in Pages, you can’t edit drawings, and content such as scanned documents and PDFs appears as thumbnail images. Tags, mentions, checklists, and links to notes also aren’t active items there. If you export a shared note, the resulting Pages document isn’t shared.

Export a note as a PDF

PDFs you create from a note use its current view settings for attachments. If the note includes a multipage PDF or scanned document, only the first page of the original makes it into the exported PDF.

  1. Open the Notes app on your iPad.
  2. Open the note you want to export.
  3. Tap the Share button, then tap Markup.

    If you don’t see the Markup option, first tap the View More button.

  4. Mark up the pages in the exported PDF as needed and tap the Done button to save the PDF.

Export a note as a Markdown file

You can export your notes as Markdown files to integrate your notes into writing, content, and other workflows that support Markdown.

  1. Open the Notes app on your iPad.
  2. Open the note you want to export.
  3. Tap the Share button and then tap Export as Markdown.

    If you don’t see the Markdown option, first tap the View More button.

  4. Choose how to send or save your note.

Print a note

  1. Open the Notes app on your iPad.
  2. Open the note you want to print.
  3. Tap the Share button, then tap Print.

    If you don’t see the Print option, first tap the View More button.

  4. Choose the printer and other options, then tap Print.

See also

Tag: Notes

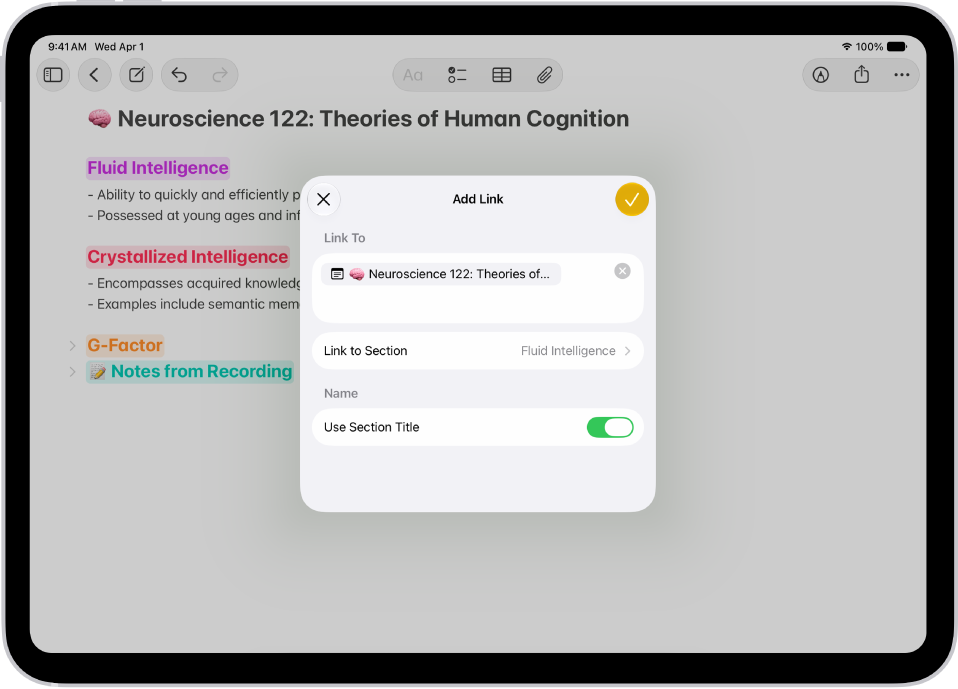
In the Notes app, you can add links to webpages or sections in a note. You can also link to related notes, like a trip itinerary and a list of recommended restaurants.

When you add street and email addresses, phone numbers, and dates, they automatically become underlined text that you can tap to take action on. And if the title of a linked note changes, the link updates automatically. You can link to a section of a note, too, once you’ve organized it with sections and headings.

Adding a link to a section in a note in the Notes app.

Link to a webpage

  1. Start the Notes app on your iPad.
  2. In the note where you want to insert a link, select the text or tap to place the insertion point.
  3. Tap the Forward button, tap Add Link, and enter the URL to specify the link destination. Optionally, you can add a name for the link.
  4. Tap the Done button.

Link to a note or section of a note

Note: To link to a section of a note, first Organize a note with sections and headings.

  1. Start the Notes app on your iPad.
  2. In the note where you want to add a link, select the text or tap to place the insertion point.
  3. Tap the Forward button and tap Add Link. Do any of the following:

    • Link to a section in the same note: Tap Link to Section, then select a section. To customize the link name, turn on Use Section Title or enter a custom link name.

      Note: If the title of a linked note or section changes, any link that uses the note or section title as its name is updated automatically.

    • Link to another note: Start typing the title of the target note and then select it. To customize the link name, turn on Use Note Title or enter a custom link name.

      Tip: To quickly link to another note, type “>>” in the note body, then enter the title of the target note. You can then link to a section in that note by typing “/,” then selecting a section.

    • Link to a section in another note: Link to another note, tap Link to Section. Then select a section.
  4. Tap the Done button.

To edit or remove the link, touch and hold the link, then choose an action.

Take action on addresses, phone numbers, dates, and more

In your notes, an underline appears below text that’s recognized as a street or email address, phone number, date, or other data. Tap the underlined text to take action on it. For example, you can see a street address in Maps, compose an email, call a phone number, add a calendar event, or convert units and currency.

Note: Data detection is available when the system language of your iPad is set to a supported language in Settings > General > Language & Region.

See also

Tag: Notes

In the Notes app, you can organize your notes into folders and pin the important notes to the top of the notes list.

You can create, rename, move, or delete folders, and if you change your mind about a deleted folder, you can recover the notes from the Recently Deleted folder. You can also change the folder view, sort the notes by title or date, reverse the sort order, and move a note to another folder.

Here’s how to organize your notes in folders on iPad.

Create, rename, move, or delete folders

  1. Open the Notes app on your iPad.
  2. In the folders list (if necessary, tap the Toggle Sidebar button to show the folders list), do any of the following:

    • Create a folder: Tap the New Folder button, choose an account (if you have more than one), tap New Folder, and then enter a name.
    • Create a subfolder: Touch and hold a folder and then drag it onto another folder.
    • Rename a folder: Touch and hold a folder, tap Rename, and then enter a new name.
    • Move a folder: Touch and hold the folder and drag it to a new location. The folder becomes a subfolder if you drag it onto another folder.
    • Delete a folder: Swipe left on the folder and then tap the Delete Folder button. Or touch and hold the folder and then tap Delete.

      If you change your mind, open the Recently Deleted folder to recover the notes.

Pin notes

Pinning keeps an important note at the top of the notes list.

  1. Open the Notes app on your iPad.
  2. In the notes list, touch and hold the note and then tap Pin Note. Or swipe right on the note and then tap the pin.

Sort and change the folder view

  1. Open the Notes app on your iPad.
  2. In the notes list, tap the Folder Actions button and then do any of the following:

    • Change the folder view: Choose View as Gallery or View as List.
    • Sort the notes by title or date: Tap Sort By, then choose an option.

      By default, the notes are grouped by date. To turn this off, tap the Folder Actions button, then tap Group By Date.

    • Reverse the sort order: Tap Sort By. Choose Oldest First (when sorting by date) or Descending (when sorting by title).

      To choose a default sorting method for all your folders, go to Settings > Apps > Notes, then tap Sort Notes By.

Move a note to another folder

  1. Open the Notes app on your iPad.
  2. In the notes list, do one of the following:
    • Swipe left on the note, then tap the Move Folder button.
    • Touch and hold the note, tap Move, then choose a folder.

Delete a note

  1. Open the Notes app on your iPad.
  2. In the notes list, do one of the following:
    • Swipe left on the note, then tap the Delete button.
    • Touch and hold the note, then tap Delete.

If you change your mind, you can recover the note from the Recently Deleted folder.

See also

Tag: Notes

In Settings, you can customize your preferences for the Notes app. Choose the default account for new notes, set a password, and more.

You can add or remove accounts, choose your preferred language when you’ve added more than one, and allow content from Notes to appear in Search and widgets. Siri can also make suggestions based on how you use Notes.

Here’s how to change your Notes settings on iPad.

Customize your Notes settings

  1. Start the Settings app on your iPad.
  2. Tap Apps, then tap Notes.
  3. Adjust any of the following:
    • Accounts: Add or remove accounts in Notes.
    • Siri: Allow Siri to make suggestions across apps based on the way you use Notes. See Customize where suggestions appear.
    • Search: Allow suggestions and content from Notes to appear in Search and widgets.
    • Language: Choose your preferred language (option appears when multiple languages are added).
    • Default Account: Choose the default account when creating notes using Siri and the Notes widget.
    • Password: Lock important notes.
    • “On My iPad” Account: Turn on the On My iPad account.
    • Mention Notifications: Receive notifications when your name is mentioned in shared notes.
    • Viewing: Choose viewing options such as the sort order, lines and grids, and group notes by date.
    • Quick Notes: Choose corner gestures to quickly create a new note or resume the last Quick Note.
    • App Links: Get suggested app links.
    • Auto Convert to Tag: Automatically change #text to a tag when typing a space.
    • Save to Photos: Save photos and videos taken in Notes to the Photos app.
    • Access Notes from Lock Screen: Choose Always Create New Note or Resume Last Note. Or turn it off to prevent access from the Lock Screen.

See also

Tag: Notes

In the Notes app, you can lock notes to protect your sensitive information. You can access your locked notes using your device passcode or a custom password, and if you have multiple Notes accounts, you choose the locking method for each one.

Using your device passcode means you don’t have to create and remember a separate password. Notes locked that way need iOS 16, iPadOS 16, macOS 13, or later to open.

Lock notes with your device passcode

Using your device passcode to access locked notes means you have no separate password to create and remember, which reduces the chance of losing access to your locked notes. It also means you can use Face ID or Touch ID to access your locked notes.

When you sign in to the same Apple Account on multiple devices, each device’s own passcode, or the login password for a Mac, is how you access your locked notes on that device.

You need iOS 16, iPadOS 16, macOS 13, or later to access notes locked with a device passcode, so you won’t be able to access the locked notes on devices with an earlier version of the OS.

  1. Start the Settings app on your iPad.
  2. Tap Apps, then tap Notes.
  3. Tap Password.
  4. If you have multiple accounts, choose the account you want to set a password for.
  5. Tap Use Device Passcode.
  6. For added convenience, you can also turn on Face ID or Touch ID.

Lock notes with a custom password

A custom password for locked notes can provide additional security. Forget it, though, and you may lose access to your locked notes.

On every device where you’re signed in to the same Apple Account, your custom password is what you use to access your locked notes. And with more than one iCloud account or an “On My iPad” account, each account can have a different custom password.

You won’t see notes locked with a custom password on devices with an earlier version of the OS. Those notes need iOS 9.3, OS X 10.11.4, iPadOS 13, or later.

  1. Start the Settings app on your iPad.
  2. Tap Apps, then tap Notes.
  3. Tap Password.
  4. If you have multiple accounts, choose the account you want to set a password for.
  5. Tap Use Custom Password.
  6. For added convenience, you can also turn on Face ID or Touch ID.

    Don’t rely on Face ID or Touch ID as the only means of unlocking your notes. If you update your Face ID or Touch ID settings, or want to change your Notes password, you have to reenter your Notes password.

Important: If you forget your custom password, and you can’t use Face ID or Touch ID to access your locked notes, Apple can’t help you regain access to those notes.

You can reset your custom password, but this doesn’t give you access to previously locked notes. The new custom password applies to all notes you lock from now on. Go to the Settings app, tap Apps, tap Notes, tap Password, then tap Reset Password.

Change the locking method

A custom password isn’t permanent, since you can switch to using your device passcode. Any notes you accessed with the previous method begin using the new method when you change your locking method.

  1. Start the Settings app on your iPad.
  2. Tap Apps, then tap Notes.
  3. Tap Password, choose an account (if you have more than one), and then choose a password method.

Lock a note

Locking is limited to notes on your device and notes in iCloud. Even then, notes with tags, notes with video, audio, PDF, or file attachments, and notes that use features from a newer version of Notes can’t be locked. The same goes for Quick Notes, notes shared in iCloud, and notes that sync with other accounts.

  1. Start the Notes app on your iPad.
  2. Open the note and tap the Note Actions button (at the top-right corner).
  3. Tap Lock.

A locked note’s title remains visible in the notes list.

To remove a lock from a note, tap the Note Actions button, then tap Remove.

Open your locked notes

For several minutes after you open one locked note, all your other locked notes in the same account stay open, so you can jump into another note or copy and paste information from another app.

  1. Start the Notes app on your iPad.
  2. Tap the locked note and tap the Lock button or View Note.
  3. To open the note, use Face ID, Touch ID, your device passcode, or your Notes password.

To lock your notes again, do any of the following:

  • Tap the Unlock button at the top of the screen.
  • Tap Lock Now at the top of the notes list.

See also

Tag: Notes

In the Notes app, you can use multiple accounts—such as iCloud, enterprise-managed iCloud, Microsoft Exchange, Google, and Yahoo—and keep all your notes in one place. Your notes stay up to date on all your devices that use the same accounts.

You can also have an On My iPad account for notes you keep only on this device. Notes in your iCloud account, along with your changes, show up on every iPhone, iPad, and Mac signed in to your Apple Account.

Note: With iCloud and the On My iPad account, you get all the Notes features described in this guide, but some aren’t available with other accounts.

Keep your notes up to date on all your devices with iCloud

When you’re signed in to your Apple Account on your iPhone, iPad, and Mac, your iCloud notes appear on each, along with any changes you make to them.

  1. Open the Settings app on your iPad.
  2. Tap your name, then tap iCloud.
  3. Tap See All (next to Saved to iCloud). Then turn on Notes.

Add other accounts

The Notes app can also manage notes you keep in other accounts, like Microsoft Exchange, Yahoo, and Google.

  1. Open the Settings app on your iPad.
  2. Tap Apps, then tap Notes.
  3. Tap Notes Accounts and tap Add Account.
  4. Do one of the following:
    • Choose an account provider, then enter your account information.
    • If your account provider isn’t listed, tap Add Other Account, enter your email account information, then turn on Notes for that account.

Set up an On My iPad account

Notes in this account stay only on your iPad, but your iPad backups to iCloud include them.

  1. Open the Settings app on your iPad.
  2. Tap Apps, then tap Notes.
  3. Turn on On My iPad Account.

Remove an account

After you remove or delete an account, its notes won’t appear on your iPad anymore, but they remain in your internet account (for example, Google or iCloud.com) and on any other devices you’d already set up.

  1. Open the Settings app on your iPad.
  2. Tap Apps, then tap Notes.
  3. Tap Notes Accounts and tap the account you want to remove.
  4. Do one of the following:

    • Stop using Notes on the account: Turn off Notes.

      For an iCloud account, tap iCloud. Tap See All (next to Saved to iCloud), then turn off Notes.

      Note: You can continue to use the account for other services, such as Mail.

    • Stop using all services on the account: Tap Sign Out (for an iCloud account) or Delete Account (for other accounts).

      If you don’t see Sign Out or Delete Account, your account may be managed by your organization. See an administrator for removal instructions.

See also

Tags: iCloud, Notes

In the Notes app, you can record audio and have the spoken words transcribed to text. You can search the transcript, add the text to the note, or copy the text to other documents.

You can see the live transcript while you record and take notes at the same time, and spoken words in supported languages are automatically transcribed. Later, you can play the recording and review the transcript in the note.

Note: Audio transcription is available on supported iPad models when the device language is set to English, Spanish, Portuguese, Italian, French, German, Japanese, Korean, Simplified Chinese, and Traditional Chinese.

Record audio and see the live transcript

In a note, you can record audio and have the spoken words transcribed.

  1. Open the Notes app on your iPad.
  2. In a note, tap the Attachments button. Tap Record Audio.
  3. To start the recording, tap the Record button.

    Tip: To take notes while recording, swipe down from the top of the screen.

  4. Do any of the following:

    • Pause recording: Tap the Pause button.
    • Resume recording: Tap the Resume button.
    • See the live transcript: Tap the Transcription button.

      Note: Spoken words in supported languages are automatically transcribed. If you don’t see the Transcription button, your iPad either doesn’t meet the minimum requirements or doesn’t detect a supported language.

  5. When you’re finished recording, tap the Pause button. Then tap the Done button.

Play an audio recording and review the transcript

  1. Open the Notes app on your iPad.
  2. In a note with an audio recording, tap the Play button to play it.
  3. To review the transcript, tap the audio recording. Tap the Transcription button.

    Note: Spoken words in supported languages are automatically transcribed. If you don’t see the Transcription button, your iPad doesn’t meet the minimum requirements or doesn’t detect a supported language.

    While viewing the transcript, you can do any of the following:

    • Play the audio at a specific point: Tap the text you want to hear.
    • Search the transcript: Tap the More button and then tap Find in Transcript.
    • Copy the transcript: Tap the More button and choose Add Transcript to Note or Copy Transcript.
    • Name your recording: Tap the boldfaced title, type a name for your recording, then tap Save.
    • Save or delete the audio recording: Tap the More button and then choose an option.

      Note: Deleting the audio recording also deletes the transcript.

View a summary of an audio recording

To get to the most important information at a glance, use Apple Intelligence to generate a summary of the transcript. You can copy and share summaries, too.

Note: Apple Intelligence on iPadOS 27 or later is available on an Apple Intelligence-enabled iPad mini (A17 Pro) and iPad models with M1 or later. Apple Intelligence is not available in all languages or regions. Usage limits may apply.* Some languages that support Apple Intelligence summaries are not available for audio transcription.

  1. Open the Notes app on your iPad.
  2. Open a note with a recording.
  3. Tap the recording, then tap Summary.

    Tip: You can copy or share a summary. Tap the More button at the top of the summary, then choose an option.

View transcripts of phone and FaceTime audio calls

With iOS 18.1 or later, you can record a call in the Phone or FaceTime app and see the spoken words transcribed in the Notes app, and these guides explain how:

*Apple Intelligence is available with Siri and device language set to Chinese (Simplified), Chinese (Traditional), Danish, Dutch, English, French, German, Italian, Japanese, Korean, Norwegian, Portuguese, Spanish, Swedish, Turkish, or Vietnamese. Some features may not be available in all regions or languages. Some devices may not be available in all regions. Siri AI is available in beta in iOS 27, iPadOS 27, macOS 27, watchOS 27, and visionOS 27 and requires an Apple Intelligence–enabled device set to a supported language. Available in English to start. Siri AI will not be initially available in the EU on iOS, iPadOS, and watchOS. Certain Apple Intelligence features that rely on server-side models are subject to daily usage limits, including but not limited to Siri AI, Intelligent Photo Editing Tools, Image Playground, and AFM 3 Cloud models in Shortcuts. Daily limits may vary by feature, request complexity, system demand, system policies, and other factors. Expanded access to such features will be available for a fee in the future. Use of these features is subject to the Apple Intelligence Terms and Conditions.

See also

In the Notes app, you can use the camera to scan text and documents.

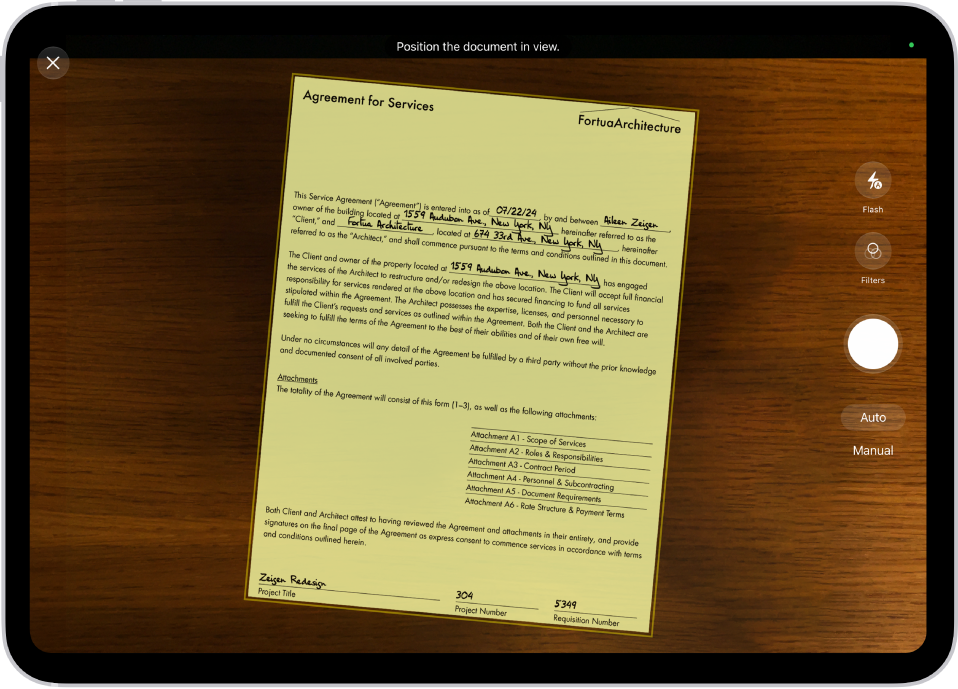
In supported languages, you can insert scanned text right into a note. When you scan a document, iPad can capture it automatically once it detects the page boundaries, or you can capture it yourself. Either way, it’s saved as a PDF right in the note.

Here’s how to scan text and documents in Notes using the iPad camera.

A screen showing a document being scanned. The Take Picture button is on the right.

Scan text into a note

The camera lets you insert scanned text in supported languages.

  1. Open the Notes app on your iPad.
  2. In a note, tap the Attachments button. Then tap Scan Text.
  3. Position your iPad so that the text appears within the camera frame.
  4. Drag or use grab points to select text and tap Insert.

Scan a document into a note

  1. Open the Notes app on your iPad.
  2. In a note, tap the Attachments button and tap Scan Documents.
  3. Position your iPad so that the document page appears on the screen, adjust any settings such as Flash (on supported models) or Filters. Do one of the following:

    • Automatic capture: Keep your iPad steady. Your iPad automatically captures the document when it detects the page boundaries. To make adjustments, tap the thumbnail, tap an option such as Adjust, make your changes, and then tap the Back button.
    • Manual capture: Tap Manual and tap the Take Picture button. Adjust the corners as needed and tap Retake or Keep.
  4. Scan additional pages, then tap the Done button when you’re done.

    The document is saved as a PDF in the note.

See also

Tags: camera, Notes

In the Notes app, you can attach, view, edit, and collaborate on PDFs, including documents you scanned into a note. You can also annotate or sketch directly on PDFs and scanned documents in your note using Apple Pencil or your finger, and even preview multiple PDFs in the same note.

You can change the viewing size to Small, Medium, or Large, view a PDF in full screen, and search in PDFs. When you collaborate on a note, others get real-time updates as you mark up a document.

Attach a PDF to a note

Do any of the following to attach a PDF from an app like Files or Mail:

  • Drag the file into a note.
  • Touch and hold the file, tap the Share button, tap Notes, choose a note, then tap Save.

View and edit a PDF in a note

  1. Open the Notes app on your iPad.
  2. In the note with the PDF, tap the Menu button. Then do any of the following:
    • Change the viewing size: Tap View As and choose Small, Medium, or Large.
    • View in full screen: Tap Quick Look.
    • Copy, save, print, share, rename, or delete the PDF: Choose an action.
  3. When viewing as Medium or Large, you can also do any of the following:
    • Show or hide thumbnails: Tap the Thumbnails button.
    • Zoom in and see more: Pinch the screen or swipe right to see more pages.
    • Edit a page: Tap the thumbnail for the page, tap the More button, and choose an action such as Rotate Left, Rotate Right, Filters, Crop Page, or Insert Blank Page. (Filters and Crop Page are supported only in scanned documents.)

Search in PDFs

For the steps, read our guide, Search through your notes.

Annotate a PDF in a note

  • Small preview size: Tap the PDF to open it, then tap the Handwriting Tools button.
  • Medium and large preview sizes: Start drawing or writing with Apple Pencil. Or to draw or write with your finger, tap the Handwriting Tools button.

To learn more about Markup, see our article, Write and draw in documents with Markup.

Collaborate with others

When you collaborate on a note with other people, updates happen in real time, so the people you share with see the changes on their devices as you add a sticker, draw a diagram, or mark up a document.

See also

Tag: Notes