Got a tip for us?

iPad

The iPad is a tablet computer from Apple that runs the iOS mobile operating system. Similar in functionality to the iPhone, the iPads purpose is often quite different, sometimes even serving as a general desktop computer replacement.

With Apple Intelligence, Siri can tap into ChatGPT. After you set up the extension, Siri can use it to get the information you’re looking for. You can ask ChatGPT to compose a haiku, suggest ideas for a free afternoon, or summarize a document. You can even ask about a photo open in the Photos app or a document open in the Files app, and iPad may ask you to confirm before your request is sent.

Note: Apple Intelligence on iPadOS 27 or later is available on an Apple Intelligence-enabled iPad mini (A17 Pro) and iPad models with M1 or later. Apple Intelligence is not available in all languages or regions. Usage limits may apply.* The ChatGPT extension is available with Apple Intelligence in regions where the ChatGPT app and service are available. **

Siri: On your iPad, activate Siri, then ask a question. For example, say something like:

  • “Hey Siri, ask ChatGPT to compose a haiku about dragons.”
  • “Hey Siri, ask ChatGPT for some ideas of how to spend a free afternoon in Malibu if I don’t feel like hitting the beach.”
  • “Ask ChatGPT what kind of recipes can I make with this?” with a photo of fruit open in the Photos app.
  • “Hey Siri, ask ChatGPT to summarize this document for me,” with a document—like a PDF of a home inspection report—open in the Files app.

Quick tip: iPad may ask you to confirm before sending your request to ChatGPT. If you want to have Siri send a request without confirming, you can turn off Confirm Requests in the Settings app.

*Apple Intelligence is available with Siri and device language set to Chinese (Simplified), Chinese (Traditional), Danish, Dutch, English, French, German, Italian, Japanese, Korean, Norwegian, Portuguese, Spanish, Swedish, Turkish, or Vietnamese. Some features may not be available in all regions or languages. Some devices may not be available in all regions. Siri AI is available in beta in iOS 27, iPadOS 27, macOS 27, watchOS 27, and visionOS 27 and requires an Apple Intelligence–enabled device set to a supported language. Available in English to start. Siri AI will not be initially available in the EU on iOS, iPadOS, and watchOS. Certain Apple Intelligence features that rely on server-side models are subject to daily usage limits, including but not limited to Siri AI, Intelligent Photo Editing Tools, Image Playground, and AFM 3 Cloud models in Shortcuts. Daily limits may vary by feature, request complexity, system demand, system policies, and other factors. Expanded access to such features will be available for a fee in the future. Use of these features is subject to the Apple Intelligence Terms and Conditions.

**ChatGPT uses generative models and outputs may vary. Check important information for accuracy. When using the ChatGPT extension, you choose what content to send to ChatGPT. Your request and attachments, as well as limited data associated with the request, such as current time zone, country, device type, language, and feature being used when making the request, are sent to ChatGPT to answer your request and enable ChatGPT to provide you accurate and relevant results.

See also

Tag: Siri

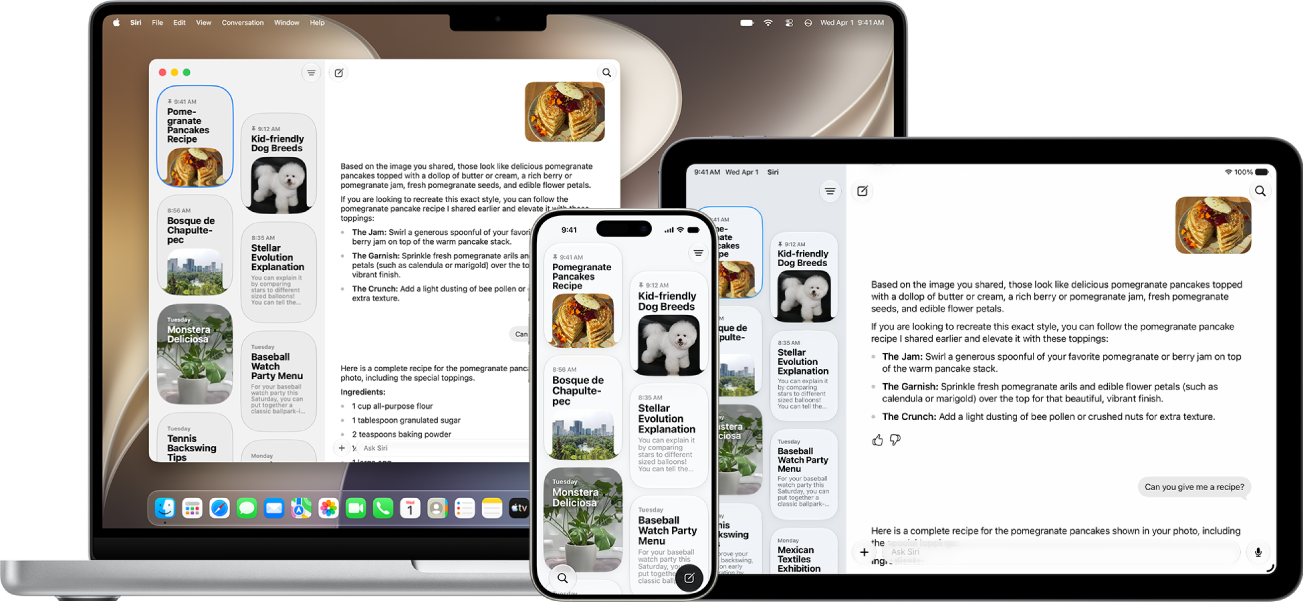
With Siri AI (Beta), you have a dedicated Siri app that brings all your conversations together in one place. You can ask a question on your iPad and pick up where you left off on your other Apple devices when you’re signed in to the same Apple Account.

You can type or speak your request, add a picture, photos, or files to the conversation, and ask follow-up questions. You can also pin conversations for easy access, search them, or start a new one, and your conversation history syncs across platforms.

Siri AI is available in beta on iPadOS 27 or later on an Apple Intelligence-enabled iPad mini (A17 Pro) or iPad model with M1 or later set to a supported language. Available in English to start. Siri AI will not initially be available in the EU on iPadOS. Usage limits may apply.*

The Siri app on iPhone, iPad, and Mac.

Start or continue a conversation

  1. Start the Siri app on your iPad.
  2. Tap the new conversation button to start a new conversation, or tap a conversation you want to continue.
  3. Do one of the following to enter your request:
    • Type your request: Enter your request using the keyboard and tap the Ask Siri button.
    • Speak your request: Tap the Microphone button, then speak your request. Tap the Keyboard button to type to Siri.
  4. Do any of the following:
    • Take a picture: Tap the Add button, tap Camera, and then take a picture using your iPad.
    • Add photos: Tap the Add button, tap Photos, and select a photo to add to the conversation.
    • Add files: Tap the Add button and tap Files. Then select a file to add to the conversation.
    • Ask follow-up questions: Enter follow-up questions.

View your conversation history

You can view your conversation history, which stays in sync across platforms when you’re signed in to the same Apple Account.

  1. Start the Siri app on your iPad.
  2. If the Siri app opens to a new conversation, tap the Close button to see your conversation history.
  3. To change how your conversation history is displayed, tap the Options button in the top-right corner and then tap Grid or List.

Search and pin conversations

  1. Start the Siri app on your iPad.
  2. If the Siri app opens to a new conversation, tap the Close button to see your conversation history.
  3. Do any of the following:
    • Search a conversation: Tap the Search button and enter what you’re searching for. Then tap the Search button on the keyboard.
    • Pin conversations: Touch and hold the conversation you want to pin and tap Pin.

Rename conversations

  1. Start the Siri app on your iPad.
  2. If the Siri app opens to a new conversation, tap the Close button to see your conversation history.
  3. Touch and hold a conversation, then tap Rename.
  4. Enter the new name for the conversation and tap OK.

Delete Siri conversations

  1. Start the Siri app on your iPad.
  2. Do one of the following:
    • Delete one Siri conversation: Touch and hold the conversation you want to delete, tap Delete, and then tap Delete to confirm.
    • Delete multiple Siri conversations: Tap the Options button in the top-right corner and tap Select. Then select the conversations you want to delete. Tap the Trash button, then tap Delete to confirm.

Change Siri app settings

In Siri settings, decide how long to hold on to conversations and what appears when you open the Siri app.

  1. Start the Settings app on your iPad.
  2. Tap Siri.
  3. Do any of the following:

    • Choose what appears when you open the Siri app: Tap Opens To and choose Recent Conversations or A New Conversation.
    • Choose how long to keep conversations: Tap Keep Conversations, then choose an option.

      Note: If you choose 30 days or 1 year, older conversations are permanently deleted.

    • Choose a conversation preview length: Tap Preview, then choose an option.

In Screen Time settings, you can choose which Siri features are available to you and which content Siri can access. Read our guide, Block features or content with Screen Time.

*Apple Intelligence is available with Siri and device language set to Chinese (Simplified), Chinese (Traditional), Danish, Dutch, English, French, German, Italian, Japanese, Korean, Norwegian, Portuguese, Spanish, Swedish, Turkish, or Vietnamese. Some features may not be available in all regions or languages. Some devices may not be available in all regions. Siri AI is available in beta in iOS 27, iPadOS 27, macOS 27, watchOS 27, and visionOS 27 and requires an Apple Intelligence–enabled device set to a supported language. Available in English to start. Siri AI will not be initially available in the EU on iOS, iPadOS, and watchOS. Certain Apple Intelligence features that rely on server-side models are subject to daily usage limits, including but not limited to Siri AI, Intelligent Photo Editing Tools, Image Playground, and AFM 3 Cloud models in Shortcuts. Daily limits may vary by feature, request complexity, system demand, system policies, and other factors. Expanded access to such features will be available for a fee in the future. Use of these features is subject to the Apple Intelligence Terms and Conditions.

See also

Tag: Siri AI

You can customize how you activate Siri, change Siri’s language and voice, change how Siri responds, and more in Siri settings on iPad.

You might say “Siri” or “Hey Siri,” or use the side button or type instead, and on supported models, you can say just “Siri” in some languages and regions. iPad can listen for “Siri,” “Hey Siri,” or both, depending on your choice. You can also tell Siri about yourself and retrain Siri with your voice.

For information about how to set up and use Siri, see Turn on and activate Siri.

Customize how you activate Siri

You can change how you activate Siri. For example, you can say “Siri” or “Hey Siri,” click the side button on your iPad, or type to Siri.

Note: The option to say just “Siri” is available on supported iPad models in some languages and regions.

  1. Start the Settings app on your iPad.
  2. Tap Siri.
  3. Tap Requests and then do any of the following:

    • Turn on “Siri” or “Hey Siri”: Tap Siri or Hey Siri (or Hey Siri) and then follow the instructions to set it up.

      Depending on your choice, iPad listens for “Siri,” “Hey Siri,” or both to activate Siri. To retrain Siri with your voice, turn off “Siri” or “Hey Siri,” turn it back on again, then follow the onscreen instructions.

      Tip: To prevent iPad from responding to “Siri” or “Hey Siri” when you don’t want it to, place your iPad face down.

    • Turn off “Siri” or “Hey Siri”: Tap Off. iPad doesn’t listen for “Siri” or “Hey Siri” to activate Siri.
    • Activate Siri using the side button on your iPad: Turn on Press Side Button for Siri.
    • Type to Siri: Turn on Type to Siri. When Siri AI (Beta) is on, you can always type to Siri.

      Note: Siri AI is available in beta on iPadOS 27 or later on an Apple Intelligence-enabled iPad mini (A17 Pro) or iPad model with M1 or later set to a supported language. Available in English to start. Siri AI will not initially be available in the EU on iPadOS. Usage limits may apply.*

Change Siri’s language

  1. Start the Settings app on your iPad.
  2. Tap Siri.
  3. Tap Language, then select a language from the list.

    The language you choose is used for Siri, Maps, turn-by-turn directions, and Listen to Page in Safari.

Change Siri’s voice

You can change the way Siri sounds by changing the variation and voice Siri uses.

  1. Start the Settings app on your iPad.
  2. Tap Siri.
  3. Do any of the following:

    • Change the variation: Tap Voice and select an option below Variations.
    • Change the voice: Tap Voice, then select an option below Voices.
    • Use Siri Expressive Voices** (Siri AI only): Tap Voice and then adjust Voice, Pace, and Expressivity settings until they sound just right to you.

      Note: Pace and Expressivity adjustments are currently available for American and British voices.

Change how Siri responds

Siri can always respond silently or speak back when you provide voice input; it’s your choice. You can also have messages sent automatically without Siri asking you to confirm, and Siri can read your messages in a different language.

Note: The options you see vary with the version of Siri you’re using.

  1. Start the Settings app on your iPad.
  2. Tap Siri.
  3. Tap Responses and then do any of the following:

    • Have Siri respond aloud: Choose Prefer Spoken Responses or Speak Back for Voice Input. If Siri AI is turned on, choose Spoken Response.
    • Have Siri respond silently: Choose Prefer Silent Responses or Always Silent. If Siri AI is turned on, choose Silent Response.
    • See what Siri says onscreen: Turn on Always Show Siri Captions.
    • See your request onscreen: Turn on Always Show Request.
    • Have Siri send messages without confirming: Turn on Automatically Send Messages.
    • Have Siri read messages in a different language: Tap Add Language and select a language from the list.

      Tip: After languages download, you can choose the variety and voice Siri uses to read messages. Tap the language below Read Messages, then select from the options below Variety and Voice.

Tell Siri about yourself

For a more personalized experience, you can give Siri information like your name, your home and work addresses, and even your relationships. Then you can say things like “Give me driving directions home” and “FaceTime Mom.” Siri learns about you from your contact card (called My Card) in the Contacts app.

  1. Start the Settings app on your iPad.
  2. Tap Siri.
  3. Tap Your Information, then tap your name.
  4. Go to the Contacts app to do any of the following:
    • Change or edit the information: Tap My Card at the top and tap Edit. Then edit your information. For more information, see Add or edit your contact info and photo.
    • Tell Siri how to pronounce your name: Tap My Card at the top and then tap Edit. Scroll down and then tap “add field.” Select a pronunciation name field, then type how to say your name. You can also add pronunciations for other contacts.

Siri can learn who other people are in relation to you. Try saying something like “Sarah Milos is my sister” or “Hey Siri, Ashley Kamin is my mom.”

Your personal information, which is encrypted and remains private, stays current on every device where you use the same Apple Account. When Siri learns about you on one device, your Siri experience gets better on your other devices, too. Turning off Siri in iCloud settings keeps Siri personalization from updating across your devices.

Change Visual Intelligence settings

If you have Apple Intelligence, Visual Intelligence can search for items similar to those around you, and you can choose to have highlighted objects sent automatically to third parties to provide results.

  1. Start the Settings app on your iPad.
  2. Tap Siri and then do any of the following:
    • Turn on Highlight to Search (Siri AI only). This setting automatically searches the web when you highlight content in screenshots.
    • Turn on Automatic Visual Look Up. This setting automatically identifies objects and places that appear in screenshots.

Customize apps Siri has access to

Give Siri access to an app or App Clips, and it can find information and suggest what you might want to do next, even before you ask. Get an invitation in Mail, for example, and you’re asked whether to add it to your calendar. Suggestions are on by default, though you can change which apps Siri has access to at any time.

Note: Siri and Apple Intelligence are designed to protect your privacy and keep you in control of your personal data by giving you control over what you share.

  1. Start the Settings app on your iPad.
  2. Tap Siri.
  3. Do any of the following:

    • Allow Siri to learn how you use an app to make suggestions: Tap App Access and select an app from the list. Then turn on Learn from this App.
    • Choose how Suggestions appear: Tap App Access, select an app from the list, and then turn on Show on Home Screen, Suggest App, or Suggestion Notifications.

      Note: The options you see may be different depending on the app you select and which version of Siri you’re using.

    • Allow Siri to learn from App Clips to make suggestions: Tap App Clips and then turn on Learn From App Clips.
    • Allow Search and Shortcuts to show App Clips: Tap App Clips and turn on Show in Search or Suggest App Clips.

Customize where suggestions appear

Where suggestions appear is up to you. You might show them in an app, for example, but not on the Home Screen or as notifications.

  1. Start the Settings app on your iPad.
  2. Tap Siri.
  3. Tap Suggestions and then do any of the following:
    • Allow suggested apps to appear in search: Turn on Suggest Apps Before Searching.
    • Allow suggestions to appear in notifications: Turn on Allow Notifications.
    • Allow suggestions to appear in App Library: Turn on Show in App Library.
    • Allow suggestions to appear when sharing: Turn on Show When Sharing.
    • Allow suggestions to appear when you might want to listen to music: Turn on Show Listening Suggestions.

To change Siri accessibility settings, check out our guide, Change Siri accessibility settings.

*Apple Intelligence is available with Siri and device language set to Chinese (Simplified), Chinese (Traditional), Danish, Dutch, English, French, German, Italian, Japanese, Korean, Norwegian, Portuguese, Spanish, Swedish, Turkish, or Vietnamese. Some features may not be available in all regions or languages. Some devices may not be available in all regions. Siri AI is available in beta in iOS 27, iPadOS 27, macOS 27, watchOS 27, and visionOS 27 and requires an Apple Intelligence–enabled device set to a supported language. Available in English to start. Siri AI will not be initially available in the EU on iOS, iPadOS, and watchOS. Certain Apple Intelligence features that rely on server-side models are subject to daily usage limits, including but not limited to Siri AI, Intelligent Photo Editing Tools, Image Playground, and AFM 3 Cloud models in Shortcuts. Daily limits may vary by feature, request complexity, system demand, system policies, and other factors. Expanded access to such features will be available for a fee in the future. Use of these features is subject to the Apple Intelligence Terms and Conditions.

**Siri Expressive Voices are available with Siri AI on iPad models with M4 or later with at least 12GB of unified memory.

See also

Tag: Siri

Siri is an intelligent assistant that’s built into your iPad to help you get answers, find what you need, and get things done.

Before you can use Siri, you need to turn it on. To ask a question or make a request, you then activate it with your voice or the buttons on iPad, and Siri needs an internet connection. There’s also Siri AI (Beta), the new version of Siri powered by Apple Intelligence, to try.

Note: Siri is designed to protect your information and to let you choose what you share.

Turn on Siri

Siri needs to be turned on before you can use it. If you didn’t set up Siri when you first set up your iPad, do the following:

  1. Start the Settings app on your iPad.
  2. Tap Siri.
  3. Tap Turn On Siri and then follow the onscreen instructions.

    Tip: Tap Try Siri AI (Beta)* to get Siri AI, the new version of Siri powered by Apple Intelligence on iPadOS 27 or later. See Get started with Siri AI.

Activate Siri and make requests

After you turn on Siri, activate it before you ask a question or make a request.

Note: You must be connected to the internet to use Siri.

  1. Activate Siri by doing one of the following:

    • Use your voice: Say “Siri” or “Hey Siri.” This option is only available if “Siri” or “Hey Siri” is turned on. See Customize how you activate Siri.
    • Use the buttons on iPad: Press and hold the top button on an iPad with Touch ID, or press and hold the Home button on an iPad with a Home button.

      When you activate Siri with a button and iPad is muted, Siri responds silently. When you activate Siri with your voice, Siri responds out loud. To change this behavior, see Change how Siri responds.

    • Use headphones connected to your iPad: Press and hold the center or call button on your EarPods.

    If you have Siri AI, you can also activate Siri by doing one of the following:

    • Use the Dynamic Island on iPad: Swipe down from the top of the screen.
    • Use the shortcut menus on iPad: Touch and hold something on your iPad screen—a file or a photo, for example—then choose Ask Siri or the Ask Siri button from the pop-up menu.
    • Take a screenshot on iPad: Quickly press and release the side button and the volume up button at the same time to take a screenshot. Tap the Ask button to ask a question, the Search button to search, or an action that appears in the middle. See Siri AI: Learn about what’s on your iPad screen.
  2. Ask Siri a question or make a request.

    See Get started with Siri AI and Use Siri to find information and get things done for ideas on how you can use Siri.

Turn off Siri

  1. Start the Settings app on your iPad.
  2. Tap Siri.
  3. Tap Turn Off Siri at the bottom and then tap Turn Off Siri.
  4. If you have Siri AI, but want to use the previous version of Siri, tap Turn On Siri. Then select Use Siri Classic.

*Apple Intelligence is available with Siri and device language set to Chinese (Simplified), Chinese (Traditional), Danish, Dutch, English, French, German, Italian, Japanese, Korean, Norwegian, Portuguese, Spanish, Swedish, Turkish, or Vietnamese. Some features may not be available in all regions or languages. Some devices may not be available in all regions. Siri AI is available in beta in iOS 27, iPadOS 27, macOS 27, watchOS 27, and visionOS 27 and requires an Apple Intelligence–enabled device set to a supported language. Available in English to start. Siri AI will not be initially available in the EU on iOS, iPadOS, and watchOS. Certain Apple Intelligence features that rely on server-side models are subject to daily usage limits, including but not limited to Siri AI, Intelligent Photo Editing Tools, Image Playground, and AFM 3 Cloud models in Shortcuts. Daily limits may vary by feature, request complexity, system demand, system policies, and other factors. Expanded access to such features will be available for a fee in the future. Use of these features is subject to the Apple Intelligence Terms and Conditions.

See also

Tag: Siri

In apps on iPad, you can use gestures and the keyboard to select and edit text in text fields. You can also use built-in proofreading tools.

You can select a word, a paragraph, or a block of text, and then cut, copy, or paste the text you want to revise. You can also fix mistakes, undo or redo the last edit, place the insertion point, and move text without cutting or copying it.

Select, cut, copy, and paste text

  1. To select text, do any of the following:

    • Select a word: Double-tap with one finger.
    • Select a paragraph: Triple-tap with one finger.
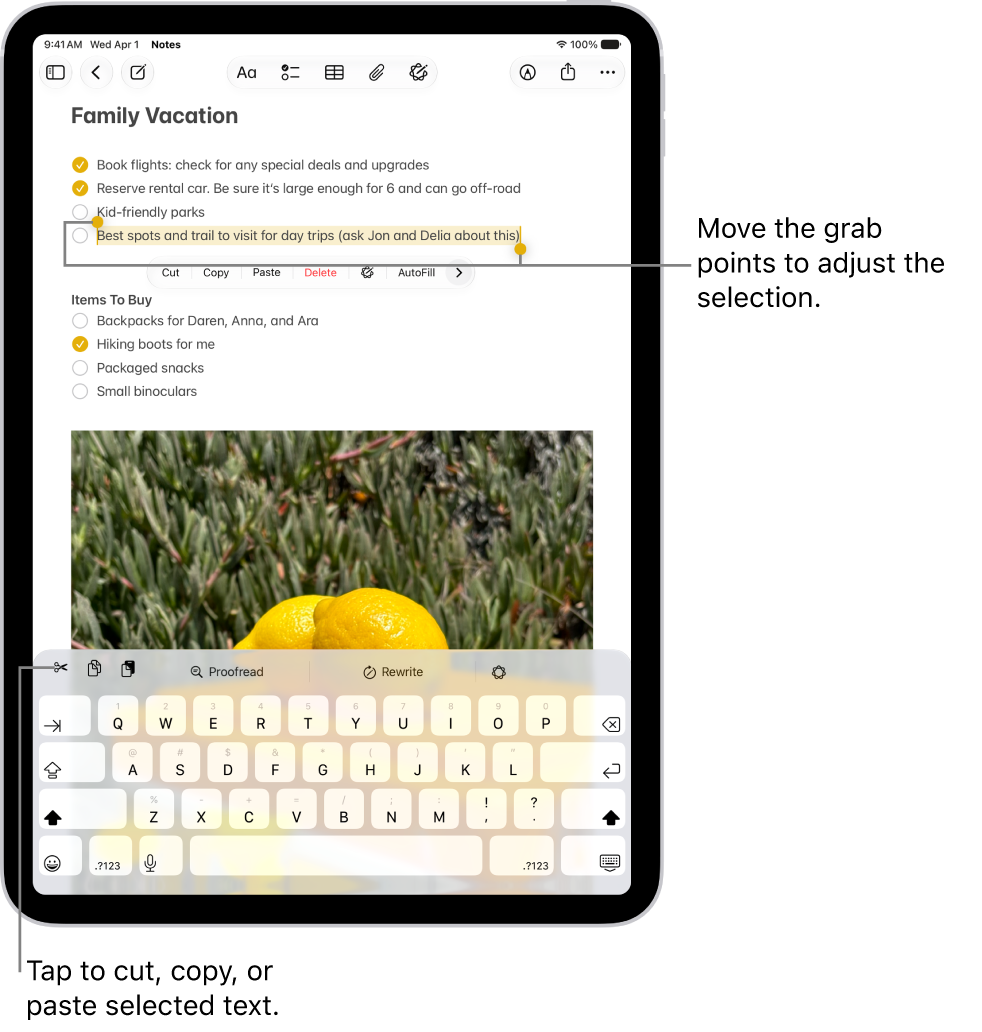
    • Select a block of text: Double-tap and hold the first word in the block. Drag the grab points.

      Text is selected in a note in the Notes app. Above the selected text is a menu of buttons including Cut, Copy, and Paste. The selected text is highlighted, with grab points to adjust the selection at either end.

  2. After selecting the text you want to revise, tap the selection. Tap an editing option. You can also use these gestures:

    • Cut: Pinch closed with three fingers two times.
    • Copy: Pinch closed with three fingers.
    • Paste: Pinch open with three fingers.

Fix mistakes

When you notice an error while entering text, do any of the following:

  • Undo the last edit: Swipe left with three fingers, then tap the Undo button or Undo at the top of the screen.
  • Redo the last edit: Swipe right with three fingers, then tap the Redo button or Redo at the top of the screen.
  • Correct spelling and grammar: Tap a misspelled or misused word (underlined in red), then either tap a suggestion to replace the word, or type the correction.
  • Undo autocorrect: As you enter text, misspelled words are automatically corrected and temporarily underlined so you know what was changed. To revert the autocorrection to what you entered, tap the underlined word, then tap your spelling (the first one listed and marked with the Undo button).

Turn on or off proofreading features

  1. Open the Settings app on your iPad.
  2. Tap General, then tap Keyboard.
  3. Turn on or off any of the following:
    • Auto-Capitalization
    • Auto-Correction
    • Check Spelling and Grammar

Place the insertion point

  1. Do any of the following:

    • Tap where you want to add or edit text.
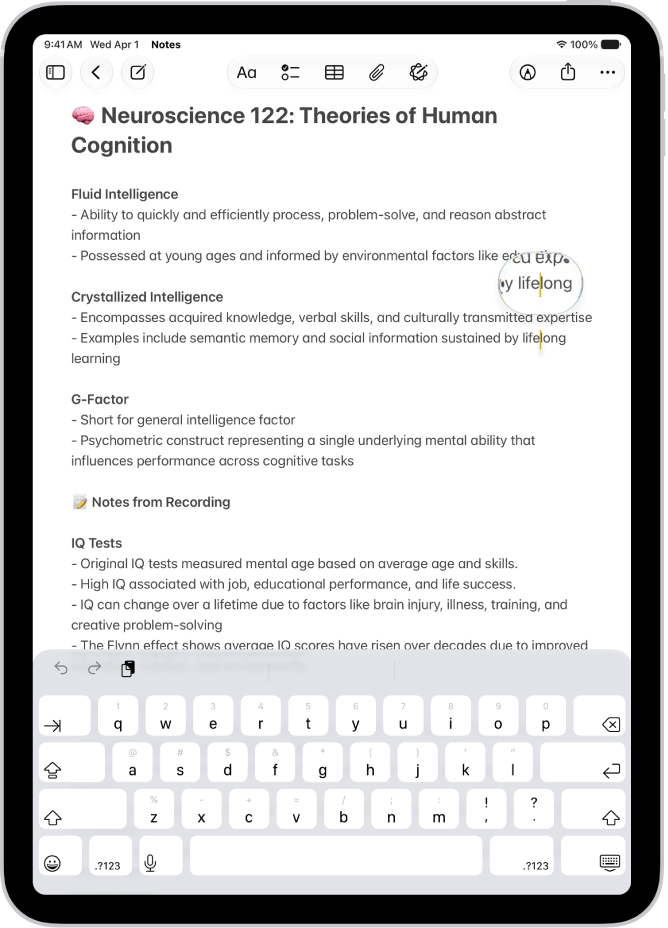
    • Touch and hold to magnify the insertion point, then drag it.

      A note showing the insertion point positioned where text will be inserted or edited. The surrounding text is magnified to make it easier to place the insertion point.

    Note: To navigate a long document, touch and hold the right edge of the document, then drag the scroller to locate the text you want to revise.

  2. Enter the text you want to add.

    Tip: To easily move the insertion point, touch and hold the Space bar of the onscreen keyboard until the characters on the keys disappear, then drag your finger around the keyboard to move the insertion point elsewhere. To select text, tap the keyboard with a second finger, then drag your first finger to select text.

Move text without cutting or copying

  1. Select the text you want to move.
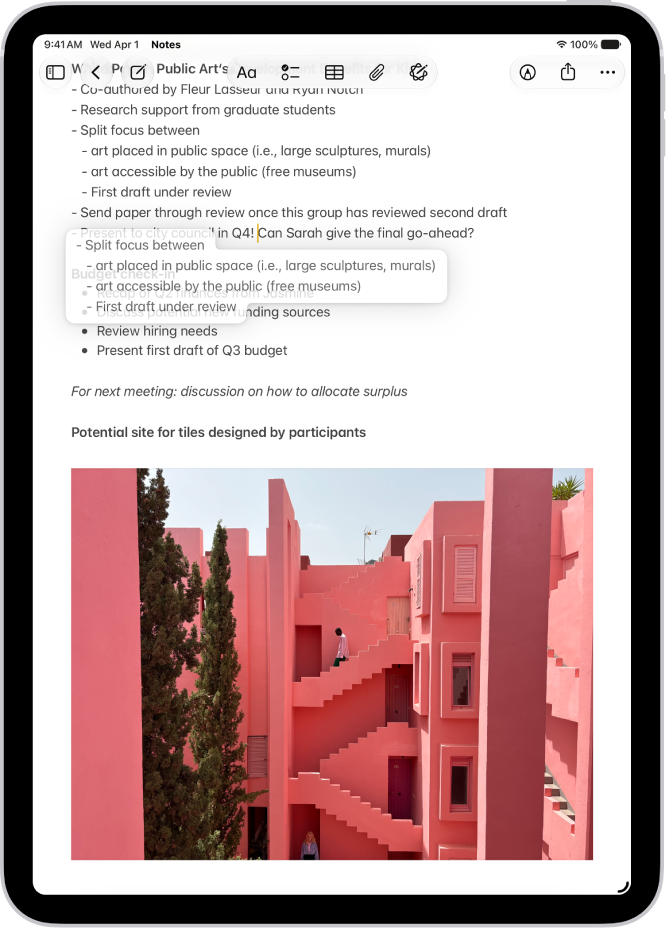
  2. Touch and hold the selected text until it lifts up and drag it to another location within the app.

    A document is open in the Notes app. Selected text is lifted within the document to be moved to a new location.

If you change your mind while moving the text, lift your finger before dragging, or drag the text off the screen.

Quick tip: With Universal Clipboard, you can cut or copy something on another Apple device, then paste it on iPad. Read our guide, Copy and paste between iPad and other Apple devices.

See also

Depending on your iPad model, you can type with the onscreen keyboard either floating and movable on the screen, split at the bottom of the screen, or undocked in the middle of the screen.

A floating keyboard can move anywhere on the screen, and you can turn Split Keyboard on or off, too. You can put the split keyboard back together, move the keyboard up from the bottom of the screen, or return it to its original position.

Here’s how to move the iPad onscreen keyboard.

Use a floating keyboard

You can make the onscreen keyboard float and move it anywhere on the screen by dragging from the bottom of the screen.

  1. Tap in a text field to open the onscreen keyboard.
  2. Touch and hold the Hide Keyboard key, slide your finger to Floating and then release. A miniature version of the keyboard opens.
  3. To reposition the keyboard, touch and hold the More button, and drag the keyboard to a new place.
  4. Tap keys or type by sliding from one letter to the next without lifting your finger (not available for all languages).
  5. To return the keyboard to full width, pinch the floating version open. You can also tap the More button. Then tap Full.

Split or undock the keyboard

  1. To split the keyboard on supported models, do one of the following:
    • Go to Settings > General > Keyboard, then turn Split Keyboard on or off.
    • Touch and hold the Emoji button or the Switch Keyboard key, tap Keyboard Settings, then select Split Keyboard.
  2. While in a text field, do any of the following:
    • Split the keyboard: Touch and hold the Hide Keyboard key, slide your finger to Split and then release.
    • Put the split keyboard back together: Touch and hold the Hide Keyboard key, slide your finger to Merge. Then release.
    • Move the keyboard up from the bottom of the screen: Touch and hold the Hide Keyboard key, slide your finger to Undock. Release.
    • Return an undocked keyboard to its original position: Touch and hold the Hide Keyboard key, slide your finger to Dock. Release.

See also

You can use predictive text on iPad to complete words and phrases as you type. You can accept or reject inline text predictions, accept or reject suggested text and information, and turn suggestions and inline text predictions off or on. You can also accept and reject a correction.

Using predictive text, you can write and complete entire sentences with just a few taps. As you type on the iPad keyboard, you see choices for words, emoji, and information that you’d probably type. In Messages, for example, when you type something like:

  • “I’m at” followed by a space, your current location appears as an option
  • “My number is” followed by a space, your phone number appears as an option

Predictions that complete your word or phrase appear inline as you’re typing.

Note: Predictive typing and inline predictions may not be supported in your language.

Accept or reject inline text predictions

While you type, inline predictions in gray text complete the word or phrase you’re typing, and you can do one of the following:

  • Accept the prediction: Tap the Space bar.
  • Reject the prediction: Keep typing.
  • Change a prediction you accepted: Tap the Delete key, then tap the word you were in the process of typing.

Accept or reject suggested text and information

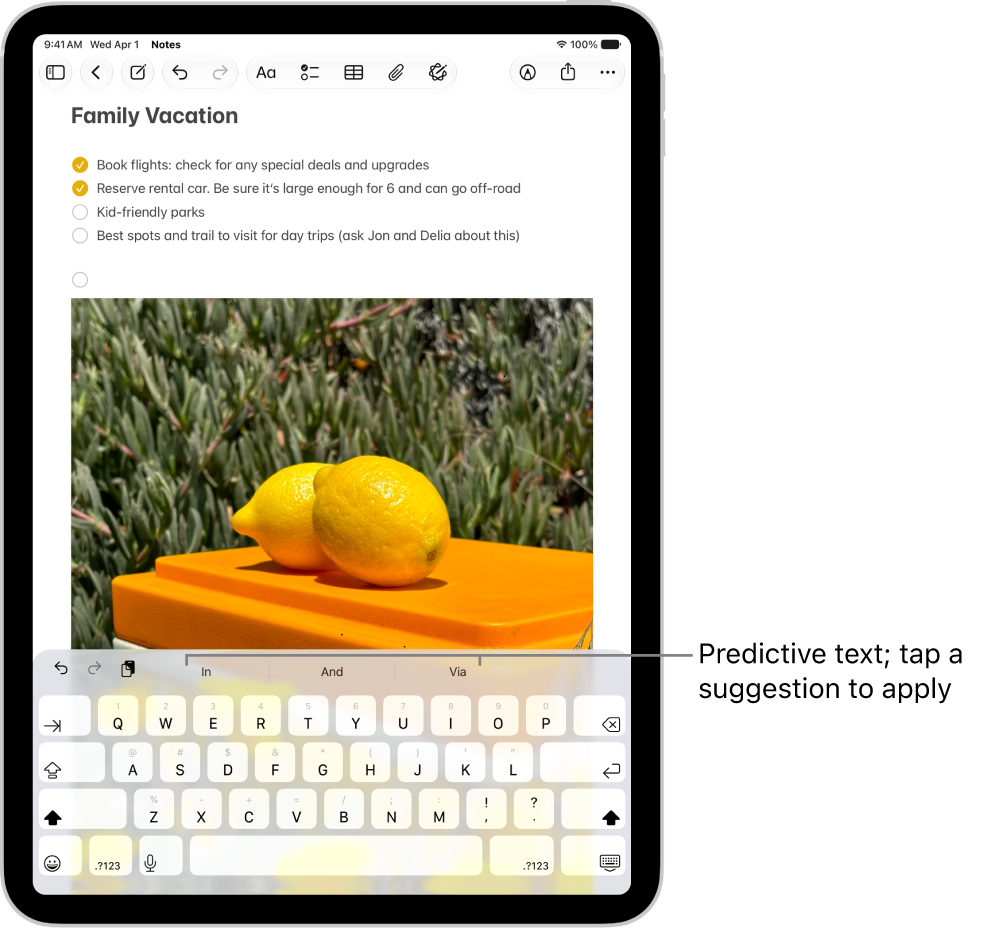
Suggested words, emoji, and information show up above the onscreen keyboard as you type, and you can do one of the following:

  • Accept a suggestion: Tap a suggestion to apply it.
  • Reject the suggestions: Tap your original word (shown as the option in quotation marks), or just continue to type.

The onscreen keyboard is open in the Notes app. Text is entered in the text field and above the keyboard are predictive text suggestions for the next word.

Turn suggestions and inline text predictions off or on

  1. Open the Settings app on your iPad.
  2. Tap General, then tap Keyboard.
  3. Do any of the following:

    • Stop (or start) seeing suggestions above the keyboard: Turn Predictive Text off (or on).

      Note: Turning off the Predictive Text setting turns off both predictive text and inline text predictions.

    • Stop (or start) seeing predicted text inline: Turn Show Predictions Inline off (or on).

Quick tip: Touch and hold the Emoji button or the Switch Keyboard key for quick access to Keyboard Settings while you use the onscreen keyboard.

Accept and reject a correction

If you turn off Predictive Text, you might still see corrections for misspelled words; just do one of the following:

  • Accept a correction: Enter a space or punctuation, or tap Return.
  • Reject a correction: Tap the “x.”

Reject the same suggestion a few times, and iPad stops suggesting it.

See also

When you set up a text replacement on iPad, you can enter long or complicated text by tapping just a few keys, like shorthand for your most frequently used words and phrases.

One shorthand for “On my way” is already set up for you, but you can add your own. You can also stop a word or phrase from being replaced, and create replacements for word and input pairs on certain Chinese or Japanese keyboards.

Create a text replacement

  1. While in a text field, do one of the following:
    • With an onscreen keyboard: Touch and hold the Emoji button or the Switch Keyboard key, tap Keyboard Settings, and tap Text Replacement.
    • With an external keyboard: Open Settings, tap General, tap Keyboard, and then tap Text Replacement.
  2. Tap the Add button at the top right.
  3. Type a phrase in the Phrase field and the text shortcut you want to use for it in the Shortcut field.

Don’t want to replace a word or phrase you use?

  1. Open the Settings app on your iPad.
  2. Tap General, tap Keyboard, and tap Text Replacement.
  3. Tap the Add button at the top right and enter your word or phrase in the Phrase field, but leave the Shortcut field blank.

Create a text replacement for word and input pairs

Certain Chinese or Japanese keyboards let you create a text replacement for word and input pairs, which gets added to your personal dictionary. After that, when you type the text shortcut for a word or input on a supported keyboard, the paired word or input replaces the shortcut.

Shortcuts work for these languages and input methods:

  • Simplified Chinese: Pinyin
  • Traditional Chinese: Pinyin and Zhuyin
  • Japanese: Romaji and Kana

To add these keyboards, see Add or remove a keyboard for another language.

Sync your personal dictionary across devices

iCloud keeps your personal dictionary up to date on your other devices.

  1. Open the Settings app on your iPad.
  2. Tap your name, then tap iCloud.
  3. Tap See All and tap iCloud Drive. Then turn on Sync this iPad.

Reset your personal dictionary

  1. Open the Settings app on your iPad.
  2. Tap General, then tap Transfer or Reset iPad.
  3. Tap Reset and tap Reset Keyboard Dictionary.
  4. Enter your passcode, then tap Reset.

    All custom words and shortcuts are deleted, and the keyboard dictionary returns to its default state.

See also

With Dictation on iPad, you can dictate text anywhere you can type it. You can use typing or handwriting with Dictation, and the keyboard or tools palette can stay open, so you can easily switch between speaking and typing or handwriting. You might select text with touch or Apple Pencil and replace it with your voice.

Dictation is processed on your device in many languages, and no internet connection is required. When you dictate in a search field, though, your dictated text may be sent to the search engine.

Note: Dictation may not be available in all languages or in all countries or regions, and features may vary. With Apple Intelligence in iPadOS 27, dictation uses an on-device model to improve spelling, punctuation, and capitalization. Available in English on iPad models with M4 or later, at least 12GB of unified memory. Apple Intelligence on iPadOS 27 or later is available on an Apple Intelligence-enabled iPad mini (A17 Pro) and iPad models with M1 or later. Apple Intelligence is not available in all languages or regions. Usage limits may apply.*

When using Dictation, cellular data charges may apply. See View or change cellular data settings.

Make dictation possible

  1. Start the Settings app on your iPad.
  2. Tap General, then tap Keyboard.
  3. Turn on Enable Dictation. If a prompt appears, tap Enable Dictation.

To learn more about how Apple protects your information and lets you choose what you share, tap About Dictation & Privacy below the dictation settings.

Using an external keyboard? Read our guide, Dictate text while using an Apple external keyboard.

Dictate text

Dictate text and use voice commands to edit and format content.

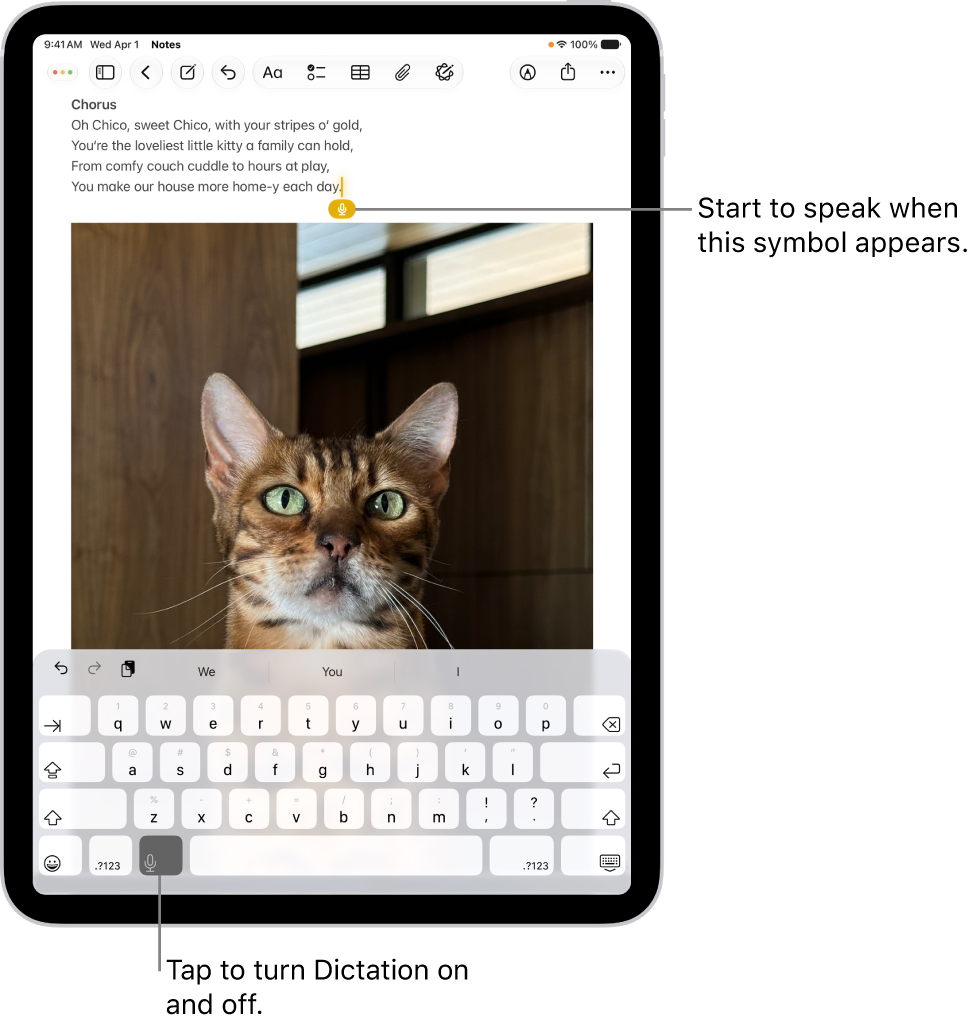
The onscreen keyboard is open in the Notes app. The Dictation button at the bottom of the keyboard is selected and the Dictation button appears below the insertion point in the text field.

  1. In a text field, tap to place the insertion point where you want to begin dictating text.
  2. Tap the Dictate button on the onscreen keyboard (or in any text field where it appears).

    If you don’t see the Dictate button, go to the Settings app, tap General, tap Keyboard, then turn on Enable Dictation. If a prompt appears, tap Enable Dictation.

  3. When the Dictate button appears near the insertion point in the text field, begin to dictate your text.
  4. Do any of the following:

    • Add emoji: Say the name of an emoji, like “heart emoji” or “smiley face emoji.”
    • Add punctuation: Say the name of the punctuation mark, such as “exclamation point.”

      Note: In supported languages, Dictation automatically inserts commas, periods, and question marks as you dictate. To turn off automatic punctuation, go to Settings > General > Keyboard, then turn off Auto-Punctuation.

    • Add a line break: Say “new line” or “new paragraph.”
    • Spell a word: Say something like “Let’s invite Steven S-T-E-P-H-E-N.”
    • Correct spelling: Say something like “Change tea to T-E-E.”
    • Edit text: Say “select” or “delete” followed by the phrase you want to change.
    • Undo or repeat a command: Say “undo” or “redo” if you change your mind or want to repeat a command.
  5. To stop dictating, do one of the following:

    • Tap the Dictate button.
    • Say “Stop dictation.”
    • Remain silent for 30 seconds. Dictation stops automatically.

For every command you can use while dictating, see our article, Commands for dictating text.

Dictation works in another language, too, when you use a keyboard for that language; check out our guide, Add or change keyboards.

Turn off Dictation

  1. Start the Settings app on your iPad.
  2. Tap General, then tap Keyboard.
  3. Turn off Enable Dictation.

*Apple Intelligence is available with Siri and device language set to Chinese (Simplified), Chinese (Traditional), Danish, Dutch, English, French, German, Italian, Japanese, Korean, Norwegian, Portuguese, Spanish, Swedish, Turkish, or Vietnamese. Some features may not be available in all regions or languages. Some devices may not be available in all regions. Siri AI is available in beta in iOS 27, iPadOS 27, macOS 27, watchOS 27, and visionOS 27 and requires an Apple Intelligence–enabled device set to a supported language. Available in English to start. Siri AI will not be initially available in the EU on iOS, iPadOS, and watchOS. Certain Apple Intelligence features that rely on server-side models are subject to daily usage limits, including but not limited to Siri AI, Intelligent Photo Editing Tools, Image Playground, and AFM 3 Cloud models in Shortcuts. Daily limits may vary by feature, request complexity, system demand, system policies, and other factors. Expanded access to such features will be available for a fee in the future. Use of these features is subject to the Apple Intelligence Terms and Conditions.

See also

You can add keyboards for writing or using Dictation in different languages on your iPad. You can also change the layout of your onscreen or external keyboard.

For some supported languages, you can type in two languages without having to switch between keyboards, since your keyboard automatically switches between the two languages you use most often. A bilingual keyboard is available for languages such as English (U.S.) and Spanish (Latin America), and you can remove a keyboard you no longer need.

Add or remove a keyboard for another language

  1. Open the Settings app on your iPad.
  2. Tap General, then tap Keyboard.
  3. Tap Keyboards and then do any of the following:
    • Add a keyboard: Tap Add New Keyboard and choose a keyboard from the list. Repeat to add more keyboards.
    • Use a bilingual keyboard: For languages such as English (U.S.) and Spanish (Latin America), tap Add New Keyboard. Tap Add to [language] Keyboard. (Available for select language pairs.)
    • Remove a keyboard: Swipe left on the keyboard and tap Delete.
    • Reorder your keyboard list: Tap Edit, drag the Reorder button next to a keyboard to a new place in the list, and then tap the Done button.

If you add a keyboard for a different language, the corresponding language is automatically added to the Preferred Languages list. To view this list and add languages to it directly, go to the Settings app, tap General, then tap Language & Region. To change how apps and websites display text, reorder the Preferred Languages list.

Switch to another keyboard

  1. While typing text, touch and hold the Emoji button or the Switch Keyboard key.
  2. Tap the keyboard you want to switch to.

To cycle between English, emoji, and other keyboards you add for another language on an external keyboard, press and hold Control, then press the Space bar. See Switch between keyboards.

Assign an alternative layout to a keyboard

  1. Open the Settings app on your iPad.
  2. Tap General, tap Keyboard, and tap Keyboards.
  3. Tap a language. Then select an alternative layout from the list.

See also