Got a tip for us?

iPad

The iPad is a tablet computer from Apple that runs the iOS mobile operating system. Similar in functionality to the iPhone, the iPads purpose is often quite different, sometimes even serving as a general desktop computer replacement.

You can back up iPad using iCloud or your computer. iCloud backups store information and settings on your iPad that don’t regularly sync to iCloud, including things like device settings, Home Screen layout, and app organization.

iCloud automatically backs up your iPad daily when it’s connected to power, locked, and connected to Wi-Fi. You can also save a backup of your iPad on your Mac or Windows device, and encrypt your backup data to protect it with a password.

Quick tip: When you replace your iPad, use its backup to transfer your information to the new device. Check out our guide, Restore all content to iPad from a backup, for the steps.

Back up iPad using iCloud

iCloud backups cover the information and settings on your device that don’t sync to iCloud regularly, like device settings, Home Screen layout, and app organization.

  1. Start the Settings app on your iPad.
  2. Tap [your name] and tap iCloud. Tap iCloud Backup.
  3. Turn on Back Up This iPad.

    iCloud automatically backs up your iPad daily when iPad is connected to power, locked, and connected to Wi-Fi.

    Note: On Wi-Fi + Cellular models that support 5G, your carrier may give you the option to back up iPad using your cellular network. Go to Settings > [your name] > iCloud > iCloud Backup, then turn Backup Over Cellular on or off.

  4. To perform a manual backup, tap Back Up Now.

View available iCloud storage

  1. Start the Settings app on your iPad.
  2. Tap [your name], then tap iCloud.

    The amount of iCloud storage used and the amount of iCloud storage available appear at the top of the screen.

Manage iCloud storage

Details about iCloud backups are available to view, including the next backup size, the last backup, and the apps included in the backup.

  1. Start the Settings app on your iPad.
  2. Tap [your name], then tap iCloud.
  3. Tap iCloud Backup and then tap your iPad (This iPad).
  4. To reduce the size of a backup, turn off the apps you don’t want to back up anymore; the apps’ existing backup data will also be deleted from iCloud.

Back up iPad using your Mac

You can save a backup of your iPad on your Mac.

  1. Connect iPad and your computer with a cable.
  2. In the Finder sidebar on your Mac, select your iPad.

    To use the Finder to back up iPad, macOS 10.15 or later is required. With earlier versions of macOS, use iTunes to back up iPad.

  3. At the top of the Finder window, click General.
  4. Select Back up all of the data on your iPad to this Mac.
  5. To encrypt your backup data and protect it with a password, select Encrypt local backup.
  6. Click Back Up Now.

Note: You can connect iPad to your computer wirelessly, too. Read our guide, Transfer files between your iPad and other devices.

Back up iPad using your Windows device

  1. Connect iPad and your computer with a cable.
  2. In the iTunes app on your Windows device, click the iPad button near the top left of the iTunes window.
  3. Click Summary.
  4. Click Back Up Now (below Backups).
  5. To encrypt your backups, select “Encrypt local backup,” type a password and click Set Password.

To see the backups stored on your computer, choose Edit > Preferences, then click Devices. Encrypted backups have a lock icon in the list of backups.

Note: Prefer to connect iPad to your computer wirelessly? See our article, Transfer files between your iPad and other devices.

Tags: iCloud, iPadOS

You can securely erase your personal information, content, and settings (such as privacy and network settings) from your iPad. When you erase your iPad, it’s restored to factory settings.

If you want to reset your iPad settings but keep your personal content, see Reset iPad settings to their defaults. Before you begin, you back up your iPad so you can restore your data later, and if you have an eSIM, you can choose to erase it or keep it.

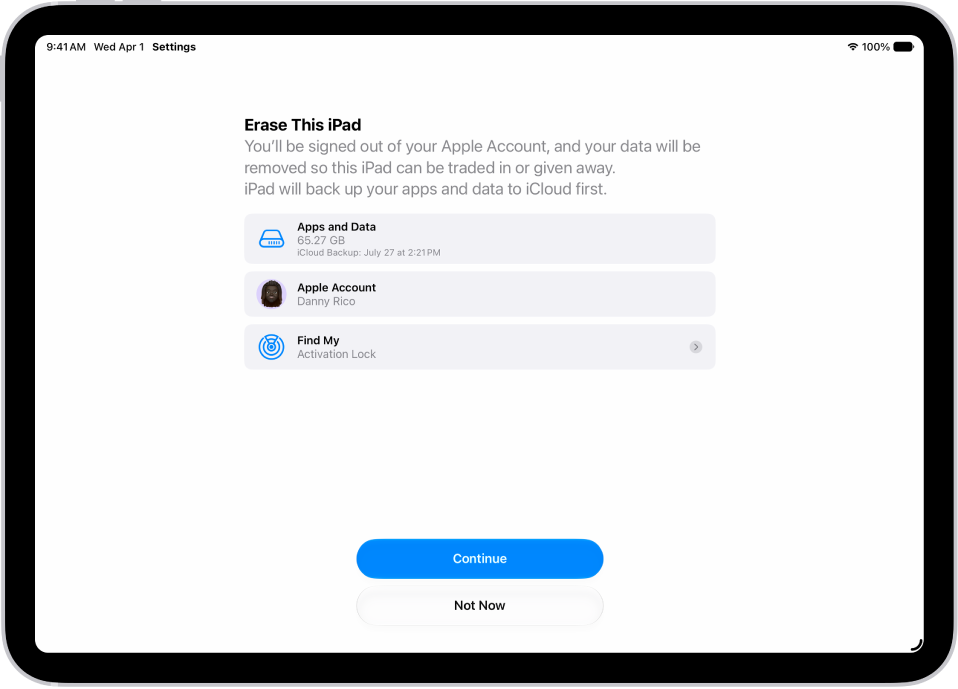
The Erase This iPad screen.

Before you begin

Back up your iPad so you can restore your data later on a different device.

Erase iPad using Settings

  1. Open the Settings app on your iPad.
  2. Tap General, then tap Transfer or Reset iPad.
  3. Tap Erase All Content and Settings.
  4. If asked, enter your iPad passcode or Apple Account password.
  5. Tap Continue to confirm.

    If you have an eSIM, you can choose to erase your eSIM or keep it. If you erase your eSIM, you need to contact your carrier to reactivate your cellular plan.

Erase iPad using your Mac or Windows device

  1. Connect your iPad to your computer with a USB or USB-C cable.
  2. On your Mac, click the Finder icon to open a Finder window, or open the Apple Devices app on your Windows device.

    If your Mac is using macOS 10.14 or earlier, or your Windows device doesn’t have the Apple Devices app, open iTunes instead.

  3. Click the iPad icon in the Finder sidebar (below Locations). Then click General at the top of the window.
  4. Click Restore iPad, then click Restore to confirm.

    Note: If you’re signed in to Find My, you need to sign out before you can click Restore.

See also

Tag: iPadOS

On an iPad with a Home button, iPad (10th generation and later), iPad Air (4th generation and later), iPad mini (6th generation), or iPad mini (A17 Pro), you can use Touch ID to securely and conveniently unlock iPad, authorize purchases and payments, and sign in to many third-party apps.

Touch ID can also fill in passwords automatically and open password-protected apps. You can choose when to use Touch ID, add a fingerprint, and name or delete one.

To use Touch ID, you must set a passcode on your iPad.

Turn on Touch ID

  1. Open Settings and then tap Touch ID & Passcode.
  2. Turn on any of the options below Use Touch ID For. Then follow the onscreen instructions.

With iTunes & App Store turned on, your first App Store, Apple Books, or iTunes Store purchase asks for your Apple Account password. For later purchases, you’re asked to use Touch ID.

Choose when to use Touch ID

With Touch ID, you can open password-protected apps, unlock your iPad, authorize payments, and automatically fill in passwords.

Go to Settings > Touch ID & Passcode, then turn on options below Use Touch ID For.

Add a fingerprint

You can add multiple fingerprints, for example both of your thumbs and forefingers.

  1. Open Settings and then tap Touch ID & Passcode.
  2. Tap Add a Fingerprint.
  3. Follow the onscreen instructions.

Name or delete a fingerprint

  1. Open Settings and then tap Touch ID & Passcode.

    If you added more than one fingerprint, do one of the following to identify its print:

    • On an iPad with a Home button: Rest a finger on the Home button.
    • On iPad (10th generation and later), iPad mini (6th generation), iPad mini (A17 Pro), and iPad Air (4th generation and later): Rest a finger on the top button.
  2. Tap the fingerprint and enter a name (such as “Thumb”) or tap Delete Fingerprint.

Turn off Touch ID

Go to Settings > Touch ID & Passcode, then turn off one or more of the options.

See also

You can connect iPad to a power outlet and charge the battery using the included USB-C power adapter and charge cable, and the adapter and cable depend on your iPad model and region. You can also use the charge cable to connect iPad to your computer for charging, transferring files, and more.

The type of charge cable depends on your iPad model, too, and the cable also lets you use iPad as a second display for your Mac. A third-party power adapter should meet the recommended specifications, like a minimum power output of 15 W.

USB-C Power Adapter

The USB-C power adapter.

A third-party power adapter should meet these recommended specifications:

  • Frequency: 50 to 60 Hz, single phase
  • Line Voltage: 100 to 240 VAC
  • Output Voltage/Current: 5 to 15 V / 3 A
  • Minimum Power Output: 15 W
  • Output Port: USB-C

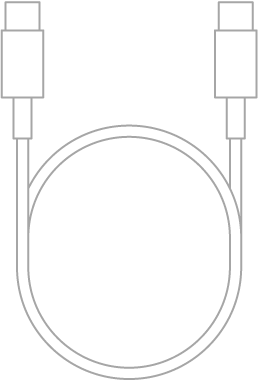
USB-C Charge Cable

The USB-C Charge Cable.

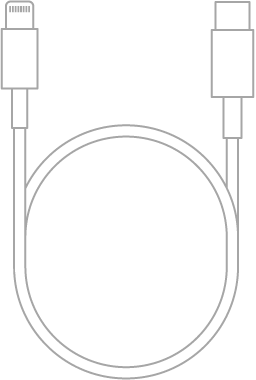
Lightning to USB-C Cable

The Lightning to USB-C Cable.

Tag: Battery

iPad Smart Keyboards and Magic Keyboards (sold separately) allow you to type while viewing the entire iPad screen. They magnetically attach to iPad without switches, plugs, or pairing, and provide a lightweight protective cover when closed.

Each keyboard is listed with the iPad models it’s compatible with, so you can find the right keyboard for your iPad, from the Magic Keyboard for iPad Pro to the Smart Keyboard Folio. You can also use shortcuts on an Apple external keyboard with iPad.

Find the right keyboard for your iPad

Keyboard Compatible with
Magic Keyboard for iPad Pro iPad Pro 11-inch (M4 and M5)

iPad Pro 13-inch (M4 and M5)

Magic Keyboard for iPad Air

Note: Requires iPadOS 18.3 or later.

iPad Air 11-inch (M2, M3, and M4)

iPad Air 13-inch (M2, M3, and M4)

iPad Air (4th and 5th generation)

Magic Keyboard for iPad Air and iPad Pro iPad Air 11-inch (M2, M3, and M4)

iPad Air 13-inch (M2, M3, and M4)

iPad Air (4th and 5th generation)

iPad Pro 11‑inch (1st, 2nd, 3rd, and 4th generation)

iPad Pro 12.9‑inch (3rd, 4th, 5th, and 6th generation)

Magic Keyboard Folio iPad (A16)

iPad (10th generation)

Smart Keyboard Folio iPad Air 11-inch (M2, M3, and M4)

iPad Air 13-inch (M2, M3, and M4)

iPad Air (4th and 5th generation)

iPad Pro 11‑inch (1st, 2nd, 3rd, and 4th generation)

iPad Pro 12.9‑inch (3rd, 4th, 5th, and 6th generation)

Smart Keyboard iPad (7th, 8th, and 9th generation)

iPad Air (3rd generation)

iPad Pro 10.5‑inch

See also

iPad has an internal, lithium-ion rechargeable battery. Compared with traditional battery technology, lithium-ion batteries are lighter, charge faster, last longer, and have a higher power density for more battery life.

The battery icon in the status bar shows the battery level or charging status. If iPad is very low on power, you’ll see an image of a nearly depleted battery, and it may need to charge for up to 10 minutes before you’re able to use it. You can improve charging speed and learn how charging behaves, too.

About charging the battery

Battery icon with a lightning bolt indicates that the battery is charging.

To see the battery level or charging status, look at the battery icon at the top right of the status bar. It can take longer to charge while you’re syncing or using iPad.

When iPad is very low on power, it may show an image of a nearly depleted battery. That means iPad needs up to 10 minutes of charging before you can use it. And if it’s extremely low on power when you start charging, the display may stay blank for as long as 2 minutes before the low-battery image appears.

Charge the battery

There’s more than one way to charge your iPad battery:

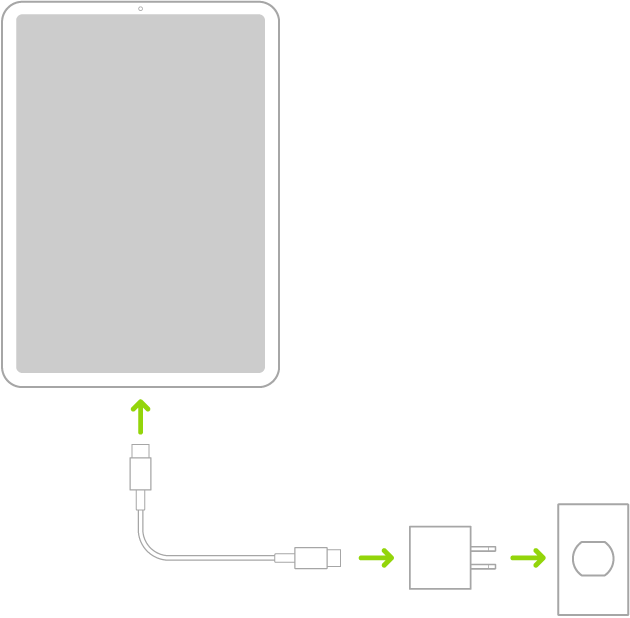
  • Connect iPad to a power outlet using the included cable and power adapter. See Power adapter and charge cable.

    iPad connected to the power adapter plugged into a power outlet.

  • Connect iPad and your computer with a cable.

    Make sure your computer is turned on—if iPad is connected to a computer that’s turned off, the battery may drain instead of charge. Look for the charging icon on the battery icon to make sure iPad is charging.

    If your Mac or Windows device doesn’t provide enough power to charge iPad, a Not Charging message appears in the status bar.

    Note: Don’t try to charge your iPad by connecting it to your keyboard, unless your keyboard has a high-power USB port.

  • When iPad is connected to a Magic Keyboard with USB-C, the keyboard can pass through power from an attached USB-C cable and power adapter.

An iCloud backup can start when you connect iPad to a power outlet. Read our guide, Back up iPad.

WARNING: If you suspect there may be liquid in the charging port of iPad, don’t plug the charging cable into it. For information about exposure to liquid, and other important safety information about the battery and charging iPad, see Important safety information for iPad.

Improve charging speed

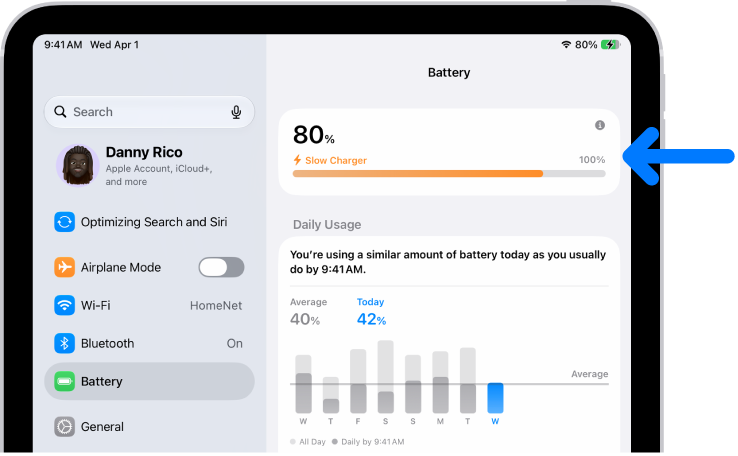
If your iPad is charging slowly, you’ll see a Slow Charger message in the Settings app, then tap Battery. This message appears when your iPad supports fast charging but the connected charger isn’t capable of delivering optimal power.

With a wired charger that provides 7.5 watts or less, charging might take longer than expected.

The charging information card in iPad Battery settings. The card shows the battery at 80% and indicates it’s connected to a “Slow Charger.”

Understand charging behavior

To help preserve long-term battery health, iPad manages how it charges. This is what happens when you charge:

  • Fast charging up to 80%: iPad charges quickly until the battery reaches about 80%.
  • Trickle charging after 80%: Charging slows to reduce battery stress and limit heat. This final stage helps maintain battery lifespan.
  • Temperature: Charging may pause temporarily while in extreme temperature conditions, and will resume once the battery’s temperature returns to its normal operating range.

These protections happen automatically and don’t require any changes to your settings.

About charge cycles and battery lifespan

The capacity of any type of battery will diminish after a certain amount of recharging. With lithium-ion batteries, the capacity diminishes slightly with each complete charge cycle. Apple lithium-ion batteries work in charge cycles and retain about 80% of its original capacity for a high number of charge cycles, depending on the product.

A charge cycle happens when you use a total of 100% of your battery’s capacity,* even if it’s not all at once. For example, you might use 75% of your battery’s capacity one day, then recharge it fully overnight. If you use 25% the next day, you will have discharged a total of 100%, and the two days will add up to one charge cycle.

Battery life and charge cycles vary with use and settings. The iPad battery should be serviced or recycled by Apple or an Apple Authorized Service Provider.

*A complete charge cycle is normalized between 80% and 100% of original capacity to account for expected diminishing battery capacity over time.

See also

Tag: Battery

You can see how much charge remains in your iPad battery in the status bar. You can also add a widget to the Home Screen to monitor the battery levels of your iPad and connected accessories, including AirPods and Apple Pencil.

By default, iPad shows a battery icon without a percentage, though you can display the number alongside the icon. Control Center shows the current percentage, too, even if that setting is off.

Show the iPad battery percentage in the status bar

iPad shows a battery icon without a percentage by default, but turning on Battery Percentage displays the number alongside the icon.

  1. Start the Settings app on your iPad.
  2. Tap Battery and then turn on Battery Percentage.

Check the battery percentage in Control Center

Even with Battery Percentage turned off in Settings, Control Center shows the current battery percentage.

Add a Batteries widget to your Home Screen

See Add a widget to your Home Screen and Create a custom Lock Screen.

See also

Tag: Battery

When you subscribe to Apple Music, you can browse new and noteworthy music, music videos, playlists, and more.

You can explore featured songs and videos, browse playlists created by music experts, and explore new releases. You can also see upcoming concerts and what’s hot, listen to the top songs from around the world, and even discover your most-played music of the year.

Here’s how to find new music with Apple Music on iPad.

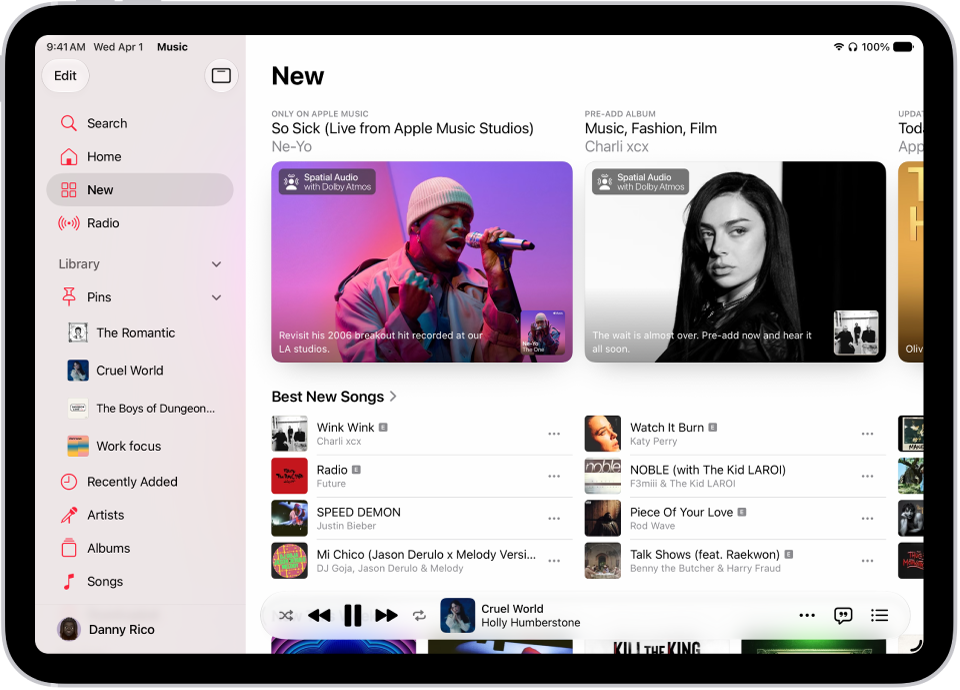
The New tab showing the sidebar on the left and the New section at the right. The New tab shows featured music at the top. Swipe left to see more featured music and videos. The Best New Songs section appears below. The MiniPlayer is at the bottom.

Discover new releases, featured music, and more

  1. Open the Music app on your iPad.
  2. Tap New to find new music and then do any of the following:

    • Explore featured music: Swipe through featured songs and videos at the top of the screen.
    • Browse playlists created by music experts: Tap one of the many playlists created by music experts.
    • Explore new music: Tap a song below the Latest Songs heading or swipe through the albums listed below New Releases.
    • See upcoming concerts: Go to any Artist page to see upcoming concerts. Scroll down to see details under All Upcoming Concerts. To view all upcoming concerts and update your location in the Concerts Hub, tap the Search tab and then tap Concerts.

      Note: Concerts isn’t available in China.

    • See what’s hot: Tap a song below the Trending Songs heading. Swipe left to see more songs.
    • Listen to the top songs from around the world: Tap one of the Daily Top 100 playlists. These playlists reflect the day’s most popular songs in countries across the globe.
    • Listen to songs from upcoming albums: Tap an album below Coming Soon and tap an available song to play it.
    • Watch music videos: Tap Music Videos and then tap a featured music video or playlist of music videos.
    • Play the day’s most popular songs: Tap Charts and tap a song, playlist, album, or music video to play it. Tap All Genres at the top of the screen to see the top songs and music videos in a genre you choose.
    • Browse your favorite genres: Tap Browse by Genre, choose a genre, and then tap a featured playlist, song, album, artist, or radio station to enjoy music handpicked by music experts.
    • Play music that matches your mood: Tap Moods and Activities and tap a playlist such as Feel Good, Romance, or Party.

Note: Swipe left on the album art to see more music, and if you want all the music in a section, such as New Releases, tap the Forward button next to the section’s name.

Discover your most-played music of the year

For every year you’ve been subscribed to Apple Music (and listened to enough music to become eligible), Apple Music builds a Replay personal chart ranking the songs you’ve played the most.

  1. Open the Music app on your iPad.
  2. Tap Home, swipe down to Replay: Your Top Music, and tap an option (for example, a year).

You can also see all your insights throughout the year on your iPad or at the Apple Music Replay website.

Discover music you’ve never played before

Using your listening history and taste profile, Apple Music recommends music you may like that you’ve never played before.

Siri: Ask Siri something like, “Play my Discovery Station.” Learn how to use Siri.

  1. Open the Music app on your iPad.
  2. Tap Home in the sidebar. Then swipe down to Stations for You.
  3. Tap Discovery Station.

Turn on or off new music notifications

  1. Open the Music app on your iPad.
  2. Tap the Show Sidebar button. Then tap your name at the bottom of the sidebar.
  3. Tap Notifications, then turn on (or off) New Music.
Tag: Music

Low Power Mode reduces the amount of power that your iPad uses when the battery gets low. It optimizes performance for essential tasks like making and receiving calls, sending and receiving email and messages, accessing the internet, and more. On iPad models with ProMotion display technology, Low Power Mode limits the display refresh rate to 60 frames per second.

It turns off on its own when your iPad charges to 80 percent or higher, so you don’t need to switch it off yourself.

Note: When iPad is in Low Power Mode, it might perform some tasks more slowly.

Turn Low Power Mode on or off

To turn Low Power Mode on or off, use any of these methods:

  • In Settings: Go to the Settings app, tap Battery, then tap Low Power Mode.
  • In Control Center: Add the Low Power Mode button to Control Center, then tap the Low Power Mode button.

Low Power Mode turns off automatically when iPad charges to 80 percent or higher.

See also

Tag: Battery

You can use the Contacts app to create, find, share, and delete contacts.

Siri can even suggest new contacts based on what you do in Mail and Calendar. You can also search your contacts using Spotlight, and quickly reach a contact with a call, message, or email. And you can change the default phone number or email address for a contact.

Here’s how to add and use contact information on iPad.

Siri: Siri can update information about a contact. Say something like, “Sarah Milos is my sister.” Learn how to use Siri.

Create a contact

  1. Start the Contacts app on your iPad.
  2. Tap the Add button.
  3. Enter details for the contact such as name and phone number and tap the Done button.

Siri suggests new contacts based on your activity in other apps, such as Mail and Calendar. Siri also suggests adding contact information in other apps based on how you use Contacts. To turn off either feature, go to the Settings app, tap Apps, then tap Contacts. Tap Siri (or Apple Intelligence & Siri), then turn off Show Contact Suggestions or Learn from this App.

Find a contact

Tap the search field at the top of the contacts list, then enter a name, address, phone number, or other contact information.

You can also search your contacts with Search (see our guide, Search with Spotlight).

Share a contact

  1. Start the Contacts app on your iPad.
  2. Tap a contact and tap Share Contact. Then choose the fields you want to share.
  3. Tap the Done button then choose a sharing option, such as Messages or Mail.

Quickly reach a contact

  1. Start the Contacts app on your iPad.
  2. Tap a contact.
  3. Tap a button below the contact’s name to do any of the following: start a message, make a phone call or a FaceTime call; or compose an email.

To change the default phone number or email address for a contact method, touch and hold the button for that method below the contact’s name, then tap a selection in the list.

Delete a contact

  1. Start the Contacts app on your iPad.
  2. Go to the contact’s card and tap Edit.
  3. Scroll down, tap Delete Contact, and then tap Delete Contact again to confirm your edit.

See also