Got a tip for us?

iPad

The iPad is a tablet computer from Apple that runs the iOS mobile operating system. Similar in functionality to the iPhone, the iPads purpose is often quite different, sometimes even serving as a general desktop computer replacement.

Use iCloud Keychain to keep your website and app passwords and passkeys, credit card information, Wi-Fi network information, and other account information up to date across all your approved devices and Mac computers. It’s secured with 256-bit AES encryption during storage and transmission, and its data can’t be read by Apple.

iCloud Keychain can also keep your Mail, Contacts, Calendar, and Messages accounts up to date on your iPhone, iPad, and Mac. When you add a device, you approve it on one of your others.

Set up iCloud Keychain

Skipped iCloud Keychain when you first set up your iPad? You can still set it up now.

  1. Start the Settings app on your iPad.
  2. Tap your name, then tap iCloud.
  3. Tap See All (next to Saved to iCloud) and tap Passwords & Keychain.
  4. Turn on Sync this iPad. Follow the onscreen instructions.

Set up iCloud Keychain on an additional device

Turning on iCloud Keychain on an additional device sends a notification to your other devices using iCloud Keychain, asking you to approve the additional device.

After you approve the additional device on one of your other devices, your iCloud Keychain automatically begins updating on it.

If you don’t have access to your other devices, you can still approve iCloud Keychain by following the onscreen instructions to use your iCloud Security Code.

Recover your iCloud Keychain if all your devices are lost or stolen

iCloud Keychain syncs across devices to provide convenience and redundancy in case you lose a single device. If all your devices are lost and you’ve added a recovery contact to your Apple Account, your contact can help you recover your iCloud Keychain. Go to Settings > [your name] > Sign-In & Security, tap Recovery Contacts, then tap Learn More.

You can also recover your iCloud Keychain through iCloud Keychain escrow, which is also protected against brute-force attacks. According to Apple, iCloud Keychain escrows a user’s keychain data with Apple without allowing Apple to read the passwords and other data it contains. Your keychain is encrypted using a strong passcode, and the escrow service provides a copy of the keychain only if a strict set of conditions is met.

Recovering your keychain through iCloud Keychain escrow starts with authenticating with your Apple Account on a new device and responding to an SMS sent to a trusted phone number. After that, you must enter the device passcode. iOS, iPadOS, and macOS give you only 10 attempts to authenticate, and after several failed attempts, the record locks. To be granted more attempts, you must contact Apple Support on the Apple Support website.

For better security, set a passcode that needs to be entered to unlock iPad when you turn it on or wake it. Setting a passcode also turns on data protection, which encrypts your iPad data with 256-bit AES encryption (some apps may opt out).

The most secure options are in Passcode Options. After you set one, you can use Face ID or Touch ID to unlock iPad on supported models.

Set or change the passcode

  1. Open Settings. Then depending on your model, tap one of the following:

    • Face ID & Passcode
    • Touch ID & Passcode
  2. Tap Turn Passcode On or Change Passcode.

    To view options for creating a passcode, tap Passcode Options. The most secure options are Custom Alphanumeric Code and Custom Numeric Code.

After you set a passcode, on supported models you can use Face ID or Touch ID to unlock iPad (depending on your model). For additional security, however, you must always enter your passcode to unlock your iPad under the following conditions:

  • You turn on or restart your iPad.
  • You haven’t unlocked your iPad for more than 48 hours.
  • You haven’t unlocked your iPad with the passcode in the last 6.5 days, and you haven’t unlocked it with Face ID or Touch ID in the last 4 hours.
  • Your iPad receives a remote lock command.
  • There are five unsuccessful attempts to unlock your iPad with Face ID or Touch ID.

Change when iPad automatically locks

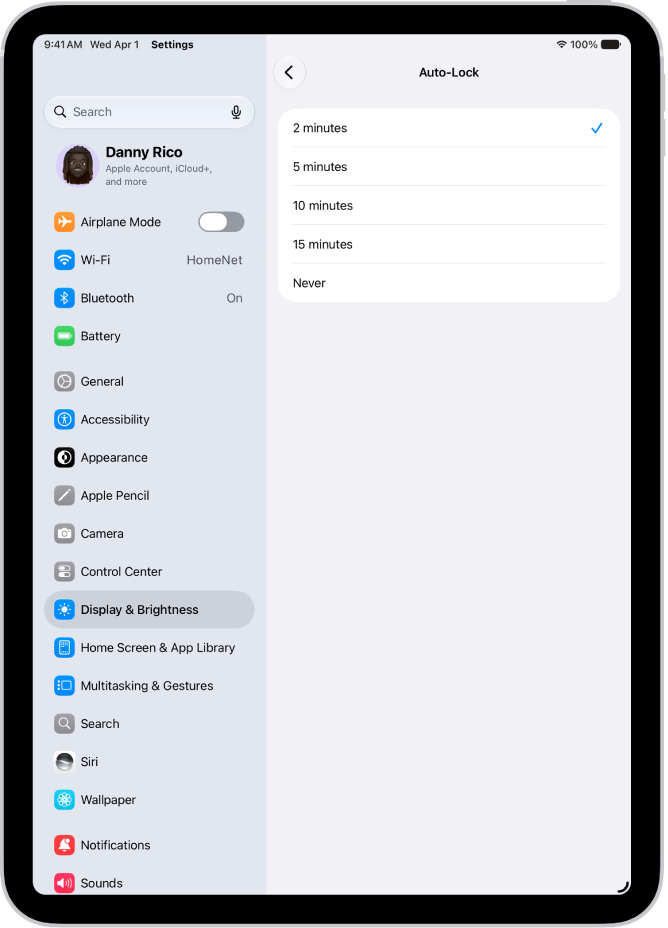
Go to Settings > Display & Brightness > Auto-Lock, then set a length of time.

The Auto-Lock screen, with settings for the length of time before iPad automatically locks.

Erase data after 10 failed passcodes

You can set iPad to erase all your information, media, and personal settings after 10 consecutive failed passcode attempts.

  1. Open Settings. Then depending on your model, tap one of the following:

    • Face ID & Passcode
    • Touch ID & Passcode
    • Passcode
  2. Turn on Erase Data.

    Note: If you keep your iPad on the Home Screen and don’t take any action, your Auto-Lock time is reduced by half.

With all data erased, you must restore iPad from a backup, or, if you didn’t back up your iPad, set it up again as new.

Turn off the passcode

  1. Open Settings. Then depending on your model, tap one of the following:
    • Face ID & Passcode
    • Touch ID & Passcode
    • Passcode
  2. Tap Turn Passcode Off.

Reset the passcode

Entering the wrong passcode four times in a row locks you out of your device, and you’ll see a message that says iPad is disabled. Can’t remember your passcode? Erase your iPad with a computer or with recovery mode, and then set a new passcode.

Note: You can restore your data and settings from an iCloud or computer backup, as long as you made it before you forgot your passcode.

See also

You can restore content, settings, and apps from a backup to a new or newly erased iPad. You can restore from an iCloud backup or a computer backup, and if you’ve already set up your iPad, you need to erase all of its content first. If your backup is encrypted, you’ll need its password, too.

Important: To restore your iPad, you must have a backup to restore from. See Back up iPad.

Restore iPad from an iCloud backup

  1. Turn on your iPad.

    The Hello screen should appear. If you already set up your device, you need to erase all of its content before you can use these steps to restore from your backup.

  2. Do one of the following:

    • Tap Set Up Manually, tap Restore from iCloud Backup, then follow the onscreen instructions.
    • If you have another iPad, iPhone, or iPod touch with iOS 11, iPadOS 13, or later, you can use Quick Start to automatically set up your new device. Bring the two devices close together, then follow the onscreen instructions to securely copy many of your settings, preferences, and iCloud Keychain. You can then restore the rest of your data and content to your new device from your iCloud backup.

      Or, if both devices have iOS 12.4, iPadOS 13, or later, you can transfer all your data wirelessly from your previous device to your new one. Keep your devices near each other and plugged into power until the migration process is complete.

You’re asked for your Apple Account. If you’ve forgotten your Apple Account, go to the Recover your Apple Account website.

Restore iPad from a computer backup

  1. Using USB, connect a new or newly erased iPad to the computer containing your backup.
  2. Do one of the following:
    • On a Mac (macOS 10.15 or later): In the Finder sidebar, select your iPad, click Trust, and click Restore from this backup.
    • On a Mac (macOS 10.14 or earlier) or a Windows device: Open the iTunes app, click the button resembling an iPad near the top left of the iTunes window, click Summary, and then click Restore Backup.
  3. Choose your backup from the list and click Continue.

If your backup is encrypted, you need to enter the password before you restore your files and settings.

Tags: iCloud, iPadOS

With Handoff, you can start a task on one device and complete it on another—say, start an email on your iPad and finish it on your Mac computer’s bigger screen. It works with many Apple apps, like Safari, Mail, FaceTime, and Maps, and some third-party apps, too. You can use it between your iPhone, iPad, and Mac, and between your Apple Watch and iPhone.

Both devices need Wi-Fi and Bluetooth® turned on, and you need to be signed in to the same Apple Account on both. When your devices are near each other, you’ll see an icon whenever a task can be handed off.

Before you begin

Before using Handoff between your devices, check that each of these is true:

  • Both devices have Wi-Fi and Bluetooth® turned on.
  • You’re signed in to the same Apple Account on both devices.
  • Both devices meet minimum system requirements for Handoff.

Using a VPN? Check that its configuration doesn’t prevent local networking, since that may interfere with some Continuity features.

Turn on Handoff

Turn on Handoff on both your iPad and your other Apple device.

  • On your iPhone or iPad: Go to Settings > General > AirPlay & Continuity, then turn on Handoff.
  • On your Mac: Choose Apple menu > System Settings, click General in the sidebar. (You may need to scroll down.) Click AirPlay & Continuity, then turn on Handoff.

    Note: If your Mac has macOS 12.5 or earlier, choose Apple menu > System Preferences, click General, then select “Allow Handoff between this Mac and your iCloud devices.”

Hand off a task between your iPad and other devices

When your devices are near each other, an icon appears whenever a task can be handed off. Just tap or click the Handoff icon to continue working on your other device.

Where the Handoff icon shows up depends on the device:

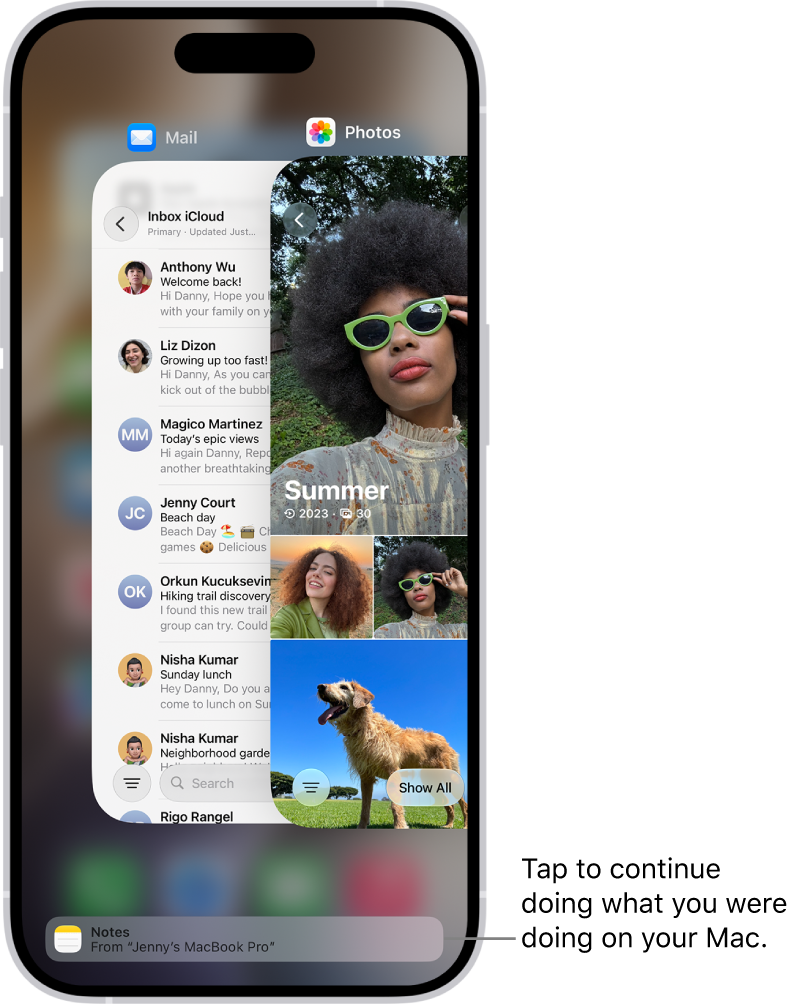
  • On an iPhone: At the bottom of the App Switcher screen.

    The App Switcher on iPhone showing a handoff notification at the bottom of the screen.

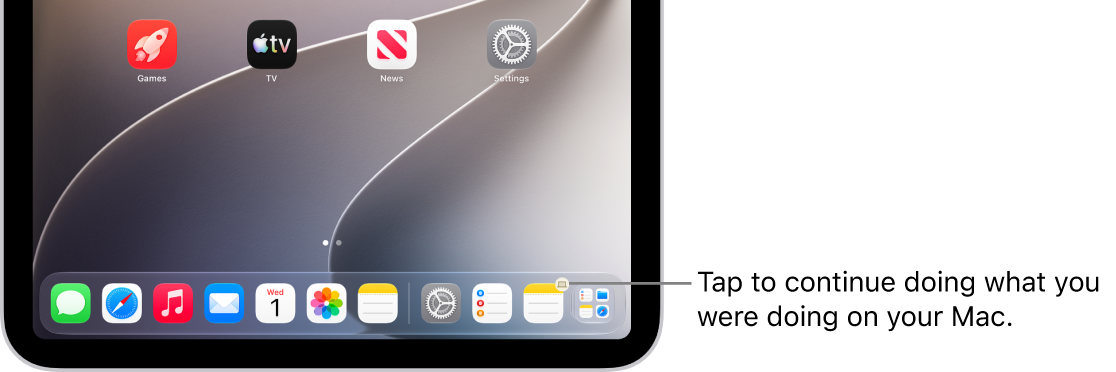
  • On an iPad: At the right end of the Dock.

    The Handoff icon visible in the Dock on an iPad.

  • On a Mac: Toward the right end of the Dock, if the Dock is at the bottom of the screen. If you set up the Dock to appear on the left or right side of your screen, the Handoff icon appears at the bottom of the Dock.

If Handoff isn’t working

  • Make sure that both devices have Wi-Fi and Bluetooth turned on, and you’re signed in to the same Apple Account.
  • Check that your app supports Handoff. Calendar, Contacts, FaceTime, Keynote, Mail, Maps, Pages, Numbers, Reminders, and Safari, as well as many third-party apps, allow Handoff.

Quick tip: With Handoff on, Universal Clipboard lets you copy and paste text, images, photos, and videos across devices.

See also

You can use a feature called Universal Clipboard to copy content from one of your Apple devices and paste it on another. You might copy text on your iPad and paste it into a note on your iPhone, or copy an image from Safari and paste it into an email on your Mac.

It works with your iPhone, iPad, and Mac, as long as both devices have Wi-Fi, Bluetooth®, and Handoff turned on and you’re signed in to the same Apple Account.

Before you begin

For Universal Clipboard to work, all of these need to be true:

  • Both devices have Wi-Fi, Bluetooth®, and Handoff turned on.
  • You’re signed in to the same Apple Account on both devices.
  • Both devices meet minimum system requirements for Universal Clipboard.

If you’re using a VPN, confirm its configuration doesn’t block local networking, since that may interfere with some Continuity features.

Copy and paste between your iPad and other devices

You won’t actually see Universal Clipboard. It works just like copy and paste on your iPad, except you can paste on one of your other Apple devices, like a Mac or an iPhone.

  1. Select the text or image on your iPad, then tap Copy.
  2. On your other device, either tap (on another iPad or an iPhone) or click (on a Mac) where you want to paste the text or image. Then tap or click Paste. You can also use keyboard shortcuts.

    For more information on how to copy or paste on your iPhone, iPad, or Mac, see How to copy and paste on an iPhone or iPad or How to copy and paste on a Mac.

    Note: When you copy the content, it’s available on your Clipboard for a time.

How to copy and paste on an iPhone or iPad

  • Select and copy text: Double-tap with one finger to select a word or triple-tap with one finger to select a paragraph. (You can also move the grab points to adjust your selection.) Then tap Copy.
  • Select and copy an image: Touch and hold to select an image, then tap Copy.
  • Paste text or an image: Tap where you want to paste the text or image, then tap Paste.

For more gestures that let you copy and paste, check out our guide, Select, cut, copy, and paste text on iPad.

How to copy and paste on a Mac

  • Select text or an image: With your pointer, select the text or image you want to copy.
  • Copy text or an image: Press Command-C or choose Edit > Copy from the menu bar.
  • Paste text or an image: Move your pointer where you want to paste the text or image and click, then press Command-V or choose Edit > Paste from the menu bar.

Additional gestures can also help you copy and paste. See our article, Select, cut, copy, and paste text on iPad.

If Universal Clipboard isn’t working

  • Make sure that you’re signed in to the same Apple Account on both devices.
  • Make sure that both devices have Wi-Fi, Bluetooth, and Handoff turned on.
  • Your devices must be within 30 feet (10 meters) of one another.
  • If you’re having difficulty getting Universal Clipboard to work, restart your devices and try again.

Universal Clipboard works best for small selections of text or copied images. To share multiple files between your iPad and Mac, check out our guide, Transfer files from iPad to a storage device, a server, or the cloud.

See also

With AirDrop, you can wirelessly send photos, videos, documents, and more to a nearby iPhone, iPad, or Mac. AirDrop can send files to your own devices or share files with others.

Transfers are encrypted for security, and the recipient can accept or decline each transfer as it arrives. Both devices need Wi-Fi and Bluetooth® turned on, within 30 feet (10 meters) of each other, and when you’re signed in to the same Apple Account on your own devices, items are accepted and saved automatically.

Here’s how to use AirDrop on iPad to send items to nearby Apple devices.

Note: If you leave Bluetooth or Wi-Fi range once an AirDrop transfer has been initiated, it continues over the internet.
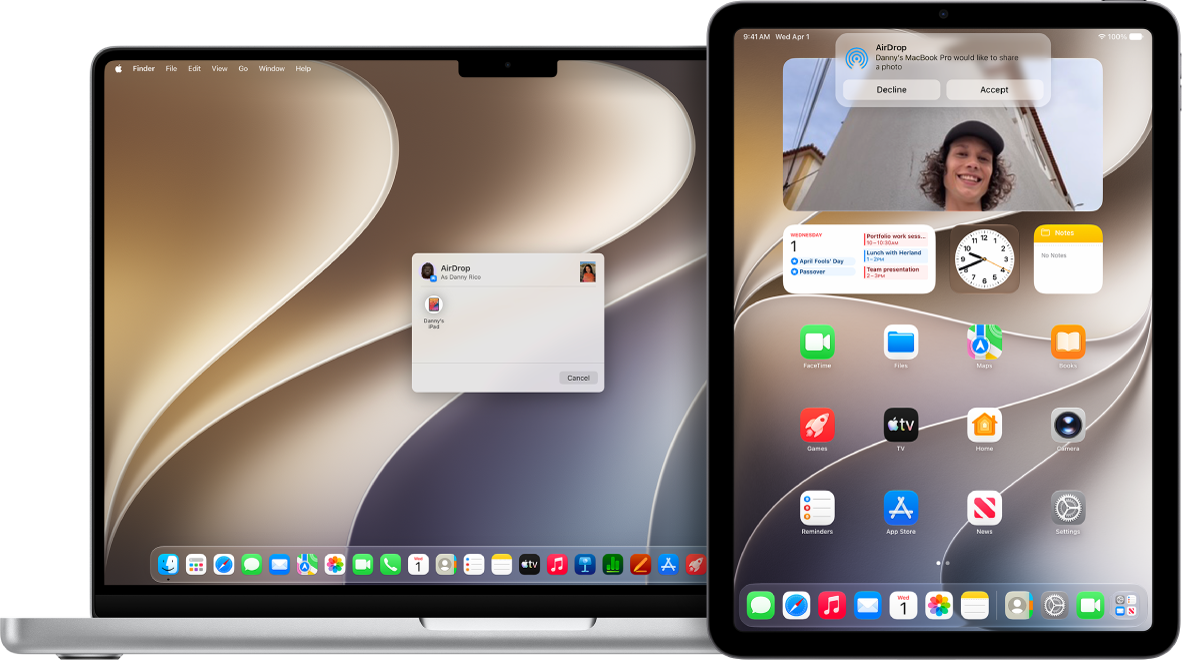
A Mac is next to an iPad. The AirDrop dialog is open on the Mac desktop, ready to share a document with the iPad. The iPad screen has a notification about receiving the document.

Before you begin

To use AirDrop, both devices need to meet the following:

  • Both devices have Wi-Fi and Bluetooth® turned on.
  • The devices are within 30 feet (10 meters) of each other.

If a VPN you’re using has a configuration that prevents local networking, it may interfere with some Continuity features.

If you want to send items between your Apple devices with AirDrop, sign in to the same Apple Account on each so the items are automatically accepted and saved.

Turn on AirDrop

  • On an iPhone or iPad: Open Control Center, touch and hold the top-left group of controls, then tap the AirDrop icon. Tap Contacts Only or Everyone for 10 Minutes to choose who you want to receive items from.

    Note: The Contacts Only and Everyone for 10 Minutes options are available only on devices with minimum system requirements.

  • On a Mac: Click Control Center status menu in the menu bar, then click the AirDrop icon. When it’s blue, it’s on.

    To choose who can send items to you, click the right arrow next to AirDrop, then click Contacts Only or Everyone.

Send an item using an AirDrop code

Someone who isn’t in your contacts must use an AirDrop code to send you an item with AirDrop on iPadOS 26.2, iOS 26.2, macOS 26.2, or later.

If you choose to receive the item, select Continue. The AirDrop code appears on your device. After you share the code with the sender and they enter it on their device, the item is shared.

You can continue to share and receive items using AirDrop with that person for 30 days without needing to use another AirDrop code. If you no longer want to share items before the 30 days are up, go to the Contacts app, find the sender in your Other Known list, then select Forget This Person.

Send an item using AirDrop

Both you and your recipient must have AirDrop turned on to send an item to someone with AirDrop.

Sending items to someone who only accepts items from a contact requires you to be in their contacts list, with your Apple Account email address or phone number in your contact card.

After that, do any of the following:

  • On an iPhone or iPad: Open the item, then tap the Share icon, Share, the AirDrop icon, the More ellipsis button, or another button (depending on the app). Tap the AirDrop icon, then tap the recipient you want to share with. The recipients you see are those who are nearby, have Wi-Fi and Bluetooth turned on, and are able to accept files from your device.
  • On a Mac: Open the item on a Mac, click the Share icon in the toolbar, then click AirDrop. Select the recipient you want to share with. The recipients you see are those who are nearby, have Wi-Fi and Bluetooth turned on, and are able to accept files from your device.

    Tip: You can also share items with AirDrop in the Finder. To open a Finder window, click the Finder icon in the Dock. Click AirDrop in the sidebar, then drag the item you want to share to the recipient you want to send it to.

Asked by a notification to enter a code before you can share the item? Use the AirDrop code generated on the recipient’s device.

AirDrop can also securely share app and website passwords with a person using an iPhone, iPad, or Mac. Read our article, Share passwords and passkeys with people you trust on iPad.

Receive items with AirDrop

On your device, tap or click Accept on the AirDrop notification.

If you see a notification that you need an AirDrop code in order to receive the item, tap or click Get AirDrop Code and share it with the sender. The sender enters the code on their device in order to send the item with AirDrop.

Note: Items you send between devices where you’re signed in to the same Apple Account are automatically accepted.

Items usually land in the app they’re sent from, so a photo someone sends with AirDrop from the Photos app is saved in the Photos app on your device.

Your files may end up in other places, depending on the device. Some items may be saved in the Files app on an iPhone or iPad, while a Mac automatically saves some items in the Downloads folder. You may also get the option on a Mac to choose where to save items, like saving a photo in the Downloads folder or opening it in Photos.

Note: With AirDrop open in the Finder on a Mac, a notification to accept or decline appears here instead of in Notification Center.

When you send items from one of your Apple devices to another, like from your Mac to your iPad, they’re accepted and saved automatically if both devices are signed in to the same Apple Account.

Turn off cellular data for AirDrop

Cellular data charges may apply when you use AirDrop.

If you don’t want to use cellular data when you’re out of Bluetooth or Wi-Fi range, go to Settings > General > AirDrop, then turn off Use Cellular Data.

This is typically a one-time setting. You might want to change it when you’re traveling, though, to avoid roaming charges.

If AirDrop isn’t working

  • Make sure that both the sender and recipient have Wi-Fi and Bluetooth turned on and that you’re both using an iPhone, iPad, or Mac.
  • Check that the recipient has their AirDrop settings set to receive from Everyone or Contacts Only.
  • If you’re having difficulty getting AirDrop to work, restart your device and try again.

AirDrop works best for a small selection of files. To share many files between your Mac and other Apple devices, read our guide, Transfer files from iPad to a storage device, a server, or the cloud.

See also

Tag: AirDrop

With iPad and a computer, you can transfer files using an external storage device, a file server, or a cloud storage service like iCloud, Box, or Dropbox.

You can copy files to a storage device such as a USB drive or SD card with a supported app like Files or Pages, and to connect one to iPad, you might need a cable adapter. In the Files app, you can rename, erase, open, or get info on a connected storage device. On iPad models with a USB-C port, you can even change an external drive to APFS, ExFAT, or MS-DOS (FAT).

Transfer files with an external storage device

  1. Connect your iPad or computer to an external storage device, such as a USB drive or SD card.

    To connect to iPad, you might need a cable adapter. See Connect external storage devices.

    Note: If an alert appears on iPad asking whether to trust this computer, select Trust.

  2. Use a supported app (like Files or Pages) to copy files to the storage device. See Organize files and folders.
  3. Disconnect the storage device and then connect it to the device where you want the copied files to appear.
  4. Copy the files to the connected device.

Access an external storage device

A connected external storage device is something you can open, rename, erase, and get information about.

  1. Go to the Files app on your iPad.
  2. Tap the Sidebar button at the top of the screen.
  3. Touch and hold the name of the storage device below Locations and then do any of the following:
    • View the contents of the storage device: Tap Open in New Window.
    • Rename the storage device: Tap Rename [device].
    • Erase the storage device: Tap Erase.
    • Get information about the storage device: Tap Get Info.

Change the formatting of an external storage device

iPad models that have a USB-C port can use the Files app to quickly reformat an external drive as MS-DOS (FAT), APFS (Apple File System), or ExFAT.

  1. Start the Files app on your iPad.
  2. Tap the Toggle Sidebar button at the top of the screen.
  3. Touch and hold the name of the storage device below Locations. Tap Erase.
  4. Select a format for the device—for example, APFS, ExFAT, or MS-DOS (FAT)—then tap Erase again.

Connect to a computer or file server

  1. Start the Files app on your iPad.
  2. Tap the Sidebar button at the top of the screen.
  3. Tap the More button at the top of the sidebar.
  4. Tap Connect to Server.
  5. Enter a local hostname or a network address, then tap Connect.

    Tip: After you connect to a computer or file server, it appears in the Recent Servers list on the Connect to Server screen. To connect to a recent server, tap its name.

  6. Select how you want to connect:

    • Guest: You can connect as a Guest user if the shared computer permits guest access.
    • Registered User: If you select Registered User, enter your user name and password.
  7. Tap Next and then select the server volume or shared folder in the Browse sidebar (below Shared).

To disconnect from the file server, tap the Eject button next to the server in the Browse sidebar.

Transfer files with a cloud storage service like Box or Dropbox

Note: Subscription fees might apply.

  1. On your iPad or computer, follow the instructions from your cloud storage service to upload the files you want to share.
  2. To access your shared files on iPad, open the Files app, tap the Sidebar button at the top of the screen, and tap the name of the storage service below Locations.

    To access the shared files on a computer, follow the service’s instructions.

Keep selected files downloaded

Files you want to access on your iPad at all times can stay downloaded, and changes you make to them while offline sync with iCloud when you’re back online.

  1. Start the Files app on your iPad.
  2. Locate a file you want to keep downloaded.
  3. Touch and hold the file you want to keep downloaded. Then tap Keep Downloaded in the menu that opens.

    If Keep Downloaded doesn’t appear in the menu, the file is already on your iPad.

See also

Tag: Files

You can use a cable to directly connect your iPad to a Mac with OS X 10.9 or later, or to a Windows device with Windows 7 or later. A cable connection is how you set up iPad, share your internet connection, update iPad, or sync content with your computer.

Using the charging cable for your iPad, connect iPad to the USB port on your computer. If the cable isn’t compatible with the port on your computer, you’ll need to use an adapter (sold separately).

Note: When your iPad shows an alert asking whether to trust this computer, select Trust.

After connecting iPad to a computer with a cable, you’re able to do any of the following:

While iPad is connected to your computer, the iPad battery charges, as long as your computer is connected to power.

Tag: iPadOS

You can return your iPad settings to their defaults without erasing your content. If you want to save your settings, back up iPad before resetting it, so you can restore your previous settings from a backup if resetting doesn’t solve a problem.

Reset All Settings removes or resets things like network settings, the keyboard dictionary, location and privacy settings, and Apple Pay cards, but no data or media are deleted. You can also reset just your network settings, or erase all content and settings.

  1. Open the Settings app on your iPad.
  2. Tap General, tap Transfer or Reset iPad, and then tap Reset.

    WARNING: If you choose the Erase All Content and Settings option, all your content is removed. See Erase iPad.

  3. Choose an option:

    • Reset All Settings: All settings—including network settings, the keyboard dictionary, location settings, privacy settings, and Apple Pay cards—are removed or reset to their defaults. No data or media are deleted.
    • Reset Network Settings: All network settings are removed. In addition, the device name assigned in Settings > General > About is reset to iPad, and manually trusted certificates (such as for websites) are changed to untrusted.

      Cellular data roaming may also be turned off. (See View or change cellular data settings on iPad (Wi-Fi + Cellular models).)

      When you reset network settings, previously used networks and VPN settings that weren’t installed by a configuration profile or mobile device management (MDM) are removed. Wi-Fi is turned off and then back on, disconnecting you from any network you’re on. The Wi-Fi and Ask to Join Networks settings remain turned on.

      To remove VPN settings installed by a configuration profile, go to Settings > General > VPN & Device Management, select the configuration profile, then tap Remove Profile. This also removes other settings and accounts provided by the profile. See Install or remove configuration profiles.

      To remove network settings installed by MDM, go to Settings > General > VPN & Device Management, select the management, then tap Remove Management. This also removes other settings and certificates provided by MDM.

    • Delete All eSIMs (Wi-Fi + Cellular models): All eSIMs stored on your iPad are deleted. You will need to set up a new eSIM or physical SIM card to connect to a cellular network. See Set up cellular service on iPad (Wi-Fi + Cellular models).
    • Reset Keyboard Dictionary: You add words to the keyboard dictionary by rejecting words iPad suggests as you type. Resetting the keyboard dictionary erases only the words you’ve added.
    • Reset Handwriting Style: Resets custom handwriting preferences to their defaults.
    • Reset Home Screen Layout: Returns the built-in apps to their original layout on the Home Screen.
    • Reset Location & Privacy: Resets the location services and privacy settings to their defaults.

To completely erase your iPad, read our guide, Erase iPad using Settings. And if you need to use a computer to erase your iPad, see our article, Erase iPad using your Mac or Windows device.