








Got a tip for us?

Music

Apple Music subscribers can access millions of tracks encoded using lossless audio compression, a form of compression that preserves all of the original data. Apple has developed its own lossless audio compression technology called Apple Lossless Audio Codec (ALAC), and the entire Apple Music catalog is encoded using ALAC in resolutions ranging from 16-bit/44.1 kHz (CD Quality) up to 24-bit/192 kHz.

There are trade-offs, though. Streaming lossless audio consumes significantly more data, and downloading it uses significantly more space on your device. And Bluetooth® connections aren’t lossless.

What you need to know about lossless in Apple Music

  • Streaming lossless audio over a cellular or Wi-Fi network consumes significantly more data. And downloading lossless audio uses significantly more space on your device. Higher resolutions use more data than lower ones.
  • AirPods, AirPods Pro, AirPods Max, and Beats wireless headphones use Apple AAC Bluetooth Codec to ensure excellent audio quality. However, Bluetooth® connections aren’t lossless.
  • To get a lossless version of music that you already downloaded from Apple Music, just delete the music and redownload it from the Apple Music catalog.
  • To play songs at sample rates higher than 48 kHz on iPhone, you need an external digital-to-analog converter.

Note: Apple Music and lossless aren’t available in all countries or regions.

Turn on Lossless Audio and choose audio quality settings

For cellular streaming, Wi-Fi streaming, and downloads, you can choose audio quality settings.

  1. Open Settings, tap Apps, and then tap Music.
  2. Tap Audio Quality and tap Lossless Audio to turn it on or off.
  3. Choose the audio quality for streaming and downloading audio.
    • Choose Lossless for a maximum resolution of 24-bit/48 kHz.
    • Choose Hi-Res Lossless for a maximum resolution of 24-bit/192 kHz.

Note: Automix and Crossfade don’t work while Hi-Res Lossless is turned on. If you want Automix or Crossfade, select Lossless or another audio quality setting instead.

Streamed music’s audio quality depends on network conditions, song availability, and the capability of connected headphones or speakers.

Identify lossless music

The Lossless icon appears on album pages when the music is available in lossless audio. To see the Lossless icon for music on the Now Playing screen, go to Settings > Apps > Music > Audio Quality, then turn on Lossless Audio.
Tag: Music

Use the queue to see a list of upcoming songs, add songs and videos to the queue, and see what you recently played.

You can also use AutoPlay to add songs to the queue, manage the queue, and turn song transitions in the queue on or off. You can reorder the list, too. While a song is playing, the queue is on the Now Playing screen.

Here’s how to queue up your music on iPhone.

Use the queue

  1. Start the Music app on your iPhone.
  2. While a song is playing, tap the MiniPlayer to open the Now Playing screen.
  3. Tap the Playing Next button and tap a song to play it and the songs that follow.

    To reorder the list, drag the Reorder button.

  4. Tap the Playing Next button again to hide the queue.

Add music and music videos to the queue

  1. Start the Music app on your iPhone.
  2. While browsing or playing music, touch and hold a song, album, playlist, or video. Choose an option:
    • Add music right after the currently playing item: Tap Play Next.
    • Add music to the end of the queue: Tap Play After or Add to Queue.

Quick tip: When you’re using HomePod to stream music, friends on the same Wi-Fi network can add items to the queue.

Use AutoPlay to add songs to the queue

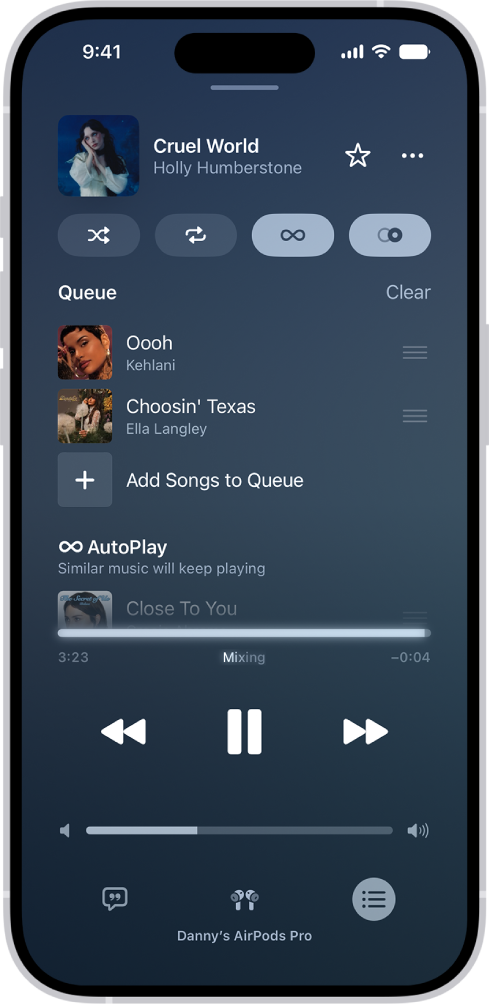
Not sure what to play next? If you’re an Apple Music subscriber, AutoPlay adds similar songs to the end of the queue and plays them when you play something. With AutoPlay on, the AutoPlay icon appears at the top of the queue while a song is playing.

The Now Playing screen showing the queue with AutoPlay and AutoMix turned on. Similar songs appear below the songs in the queue.

  1. Start the Music app on your iPhone.
  2. While a song is playing, tap the MiniPlayer to open the Now Playing screen.
  3. Tap the Playing Next button and tap the AutoPlay button at the top of the queue to turn AutoPlay on.

    When AutoPlay is on, the button changes color. Tap it again to turn it off.

Note: If you turn off AutoPlay on one device that uses your Apple Account (your iPhone, for example), it’s also turned off on every other device using the same Apple Account.

Manage the queue

  1. Start the Music app on your iPhone.
  2. While a song is playing, tap the MiniPlayer to open the Now Playing screen.
  3. Tap the Playing Next button and then do any of the following:

    • Change the order of songs in the queue: Drag the songs into the order you want them to play.
    • Add more songs to the queue: Scroll below the Queue section and tap Add Songs to Queue.
    • Remove a song from the queue: Swipe left on the song and tap the minus button.
    • See how many songs are in the queue: Scroll to the bottom of the queue.

      When multiple songs are repeating, you can see how many songs will be repeated instead.

    • Remove all songs from the queue: Tap Clear at the top of the queue.

Quick tip: Friends on the same Wi-Fi network can also reorder items in the queue while you’re streaming music on HomePod.

See what you recently played

  1. Start the Music app on your iPhone.
  2. While a song is playing, tap the MiniPlayer to open the Now Playing screen.
  3. Tap the Playing Next button. Then swipe down to see your playing history.

    To play a song in the history, tap it. To remove your playing history, tap Clear.

Turn on or off song transitions in the queue

  1. Start the Music app on your iPhone.
  2. Tap the Playing Next button and tap the AutoMix button or the Crossfade button in the top-right corner to turn on or off AutoMix or Crossfade.
Tag: Music

After you subscribe to Apple Music, you can create an Apple Music profile that features your favorite playlists and what you’re currently listening to. You can share your profile with friends you invite or with other Apple Music subscribers.

After you create a profile, you can choose the playlists you want to share. You can also follow friends. View profiles they’ve created, or request to follow them and see what they’re listening to.

Here’s how to create an Apple Music profile on iPhone.

Create a profile

  1. Open the Music app on your iPhone.
  2. Tap the My Account button.
  3. Tap Set up Profile and then follow the onscreen instructions to create a profile.

With your profile set up, you can find friends whose music profile you’d like to follow. To show friends what you’re listening to, choose who you share music with.

Note: If you’re the organizer of a Family Sharing group, you can allow children ages 13 to 18 to create Apple Music profiles (or prevent them from doing so). Children under 13 can’t create Apple Music profiles. (Age restrictions vary by region.)

Edit your profile

  1. Open the Music app on your iPhone.
  2. Tap the My Account button or your profile picture.
  3. Tap Music Profile at the top of the screen, then tap Edit to make updates.

To choose who you share music with, or which music to share with your followers, edit your profile.

Delete your profile

Deleting your profile means your playlists and music no longer appear in searches, and your followers can’t see your music or profile.

Note: You can delete your profile without affecting your Apple Music subscription, library, or playlists, but you’ll no longer see what your friends are listening to.

  1. Open the Music app on your iPhone.
  2. Tap the My Account button or your profile picture.
  3. Tap Music Profile at the top of the screen and tap Edit.
  4. Scroll to the bottom, then tap Delete Profile.

Create your profile again within 90 days, and your previous information and followers are restored.

Note: Your profile might stay visible to your followers or in searches for several minutes after you delete it.

Tag: Music