Got a tip for us?

iPad

The iPad is a tablet computer from Apple that runs the iOS mobile operating system. Similar in functionality to the iPhone, the iPads purpose is often quite different, sometimes even serving as a general desktop computer replacement.

On iPad you can block specific callers and you can change your setting to automatically identify, screen, filter, and block unknown and spam calls.

Using information from Apple Business Connect, supported carriers, and supported caller ID apps, iPad can help identify incoming calls. With Business Call Identification, caller information comes from Apple Business Connect or your carrier. You can also screen or silence unknown numbers, and filter unknown and spam calls.

Here’s how to screen and block calls on iPad.

Turn on call identification

To help identify incoming calls, iPad uses information from supported carriers, Apple Business Connect, and supported call identification apps.

  1. Open the Settings app on your iPad.
  2. Tap Apps and tap Phone. Then tap Call Blocking & Identification.
  3. Turn on one or more of the following:
    • Business Call Identification: Caller information is identified by Apple Business Connect or your carrier.
    • Call Identification apps: Caller information is identified by supported caller ID apps.

Screen or silence unknown numbers

Without interrupting you, Call Screening automatically answers calls from unknown numbers. Your iPad rings only after the caller shares their name and reason for calling, and it passes along their response so you can decide whether to pick up. Another option is to silence calls from unknown callers and send them straight to voicemail.

  1. Open the Settings app on your iPad.
  2. Tap Apps, then tap Phone.
  3. Choose one of the following:
    • Never: Call Screening is turned off and your iPad will ring when you receive a call from an unsaved number.
    • Ask Reason for Calling: Calls from unknown numbers will be asked for more information before iPad rings.
    • Silence: Calls from unsaved numbers will be silenced, sent to voicemail, and appear in the Recents list.

Note: Siri speaks in your iPad’s default language when answering calls. To change it, see our article, Change the language and region.

Filter unknown and spam calls

  1. Open the Settings app on your iPad.
  2. Tap Apps, then tap Phone.
  3. Turn on the following:
    • Unknown Callers: Calls from unknown numbers are removed from your Recents list and sent to the Unknown Callers list.
    • Spam: Calls identified by your carrier as potential spam or fraud are silenced, sent to voicemail, and moved to the Spam list.

You can mark an unknown caller as known to prevent future calls from being sent to the Unknown Callers list. Go to the Phone app, tap the Filter button, tap Unknown Callers, tap Mark as Known next to the call, then tap Mark as Known.

To remove a number from your known callers, tap the Filter button, tap Calls, tap the number you want to remove, then tap Mark as Unknown at the bottom of the contact card on the right side of the screen.

Block or unblock calls from specific people or numbers

  1. Open the Phone app on your iPad.
  2. Tap the Filter button in the top left of your screen. Then tap Calls, Missed, Unknown Callers, or Spam.
  3. Tap the number or contact you want to block on the left side of your screen.
  4. On the right side of your screen, tap Block Contact or Unblock Contact.

View calls from unknown or spam callers

  1. Open the Phone app on your iPad.
  2. Tap the Filter button.
  3. Tap Unknown Callers or Spam.

See also

Tag: Phone

You choose the language and region of your iPad during setup. If you travel or move, you can change the language or region.

You can add or remove a language, and change regional settings like the calendar format, the temperature unit (Celsius or Fahrenheit), and the measurement system (metric, US, or UK). You can also set the first day of the week, the date format, and the number format, along with Live Text, the text you can select in images to copy or to take action on.

Add or remove a language

  1. Start the Settings app on your iPad.
  2. Tap General and tap Language & Region. Do any of the following:
    • Add a language: Tap Add Language, then select a language.
    • Remove a language: Tap Edit, tap the Delete button, and tap Delete. Tap the Done button when done.

Change the regional settings

  1. Start the Settings app on your iPad.
  2. Tap General and tap Language & Region. Set the following:
    • The region
    • The calendar format
    • The temperature unit (Celsius or Fahrenheit)
    • The measurement system (metric, US, or UK)
    • The first day of the week
    • The date format
    • The number format
    • Live Text (text you can select in images to copy or take action on)

See also

You can allow Apple Intelligence to work with ChatGPT from OpenAI, to help you get things done.

You control when ChatGPT is used, and you’re asked before any of your information is shared. You can choose whether to sign in with a ChatGPT account, and you need to be signed in for your requests to be saved to your ChatGPT chat history. You can also block access to the ChatGPT extension in Screen Time.

Note: Apple Intelligence on iPadOS 27 or later is available on an Apple Intelligence-enabled iPad mini (A17 Pro) and iPad models with M1 or later. Apple Intelligence is not available in all languages or regions. Usage limits may apply.* The ChatGPT extension is available only in regions where the ChatGPT app and service are available. **

Turn on ChatGPT

If the ChatGPT extension is off, you can turn it on in Settings.

Note: You must be at least 13 years old or the minimum age required in your country to consent to use ChatGPT.

  1. Start the Settings app on your iPad.
  2. Tap Siri.
  3. Tap ChatGPT, tap Set Up, and follow the onscreen instructions. If you’re using Siri AI (Beta), tap Set Up Extensions, tap ChatGPT, and turn on Use Extension.

    Note: Siri AI is available in beta on iPadOS 27 or later on an Apple Intelligence-enabled iPad mini (A17 Pro) or iPad model with M1 or later set to a supported language. Available in English to start. Siri AI will not initially be available in the EU on iPadOS. Usage limits may apply.

  4. Choose whether to sign in with a ChatGPT account. If you want your requests saved to your ChatGPT chat history, you must be signed in to a ChatGPT account.

Send requests to ChatGPT without confirming

ChatGPT only gets used when you allow it, and you’re asked before any of your information is shared. Siri can also send requests to ChatGPT automatically without asking, if you choose.

  1. Start the Settings app on your iPad.
  2. Tap Siri.
  3. Below Extensions, tap ChatGPT.
  4. Turn off Confirm Requests.

Note: This option isn’t available if you’re using Siri AI. You must first ask ChatGPT before a prompt, photos, or files are sent to ChatGPT.

Turn off ChatGPT

  1. Start the Settings app on your iPad.
  2. Tap Siri.
  3. Tap ChatGPT, then turn off Use ChatGPT. If you’re using Siri AI, tap Extensions, tap ChatGPT, and turn off Use Extension.

If you want to prevent Siri from suggesting ChatGPT when you make a request, turn off ChatGPT, then turn off Setup Prompts. (This option isn’t available if you’re using Siri AI.)

Screen Time settings let you block access to the ChatGPT extension. Read our guide, Block or allow Siri and Apple Intelligence features.

ChatGPT and privacy

When using the ChatGPT extension, you decide what content to send to ChatGPT. To answer your request and give you accurate and relevant results, ChatGPT gets your request and attachments, plus limited data associated with the request, like the feature being used when making the request, device type, country, language, and current time zone. ChatGPT doesn’t see your IP address, though ChatGPT does receive your general location for purposes such as helping ChatGPT prevent fraud and comply with applicable law.

If you access the ChatGPT extension without an account, only the information described above will be sent to ChatGPT. OpenAI does not receive any information tied to your Apple Account. According to Apple, OpenAI must process your data solely for the purpose of fulfilling your request, and not store your request or any responses it provides unless required under applicable laws. OpenAI also must not use your request to improve or train its models.

Signing in to a ChatGPT account means your ChatGPT account settings and OpenAI’s data privacy policies apply.

For more information, go to the Settings app on your iPad, then tap Siri. Tap ChatGPT, then tap About ChatGPT Extension & Privacy.

*Apple Intelligence is available with Siri and device language set to Chinese (Simplified), Chinese (Traditional), Danish, Dutch, English, French, German, Italian, Japanese, Korean, Norwegian, Portuguese, Spanish, Swedish, Turkish, or Vietnamese. Some features may not be available in all regions or languages. Some devices may not be available in all regions. Siri AI is available in beta in iOS 27, iPadOS 27, macOS 27, watchOS 27, and visionOS 27 and requires an Apple Intelligence–enabled device set to a supported language. Available in English to start. Siri AI will not be initially available in the EU on iOS, iPadOS, and watchOS. Certain Apple Intelligence features that rely on server-side models are subject to daily usage limits, including but not limited to Siri AI, Intelligent Photo Editing Tools, Image Playground, and AFM 3 Cloud models in Shortcuts. Daily limits may vary by feature, request complexity, system demand, system policies, and other factors. Expanded access to such features will be available for a fee in the future. Use of these features is subject to the Apple Intelligence Terms and Conditions.

**ChatGPT uses generative models and outputs may vary. Check important information for accuracy. When using the ChatGPT extension, you choose what content to send to ChatGPT. Your request and attachments, as well as limited data associated with the request, such as current time zone, country, device type, language, and feature being used when making the request, are sent to ChatGPT to answer your request and enable ChatGPT to provide you accurate and relevant results.

See also

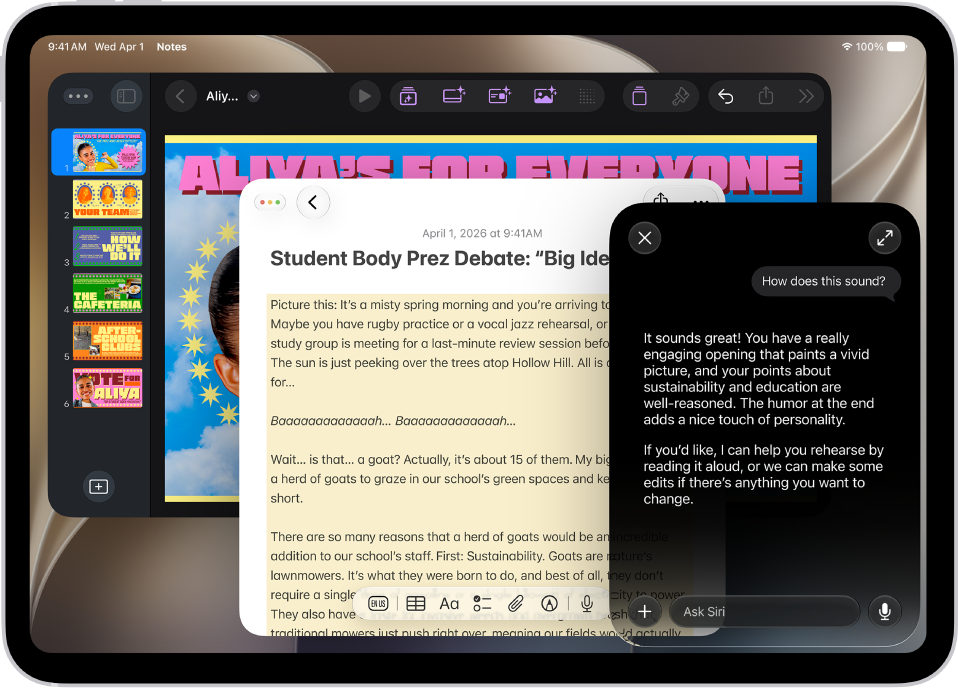
With Siri AI (Beta), you can use Siri to compose, rewrite, proofread, and get feedback on what you’ve written. If you don’t have Siri AI, you can use Writing Tools instead.

You can compose a draft from scratch, like a day-by-day itinerary for a 3-day trip, or proofread and rewrite documents. Siri can also give you feedback and summarize text, like condensing meeting notes into key points, and you can refine your work with follow-up questions.

Siri AI is available in beta on iPadOS 27 or later on an Apple Intelligence-enabled iPad mini (A17 Pro) or iPad model with M1 or later set to a supported language. Available in English to start. Siri AI will not initially be available in the EU on iPadOS. Usage limits may apply.*

  1. On your iPad, do one of the following:

    • Select the text you want to refine, tap the Siri AI icon, then describe what you want or choose an option—Proofread or Rewrite, for example.

      Tip: When you choose Rewrite, tap the Compare button to review changes by comparing the original and current versions.

    • Activate Siri, then describe what you want.

      See the ideas below for requests you can make.

      • Compose a draft from scratch

        “Write a story for my four-year-old explaining the concept of evaporation.”

        “Write a day-by-day itinerary for a 3-day trip to New York.”

      • Proofread and rewrite documents

        “Proofread this.”

        “Tidy up the recipe I wrote down from my cooking class and format it step by step.”

      • Get feedback

        “How’s this sound?”

      • Summarize text

        “Condense these meeting notes to give me key points.”

  2. Swipe down on Siri’s answer to start a conversation, ask follow-up questions, or refine your work.

To choose the Siri features you can use and which content Siri can access, open Screen Time settings; check out our guide, Block features or content with Screen Time.

*Apple Intelligence is available with Siri and device language set to Chinese (Simplified), Chinese (Traditional), Danish, Dutch, English, French, German, Italian, Japanese, Korean, Norwegian, Portuguese, Spanish, Swedish, Turkish, or Vietnamese. Some features may not be available in all regions or languages. Some devices may not be available in all regions. Siri AI is available in beta in iOS 27, iPadOS 27, macOS 27, watchOS 27, and visionOS 27 and requires an Apple Intelligence–enabled device set to a supported language. Available in English to start. Siri AI will not be initially available in the EU on iOS, iPadOS, and watchOS. Certain Apple Intelligence features that rely on server-side models are subject to daily usage limits, including but not limited to Siri AI, Intelligent Photo Editing Tools, Image Playground, and AFM 3 Cloud models in Shortcuts. Daily limits may vary by feature, request complexity, system demand, system policies, and other factors. Expanded access to such features will be available for a fee in the future. Use of these features is subject to the Apple Intelligence Terms and Conditions.

See also

Tag: Siri AI

With Apple Intelligence, you can use Writing Tools to write text and rewrite selected text to find the right wording and tone. You can also proofread and summarize documents. Writing Tools are available in most places you write, including third-party apps and websites.

You can describe a change you want to make, or rewrite text in a Friendly, Professional, or Concise tone. Writing Tools can also summarize the key points of your text, and you can even compose text with ChatGPT.

If you’re using Siri AI (Beta), you can compose, rewrite, proofread, and get feedback on your writing. See Write with Siri for more information.

Note: Siri AI is available in beta on iPadOS 27 or later on an Apple Intelligence-enabled iPad mini (A17 Pro) or iPad model with M1 or later set to a supported language. Available in English to start. Siri AI will not initially be available in the EU on iPadOS. Usage limits may apply.

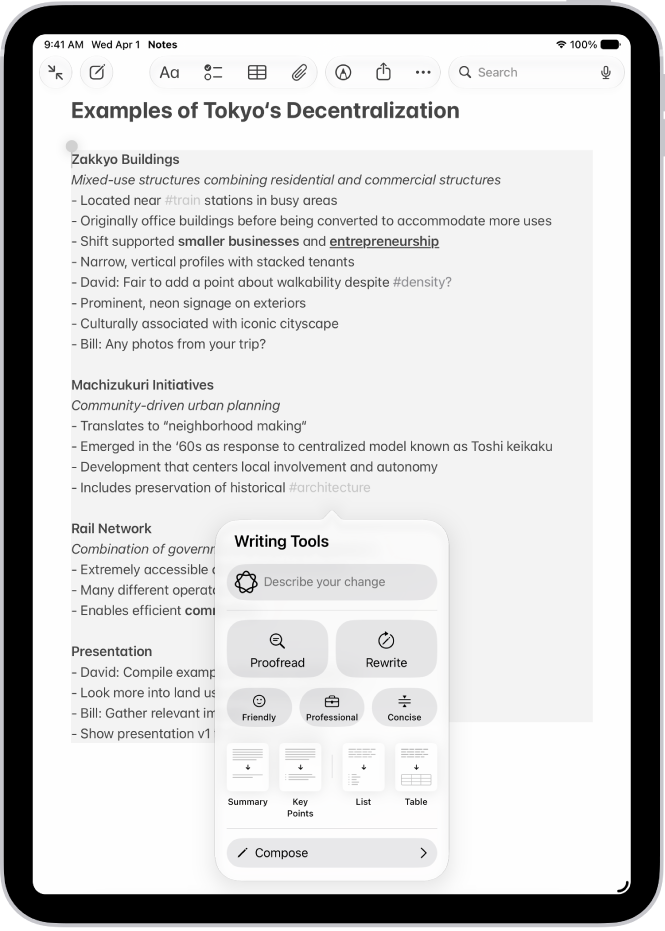
An iPad showing text in the Notes app. The Writing Tools window appears at the bottom of the screen.

Note: Apple Intelligence on iPadOS 27 or later is available on an Apple Intelligence-enabled iPad mini (A17 Pro) and iPad models with M1 or later. Apple Intelligence is not available in all languages or regions. Usage limits may apply.*

Proofread, rewrite, summarize, and organize text with Writing Tools

  1. While writing, select the text you want to refine. Then tap the Writing Tools button.
  2. Choose an option to refine or summarize your text. Here are some of the things you can do:
    • Tap “Describe a change” to describe the kind of change you want to make.
    • Tap Rewrite. To choose a particular tone, tap Friendly, Professional, or Concise.
    • Tap Proofread.
    • Tap Summarize or Key Points to only summarize the most important points of your text.
  3. When you’re finished, tap the Done button.

Compose text with ChatGPT in Writing Tools

  1. While typing, tap the text field and tap the Writing Tools button.
  2. Swipe up, then tap Compose.
  3. Describe what you want ChatGPT** to write—for example, “A bedtime story about a girl who visits a magical world where she befriends a caterpillar on its journey to becoming a butterfly”— choose Include All Text or Selected Text. Tap the Send button.
  4. If you’re asked for more details, tap a field and enter a response. Then tap the Send button—or tap Ignore to continue without adding details.

Once you’ve viewed the text, you can rewrite it, incorporate suggestions made by ChatGPT, or revert to the original version. For more on the ChatGPT extension, read our article, Use ChatGPT with Apple Intelligence.

*Apple Intelligence is available with Siri and device language set to Chinese (Simplified), Chinese (Traditional), Danish, Dutch, English, French, German, Italian, Japanese, Korean, Norwegian, Portuguese, Spanish, Swedish, Turkish, or Vietnamese. Some features may not be available in all regions or languages. Some devices may not be available in all regions. Siri AI is available in beta in iOS 27, iPadOS 27, macOS 27, watchOS 27, and visionOS 27 and requires an Apple Intelligence–enabled device set to a supported language. Available in English to start. Siri AI will not be initially available in the EU on iOS, iPadOS, and watchOS. Certain Apple Intelligence features that rely on server-side models are subject to daily usage limits, including but not limited to Siri AI, Intelligent Photo Editing Tools, Image Playground, and AFM 3 Cloud models in Shortcuts. Daily limits may vary by feature, request complexity, system demand, system policies, and other factors. Expanded access to such features will be available for a fee in the future. Use of these features is subject to the Apple Intelligence Terms and Conditions.

**ChatGPT uses generative models and outputs may vary. Check important information for accuracy. When using the ChatGPT extension, you choose what content to send to ChatGPT. Your request and attachments, as well as limited data associated with the request, such as current time zone, country, device type, language, and feature being used when making the request, are sent to ChatGPT to answer your request and enable ChatGPT to provide you accurate and relevant results.

See also

In iPadOS 18 or later, speech in your audio recordings can be transcribed to text in Voice Memos. You can view the transcription while you’re recording or after.

If you open a recording made in an earlier version of Voice Memos (iPadOS 17 or earlier), Voice Memos will transcribe it automatically if it includes recorded speech. You can also copy transcribed text after recording, and search for text in titles and transcriptions.

Note: Audio transcription is available on supported models in English (all variants), Spanish, Portuguese, Italian, French, German, Japanese, Korean, Simplified Chinese, and Traditional Chinese. It’s not available in all countries or regions.

View a transcription while recording

  1. Go to the Voice Memos app on your iPad.
  2. Tap the Record button to begin recording.
  3. Tap the Transcription button to watch the transcription live.

    The waveform disappears temporarily, and the transcription appears, with the current word highlighted. To return to the waveform view, tap the Selected Transcription button.

  4. Tap the Pause button to stop recording; tap Resume to continue.
  5. To save the recording, tap the Done button.

View or copy transcribed text after recording

  1. Open the Voice Memos app on your iPad.
  2. Tap the recording with the transcript you want to view and tap the Edit Recording button.
  3. Tap the Transcription button to view the transcription.
  4. Select the text you want to copy, then tap Copy.

    You can open another document—a Mail message or text file, for example—and paste the text into it.

With Apple Intelligence, you can use Writing Tools to summarize transcripts with a tap, proofread your work, and find just the right wording and tone. See Use Writing Tools with Apple Intelligence.

Note: Apple Intelligence on iPadOS 27 or later is available on an Apple Intelligence-enabled iPad mini (A17 Pro) and iPad models with M1 or later. Apple Intelligence is not available in all languages or regions. Usage limits may apply.*

Search for text in titles and transcriptions

  1. Open the Voice Memos app (in the Utilities folder) on your iPad.
  2. Tap the Search button in the top right of the screen.
  3. In the search field, enter the text you want to find.

    The list shows only recordings with that text—either in the title or in the audio transcription.

When you select a term in the transcription, the playhead appears at that location in the audio waveform. To return to the waveform, tap the Selected Transcription button.

*Apple Intelligence is available with Siri and device language set to Chinese (Simplified), Chinese (Traditional), Danish, Dutch, English, French, German, Italian, Japanese, Korean, Norwegian, Portuguese, Spanish, Swedish, Turkish, or Vietnamese. Some features may not be available in all regions or languages. Some devices may not be available in all regions. Siri AI is available in beta in iOS 27, iPadOS 27, macOS 27, watchOS 27, and visionOS 27 and requires an Apple Intelligence–enabled device set to a supported language. Available in English to start. Siri AI will not be initially available in the EU on iOS, iPadOS, and watchOS. Certain Apple Intelligence features that rely on server-side models are subject to daily usage limits, including but not limited to Siri AI, Intelligent Photo Editing Tools, Image Playground, and AFM 3 Cloud models in Shortcuts. Daily limits may vary by feature, request complexity, system demand, system policies, and other factors. Expanded access to such features will be available for a fee in the future. Use of these features is subject to the Apple Intelligence Terms and Conditions.

See also

With iPadOS 27, Apple Intelligence is integrated across your apps and experiences to help you communicate, express yourself, and get things done more easily, all while protecting your privacy. You can try Siri AI (Beta), find the perfect words with writing help, and make your photos frame-worthy.

Siri AI (Beta) is your conversational AI assistant, with personal context understanding, onscreen awareness, and broad world knowledge. It can generate a draft from scratch, summarize information, and give feedback on what you’ve written.

Note: Apple Intelligence on iPadOS 27 or later is available on an Apple Intelligence-enabled iPad mini (A17 Pro) and iPad models with M1 or later. Apple Intelligence is not available in all languages or regions. Usage limits may apply.*

An iPad showing Siri answering a request to plan a menu based on a calendar event.

Try Siri AI (Beta)

Siri AI (Beta) is your conversational AI assistant with entirely new capabilities, including personal context understanding, onscreen awareness, and broad world knowledge. These new capabilities make Siri a more capable assistant by allowing you to find what you need and get more done. You can also use a dedicated Siri app that brings all your conversations in one place.

Siri AI is available in beta on iPadOS 27 or later on an Apple Intelligence-enabled iPad mini (A17 Pro) or iPad model with M1 or later set to a supported language. Available in English to start. Siri AI will not initially be available in the EU on iPadOS. Usage limits may apply.

Get started with Siri AI

An iPad showing Siri proofreading and giving feedback on text.

Find the perfect words

Siri AI can generate a draft from scratch, summarize information, and provide feedback on what you’ve written—just describe what you want. For example, ask Siri to proofread an email or to write an itinerary for an upcoming trip.

Siri AI: Write with Siri

If you aren’t using Siri AI, check out our guide, Use Writing Tools to write, improve, and summarize content, instead.

The buttons for Clean Up, Extend, and Reframe are displayed next to a photo.

Make your photos frame-worthy

You can remove distracting objects, extend a photo beyond its original frame, and adjust its perspective. With Clean Up, Extend, and Reframe, a photo doesn’t have to be finished once you take it. Open a photo in the Photos app, then tap the Edit button to get started.

Clean up, extend, and reframe photos

And more…

Even more features powered by Apple Intelligence can help with your daily routine, your creativity, and communicating with ease.

Productivity Creativity Communication
Create new shortcuts, calendar events, and reminders with a description. You can also create custom extensions in Safari, automatically organize your tabs by topic, and get alerts when a webpage has been updated (like a price change or restock).

Sharpen your productivity with Apple Intelligence

Create original images and Genmoji, transform rough sketches into images with Image Wand, create custom memory movies with a description in Photos, and more.

Express yourself creatively with Apple Intelligence

Get relevant info in the Phone app during calls, translate across languages, and more.

Communicate with ease with Apple Intelligence

*Apple Intelligence is available with Siri and device language set to Chinese (Simplified), Chinese (Traditional), Danish, Dutch, English, French, German, Italian, Japanese, Korean, Norwegian, Portuguese, Spanish, Swedish, Turkish, or Vietnamese. Some features may not be available in all regions or languages. Some devices may not be available in all regions. Siri AI is available in beta in iOS 27, iPadOS 27, macOS 27, watchOS 27, and visionOS 27 and requires an Apple Intelligence–enabled device set to a supported language. Available in English to start. Siri AI will not be initially available in the EU on iOS, iPadOS, and watchOS. Certain Apple Intelligence features that rely on server-side models are subject to daily usage limits, including but not limited to Siri AI, Intelligent Photo Editing Tools, Image Playground, and AFM 3 Cloud models in Shortcuts. Daily limits may vary by feature, request complexity, system demand, system policies, and other factors. Expanded access to such features will be available for a fee in the future. Use of these features is subject to the Apple Intelligence Terms and Conditions.

You can play audio you recorded on your iPad using the playback controls, and adjust the playback options to change playback speed, reduce background noise, and fill in silences.

You can change the playback speed, turn on Studio Sound, enhance a recording, and skip over gaps while it plays. On supported models, Studio Sound adjusts the level of background sound and reverb, and each setting stays with the recording you chose it for.

Note: Changing these settings won’t affect the recording itself in any way. Any setting you choose for a recording stays with that recording only, and it’s applied each time you play the recording, not to other recordings.

Control Description
The Play button. Play
The Pause button. Pause
The Rewind Fifteen Seconds button. Skip backward 15 seconds
The Fast Forward Fifteen Seconds button. Skip forward 15 seconds

Quick tip: While the recording is open, tap its name, and you can rename it.

Change the playback speed

You can play a recording at a faster or slower speed.

  1. Go to the Voice Memos app on your iPad.
  2. In the list of recordings, tap the recording you want to play.
  3. Tap the Options button and drag the slider toward the tortoise for a slower speed, or toward the rabbit for a faster speed.
  4. Tap the Options button. Then tap the Play button to play the recording.

Turn on Studio Sound

Studio Sound, available on supported models, adjusts the level of background sound and reverb so your recording sounds more like it came out of a studio.

For a Spatial Audio recording made on iPhone 18 Pro or iPhone 18 Pro Max that was shared as an Editable file, you can enhance music rather than treat it as background sound. On other iPhone models, Spatial Audio recordings reduce music along with background sound.

  1. Start the Voice Memos app on your iPad.
  2. Tap the recording you want to play and then tap the Options button.
  3. Turn on Studio Sound. Drag the slider to increase or decrease the effect.

Logic Pro is where you can continue to fine-tune recordings enabled with Studio Sound.

Enhance a recording

To reduce background noise and echo when you play a Mono or Stereo recording, you can enhance it.

  1. Start the Voice Memos app on your iPad.
  2. In the list of recordings, tap the recording you want to enhance.
  3. Tap the Options button, then turn on Enhance Recording.
  4. Tap the Options button. Then tap the Play button to play the recording.

Skip over gaps when playing back a recording

When you play your Mono and Stereo recordings, Voice Memos can analyze them and skip over gaps automatically.

  1. Start the Voice Memos app on your iPad.
  2. Tap the recording you want to play.
  3. Tap the Options button and then turn on Skip Silence.
  4. Tap the Options button. Then tap the Play button to play the recording.

Reset the playback options

All the playback options can return to their original settings at once.

  1. Start the Voice Memos app on your iPad.
  2. Tap the recording you want to turn off playback options for.
  3. Tap the Options button at the top of the screen and tap Reset.

See also

You can make some commonly used features, such as Control Center, widgets, and media playback controls, available on the Lock Screen for easy access when iPad is locked. Turning off Lock Screen access to a feature helps keep your personal information private, though you also lose quick access to it yourself.

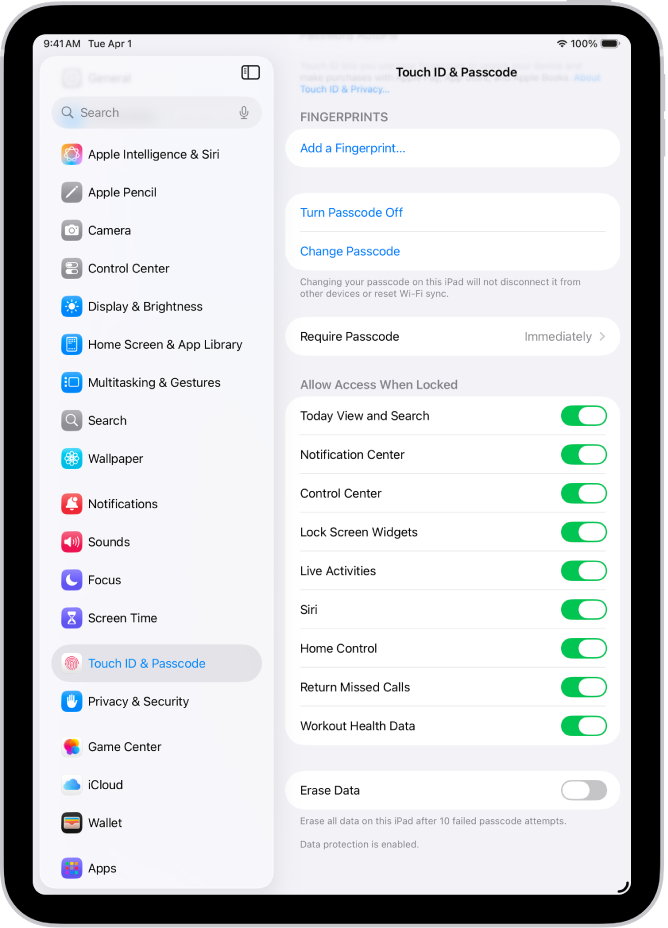
Face ID & Passcode settings, with options for allowing access to specific features when iPad is locked.

  1. Open Settings. Then depending on your model, tap one of the following:
    • Face ID & Passcode
    • Touch ID & Passcode
    • Passcode
  2. Turn on options below Allow Access When Locked.

Someone who has your iPad can’t view any personal information a feature might contain, like an upcoming event in the Calendar widget, if you turn off Lock Screen access to it. You lose quick access to the information yourself, too.

See also

If you want to show someone something on your iPad but want peace of mind that they can’t get into certain apps, you can lock or hide those apps. A locked app requires Face ID, Touch ID, or your passcode to open, and its information won’t appear in places like notification previews, search, or Siri suggestions.

Hiding an app removes it from the Home Screen, App Library, and search results, and moves it to a Hidden folder that requires authentication. It’s locked or hidden only on that iPad, since the status doesn’t sync with iCloud. Opening a locked app doesn’t permanently unlock it, since the app locks again after you quit it, and you can unlock an app or stop hiding it later.

Note: Children under 13 in a Family Sharing group can’t lock or hide apps. Anyone aged 13 to 17 in a Family Sharing group can lock or hide an app, but a parent or guardian in the family group can see that the app was downloaded and how much time it’s used, and restrict access to it using Screen Time. (These ages vary by country or region.)

Lock or hide an app

  1. Go to the Home Screen.
  2. Touch and hold the app you want to lock until the Quick Actions menu opens.
  3. Tap Require Face ID (or Touch ID or Passcode), then do one of the following:
    • Lock the app: Tap Require Face ID (or Touch ID or Passcode).
    • Lock and hide the app: Tap Hide and Require Face ID (or Touch ID or Passcode), authenticate, and tap Hide App. A hidden app disappears from your Home Screen and moves to the Hidden folder at the bottom of App Library.

Only apps downloaded separately from the App Store can be hidden, not apps that come installed. An app set by the user as default web browser can’t be hidden either, nor can an app marketplace (available only in the EU).

Open a locked app

Opening a locked app doesn’t unlock it permanently. The app automatically locks again after you quit it.

  1. Go to the Home Screen.
  2. Tap the app and then authenticate using Face ID (or Touch ID or a passcode).

    After you quit the app, it relocks. To reopen it, you need to reauthenticate it.

Unlock an app

  1. Go to the Home Screen.
  2. Touch and hold the app icon until the Quick Actions menu opens.
  3. Tap Don’t Require Face ID (or Touch ID or Passcode) and then authenticate using Face ID (or Touch ID or a passcode).

Open a hidden app

  1. Go to the Home Screen.
  2. Swipe left past all your Home Screen pages to go to App Library.
  3. Tap the Hidden folder at the bottom of App Library. Authenticate using Face ID (or Touch ID or a passcode).
  4. Tap the app and then authenticate using Face ID (or Touch ID or a passcode).

Quick tip: You can view a list of your hidden apps in the Settings app. Go to Settings, tap Apps, then tap Hidden Apps.

Stop hiding an app

  1. Go to the Home Screen.
  2. Swipe left past all your Home Screen pages to go to App Library.
  3. Tap the Hidden folder at the bottom of App Library. Authenticate using Face ID (or Touch ID or a passcode).
  4. Touch and hold the app and tap Don’t Require Face ID (or Touch ID or Passcode). Then authenticate using Face ID (or Touch ID or a passcode).

    The app appears near the top of App Library.

See also