Got a tip for us?

Mac

Mac OS, Mac OS X, or macOS, is the operating system that resides on Apple’s desktop and portable computer lineup. Built upon a Unix core, it is easy to use yet highly advanced, extremely stable, and an excellent OS for productivity and creation. Browse through our articles to
look for something specific that is pertinent to the Mac operating system.

Everyone has heard of computer viruses and malware expecting inattentive users online. Here are some useful recommendations on MacBook cybersecurity.

MacBook Safety: The Guide to Secure Your Laptop Online

The world has gone online long ago. Viruses and malware programs have been remaining with us all the time, waiting for that chance to infect all the gadgets regardless of their OS and manufacturer. Windows PCs, Android and iOS phones or tablets, iMacs, and MacBooks are all in danger.
Still, cybersecurity is also being developed. In 2020, it is not something complicated and specialized. Software designers aim to make maximum safety available and understandable for every user by default.
The users of Apple devices and software solutions can be calm as well. Most frequently, all that is needed to keep your favorite MacBook and its data away from danger is the user’s attention.

1. Make Sure Your Operating System is Up-to-Date

Here is the point: hackers creating malware always target OLD operating system versions. The reason is that they study the codes and find security weaknesses to use while infiltrating into your MacBook’s system.
When you keep your OS X updated, you guarantee the most breakage points to be blocked by developers. The same thing works for all the applications you install on your laptop.

2. Use Programs You Know Exclusively

The software that users download and install on their MacBooks is probably the most frequently exploited gateway by hackers. Malware units are mainly like vampires. A vampire is known to require an invitation to enter someone’s living, and a malware agent needs your permission to be installed.
So, every installation of third-party apps, pirated or cracked programs, “keygens”, and other likely things are a threat to your laptop’s cybersecurity. It is strictly recommended to install exclusively licensed pieces of software if you want to avoid being hacked.

3. Avoid Random Links

Private data hunters and malware spreaders use every possibility to hook the inattentive user. A random link published on Facebook, Reddit, Twitter, or any other website can lead you to a phishing site or an “infected” Internet page. Of course, web admins do everything they can aiming to block suspicious URL addresses and to warn their users about threats.
Still, warnings don’t always work, and no specialist is almighty. The key here is your attention. Again.

4. Filter Ads

There exist special browser extensions like AdBlock that block all the advertisement banners and pop-up windows from appearing on the screen of your MacBook. That’s how you prevent clicking on a random ad, and also don’t allow cybercriminals to track your online activities.
There exist both free and paid ad blocking solutions. Many antivirus packages include such software that is simple to install and use.

5. Use XProtect, the Built-In Mac Antivirus

It is really useful.
The market offers multiple antivirus software choices. However, not all of them can provide reliable protection from malware. The trouble is especially relevant nowadays when hackers target Mac OS weaknesses specifically with the latest virus modifications. The default antivirus solution provided by apple is actually enough to protect your MacBook from such threats as malware, spyware, phishing attacks, keyboard spies, and data leakage attempts.
There also exist specialized third-party antivirus apps designed to secure Mac computers specifically (for instance, Airo AV). Still, you need them only in case you feel the requirement for advanced security layers. Mostly, users will be enough with the functions and capabilities of XProtect.

6. Use Confidential Browsers

Despite being quite comfortable and loved by MacBook users, the default Safari app by Apple is not the safest thing to use. Most probably, you heard about such programs as Tor and Opera. Those are safe and confidential web browsing solutions.
The use of alternative safety browsers is among the top measures to provide your MacBook with the best cybersecurity. Such programs don’t let intruders track the user’s web activity and surfing history, hide their IP-addresses (which means hiding physical location), and even block suspicious scripts hidden on fraud websites.

7. Have Backups

It’s an axiom of data security, though most users don’t keep up with this rule. None of the data protection measures is perfect. There always exists a chance for malware agents to intrude on your MacBook’s system and cause software malfunctions, data losses, and even hardware breakages.
By backing up your Mac regularly, you can be sure to have a copy of all your files all the time, even if a MacBook will be broken, stolen, or lost. Apple has the built-in Time Machine function to simplify the process of creating regular backups. Of course, this means you need to sacrifice a lot of your hard drive space to it, but the confidence about your data being safe is worth anything in our times.
The vast majority of people use their MacBook to browse the Internet or send a couple of emails. These tasks only scratch the surface of what you can do with your Mac. Your Mac can be a timesaver and a useful productivity tool with just a little bit of know-how. If you want to move into the power user category, continue reading to learn five hidden Mac features you didn’t know about.

Hidden Mac Features you Didn’t Know About

Many of us have had mack OS big sir on our MacBooks for a while now, so we’re pretty used to the new features of the operating system from daily use. But whether you’re using the Macbook you’ve had for years or upgraded to a new one, you might find it useful to learn some of the tricks that Apple has hidden underneath the hood. Give these hidden MacBook Pro features a try, and improve your macOS Big Sur experience.

See also: Amazing Mac tips and tricks

Cool Hidden Mac Features

Here are 5 cool hidden Mac features most people didn’t know existed.

Add Quick Actions to the Touch Bar

Hidden Mac Features you Didn’t Know About

Besides using Quick Actions to automate your workflows, macOS has a hidden feature that lets you add Quick Actions to the Touch Bar on your Mac. Please follow these steps:

  1. Select the Apple menu located on the upper left corner.
  2. Now, click System Preferences, then hit Extensions.
  3. Next, click Touch Bar located on the left panel,
  4. Next on, select the checkbox next to each action you want to be available from the Touch Bar.
  5. Now, click Customize Control Strip located on the bottom right.
  6. Next, drag the Quick Actions button to the bottom of the Display until it appears in the Touch Bar. You can move it left or right to place it where you want.
  7. Finally, hit Done and the button will now be on your Touch Bar.

Lock Your Screen in an Instant

Hidden Mac Features you Didn’t Know About

Need to step away from your Mac for a few minutes and want to lock your screen? You can do this in just a single click. Hold down Control + Command(⌘) + Q, and your screen will turn off instantaneously. This keystroke combo works in newer versions of macOS such as macOS Catalina. If your Mac is running an earlier version of macOS, you’ll need to hold down control + shift + power or control + shift + eject if you have an optical drive.

Create Text Shortcuts

Hidden Mac Features you Didn’t Know About

Do you find yourself typing the same phrase over and over again on your Mac? Speed up your work by using the nifty text replacement feature in macOS. Please follow these steps:

  1. Click on the Apple menu located on the upper left and choose System Preferences.
  2. Now, click Keyboard, then hit Text.
  3. Please nOTE: If you’re working in an app, you can also jump right to the settings by selecting Edit > Substitutions > Show Substitutions. Then select Text Preferences.
  4. Click the Add button (+) in the lower-left corner and type the text you want to replace. You should put something like “&done” in the Replace section, with its replacement saying “Heading home for the day. See you tomorrow!” in the With section.
  5. When you are working in an app, try typing your “replace” phrase like &done and macOS will automatically replace it with “Heading home for the day. See you tomorrow!”

Add Emojis Quickly 😁

Hidden Mac Features you Didn’t Know About

Want to add emojis to an email or message? You can quickly bring up the emoji menu by holding down Control + Command(⌘) + Spacebar from any window. Your emojis will be presented in various categories with a section for the ones you use most often. Simply click on an emoji and it will be inserted into your text.

Design Custom Folder Icons

Hidden Mac Features you Didn’t Know About

The vast majority of people use folders to organize all their files. Make it easy to find folders by assigning an emoji or custom icon to each one. You could use a dollar sign for your finances folder and an office chair for your work folder. When browsing through your folders, you only have to look at the icon to find the one you want. It’s a simple thing, but it can come in handy, especially if you work with a lot of folders. Here’s how to assign an icon:

  1. Find an emoji (or another image) that you want to use by searching Google or the search engine of your choice.
  2. Now, save the image you want to your Mac.
  3. Now, open the emoji in Preview and make the background transparent by selecting the Markup Tool, then the Magic Wand, and then clicking the image’s background to select it.
  4. Next, select Edit > Cut to remove the background
  5. Next on, use the selection tool to drag a box around the emoji.
  6. Now, click Edit > Select All. Then press Command + C to copy the emoji.
  7. Next on, select the folder for the emoji and right-click on it.
  8. Now, select Get Info to reveal the folder details.
  9. In the informational screen that appears, select the blue folder icon located on the upper-left hand corner.
  10. Press Command + V to paste your emoji onto the folder.
  11. If you don’t like how it looks, simply hit Command + Z to undo.

And that covers everything about hidden Mac features most people don’t know about. Have we missed some cool hidden Mac features here? Let us know in the comments section below.

Is your Mac slow after macOS Monterey update? , there may be good reason for that slowness, or it may be due to a variety of other factors. Don’t fret, as there very well could be a simple solution. Find out why your Mac is so slow after macOS Monterey update and discover a few ways to speed it up

If your Mac starts running slow after Monterey update, it doesn’t necessarily mean that it caught a virus or became too outdated. The problem might lie in its settings, or lack of disk space, or poor resource allocation. This would be a logical consequence of intense exploitation and it might reveal itself in just a few months after you purchase the device. In this article, we’ll walk through some possible reasons as to why macOS Monterey feels slow on a Mac, as well as covering some advice and general tips and tricks to speed things back up again.

Without further ado, here’s how to fix a slow macOS Monterey and prevent your Computer from slowing down further in the longterm.

Slow Mac right after macOS Monterey update? Wait it out!

If you just recently updated to macOS Monterey and you feel the Mac is slower than usual, the best course of action is to keep the Mac awake, plugged in (if it’s a laptop), and let it sit for a while (perhaps overnight or for a nights) – basically, hurry up and wait. I know that sounds like weird advice, but here’s the logic behind it: after a major macOS system software update, the Mac performs various maintenance routines behind the scenes, it reindexes the drive for Spotlight and Siri, and apps like Photos may reindex too.

So basically, let the Mac sit turned on overnight, perhaps for a few nights in a row, and allow those indexing and optimization processes to complete. When they’re finished, the performance of the Mac should be significantly better, if not entirely back to normal.

This is often the the number one reasons Mac users think a new operating system is slower than a prior version, so don’t disregard this simple advice!

Resort to the Activity Monitor to Detect and Delete Resource Hogs

If a Mac feels slow or sluggish after Monterey update, one way to possibly find the culprit is to check Activity Monitor for processes that are using the slow down. This is somewhat advanced to take action on, but it’s simple enough to observe that it can be helpful.

Feel free to select between these two interchangeable ways to access Activity Monitor:

  • Proceed to the Utilities section in the Applications
  • Press Command + Spacebar and type “Activity Monitor” in the search bar

Open the CPU tab and sort the inventory so that the most resource-consuming apps would be displayed at the top.
To suspend the unwanted processes, press the “X” button in their left upper corners. Be careful not to stop the ones that are crucial to the system’s functioning! An equal procedure can be done with the Memory section.

Consider Your Messages

If you use the Messages app on the Mac to talk to people, and if you send and receive many videos, stickers, animated GIFs, and other things of that nature, you may notice the Mac slows down when those active message conversations are open on the Mac.

You may notice that animated GIFs can be particularly sluggish, as they’re playing repeatedly on screen.

There’s no need to delete or remove the messages however, all you need to do is wait for the animated GIF to move off the screen, or select another message chat thread, which will cause the animated GIF to stop playing constantly.

Using the aforementioned Activity Monitor trick you may notice this directly; if you have a message thread with a lot of animated GIFs going on, and you open Activity Monitor, don’t be surprised to see “Messages” using some CPU.

Disable Window Transparency & Use Reduce Motion

Visual effects can make the Mac look quite fancy, but they can also cause some system slow downs, particularly if you have a lot of windows and apps open, or if the Mac is older or has fewer system resources in general. Accordingly, one way to speed up macOS Monterey (and most other modern Mac OS releases too for that matter) is to simply disable Window Transparency and use the Reduce Motion feature.

Open the  Apple menu, open ‘System Preferences’, then select the “Accessibility” preference panel
Choose “Display” settings
Check the boxes for “Reduce motion” and “Reduce transparency”
Exit out of System Preferences
You will see an immediate change in the visual appearance of things as the transparency is disabled, and windows, sidebars, titlebars, menubar, and other interface aspects will no longer have a translucent effect. You’ll also notice far fewer animations of zips and zooms, and instead with Reduce Motion enabled you’ll find there’s a fading animation used instead. The net effect is less system resource usage as there are fewer resources needed to draw the interface eye candy, and often a faster Mac too.

The ability to reduced transparency on Mac and Reduce Motion has been around a while, and these tips can help speed up other older system software versions too.

Stop the Programs Working in the Background

If you think that closing an app is equal to stopping it, you are making a common mistake. An app might not stop functioning after you press the “X” mark in the corner of its window. To check if the program keeps on working in the background, cast a glance at the dock. If the app’s icon is there, marked with a tiny dot, stop it with any of the following methods:

  • Two-finger tap the app’s icon, then press Quit
  • Right-click plus Command-click
  • Use the Command + Q keyboard shortcut
  • Proceed to File, then Quit
  • In case the item doesn’t respond, right-click its icon, hold Option and push the Force Quit button.

Steam, Excel and Photoshop would be among the most likely candidates to keep functioning in the background, consuming your Mac’s resources without your knowledge.

Don’t Allow Apps to Autostart

When you start the system, several apps would launch automatically. You won’t be able to use the computer properly until all of them load and start functioning. If you don’t want to wait that long, proceed to the System Preferences and press the Login Items button in the Users & Groups section. In the inventory of the auto starting programs, select the ones you are not planning to use and push the “minus” button.

Reset SMC and PRAM/NVRAM

The SMC abbreviation stands for the System Management Controller. This component is in charge of fans, power buttons, light LEDs and other low-level functions. If a decline in performance is accompanied by weird fan behavior or unusual keyboard backlighting, you should reset your SMC. Please google the exact step-by-step instructions because they might considerably differ depending on the model of your device.
Resetting NVRAM or PRAM, on the contrary, is very easy: while the system is starting up, hold Command + Option + R + P. This element is in charge of storing settings such as time zone, screen resolution or sound volume. PRAM or NVRAM failures are among the most frequent answers to the question why your Mac is slowing down.

Free at Least 5 GB in Your Mac’s Memory

Or even better 10 GB, if possible. This is the minimum volume of memory the device needs to function properly. In the right upper corner, press the Apple icon and then the About This Mac icon. The Storage tab will show you which part of your hard drive’s memory is currently used and which ratio of it is still available.
If you critically lack free memory, the system might fail to boot or hibernate. You’ll be unable to download large files and install updates. The functionality of certain apps might be limited. To fix these problems, erase unnecessary files and apps.

Clean Up the Desktop

Each item stored on your desktop consumes as many resources as if it were a separate window. To boost productivity, relocate the files from your desktop to other folders and eliminate the icons of the apps that you are not planning to use frequently.

Get Rid of Excessive Tabs and Browser Extensions

The more extensions you have in your browser, the more memory and CPU they require. The volume of the resources they consume is incommensurate with their insignificant functionality. The same can be said about all the tabs that you keep open while not actually using them: Twitter, Google, Instagram… Proceed to the Memory tab in the Activity Monitor to check how thirsty these tabs are and close them immediately.

Switch to Safari Browser

Unlike Firefox or Chrome, this one was tailor-made for Apple devices. It saves your Mac’s battery and won’t irritate you with memory hogs.

Timely Upgrade Your Operating System

The above-mentioned measures will have just a partial effect. Installing the latest version of your macOS or a new operating system will give a major boost to your device’s productivity. But beforehand, make sure to save all the meaningful data on an external physical drive or a cloud storage.
Previously, owners of older Macs would hesitate to switch to the latest operating systems because that would slow down their devices. Today, this problem is not relevant anymore. However, it would be wise to do some preliminary investigation and ensure that the newest version supports all the programs you use daily.
If installing a new OS is out of the question, try to upgrade at least all the applications. The exact procedure of doing it depends on how you installed them. Those downloaded from the AppStore should be updated right in the store.

Conclusion

The older your Mac, the less impressive its productivity. Fortunately, investing in a new computer is not the only way out. Try to clean the device’s memory, upgrade its OS and programs, fine-tune its settings to optimize the consumption of resources. As soon as you complete the procedures described in this article, your device will once again become quick and responsive.

This is a very useful, but somehow also dangerous trick. Useful because you can still access your
Mac
even if you forgot your password. Dangerous because anybody could bypass your Mac password by changing it. As always it depends on the person’s intention. There are good persons, using knowledge and tools for the right things and bad persons misusing knowledge. Be a good person.
in this article, I’ll tell you how to bypass Mac password login and how I discovered the trick. Actually, you do not forget the passwords you use every day. That’s what I thought. One day at work I tried to access my MacBook and I was 100% sure it was the correct password. I tried several different variations. Turned it off. Thought about it. Tried again. Searched in my documents for the passwords. Tried again, but could not access it. Somehow I must have forgotten a tiny part of it, just a special character as ? or : or maybe any of the signs was uppercase. I tried to remember but could not figure it out.
So what to do?
The first idea that crossed my mind, was the apparently easiest solution: just asking the IT guys for help. However, I knew that the team was overloaded due to its small size. So asking for help regarding such an annoying problem was somehow embarrassing, but also stressing for them. Next to asking my co-workers, there was the more unlikely possibility of trying to do it myself. However, I thought that Macbooks have reputable security and it would certainly not be possible to gain access without having any kind of password or a third-party tool. Far from it! Actually, it is a pretty easy and quick solution from which I was really surprised.
You just need to perform a few simple steps, so let’s jump into it and see how to bypass Mac password in 2020. If you just want to try it, but know your password then you should load this guide on another device because the first step involves shutting down your Mac. And I guess you might still need to follow the instructions step by step when executing it. So let’s start by turning off the computer.
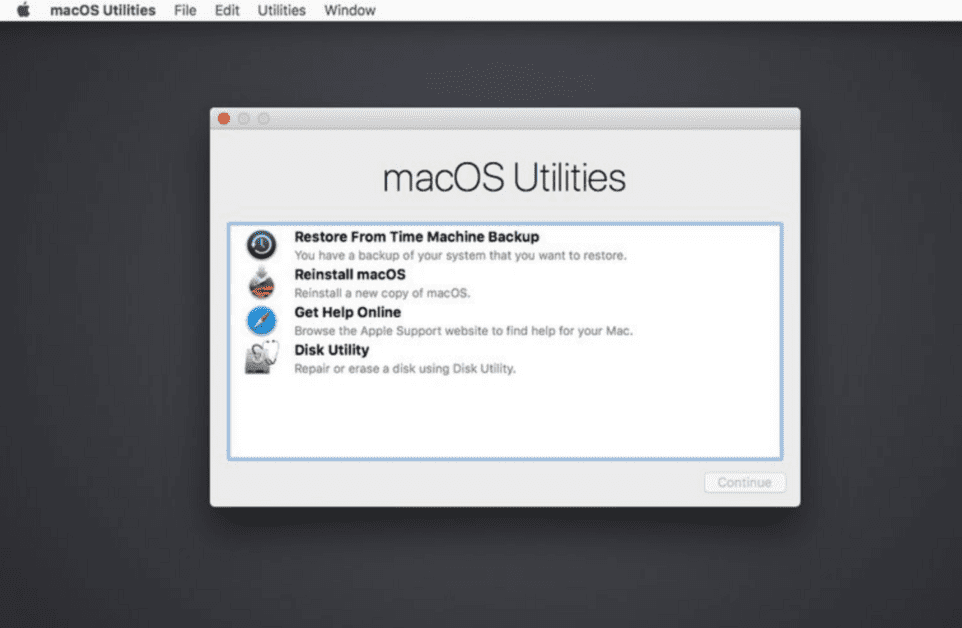
Next, turn on your Mac and hold immediately the keys “CMD+R” together until you see the  logo on the screen. The recovery mode of your Mac will launch. It should open a window with the header macOS utilities. On the uppermost part of the screen you can see the top bar with the following menu points as can also be seen on the image below:

Bypass Mac password

Click on Utilities and choose Terminal to launch the Mac Shell Terminal. It should appear a new window that looks like the window below.

Bypass Mac password

Click in the terminal and type resetpassword. A new window will appear with the header Reset password. On this window, you can see all user accounts with their names and profile pictures. Choose the user account for which you intend to change the password. Enter a new password, confirm it and hit save. Boom, a new password has been set. Restart your Mac and login with your new password. It should work. In case it does not, repeat the above steps. So in case you are forgetful, don’t worry. The above solution should help you bypass Mac password in no time.
Considering my slightly embarrassing situation, the above solution was a quite quick and easy fix. So, what lesson can you learn from the story?
As soon as a problem arises, there is already an answer to it. You just have to go out there and find it. I hope you learned something and maybe you were as surprised as I was.
You can achieve the same on Windows or Linux-based systems such as Ubuntu. If you are interested in a similar article for other operating systems, please let me know down in the comments.

A lone
MacBook
is a powerful and impressive device. However, add some accessories into the mix, and they’ll enable an almost magical experience. There are numerous options of accessories for a MacBook, even so, many that it is difficult to see which ones will help you to get work done on your Mac. Finding the accessories that suits your needs can prove challenging, so it helps focus on the essentials. However, some accessories benefit power users as well as casual ones.

1. Mouse

It’s a good idea to have a reliable, precise mouse for your MacBook. Even though MacBook’s comes with best in class trackpads you can ever find in a computer, they don’t quite manage to beat the experience a mouse provides.

There are tons of outstanding mice out there. Which one you should get to accompany you, and your MacBook heavily depends on your needs.

When purchasing a new mouse, I suggest that you look for wireless connectivity, preferably via Bluetooth, and a USB-C charging that lets you use it even while on the charger (sorry Apple Magic Mouse 2).

Accessories for MacBook

Personal Recommendation

My personal recommendation for a mouse is the Logitech MX Master 3. It features all the things I want it to have plus so much more. Starting with the essential features, it has wireless connectivity via Bluetooth and even has multi-device support. With just a press of a button on the mouse’s underside, you can switch the device you want it to control. It charges via USB-C and has an excellent battery life. Over the half-year I’ve owned it, I had to charge it once.

On top of these major features, the mouse has Logitech’s Magspeed scroll wheel. It is the best scrolling you’ll ever find, switching seamlessly from precision scrolling to the fast, 1’000 lines of text in a second scrolling.

In addition, the mouse comes with a gesture button that is perfect for the Mac, a thumb scrolling wheel, and two customizable buttons. The sensor is also brilliant and works smoothly on almost any surface.

The only minor downside of this mouse is the size. Since it is an ergonomically designed and feature-packed mouse, it is a bit bulky.

Having said that, if you are looking for one of the best mice in the market, you cannot go wrong with the Logitech Master MX 3.

2. USB-C Hub

When getting a new MacBook, you’ll get four Thunderbolt 3 ports at most. Because not everyone uses peripherals with USB-C connectivity, owning a USB-C hub can prove helpful.

Having one protects you from the awkward moment when you have to explain your coworker that you can’t read a USB stick, but it will also increase your flexibility.

When buying a USB-C hub, you should always make sure the one you choose has all the ports you want it to have, such as an SD-Card reader and HDMI.

It is also important to look out how many ports the hub will need to work. There are a couple of options out there, some only need one Thunderbolt 3 connector others need two.

Accessories for macbook

Personal Recommendation

As far as I’m concern, a USB-C hub ought to be portable and have a lot of input options. With that in mind, I chose the Satechi ST-SCMA2M. It comes in proper Mac colorways, and henceforth doesn’t take away the beautiful aesthetics of a Mac, it also gives me a broad range of input options. It comes with an HDMI, an SD-Card reader, a micro SD-card reader, two standard USB type A readers, and a USB-C port, which allows for passthrough charging.

The Satechi ST-SCMA2M also only needs one Thunderbolt 3 port to connect, and that’s all what I need.

The sleek form factor and the multitude of ports are pretty good, which makes me recommend this hub for everyone.

3. Headphones

Love listening to music while getting work done? Well, if you want to be able to listen to your music all the time, you should grab a pair of headphones.

Although all MacBooks comes with a headphone jack, when purchasing headphones to go along with your MacBook, I highly recommend looking for wireless headphones.

No matter your budget, you’ll get good wireless headphones in every price range, from sub 100$ to +300$.

When looking for a good headphones to complement your MacBook, I suggest that you think about the essential features. Do you need good microphones because you find yourself in conference calls a lot? Do you need active noise canceling because your workspace is too loud otherwise?

Outline all the features you want to have and then look for the headphones that suits your needs. Nowadays there are a wide range of valuable options, there is one for everybody.

Of course, getting Apple headphones (Beats also included) you’ll get some features the other headphones can’t provide, so I advice you to look into the Apple headphones first. However, the features they offer are not game-changing at all, and if you find yourself liking the headphones of a different company more, go for them.

Accessories for MacBook

Personal Recommendation

As far as I’m concerned, one of the best headphones to complement your MacBook are the
Apple AirPods Pro.
The AirPods Pro have a super active noise canceling feature. In addition, they are super portable and perfectly integrated into the
Apple ecosystem.

If you are looking for one pair of headphones for all your needs, including to pair it with other devices, then your MacBook, the AirPods Pro Might be only headphones you’ll ever need.

AirPods Pro offers a great sound, and the battery life of about 4.5 hours with active noise canceling should be enough for almost everybody.

The only downside of the AirPods Pro is that they are quite expensive , and when compared to other headphones in their price tag, the sound isn’t that superb anymore.

However, due to their small size, the one headphones for all needs aspect, and their excellent active noise canceling, it’s pretty easy to recommend the AirPods Pro as headphones Companion for your MacBook. Additionally, the fact that they are designed by Apple gives them a unique connection with the MacBook and makes them easy to use.
See also:
AirPods 2 Vs. AirPods Pro – FIGHT!

4. External storage

One of the best utility apps that come pre-installed on the MacBook is Time Machine. Apple’s backup program is fantastic, and everyone should take advantage of it. To do so, you need a reliable external hard drive or SSD storage.

In addition, having an external storage solution allows you to free up space on the MacBook’s internal storage.

When looking for the perfect external storage solution, the most important thing is reliability. If you find yourself needing the backup, you want to be sure that your external storage can handle it.

Another essential factor to consider is the type of storage, hard drive, or solid-state storage (SSD). Both have their pros and cons, but they are both greatoptions.

SSD’s usually come in at a little higher price but have higher write and read speeds, where hard drive mostly costs a bit less but can’t provide as fast speeds. It is said that SSD’s don’t have the same lifespan as hard drives, however, although this is technically true, no regular user will ever have problems with this.

Accessories for MacBook

Personal Recommendation

I wouldn’t recommend going all out on a high capacity, lighting-fast external SSD as your solution for external storage, except you need the fastest speeds to transfer data.

As far as I’m concerned, western digital’s “my passport” line is a perfect option for everyone. The hard drives offer a quick transfer speed and very high capacities while maintaining a reasonable price. They also have no known reliability issues, and personally, I use two of them as my storage solutions.

For time machine, I use a LaCie rugged 4TB hard drive that I got as a present. However, while it’s quite appealing and also is very reliable, the price of this hard drive is only justified by its looks, and there are more great options out there.

5. A backpack

Laptops standout feature is their portability. MacBooks are powerful machines that’ll go where ever you take them. Whether you use it to get work done on the train, edit videos in the airplane, or take your lecture notes in the auditorium, the MacBook is part of your daily carry.

In order to facilitate that portability of a MacBook or, for that matter, any Laptop, you’ll need a means of transportation for it. I highly recommend a backpack for transporting your MacBook. It is easier to carry than a sleeve, and it also has room for additional stuff you bring around.

When getting a Backpack for your MacBook, ensure it has a good pocket for your device. It should be padded well, and if there are zippers close to it, look for a lining that separates the zipper from the MacBook.

Once you’ve made sure that the backpack has a functional pocket for your MacBook and does not damage it while carrying around, find a bag that fits your needs. If you carry around a camera with you a lot, maybe you want a backpack that allows you to take your camera with you also. Do you need waterproofing?

As with the headphones, make a list and look for the backpack that ticks all the boxes for you.

Accessories for MacBook

Personal Recommendation

To carry around my 16’ MacBook Pro, I use Douchebags the “Backpack”. With a dedicated Laptop compartment right against your back, it keeps the MacBook safe from all the other stuff I lug around on a daily basis. The main compartment is also easily accessible and has sufficient space for all the stuff I need to carry around.

In addition, the “Backpack” has a simple, yet modern and fresh look that perfectly complements the MacBook. If you are also into photography, there is a camera inlet that fits perfectly into the “Backpack”. So carrying around your camera and the MacBook is easy and secure.

While it a bit pricy, it ticks all my boxes and is the perfect means of transportation for my MacBook.

Whether you use your Mac for work or just for your personal projects, you’ve likely found yourself wondering how to improve your productivity. There are only so many hours in a day, and so much mental stamina you can muster before you run out.

There are a number of tricks you can use to
improve productivity on your iPhone
but if you’re looking to do the same on
macOS,
the best thing to do is equip your Mac with productivity apps designed to help you do more in less time.

In this article, I will discusssome of the best productivity apps to help you get the most out of your Mac:

#1. Alfred

Free, with option to upgrade

Alfred is an amazingly powerful productivity app that essentially acts as the native macOS app Spotlight, but with a seemingly endless array of features. What separates Alfred from the park though, is the ability to create so-called “Workflows” which are chains of actions that can be triggered using a hotkey, a “snippet” (keyword that expands to longer text), a keyword, among others.
The Alfred app is free, and while the free version is incredibly fantastic, the Alfred Powerpack (£25 for a single license, £45 for a lifetime of free updates) adds a range of new and enhanced features to the already impressive array of features offered in the free version.

#2. Notion

Free for personal use
Notion is a very powerful app that can be used to perform a wide range of tasks. The app acts as a workspace that lets users integrate text, databases, Kanban-style boards, and many other forms of information.

Notion features an incredibly clean Interface that puts usability and function above anything.
My primary use for Notion has been note-taking during conferences. The ability to quickly drag photos into a note, create tables, and split pages into columns is essential for fast note-taking and clean final note. Moreover, being able to search the whole Notion catalog with the key command ⌘P comes in handy when you want to find specific pieces of information quickly.

What makes Notion to stand out from the park however, is ease of use and the ability to quickly navigate different pages which is extremely important for a smooth workflow.

#3. All-in-One Messenger

Free
All-in-One Messenger ties together the messaging platforms that you use the most into one single app. The app uses each messaging platform’s website to present them in a tab format. It just works.

The only real drawback that I’ve experienced while using All-in-One Messenger, is the absence of iMessage therefore you still have to use iMessage in its separate app when using your Mac.

#4. 1Password

$2.99 (billed annually)
The iCloud Keychain it’s not the most intuitive and user-friendly password manager out there. Thankfully, you can take advantage of1Password which is a super simple password manager that allows you to store all your passwords in one place, accessible with a master password. The beauty of 1Password really shows when using the 1Password Safari Extension, though.

1Password sits idly in your toolbar waiting for you to unlock it when you want a password to a given site, credit card information, or other sensitive information that you may need faster.
When you create a new login for a website, 1Password shows up and asks you if you would like to save the recently created login. If you allow it it’ll automatically save the login which saves you a huge amount of time if you sign up to so many services on a regular basis.

#5. Things 3

$50
Even though Things 3 has a high price point, after using it for a long period of time you won’t bat an eye at the price tag. With an extremely polished user interface Things 3 looks like it could be included in the inbuilt range of macOS apps. Things 3 integrates well with your iCloud calendar and allows you to easily arrange tasks in Projects and Areas.

Things 3 is easy to navigate and use. The simplicity of just being a to-do app makes it fantastic and is why you’ll most likely stick with it for years without switching.
You can simply dump any task that comes your way into the Inbox, and later on, sort them into the fitting categories. The status circle next to the project name is a nice feature that allows you to see an overview of your progress in that specific project. With a simple shortcut (⌥space for me) you can add tasks to a certain folder without launching the app.
And those are my best productivity apps for macOS. I hope you enjoyed these app recommendations. Feel free to leave a recommendation of some of your favorite Mac productivity apps in the comments!
See also:
How to Setup your iPhone for a Better, Less Stressful Life

For many decades, Mac machines stayed ahead of their Windows counterparts in terms of safety. They demonstrated a higher level of resilience against malware. Therefore, they built a permanent safety reputation in the minds of many users. This image can be further solidified by the fact that we have never had a Mac epidemic. That’s why it’s hard to convince many people that Mac computers are also vulnerable to malware. If you are one of them, you should change your mind. The reason is that the 2020 State of Malware Report shows that modern hackers are directing more attacks against Macs. The report shows that hackers increased their attacks on Mac PCs last year alone by a staggering 400% increase, emphasizing how important it is to take precautions and beef up your PC safety. Read on to discover how you can detect and remove viruses targeting your Mac.


Mac security

Detecting Malware: Top Signs to Look For

Detecting viruses on your Mac is easy if you know how to do it. Below are the leading signs you need to look for to know whether your machine is infected or not.

  • Your PC will suddenly start performing slower than ever.
  • You will notice strange ads popping up on your machine’s screen.
  • You will also notice some strange app icons on your Mac’s desktop, yet you never installed them.
  • A virus infection can replace your custom browser with a new one.
  • You will notice your machine redirecting you to strange web pages when loading.
  • You will also see severe threats and warnings popping up and forcing you to download specific programs.
  • Your machine or its programs start shutting down or restarting automatically.

Removing Malware

So, what do you do if malware has already invaded your Mac? Here are two main ways of removing malware from your PC.

Manual Removal

If you have identified the malicious app disturbing your Mac, you can start by closing and rooting it out of its system’s processes. You will need to do so by:

  1. Opening the Activity Monitor by typing its name in the Launchpad;
  2. Locating the malicious program the Processes;
  3. Using the [x] button to stop the process.
  4. Afterward, you will return to the Applications and send the program to the Trash bin and empty it immediately.

Although this method is easy and straightforward, you will need more time to do it successfully. Also, by the time you were sending it to trash, it may have scattered into different folders. So, it’s safer to use an effective antivirus app.

Cleaning Your Login Data

At times, many malware programs hide in your Mac’s bootup process. Fortunately, you can remove them without a sophisticated antivirus app. Here is how to do it.

  1. Opening the Apple menu, then the System Preferences.
  2. Choosing the Users & Groups section.
  3. Next, ensure you have highlighted your username.
  4. Then, open the Login Items tab.
  5. Use the “—” sign to disable all the malware.
  6. Lastly, reboot the machine to apply the changes.

Additional Steps:
You also need to take the following steps to safeguard your Mac.
If you fear that the malware you dealt with could return, you can create a new user profile on your machine. The reason is that most malware targets users and not devices.
It would be best if you ran a malware detector on your PC to ensure that it is always safe.
You can also restore your machine’s older version to eliminate the virus. This solution is easy, although you may lose any change you made after you made the last backup on the Mac.
If things remain complex, don’t fear to call for technical support to deal with the malware.
Although Macs lead their Windows counterparts in safety matters, recent hacking onslaughts have exposed them to attacks. Therefore, be aware that you are not 100% safe unless you stay ahead of hackers. To help you do this, we shared insights on how to boost your security by detecting and removing malware. We hope you will use them well to remain on top of the security game.

In this article, I’ll tell you exactly why the Macbook Air is becoming the most unnecessary piece of hardware in Apple’s lineup.
Apple first released the Macbook Air in 2008 and claimed by Steve Jobs as the world’s thinnest notebook. It replaced the ‘Macbook’ range of laptops and was a Machine targeting the users who we’re vying for the more powerful MacBook Pro and simply wanted a laptop that could do Basic tasks such as run office apps and do some web browsing. Haters labeled the MacBook Air as “the most expensive Machine to browse twitter on” whilst MacBook Pro users disregarded their little siblings as casual users.
After remaining relevant for many years, the changes in the Apple product line up and hardware progression began to blur the lines of the MacBook Air’s place.

It Lost its Spot in the Lineup

The MacBook line up was very straight forward at the beginning. It was part of Job’s plan to simplify the lineup with Consumer and Pro users as his segregation. As per his famous grid, he was going to make a product which meets the needs of each user type.
If you were a simple “consumer” user that needed a portable Computer that ran Mac OS you would simply purchase the
MacBook Air.
If you were a “power” user that needed a portable laptop that could run heavier software such as Adobe’s Creative Suite you would go for the more powerful
MacBook Pro.
Over time the Macbook Air received the upgrades that all MacBooks did in the lineup like Retina displays, Solid State Drives and faster connectivity ports making it a good contender against the MacBook Pro. Later versions of the Macbook Air could run resource-heavy software, the hardware itself wasn’t designed for it with less cooling facilities and weaker chipsets but you could still make do.

Today’s price difference between MacBooks.
The pricing of both items also played a significant role. Initially, there was a much larger difference in the price between the Air and the Pro. Now for just USD300 more, you can get the MacBook Pro which is faster, more powerful and will have an increased longevity compared to a MacBook Air. So when you are purchasing a Macbook the option of choosing a Pro over an Air is much easier. To counteract this, Apple is doing what Apple rarely does and is offering a discount on the Air to encourage people to buy it.

Apple is Apple’s Biggest Competitor

The iPod was the most revolutionary piece of technology created by Apple and it changed the world. In 2001 I still remember seeing Steve Jobs on stage exhibiting a box that could store thousands of songs, that fit in his hand. It single-handedly killed the cd industry and changed music distribution and later pushed forth streaming.

Fast forward a few years later and all the features of the iPod are being slowly assimilated into the iPhone. Soon the iPod is considered redundant with the amount of hard drive space that phones come in. A basic level iPhone has more hard drive space than an iPod.
Later Apple changes the game again with the launch of it’s streaming service. Apple Music. This was the final nail to the coffin to the iPod. Why walk around with a device that can store downloaded songs when you’re phone with the help of omnipotent data can stream any song of your choice? In fact, they have replaced iPod from the menu of Apple.com for “Music”

The Rise of the iPad Pro

Apple announced the first generation of the iPad Pro in 2015. It was meant to be a more powerful iPad targeting the professional market (like they did with the Mac Pro). Apple saw a world of illustrators and designers using iPad Pros in their day to day work, but the first generation didn’t catch on. Its hardware wasn’t too powerful and people were still used to computers and drawing tablets. It, however, caught the attention of students who purchased it as an alternative to carrying a laptop around campus and was much easier to read notes in.

The second generation of the iPad Pro was more powerful and introduced the world to a magnetic connectivity port at the back allowing you to strap on a multi-purpose keyboard cover. When I got my hands on one at the Apple store it dawned on me; they’re going to cannibalise their own MacBook Air.
The next generation of the iPad and thereafter keeps drawing closer and closer to defeating the MacBook Air. It has a better display which is a touch screen, the same hard disk space, support for a pen and runs iPad OS which with every update gets very close to operating as a computer OS.

All its apps are optimised to run in harmony with the hardware with a lot of preference to design and illustration apps that pair well with the Apple Pencil, that magnetically attaches (and charges) itself to the top.
The iPad Pro is also the first iPad to support the full Adobe Photoshop software instead of the watered-down version. Note-taking apps such as Microsoft Words, Evernote and Apple Notes has been updated to attract the journalist and student market. The other apps are present too if you still want to watch a video or play a game.
The accessories that come with the iPad Pro also mean that it is a more versatile product for different needs. The Apple Pencil for graphic designers and illustrator and Magic Keyboard for anyone from journalists to students who want the keyboard experience.
Where do we see the MacBook Air in the future? Since professional users are becoming Apple’s primary target they will be catered to with MacBook Pros and Mac Pros and optimised software and hardware. Consumer users won’t be left in the dust, they will be rewarded with an even more portable, yet powerful iPad Pro that will give them the ability to do everything that they want plus more with accessories to fit their needs.
Whether category you fall into the iPad Pro brings better software optimisation, cooler accessories and a computing experience like no other at the same cost as the Macbook Air.
Apple is right: Your next computer isn’t a computer.

When you ask a geek for help because of some issues with your Mac, iPhone, but also printer or internet connection, the first question they throws at you is always the same:
Have you tried turning it off and on again?
But why rebooting a device solves almost, all the problems?
As a software engineer I’m aware that every system has glitches , it is impossible to have a flawless application. And often glitches only occur under certain conditions when specific events happen. If a problem occurred at every startup, it would be resolved immediately.

Occasionally, a certain combination of conditions and events causes the MacBook or iPhone to crash. A process could possibly accumulate RAM space, with a glitch known as
memory leak.
By restarting, the memory resets, execution starts again, the program is reloaded, and the software variables are initialized. The conditions that caused the anomaly no longer exist. They may reoccur by executing the same operations, or the cause may not even appear any longer, since it might be caused by something not directly related to how we used the software.

As for network devices , like routers or switches, some routing tables might be corrupted for some reason. Or the connection to some service might be lost, like a DNS server, whose work is to translate web addresses into IP addresses. In these cases, or in similar cases, restarting the device will clean the internal tables and force a reconnection with the other network components, often resolving the problem.

Lastly, I recommend that you restart your devices once in a while, even if they work. It doesn’t hurt to reboot your iPhone or your Mac every now and then and give it a fresh start!
See also:
How To Force Restart a MacBook, MacBook Air, or MacBook Pro

Here’s how you can do it too but only if you qualify…

As you may already know, the first generation of the MacBook Pro with a touch bar suffered from keyboard issues. It came with Apple’s butterfly keyboard which was meant to be thin and streamlined but turned out to be a right pain in the butt for many of those people who used it.
I happened to be one of those people. Now, I actually enjoy using the butterfly keyboard which is a very controversial statement but I like the way it feels but what I don’t like is when it fails on me. The keyboard begun failing on me just as I was really getting into the groove of writing about a year ago.
The problem was with certain keys sticking such as the enter key, backspace, tab, shift and a range of letters spread across the keyboard. This was a real nightmare and lead to many hours of frustration as the keyboard would often put the same letter ten times. I even resorted to an external keyboard for a while which meant typing out and about was a hassle.

So, I conducted some research online and found out that I wasn’t the only one who was facing this issue. And to my excitement, Apple offered a keyboard replacement programme for my MacBook which was very nice
So, I
made a genius bar reservation
and got on the next train to Leeds to get this issue resolved. I arrived and they were very friendly and had obviously had people complain before about these problematic keys. So, I showed them the problem and they were more than happy to get it sent off for me which was perfect.
It took around five days I think in total which was Great and I went back into Leeds to pick it back up. When I got it back I was blown away to find out Apple had pretty much just given me a whole new laptop for free.

The internals were still the same, and it was my MacBook but they had made some changes. They gave me a new display, a new metal case, top and bottom, a new battery, new trackpad and a brand new keyboard which had been updated to the 2019 version. This keyboard works much better than the previous one and even has some changes to the backspace key and option key.
The total for this repair job amounted to $359.83 and I wasn’t charged a penny. This was great news as not only was I low on cash but I had also just bought a Pret lunch which really meant I had no cash to spare.
I am using that keyboard exactly a year on to type this blog post on and it handles it no problem which is Great news.

If you think you qualify for this and are experiencing keyboard issues on your MacBook between 2016 and 2019 then
visit this link
to check out Apple’s repair programme.