





Got a tip for us?

iOS 27

Apple’s Family Sharing feature is a really neat way to save money with your friends and family. You can split costs by having just one person pay for services like Apple TV, Apple Arcade, Apple Music, etc., for five other people.

However, some people have tried to make this feature work and failed. So, if you’re sure you’ve paid for a subscription service and you notice that it’s not shared among family members, we have listed a few troubleshooting steps to resolve the problem on your iPhone 18 Pro Max.

1. Check Apple’s System Status Page

Before logging out of your Apple Account, removing and adding family members, and sifting through your payment details, you might save some time by checking if the service you seemingly can’t share is online in the first place.

Go to Apple’s System Status page and scan the list of Apple services to see if the one you’re trying to share has a green dot next to it.

This will hardly be the culprit, but it’s worth checking before going into the more detailed fixes.

2. Turn on Purchase Sharing and Share With Family

Purchase Sharing is a feature that allows family members to share apps, movies, TV shows, songs, and books they bought with each other. The family organizer will pay for it using a shared payment method, but all the family members will get to download it if they want.

Here’s how to turn it on using an iPhone:

  1. Open Settings on your iPhone 18 Pro Max.
  2. Tap Family, tap Purchase Sharing, then follow the onscreen instructions.
  3. Tap Subscriptions, then tap Manage Subscriptions.
  4. Turn on Share with Family.

This might fix your issue, but try the next step if it doesn’t.

3. Change Apple Account Region

This may not be immediately obvious, but regions matter a lot for apps and media purchases. If your family members are using different Apple Account regions, they won’t be able to access the same subscriptions.

The best way to change your region is to visit the Apple Account website and change it from there. However, there are some things you need to know before changing your App Store country.

Here’s a quick way to do it on your browser:

  1. Cancel all your subscriptions and make sure you have no money left in your Apple Account balance.
  2. Visit the Apple Account Personal Information page and click Country/Region.
  3. Follow the instructions and enter a valid payment method for your new country or region.
  4. Now, as long as you and your family members are in the same region, you will all enjoy access to shared subscriptions.

4. Sign Out and Sign In to Media & Purchases

First, you must ensure you’re using the same Apple Account for Family Sharing and Media & Purchases. You can find it in Settings > Family > Your Name > Purchases > Apple Account for Purchases. Confirm that your Apple Account for purchases is the same as your regular Apple Account.

Sign out and into Media & Purchases by doing the following on your iPhone 18 Pro or iPhone 18 Pro Max:

  1. Open Settings and tap your Apple Account name.
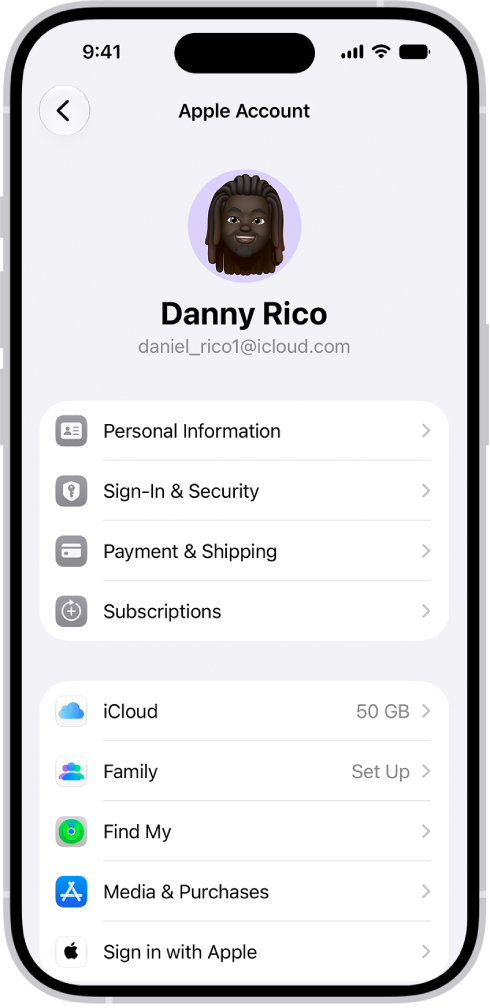
    The Apple Account Settings shown with a list of options including personal information, subscriptions, Find My, and more.

  2. Now, tap on Media & Purchases and choose Sign Out from the pop-up menu.
  3. Tap Media & Purchases again, and make sure you sign in with the same Apple Account you use for Family Sharing.

5. Sign Out, Restart, and Sign In

A little Apple Account reset on the device that isn’t receiving the shared subscription might do the trick.

So, follow these steps to sign in again with your Apple Account on an iPhone 18 Pro Max:

  1. Open Settings and tap on your Apple Account name.
  2. Scroll to the bottom and Sign Out (marked in red).
  3. Now, restart your iPhone, go back to Settings, and select Sign in to your iPhone.

This should refresh the App Store and other apps, and it should now recognize that the signed-in Apple Account has access to the shared subscriptions.

6. Add the Family Member Again

As an extension of refreshing it all, you can re-organize the Family Sharing group by disbanding it and adding everyone back again.

Here’s how to do it on iOS:

  1. Open Settings and tap Family.
  2. Select individual family members and tap Remove [member’s name] from Sharing Group.
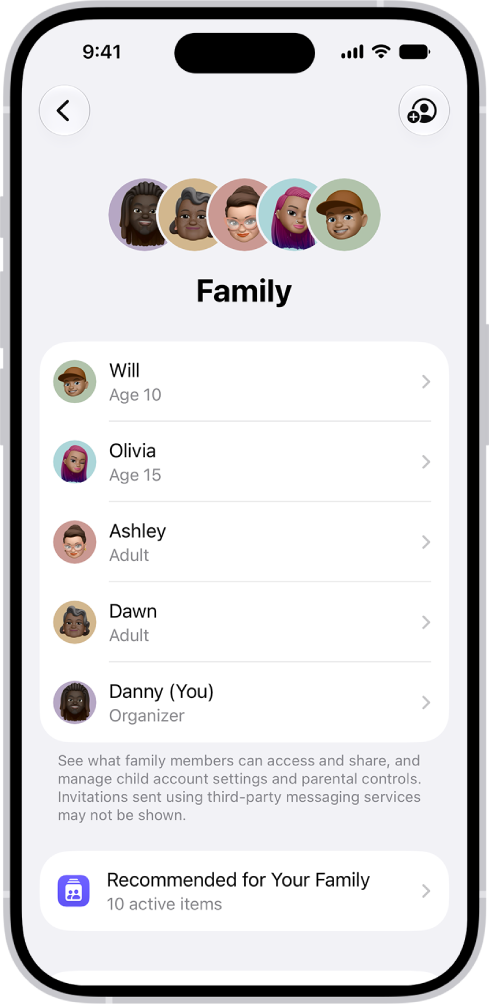
    The Family Sharing screen in Settings. Five family members are listed with recommendations for the family.

  3. Invite them back: tap the Add Member button, tap Invite Others, then follow the onscreen instructions.

Check Payments if All Else Fails

If you tried all these troubleshooting steps and still can’t share your subscription, you can try contacting Apple Support for guidance.

However, the only related issues short of the ones listed here that could stop you from sharing a subscription with family members are payment issues. So, you should probably check if your payment information is correct and if you actually have access to the subscriptions yourself.

Hopefully, one of these fixes works for you, and your family and friends can enjoy all the goodies that come with sharing digital content purchases and subscriptions.
Apple introduced the Continuity Camera feature, which lets you use your iPhone’s high-quality camera wirelessly.

While it works seamlessly for the most part, sometimes, you won’t see your iPhone’s camera when attempting to use this feature on your Mac. So, follow this guide, as we’ll show you how to fix Continuity Camera from your iPhone 18 Pro Max if it’s not working on your Mac.

1. Check If Your Device Supports Continuity Camera

Before troubleshooting the Continuity Camera feature, ensure that your device supports this feature. Here’s what you’ll need for the Continuity Camera feature to work on your Mac:

  • Mac running macOS Ventura or later
  • Logged into the same Apple Account on both devices

If you have a compatible iPhone and Mac but still cannot use the Continuity feature on your Mac, try the following troubleshooting methods.

2. Turn On Bluetooth and Wi-Fi

The Continuity Camera feature relies on an active Wi-Fi and Bluetooth connection. So, make sure you have these features enabled on both devices.

On your Mac, click the Control Center icon on the right side of the menu bar and enable the toggles for Wi-Fi and Bluetooth.

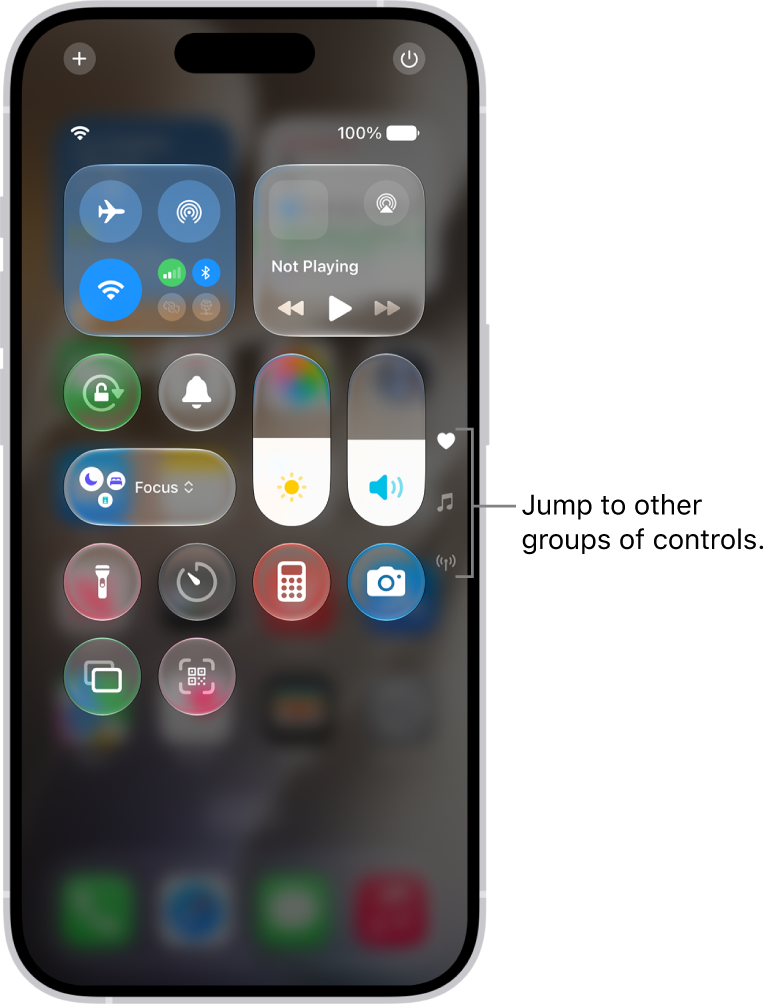
Similarly, on your iPhone 18 Pro or iPhone 18 Pro Max, open the Control Center by swiping from the top-right of the display and turning on the Bluetooth and Wi-Fi toggles.

Control Center open on the iPhone screen, with icons on the right for viewing other groups of controls.

Also, ensure that your iPhone isn’t sharing its cellular connection and the Mac isn’t sharing its internet connection. Furthermore, you should not use AirPlay or Sidecar while using this feature.

If you’re using a VPN, make sure its configuration doesn’t prevent local networking, as that may interfere with some Continuity features.

3. Update Your iPhone and Mac

Since Continuity Camera is a software feature, there are chances that it can be buggy. Over time, Apple fixes these bugs in the latest macOS and iOS updates, one of many reasons you need to update iOS on your iPhone.

So, you should install the latest iOS and macOS updates whenever they become available. Here’s how to check for the latest macOS update and install it on your Mac:

  1. Open System Settings on your Mac from the Dock.
  2. Navigate to General > Software Update.
  3. Click the Update Now button if there’s a software update available.

Similarly, here’s how to check for the latest iOS update and install it on your iPhone:

  1. Open Settings on your iPhone.
  2. Navigate to General > Software Update.
  3. Tap Update Now if there is a new update available.

Wait for the updates to install and automatically restart your Mac and iPhone. After the restart, check whether Continuity Camera is working as intended. But if it’s not, or you don’t find any updates, try the other fixes below.

4. Enable Continuity Camera on iPhone 18 Pro Max

Continuity Camera is enabled by default. However, if you accidentally turned this setting off at some point, that could be why you’re unable to use the Continuity Camera feature on your Mac. So, follow these simple steps to enable it on your iPhone:

  1. Open the Settings app on your iPhone.
  2. Navigate to General > AirPlay & Continuity.
  3. Turn on the toggle next to Continuity Camera.

Once enabled, you should be able to use the Continuity Camera feature. If you can’t use it still, follow the next troubleshooting methods.

5. Sign Out and Sign In to Your Apple Account

The Continuity Camera feature requires you to sign in with the same Apple Account on both the iPhone and Mac. However, issues with the Apple Account can also break this feature.

Therefore, you should try signing out of your Apple Account and signing back in on your iPhone and Mac.

To sign back in, open Settings on iPhone and System Settings on Mac, choose the Sign in option, and enter your login details.

6. Reset Network Settings on Mac and iPhone

If nothing works for you, resetting network settings may fix this issue. You can easily reset network settings on your iPhone from the Settings app on iOS.

Follow these simple instructions to reset network settings on your iPhone:

  1. Open the Settings app on your iPhone and go to General.
  2. Next, scroll down to the bottom and tap on the Transfer or Reset iPhone option.
  3. Now, select Reset, and then Reset Network Settings.
  4. Enter your iPhone’s passcode when prompted.

Your iPhone’s network settings will reset, and you can try and check whether Continuity Camera works as intended.

Unlike on an iPhone, you can’t reset network settings on your Mac from macOS Ventura’s revamped System Settings app.

7. Restart Your Mac and iPhone 18 Pro Max

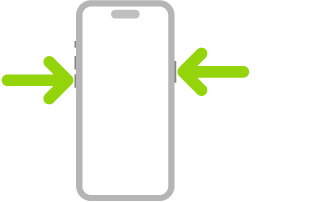
As a last resort, you can try restarting your iPhone and Mac since it’s the best way to fix minor software glitches and bugs on your device. Simultaneously press and hold the side button and either volume button until the sliders appear, then drag the Power Off slider. Press and hold the side button until the Apple logo appears.

An illustration of iPhone with arrows pointing to the side button on the upper right and a volume button on the upper left.

Similarly, you can restart your Mac by clicking on the Apple menu and selecting the Restart option from the dropdown.

After restarting your Mac and iPhone, you should be able to use the Continuity Camera feature.

8. Contact Apple Support

If none of the above troubleshooting steps helped, it’s time to get expert assistance from Apple. Whether you think it’s an issue with your iPhone or Mac, you can get tech support with the Apple Support app on your iPhone.

In case the hardware’s at fault, Apple experts will assist you in ways we can’t, especially if your devices are still covered by warranty.

Fix macOS Problems With Ease

We hope you can get the Continuity Camera feature working on your Mac. It’s an excellent way to get better video call quality on your Mac.

macOS isn’t perfect, so you’re bound to find bugs often. So, knowing some basic troubleshooting tips will help you fix such problems.

If you are finding that you can’t hear people clearly when you make phone calls on your iPhone 18 Pro Max you may be wondering whether there is a simple way to improve audio quality on an iPhone.

Check the speaker

There could be an easy fix: perhaps there is dust or gunk in the speaker on your iPhone and a clean could help.

Remove the film

If it’s a brand new iPhone 18 Pro or iPhone 18 Pro Max make sure that you have removed the plastic wrap from the iPhone because if this is stopping air getting to the microphone or speakers then they simply won’t work! You’d be surprised how many people make this mistake – wanting to keep their new iPhone pristine, no doubt.

Check your headphones

Another reason you might not be able to hear the audio on your call is if you are using headphones and they either aren’t plugged in properly, or they aren’t working via Bluetooth.

To check you are connected via Bluetooth go to Settings > Bluetooth and either turn it on, or turn it off and on again.

Use Wi-Fi calling

You can also use Wi-Fi Calling as a tool to improve call quality. You’ll need to route your call over a Wi-Fi network instead rather than a mobile/cellular one.

This may well improve the quality of your calls if you have a poor cellular or mobile data connection at home.

To check to see if the feature is turned on, go to:

  1. Settings > Cellular (or Mobile Data).
  2. Tap Wi-Fi Calling, then turn on Wi-Fi Calling on This iPhone. Tap Enable, then follow the onscreen instructions.
  3. When Wi-Fi Calling is available, “Wi-Fi” is displayed after your carrier name in the status bar, and all your calls go through Wi-Fi.

Use AirPods

Those who find it hard to hear callers due to background noise could use AirPods or AirPods Pro.

Use FaceTime

Alternatively those struggling with sound quality during phone calls could use FaceTime and activate Voice Isolation, which has a similar effect of separating your voice from the background noise. To activate Voice Isolation in FaceTime follow these steps:

  1. Open FaceTime.
  2. Start the video or audio FaceTime call.
  3. Open Control Center (by swiping down from the top right corner).
  4. Tap FaceTime, then select Voice Isolation.
  5. You can now return to the call.

Ask Apple

If none of these fixes work for you then there might be a fault with the iPhone 18 Pro Max, in which case if you are still within warranty (one year from purchase) Apple should fix it for you.

iCloud lets you share calendars with other people who have iCloud accounts. They can be in a Family Sharing group or anyone at all. You can even invite people without an iCloud account, who will then be invited to create one.

However, readers have reported (and I’ve seen) that invitations sometimes aren’t delivered or don’t work, no matter what you try. Here’s typically how you would share and send an invitation within the Calendar app on your iPhone 18 Pro or iPhone 18 Pro Max:

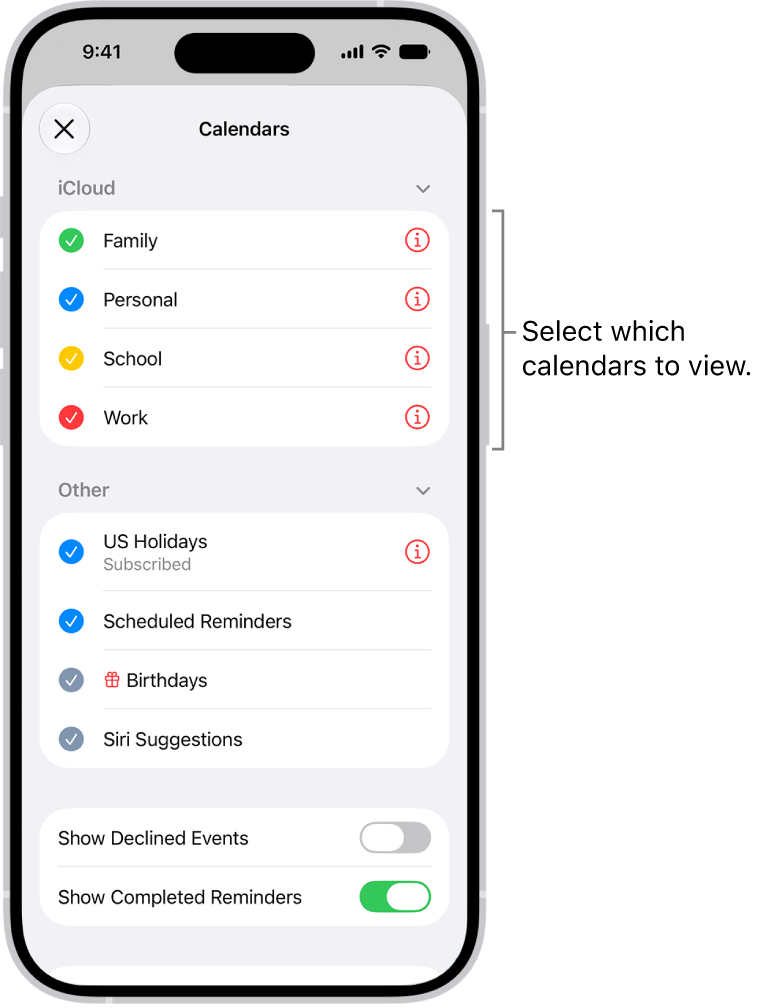
  1. Tap the Calendars button.

    The Calendars list, with checkmarks indicating which calendars are active. The Done button for closing the list is in the top-right corner.

  2. Tap the Info button next to the iCloud calendar you want to share.
  3. Tap Add Person, then enter a name or email address, or tap the Add button to browse your contacts.
  4. Tap Done.

iCloud now sends invitations to all the parties listed and provides push notifications to their devices if they have notifications enabled for Calendar. They should receive an email message with a Join Calendar link they can click or tap, which will take them to iCloud.com to log in and accept the invitation.

If that email doesn’t arrive or using the link doesn’t work, here is the workaround, which is a perfectly acceptable pathway to accept an invitation:

  1. Have the invited party log in to iCloud.com with the account you used for their invitation.
  2. Click the Calendar icon.
  3. Click the inbox icon, which should have the numeral 1 or a larger numeral overlaid on it as a badge.
  4. Under the invitation notification, click Join Calendar.

They are now joined to the calendar, which you can check via the calendar entry on your iPhone 18 Pro Max.

AirDrop makes it easy to transfer data from one Apple device to another. But it’s far from perfect, so you may occasionally face issues initiating or finishing an AirDrop transfer. Below, we list some troubleshooting steps to help you fix these problems.

1. Change Your AirDrop Visibility Settings

AirDrop gives you three visibility options: Everyone for 10 Minutes, Contacts Only, or Receiving Off. If your iPhone 18 Pro or iPhone 18 Pro Max isn’t showing up on AirDrop, it might be on Receiving Off. Therefore, switch to Everyone for 10 Minutes or Contacts Only, depending on the recipient.

Open Control Center on your iPhone, then tap and hold in the top-left section to reveal an AirDrop button. Choose your preferred option.

Control Center open on the iPhone screen, with icons on the right for viewing other groups of controls.

On a Mac, open Control Center and click AirDrop from the top-left section. In the window that pops up, choose Everyone or Contacts Only.

2. Prepare Both Devices to Receive an AirDrop Request

Your device can’t be discovered if it’s locked and in sleep mode. You must prepare your device for incoming AirDrop transfers, making it more likely to show up on someone else’s device without delay.

Unlock your iPhone 18 Pro or iPhone 18 Pro Max and leave it on the Home Screen to prepare it. On a Mac, open a new Finder window and select Go > AirDrop from the menu bar to prepare for an AirDrop request.

3. Turn Off AirDrop Restrictions

If AirDrop isn’t showing up at all, you may have blocked it in your Content & Privacy Restrictions for Screen Time. Go to Settings > Screen Time > Content & Privacy Restrictions > Allowed Apps & Features.

On a Mac, go to System Settings > Screen Time > Content & Privacy > App Restrictions.

Make sure AirDrop is turned on for each device. You may need to enter your Screen Time passcode to make these changes.

4. Enable AirDrop Over Cellular

AirDrop’s (Bluetooth) range is around 30 feet, so if you move beyond that distance, AirDrop won’t work anymore. But you can enable a setting to allow AirDrop file transfers to continue even after you leave the range.

On your iPhone 18 Pro Max, go to Settings > General > AirDrop and toggle on Use Cellular Data to ensure transfers occur over LTE or 5G.

5. Allow Sharing by Bringing Devices Together

This particular fix is specific to NameDrop. You can use NameDrop to share contact information by placing the top edge of two iPhones close to each other.

If NameDrop isn’t working, check if your device has the right settings. On your iPhone, go to Settings > General > AirDrop and toggle on Bring Devices Together if you haven’t.

Note that NameDrop only lets you share new contact information. You can’t update an existing contact with NameDrop.

6. Turn Off Do Not Disturb Mode

Your device may not receive transfer requests from AirDrop if Do Not Disturb or another Focus mode is enabled. Open Control Center and hit the Focus icon (the default is a moon icon) to turn it off on your iPhone or Mac.

7. Restart Wi-Fi and Bluetooth on Both Devices

A particularly useful solution if AirDrop isn’t working is to disable and re-enable Wi-Fi and Bluetooth. Open Control Center on your iPhone or Mac and hit the Wi-Fi and Bluetooth icons to turn them off, then select them again to turn them back on.

If either of you have Personal Hotspot on, disconnect.

8. Use AirDrop From a Third Apple Device

This isn’t an option for everyone, but if you have a spare Apple device, you should try using that to connect over AirDrop. Usually, if your iPhone or Mac shows up on this new device, it will suddenly appear on the original device as well.

9. Send a Single File Instead of Multiple Files

AirDrop lets you share many kinds of files at the same time. But if AirDrop isn’t working, you should consider simplifying matters by sending a single file at a time instead.

AirDrop files automatically open in a relevant app. For instance, images open in the Photos app, but multiple file types don’t always open in the same app. This could explain why your AirDrop transfer failed.

10. Check the Downloads Folder for Missing Files

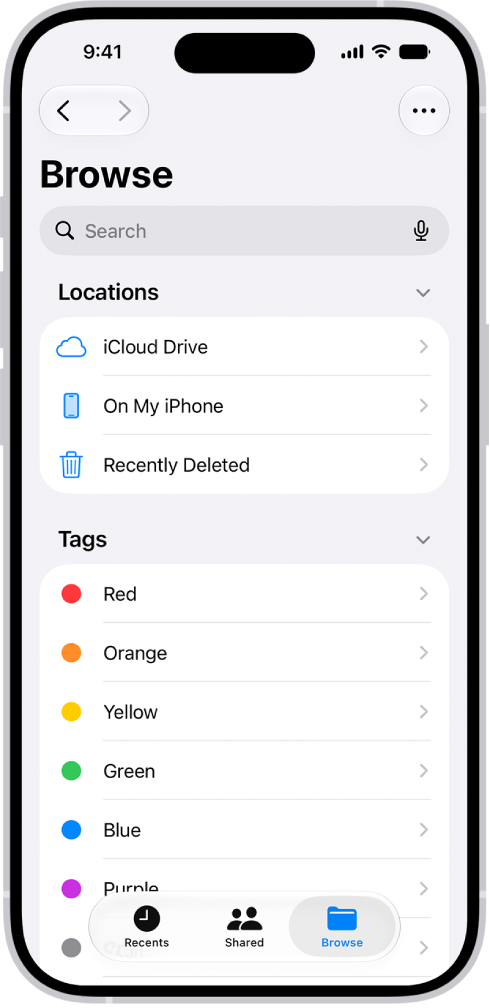
If AirDrop sent a file to your device but you can’t find it, take a look in the Downloads folder. On an iPhone 18 Pro Max, open the Files app and select the Browse tab from the bottom. Then, head into iCloud Drive or On My iPhone and tap into the Downloads folder.

The Files app displaying multiple folders and locations named Downloads, Letters, Family, and so on. At the bottom of the screen are buttons for Recent files, Shared files, and the Browse tab.

On a Mac, you can usually find the Downloads folder by opening a new Finder window and pressing Option + Command + L. You may also find it next to Trash on your Dock.

One of the coolest features most AirPods have is that they can quickly switch between your Apple devices without you doing anything. That way, if you’re listening to music on your Mac but want to watch a video on your iPhone, you can just play that video, and your AirPods will automatically switch over to your iPhone 18 Pro or iPhone 18 Pro Max.

Of course, that can also be annoying sometimes. Fortunately, you can stop AirPods from connecting to other devices with a few taps.

How to Stop Your AirPods From Switching Devices Automatically

One of the best AirPods features you may have missed is the ability to connect automatically to other devices. However, it can become annoying if you use too many Apple devices at once.

Fortunately, you can easily keep your AirPods from switching devices. But before we start, make sure you have your AirPods with you. You’ll need to connect them to your iPhone 18 Pro Max in order to change their settings. Then follow these steps:

  1. Connect your AirPods to your Apple device.
  2. Go to Settings.
  3. Select Bluetooth.
  4. Tap the More Info button on the right side of your AirPods’ name.
  5. Select Connect to This iPhone (if you don’t see that option, first tap Audio & Routing).
  6. Tap When Last Connected to This iPhone.

This will stop your AirPods from switching back and forth between your Apple devices. If you want your AirPods to start switching again, just repeat the steps above but select Automatically.

Which AirPods Support Automatic Switching?

Fortunately, most AirPods support automatic switching, but if you don’t see this feature available, your AirPods are too old to use it.

These are the AirPods that support automatic switching:

  • AirPods (2nd generation or later).
  • AirPods Pro (1st generation or later).
  • AirPods Max.

As you can see, other than the first-generation AirPods, all AirPods can use this feature.

No More Annoying Switching

Now you can wave automatic switching goodbye. You can choose when to stop your AirPods from connecting to other devices, so you never need to struggle with this feature again. And if you’re having other problems with your AirPods, you can probably fix them by yourself, too.

Seeing the “Verification Required” prompt every time you want to install an app from the App Store can be frustrating, especially when it’s free. Here’s how you can stop those annoying verification prompts on your iPhone 18 Pro Max.

1. Add or Update Your Apple Account Payment Method

Having outdated or expired payment methods for your Apple Account could trigger the “Verification Required” pop-up. This can also happen if you haven’t added any payment methods to your Apple Account.

Therefore, adding or updating your payment method information is a good place to start. Follow these steps:

  1. Open the Settings app on your iPhone 18 Pro Max and tap your name at the top.

    The Apple Account Settings shown with a list of options including personal information, subscriptions, Find My, and more.

  2. Go to Payment & Shipping and then tap your current payment method. If you haven’t set up any payment methods, tap Add Payment Method.
  3. Verify your card number, expiration date, and billing information. Use the Edit option in the top-right corner to update any details if required.
  4. Select Remove Payment Method if the current payment method is no longer available. Then, return to the previous menu to add a new method.

After adding or updating the payment method, head over to the App Store and try downloading an app to your iPhone again.

2. Check for Failed or Pending App Store Purchases

If you have pending payments, possibly from a subscription or in-app purchases, you may encounter the “Verification Required” prompt while installing free apps. To fix this, you need to check for failed or pending App Store purchases and complete them. Here’s how to do it:

  1. Go to the App Store app on your iPhone.
  2. Tap your picture, tap Apps & Purchase History, then tap Purchase History.
  3. Look for unpaid or failed payments, and complete them.

3. Sign Out of Apple Account and Sign Back In

In most cases, completing pending Apple Account purchases or updating the payment method should stop the verification prompts when installing apps on your iPhone 18 Pro Max. However, if the issue persists, you can try signing out of your Apple Account and signing back in. This should help fix any potential glitches and stop the persistent verification prompts.

To sign out of your Apple Account on your iPhone, follow these steps:

  1. Open the Settings app on your iPhone and tap your name at the top.
  2. Scroll down and tap Sign Out at the bottom. Enter your Apple Account password and tap Turn Off.
  3. Enable all the toggles to keep a copy of your iCloud data before you log out.
  4. Tap Sign Out in the top-right corner, then tap Sign Out again when prompted.

Now, restart your iPhone, open the Settings app again, and tap Sign in to your iPhone. Log in with your Apple Account credentials, and then try to download an app from the App Store.

One or more of the above tips should stop the “Verification Required” prompts you see while installing free apps on your iPhone 18 Pro or iPhone 18 Pro Max. However, if nothing works, consider using the Apple Support app for expert help. An Apple support agent should be able to assist you with troubleshooting steps specific to your situation.

Auto-brightness ensures your iPhone’s screen brightness levels adapt automatically according to the light around you. For example, when you step out in the sun, the brightness increases. And inside a room, it decreases. When your iPhone’s auto-brightness feature doesn’t work, it can spoil your user experience and even consume more battery.

If auto-brightness isn’t working on your iPhone 18 Pro or iPhone 18 Pro Max, you can use these solutions to fix it. Once that’s done, it should be more comfortable to use your iPhone during the day, night, and any other times.

1. Clean Your iPhone’s Dynamic Island Area

The ambient light sensor is at the top of your iPhone screen. Body oils, sweat, and other such gunk may stick to this sensor when holding the phone to your ear during long calls. Due to this, it may stop your iPhone’s ambient light sensor working, which is what’s responsible for adjusting the screen brightness according to your surroundings.

To fix this, use a clean, dry cloth to wipe the top portion of your iPhone screen. After this, auto-brightness should work fine. If not, follow the remaining solutions below.

2. Restart Your iPhone

If you haven’t turned off your iPhone in a while, it can cause a few problems, like auto-brightness not working correctly. To fix this, simply restart your iPhone. Simultaneously press and hold the side button and either volume button until the sliders appear, then drag the Power Off slider. Press and hold the side button until the Apple logo appears. After the device powers on, everything should work as well as it usually does.

An illustration of iPhone with arrows pointing to the side button on the upper right and a volume button on the upper left.

3. Enable and Disable Auto-Brightness

Another quick solution to fix the auto-brightness problem on your iPhone 18 Pro Max is to turn this feature off and on. Here’s how to do that:

  1. Open Settings and tap Accessibility.
  2. Tap Display & Text Size.
  3. Turn off Auto-Brightness.
  4. Restart your iPhone.
  5. Go to Settings > Accessibility > Display & Text Size and enable Auto-Brightness.

4. Update Your iPhone

When you’re running an older version of iOS, some old bugs may still be there causing issues. To fix this, you should update your iPhone to the newest version of iOS. This will ensure your device has all the latest features, bug fixes, and security patches.

To update your iPhone, go to Settings > General > Software Update.

5. Try Turning Off Night Shift

In case none of the above solutions work for you, consider turning off Night Shift. For this:

  1. Open Settings and tap Display & Brightness.
  2. Tap Night Shift.
  3. Turn off Manually Enable Until Tomorrow and Scheduled.

6. Remove Any Thick Screen Protectors

Are you using an abnormally thick screen protector on your iPhone? If yes, it may cause problems with the smooth working of the ambient light sensor. To address this, consider removing your screen protector. If you must use one, opt for a screen protector that’s thinner, or medium thickness, instead.

Similarly, if you have a case that covers the entire front of the device, or even partially blocks the top sensor area, remove that as well.

7. Reset All Settings

When you reset all settings, personal data like downloaded apps, music, photos, videos, and such won’t be deleted. However, all the settings you have customized to your liking will reset and return to the default options. This includes Wi-Fi, Bluetooth, VPN configurations, Home Screen layout, keyboard settings, and more.

After you reset all your settings, several problems such as auto-brightness not functioning should be fixed. Here’s how to do it:

  1. Open Settings and tap General.
  2. Tap Transfer or Reset iPhone.
  3. Tap Reset and choose Reset All Settings.
  4. Enter your device passcode to confirm.

Once it completes, your iPhone should adjust the screen brightness correctly based on the light around you.

Problems With Third-Party iPhone Displays

Did you break your iPhone screen and get it repaired by an unauthorized service provider? If yes, it may cause multiple problems, like Face ID not working correctly, True Tone not functioning, and possible auto-brightness issues.

Contact Apple Support to get your device repaired by Apple authorized service providers instead.

Auto-Brightness Makes Your iPhone Easier on the Eyes

After following the above fixes, your iPhone display should automatically adjust the screen brightness to match your environment, ensuring that the screen is always comfortable to look at.

If auto-brightness still doesn’t work, you may want to turn off auto-brightness and adjust it manually until you get your iPhone 18 Pro Max inspected at an Apple Store instead.

Bluetooth has been around for decades now, and the tool has become a vital part of modern gadgets. It might do you good to learn the workings of Bluetooth on your iPhone 18 Pro or iPhone 18 Pro Max, especially since the iPhone’s user interface makes essential Bluetooth functions pretty easy to perform.

In this guide, we’ll take a look at what Bluetooth is, what it can be used for, where it can be found, and the basic operations that can be performed on an iPhone, including pairing, enabling, and renaming Bluetooth devices.

What Can You Use Bluetooth For?

Bluetooth is a wireless technology that allows you to communicate or connect with various devices through radio waves. When your iPhone is within 33 feet of a connected Bluetooth device, you can use Bluetooth on your iPhone to transfer tons of files, images, and more between the two devices.

You can also use Bluetooth to connect to third-party devices, such as speakers, AirPods, keyboards, gaming controllers, and headsets.

How to Enable or Disable Bluetooth on an iPhone 18 Pro Max

You can access the Bluetooth through the Control Center or through your iPhone’s settings. You can enable and disable Bluetooth in the iPhone’s Settings, while the Control Center will only allow you to enable it.

If you do tap on the Bluetooth button in the Control Center to turn it off, it will disconnect your iPhone from paired devices and stop new Bluetooth connections. This happens even though Bluetooth is still enabled in Settings. We’ll describe both methods of enabling and disabling Bluetooth below.

Here’s how you can enable or disable Bluetooth from Settings:

  1. Open Settings and go to Bluetooth.
  2. Tap on the toggle next to Bluetooth to turn it on or off.

Here’s how you can disconnect Bluetooth from Control Center:

  1. Swipe down from the top-right corner of your screen to access Control Center.

    Control Center open on the iPhone screen, with icons on the right for viewing other groups of controls.

  2. Tap on the Bluetooth icon to enable it or disconnect devices.
  3. If the icon in the Control Center is blue, it indicates that Bluetooth is on. If the icon is gray, it indicates that Bluetooth is disconnected from all devices. If it has a diagonal line across it, it means that Bluetooth is disabled.

How to Pair or Unpair a Bluetooth Device on an iPhone 18 Pro Max

Pairing a device is a quick and easy process. Follow these steps to pair or unpair a device with your iPhone’s Bluetooth:

  1. Open Settings and go to Bluetooth.
  2. Make sure Bluetooth is enabled.
  3. If you are pairing a new device, scroll down to Other Devices and tap on the new device to pair. Ensure the device is in range and in Bluetooth pairing mode.
  4. If you are connecting a device you have paired with before, you will find the device under My Devices. Tap on it to connect. Depending on your device, you may be prompted to enter a code that appears on your screen.

To unpair a Bluetooth device from your iPhone, you should:

  1. Go to Settings > Bluetooth.
  2. Tap on the More Info button next to the device and select Forget This Device. Tap Forget Device to confirm.

If a Bluetooth device moves out of range, or if its Bluetooth is turned off, your iPhone will automatically disconnect from it. However, the device will not be forgotten. If Bluetooth remains enabled, it will automatically connect with previously paired devices when they come back into range.

How to Change the Name of a Bluetooth Device on an iPhone

To change the name of a Bluetooth device, you first need to ensure that your iPhone is connected to the device. You cannot rename a device if it isn’t connected. To rename a Bluetooth device on your iPhone, here’s what you’ll have to do:

  1. Open Settings and go to Bluetooth.
  2. Tap on the More Info button for the connected device you want to rename.
  3. Select Name.
  4. Type in your desired name and tap Done to finish the process.

Changing the name of a Bluetooth device will help make identification easier, create an organized and accessible list, maintain individuality, and increase efficiency.

What to Do if Bluetooth Isn’t Working on Your iPhone 18 Pro Max

Bluetooth tends to work seamlessly and is easy to operate. However, like all other technology, it isn’t perfect and might be difficult to work with at some point. There are several obvious troubleshooting tips that will help to get your Bluetooth up and running if you have any issues.

Here is a list of potential solutions to Bluetooth problems:

1. Update iOS

This can be done in Settings > General > Software Update. If your software is already up to date, move on to the next step.

2. Forget a Device and Pair It Again

This is one of the most popular fixes out there. Select Forget This Device from your Bluetooth Settings, disable Bluetooth from devices, enable it again, and try pairing it as a completely new, unrecognized device. Oftentimes, a fresh start is all your iPhone needs to get its bearings.

3. Pair the Bluetooth Device to Another iPhone

This will rule out any defects in the device you’re trying to pair. If the problem persists while connecting with another iPhone, then there might be a Bluetooth issue in the device itself. You can also do this by attempting to connect your iPhone with another Bluetooth device instead to see if your phone is working.

4. Reset the Network Settings

When all else fails, or your Bluetooth problems get too frequent, you can reset the network settings by going to Settings > General > Transfer or Reset iPhone > Reset > Reset Network Settings. This will wipe out all saved Bluetooth, Wi-Fi, and VPN configurations on your iPhone. Just make all those connections again like you did when your phone was new.

Bluetooth Is an Indispensable Tool, So Use It Well

Bluetooth can be found in your iPhone’s Settings, and there are a number of things you can do with it. On your iPhone, you can pair, unpair, rename devices, and enable or disable Bluetooth. You can also find Bluetooth in the Control Center, which provides quick and easy access to connect or disconnect from paired devices.

Summary

  • Properly pair an Apple Watch and iPhone 18 Pro Max by having both devices nearby and charged to at least 50 percent.
  • Fix pairing issues by ensuring both Wi-Fi and Bluetooth are enabled and unpairing if needed.

Communication between your Apple Watch and iPhone might not always be as seamless as Apple intended. Software bugs and connectivity issues can prevent them from working together. Try these fixes if you can’t pair or connect your Apple Watch to an iPhone 18 Pro Max.

How to Pair Your Apple Watch With an iPhone Properly

To pair your Apple Watch and iPhone properly, ensure both devices are nearby and charged to at least 50 percent. Wait until you see a pop-up on your iPhone that says, “Use your iPhone to set up this Apple Watch.” Then press Continue to begin the process.

You’ll see a pairing screen on your iPhone and a unique pairing animation on your Apple Watch. Point your iPhone’s camera at this pairing animation and align it with the on-screen viewfinder. You can also pair the devices manually by tapping the “i” icon on the bottom-right corner of the Apple Watch screen and following the on-screen instructions.

Once you pair your Apple Watch with your iPhone, you can go through the rest of the initial setup, like customizing watchOS settings, signing in with an Apple Account, creating a passcode, selecting apps, and more.

How to Fix Apple Watch Pairing Issues

If you’re unable to pair your Apple Watch with your iPhone 18 Pro Max, there are a couple of things you can do.

On your iPhone, swipe down to bring up the Control Center and make sure both Wi-Fi and Bluetooth are active. You need both for your iPhone to communicate with your Apple Watch.

Control Center open on the iPhone screen, with icons on the right for viewing other groups of controls.

During the pairing process, the Apple Watch’s screen should show the setup dialog box. If you see the regular watch face instead, you need to unpair your Apple Watch first because it’s already paired with another iPhone.

To prepare your Apple Watch for pairing, head to Settings > General > Reset > Erase All Content and Settings in watchOS.

5 Fixes if Your Apple Watch Is Not Connecting to an iPhone

Even after you’ve completed the first-time pairing process, your Apple Watch might have issues connecting to your iPhone. Here’s what to do to get the devices talking again.

1. Confirm Your Apple Watch Isn’t Connected to an iPhone

To confirm that your Apple Watch isn’t connecting to an iPhone, press the Side button to bring up the Control Center.

If you see a red X icon at the top of your Apple Watch’s screen, it means it isn’t connected to your iPhone. While on the same screen, make sure that Wi-Fi is turned on.

Next, head to your iPhone 18 Pro or iPhone 18 Pro Max and confirm both Bluetooth and Wi-Fi are on as well.

2. Restart Your Apple Watch and iPhone

The next step you can take is to restart both the Apple Watch and the iPhone.

On the Apple Watch, press the Digital Crown and Side button simultaneously for 10 seconds until you see the Apple logo. Wait until you see the watch face.

Then, it’s time to move on to your iPhone. Simultaneously press and hold the side button and either volume button until the sliders appear, then drag the Power Off slider. Press and hold the side button until the Apple logo appears.

An illustration of iPhone with arrows pointing to the side button on the upper right and a volume button on the upper left.

3. Check for Software Updates

If your Apple Watch is still not connecting to an iPhone, make sure that both your Apple Watch and iPhone are running the most recent software.

To check for a software update on the Apple Watch, head to Settings > General > Software Update in watchOS. Likewise, you can update your iPhone software by going to Settings > General > Software Update.

4. Reset Your iPhone’s Network Settings

Another step you can take when your Apple Watch doesn’t pair or connect is to reset the Network settings on your iPhone 18 Pro Max. Doing this won’t wipe the data on your iPhone, but it will restore all network-related settings, like Wi-Fi passwords and saved Bluetooth connections, to factory default values.

On your iPhone, head to Settings > General and choose Transfer or Reset iPhone at the bottom of the list. Tap Reset to reveal additional options and choose Reset Network Settings. Enter your iPhone passcode when prompted.

5. Reset Your Apple Watch

As a final and more drastic step, it’s time to unpair and re-pair your Apple Watch with an iPhone. To start the process, go to Settings > General in watchOS. Scroll down to the bottom and select Reset. Then, select Erase All Content and Settings.

To complete the process, you’ll need to remove your Apple Watch’s Activation Lock.

Once you’ve wiped your Apple Watch, you can hopefully re-pair it with your iPhone. If that’s successful, you can set it up as a completely new device or restore it using a previous backup during the initial setup process.

As you can see, even when your Apple Watch is having communication problems, it just takes a few steps to get your wearable back up and running.