Got a tip for us?

Notifications

Instantly mute incoming calls, stop timers, and dismiss notifications and alerts by covering the display. You can also mute and dismiss notifications with a wrist flick.

It’s easy. Cover to Mute works on alerts like an incoming phone call or an expired timer, and a haptic tap confirms the notification is muted. Both gestures are on by default, and you can still take follow-up action, like answering the phone call.

Cover the display to temporarily mute an alert

Rest the palm of your hand on the display for at least 3 seconds to quickly silence an alert—such as an incoming phone call or when a timer expires. A haptic tap confirms the notification is muted. You can still take follow-up action such as answering the phone call or resetting the timer.

By default, Cover to Mute is turned on. To turn it off, go to the Settings app on Apple Watch, then tap Gestures.

Perform a wrist flick to mute and dismiss notifications

A quick turn of your wrist, over and back, dismisses anything and returns you to the watch face. When your hands are full, you can still mute incoming calls, stop timers, dismiss notifications, and more.

By default, Wrist Flick is turned on. To turn it off, go to the Settings app on Apple Watch, then tap Gestures.

If you need to silence notifications for an extended period, you can turn on Silent Mode, Do Not Disturb, or another mode in Control Center. For details, see our guide, Silence notifications for extended periods on Apple Watch.

See also

When you don’t want to get alerts and notifications for an extended period, you can turn on Silent Mode, Theater Mode, or Do Not Disturb. You can also use a Focus that you can customize with a schedule, allowable notifications, and more.

Silent Mode mutes alerts, but you still receive haptic notifications. Theater Mode goes further, keeping the display dark when you raise your wrist. Alarms and timers still sound when your watch is charging, even in Silent Mode.

To immediately silence something such as a phone call or alarm, see Use gestures for notifications and alerts on Apple Watch.

Choose a mode for extended silencing

Silent Mode Theater Mode Do Not Disturb Focus
Sounds Off Off Off Off (with exceptions you set)
Haptics On (if you allow) On (if you allow) Off Off (with exceptions you set)
Visual notifications On Off Off Off (with exceptions you set)
Display On Off On On (except for customizable modes like Sleep)
Options — — Can turn on for 1 hour, until you leave location, until event ends, or indefinitely Can set schedules and customize allowed notifications
Good for Quiet environments where you want to see and feel notifications Dark venues like theaters and movies Meetings, appointments, and instances when you want to prevent all notifications Sleep, work, and other activities with specific notification needs
Learn More Turn on Silent Mode Turn on Theater Mode Turn on Do Not Disturb Turn on Focus

Turn on Silent Mode

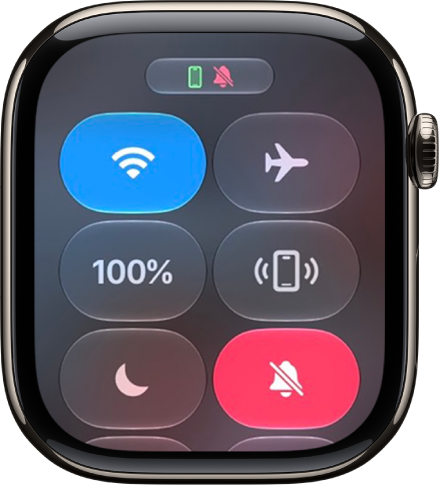
Silent Mode mutes all alerts, notifications, and sound effects, but you still receive haptic notifications.

Note: Even in Silent Mode, alarms and timers still sound while Apple Watch is charging.

  1. Press the side button to open Control Center on Apple Watch.
  2. Tap the Silent Mode button.

    Control Center with the Silent Mode button selected.

You can also go to the Apple Watch app on your iPhone, tap My Watch, tap Sounds & Haptics, then turn on Silent Mode.

Turn on Theater Mode

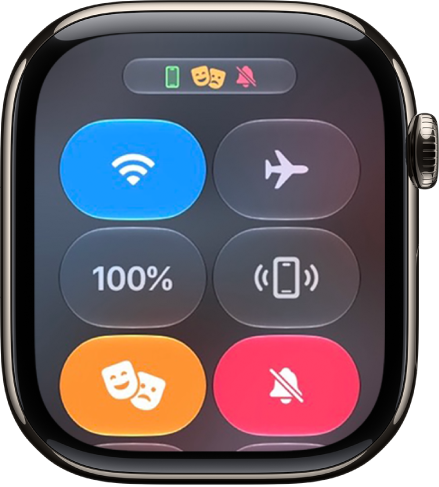
With Theater Mode, the Apple Watch display stays dark. It doesn’t turn on when you raise your wrist. Theater Mode turns on Silent Mode as well, and you still receive haptic notifications.

  1. Press the side button to open Control Center on Apple Watch.
  2. Tap the Theater Mode button.

    Control Center with Theater Mode button highlighted to show Theater Mode is on.

The Theater Mode status icon at the top of the screen shows when Theater Mode is on.

To wake Apple Watch when Theater Mode is on, tap the display, press the side button, or turn or press the Digital Crown.

Turn on Do Not Disturb or a Focus

To prevent sound and haptic notifications, do the following:

  1. Press the side button to open Control Center on Apple Watch.
  2. Tap the Do Not Disturb button and then choose Do Not Disturb or a Focus.
  3. Tap On or choose an ending point—such as On for 1 hour or On until I leave.

To set up your own Focus, read our guide, Create a custom Focus.

See also

By default, the notification settings for the apps on an Apple Watch that you set up for yourself mirror the settings on your iPhone. But you can customize how some apps display notifications.

You can choose how apps send notifications from the Apple Watch app on your iPhone, or change notification settings directly on Apple Watch. Swiping left on a notification gives you quick options, too, like Mute 1 hour or Mute for Today. And you can choose whether notifications show on the Lock Screen.

Note: An Apple Watch you manage for a family member doesn’t use mirrored settings.

Choose how apps send notifications

  1. Start the Apple Watch app on your iPhone.
  2. Tap My Watch, then tap Notifications.
  3. Tap the app (for example, Messages), tap Custom, and choose an option. Options may include:
    • Allow Notifications: The app displays notifications in Notification Center.
    • Send to Notification Center: Notifications are sent directly to Notification Center without Apple Watch making a sound or displaying the notification.
    • Notifications Off: The app sends no notifications.
  4. Notification grouping: Choose how notifications for the app are grouped. Options include:
    • Off: Notifications aren’t grouped.
    • Automatically: Apple Watch uses information from the app to create separate groups. For example, News notifications are grouped by the channels you follow.
    • By App: All the app’s notifications are grouped.

Quick tip: In some apps, you can choose the specific kind of notifications you receive. Calendar, for instance, can allow notifications only for certain calendars or specific actions, such as when you get an invitation or someone changes a shared calendar. And in Mail, you get to choose which email accounts are allowed to send notifications.

Change notification settings directly on Apple Watch

You can manage other notifications preferences directly on Apple Watch by swiping left on a notification and tapping the More button. Options may include:

  • Mute 1 hour or Mute for Today: For the next hour or for the rest of the day, notifications are sent directly to Notification Center without Apple Watch making a sound or displaying the notification. To see and hear these notification alerts again, swipe left on a notification, tap the More button, then tap Unmute.
  • Add to Summary: Future notifications from the app appear in the Notification Summary on your iPhone.

    To have the app once again notify you immediately, go to the Settings app on your iPhone, tap Notifications, tap the app, then tap Immediate Delivery.

  • Turn off Time Sensitive: Time-sensitive notifications are always delivered immediately, even if you’re using a Focus that delays most notifications. However, if you want to prevent this app from delivering even time-sensitive notifications immediately, tap this option.
  • Turn off: The app sends no notifications. To reenable notifications from the app, go to the Apple Watch app on your iPhone, tap My Watch, tap Notifications, tap the app you want to adjust, then tap Allow Notifications.

Show notifications on the Lock Screen

How notifications appear on the Lock Screen of Apple Watch is your choice.

  1. Start the Settings app on your Apple Watch.
  2. Tap Notifications.
  3. Choose the following options:
    • Show Summary When Locked: With this option on, Apple Watch shows a notification summary—or short look—when it’s locked. The summary includes the notifying app’s name and icon along with a brief headline.
    • Tap to Show Full Notification: When you raise your wrist to see a notification, you see a quick summary. Full details a few seconds later. For example, when a message arrives, you see who it’s from first. The message appears. Turn on this option to stop the full notification from appearing unless you tap it.
    • Show Notifications on Wrist Down: By default, notifications don’t appear on Apple Watch when your wrist is down. Turn on this option to make notifications appear, even when Apple Watch is turned away from you.

See also

You can assign distinctive ringtones to certain people, and turn the ringer on or off. A contact’s ringtone is set in Contacts, when you edit the contact. And on models with an Action button, you can turn the ringer on or off from Control Center.

Assign a different ringtone to a contact

  1. Open the Contacts app on your iPhone.
  2. Select a contact, tap Edit, tap Ringtone, and then choose a ringtone.

Turn the ringer on or off

  • On models with an Action Button: Open Control Center, then tap the Mute Switch button. You can also configure the Action Button to turn the ringer on or off.
  • On other models: Flip the Ring/Silent switch to turn Silent mode on or off.

Even with Silent mode turned on, Clock alarms still play. To silence incoming calls temporarily, turn on or schedule a Focus. And you can change the default sound for a call, text, voicemail, email, reminder, or other notification.

Notifications help you keep track of what’s new. They let you know if you missed a call, if the date of an event moved, and more, and you can customize your notification settings so you see only what’s important to you.

Unless you have notifications silenced with a Focus, iPhone displays them as they arrive, rolling in from the bottom of the screen to minimize distraction. You can view them on the Lock Screen in an expanded list view, stacked view, or count view, and change the layout whenever you like.

Note: An app you’re using might ask how you want to receive its notifications: immediately, not at all, or in a scheduled summary. If you change your mind, tap Notifications in the Settings app.

Find your notifications in Notification Center

To check your notifications in Notification Center, do either of the following:

  • On the Lock Screen: Swipe up from the middle of the screen.
  • On other screens: Swipe down from the top-left corner. Then you can scroll up to see older notifications, if there are any.

To close Notification Center, swipe up from the bottom with one finger or press the Home button (on an iPhone with a Home button).

Respond to notifications

Multiple notifications in Notification Center or on the Lock Screen are grouped by app, so they’re easier to view and manage. Some apps may also group notifications by their own organizing features, like topic or thread. Grouped notifications show up as stacks, with the most recent one on top.

In Notification Center, you can do any of the following with your notifications:

  • To expand a group of notifications to see them individually: Tap the group. To close the group, tap Show Less.
  • To view a notification and perform quick actions if the app offers them (on supported models): Touch and hold the notification.
  • To open a notification’s app: Tap the notification.

View, dismiss, and clear notifications

When notifications show up on your iPhone, do any of the following:

  • Handle a notification you receive while using another app: Tap to view it, then swipe up to dismiss it.
  • Clear notifications: Swipe left on the notification or group of notifications, then tap Clear or Clear All.
  • Mute notifications for an app: Swipe left on the notification or group of notifications, tap Options, then tap an option to mute the app’s notifications for an hour or a day. This sends them directly to Notification Center and prevents them from appearing on the Lock Screen, playing a sound, lighting up the screen, or presenting a banner.

    To see and hear these notifications again, swipe left on the notification in Notification Center, tap Options, then tap Unmute.

  • Turn off notifications for an app or notification group: Swipe left on a notification or group of notifications, tap Options, then tap Turn Off.
  • Change how an app displays notifications: Swipe left on a notification, tap Options, then tap View Settings.
  • Clear all your notifications in Notification Center: Go to Notification Center, tap the Clear Notifications button, then tap Clear.

If you haven’t opened an app for a while, you may see a suggestion to turn off notifications for that app.

Show recent notifications on the Lock Screen

You can allow access to Notification Center on the Lock Screen.

  1. Start the Settings app on your iPhone.
  2. Tap Face ID & Passcode or Touch ID & Passcode.
  3. Enter your passcode.
  4. Scroll down and turn on Notification Center (below Allow Access When Locked).

With its deep understanding of language, Apple Intelligence can help condense the information most important to you. Notifications are summarized so you can scan them for key details, such as when a group chat is particularly active.

Your iPhone can also determine which notifications have priority over others. And the Reduce Interruptions Focus shows you only the notifications that might need immediate attention, like a text about an early pickup from daycare. You can customize notification summaries, or turn them off.

Note: Apple Intelligence on iOS 27 or later is available on an Apple Intelligence-enabled iPhone 15 Pro, iPhone 15 Pro Max, or iPhone 16 model or later. Apple Intelligence is not available in all languages or regions. Usage limits may apply.*

Customize notification summaries

To make long or stacked notifications easier to understand at a glance, your iPhone can summarize them.

  1. Start the Settings app on your iPhone.
  2. Tap Notifications.
  3. Tap Summarize Notifications, turn on Summarize Notifications, and then tap Choose Notifications to Summarize.
  4. Tap the notifications you want to summarize and tap Summarize Selected Notifications.

To change which notifications you want to summarize, tap the button next to an app.

Turn notification summaries on or off

  1. Start the Settings app on your iPhone.
  2. Tap Notifications.
  3. Tap Summarize Notifications. Turn Summarize Notifications on or off.

Turn priority notifications on

Your iPhone can work out which notifications have priority over others. Those priority notifications show up at the top of the stack, which helps you catch up on anything you may have missed.

  1. Start the Settings app on your iPhone.
  2. Tap Notifications.
  3. Tap Prioritize Notifications, then turn Prioritize Notifications on.

To turn off priority notifications, turn Prioritize Notifications off. To change which notifications you want to prioritize, tap the button next to an app. You can also change settings when you receive a priority notification on the Lock Screen. When a priority notification appears, do one of the following:

  • Turn off Priority Notifications for a specific app: Swipe left, tap Options, then tap Turn Off All [app] Notifications.
  • Turn off all Priority Notifications: Swipe left, tap Options, then tap Turn Off Prioritization.

Use the Reduce Interruptions Focus

The Reduce Interruptions Focus understands what’s in your notifications, so it shows you the most important ones and silences those that are less important.

You can customize a Reduced Interruptions Focus.

  1. Start the Settings app on your iPhone.
  2. Tap Focus.
  3. Tap the Add button at the top right. Then tap Reduce Interruptions.
  4. Tap Customize Focus and tap People or Apps.
  5. Choose the people and apps to allow notifications from.

Note: Notifications you’ve specifically allowed or silenced stay that way, even when you turn on Intelligent Breakthrough & Silencing for any Focus.

*Apple Intelligence is available with Siri and device language set to Chinese (Simplified), Chinese (Traditional), Danish, Dutch, English, French, German, Italian, Japanese, Korean, Norwegian, Portuguese, Spanish, Swedish, Turkish, or Vietnamese. Some features may not be available in all regions or languages. Some devices may not be available in all regions. Siri AI is available in beta in iOS 27, iPadOS 27, macOS 27, watchOS 27, and visionOS 27 and requires an Apple Intelligence–enabled device set to a supported language. Available in English to start. Siri AI will not be initially available in the EU on iOS, iPadOS, and watchOS. Certain Apple Intelligence features that rely on server-side models are subject to daily usage limits, including but not limited to Siri AI, Intelligent Photo Editing Tools, Image Playground, and AFM 3 Cloud models in Shortcuts. Daily limits may vary by feature, request complexity, system demand, system policies, and other factors. Expanded access to such features will be available for a fee in the future. Use of these features is subject to the Apple Intelligence Terms and Conditions.

When you set up a Focus, you can select people and apps you want to receive notifications from. For example, set up a Work Focus and allow only notifications from your coworkers and the apps you use for work.

You can also silence specific people or apps, and allow repeated calls, which are two or more calls from the same person within 3 minutes.

Here’s how to allow or silence notifications for a Focus on iPhone.

Allow or silence notifications from specific people during a Focus

  1. Open the Settings app on your iPhone.
  2. Tap Focus. Then choose a Focus—for example, Do Not Disturb, Personal, Sleep, or Work.
  3. Tap People (or tap Choose People). Do one of the following:

    • Allow specific people: Tap Allow Notifications From, tap the Add People button, and then select from your contacts.

      You can also turn on options to allow calls from certain groups of people and allow repeated calls (two or more calls from the same person within 3 minutes).

    • Silence specific people: Tap Silence Notifications From, tap the Add People button, and then select people from your contacts.

      You can also turn on Allow Calls From Silenced People.

Note: Regardless of your Focus settings, you can allow calls from your emergency contacts to come through. See Allow calls from emergency contacts when notifications are silenced, below.

With Intelligent Breakthrough & Silencing on, Apple Intelligence lets important notifications interrupt you, while it silences notifications determined not to be important.

Note: Apple Intelligence on iOS 27 or later is available on an Apple Intelligence-enabled iPhone 15 Pro, iPhone 15 Pro Max, or iPhone 16 model or later. Apple Intelligence is not available in all languages or regions. Usage limits may apply.*

Allow or silence notifications from specific apps during a Focus

  1. Open the Settings app on your iPhone.
  2. Tap Focus. Then choose a Focus—for example, Do Not Disturb, Personal, Sleep, or Work.
  3. Tap Apps (or tap Choose Apps) and then do one of the following:
    • Allow specific apps: Tap Allow Notifications From and tap the Add Apps button. Select apps.
    • Silence specific apps: Tap Silence Notifications From, tap the Add Apps button, and select apps.

Note: Web apps you’ve added to your Home Screen count, too. You can allow or silence notifications from specific ones.

Turning on Time Sensitive Notifications lets all apps send time-sensitive notifications immediately.

Choose whether to share your Focus status

People who try to contact you, in Messages for example, may see that you have “notifications silenced.” That happens when you’re using a Focus with your focus status turned on, which you can turn on or off.

  1. Open the Settings app on your iPhone.
  2. Tap Focus and tap Focus Status.
  3. Turn Share Focus Status on or off.
  4. If you turn it on, choose which Focus profiles can share that you have notifications silenced.

Allow calls from emergency contacts when notifications are silenced

Even when your iPhone or notifications are silenced, sounds and vibrations from emergency contacts can still come through if you’ve allowed them.

  1. Open Contacts.
  2. Select a contact, then tap Edit.
  3. Tap Ringtone or Text Tone. Then turn on Emergency Bypass.

You could also set up your Medical ID and identify an emergency contact.

*Apple Intelligence is available with Siri and device language set to Chinese (Simplified), Chinese (Traditional), Danish, Dutch, English, French, German, Italian, Japanese, Korean, Norwegian, Portuguese, Spanish, Swedish, Turkish, or Vietnamese. Some features may not be available in all regions or languages. Some devices may not be available in all regions.

Siri AI is available in beta in iOS 27, iPadOS 27, macOS 27, watchOS 27, and visionOS 27 and requires an Apple Intelligence–enabled device set to a supported language. Available in English to start. Siri AI will not be initially available in the EU on iOS, iPadOS, and watchOS. Certain Apple Intelligence features that rely on server-side models are subject to daily usage limits, including but not limited to Siri AI, Intelligent Photo Editing Tools, Image Playground, and AFM 3 Cloud models in Shortcuts.

Daily limits may vary by feature, request complexity, system demand, system policies, and other factors. Expanded access to such features will be available for a fee in the future. Use of these features is subject to the Apple Intelligence Terms and Conditions.

On your iPhone, you can change whether or not you’re notified about text messages you receive, and how the notifications appear or sound. For example, you can turn off message notifications so you aren’t distracted when you’re in a meeting, or assign a special sound for certain contacts so you know when you get a message from them.

With notifications off, you still receive messages, and senders see a note that you have notifications silenced. You can also stop sharing your Focus status with one person, and mute the sounds for sent and received messages.

Here’s how to stop, mute, and change message notifications on iPhone.

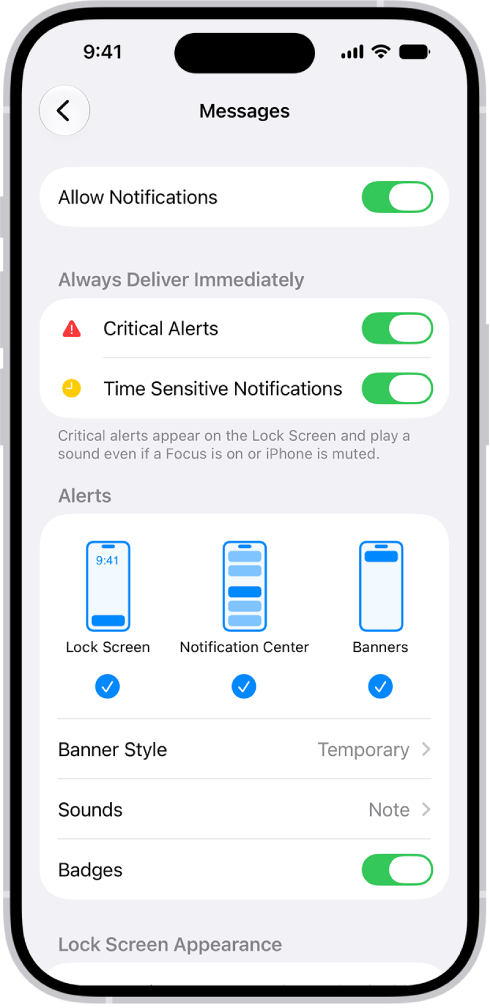
Messages Notification settings in Settings.

Stop all notifications

You can turn off notifications for activity in the Messages app and still receive messages. When you’re ready to read them, open Messages to catch up on the texts that came in while notifications were off.

  1. Start the Settings app on your iPhone.
  2. Tap Notifications, then tap Messages.
  3. Turn off Allow Notifications.

Note: Senders receive a note indicating that you have notifications silenced.

Turn on read receipts to let people know you’ve read their messages.

To get notified again, turn on Allow Notifications. And to hear them, too, check that your volume is audible and the Ring/Silent switch isn’t in Silent mode.

Notifications from other Apple apps and third-party apps can be stopped, too.

Stop sharing your Focus Status with one person

If your Focus or sleep schedule is pausing notifications, your status appears in the Messages app so people know you’re not receiving messages, though you can turn this off in one-to-one conversations.

  1. Start the Messages app on your iPhone.
  2. Tap a conversation, then tap the contact icon at the top of the conversation.
  3. Turn off Share Focus Status.

Change sounds or vibrations for sent and received messages

For alerts, you can mute them or set the sound volume, choose between a tone or sound, or change the notification vibration pattern when the phone is silenced.

  1. Start the Settings app on your iPhone.
  2. Tap Notifications, then tap Messages.
  3. Tap Sounds and then do any of the following:
    • Mute sounds: Tap None. This setting turns off the swoosh sound for sent messages and the tone for messages you receive.
    • Turn off vibrations: Tap Haptics (near the top), then tap None.
    • Choose a tone or sound: Tap Text Tone and tap a sound (or tap Tone Store to download one).
    • Choose a vibration pattern: Tap Text Tone, tap Haptics, and choose an option (or tap Create New Vibration to make your own).
  4. To set how many times a notification repeats, tap Customize Notifications and tap Repeat Alerts. Then choose an option. Alerts repeat at two-minute intervals.

You can also put the Ring/Silent switch in Silent mode.

To adjust the volume to be quieter or louder, go to the Settings app, tap Sounds & Haptics, then use the slider.

Note: Both the None and the Ring/Silent switch setting affect incoming and outgoing sounds, and you can’t mute only one of them.

Change the notification sound for certain people

Choose a specific sound or vibration pattern to play when a particular contact messages you.

  1. Start the Messages app on your iPhone.
  2. In a conversation with one person, tap the contact icon at the top of the conversation.
  3. Tap Info, tap Edit and tap Edit Contact Info. Then tap Text Tone.
    If you don’t see Edit, tap Create New Contact or Add to Existing Contact.
  4. Do any of the following:

    • Specify a tone or sound: Tap a sound below Alert Tones (or tap Tone Store to download one).
    • Specify a vibration pattern: Tap Haptics and then choose an option (or tap Create New Vibration to make your own).
    • Mute notifications for this conversation: Tap None below both Haptics and Alert Tones.

Turn on Emergency Bypass to give this contact the option to override a Focus, so their important messages can get through. You might do this for a family member, caretaker, or colleague, for example.

Mute one conversation

You can stop getting a conversation’s notifications while you still receive its messages.

  1. Start the Messages app on your iPhone.
  2. In the conversation list, do one of the following:
    • Swipe left on a conversation, then tap the Mute button.
    • Tap a conversation, tap the contact or icon at the top of the conversation, then turn on Hide Alerts.

Note: Senders receive a note indicating that you have notifications silenced.

To stop getting messages for one conversation completely, block a specific person or number or leave a group conversation.

Announce messages

Siri can announce messages on your iPhone speaker, supported headphones, and when using CarPlay.

Choose when and how notifications appear, which apps can send them, and what sounds they make. You can also set up location-based alerts, allow government alerts, and more.

Many notification settings apply to all app notifications, while others can be customized for individual apps. For a single app, you can turn notifications off entirely, choose whether they appear on the Lock Screen, in Notification Center, or as banners, and show a badge on its icon.

Here’s how to change notification settings on iPhone.

Customize notifications for an app

  1. Start the Settings app on your iPhone.
  2. Tap Notifications, then tap an app below Notification Style.
  3. Do any of the following:
    • Turn off notifications for the app: Turn off Allow Notifications.
    • Allow time-sensitive notifications: If the app supports it, turn on Time Sensitive Notifications.
    • Choose where notifications appear: Under Alerts, choose whether notifications appear on the Lock Screen, in Notification Center, or as banners.
    • Choose a notification sound: If the app supports it, tap Sounds and then select a sound.
    • Show a badge on the app icon: Turn on Badges.
    • Customize Lock Screen appearance: Under Lock Screen Appearance, set how previews appear and how notifications are grouped.
    • Prioritize notifications from the app: If you use Priority Notifications, turn Prioritize Notifications on or off under Lock Screen Appearance.
    • Choose when notifications are delivered: If you use Scheduled Summary, under Notification Delivery choose Immediate Delivery or Scheduled Summary.
    • Customize notification types: If the app supports it, tap Customize Notifications to choose which types of notifications to receive from the app.
    • Change notification settings in the app: For some apps, tap App Name Notification Settings at the bottom of the screen to open the app’s own notification settings.

Change the appearance of notifications

  1. Start the Settings app on your iPhone.
  2. Tap Notifications and choose how you want notifications displayed on the Lock Screen:
    • View just the number of notifications: Tap Count.
    • View the notifications grouped into stacks by app: Tap Stack.
    • View the notifications in a list: Tap List.

Pinching the notifications on the Lock Screen changes their layout when they arrive.

Change the frequency of notifications

Schedule a notification summary with notifications for several apps at once to minimize interruptions throughout the day.

  1. Start the Settings app on your iPhone.
  2. Tap Notifications, then tap Scheduled Summary.
  3. Turn on Scheduled Summary and then tap Continue (if it appears).
  4. Schedule times for the notification summary.
  5. Tap A to Z, turn on the apps to include in your notification summary, and then tap the Back button.
  6. To choose when you want notification previews to appear, tap Show Previews, select an option, and then tap the Back button.

Things like text from Messages and Mail, or invitation details from Calendar, can appear in previews. For individual apps, you can override this setting.

To prevent interruptions, Focus delays the delivery of notifications on iPhone when you use it. You can pick a time to receive a summary of the ones you missed.

Prevent notification previews from appearing on the Lock Screen

You can choose when notification previews appear on your Lock Screen, for a single app or for all apps.

Note: Not all apps support notification previews.

  1. Start the Settings app on your iPhone.
  2. Tap Notifications.

    To turn off notification previews for a specific app, tap the app below Notification Style.

  3. Tap Show Previews (if it appears). Then select one of the following:

    • Always
    • When Unlocked
    • Never

Show or hide notifications during screen sharing

Notifications are allowed by default when you share your screen using SharePlay or Screen Mirroring. You can turn them off if you don’t want them showing up during a session.

  1. Start the Settings app on your iPhone.
  2. Tap Notifications, then tap Screen Sharing.
  3. Turn Allow Notifications on or off.

Use Apple Intelligence to summarize notifications and prioritize time-sensitive ones

Apple Intelligence can summarize long or stacked notifications so they’re easier to understand at a glance. It can also prioritize time-sensitive notifications, helping you catch up on what you may have missed.

Note: Apple Intelligence on iOS 27 or later is available on an Apple Intelligence-enabled iPhone 15 Pro, iPhone 15 Pro Max, or iPhone 16 model or later. Apple Intelligence is not available in all languages or regions. Usage limits may apply.*

Turn off location-based alerts

Based on where you are, some apps use your location to send you relevant alerts. The Weather app, for example, might send you alerts based on your location.

Don’t want to see these types of alerts? Turn them off.

  1. Start the Settings app on your iPhone.
  2. Tap Privacy & Security and tap Location Services. Turn on Location Services.
  3. Tap an app (if any appear in the list) and choose whether you want to share your location while using that app.

Turn government alerts on or off

In some countries or regions, you can turn on alerts in the Government Alerts list. For example, on iPhone in the United States, you can receive National Alerts, and you can turn AMBER, Public Safety, and Emergency Alerts (which include both Severe and Extreme Imminent Threat Alerts) on or off (they’re on by default). On iPhone in Japan, you can receive Emergency Earthquake Alerts from the Japan Meteorological Agency.

  1. Start the Settings app on your iPhone.
  2. Tap Notifications, scroll down to the Government Alerts section, and turn on the alerts you want to receive.
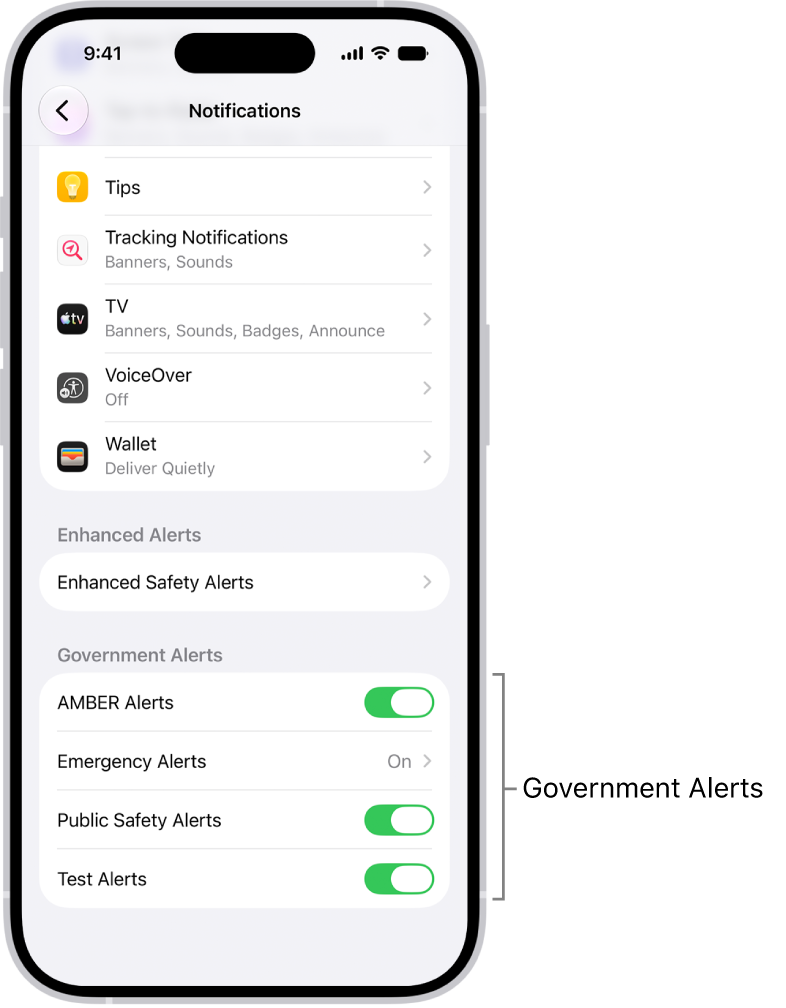
    The Notifications screen, showing the Government Alerts you can turn on to receive government alerts.

  3. Tap Emergency Alerts if you want to turn on Emergency Alerts and Local Awareness.

Note: In some regions, Local Awareness may improve the timeliness, accuracy, and reliability of certain Emergency Alerts. For example, Earthquake Alerts received on iPhone in California, Oregon, and Washington (including bordering regions) may be more timely or delivered with increased accuracy when Local Awareness is turned on.
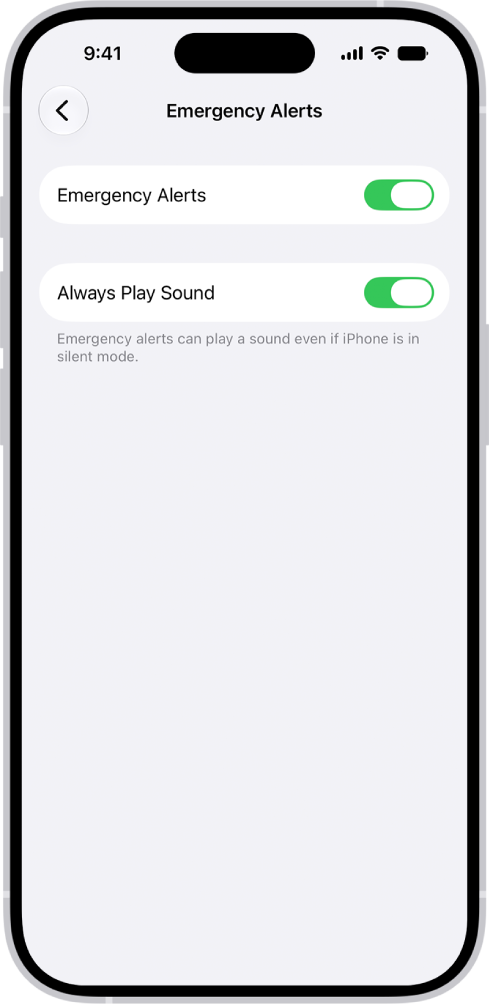
The Emergency Alerts screen, with Emergency Alerts, Local Awareness, and Always Play Sound turned on.

Turn on Always Play Sound to have Emergency Alerts play a sound even if iPhone is in Silent mode.

Government alerts vary by carrier and iPhone model, and may not work under all conditions.

*Apple Intelligence is available with Siri and device language set to Chinese (Simplified), Chinese (Traditional), Danish, Dutch, English, French, German, Italian, Japanese, Korean, Norwegian, Portuguese, Spanish, Swedish, Turkish, or Vietnamese. Some features may not be available in all regions or languages. Some devices may not be available in all regions. Siri AI is available in beta in iOS 27, iPadOS 27, macOS 27, watchOS 27, and visionOS 27 and requires an Apple Intelligence–enabled device set to a supported language. Available in English to start. Siri AI will not be initially available in the EU on iOS, iPadOS, and watchOS. Certain Apple Intelligence features that rely on server-side models are subject to daily usage limits, including but not limited to Siri AI, Intelligent Photo Editing Tools, Image Playground, and AFM 3 Cloud models in Shortcuts. Daily limits may vary by feature, request complexity, system demand, system policies, and other factors. Expanded access to such features will be available for a fee in the future. Use of these features is subject to the Apple Intelligence Terms and Conditions.


In the iTunes Store app, you can purchase ringtones, text tones, and other alert tones for clock alarms and more.

You can browse by category or search for a specific song or artist, and play a preview before you buy. Tones you bought on another device can be downloaded again on your iPhone, too.

Here’s how to get ringtones, text tones, and alert tones in the iTunes Store on iPhone.

Buy new tones

  1. Open the iTunes Store app on your iPhone.
  2. Tap Tones.
  3. Browse by category or tap Search to find a specific song or artist.
  4. Tap a tone to see more information or play a preview.
  5. To buy a tone, tap the price.

Redownload tones purchased with your Apple Account

When you’ve bought tones on another device, you can download them again.

  1. Open the Settings app on your iPhone.
  2. Tap Sounds & Haptics (on supported models) or Sounds (on other iPhone models).
  3. Below Ringtone, tap any item.
  4. Tap Download All Purchased Tones. You might not see this option if you already downloaded all the tones that you purchased or if you haven’t purchased any tones.

When you purchase access to movies, TV shows, music, music videos, ebooks, audiobooks, or ringtones from Apple, you also have the option to permanently download these items to a compatible iPhone, iPad, Mac, or PC. Apple cannot revoke your downloaded content, and you can always access your downloaded content without an internet connection.