





Got a tip for us?

iOS 27

Do you keep receiving a “Last Line No Longer Available” error while attempting to place a call on your iPhone 18 Pro or iPhone 18 Pro Max? You’re not alone, as several iOS users have come across the same issue.

Below, we’ll briefly discuss what this error means, why it shows up on your iPhone, and teach you everything you can do to get rid of it. So, let’s get started, shall we?

What Does the “Last Line No Longer Available” Error on iPhone Mean?

An iPhone on a Dual SIM setup can display a “Last Line No Longer Available” error when it has trouble detecting the default or preferred line while attempting to make a phone call.

The underlying reason is some random bug or glitch with the cellular radio, a corrupt call log, or an incorrectly configured network setting. You can still use your other number, but that’s not always practical.

Usually, fixes like toggling Airplane Mode on and off, restarting your iPhone, or clearing your “Recents” history help resolve the issue. However, you may have to resort to performing a carrier settings update or a network reset if none of the more straightforward fixes help.

Let’s go through each possible way to fix the “Last Line No Longer Available” iPhone 18 Pro Max error.

1. Switch Phone Lines Manually on iPhone

Tapping the Call option on the “Last Line No Longer Available” pop-up automatically puts the call through the other line on your iPhone. If that doesn’t work as well, try switching numbers manually.

  • While dialing a new number, tap the current line at the top of the screen and pick the other line.
  • While placing a call from the “Favorites” and “Recents” lists, tap the More Info button and choose the number you want.

If you do not want to use the alternative line on your iPhone, continue with the potential fixes below.

2. Toggle Airplane Mode On and Off on iPhone

Enabling and disabling Airplane Mode is a quick fix for most cellular connectivity issues on the iPhone. Just bring up the Control Center (swipe down from the top-right of the screen) and tap the Airplane Mode icon. After waiting 10 seconds, tap the icon once more.
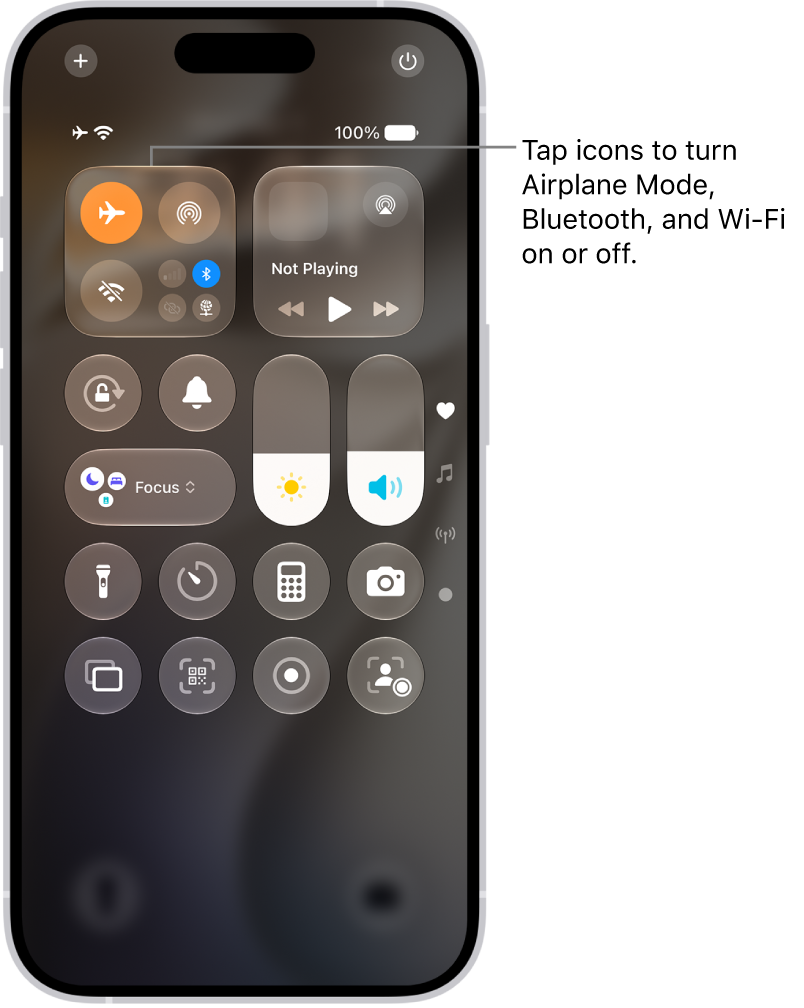
The Control Center screen showing that tapping the top-left button turns on Airplane Mode.

3. Restart Your iPhone 18 Pro Max

Another quick way to fix the “Last Line No Longer Available” error requires that you reboot your iPhone. Since iOS does not feature a “Restart” option, you must turn off the device and manually boot it back up.

To do that, open the Settings app and go to General > Shut Down. Then, drag the slider to the right, wait until the screen goes fully dark, and hold the Side button until you see the Apple logo.

4. Clear Your iPhone’s Call History

If the “Last Line No Longer Available” iPhone error occurs while dialing a contact or number on your “Recents” list, delete the call entries associated with the number and try again. To do that:

  1. Open the Phone app and switch to the Recents tab (Classic layout), or tap the Filter button, then tap Calls (Unified layout).
  2. Tap Edit, tap Select, tap the calls you want to delete, then tap Delete.

Delete the entire call log if the error occurs for every number on your iPhone’s “Recents” list. To do that:

  1. Open the Phone app, switch to the Recents tab (Classic layout) or tap the Filter button, then tap Calls (Unified layout), and tap Edit.
  2. Tap Select.
  3. Tap Clear All.

5. Update the Carrier Settings on iPhone

Check if your iPhone has a pending carrier update. To do that, open the Settings app and tap General > About. Then, scroll down to the Carrier section and wait for up to a minute. If you get a “Carrier Update Available” prompt, tap Update to install it.

You can also view your current carrier setting and see if it’s the most up-to-date on your carrier’s website.

6. Avoid Using Your Preferred Line for Cellular Data

The “Last Line No Longer Available” error can also show up on your iPhone 18 Pro Max if you use your default or preferred line to access cellular data. You can change that by following these steps:

  1. Open the Settings app and tap Cellular.
  2. Tap Cellular Data.
  3. Select the other phone line or Off to disable cellular data altogether.

You may also want to try experimenting by setting the Allow Cellular Data Switching option to on or off.

7. Disable Automatic Network Selection on iPhone

Another reason for the “Last Line No Longer Available” iPhone error is a feature called Automatic Network Selection. It prompts your iPhone to pick the best network to establish a connection but causes issues on Dual-SIM iPhones.

To disable Automatic Network Selection, open the Settings app and tap Cellular > Network Selection. Then, turn off the switch next to Automatic and pick your carrier network.

8. Disable Wi-Fi Calling on iPhone

Wi-Fi Calling allows you to make and receive phone calls over Wi-Fi in areas with poor cellular signal strength, but it could also create conflicts and result in the “Last Line No Longer Available” error.

To fix that, open the Settings app and tap Cellular > Wi-Fi Calling. Then, turn off the switch next to Wi-Fi Calling on This iPhone.

9. Install the Latest Software Updates

Apple regularly pushes software updates to iPhones in order to address issues like this. So, a newer software version might contain a permanent fix for the “Last Line No Longer Available” error. To check, open the Settings app and go to General > Software Update. Then, tap Update Now to install the latest available version of iOS for your iPhone.

10. Reset Network Settings on iPhone 18 Pro Max

If none of the fixes above work, try resetting your iPhone’s network settings. To do that, open the Settings app, go to General > Transfer or Reset iPhone > Reset > Reset Network Settings.

A network settings reset wipes your iPhone’s cellular settings and preferences, but they should automatically update after the device reboots itself. Contact your carrier if they don’t.

Resetting the network settings on your iPhone deletes all the saved Wi-Fi hotspots and passwords. You must manually rejoin any networks afterward.

Say Goodbye to the “Last Line No Longer Available” Error

Turning Airplane Mode on and off, restarting your iPhone 18 Pro Max, or clearing your “Recents” list almost always fixes the “Last Line No Longer Available” error. If not, take the time to go through the other fixes above, and it should eventually go away.

However, if the problem persists, the only remaining option is to contact your carrier or Apple Support for help. But don’t worry; they can help you in more ways than we could.
It’s almost as if having your iPhone 18 Pro Max stolen is worse than having your house robbed. It’s not just losing an expensive device—your iPhone holds so much of your private life that criminals don’t even have to do the work of ransacking your place for cash, jewelry, credit cards, and electronics.

Reports have detailed how criminals can use your iPhone to break into your iCloud and bank accounts to quickly drain your finances and steal your identity by permanently locking you out of your Apple Account. That’s in addition to cutting off contacts, notes, emails, and photos. How? Thieves watch and wait for you to enter your passcode, memorize it, and then snatch your iPhone out of your hand while you’re using it. Once they have your device and passcode, they can immediately change your passcode and Apple Account password, and from there, even the iPhone Recovery Key–the only information Apple currently recognizes as proof of your identity.

Forget everything you know about Find My iPhone and iCloud backup. Once thieves have changed your phone’s basic information–which can take just a few minutes–Find My won’t help you, and neither will Apple. But it turns out that there’s a way to prevent it all from happening. You might not know it, but your iPhone’s Screen Time feature hides a fairly bulletproof way to prevent thieves from locking you out of your handset (and all your other Apple devices) even if they do manage to steal your phone.

Screen Time for added protection

If you’re childless and aren’t concerned about how much you use your phone, chances are you have never used iOS’s Screen Time feature. But Screen Time has another feature that can prevent anyone from changing your most important passwords. Here’s how it works:

At a glance

  • Time to complete: 3 minutes

1. Turn on the Screen Time Passcode setting

Go to Settings, tap Screen Time, tap Manage Screen Time, then tap Lock Screen Time Settings. We recommend using a different passcode from the one you use to unlock your iPhone 18 Pro or iPhone 18 Pro Max for obvious reasons.

2. Set Content & Privacy Restrictions

Next, go to Screen Time > Content & Privacy Restrictions and toggle it on if it’s not already. Then, scroll down to the Allow Changes To section, tap Accounts, and then Don’t Allow. That will prevent anyone else who has your phone from accessing or changing passwords because they would first need to tap in the unique Screen Time password which they won’t have.

One caveat: If your iCloud account password is saved to your Passwords keychain, a thief could use your Apple Account to reset your Screen Time passcode, turn on account changes, and then change your password.

This simple Screen Time setup will stop—or at least deter—anyone from changing your iCloud password and using that information from draining your bank account, setting up credit cards in your name, and stealing your identity, as you struggle to recover your lost property, privacy, and sanity. You’ll still need to replace your iPhone, but this one setting could keep a bad day from becoming a horrible one.

You can use Stolen Device Protection to protect against the rare instance when someone has stolen your iPhone and knows your passcode. Stolen Device Protection prevents the person from performing critical device and Apple Account operations (like changing your device passcode or Apple Account password).

  1. Go to Settings.
  2. Tap Face ID & Passcode, then enter your passcode.
  3. Scroll down and tap Stolen Device Protection.
  4. Turn on Stolen Device Protection.

The Home button was central to a huge range of functions, from triggering Siri and taking screenshots to, well, going back to the Home screen.

In this tutorial we explain how to close apps on an iPhone 18 Pro or iPhone 18 Pro Max.

Bring up the app switcher

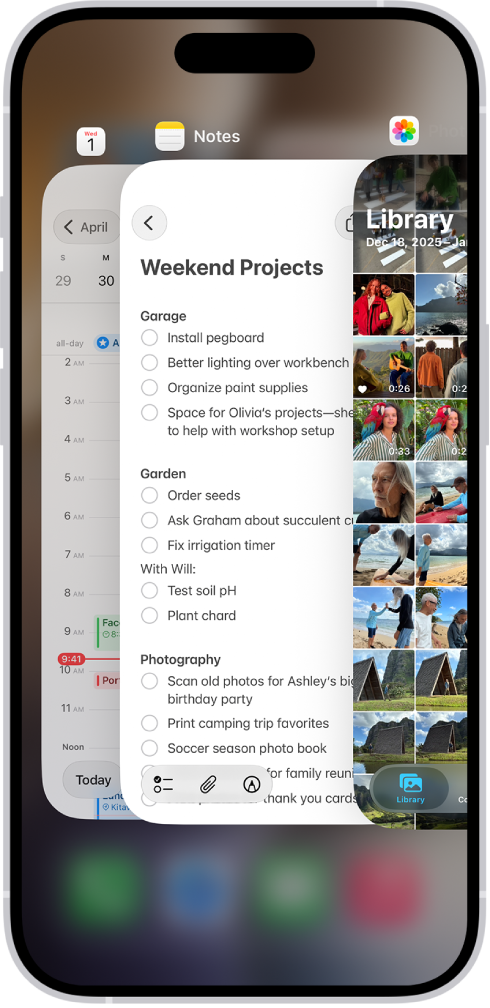
Swipe up from the bottom of the screen. Swiping up and letting go will take you to the Home screen, so instead swipe up and hold your finger on the screen for a moment. The app switcher screen will appear.

The App Switcher. Icons for the open apps appear at the top, and the current screen for each open app appears below its icon.

The app you’re currently using – or used last – will be front and centre. Swipe right to look at progressively longer-ago apps, until you find the one you want to close.

Close the app(s)

All you need to do now is swipe up on the app you want to close so it disappears off the top of the screen. Hey presto, app closed.

To get out of the app switcher, you can select one of the apps by tapping on its thumbnail, or tap elsewhere on the screen to go back to the previous screen. That was easy, wasn’t it?

Notes is a very useful app on iOS, allowing you to make everything from grocery lists, to story ideas, to research notes, and more. If you have iCloud Sync enabled, too, all your notes are synced across your devices, allowing you to access them from literally anywhere.

Unfortunately, your notes can sometimes get deleted—which has caused a lot of trouble for some users. Luckily, there are two methods you can use to recover deleted notes, even if you haven’t backed them up before. Keep reading to find out how to recover deleted notes on your iPhone 18 Pro Max.

1. Recover Notes From the Recently Deleted Folder

The quickest way to recover a deleted note is from the Recently Deleted folder. The Recently Deleted folder contains notes deleted in the past 30 days, after which they’ll be permanently deleted.

If the note you’re looking to recover was deleted in the past 30 days, you can recover it using the steps below:

  1. Open the Notes app and find the Recently Deleted folder from the main folders page.
  2. Swipe left on the note, then tap Move.
  3. Select the folder you want to move your notes to—any of them will do.

That’s it! Your notes should now be recovered and present in your selected folder for you to access.

If you don’t see Recently Deleted, you don’t have any notes in that folder, and there’s nothing to be recovered.

2. Recover Notes From an iCloud Backup

If your iPhone 18 Pro Max regularly backs up to iCloud, there’s a fair chance that your deleted note may be present in a previous backup in the cloud. Even if you back up on an infrequent schedule, there’s still a chance that the note will be available for you to recover.

If you’re not sure whether your Notes are being backed up to iCloud, you can check from the Settings app:

  1. Open up the Settings app on your iPhone.
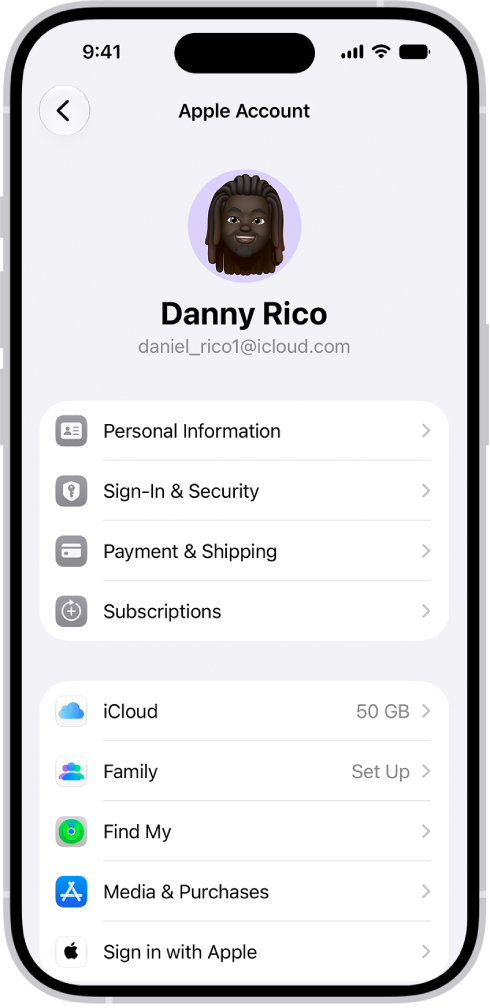
  2. Tap on your profile at the top of the page.

    The Apple Account Settings shown with a list of options including personal information, subscriptions, Find My, and more.

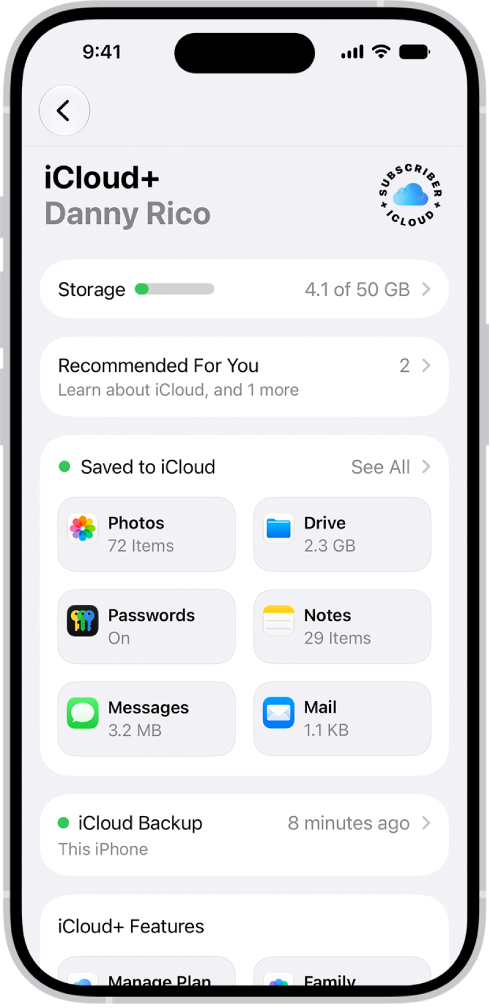
  3. Tap on iCloud, tap See All next to Saved to iCloud, and see if Notes is turned on. iCloud backups don’t include Notes that you already store and sync in iCloud.

    The iCloud settings screen showing the iCloud storage meter and a list of features—including Photos, iCloud Drive, and iCloud Backup—that can be used with iCloud.

Here comes the tricky part—to recover the deleted notes, you need to restore your entire iPhone 18 Pro Max from an iCloud Backup. This will require you to erase your iPhone completely and restore it from the backup.

This isn’t the most ideal method, since you’ll lose all the data you saved between the backup date and today. If you complete your backups frequently, this may not be much. However, if you have infrequent backups, you’ll risk losing all your existing data while trying to recover your previous data.

Before resetting your iPhone, it’s worth making a completely new iPhone backup. This can help restore your iPhone back to your current settings in the rare case that you don’t find your deleted note. You can also choose to recover the deleted note from a previous backup, copy its contents over to somewhere safe, and then again reset and restore the iPhone to the latest backup you just made.

To reset your iPhone and restore it from an iCloud Backup:

  1. In the Settings app, select General > Transfer or Reset iPhone > Erase All Content and Settings.
  2. Tap Continue to confirm. You can back up your iPhone here before resetting it if you haven’t done so already.
  3. It’ll take a few minutes for your iPhone to restore to factory settings. After that, you’ll be greeted with the initial welcome screen.
  4. Proceed with the setup as you normally would. Use your Apple Account and password to sign in to your iCloud account.
  5. On the Transfer Your Apps & Data screen, tap Set Up Manually, then tap Restore from iCloud Backup. You’ll see a list of recent backups. Tap the backup that is most likely to have your deleted note in it.

Once the backup restores, open up the Notes app and see if the deleted note is present there. You can restore your iPhone 18 Pro or iPhone 18 Pro Max back to your latest backup once you’ve successfully recovered the note and copied its contents over to somewhere safe.

Keep Your iPhone Backed Up!

In light of everything, we’d recommend keeping your backups on—no matter what. You never know when your device might stop working, or when something may be accidentally deleted. It’s always better to have a backup to recover from than to have nothing at all.

Created a fun Contact Poster for yourself on your iPhone 18 Pro Max, but none of your contacts can view it? Whether it’s a software bug preventing the feature from working as it should or an innocent mistake you made when creating your poster, we’ll help you resolve this issue quickly.

1. Enable Name and Photo Sharing with Contacts

If you created your Contact Poster recently, you may have accidentally disabled the feature that allows you to share your poster with your contacts. It’s alright—mistakes happen, and enabling the feature again will only take a few seconds! Follow the steps below:

  1. Go to the Contacts app on your iPhone.
  2. Tap My Card at the top, tap Edit, then tap your contact photo.
  3. Now, check whether Name & Photo Sharing is enabled. If not, toggle it on.
  4. Make sure the Share Automatically setting is set to Contacts Only.

If someone you know has set up their Contact Poster and you can’t see it, simply ask them to follow the steps above and ensure the feature is enabled!

2. Delete and Recreate the Contact Poster

If the above fix doesn’t work, we recommend deleting your Contact Poster entirely and creating a new one. Here’s how you can delete your current Contact Poster:

  1. Go to the Contacts app on your iPhone.
  2. Tap My Card at the top, tap Edit, then tap your contact photo.
  3. Tap Remove Photo.
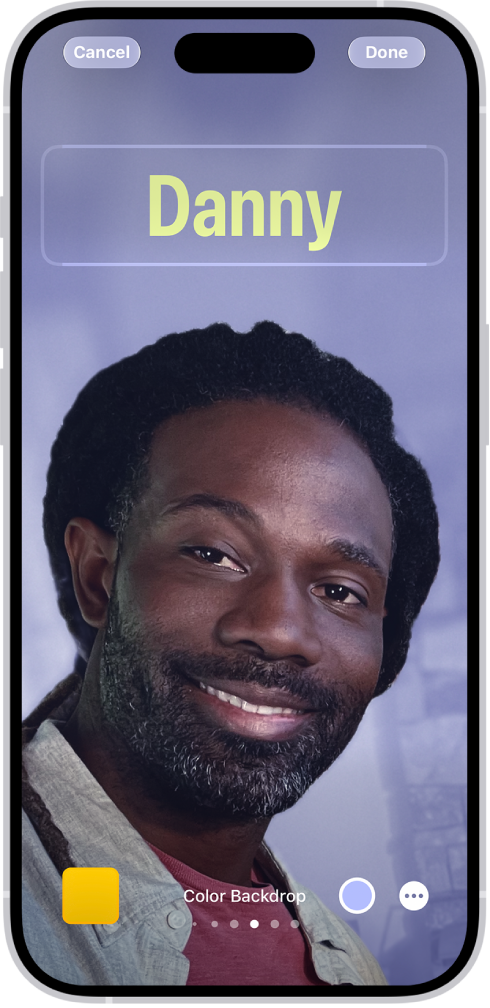
  4. Finally, create and customize a new Contact Poster for yourself and your contacts. Tap your contact photo, then choose a style. Tap Customize to edit your avatar and poster.

    The screen to create a unique Contact Poster.

3. Disable Name and Photo Sharing and Restart Your iPhone

Perhaps a software bug is the culprit behind this issue. Fortunately, the simplest way to fix software glitches like this one is restarting your iPhone 18 Pro or iPhone 18 Pro Max. Before you restart your iPhone, head to Contacts > My Card > Edit, tap your contact photo, and disable Name & Photo Sharing.

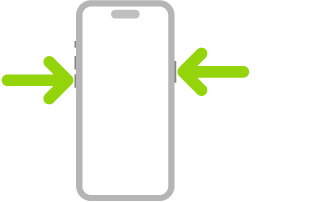
Simultaneously press and hold the side button and either volume button until the sliders appear, then drag the Power Off slider. Press and hold the side button until the Apple logo appears. After you turn your iPhone back on, follow the steps above to enable Name & Photo Sharing again.

An illustration of iPhone with arrows pointing to the side button on the upper right and a volume button on the upper left.

It’s Time to Get Your Contact Posters Back

If none of the troubleshooting steps we mentioned above worked, you may be experiencing this issue due to an iOS bug. Fortunately, Apple periodically rolls out software updates to resolve well-known problems like this. While it isn’t ideal, we recommend waiting it out until a new update is available. Alternatively, you can contact Apple Support for expert assistance.

Many people found–and some still find–USB-C confusing because of the variety of data standards supported by different hosts (computers, mobile phones, etc.) and devices (headphones, other computers, gaming systems, drives, and so forth). But mixed in there was the issue that a USB-C cable has no preferred end and can carry power over any cable, often at high wattages necessary for charging laptops or recharging USB battery packs.

When you plug in multiple devices that can provide power over USB-C, will you fry a computer or other equipment? Will their voltages combine for faster charging? If they’re competing to charge, which one “wins” when you have two sources with different outputs, like 15 watts and 100 watts?

The answer is that USB-C sorts it all out. The controller on each device that handles negotiation over the cable with other connected devices also negotiates power flow, as power has to pass over certain pathways within the cable. This should typically lead to a host device choosing the highest available power, though there’s no way to be sure.

One reader described a scenario in which they had plugged into their MacBook Pro a dock that provided 65W over USB-C even though the computer could charge at up to 95W. (All USB-C cables have to carry a minimum of 60W, but ones that are also rated for Thunderbolt 4 must pass 100W. However, charging devices aren’t required to offer a minimum power.)

As expected, when they plugged both in, the laptop received 95W from the directly attached adapter, declining the power feed from the dock. If the MacBook Pro’s charger were unplugged, it would immediately switch to receiving power from the dock through a sub-second negotiation.

We once had to shed our phone number when we changed wireless providers or moved–sometimes even moving from one part of a town to another. One of the great changes in mobile phones since their introduction decades ago was the introduction about 20 years ago of number portability.

However, portability and the ease of signing up for a new mobile contract can lead you to have phone numbers that linger on after you’re no longer using them. If you’ve associated a phone number with your Apple Account and no longer have access to receive calls or texts at the number, you might feel stymied. However, while it was once hard to sever the link, that’s no longer the case.

Apple uses phone numbers in several ways for your Apple Account and for iCloud services, and you can remove them similarly in various places corresponding to those uses.

Warning: Before doing any of the following, check if the iPhone the phone number was associated with still appears in the list of hardware connected to your Apple Account. If it is, remove it from your account. In Settings, tap your name. A list of the devices associated with your Apple Account appears near the bottom of the screen. To remove a device, tap it, then tap Remove from Account.

Remove number available for Apple Account sign-ins

Apple made a change that lets you use any email address or phone number associated with an Apple Account as the login identity. To remove an associated phone number available for this, follow these steps:

  1. Go to account.apple.com and log in.
  2. In Sign-In and Security, click Email and Phone Numbers.
  3. With at least two numbers in place (if not, see below) click the – (minus) icon and click Remove to confirm.

If you don’t have a second number, you can click the + (plus) icon next to “1 phone number” and follow the steps to add one via a text message or automated voice call. After confirming at least one additional number, you can delete the number you wanted to remove.

Remove from calls, Messages, and FaceTime

You can remove a phone number from use with incoming voice phone calls, Messages, and FaceTime on a Mac. Just change the Apple Account password. This makes all phone numbers inaccessible from all those devices; you’ll have to add back any number you want to provide access to for calls or texts.

You can’t remove the number from voice calls, Messages, and FaceTime from an iPhone, as the iPhone with that number is something you don’t possess. However, if the number is still available from another iPhone you’re using, make sure to remove the number as one trusted by your account.

Remove as a trusted phone number (Stolen Device Protection off)

With two-factor authentication (2FA) enabled for an Apple Account, Apple treats every logged-in iPhone or Mac as a trusted device. It also requires at least one trusted phone number. If your former number appears in the list of trusted numbers, go to Settings, tap your name, then tap Sign-In & Security. Tap Two-Factor Authentication, tap the Delete button next to the phone number, then tap Done.

You may have to follow a different process with Stolen Device Protection enabled.

Remove as a trusted phone number (Stolen Device Protection on)

Apple added Stolen Device Protection in iOS 17.3 to help remove a way that a criminal could observe your iPhone passcode or coerce it out of you, then use it to reset your Apple Account. If you have enabled that feature from your current iPhone 18 Pro or iPhone 18 Pro Max, you won’t be able to remove a trusted phone number via the Apple Account site or other devices and you may face an intentional delay in completing the removal.

Instead, you have to start with your iPhone:

  1. Go to Settings > [your name] > Sign-In & Security > Two-Factor Authentication.
  2. Tap the Delete button next to the phone number.
  3. When you’re finished making changes, tap Done.

Stolen Device Protection kicks in at steps 2 and 3 if you’re not at what your iPhone 18 Pro Max has decided is a “familiar location,” typically your home or place of work. If that’s the case you’ll be prompted for Face ID when you attempt to remove the number. After showing your face, a one-hour timer starts. After that time elapses, you can authenticate again via Face ID, and then complete the steps to remove the unwanted number.

Summary

  • You can only leave an iMessage or RCS group chat in the Messages app if there are at least three other participants in it.
  • If you’re in an SMS/MMS group, you can either mute it or delete and block the thread on your iPhone 18 Pro Max.
  • You may not be able to leave a group chat if one or more of the participants don’t have RCS or iMessage enabled on their devices.

Although group chats are convenient to stay in touch with friends, colleagues, and family, they can be annoying at times—so much so that you just want to leave them. But Apple’s Messages app doesn’t always make it easy for you to do so.

Why You Can’t Leave a Group Chat in Apple Messages

You can create or be a part of three kinds of group chats in Apple’s Messages app: an iMessage group, an RCS group, and an SMS/MMS group. While an iMessage group is full of Apple users, RCS and SMS/MMS groups include participants from other platforms like Android.

You can tell you’re in an iMessage group when you see blue text bubbles, but it’s hard to differentiate between RCS and SMS/MMS at first glance because they both have green bubbles. So, look closely at the text input field; if you see RCS next to Text Message, you’re in an RCS group.

Here’s the kicker: SMS/MMS groups don’t give you the option to leave since you’re not actually using an instant messaging platform. Instead, these messages go through your carrier. So, all you can do is mute the thread or delete and block the conversation.

However, you can leave RCS and iMessage groups as long as they have at least three other participants. If you can’t leave either of these groups despite meeting this requirement, it’s likely because one or more of the participants don’t have RCS or iMessage enabled.

How to Leave iMessage and RCS Group Chats on iPhone 18 Pro Max

As mentioned, you can only leave an iMessage or RCS group if there are at least three other participants. You can leave by following these steps:

  1. Open the group chat in Messages.

    A group conversation including shared files.

  2. Tap the group icon or the group name at the top of the thread.
  3. Now, tap on Leave This Conversation at the bottom of the page and confirm you want to leave when prompted.

What to Do if You Can’t Leave a Group Chat

Leaving is impossible if you are part of an SMS/MMS group. However, you can still get rid of the noise by simply muting the message thread or deleting and blocking the conversation.

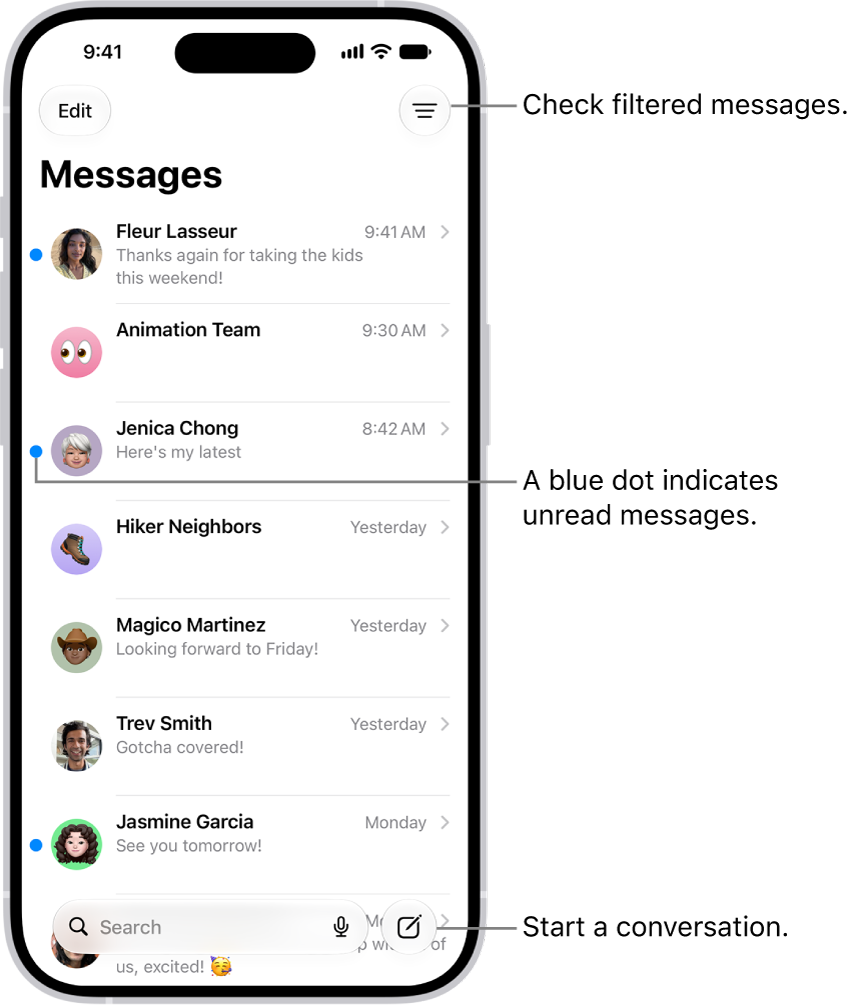
To mute an SMS/MMS group, swipe left over the group message thread and tap the Mute button (the bell icon in purple). Once you do this, a bell icon will appear next to the group chat to indicate that it’s muted. When you’re ready to unmute the group, swipe left and tap the Mute button again.

The Messages conversation list, with the Compose button at the bottom right. A blue dot to the left of a message indicates it’s unread.

However, if you want to block the SMS/MMS group conversation, follow these steps:

  1. Open the group chat in Messages.
  2. Tap the group icon or the group name at the top of the thread.
  3. Scroll down and tap on Delete and Block This Conversation.
  4. When prompted, tap Delete and Block Conversation again.

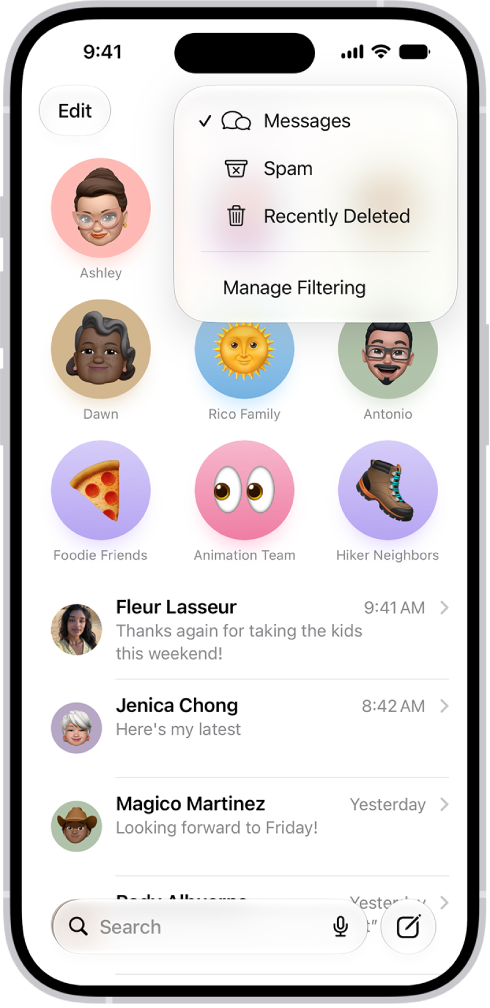
Once you do this, the Messages app will move the thread to the Recently Deleted folder. Any new messages you receive in the group will be automatically deleted, and you won’t get notifications for them. However, you can recover your text messages by heading to Filter > Recently Deleted in the Messages app.

A conversation list in Messages. All messages are shown, because no filter is selected in the Filter menu.

The group conversation will be permanently deleted from your iPhone 18 Pro or iPhone 18 Pro Max if you don’t receive any new messages over the next 30 days.

Staying connected with your loved ones is a human need. However, back-and-forth messaging about nonsense or topics you’re not really interested in can be annoying.

Sometimes, you may prefer solitude and a few hours free from distractions and noise to focus on your work. So, muting group chats or leaving them altogether for some much-needed silence may just be what you need.

Browsing the web can be a frustrating experience these days, with pop-ups asking you for permission for websites to use data about you, including your location. There’s not much you can do about the frequency of the privacy pop-ups relating to cookies as these are required by law, but you can at least stop Safari from asking if it can use your location data. We’ll show you how below.

Beware though, one of the disadvantages of stopping Safari from asking for permission can be that your Google searches will get stuck in whatever location you were when you changed this setting. So, if you are wondering why your Safari location is wrong, or how you can reset your Safari location to make searches more relevant, we’ll answer that too.

Why does Safari ask for my location?

Before we tell you how to stop Safari asking for your location you might want to know exactly why it does so, because that may affect your choice when it comes to turning it on or off.

Most frequently you are likely to see the request when you search for something in Google. If you are just searching for the latest Apple news your location may not matter so much (although it could give preferential treatment to websites based in the same country as you).

However, if you are searching for local information, such as restaurant reviews, whether schools near you are closed, or opening hours for your local Tesco, for example, then having the search be specific to you can be a good thing.

Why does Safari ask for your permission though? That’s a privacy feature added by Apple to ensure that you can determine whether information about you is made available to Google, and other websites, and that you are aware if this information is requested.

If you don’t want websites to have your data, which can be used to target you with advertising, or even show alternative prices to you, you can use privacy settings in iOS and macOS to make sure that your data isn’t shared.

How to stop Safari asking for location on iPhone

If you are fed up with Safari asking you to confirm your location on your iPhone 18 Pro Max every time you search in Google, or when you visit some sites, here’s what to do:

If you want Safari to stop bugging you do this:

  1. Open Settings on your iPhone.
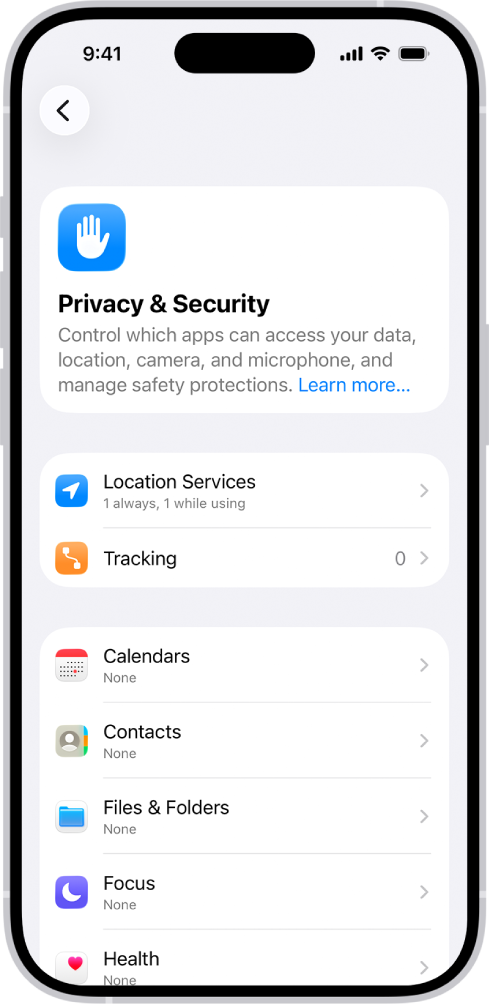
  2. Tap Privacy & Security.

    The Privacy & Security screen, with settings for Location Services and Tracking, and settings to control which apps can access your data.

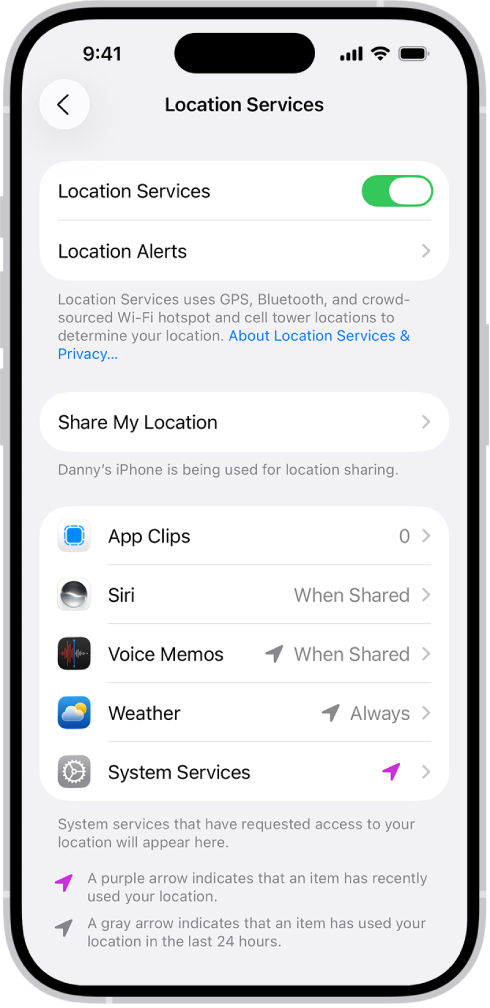
  3. Tap on Location Services.

    The Location Services screen, with settings to share the location of your iPhone with apps.

  4. Scroll to Safari Websites.
  5. Tap on Never.

Note that Safari will still use the location data that’s in its memory the next time you perform a search though. So, if you then change location and want to make your searches more relevant you may want to look at the section below about changing your location.

How to stop sharing your location data

One way to search without sharing your location data, or to search with different location data is to use DuckDuckGo.

  1. Go to DuckDuckGo.com.
  2. Perform your search.

Note results will still be based on your country location – but if you want to change that you can, here’s how:

  1. Tap on the drop down menu beside regional information at the top (in our case it says United Kingdom).
  2. Choose a different region.

This should return results based on the country selected (when we changed it to the US though the map at the top of the page inexplicably showed Coventry).

The only way to completely stop using your location when searching is to use a VPN.

How to change your location in Safari

If you have stopped Safari asking you to confirm your location you may find that Google searches get stuck in the location you were previously in. Here’s how to change the location to the one you are in now.

  1. Open Safari on your iPhone 18 Pro or iPhone 18 Pro Max and go to Google.
  2. Scroll to the bottom of the page you will see details of your last location, or it will say Unknown.
  3. If you search now you will find that the search results are linked to the location that is stored in your search history.
  4. If you want to switch to your new location, tap on Use precise location.
  5. The location may be revealed, or it may say: “Location Unavailable”.
  6. If it says “Location Unavailable” head back to Settings > Privacy & Security > Location Services.
  7. Find Safari Websites again and switch to While Using the App.
  8. Now search once more and agree to share your Location Data.
  9. Now that your location is switched to the one you are in you can go back to Location Services and switch Safari Websites back to Never.

How to search the web privately

If you want to browse incognito then you could open a Private window in Safari, here’s how to do that:

  1. Tap the Tabs button.
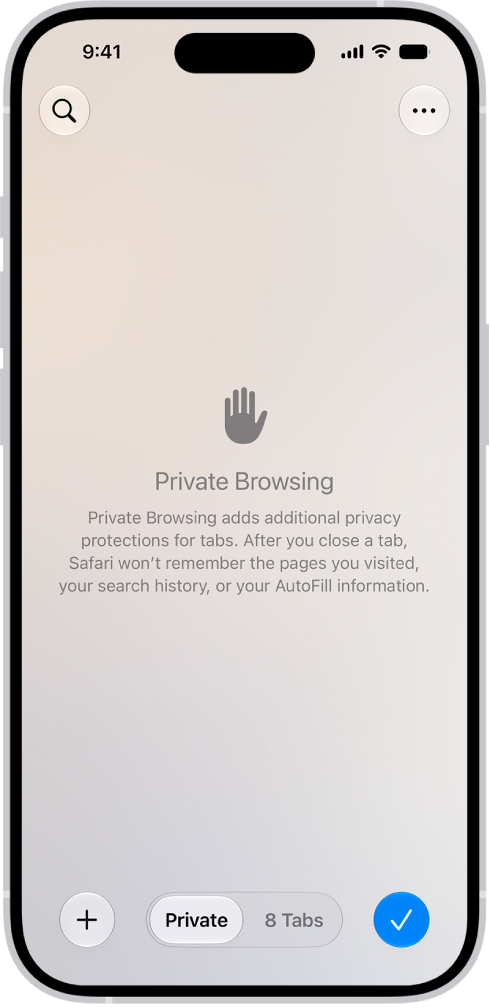
  2. Swipe right on the tab bar at the bottom of the screen until Private Browsing opens, then tap Unlock.

    A Private Browsing screen in the Safari app. The word Private appears in the field at the bottom of the screen.

  3. Enter your search in the new window, which will be darker than usual.

However, Safari is still going to base the search on a recent location though.

There are alternatives to Safari on iOS that can allow you to browse the web privately, such as Firefox Focus which is a privacy browser with tracking protection and content blocking.

Since the introduction of the iPhone X back in November 2017, iOS has had two flavours: one with a Home button interface and one without. The latter makes extended use of swipes and gestures.

One issue that this new approach has brought with it is that the Home bar (the horizontal line at the bottom of the screen) is nearly always visible. While this is fine when you’re navigating your way around the interface, it can be maddening when playing games or using certain apps.

So how can you hide the Home bar on an iPhone 18 Pro Max? We investigate.

Can you turn off the Home bar on iPhone?

We’d love to say that being able to hide the Home bar was a simple case of popping into the settings and toggling a switch so that it removes itself whenever you’re in an app. But for some inexplicable reason, Apple has decided that it should remain. This means that we’ll have to find a workaround to fix this glaring oversight.

Use Accessibility settings to hide the Home bar

Other than jailbreaking your iPhone 18 Pro or iPhone 18 Pro Max, which we really don’t recommend, the only way we’ve found to hide the Home bar is by using the Accessibility settings. This is a quick and effective workaround, with one quite major limitation: you have to do it on a per-app basis. Each time you leave an app and open another one, the Home bar will return and need to be banished once more.

Open Settings and navigate to Accessibility > Guided Access and toggle the switch to on.

This will open up a menu of options governing the way the feature works. There are a few things you’ll need to do to get things ready for hiding the bar. First, tap Passcode Settings and enable the Face ID option. You can also set up a Passcode for the Guided Access feature, which is probably a good idea.

Return to the Guided Access page and enable the Accessibility Shortcut toggle switch.

With all of these settings in place, you’re ready to banish the Home bar while using an app. Open the app in question and click the side button (the one on the righthand edge of the device) three times.

You may find that you’re pushed straight into Guided Access mode, with a brief notification but no need to select further options.

In Guided Access, you’ll notice, the Home bar indicator isn’t visible, because this mode prevents you from leaving the app and returning to the Home screen. (When you’re ready to leave, you’ll need to triple-click the side button again, and potentially enter a passcode.) Mission accomplished!

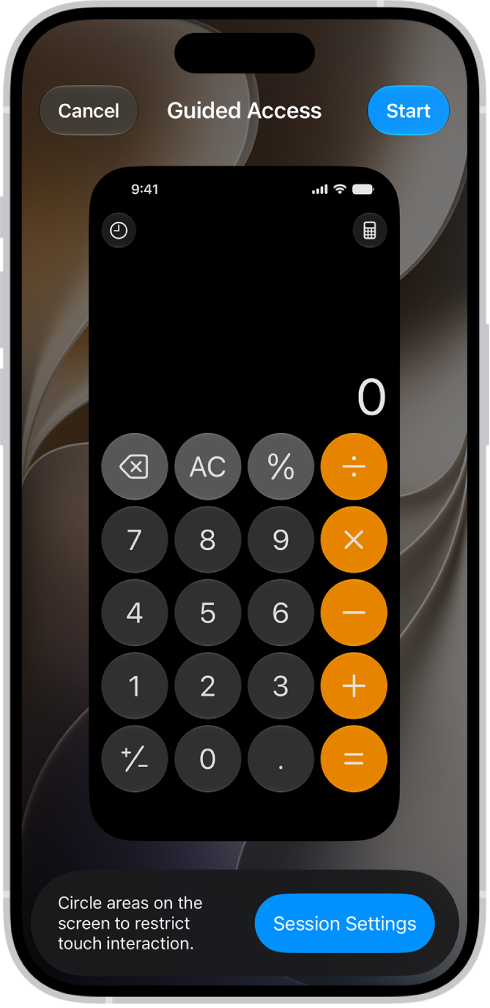
In some cases, you’ll face the very slight complication that when you do the triple-click, a Guided Access window will appear around the edges of the screen, with several options. You simply need to tap Start (or Resume, if you’ve triple-clicked a second time) to enter Guided Access mode, in which the Home bar is disabled.

An iPhone screen showing Guided Access being set up. iPhone is being temporarily locked to just the Calculator app, and one of the buttons in the app has been disabled.

Obviously this is great while you’re playing the game or reading your ebook or whatever app it is you’re in, but getting back to the Home page is also important, so to do this, simply press the side button three times and you should see the message that Guided Access has now been disabled.

That’s it. Not a perfect solution, but one you can now use whenever you’re in an app just by pressing the side button three times to begin and end. After a while it will seem like second nature, and it will have to do until Apple gives us the chance to do it all from the Settings menu. Let’s just hope that it doesn’t take the company too long.