Got a tip for us?

iTunes

If you tried the wrong passcode repeatedly or your kids type randomly in the lock screen, it will cause the iPad to be disabled. As a result, you will be informed that iPad is disabled connect to iTunes. In such a case, how to unlock a disabled iPad without iTunes or iCloud or computer? Let us discuss this issue together.

Part 1: How to Unlock a Disabled iPad without iTunes? Give iCloud a Try

The first method to unlock a disabled iPad without iTunes would be using iCloud. Let’s cut to the chase:

Step 1: On your browser, head over to icloud.com.

Step 2: Sign in with your Apple ID.

Step 3: Now, click on “All Devices” at the top of the window. Then choose your disabled iPad.

Step 4: Here are three options available for you:

Play Sound: Make your device vibrate and play a sound immediately for two minutes. This helps you to find your iPad if you lost it nearby.
Lost Mode: Allows you to lock and track your lost device remotely.
Erase: Erase all the data and settings from your iPad (except iCloud account).
All of the above options only work when your iPad is online.

Here choose the Erase option. If your disable iPad is online, the remote erase begins. Or it will remote erase the next time it’s online.

Step 5: Last, set up your device and restore it from your iCloud backup (if available).

Part 2: How to Unlock a Disabled iPad without iTunes/iCloud/ Computer

The second method to unlock a disabled iPad without iTunes or iCloud or computer would be using the Find My app.
To unlock iPhone with iCloud, you can refer Part 1 tutorial to conduct the operation. Here we will guide you to unlock a disabled iPad without a computer via Find My app on another iPhone or iPad. Let’s cut to the chase:
Step 1: Open the ‌Find My‌ ‌‌ app on another device.

Step 2: Sign in with your ‌Apple ID‌.

Step 3: scroll down to the missing device and tap it.
Then tap on Actions at the bottom of the iPad screen. After that, you are offered three options. Tap Erase iPad and then you will get the disabled iPad erased. Of course, the locked screen is removed from the iPad.

If your disabled iPad is online, the remote erase begins after you follow the onscreen instructions. If your disabled iPad is offline, the remote erase begins the next time it’s online.

As a matter of fact, this process is similar to unlock the disabled iPad with iCloud. The most important part is that you need to enter the right iCloud account and password.

Tags: iCloud, iTunes

A couple of users have stated that they received the “iTunes could not connect to iPhone or iPad because an invalid response was received from the device” error message when they connect their iPhone to their computers. In addition, some other users have reported that iTunes freezes while they are syncing their iPhone with their computer.

Sometimes, you might face this problem while trying to connect your iPhone to your Window’s iTunes application. You will see a message “iTunes could not connect to the iPhone because an invalid response was received from the device“. This message will prevent you from connecting your iPhone to your
iTunes.

This error can be caused by incompatibility issue.  Your iTunes version might not be updated to the latest version and, therefore, incompatible with the iOS version. Your computer need to be running a certain version of iTunes application for it to work with certain iOS versions.

In most cases, the solution of this problem revolves around updating your iTunes as well as iOS device. If these things doesn’t fix your problems, there are other things that you can do to resolve the issue.

With iTunes you can:

  • sync your content (movies, apps and much more)
  • Transfer the content from your computer to your iPhone or iPad and vice versa
  • update or restore your iPhone or iPad

How to fix Invalid Response Received From the Device error

Here’s how to fix “iTunes could not connect because invalid response was received from device”

Solution #1. Update iTunes

Since the issue is related to version compatibility problem, it’s logical to update the devices and software involved. So, let’s start by updating the iTunes application to ensure that you are running the most latest version.

Here’s how to update iTunes on windows:

  1. Start the iTunes app
  2. Now, click Help
  3. Next, click Check for updates
  4. If updates are available, download and install

Here’s how to update iTunes on Mac:

  1. Go to App Store
  2. Now, click Update
  3. If updates are available, download and install.

Once your iTunes is updated, check if it resolves the issue

Solution #2. Reinstall iTunes

If your issue was not resolved by updating iTunes application, please try to uninstall and reinstall the iTunes.

Here’s how to uninstall and reinstall iTunes on windows:

  1. Press and hold down Windows key and press R
  2. Now, type appwiz.cpl and hit Enter
  3. Next, find your iTunes application and select it
  4. Next on, hit Uninstall and follow the on-screen prompts

Here’s how to uninstall and reinstall iTunes on Mac:

  1. Launch spotlight search and type Terminal
  2. From the search results that appear, select Terminal
  3. Now, type cd /Applications/ and hit Enter
  4. Next, type sudo rm -rf iTunes.app/ and hit Enter
  5. Next on, type in the admin password

Once done, visit
(https://www.apple.com/itunes/)
and click the Download now button. If you are on Mac, visit
(https://www.apple.com/itunes/)
and click the Download now button.

Once the download is complete, double click the downloaded file and install the iTunes application again. Check if your issue was resolved.

Solution #3. Update your iPhone

Since the latest version of iTunes work with certain iOS versions, updating your iPhone to the latest iPhone version can fix the An Invalid Response Received From the Device error too.

Please follow these steps to update your iPhone:

  1. Start the settings app on your iPhone
  2. Go to General
  3. Tap Software update
  4. If an update is available, hit download and Install
  5. If asked, type in your password

Once the update is installed, try to connect your iPhone again and see if the the problem was fixed.

Other solutions

  1. Your USB cable can be broken or faulty. Connect your iPhone to a computer using a different USB/lightning cable
  2. Make sure your USB port is working properly. Connect your iPhone to a different USB port
  3. If possible, try using a different computer
  4. Close iTunes and reopen and try again
  5. Try restarting your computer
  6. Try restarting your iPhone
  7. Try restarting your router
  8. A locked iPhone can cause connectivity issues. Ensure that your iPhone is unlocked when it is connected to a computer
  9. Force restart your iPhone. Do not worry, you will not lose anything. Here’s how:
    • iPhone x and newer: quickly press and release the volume up and then the volume down button. Press and hold the power button until you see the Apple Logo on the screen.
    • iPhone 7 and 7 plus: Press and hold both the Sleep/Wake (On/Off) and Volume Down buttons together until you see the Apple logo on the screen.
    • iPhone 6 and older: Press and hold both the Sleep/Wake (On/Off) and Home buttons simultaneously until the Apple logo appears on the screen.
  10. Update your computer to the latest OS version
  11. Sometimes, the problem can be caused by your iPhone’s network settings. Reset your iPhone network setting by heading over to Settings > General > Reset > Reset Network Settings (Please note: this will remove your Wi-Fi passwords etc).
  12. On your iPhone or iPad, head over to Settings > General > Date & Time and turn on “Set Automatically”
  13. If you are using a Mac), make sure that time and date settings are set correctly. Head over to (System Preferences > Time & Date). If you are using A windows PC, also make sure that time and date settings are set correctly.
Tag: iTunes

Have you ever picked up your iPhone to be greeted with a notification saying “iPhone is disabled” and to “try again in 1 minute” or to try again 5, 15, 60 minutes? The worst of all, the error says “iPhone is disabled connect to iTunes”, and you cannot use it until then.

So, why is the iPhone saying “iPhone is disabled connect to iTunes?” And how do you fix the issue so that you can use the iPhone again? The answers to these questions are usually easy. In this step-by-step guide, we’ll explain why your device says iPhone is disabled connect to iTunes, and most importantly, show you how to unlock so that you can reenable your iPhone and start using it again. We’ll also walk you through how to unlock a disabled iphone without itunes.
iphone disabled one minute delay

Why is My iPhone Disabled?

If you enter the wrong passcode repeatedly, your iPhone
will automatically be disabled for sometimes and it will display iPhone is disabled error notification on the screen.
The obvious fix in this situation is to hold on for a minute or two and then enter the correct passcode to unlock the iPhone and get around the disabled message. In the future, just enter the correct passcode in the first attempt and you’ll avoid this message and the lock out period.

If you enter incorrect passcode repeatedly, the iPhone will be disabled and display an error message saying “iPhone is disabled connect to iTunes”

You may want to know how many failed passcode attempts are required to disable the iPhone for a given period of time and to get the Error message, that information is as follows:

  • 5 failed passcode attempts in a row – iPhone is disabled, try again in 1 minute
  • 7 failed passcode attempts in a row – iPhone is disabled, try again in 5 minutes
  • 8 failed passcode attempts in a row – iPhone is disabled, try again in 15 minutes
  • 9 failed passcode attempts in a row – iPhone is disabled, try again in 60 minutes
  • 10 failed passcode attempts in a row – iPhone is disabled, connect to iTunes (or the iPhone erases itself of all datA IF self-destruct mode is enableD

Keep in mind that the time delays mentioned above are automatically triggered on your iPhone, and cannot be adjusted or turned off.
Being locked out for 1 minute isn’t too bad, however, bing locked out for 60 minutes is annoying, as is connecting to iTunes to enable the iPhone again. If you want to unlock a disabled iPhone,there are a few simple steps which you need to follow.
Here is the step by step guide which will help you unlock a disabled iPhone with or without iTunes.
Let’s further understand the common causes of this problem to avoid it in the future, then we’ll dive into solving iPhone is disabled connect to iTunes error.

But I didn’t try to unlock my iPhone, so why does it say it is disabled?

Under some circumstances, you didn’t actually try to unlock an iPhone and you didn’t (intentionally) enter incorrect passcode, but the iPhone says it is disabled. Here are three most common reasons why this happens:

  • pocket: Inadvertently disabling an iPhone in a pocket is very common! This mostly happens to iPhone users who keep their iPhones in a pocket that they also use for their hands, often hip coat pockets, the hoodie pouch pocket, or front pants pockets. The iPhones screens slide to unlock feature can easily trigger itself, landing your device into passcode entry area while the iPhone is in a pocket.
  • Snoopers. Friends and colleagues don’t always understand they don’t have limitless number of guesses to unlock your iPhone .
  • Kids. Kids love iPhones and they love playing with phones. Tom gets sad when the phone stop working and mom isn’t happy that her iPhone is disabled.

iPhone is disabled connect to iTunes, how to unlock

Want to unlock an iPhone stuck on the disabled screen? The most straight forward solution is to wait for the time to pass, then enter the correct passcode. For anywhere up to 9 failed passcode attempts, all you need to do is grab a cup of coffee and wait for time to elapse. (‘Try again in X minutes’ count down will be displayed on the screen therefore, you can see how long You are required to wait.)
There is nothing much you can do during this period, however, you have an option to place emergency calls by tapping the immergency button located at the bottom of the screen.

Once the waiting period is over, your iPhone’s screen will display a normal background and you’ll have a chance to try entering the passcode again. At this point, try entering your passcode carefully when given a chance. If you input the passcode wrongly one more time, you’ll be subjected to another waiting period.

As soon as you get to an hour wait, you’re approaching your final chance. Get it wrong one more time and your iPhone will be disabled until you connect to iTunes.

If you’re approaching the 10-guess limit, be careful. Do you have the right passcode penned down somewhere, or is there anyone else who knows It?
It might be prudent to jot down every attempt you make from this moment on (and any that you’re certain you’ve tried before), but this is only to help nudge the memory – however, iOS smartly counts various entries of the same wrong passcode as one wrong guess, so you should not mind about trying any guesses repeating yourself.
After 10 failed passcode attempts , you’ll have to restore your iPhone using iTunes.

How to unlock a disabled iPhone with iTunes

When your device says “iPhone is disabled connect to iTunes,” the only solution is to connect It to a computer to unlock it again. Hopefully you have a recent backup on your computer, and hopefully you remember your iPhone’s passcode, otherwise you’ll be required to wipe your device clean and lose all your data. Yes really. This is why it is important to back up your iPhone frequently.

Steps to unlock a disabled iPhone with iTunes

If you know your iPhone’s passcode and Had recently synced your device to iTunes, you are in luck. You can restore it as new without loosing data. Follow these steps to fix iPhone is disabled connect to iTunes error:

  1. Connect the iPhone to a computer it usually syncs with via a lightening cable and open iTunes
  2. Choose the iPhone (from the sidepane or from top-right of the screen
  3. Click “Sync” in iTunes and enter the correct passcode when requested to unlock the device, this will backup the iPhone to the computer
  4. Hit “Restore” to restore the iPhone from the most recent backup

If you can’t remember the iPhone passcode, the only option is to erase the iPhone completely and it will wipe all data using recovery mode.

Use Recovery Mode

Recovery Mode erases the iPhone completely. However, it can prove helpful if the above fix didn’t work.
Note, iTunes won’t allow you to restore your device if Find my iPhone is enabled on your device, even if you have synced your iPhone with a computer. In such a situation, the only solution is to restore your iPhone from recovery mode. Here’s how to put your iPhone into Recovery Mode:

  1. Connect the USB to lightening cable to your computer but don’t plug it to the iPhone yet.
  2. Open iTunes on your computer.
  3. If you are using iPhone X or newer, quickly press the Volume Up button, then quickly press the Volume Down button and then press and hold the Side button until the recovery mode screen appears.
  4. Next, connect your iPhone to the computer. A ppop up will appear on iTunes window stating “An iPhone has been detected in recovery mode. Now, proceed with the restore process.
  5. If you are using iPhone 6S or older, press and hold down the Home button and Sleep/Wake button for approximately 10 seconds until the iPhone shuts down.
  6. Release the Sleep/Wake button but keep holding the home button.
  7. Now, connect the lightening jack to your iPhone, (Don’t release the Home button yet).
  8. A pop up will appear on iTunes window stating “An iPhone has been detected in recovery mode.” Now, go ahead with the recovery process.
  9. If you are using iPhone 7 or 7 Plus, press and hold ON/OFF button and volume down button simultaneously). Keep holding both the buttons until Connect to iTunes screen appears. After connecting your iPhone to iTune, a ppop up will appear on iTunes window stating “An iPhone has been detected in recovery mode. Now go ahead with the restore process

What do you do when your iPhone is disabled and won’t connect to iTunes? In this case, check the next solution.

How to unlock a disabled iPhone without iTunes

Some iPhone users find that connecting the disabled iPhone to iTunes doesn’t fix the problem. Fear not! You can unlock disabled iPhone without iTunes using third-party tool, known as Tenorshare 4uKey with just a few simple clicks.
Unlock a disabled iPhone with Tenorshare 4uKey:

Tenorshare 4uKey is an easy tool designed to unlock iPhone screen without iTunes. Whether it’s a simple 4-digit passcode, 6-digit passcode or more complex custom numeric code and alphanumeric passcode, 4uKey offers the ability to remove an iPhone screen lock passcode in a very short amount of time.

Tenorshare 4uKey has one of the best mobile interfaces out there. Its features options are robust, but you’ll never struggle to navigate them. Tenorshare 4uKey is designed to allow you to unlock a disabled iPhone with minimal effort. It succeeds at that goal.

Unlocking a disabled iPhone works like magic. You just need to connect your iPhone to your computer, launch Tenorshare 4uKey and perform a few Clicks.

With that in mind, here is how to unlock a disabled iPhone without iTunes using Tenorshare 4uKey:
Unlock disabled iPhone with Tenorshare 4uKey

Steps to remove lock screen and unlock disabled iPhone without iTunes

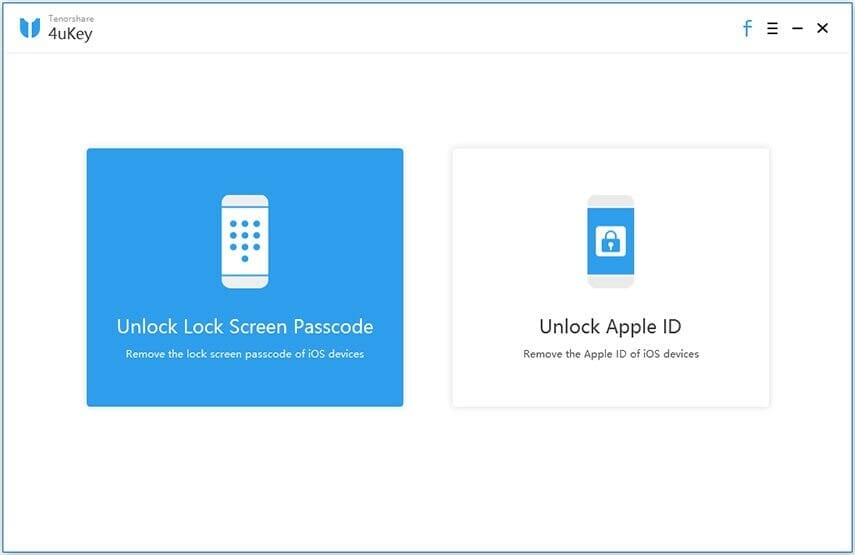
Step-1: Download, install and launch 4uKey on your Mac or Windows computer. It is necessary to sign in to the software with your registration Code. Then click on Unlock Lock Screen Passcode to get started.

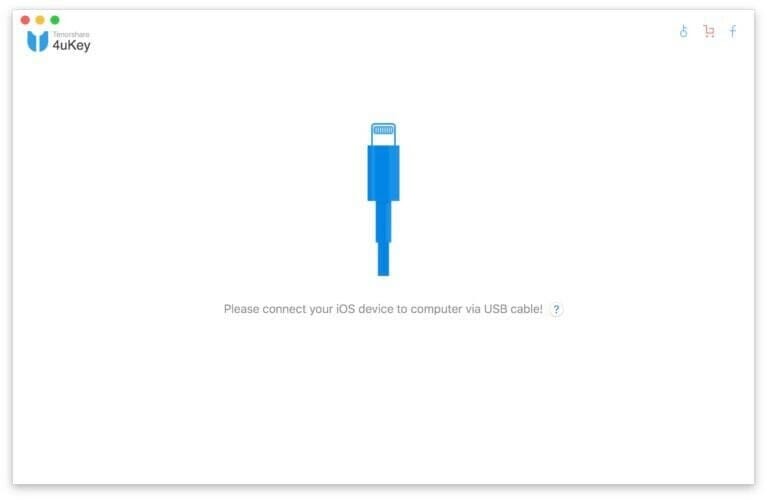
Step-2: Connect the disabled iPhone to your Mac or Windows computer through a USB cable.
Connect your iOS device to computer
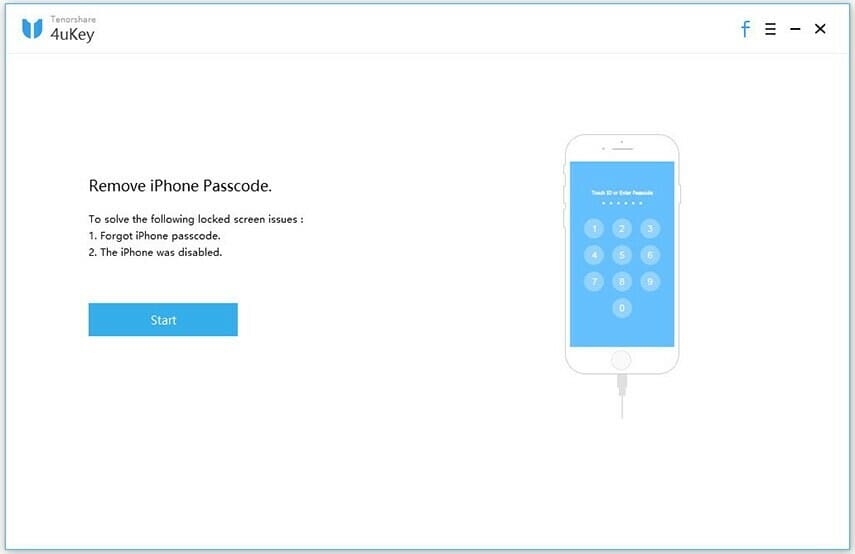
Step-3: Click the Start button on the main interface

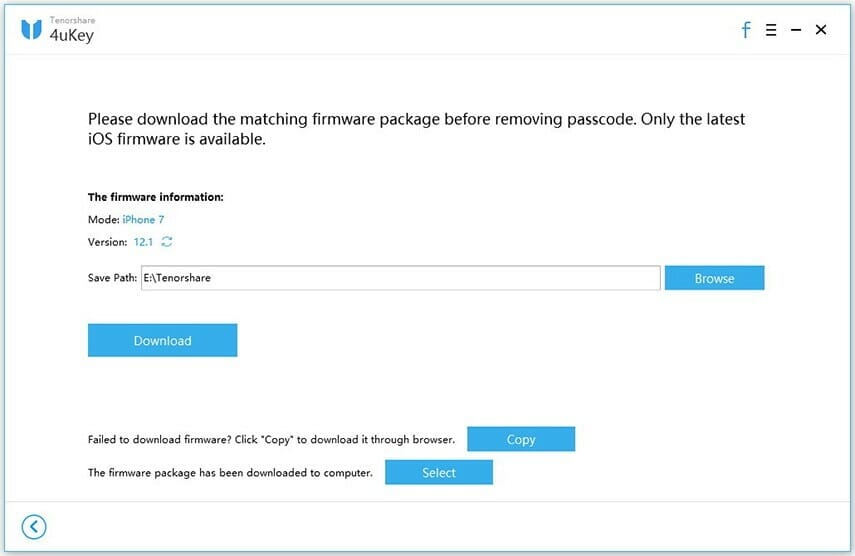
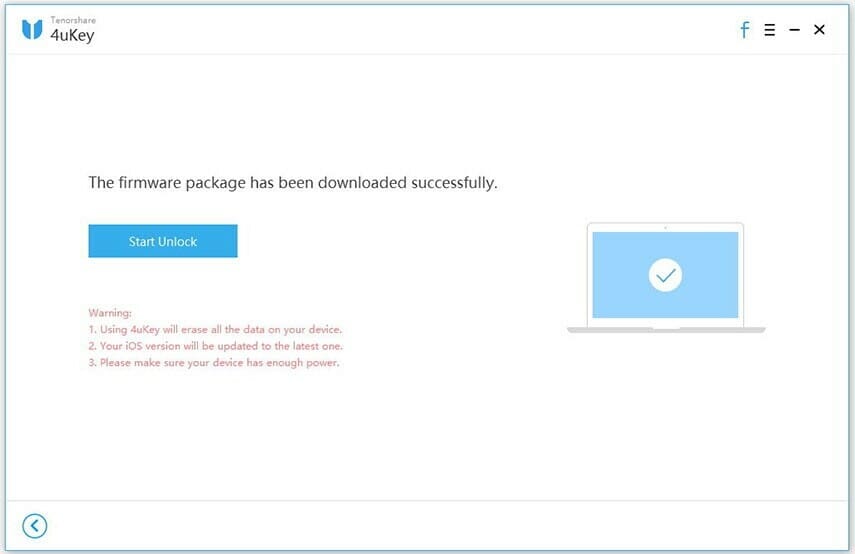
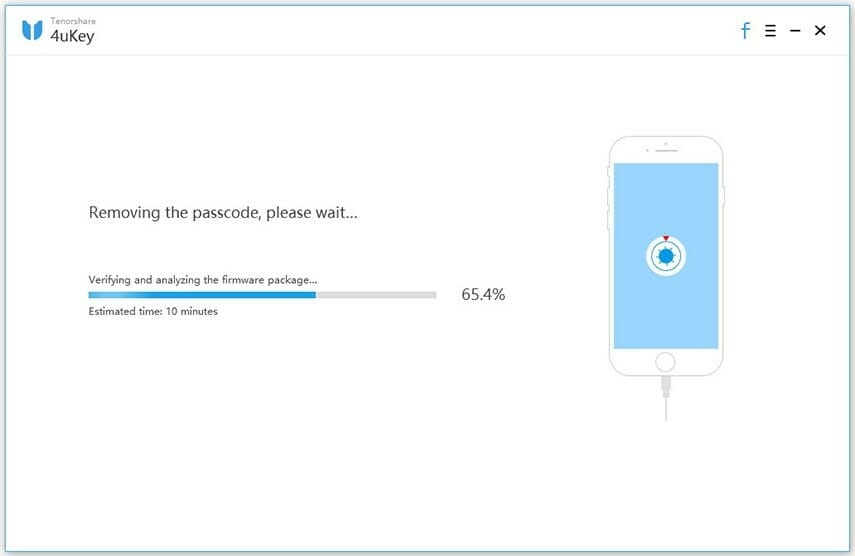
Step-4: The software will automatically detect all the information on your iPhone. And in the download firmware package online interface, you just need to Choose a save path and click the Download button.
download firmware packageDownloading firmware package
firmware package downloaded successfully
Step-5: When the process completes, Tenorshare 4uKey will say that the passcode has been removed successfully.
Removing passcode
Passcode removed successfully
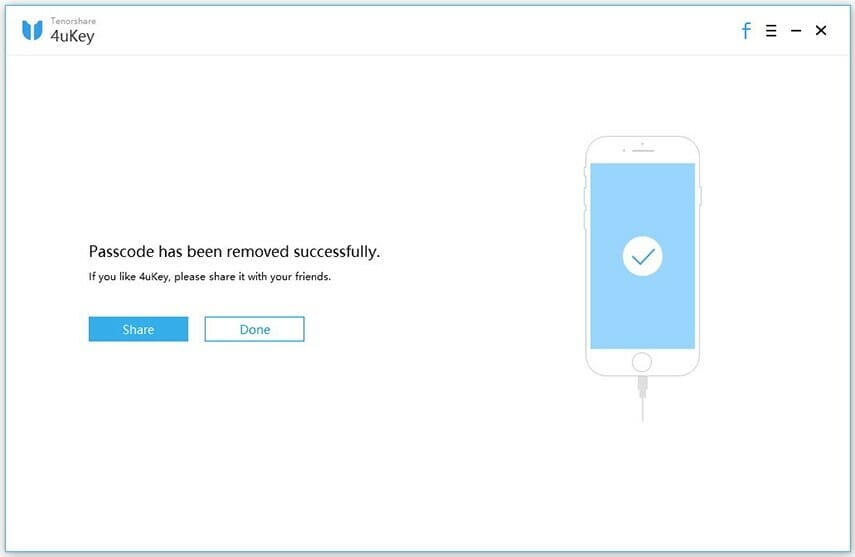
Step-6: When iPhone passcode has been removed successfully, Follow the on-screen instructions to set up your iPhone. You can restore from an iCloud backup, iTunes backup, or set up your iPhone as new. If you have a backup available, we recommend restoring from it so you don’t lose any of your data.
Now, my disabled iPhone was unlocked successfully without any problem In just a few moments and pricing was also very low which is affordable by everyone because we need to pay a little for some great tools that make our life easier.

Some important features of Tenorshare 4uKey:

  • Ability to unlock a disabled iPhone without iTunes or iCloud
  • Support all iOS versions and devices including the latest iOS 13 and iPhone 11, iPhone 11 Pro, iPhone 11 Pro Max and iPhone SE 2020
  • Remove all kinds of iPhone passcodes: 4-digit passcode, 6-digit passcode, custom numeric code, alphanumeric passcode, Touch ID, or Face ID
  • Reset a second-hand, passcode-locked iPhone.
  • Factory reset locked iPhone without iTunes or passcode.
  • No need for specialist skills

That’s all about unlocking a disabled iPhone without iTunes or iCloud. If you have any questions, let us know in the comments section below.

If the worst happen and you need to restore your iPhone, the simplest way to do so is through iTunes. In this article, we’ll explain how to restore an
iPhone via iTunes…

If your iPhone is not working properly, or if you’re getting ready to sell it, you’ll want to restore the device. But restoring your iPhone can mess up the device
if you don’t do things in the right way.

In this article, we’ll explain what an iPhone restore is, under which circumstance you might want to do a restore, and the steps to follow when you do so.

You will need toback-up your iPhone before getting started, and the best way to do that is via iCloud or iTunes. We’ve explained both options in detail below, so read on for instructions on how to backup and restore your iPhone…

What Restoring Your iPhone Does

Restoring your iPhone is the “nuclear” version of formatting your device back to factory default. A restore will erase everything from your iPhone–settings,
apps, the OS, as well as the firmware itself.
If you want the iPhone to appear the way it was when you first opened it from the box you need to restore it.

All the methods explained here work on iPad too. Another handy tip, especially if you’ve ever thought the following:

Is to make sure you have
Find Myconfigured on your iPhone or iPad.

Why You May Want To Restore Your iPhone

You want to restore your iPhone if you are planning to sell or giving it to someone, or you are having some issues with it. Always keep in mind to do a restore if you
are selling your iPhone.
Restoring your iPhone will remove everything on the device, wiping not only all your information but the existing OS and firmware from the device.

After a restore, the device will install the latest clean version of iOS.

How to Restore Your iPhone From iTunes

Restoring your iPhone can somehow be risky because if you do it wrong you can seriously mess up your device. However, it’s very rare to encounter such an issue.
What we are saying, most of the time people restore their iPhone without doing a backup first. Then when they go to restore their device, they
find they don’t have any of their data saved.

Another common issue is when people restore their iPhone without disassociating their Apple/iCloud ID from it first and then sell their device. If you don’t
disassociate your Apple/iCloud ID first, that iPhone will forever be locked to your Apple/iCloud ID, which means a future owner won’t have full access
over it.

Back-Up Your iPhone First!
The first, MOST ESSENTIAL step is toback up your iPhone BEFORE restoring it. So choose a backup method. You can do this via iCloud or iTunes.

How to backup iPhone to iCloud manually:

  1. Make sure you’re iPhone is connected to a Wi-Fi network
  2. Head over to Settings & then tap your profile on top
  3. Tap on iCloud
  4. Tap iCloud Backup
  5. > Turn on “iCloud Backup” if it’s switched off

    Tap Backup Now

How to Backup iPhone or iPad in Mac on MacOS Catalina

  1. Build a connection between your iPhone and computer via USB cable and launch Finder.
  2. Now, click on the name of your device.
  3. Next, click on General at the top of the Finder window and then click
    Back up all of the data on your iPhone to this Mac.
  4. Finally, click back up now.

How to back up your iPhone or iPad using iTunes on windows PC or Mac running MacOS Mojave or earlier

  1. Launch iTunes
  2. Connect Your iPhone To Your PC using a USB cable
  3. Click iPhone , then summary
  4. Click Backup Now

How to restore iPhone or iPad backup in MacOS Catalina

If your Mac is runningMacOS Catalina, you can restore your iPhone or iPad from Backup using Finder. Before you jump into it, ensure that the Find My is turned off.
Now, simply follow these steps:

  1. Build a connection between your iPhone and Mac via a USB cable.
  2. Now, open Finder on your Mac.
  3. Next, click on your device from the Locations section.
  4. Next on, click on General to reveal device settings.
  5. Click on restore Backup
  6. Choose the Backup data you wish to restore from the pop-up that appears on the screen.
  7. Lastly, click Restore to initiate the restoration process.

Keep your iPhone or iPad connected after it restarts and wait for it to sync with your Mac.

How to restore iPhone or iPad Backup from iTunes

If your Mac is running MacOS Mojave or older or windows PC, iTunes will help you with the task. Before you dive into it:

  • Ensure that your Mac or PC is running the latest version of iTunes.
  • Ensure that Find My iPhone is disabled.
  • Now, Follow these steps to restore Your iPhone or iPad backup from iTunes
    1. Connect your iPhone to your computer using a USB cable.
    2. When your iPhone appears in iTunes, click on its Summary panel and then click Restore backup.
    3. Click Restore again to confirm that you want to restore your iPhone to factory settings. All data and content will be erased.
  • After your iPhone restarts you’ll be asked if you want to set up the iPhone as a new device (do this if you are selling it or giving it away) or if you
    want to restore it from a backup. If you want to set it up as a new device, you’re done, just follow the “Set Up As New iPhone” steps on screen when you see the
    Hello screen.
    If you want to restore your device from a backup you can do so from iCloud or your iTunes backup (depending on where you backed up your iPhone before
    you restored it.
    To restore from iCloud: After you see Hello screen follow the steps in the iOS Setup Assistant until you get to the Set-Up screen. Select Restore from iCloud
    Backup. Select the backup you made.
  • To restore from iTunes: connect your iPhone to your Mac or PC using a USB cable. In iTunes choose File > Devices > Restore from Backup. Choose the backup
    you made.
    That’s all, folks.

    Tags: Backup, iTunes

    Why do people back up iPhone data to iCloud? Answer: if your iPhone goes missing, or it’s damaged, you cannot access all the vital information that is stored on
    The device. Backing up your iPhone regularly ensures that, should the worst happen, you’re 100% covered – and you can still retrieve all your most important
    information. While it may appear difficult, backing up an iPhone is actually very easy…
    If you don’t know how to back up an iPhone, then this article is for you. Here are the 4 most common methods for backing up an iPhone.

    All the methods explained here are easy, so, by the end of this post, your iPhone will be completely backed-up and ready to go.

    How To Back Up iPhone

    Method #1) iCloud – The Simplest Way

    Apple default cloud storage service is known as iCloud. It works seamlessly on all iOS/macOS devices, therefore, most users prefer iCloud backups option when backing
    up an iPhone.

    How to backup iPhone to iCloud:

    1. Make sure you’re iPhone is connected to a Wi-Fi network
    2. Head over to Settings & then tap your profile on top
    3. Tap on iCloud
    4. Tap iCloud Backup
    5. > Turn on “iCloud Backup” if it’s switched off

      Tap Backup Now

    You can check the status by heading over to Settings > your profile > iCloud > Storage > Manage Storage

    Things To Keep In Mind

    iCloud offers only 5GB free storage, so you might need to upgrade your iCloud storage space 50GB costs $0.99 a month while 200GB costs $2.99
    a month.

    Method #2 How to Backup iPhone or iPad in Mac on MacOS Catalina

    Apple discontinued iTunes with the introduction ofMacOS Catalina. Thankfully, you can use finder to back up your iPhone or iPad to Catalina. Simply follow these steps:

    1. Build a connection between your iPhone and computer via USB cable and launch Finder.
    2. Now, click on the name of your device.
    3. Next, click on General at the top of the Finder window and then click
      Back up all of the data on your iPhone to this Mac.
    4. Finally, click back up now.

    Method #3 How to back up your iPhone or iPad using iTunes on windows PC or Mac running MacOS Mojave or earlier

    Before the introduction of iCloud, Apple’s method for backing up iOS devices was iTunes. And in 2020 , it still works perfectly too.

    How to backup iPhone with iTunes

    1. Launch iTunes
    2. Connect Your iPhone To Your PC using a USB cable
    3. Click iPhone , then summary
    4. Click Backup Now

    Things To Keep In Mind

    This is a manual process and can take a while to complete depending on the size of data stored on your iPhone.

    Moreover, your PC hand drive need to have enough space on your as well.

    If you have met all these, you’re all set with an iTunes Backup

    Method #4 Google Photos Backup For ALL Your Images

    If you want to store all your photos somewhere, somewhere safe, Google Photos is your best bet, which can be downloaded for free on the App Store.

    After downloading the app, simply select it as a backup for all your iPhone’s photos and videos. This way, anytime you take photos they’ll be
    automatically uploaded to Google Photos, where you can access them any time and anywhere.

    You just need a Gmail account and a computer.

    Dropbox and OneDrive are also great options, but I especially like the way the Google Photos app looks and works.

    So you just bought a new iPhone or reset your old one back to factory default. That means, you probably want to get all the old data and settings you
    had on your phone up and running on your brand new or reset iPhone. And the most convenient way to do so is restoring your iPhone from a previous iCloud Backup. In this article I’ll explain how to restore iPhone from iCloud Backup in quick and easy steps.

    What Is An iCloud Backup?

    Basically, an iCloud backup is a duplicate of all the data, layouts, and other settings on your iPhone that is stored on Apple’s cloud service known as,iCloud.
    Here’s what is included on iCloud Backup:

    • App data
    • Images and videos saved on your iPhone, iPad, and iPod touch (unless you use iCloud Photos)
    • Apple Watch backups
    • iMessage, text (SMS), and MMS messages (unless you use Messages in iCloud)
    • Device settings
    • Visual Voicemail password (You’ll need the SIM card which was in use during backup)
    • Home screen and app arrangement
    • Purchase history from Apple services, such as your music, films, TV shows, apps, as well as books
    • Ringtones

    Having said that, there are a couple of stuff that are NOT included in an iCloud backup. These mostly include your data such as emails, Notes, Contacts, Calendars,
    And bookmarks if you are an iCloud user.

    This is because iCloud already stores this data on Apple’s servers separately from an iCloud backup, therefore, no need of including this data
    in the iCloud backup.

    Before Restoring An iPhone From iCloud

    Before you restore an iPhone from iCloud, you need to ensure you already have an iCloud backup of your iPhone.
    For this to happen you’ll need to have hadenabled iCloud backups on your iPhone beforehand.

    To set up your iPhone to back up to iCloud, simply follow these steps:

    1. Start the Settings app on your iPhone.
    2. Tap on your profile at the top of the display (this will be your name).
    3. On the next screen, select iCloud.
    4. Now scroll down and tap on iCloud Backup.
    5. On the Backup screen toggle the iCloud Backup switch to ON position.

    After performing the above steps, your iPhone will automatically back up to iCloud each day provided your iPhone is plugged to power and connected to a Wi-Fi network.
    This means, you’ll have a new iCloud backup with the most latest apps and settings each day.

    Therefore, when you restore from iCloud you’ll have your iPhone with the most lately used settings again.

    How To Restore An iPhone From iCloud

    OK, now that your iPhone’s data is backed up to iCloud, you are ready to restore your new or reset iPhone from iCloud. Here are step-by-step instructions for how to restore a current
    iPhone that you are already using:

    1. Launch the Settings app.
    2. Now, tap General.
    3. Next, tap Reset.
    4. Next on, tap ‘Erase All Content and Settings’.
      On the Apps & Data screen, choose Restore from iCloud Backup.
    5. Enter your Apple ID to sign in so your phone can access your iCloud backups.
      Go to ‘Choose backup’, then choose the backup you want from a list of available
      backups in iCloud.

    And here are the instructions for how to restore iCloud backup on new iPhone:

    1. Switch on your new iPhone.
    2. From the Apps & Data screen, choose Restore from iCloud Backup.
    3. Enter your Apple ID to sign in so your phone can access your iCloud backups.
      Go to ‘Choose backup’, then choose the backup you want from a list of available
      backups in iCloud.

    After you’ve followed the above given steps, your iPhone will begin restoring from iCloud. It’s worth noting however, restoring from iCloud can take a while depending
    on the size of your iPhone backup. If your iPhone backup is quite a lot of gigabytes, it could take an hour or so.