Got a tip for us?

iPad

The iPad is a tablet computer from Apple that runs the iOS mobile operating system. Similar in functionality to the iPhone, the iPads purpose is often quite different, sometimes even serving as a general desktop computer replacement.

You can use Private Browsing Mode, view the Privacy Report, and adjust settings in the Safari app to keep your browsing activities private and help protect yourself from malicious websites.

Tabs you open in Private Browsing don’t appear in History on iPad or in the tab list on your other devices, even if you’re signed in to the same Apple Account. And if you have a passcode set, Private Browsing locks when it’s not in use.

Here’s how to browse the web privately in Safari on iPad.

Visit sites privately

Tabs you open with Private Browsing stay out of History on iPad and off the tab list on your other devices. Those tabs aren’t shared with your other Apple devices, even when you’re signed in to the same Apple Account.

With a passcode set on your iPad, Private Browsing locks whenever it’s not in use, but not always immediately.

  1. Open the Safari app on your iPad.
  2. Tap the Show Sidebar button, then tap Private.

    If you don’t see Private, tap the Back button at the top of the sidebar.

  3. Follow the directions onscreen to unlock Private Browsing.

    To exit Private Browsing, tap the Show Sidebar button, then tap a Tab Group. The websites you have open in Private Browsing stay open, and Private Browsing locks.

To allow Private Browsing to be locked, go to Settings > Apps > Safari, then turn on Require Passcode to Unlock Private Browsing, Require Face ID to Unlock Private Browsing (supported models), or Require Touch ID to Unlock Private Browsing (supported models).

Note: Any Safari extensions you have installed that have access to browsing data are automatically turned off in Private Browsing. To turn on an extension in Private Browsing, see Change Safari extension settings.

Choose a search engine for Private Browsing

  1. Open the Settings app on your iPad.
  2. Tap Apps, then tap Safari.
  3. Turn off Also Use in Private Browsing.
  4. Tap Private Search Engine, then choose a search engine.

View the Privacy Report

Safari helps stop trackers from following you across websites and seeing your IP address. To see a summary of the trackers Intelligent Tracking Prevention has encountered and prevented on the webpage you’re currently visiting, check the Privacy Report. In Safari settings, you can also make adjustments that keep your browsing private from other people who use the same device and help protect you from malicious websites.

  1. Open the Safari app on your iPad.
  2. Tap the Page Menu button and tap Privacy & Security.
  3. Tap Privacy Report.

Use iCloud Private Relay to browse the web with more privacy

When you subscribe to iCloud+, you can use iCloud Private Relay to help prevent websites and network providers from creating a detailed profile about you. When iCloud Private Relay is turned on, the traffic leaving your iPad is encrypted and sent through two separate internet relays. This prevents websites from seeing your IP address and exact location while it prevents network providers from collecting your browsing activity in Safari. See Protect your web browsing with iCloud Private Relay.

See Protect your web browsing with iCloud Private Relay to learn how to:

  • Turn iCloud Private Relay completely on or off for your iPad.
  • Turn iCloud Private Relay on or off for a specific Wi-Fi or cellular network.
  • Turn iCloud Private Relay off temporarily.
  • Set the specificity of your IP address location.

Note: iCloud Private Relay isn’t available in all countries or regions.

Temporarily allow a website to see your IP address

Some websites rely on IP filtering, monitoring, or rate-limiting and might need your IP address to be visible. For that website only, you can turn off iCloud Private Relay temporarily.

  1. Open the Safari app on your iPad.
  2. Go to the website.
  3. Tap the Page Menu button on the left side of the search field and tap Privacy & Security.
  4. Tap Show IP Address (if available).

    Your IP address remains visible to that website until you leave the website or close its Safari tab. iCloud Private Relay remains on for other websites.

To turn off or pause iCloud Private Relay for all websites, see Protect your web browsing with iCloud Private Relay.

Control privacy and security settings for Safari

  1. Open the Settings app on your iPad.
  2. Tap Apps, then tap Safari.
  3. Turn any of the following on or off:
    • Prevent Cross-Site Tracking: Safari limits third-party cookies and data by default. Turn this option off to allow cross-site tracking.
    • Hide IP address: Safari automatically protects your IP address from known trackers. For eligible iCloud+ subscribers, your IP address is protected from trackers and websites as you browse in Safari. If this option is off, your IP address isn’t hidden.
    • Fraudulent Website Warning: Safari displays a warning if you’re visiting a suspected phishing website. Turn this option off if you don’t want to be warned about fraudulent websites. (Not available in all countries or regions.)
    • Camera: Choose whether Safari websites can use your camera without asking you first. Tap Camera and choose Ask, Deny, or Allow.
    • Microphone: Choose whether Safari websites can use your microphone without asking you first. Tap Microphone, then choose Ask, Deny, or Allow.
    • Location: Choose whether Safari websites can use your location without asking you first. Tap Location and then choose Ask, Deny, or Allow.

To set exceptions for a specific website, open the website in the Safari app, tap the Page Menu button, tap Website Settings, then tap the setting you want to change below Website Settings For.

See also
Tags: iCloud, Safari

If you use a pointer device with iPad, you can adjust how it works with VoiceOver. You can set the pointer to ignore, follow, or move the VoiceOver cursor, and adjust the delay before VoiceOver speaks the item under the pointer. You can also make the pointer easier to see.

  1. Open Settings, tap Accessibility, and then tap VoiceOver.
  2. Below Pointer Control, tap any of the following:
    • Pointer: Set the pointer to ignore, follow, or move the VoiceOver cursor.
    • Speak Under Pointer: You can adjust the delay to speak the item under the pointer.

See also

If you can’t see your screen and your content includes audio descriptions, you can listen to an audio description—a separate audio track that narrates or describes the visual content of a clip, show, or movie. You can also get live descriptions of your surroundings.

  1. Open Settings, tap Accessibility, and then tap Audio Descriptions.
  2. Turn on Audio Descriptions.

See also

Even if VoiceOver is turned off, you can have iPad read text on the screen out loud. Have iPad read the entire screen or a specific selection, or hear what you type spoken out loud, character by character or word by word.

Accessibility Reader lets you read or listen to text in a full-screen view, with your own fonts, layouts, and background colors, and you can change how spoken content sounds.

Here’s how to hear iPad speak the screen, selected text, and typing feedback.

Have iPad speak onscreen text

  1. Start the Settings app on your iPad.
  2. Tap Accessibility and tap Read & Speak.
  3. Turn on and customize any of the following:

    • Accessibility Reader: Turn on Accessibility Reader to read or listen to text in a full-screen view, and customize fonts, layouts, and background colors. Turn on Autoplay if you want Accessibility Reader to automatically read text aloud.

      See Read or listen to text in apps with Accessibility Reader.

    • Speak Screen: Tap Speak Screen. Then turn on Speak Screen to have iPad read all text on the screen, then do any of the following:

      Highlighting: Customize the highlight style, color, and selection for in-app text that is spoken aloud.

      Show Controller: Turn on Show Controller to keep the Speak Screen controls on the screen.

      Controller Actions: Choose what happens when you long press or double-tap the screen. You can also reduce the size of the speech controller when you’re not using it.

    • Speak Selection: Turn on Speak Selection to have iPad speak the text you select. Customize the highlight style, color, and selection for in-app text that is spoken aloud.
  4. Do any of the following:

    • Hear selected text (if you turned on Speak Selection): Select the text you want spoken, then tap Speak.
    • Hear all text on the screen (if you turned on Speak Screen): Swipe down with two fingers from the top of the screen.

      Use the controls that appear to pause speaking, adjust the rate, navigate forward or back to the content you want to hear, or use Speak on Touch (tap the text you want iPad to read).

Siri: Ask Siri something like, “Speak screen.” Learn how to use Siri.

Change how spoken content sounds

  1. Start the Settings app on your iPad.
  2. Tap Accessibility and tap Read & Speak.
  3. Adjust any of the following:
    • Voices: Choose a voice and dialect.
    • Default Language: Choose a default language that iPad will speak.
    • Detect Languages: Turn on Detect Languages to have iPad automatically detect and speak multiple languages.
    • Speaking Rate: Drag the slider.
    • Pronunciations: Dictate or spell out how you want certain phrases to be spoken.

See also

With built-in accessibility features for vision on iPad, you can make it easier to see what’s on the screen, or hear what’s on the screen spoken out loud. You can even use your iPad as a magnifying glass, and hold it up to get descriptions of your surroundings.

With a mouse or trackpad, you can see a bigger version of any text you hover over, and make the pointer easier to see.

To explore accessibility features for vision, go to Settings > Accessibility. Vision features are at the top.

Hear what’s on the screen

Quick tip: Siri and Dictation let you complete common tasks and enter text with just your voice.

Get information about your surroundings

Make text and other onscreen content larger

  • Zoom in

    Enlarge what you’re viewing—the entire screen or one part of it.

    Zoom in on the iPad screen

  • Make text bigger and bolder

    Adjust the reading size for text across iPad apps and system features.

    Make text easier to read

  • Enlarge text as you type

    Display a separate window with a larger version of the text that you’re typing.

    Use Hover Typing

If you use a mouse or trackpad with iPad, you can also show a larger version of text when you hover over it or make the pointer easier to see.

View what’s on the screen more comfortably

See also

With VoiceOver, a gesture-based screen reader, you can use iPad even if you can’t see the screen. VoiceOver gives audible descriptions of what’s on your screen, so you can hear the battery level, who’s calling, or what item your finger is on. You can also customize the VoiceOver speaking voice to suit your needs.

As you touch the screen or drag your finger over it, VoiceOver speaks the name of the item your finger is on, including icons and text. You use VoiceOver gestures to interact with an item, such as a button or link, or to move to another item.

When you go to a new screen, VoiceOver plays a sound, then selects and speaks the name of the first item on the screen, typically in the top-left corner. It also tells you when the screen changes to landscape or portrait orientation, when the screen becomes dimmed or locked, and what’s active on the Lock Screen when you wake iPad.

Turn VoiceOver on or off

Important: VoiceOver changes the gestures you use to control iPad. When VoiceOver is on, you must use VoiceOver gestures to operate iPad.

To turn VoiceOver on or off, you can do any of the following:

  • Go to Settings > Accessibility > VoiceOver, then turn VoiceOver on or off.
  • Use Control Center if you’ve added VoiceOver there.
  • Use the Accessibility Shortcut if you’ve set it up to turn on VoiceOver.

Siri: Ask Siri something like, “Turn on VoiceOver.” Learn how to use Siri.

Siri knows when VoiceOver is on and often reads more information back to you than appears on the screen. You can also use VoiceOver to read what Siri shows on the screen.

Use an interactive tutorial to learn VoiceOver

To learn VoiceOver basics and practice essential gestures, try the interactive VoiceOver Tutorial.

With VoiceOver turned on, go to Settings > Accessibility > VoiceOver, then tap VoiceOver Tutorial to get started.

Practice VoiceOver gestures

In the VoiceOver Practice area, you can safely try out VoiceOver gestures and hear what they do, all without performing any action or otherwise affecting iPad.

Try different techniques to discover which works best for you. If a gesture doesn’t work, try a quicker movement, especially for a double tap or swipe gesture. To swipe, try brushing the screen quickly with your finger or fingers. For best results using multifinger gestures, touch the screen with some space between your fingers.

  1. Open Settings, tap Accessibility, and then tap VoiceOver.
  2. Turn on VoiceOver, tap VoiceOver Practice, and then double-tap to start.
  3. Practice the following gestures with one, two, three, and four fingers:
    • Tap
    • Double tap
    • Triple tap
    • Swipe left, right, up, or down
  4. When you finish practicing, tap Done. Then double-tap to exit.

See also

In the Magnifier app, you can use your iPad like a magnifying glass to zoom in on text or objects around you. With Apple Intelligence, you can also use Ask Magnifier to get information about your surroundings.

You can freeze the frame temporarily, switch between your default controls and custom activities, and get information about your surroundings.

Here’s how to magnify or get information about things around you with Magnifier on iPad.

Note: Apple Intelligence on iPadOS 27 or later is available on an Apple Intelligence-enabled iPad mini (A17 Pro) and iPad models with M1 or later. Apple Intelligence is not available in all languages or regions. Usage limits may apply.*

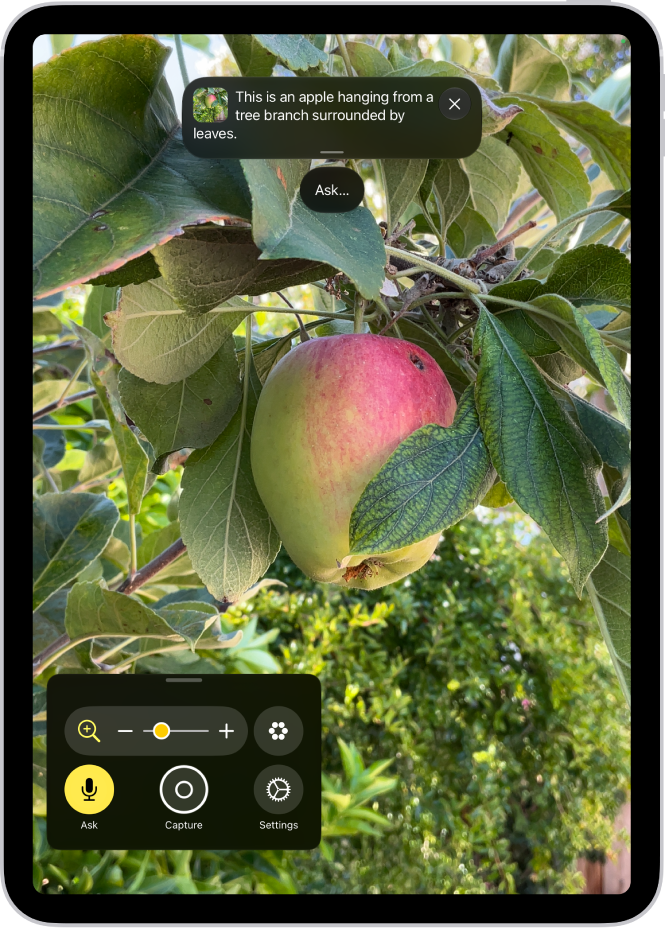
The Magnifier app showing a close-up of an unripe apple.

Magnify nearby text or objects

  1. Start the Magnifier app on your iPad.
  2. Point the iPad camera at the text or object you want to magnify. Then drag the slider to zoom in or out.
  3. You can also use any of the following default controls:
    • Tap the Activities button to switch between your default controls and custom sets of controls you’ve defined for recurring tasks or situations (called activities). See Set your preferred controls for an activity.
    • Tap the Ask button to get information about your surroundings.
    • Tap the Freeze frame button to temporarily freeze the frame.
    • Tap the Settings button to add more controls, including Get live descriptions of your surroundings, or edit activities you’ve created.

Quick tip: You can set up a shortcut that quickly opens Magnifier from Control Center or by clicking an iPad button. See our guide, Quickly turn accessibility features on or off.

Ask questions and get information about your surroundings

Apple Intelligence can describe your surroundings and answer questions about what your camera sees, such as the total on a bill or the color of a shirt. And you can set a default question that is answered automatically.

  1. Start the Magnifier app on your iPad.
  2. Point the iPad camera at the text or object you want to see, tap the Ask button. Do one of the following:
    • Select a default question: Select What is this? or a default question you created in your Ask Magnifier settings.
    • Type or speak a question: Select Type or Speak and then ask a question about your surroundings.

Temporarily freeze the frame

You can capture what’s in the frame temporarily, without saving it to Photos.

  1. Start the Magnifier app on your iPad.
  2. Tap the Capture button and then do one of the following:

    • Take one or more photos: Press and hold the Capture button and then select Single Photo or Multi-Photo to take a photo or multiple photos.

      If you select Multi-Photo, you’ll see a group of photos in the bottom right corner of the screen.

    • Capture text and reframe it: Press and hold the Capture button and then select Document. Follow the written and spoken instructions to get the text in frame or drag the corners of the box that appear around the text and then tap Confirm.

      After you tap Confirm, tap the Reader button to view the text with Accessibility Reader. See view your captured text in a format for easier reading or to listen to your captured text.

    • Customize and listen to text: If you’re magnifying text, tap the Reader button to view your captured text in a format for easier reading or to listen to your captured text.
    • Share captured images: Tap the Share button for more options, such as sharing the captured frame or saving it to your photos.
    • Stop viewing captured images: Tap the Close button to unfreeze the frame and return to the live Magnifier lens.

To reset Magnifier, press and hold the Capture button anytime and select Document, Multi-Photo, or Single-Photo.

View your captured text in a format for easier reading

When a frame you magnify contains text, you can switch to a format adapted for easier reading and even adjust its fonts, layouts, and background colors.

  1. Start the Magnifier app on your iPad.
  2. Tap the Capture button to capture the frame and then tap the Reader button.

    Magnifier alerts you if no text is detected in the frame you captured.

  3. Tap the More button, then tap Customize Reader.
  4. Select a theme, then tap Edit.
  5. Do any of the following:

    • Text Color: Choose a color or tap Custom Color.
    • Background Color: Choose a color or tap Custom Color.
    • Text Size: Drag the slider left or right to make the text smaller or larger.
    • Font: Choose a font.
    • High Legibility Characters: Turn on High Legibility Characters.

      Note: This option is only available when using System Font.

    • Bold Text: Turn on Bold Text.
    • Line Spacing: Choose the Default button, the Loose button, or the Open button to customize the space between lines.
    • Word Spacing: Choose the Default button, the Loose button, or the Open button to customize the space between words.
    • Character Spacing: Choose the Default button, the Loose button, or the Open button to customize the space between characters.
    • Readable Content Width: Choose the Default button, the Loose button, or the Open button to customize the text width.
    • Hyperlinks: Turn Show Links on or off. When turned on, you can customize the color.
    • Playback: Turn Highlighting on or off. When turned on, you can customize the style or highlight color.
    • Rename: Enter a name for the settings you choose.
    • Reset to Default: Reset all themes to their default settings.

      Tip: Rename a theme with your custom settings so you can easily find it and reuse it later.

To customize the text in apps, there’s also Accessibility Reader. Check out our article, Read or listen to text in apps with Accessibility Reader on iPad.

Listen to your captured text

  1. Start the Magnifier app on your iPad.
  2. Tap the Capture button to capture the frame and then tap the Reader button.

    Magnifier alerts you if no text is detected in the frame you captured.

  3. Do any of the following:

    • Listen to the text: Tap the Play button.
    • Pause the text: Tap the Pause button.
    • Skip backward or forward: Tap the Rewind button or the Forward button.
    • Increase or decrease the speed: Tap the Speaking Rate One Times button. Then select a speed.
    • Go to a specific time: Drag the slider left or right.

      Note: You can hide or show audio controls: Tap the More button, then tap the Hide Audio Controls button.

Get live descriptions of your surroundings

Detection Mode in the Magnifier app on iPad can help if you’re blind or have low vision: it scans your surroundings and gives you live descriptions, as text or speech, of the scenes detected in the camera view.

Important: Detection Mode should not be relied on in high-risk or emergency situations, in circumstances where you may be harmed or injured, or for navigation.

  1. Start the Magnifier app on your iPad.
  2. Tap the Detection Mode button to start Detection Mode.

    If you don’t see the Detection Mode button, you can add it. See Customize controls.

  3. Touch and hold the Detection Mode button and select Scenes. Then do any of the following:

  4. To temporarily pause detection, double-tap the screen with two fingers. Double-tap again with two fingers to resume detection. To stop Detection Mode, tap the Detection Mode button.

With VoiceOver, you can turn on Live Recognition from any screen on iPad, then get descriptions of your surroundings without opening the Magnifier app. See our guide, Get live descriptions of your surroundings with VoiceOver.

*Apple Intelligence is available with Siri and device language set to Chinese (Simplified), Chinese (Traditional), Danish, Dutch, English, French, German, Italian, Japanese, Korean, Norwegian, Portuguese, Spanish, Swedish, Turkish, or Vietnamese. Some features may not be available in all regions or languages. Some devices may not be available in all regions. Siri AI is available in beta in iOS 27, iPadOS 27, macOS 27, watchOS 27, and visionOS 27 and requires an Apple Intelligence–enabled device set to a supported language. Available in English to start. Siri AI will not be initially available in the EU on iOS, iPadOS, and watchOS. Certain Apple Intelligence features that rely on server-side models are subject to daily usage limits, including but not limited to Siri AI, Intelligent Photo Editing Tools, Image Playground, and AFM 3 Cloud models in Shortcuts. Daily limits may vary by feature, request complexity, system demand, system policies, and other factors. Expanded access to such features will be available for a fee in the future. Use of these features is subject to the Apple Intelligence Terms and Conditions.

See also

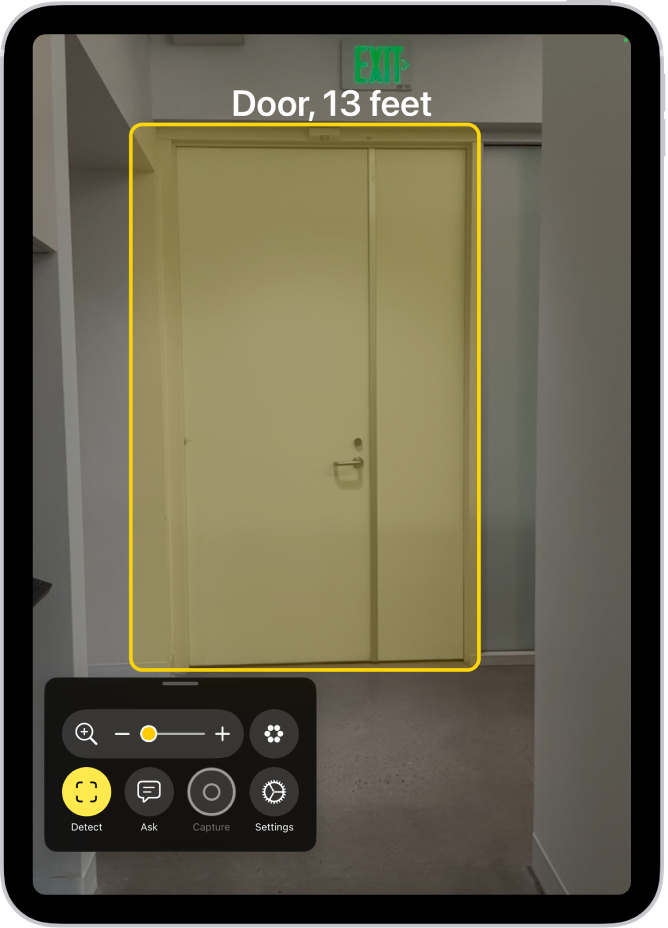
Magnifier’s Detection Mode uses sound and speech feedback to describe what’s around you if you’re blind or have low vision, but you won’t hear it with Silent mode on. The Magnifier app on iPad can give you helpful information about:

  • Doors, including their attributes and how to open them
  • People, and how close they are to help you maintain physical or social distance
  • Furniture, when chairs or sofas are detected, and whether they’re occupied

Important: Detection Mode should not be relied on in high-risk or emergency situations, in circumstances where you may be harmed or injured, or for navigation. Detection of doors, people, and furniture is only available on supported iPad models.

The Magnifier app is open and a door is being detected. A description shows how far away the door is.

Detect doors, people, and furniture near you

  1. Start the Magnifier app on your iPad.
  2. Tap the Detection Mode button to start Detection Mode.

    If you don’t see the Detection Mode button, you can add it. See Customize controls.

  3. Touch and hold the Detection Mode button, then select any of the following:

    • People
    • Furniture
    • Doors
  4. Position iPad so the rear camera can detect your surroundings. When doors, people, or furniture are detected nearby, you’re notified with sounds or speech feedback. The feedback becomes more frequent as you get closer.

    If you don’t hear sound or speech feedback, make sure Silent mode isn’t on. See Adjust the volume.

  5. To temporarily pause detection, double-tap the screen with two fingers. Double-tap again with two fingers to resume detection. To stop Detection Mode, tap the Detection Mode button.

Customize the settings for detecting doors

  1. Start the Magnifier app on your iPad.
  2. Tap the Settings button and then tap Detect.
  3. Tap Doors and then customize any of the following:
    • Units: Choose Meters or Feet.
    • Sound pitch distance: Tap the Decrement button or the Increment button to adjust the distance for sound feedback. When a door is detected within this distance, the pitch of the sound feedback increases.
    • Feedback: Turn on any combination of Labels, Sounds, and Speech. If you turn on Speech, iPad speaks the distance between you and the door.
    • Color: Select a color to outline detected doors.
    • Door Attributes: Turn on any combination of door attributes, such as the size of the detected door, how to open the door, and if the door is currently open.
    • Door Decorations: Turn on Door Decorations to get information about text and signs on or near the detected door, such as a sign for an accessible entrance or a restroom.
  4. When you’re finished, tap the Back button, tap it again, and tap the Done button.

Customize the settings for detecting people

  1. Start the Magnifier app on your iPad.
  2. Tap the Settings button and then tap Detect.
  3. Tap People and then customize any of the following:
    • Units: Choose Meters or Feet.
    • Sound pitch distance: Tap the Decrement button or the Increment button to adjust the distance for sound feedback. When people are detected within this distance, the pitch of the sound feedback increases.
    • Feedback: Turn on any combination of Labels, Sounds, and Speech. If you turn on Speech, iPad speaks the distance between you and another person.
    • People Detection Actions: Turn on People Detection Actions to get information about people holding doors near you.
  4. When you’re finished, tap the Back button, tap it again, and tap the Done button.

Customize the settings for detecting furniture

  1. Start the Magnifier app on your iPad.
  2. Tap the Settings button and then tap Detect.
  3. Tap Furniture, then customize any of the following:
    • Units: Choose Meters or Feet.
    • Sound pitch distance: Tap the Decrement button or the Increment button to adjust the distance for sound feedback. When furniture is detected within this distance, the pitch of the sound feedback increases.
    • Feedback: Turn on any combination of Labels, Sounds, and Speech. If you turn on Speech, iPad speaks the distance between you and the furniture.
    • Announce Seat Occupancy: Turn on Announce Seat Occupancy to get information about the number of people occupying chairs and sofas.
  4. When you’re finished, tap the Back button, tap it again, and tap the Done button.

See also

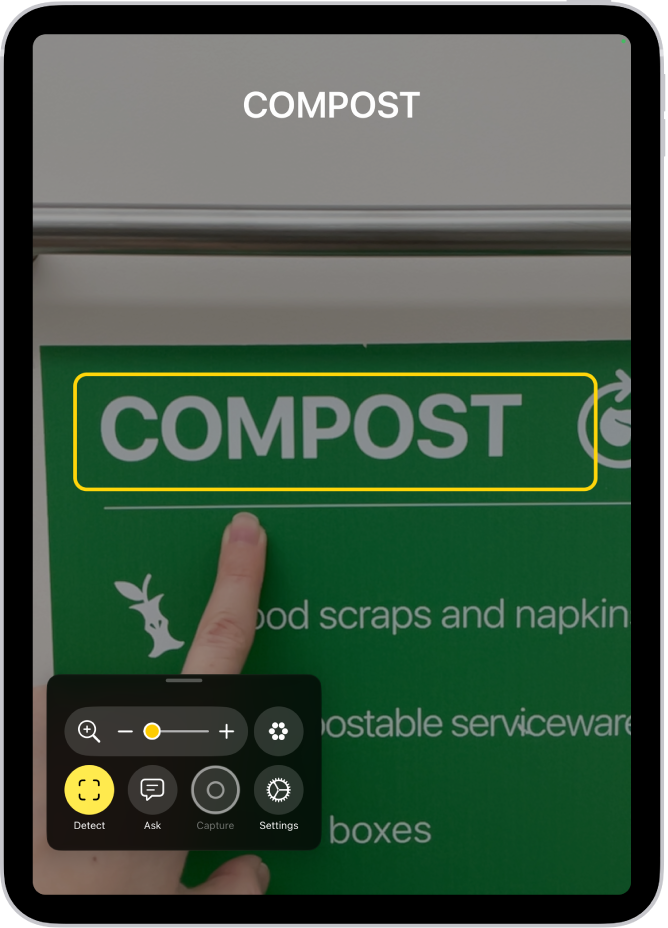
If you’re blind or have low vision, you can use the Magnifier app to aim your iPad camera at nearby text and have it spoken out loud. You can even point your finger at the specific text you want spoken.

Text in the field of view of your camera is detected and read out loud, and you can add the Detection Mode button if you don’t see it. Point and Speak isn’t available in all languages, though.

Here’s how to detect text around you using Magnifier on iPad.

Important: Detection Mode should not be relied on in high-risk or emergency situations, in circumstances where you may be harmed or injured, or for navigation. Text Detection and Point and Speak aren’t available in all languages.

The Magnifier app detecting a finger pointing at text on a sign.

Detect text in the camera frame and have it read out loud

Point your iPad camera at text, and the Magnifier app can detect text in the field of view and have it read out loud.

  1. Open the Magnifier app on your iPad.
  2. Tap the Detection Mode button to start Detection Mode.

    If you don’t see the Detection Mode button, you can add it. See Customize controls.

  3. Touch and hold the Detection Mode button and then make sure Text is selected.
  4. Position iPad so the rear camera can detect text around you.

    If you don’t hear sound or speech feedback, make sure Silent mode isn’t on. See Adjust the volume.

  5. To temporarily pause detection, double-tap the screen with two fingers. Double-tap again with two fingers to resume detection. To stop Detection Mode, tap the Detection Mode button.

Point your finger at text to have it spoken

With the Magnifier app, you can point your finger at text near you, and your iPad speaks it out loud. That’s especially helpful with objects that have text labels, like dials, buttons, or keypads on household appliances or ATMs, or a digital screen at a grocery store self-checkout.

  1. Open the Magnifier app on your iPad.
  2. Tap the Detection Mode button to start Detection Mode.

    If you don’t see the Detection Mode button, you can add it. See Customize controls.

  3. Touch and hold the Detection Mode button. Make sure Point & Speak is selected.
  4. Position iPad so the rear camera can detect the text. Then point your finger to identify which text to read.

    If you don’t hear sound or speech feedback, make sure Silent mode isn’t on. See Adjust the volume.

  5. To temporarily pause detection, double-tap the screen with two fingers. Double-tap again with two fingers to resume detection. To stop Detection Mode, tap the Detection Mode button.

Customize settings for Text Detection or Point & Speak

  1. Open the Magnifier app on your iPad.
  2. Tap the Settings button, then tap Detect. To detect text in other languages, turn on Detect Languages.
  3. Tap Text or Point & Speak, then customize any of the following:

    • Detection Feedback: Turn on any combination of Labels and Speech. For Point & Speak, you can also turn on Sound feedback.
    • Location: For Point & Speak, tap Under (to read text under your fingertip) or Above (to read text directly above your finger).
    • Automatic Flashlight: When your environment is too dark to detect text, have Magnifier turn the flashlight on for 10 seconds.

      Note: This option is available on iPad models with True Tone Flash.

    • Border and Color: For Point & Speak, outline the text you’re pointing to in a color of your choice.
  4. To return to the live Magnifier lens, tap the Back button, tap it again, and then tap the Done button.

Text Detection and Point & Speak both work with VoiceOver. To get started, check out our guide, Turn on and practice VoiceOver.

See also

You can choose different color, text size, and motion settings for certain apps or for the Home Screen and App Library. You just add an app from the list, then change its settings. You can also change display colors, make text easier to read, and customize onscreen motion.

  1. Open Settings, tap Accessibility, and then tap Per-App Settings.
  2. Tap Add App. Then choose an app from the list (or Home Screen & App Library).
  3. Tap the name of the app (or Home Screen & App Library) to access its settings.

See also