Got a tip for us?

iPad

The iPad is a tablet computer from Apple that runs the iOS mobile operating system. Similar in functionality to the iPhone, the iPads purpose is often quite different, sometimes even serving as a general desktop computer replacement.

You can get travel directions using the Maps app, the Maps widget, Siri, or other devices. You can also get them on your Mac before you leave.

Maps can speak turn-by-turn directions as you travel, whether you’re driving, cycling, or walking, and Siri can get directions for you so you stay focused on the road. To get directions, iPad must be connected to the internet, with Location Services turned on.

Important: To get directions, iPad must be connected to the internet, and Location Services must be turned on. On Wi-Fi + Cellular models, cellular data rates may apply. See View or change cellular data settings.

Get directions

  1. Open the Maps app on your iPad.
  2. Touch and hold anywhere on the map or enter a location in the search field. You can search for any of the following, for example:
    • An intersection (“8th and Market”)
    • An area (“Greenwich Village”)
    • A landmark (“Guggenheim”)
    • A zip code (“60622”)
    • A business (“movies,” “restaurants San Francisco CA,” “Apple Inc New York”)
    • A request or question (“Find cafes with free Wi-Fi”)
  3. Tap Directions or the Travel Mode button (driving, walking, transit, or cycling).
  4. Do one of the following:
    • If your starting point is My Location: Tap Go for the route you want to take. As you travel along your route, Maps speaks turn-by-turn directions to your destination.
    • If your starting point is another location: Tap Steps for the route you want to take.
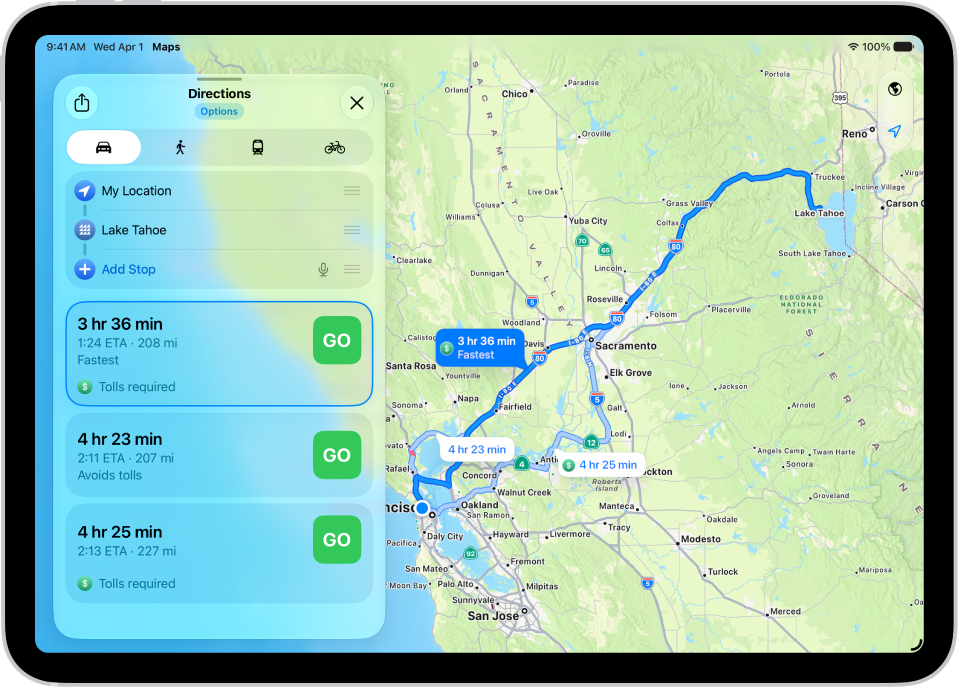
An iPad showing a map with several driving route options to the same destination. Each route shows the estimated time and distance, and a Steps button to see detailed directions. Color coding on each route indicates traffic conditions.

Use the Maps widget

If you add the Maps widget, you can get directions to a likely destination right from the Home Screen or Today View.

Use Siri to get directions

Using Siri to get directions helps you keep focused on the road, and turn-by-turn spoken directions let you follow driving, cycling, and walking directions without even glancing at your iPad.

Siri: Ask Siri something like, “Find a charging station.” Learn how to use Siri.

Send directions from your Mac to your iPad

Plan your route on your Mac before a big trip or a day of cycling, and share the details to your iPad. Both your Mac and your iPad need to be signed in to the same Apple Account.

  1. Go to the Maps app on your Mac.
  2. Create a route for your trip.
  3. Choose File > Share > Send to [your device].

Handoff can send directions from iPad to Mac, too. Read our article, Hand off tasks between iPad and your other devices.

Siri: You can use Siri to get directions and stay focused on the road. For example, ask Siri something like, “Find a charging station” or “Give me directions home.” See Use Siri to get directions.

See also

Tag: Maps

You can get detailed transit directions to your destination, including departure times, connections, and fares.

Fares are listed for suggested routes in some countries and regions. By default, they reflect the cost with a transit card, though you can see the cash fare instead. You can also plan for a future departure or arrival time, and Siri can give you transit directions, too.

Here’s how to get transit directions in Maps on iPad.

Note: Public transportation information isn’t available in all countries or regions.

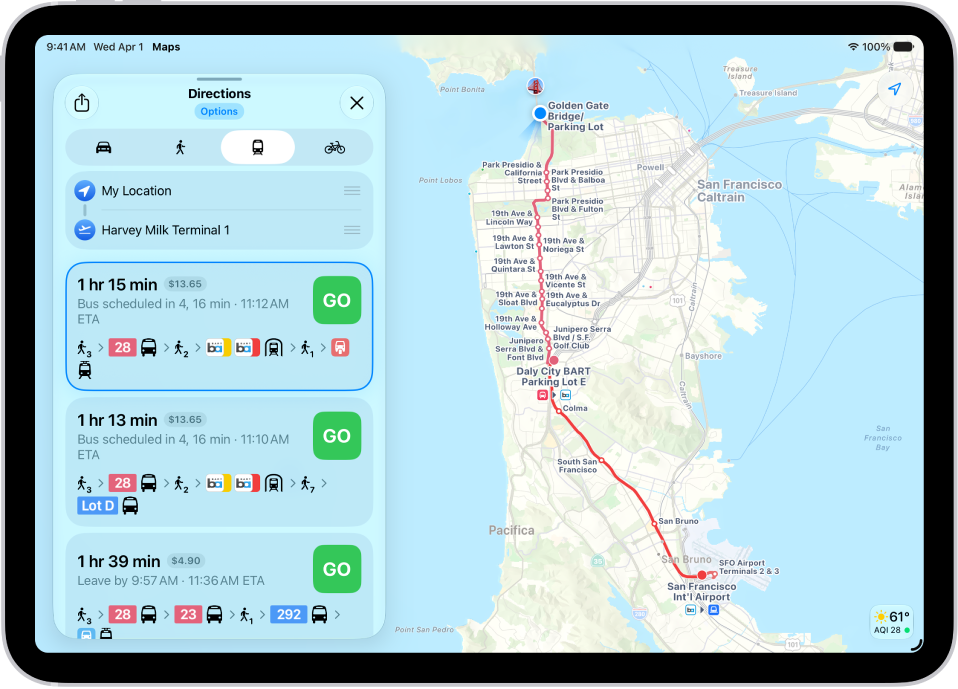
A map showing a transit route. A route card on the left shows Go buttons for several options for the route.

Get transit directions

  1. Go to the Maps app on your iPad.
  2. Touch and hold anywhere on the map or enter an address in the search field and then tap the directions button.

    If your preferred travel mode isn’t Transit, tap the directions button, then tap the Travel Mode button.

  3. Tap Go or Steps for the route you want to take.
  4. To see only the schedules of your preferred transit method, tap Options (below Directions) and then turn off any type you don’t want to use.

Siri: You can also ask Siri something like, “Give me transit directions to the Ferry Building.” Learn how to use Siri.

Plan for a future departure or arrival time

  1. Open the Maps app on your iPad.
  2. Get transit directions, as above.
  3. Tap Options (below Directions), tap Leave at or Arrive by, select a time and date, and then tap the Done button.

Show cash or transit card fares

Suggested routes list fares in some countries and regions. By default, fares reflect the cost of using a transit card, though you can see the cash fare instead.

  1. Open the Maps app on your iPad.
  2. Get transit directions, as above.
  3. Tap Options (below Directions), tap Cash Fares, and then tap the Done button.
  4. To redisplay the fares when using transit cards again, tap Cash Fares, tap Transit Card Fares, and then tap the Done button.

Get schedules for local transit

You can get one-tap access to the departure times for stops and stations near you.

  1. Open the Maps app on your iPad.
  2. Swipe up on the search field, swipe right on the icons below Places, and then tap the Add button.
  3. Tap Nearby Transit to add it to your Places.
  4. Below Places, tap Transit and tap a nearby stop to see schedules and delays.

    Tip: Touch and hold a line, then tap Pin to put it at the top of the list.

See major transit lines

  1. Open the Maps app on your iPad.
  2. With a map showing, tap the Map Modes button, which appears as the Exploring Map Mode button, the Driving Map Mode button, the Transit Map Mode button, or the Satellite Map Mode button on the right.
  3. Select Transit and then tap the Close button.

See also

Tag: Maps

While following driving, cycling, transit, and walking directions, you can get an overview of your route and a list of upcoming turns.

On an iPad with Wi-Fi + Cellular, you’re able to zoom out and see the whole route onscreen from start to finish, or see the directions in a list instead. You can also share a route with someone in the Maps app, and return to turn-by-turn directions anytime.

Note: Features for Wi-Fi + Cellular models require a cellular data plan and Cellular Data turned on in Settings > Apps > Maps. See View or change your cellular data.

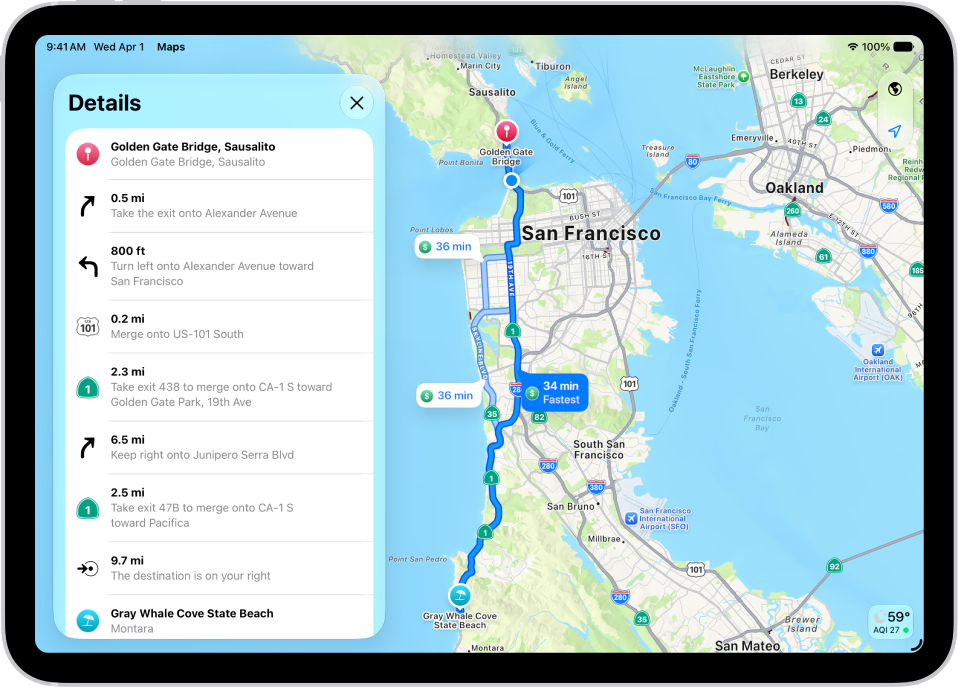
A map showing three options for routes and a detailed list of steps to get to a destination with the fewest turns.

Get an overview of your route

If you’ve got an iPad with Wi-Fi + Cellular, zooming out shows your entire route onscreen, from the starting point to the destination.

  1. Go to the Maps app on your iPad.
  2. Get directions.
  3. Tap the Overview Mode button.

To return to turn-by-turn directions, tap the Turn-by-Turn Mode button.

View a list of upcoming directions

Directions can also appear in a list on an iPad with Wi-Fi + Cellular.

  1. Open the Maps app on your iPad.
  2. Get directions.
  3. Tap anywhere on the route card except the Go button.
  4. Scroll down to see more directions.
  5. When you’re finished, tap the Close button.

Share a route with someone

  1. Open the Maps app on your iPad.
  2. Get directions.
  3. Tap anywhere on the route card except the Go button.
  4. Scroll to the bottom of the card and tap Share. Then choose a way to share the route.
  5. Tap Done.

See also

Tag: Maps

After you pair AirPods (sold separately) with iPad, you can use AirPods to listen to audio playing on iPad, make and answer FaceTime calls, listen and respond to messages, and more. They also pair automatically with your other supported devices signed in to the same Apple Account.

Pair AirPods with your iPad

  1. On iPad, open Settings, tap Bluetooth, and then turn on Bluetooth.
  2. Go to the Home Screen on your iPad.
  3. Do one of the following:

    • AirPods (1, 2, and 3) and AirPods Pro: Open the case with your AirPods inside, then hold it next to your iPad.
    • AirPods Max: Take your AirPods Max out of the Smart Case and then hold AirPods Max next to your iPad.
  4. Follow the onscreen instructions, then tap Done.

    Note: If onscreen instructions for pairing your AirPods Max don’t appear, go to Settings > Bluetooth, then select your AirPods Max. If the status light doesn’t flash white on AirPods Max, press and hold the noise control button until it does.

AirPods pair automatically with all of your supported devices signed in to the same Apple Account, as long as they’re running iPadOS 13, iOS 10, watchOS 3, macOS 10.12, or later.

See also

Tag: AirPods

You can set a maximum decibel level to ensure that headphone audio doesn’t become uncomfortable for you. iPad analyzes your headphone audio and reduces any sound above this level, and you can also check whether the current audio level is OK or loud with a headphone level meter.

AirPods, EarPods, and many other wired and wireless headphones work with Hearing in Control Center, and you can improve the accuracy of audio measurements for third-party Bluetooth headphones.

Reduce loud headphone sounds in Settings

  1. Open Settings, tap Sounds & Haptics, tap Headphone Safety, and then tap Reduce Loud Audio.
  2. Turn on Reduce Loud Sounds, then drag the slider.

Note: Once you’ve set up Screen Time for a family member, you can stop them from changing their Reduce Loud Sounds level. To do that, go to Settings > Screen Time > Content & Privacy Restrictions > Reduce Loud Sounds and select Don’t Allow.

Check your headphone level while you listen

Hearing in Control Center can check the current decibel level of headphones you’re using with iPad. It works with AirPods, EarPods, and many other wired and wireless headphones.

  1. Open Control Center. Then touch and hold in the Control Center area.
  2. Tap Add a Control and tap the Hearing Devices button.

    The audio level (in decibels) of your headphones is displayed on the Headphone Level meter.

Note: Scroll below the Headphone Level meter, and you can turn Live Listen on or off there, too. Read our guide, Use iPad as a remote microphone with Live Listen. You usually won’t use headphone level monitoring and Live Listen at the same time: The Headphone Level monitor is meant for listening to audio playback, and Live Listen is meant for listening to external sounds with the iPad microphone.

Improve the accuracy of audio measurements for third-party Bluetooth headphones

Classify your Bluetooth® devices as headphones, speakers, or other devices.

  1. Open Settings, tap Bluetooth, and then tap the information button next to the name of the device.
  2. Tap Device Type, then choose a classification.

Connecting AirPods, EarPods, or other compatible headphones to your iPad automatically sends the headphone audio levels to iPad. Apple or Beats headphones give the most accurate headphone audio measurements, while audio played through other headphones can be estimated based on your iPad’s volume.

See also

Tag: AirPods

You can use EarPods with Lightning Connector (sold separately) to listen to music and videos, and make calls on an iPad model with a Lightning port. EarPods feature a microphone, volume buttons, and the center button.

You can use the center button to answer and end calls, control audio and video playback, and use Siri, even when iPad is locked. With it, you can pause, skip forward, skip backward, or fast-forward, and switch to an incoming or on-hold call.

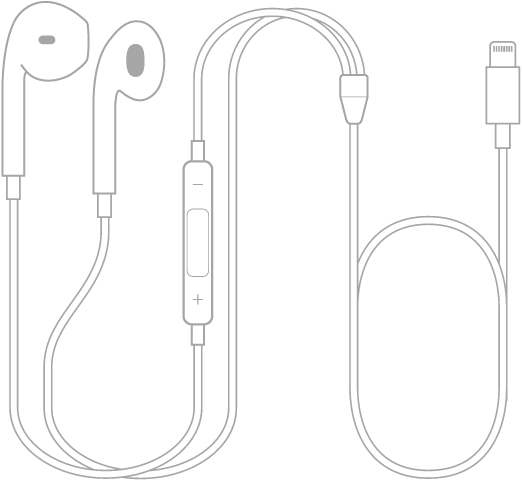
EarPods with Lightning Connector.

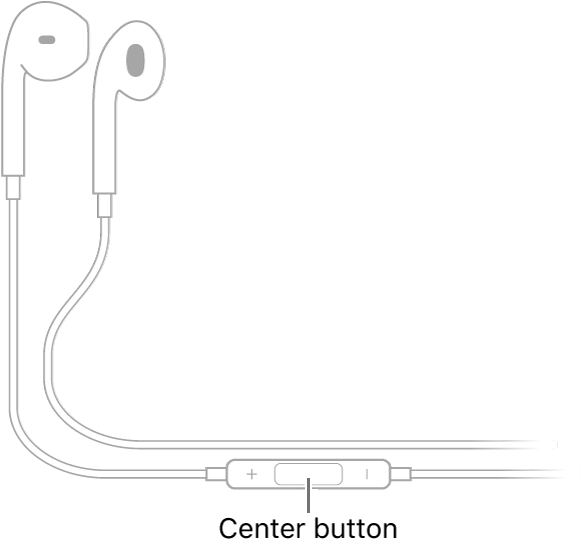
Apple EarPods; the center button is located on the cord leading to the earpiece for the right ear.

Control audio with your EarPods

  • Pause: Press the center button. Press again to resume playback.
  • Skip forward: Press the center button twice quickly.
  • Skip backward: Press the center button three times quickly.
  • Fast-forward: Press the center button twice quickly and hold.

Manage calls using your EarPods

  • Answer an incoming call: Press the center button.
  • End the current call: Press the center button.
  • Switch to an incoming or on-hold call, and put the current call on hold: Press the center button. Press again to switch back to the first call.

Ask Siri with your EarPods

Press and hold the center button until you hear a beep. Let go, then ask Siri to perform a task or answer your question. See Turn on and activate Siri on iPad.

See also

Tag: AirPods

You can open and use a website as if it’s an app. The web app gets its own icon on your Home Screen, only on the device where you add it, and it opens just like an app. You can even receive notifications from the web app and quit it like any app.

  1. Go to the Safari app on your iPad.
  2. While viewing the website, tap the Share button, tap View More, and then tap Add to Home Screen.
  3. Turn on Open as Web App.
  4. Tap Add.

An icon for the web app is added to your Home Screen. When you tap the icon, the website opens just like an app. You can receive notifications from the web app and quit the web app like you would any app.

See also

Tag: Safari

You can bookmark websites, organize your bookmarks, or add a website icon to the Home Screen to easily revisit it later.

You can bookmark all your open tabs at once, organize bookmarks in folders, and see your Mac bookmarks on iPad. With Apple Intelligence, bookmarks can even be organized into suggested topics automatically. You can create new folders, too, and move bookmarks into them.

Here’s how to bookmark a website in Safari on iPad.

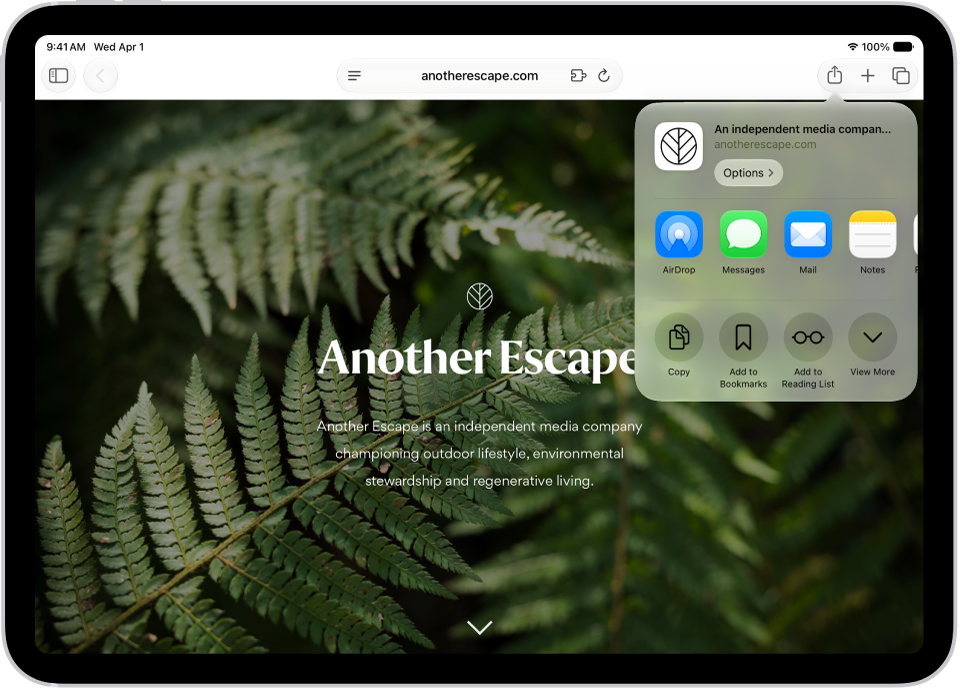
An open webpage. The Share button has been tapped, showing options for AirDrop, Messages, Mail, Notes, Copy, Add to Bookmarks, Add to Reading List, and More.

Bookmark a website

  1. Go to the Safari app on your iPad.
  2. Go to the website you want to bookmark.
  3. Tap the Page Menu button and then tap Add Bookmark to.
  4. Choose a location and tap Save.

Bookmark open tabs

  1. Start the Safari app on your iPad.
  2. Tap the Tabs button to view all your tabs.
  3. Tap the More button. Tap Add Bookmarks for [number of] Tabs.

View and organize your bookmarks

  1. Start the Safari app on your iPad.
  2. Tap the Show Sidebar button and then tap Bookmarks (below Saved).

    Recently saved bookmarks, folders, and bookmarks list items appear at the top of the sidebar. The newest is on the left, and you can scroll through the others. Touch and hold a bookmark to copy, open, edit, or delete it.

    Tip: With Apple Intelligence, bookmarks and items you add to your Reading List are automatically organized into suggested topics if three or more of them are related. Tap a topic to view thumbnails, then tap a thumbnail to open it.

  3. Do any of the following:

    • Create a new folder: Tap the More button, tap New Folder, enter a name, and tap Save.
    • Move a bookmark into a folder: Tap the More button, tap Select Bookmarks and touch and hold the Reorder button. Then drag the bookmark to a folder. Tap the Done button to return to your bookmarks.
    • Delete a bookmark: Touch and hold the bookmark and then tap Delete.
    • Rename a bookmark: Touch and hold the bookmark, tap Edit, enter a new name, and then tap Save.
    • Reorder bookmarks: Tap the More button, tap Select Bookmarks, touch and hold the Reorder button, and then drag the bookmark to a new location. Tap the Done button to return to your bookmarks.

Note: Apple Intelligence on iPadOS 27 or later is available on an Apple Intelligence-enabled iPad mini (A17 Pro) and iPad models with M1 or later. Apple Intelligence is not available in all languages or regions. Usage limits may apply.*

See your Mac bookmarks on iPad

  1. Start the Settings app on your iPad.
  2. Tap your name, then tap iCloud.
  3. Tap See All (next to Saved to iCloud) and then make sure Safari is turned on.

Note: Your Mac also needs Safari turned on in iCloud settings, and it’s got to be signed in to the same Apple Account.

Add a website icon to the Home Screen

You can add a website icon to your iPad Home Screen for quick access.

  1. Start the Safari app on your iPad.
  2. While viewing the website, tap the Share button, tap View More, and then tap Add to Home Screen.

    You can turn on Open as Web App to use the website as if it’s an app. See Turn a website into an app.

  3. Tap Add.

    The icon appears only on the device where you add it.

Note: Some websites may ask whether they can send you notifications, and you can change your notification settings at any time. Read our guide, Change notification settings.

*Apple Intelligence is available with Siri and device language set to Chinese (Simplified), Chinese (Traditional), Danish, Dutch, English, French, German, Italian, Japanese, Korean, Norwegian, Portuguese, Spanish, Swedish, Turkish, or Vietnamese. Some features may not be available in all regions or languages. Some devices may not be available in all regions. Siri AI is available in beta in iOS 27, iPadOS 27, macOS 27, watchOS 27, and visionOS 27 and requires an Apple Intelligence–enabled device set to a supported language. Available in English to start. Siri AI will not be initially available in the EU on iOS, iPadOS, and watchOS. Certain Apple Intelligence features that rely on server-side models are subject to daily usage limits, including but not limited to Siri AI, Intelligent Photo Editing Tools, Image Playground, and AFM 3 Cloud models in Shortcuts. Daily limits may vary by feature, request complexity, system demand, system policies, and other factors. Expanded access to such features will be available for a fee in the future. Use of these features is subject to the Apple Intelligence Terms and Conditions.

See also

Tag: Safari

You can add websites to Favorites, edit favorites, and show the Favorites bar in Safari on your iPad.

You can copy, open, delete, rename, or reorder a favorite, and recently saved favorites appear at the top of the sidebar. The newest is on the left. You can even show only an icon for a webpage in the Favorites bar.

Here’s how to bookmark a website as a favorite in Safari on iPad.

An open webpage. The Share button has been tapped, showing options for AirDrop, Messages, Mail, Notes, Copy, Add to Bookmarks, Add to Reading List, and More.

Add a website to Favorites

  1. Go to the Safari app on your iPad.
  2. Go to the website.
  3. Tap the Share button to the right of the search field and tap View More. Tap Add to Favorites.

Edit favorites

  1. Open the Safari app on your iPad.
  2. Tap the Show Sidebar button and then tap Bookmarks (below Saved).

    Recently saved bookmarks, favorites, and reading list items appear at the top of the sidebar. The newest is on the left, and you can scroll through the others. Touch and hold a favorite to copy, open, edit, or delete it.

  3. Tap Favorites, then do any of the following:

    • Delete a favorite: Touch and hold the favorite, then tap Delete.
    • Rename a favorite: Touch and hold the favorite, tap Edit and enter a new name. Then tap Save.
    • Reorder favorites: Tap the More button, tap Select Bookmarks, touch and hold the Reorder button, and then drag the favorite to a new location. Tap the Done button to return to your favorites.

Show the Favorites bar

  1. Open the Settings app on your iPad.
  2. Tap Apps, then tap Safari.
  3. Turn on Show Favorites Bar (below General).

Show only an icon for one webpage in the Favorites bar

  1. Open the Safari app on your iPad.
  2. Touch and hold the webpage in the Favorites bar and then tap Edit.
  3. Turn off Show Title, then tap Save.

Show only an icon for all webpages in the Favorites bar

  1. Open the Settings app on your iPad.
  2. Tap Apps, then tap Safari.
  3. Tap Favorites Bar Appearance (below General). Tap Show Icons Only.

Rename a webpage title in the Favorites bar

  1. Open the Safari app on your iPad.
  2. Touch and hold the webpage title in the Favorites bar. Then tap Edit.
  3. Enter a new name and then tap Save.

See also

Tag: Safari

The Safari app brings the internet to your iPad. You can browse the web from your start page, bookmark websites to revisit later, and keep your browsing activity private with Private Browsing, where the tabs you open don’t appear in History. You can also remove cookies and clear your history.

The Safari start page gives you easy access to your Favorites, Reading List, Suggestions, and more. Removing cookies and clearing the cache also undoes permissions you granted websites to use your location or send you notifications.

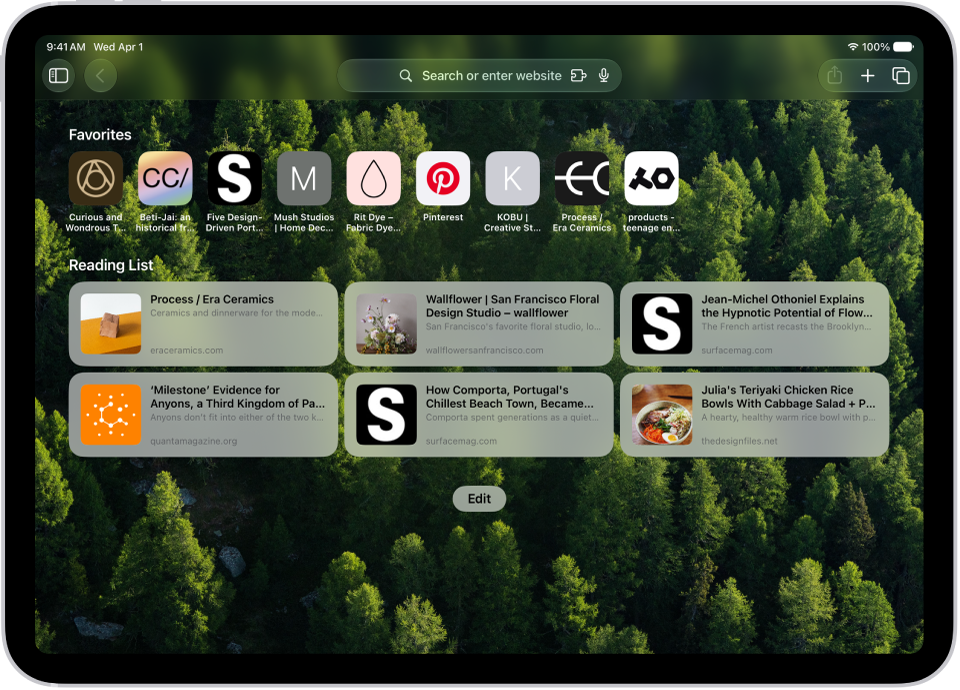
The Safari start page shown with sections for Favorites and the Reading List. Along the top, from left to right, are the Sidebar button, the Previous button, the search field, the Share button, the New Tab button, and the Tab Overview button.

Start browsing here

The Safari start page is the place to start browsing and customize your preferences, with easy access to your Favorites, Reading List, Suggestions, and more. Open the Safari app, or tap the Tabs button, then tap the Add button to open a new start page.

An open webpage. The Share button has been tapped, showing options for AirDrop, Messages, Mail, Notes, Copy, Add to Bookmarks, Add to Reading List, and More.

Bookmark a website

Save a website to revisit later. Tap the Share button to the right of the search field, then tap Add to Bookmarks.

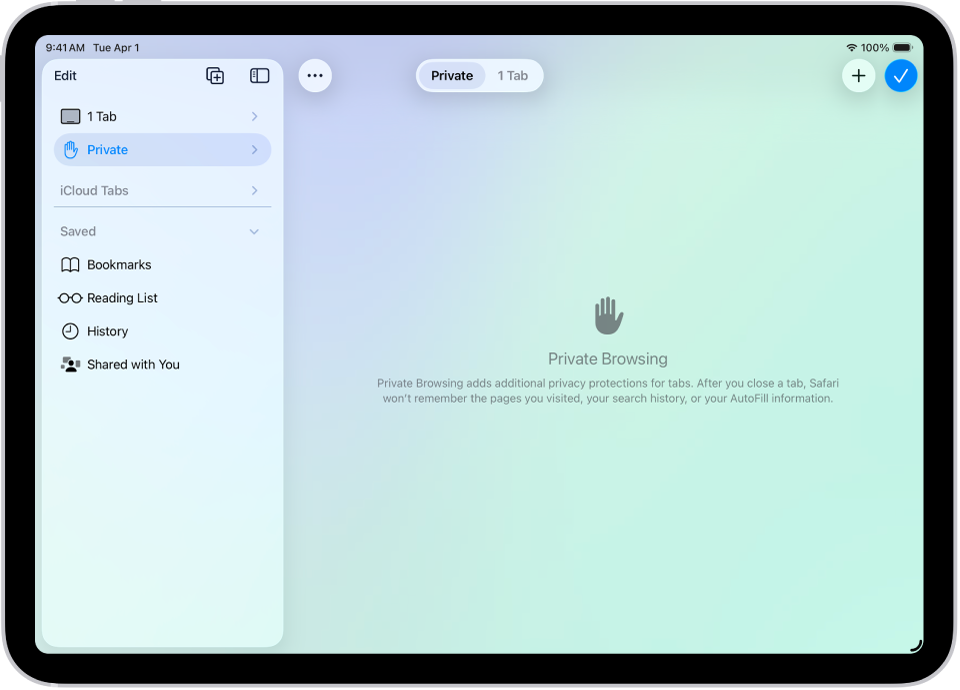
The Safari sidebar on the left side of the Safari window is open, with Private selected. On the right is an explanation that Safari won’t remember your browsing.

Browse privately

Keep your browsing activities to yourself. When you use Private Browsing, the tabs you open don’t appear in History on iPad or in the list of tabs on your other devices. Tap the Show Sidebar button, then tap Private.

In Safari, the Reading List is open in the sidebar on the left and displays a list of websites saved to the Reading List. A physics article appears on the right.

Remove cookies and clear your cache

Remove cookies and clear the cache on your iPad to undo permissions you granted to websites to use your location (or send you notifications) and to erase your browsing history. Tap the Show Sidebar button, tap History, tap the More button, then tap Clear.

Note: Clearing your browsing history in Safari doesn’t clear any browsing histories kept independently by websites you visited, or your browsing history in other apps.

If you’re browsing with Safari, these guides can help:

Tag: Safari