Got a tip for us?

iPad

The iPad is a tablet computer from Apple that runs the iOS mobile operating system. Similar in functionality to the iPhone, the iPads purpose is often quite different, sometimes even serving as a general desktop computer replacement.

To make it easier to see what’s on your iPad screen, you can invert and filter colors or make transparent items solid.

Smart Invert reverses colors everywhere except images, while Classic Invert reverses all the colors onscreen. You can also apply a filter for grayscale or color vision deficiencies. A dark background makes text stand out, especially in apps that don’t support Dark Mode.

Here’s how to change display colors on iPad to make it easier to see what’s onscreen.

Quick tip: Quickly set brightness with the slider in Control Center.

Invert colors

You might find a dark background makes text and content stand out, especially in apps and websites that don’t support Dark Mode.

  1. Open Settings, tap Accessibility, and then tap Display & Text Size.
  2. Turn on one of the following:
    • Smart Invert: Reverse colors everywhere except images.
    • Classic Invert: Reverse all the colors onscreen.

Differentiate or tone down colors

With a filter, you can see the entire screen in grayscale, tint the screen a color you choose, or adjust colors for color vision deficiencies.

  1. Open Settings, tap Accessibility, and then tap Display & Text Size.
  2. Tap Color Filters, turn on Color Filters, and then tap a color filter to apply it.

    You can drag any slider that appears to adjust the intensity or hue. The pencils reflect how the filter affects a range of colors.

    Note: Color filters can change the look of images and videos.

Turn on Reduce White Point to tone down the intensity of bright colors.

Night Shift makes screen colors warmer as it gets dark out, and it automatically removes inverted colors and color filter effects (except grayscale).

With the Magnifier app, you can capture an image of nearby text or objects, then add a color filter to it, too. Check out our guide, Customize controls in Magnifier.

Make transparent items solid

Some backgrounds are transparent or blurred by default. Give them a solid color to make them opaque. Those parts of your screen then look simpler and are easier to see.

  1. Open Settings, tap Accessibility, and then tap Display & Text Size.
  2. Turn on Reduce Transparency.

Differentiate without color

Some screen items use color to convey information, and you can replace that with other ways to tell them apart, like text or shapes.

  1. Open Settings, tap Accessibility, and then tap Display & Text Size.
  2. Turn on Differentiate Without Color.

Use symbols for on/off switches

Switches turn green when they’re on, and you can add a vertical line for on and a circle for off.

  1. Open Settings, tap Accessibility, and then tap Display & Text Size.
  2. Turn on On/Off Labels.

If you want these settings applied to only the contents of the zoom window, read our article, Zoom in on the iPad screen.

Increase contrast between colors

If you want more contrast between different elements on your iPad, like apps and background colors, you can increase it.

  1. Start the Settings app on your iPad.
  2. Tap Accessibility, tap Display & Text Size, turn on Increase Contrast.

See also

The volume buttons on iPad adjust media volume while audio is playing, and ringer and alert volume at other times. You can also adjust the volume in Control Center or Settings, and silence iPad.

In Settings, you can set separate volumes for alarms and timers, and for alerts and system sounds. See Set separate volumes for alarms and alerts. You can lock the alert volume, too, so the volume buttons only control media playback, and if you’d rather, Siri can turn the volume up or down for you.

WARNING: For important information about avoiding hearing loss, see Important safety information.

Adjust the volume with the volume buttons

Press the volume up or volume down button on the side of iPad. The button you press controls the volume for what’s currently playing—media, ringtones, or alerts.

Note: While audio is playing, the volume buttons control media volume, and when nothing is playing, they control ringer and alert volume.

You can also use Siri to turn the volume up or down.

Siri: Ask Siri something like, “Turn up the volume.” Learn how to use Siri.

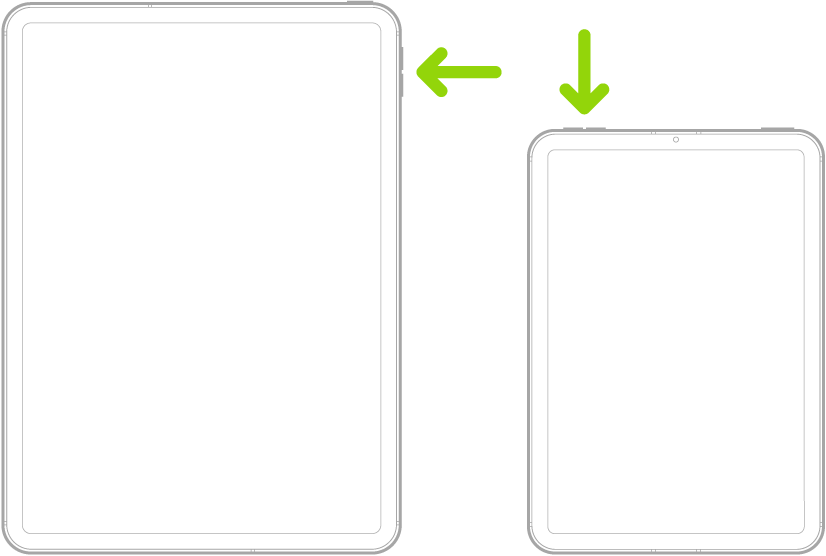
Two different iPad models shown from the front. The model on the left has the volume buttons near the upper-right side and the top button on the top right. The model on the right has the volume buttons on the top left and the top/Touch ID button on the top right.

Adjust the volume in Control Center

As you use an app, or when iPad is locked, you can adjust the volume from Control Center.

Open Control Center, then drag the volume slider.

Silence iPad

If you’d like to mute iPad quickly, do one of the following:

  • Press and hold the Volume Down button.
  • Open Control Center, then tap the Silent Mode Off button to turn on Silent mode. Tap it again to turn it off.

Note: Silent mode won’t mute audio from music, podcasts, movies, and TV shows.

A Focus lets you silence specific notifications instead of all sounds. For how to use one, check out our guide, Turn on or schedule a Focus.

Lock the alert volume

You can prevent the volume buttons from changing the volume of alerts and notifications.

  1. Start the Settings app on your iPad.
  2. Tap Sounds, then turn off Change with Buttons.

When Change with Buttons setting is off, the volume buttons only control media playback.

Limit speaker and headphone volume

You can limit the maximum volume of sound that plays through headphones or the built-in speaker on your iPad.

  1. Start the Settings app on your iPad.
  2. Tap Sounds and then do any of the following:
    • Limit speaker volume: Under Built-In Speaker, tap Volume Limit, turn on Limit Maximum Volume and then drag the slider to specify the maximum volume.
    • Soften loud sounds from the speaker: Under Built-In Speaker, turn on Reduce Loud Sounds.
    • Limit headphone volume: Under Headphones, tap Reduce Loud Audio, turn on Reduce Loud Audio. Drag the slider to set the maximum volume.

For more ways to protect your hearing from loud headphone audio, read our article, Use headphone audio-level features.

Note: Screen Time can keep a family member from changing the Reduce Loud Audio level, as long as you’ve set it up for them. Go to the Settings app on your iPad, tap Screen Time, and tap Content & Privacy Restrictions. Next, turn on Content & Privacy Restrictions, then tap Speaker Volume, Reduce Loud Audio, or Speaker Volume Limit, and select Don’t Allow.

See also

You can turn on and set up your new iPad with an internet connection, or set up iPad by connecting it to your computer. If you have another iPhone, an iPad, or an Android device, you can transfer your data to your new iPad.

To make setup as smooth as possible, it helps to have an internet connection, your Apple Account and password, and your previous iPad or a backup of your device. And you can create an Apple Account during setup if you don’t have one.

Note: When a company, school, or other organization deploys or manages your iPad, ask an administrator or teacher for setup instructions.

Prepare for setup

To make setup go as smoothly as possible, have the following items available:

  • An internet connection through a Wi-Fi network (you may need the name and password of the network) or cellular data service through a carrier (Wi-Fi + Cellular models)
  • Your Apple Account and password; if you don’t have an Apple Account, you can create one during setup
  • Your credit or debit card account information, if you want to add a card to Apple Pay during setup
  • Your previous iPad or a backup of your device, if you’re transferring your data to your new device

    Tip: If you don’t have sufficient storage space to back up your device, iCloud will provide enough storage to complete a temporary backup, free of charge, for up to three weeks from the purchase of your iPad. On your previous device, go to the Settings app, tap General, then tap Transfer or Reset [device]. Tap Get Started, then follow the onscreen instructions.

  • Your Android device, if you’re transferring your Android content

Turn on and set up your iPad

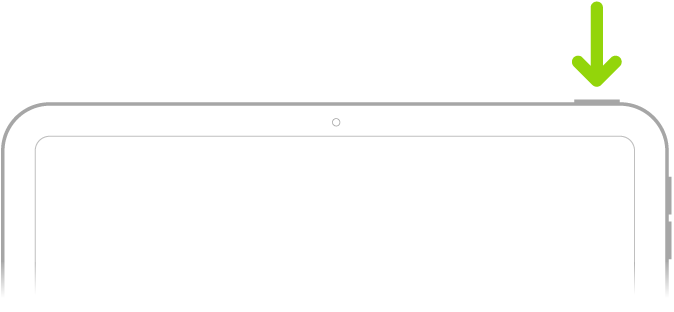
  1. Press and hold the top button until the Apple logo appears.

    A green arrow pointing to the button on the top right of iPad.

    If iPad doesn’t turn on, you might need to charge the battery.

    Tip: If you’re blind or have low vision, you can triple-click the Home button (on an iPad with a Home button) or triple-click the top button (on other iPad models) to turn on VoiceOver, the screen reader. You can also double-tap the screen with three fingers to turn on Zoom. See Get started with accessibility features.

  2. Do one of the following:

    • Set up with another device: If you have another iPhone or iPad with iOS 11, iPadOS 13, or later, you can use it to automatically set up your new device. Bring the two devices close together. Follow the onscreen instructions to securely copy many of your settings, preferences, and iCloud Keychain. You can then restore the rest of your data and content to your new device from your iCloud backup.

      Or, if both devices have iOS 12.4, iPadOS 13, or later, you can transfer all your data wirelessly from your previous device to your new one. Keep your devices near each other and plugged into power until the migration process is complete.

    • Set Up Manually: If you don’t have another device, tap Set Up Without Another Device. Follow the onscreen setup instructions.

Move from an Android device to iPad

Switching from an Android device? The Move to iOS app can transfer your data when you first set up your new iPad.

Note: Already finished setup and want to use Move to iOS? You’ll need to erase your iPad and start over, or move your data manually.

  1. On your device with Android version 4.0 or later, download the Move to iOS app.
  2. On your iPad, do the following:
    • Follow the setup assistant.
    • On the Transfer Your Apps & Data screen, tap From Android.
  3. On the Android device, do the following:
    • Turn on Wi-Fi.
    • Go to the Move to iOS app.
    • Follow the onscreen instructions.

WARNING: To avoid injury, read Important safety information before using iPad.

See also

Tag: Setup

When you subscribe to iCloud+, Hide My Email lets you send and receive email messages that forward to your real email account, to keep your real email address private. You can also generate unique email addresses on demand in the Mail app.

You can send a message with Hide My Email to one recipient at a time, and replies forward to your real email address. When you get a message at one of your unique addresses, you can reply using the same address, too.

Send an email with Hide My Email

  1. Go to the Mail app on your iPad.
  2. Tap the Compose button.
  3. Add a recipient and subject for your message.

    Note: You can only send a message using Hide My Email to one recipient at a time.

  4. Tap the From field, tap it again, and tap Hide My Email. A new, unique email address appears in the From field.

Quick tip: If someone replies to a message you sent with Hide My Email, the reply goes to your real email address. To set a Forward To address, read our guide, Create and manage Hide My Email in Settings.

Reply to an email using Hide My Email

When you receive an email message to one of your unique, random addresses, you can reply using the same address. This allows you to continue the conversation and keep your real email address private. To reply, do the following:

  1. Start the Mail app on your iPad.
  2. Tap the message. Tap the Reply button above the message.
  3. Type your response.

    You can tap the From field to view the email address the recipient sees.

Manage the addresses generated by Hide My Email

You can create, deactivate, reactivate, and manage random addresses with Hide My Email. See our article, Create and manage Hide My Email in Settings.

See also

Tags: iCloud, Mail

With your eligible cards stored in Apple Wallet, you can use Apple Pay in apps, App Clips, and online. Using Apple Pay can be simpler and safer than using a physical card.

Your actual card number is never shared with merchants, and each transaction uses a unique security code. You can also choose a different payment card, pay with rewards or installments on cards from participating issuers, and use Apple Pay in third-party browsers.

Note: Apple Pay and its features aren’t available in all countries or regions.

Use Apple Pay for purchases online and in apps

The Apple Pay button marks where you can make purchases in supported apps, App Clips, and websites.

  1. At checkout, tap the Apple Pay button.
  2. Review the payment information and set any of the following:

    • Payment method

      You can choose a different payment card; you can also pay with rewards or installments (available on cards from participating banks and card providers in certain markets; subject to eligibility and approval).

    • Billing and shipping addresses
    • Contact information

      Tip: If you subscribe to iCloud+, you can use Hide My Email to keep your real email address private.

  3. Authenticate with Face ID, Touch ID, or your passcode to complete the payment.

Use Apple Pay in third-party browsers on Mac, Windows devices, and other devices

When you shop in a third-party web browser on a supported website, you can complete the purchase using Apple Pay on your iPad. (Not available in all countries or regions.)

  1. At checkout, click Apple Pay. Then scan the code using your iPad camera.
  2. On your iPad, review the payment information and set any of the following:
    • Payment method
    • Billing and shipping addresses
    • Contact information
  3. Authenticate with Face ID, Touch ID, or your passcode to complete the payment.

Check out on iPad and pay with your iPhone

If you don’t have Apple Pay set up on your iPad, your iPhone can complete the payment.

Note: Your iPhone must be on the same Wi-Fi network as your iPad, signed in to the same Apple Account, and use iOS 27 or later. Not available in China mainland.

  1. At checkout on your iPad, tap the Apple Pay button.
  2. When you see Continue on iPhone, review the payment information on your iPhone and make any changes.
  3. Authenticate with Face ID, Touch ID, or your passcode to complete the payment.

View preauthorized payments

See preauthorized payments made with Apple Pay for future and recurring charges such as subscriptions.

  1. Open the Settings app on your iPad.
  2. Tap Wallet & Apple Pay, then tap Preauthorized Payments.
  3. Tap a payment to see the details.
  4. To cancel your service or manage the payment methods, contact the merchant directly. (For participating merchants, tap Manage.)
  5. To prevent the merchant from automatically charging your card, tap Revoke Payment Authorization.

    Note: Revoking the payment authorization doesn’t cancel your service.

Set your default card, address, and preferences for Apple Pay

  1. Open the Settings app on your iPad.
  2. Tap Wallet & Apple Pay and tap Apple Pay Defaults.
  3. Set any of the following:
    • Transaction defaults: Set the default card, your shipping address, email, and phone number.
    • Available payment options: Turn on or off Pay Later, Rewards, Offers, and Other Pay Later Options.

See also

iCloud+ gives you everything iCloud offers plus premium features including Apple Invites, iCloud Private Relay, Hide My Email, HomeKit Secure Video support, and all the storage you need for your photos, files, and more. You can subscribe to iCloud+ or to Apple One, which includes iCloud+ and other Apple services.

Plans range from 50 GB to 12 TB of storage, and you can upgrade, change, or cancel your subscription at any time.

Here’s how to subscribe to iCloud+ on iPad.

Note: Some iCloud+ features have minimum system requirements. The availability of iCloud+ and its features varies by country or region.

What’s included with iCloud+

Subscribe to iCloud+, and you can do the following on iPad:

  • Get 50 GB, 200 GB, 2 TB, 6 TB, or 12 TB (depending on your plan) of storage for photos, files, backups, and more.
  • Create and share custom invitations for your events.
  • Create unique, random email addresses that forward to your personal inbox with Hide My Email. See Use Hide My Email in Safari and Use Hide My Email in Mail.
  • Browse the web in an even more secure and private way with iCloud Private Relay. See Protect your web browsing.
  • Set up home security cameras with HomeKit Secure Video so you can view your footage from anywhere while keeping it private and secure. See Set up security cameras.
  • Use a custom email domain to personalize iCloud Mail. See Set up a custom email domain.

Upgrade, change, or cancel your iCloud+ subscription

  1. Open the Settings app on your iPad.
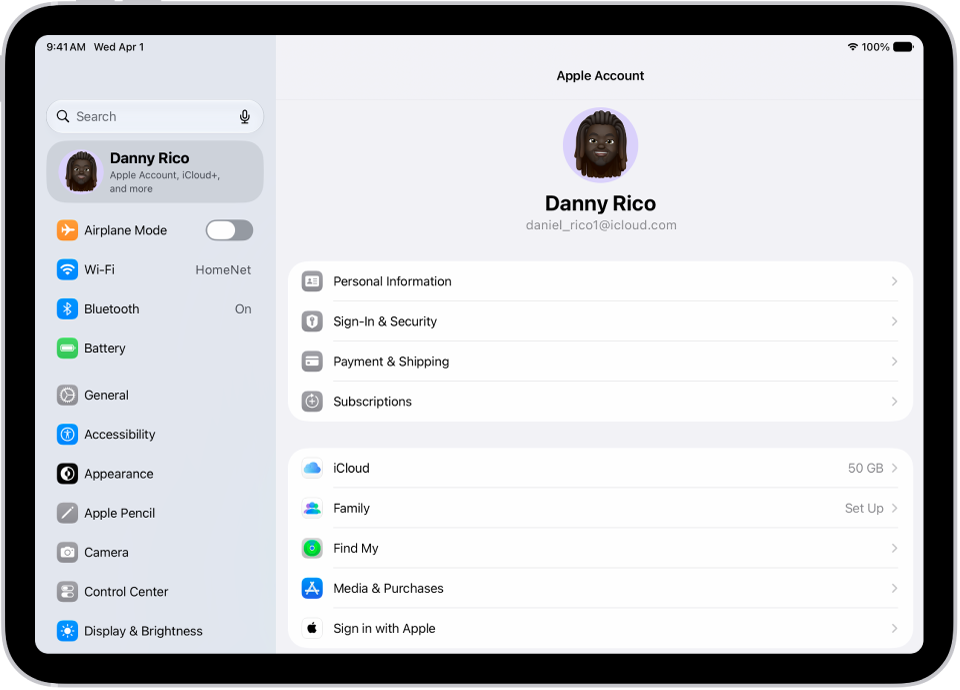
  2. Tap your name, then tap iCloud.
  3. Tap Storage and tap Manage Plan. Follow the onscreen instructions.

Note: Cancel your iCloud+ subscription, and you’ll lose access to the additional iCloud storage and iCloud+ features.

Share iCloud+

Family Sharing lets you share iCloud+ with up to five other family members, and once they accept your invitation, they get instant access to the additional storage and features.

Note: Sharing iCloud+ with a family group ends when you cancel the subscription or leave the family group, and also if you turn off or leave Family Sharing. For more, see our article, Add a member to a Family Sharing group.

See also

Tag: iCloud

When you subscribe to iCloud+, you can use iCloud Private Relay to help prevent websites and network providers from creating a detailed profile about you.

With it on, the traffic leaving your iPad is encrypted and sent through two separate internet relays, so websites can’t see your IP address and exact location, and network providers can’t collect your browsing activity in Safari. You need to turn it on on each device where you want to use it, and you can also turn it off temporarily, since it turns back on automatically within 24 hours.

Note: iCloud Private Relay isn’t available in all countries or regions.

Turn iCloud Private Relay on

Go to Settings > [your name] > iCloud > Private Relay, then tap Private Relay.

Note: You need to turn on iCloud Private Relay on each device where you want to use it.

Turn iCloud Private Relay off

  1. Open Settings, tap [your name], tap iCloud, tap Private Relay, and tap Private Relay.
  2. Do one of the following:

    • Turn off iCloud Private Relay temporarily: Tap Turn Off Until Tomorrow.

      Within 24 hours, iCloud Private Relay will turn back on automatically. If you want it to resume sooner, follow the instructions for turning it on at any time.

    • Turn off iCloud Private Relay completely: Tap Turn Off Private Relay.

For information about turning off iCloud Private Relay temporarily for a specific website, see Temporarily allow a website to see your IP address.

Turn iCloud Private Relay on or off for a Wi-Fi network

  1. Open Settings and then tap Wi-Fi.
  2. Tap the Actions Available button. Turn Limit IP Address Tracking on or off.

iCloud Private Relay gets turned off for a Wi-Fi network across all your devices signed in to the same Apple Account when you turn off Limit IP Address Tracking for that network on your iPad.

Turn iCloud Private Relay on or off for a cellular network (Wi-Fi + Cellular models)

  1. Open Settings, tap Cellular Data, and do one of the following:
    • If your iPad has a single plan: Tap Cellular Data Options.
    • If your iPad has multiple plans: Select a plan (below Cellular Plans).
  2. Turn Limit IP Address Tracking on or off.

The network setting is specific to a physical SIM or eSIM in your iPad (eSIM not available in all countries or regions). See Manage your cellular data service.

Set the specificity of your IP address location

Go to Settings > [your name] > iCloud > Private Relay > IP Address Location, then choose one of the following:

  • Maintain General Location (for example, to see local content in Safari)
  • Use Country and Time Zone (to make your location more obscure)

iCloud Private Relay is not available in all countries or regions, Apple says.

See also

Tag: iCloud

When you subscribe to iCloud+, you can use Hide My Email to keep your personal email address private. It generates unique, random email addresses that forward to your personal email account, so you don’t have to share your real address when you fill out forms, sign up for newsletters, or send email.

You can create a new address, deactivate one so it stops forwarding emails to you, choose which personal email address it forwards to, and copy a forwarding address to use elsewhere. You can also generate addresses in Safari and Mail wherever an email address is required.

You can create and manage Hide My Email addresses in Settings. Go to Settings > [your name] > iCloud > Hide My Email, then do any of the following:

  • Create a Hide My Email address: Tap Create New Address, then follow the onscreen instructions.
  • Deactivate a Hide My Email address: Tap an address (below Create New Address), then tap Deactivate Email Address. After you deactivate the address, it no longer forwards emails to you.
  • Change which personal email address to forward to: Tap Forward To, then choose an email address. Options consist of addresses that are available with your Apple Account.
  • Copy a forwarding address to use elsewhere: Tap an address (below Create New Address), touch and hold the Hide My Email section, then tap Copy. To immediately use that address elsewhere, touch and hold in a text field, then tap Paste.

You can also generate Hide My Email addresses in Safari and Mail wherever email addresses are required. In supporting apps, you can also generate a Hide My Email address when an email address is required by tapping the email address field, then tapping Hide My Email above the keyboard.

See also

Tags: iCloud, Mail

In the App Store app, you can review and download purchases made by you or other family members. You can also set restrictions and customize your preferences for the App Store in the Settings app.

You can allow the App Store to use your location, let Siri make suggestions based on how you use it, and set content restrictions to prevent in-app purchases.

Here’s how to change settings and restrictions in the App Store on iPad.

Change your App Store settings

  1. Start the Settings app on your iPad.
  2. Tap Apps, tap App Store, and then adjust any of the following settings:
    • Location: Allow App Store to use your location and show apps and ads relevant to you.
    • Siri: Allow Siri to make suggestions across apps based on the way you use the App Store.
    • Search: Allow content from the App Store to appear in Search.
    • Cellular Data: (iPad models with Cellular) To allow App Store to use cellular, turn on Cellular Data. Adjust other settings for cellular data such as automatic downloads.
    • App Downloads: Automatically install apps you purchased on your other devices.
    • App Updates: Automatically download and install app updates.
    • In-App Content: Automatically download in-app content in the background before the first time you open the app.
    • Video Autoplay: Automatically play app preview videos.
    • In-App Ratings & Reviews: Let apps ask for your feedback.
    • Offload Unused Apps: Automatically remove unused apps. You can reinstall an app at any time if it’s still available in the App Store.

Set content restrictions and prevent in-app purchases

After you turn on content and privacy restrictions, do the following:

  1. Start the Settings app on your iPad.
  2. Tap Screen Time and tap Content & Privacy Restrictions.
  3. Turn on Content & Privacy Restrictions.
  4. Tap iTunes & App Store Purchases and choose restrictions for installing or deleting apps and in-app purchases.
  5. Tap App Store, Media, Web & Games and choose age-appropriate restrictions such as the following:
    • Apps: Restrict apps by age ratings.
    • App Clips: Prevent App Clips from opening.

Set Screen Time limits and App Store restrictions for kids

With Family Sharing, the organizer—or another adult designated as parent/guardian—can set up the following parental controls for children or other members in the Family Sharing group:

  • Set restrictions for installing and deleting apps and in-app purchases.
  • Allow your child to access only age-appropriate apps.
  • Review your child’s requests to purchase and download apps.

See also