Got a tip for us?

iPad

The iPad is a tablet computer from Apple that runs the iOS mobile operating system. Similar in functionality to the iPhone, the iPads purpose is often quite different, sometimes even serving as a general desktop computer replacement.

You can view, change, and cancel your subscriptions from Apple as well as subscriptions you purchased in apps from the App Store.

Your purchase history includes free and paid apps, in-app purchases, subscriptions, music, and more, and you can view and redownload apps. You can narrow the results by date range, cost, or type, and if you’re the organizer of a Family Sharing group, by family member, too.

Here’s how to see your purchases and subscriptions in the App Store on iPad.

See your purchase history

Along with free and paid apps from the App Store, your purchase history includes in-app purchases, subscriptions, music, videos, books, AppleCare+, and more.

  1. Start the App Store app on your iPad.
  2. Tap the My Account button or your picture at the top right, tap Apps & Purchase History, and then tap Purchase History.

    You may be asked to authenticate with Face ID, Touch ID, or your passcode.

  3. To narrow the results, enter the name, price, or order ID in the search field.
  4. To change the search criteria, tap Last 90 Days, Paid and then set any of the following:

    • Date range
    • Cost (free or paid)
    • Type
    • Family member (available if you’re the organizer of a Family Sharing group)

View and redownload apps

  1. Start the App Store app on your iPad.
  2. Tap the My Account button or your picture at the top right and tap Apps & Purchase History. Then tap Your Apps.
  3. If you’re part of a Family Sharing group, tap My Apps or choose a family member.
  4. Find the app you want to download (if it’s still available in the App Store) and tap the Redownload button.

Change or cancel a subscription

  1. Start the Settings app on your iPad.
  2. Tap your name and then tap Subscriptions.
  3. Do any of the following:
    • Cancel a subscription: Tap an active subscription and tap Cancel Subscription or Cancel All Services.
    • Change a subscription: Tap an active subscription and choose a different option.
    • Renew a subscription: Tap an expired subscription, then tap Renew.
    • Share a subscription: Turn on Share with Family to automatically share eligible subscriptions with other members in your Family Sharing group.
    • Get Renewal Receipts: Turn on Renewal Receipt Emails to receive a receipt each time one of your subscriptions renews.

See also

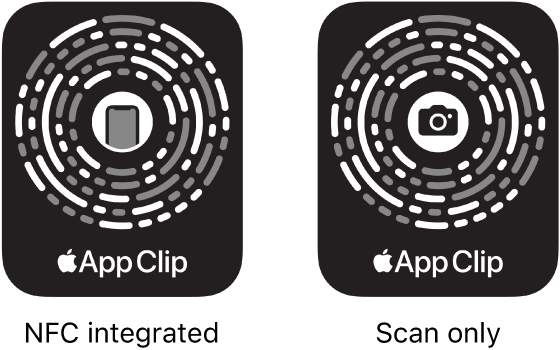
An app clip is a small part of an app that helps you do a task quickly, like rent a bike, pay for parking, or order food. You can discover App Clips in Safari, Maps, and Messages, or in the real world through QR codes and App Clip Codes, unique markers that take you to specific App Clips.

You can use Sign in with Apple and pay with Apple Pay in supported App Clips, and some let you see the full app. App Clips you’ve used are in App Library, and you can remove them, too.

On the left, an NFC-integrated App Clip Code with an iPhone icon in the center. On the right, a scan-only App Clip Code with a camera icon in the center.

Get and use App Clips

  1. Get App Clips from any of the following:
    • App Clip Code or QR code: Scan the code using the iPad camera or Code Scanner in Control Center.
    • Maps: Tap the app clip link on the information card (for supported locations).
    • Safari or Messages: Tap the app clip link.
  2. When the app clip appears on the screen, tap Open or Play.

In supported App Clips, you can use Sign in with Apple, then make a payment using Apple Pay.

With some App Clips, you can tap the banner at the top of the screen to see the full app.

Find App Clips you used on iPad

Go to App Library, tap the search field at the top of the screen, then scroll down to the end of the alphabetical list.

Remove App Clips

  1. Go to App Library. Then tap the search field at the top of the screen.
  2. Enter the name of the app clip, or scroll down to the App Clips at the bottom.
  3. Touch and hold the app clip you want to delete, then tap Remove App Clip.

See also

Use AirPrint to print wirelessly to an AirPrint-enabled printer from apps such as Mail, Photos, Safari, and Freeform. Many apps available on the App Store also support AirPrint.

iPad and the printer must be on the same Wi-Fi network. You can see the status of a print job in Print Center, where a badge shows how many documents are in the queue, and cancel printing there if you need to.

Choose an AirPrint-enabled printer

After confirming that your printer supports AirPrint and that your iPad and printer are on the same Wi-Fi network, do the following:

  1. Open the app you want to print from.
  2. Tap the Share button, the More button, the Reply button, or the Actions Menu button (depending on the app).
  3. Tap Print, tap No Printer Selected, and choose an AirPrint-enabled printer.

Print a document

  1. Open the app you want to print from.
  2. Tap the Share button, the More button, the Reply button, or the Actions Menu button (depending on the app).
  3. Tap Print. (If you don’t see Print, swipe up.)

See the status of a print job

Open Exposé, then tap Print Center.

The icon’s badge tells you how many documents are in the queue.

To cancel a print job, select it in Print Center, then tap Cancel Printing.

See also

Tag: iPadOS

Connect your iPad to the internet by using an available Wi-Fi network. Wi-Fi + Cellular models can also connect using a cellular data network when Wi-Fi isn’t available, though those steps don’t apply to a Wi-Fi only model.

You can also join a hidden network or a Personal Hotspot, and when iPad is on Wi-Fi, a blue checkmark appears next to the network name. On models that support 5G, iPad may even use 5G instead of Wi-Fi.

iPad connects in this order: the most recently used Wi-Fi network, then a Wi-Fi network you choose from the list, then your carrier’s cellular data network (Wi-Fi + Cellular models). On models that support 5G, iPad may use 5G cellular data instead of Wi-Fi. To switch back to Wi-Fi, tap the Info button next to the network name, then tap Use Wi-Fi for Internet.

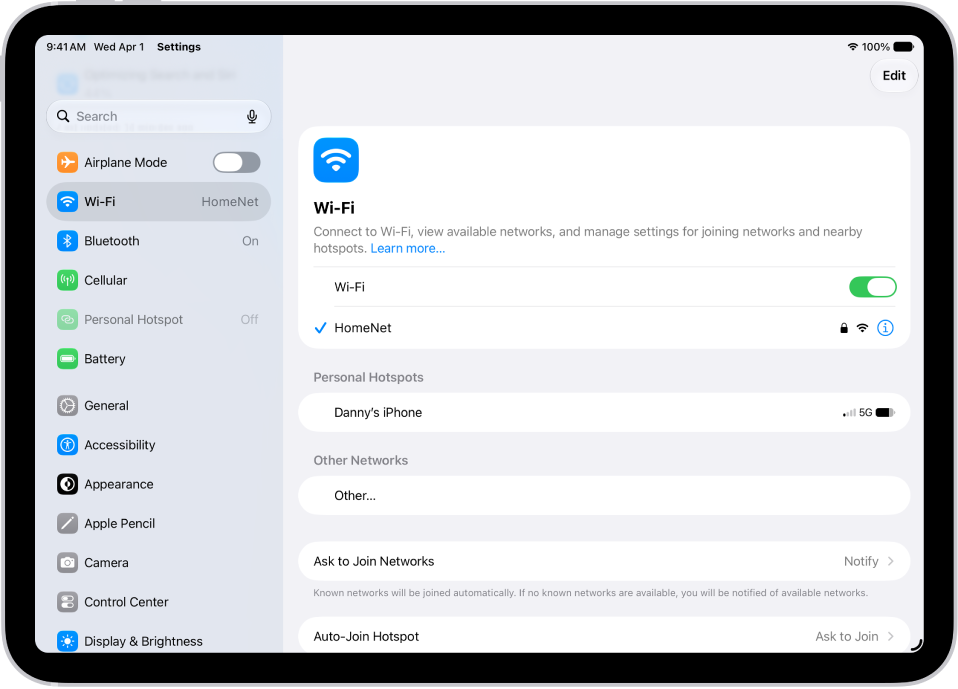
The Settings screen showing available Wi-Fi networks.

Connect to a Wi-Fi network

  1. Start the Settings app on your iPad.
  2. Tap Wi-Fi and turn on Wi-Fi.

    iPad automatically joins known networks.

  3. To join a new network, do one of the following:

    • Join an available network: Tap the name of the network. If asked, enter the password.
    • Join a hidden network: Tap Other. Then enter the name of the network, security type, and password.

When iPad is connected to Wi-Fi, you’ll see a blue checkmark next to the network name and the Wi-Fi icon at the top of the screen.

If you want to change settings for a network you’ve joined, share its password, or change how iPad joins networks, check out our guide, Manage Wi-Fi settings.

Join a Personal Hotspot

You can use the cellular connection of an iPhone or iPad with cellular service that’s sharing a Personal Hotspot.

  1. Start the Settings app on your iPad.
  2. Tap Wi-Fi. Choose the name of the device sharing the Personal Hotspot.
  3. If asked, enter the password. On the device sharing the Personal Hotspot, the password is shown in the Settings app, tap Cellular Data and then tap Personal Hotspot.

You can choose whether iPad joins Personal Hotspots on its own when no Wi-Fi network is available. See our article, Set whether iPad joins Personal Hotspots automatically.

Connect to a cellular network if Wi-Fi isn’t available

On Wi-Fi + Cellular models, iPad automatically connects to your carrier’s cellular data network if a Wi-Fi network isn’t available. If iPad doesn’t connect, check the following:

  1. Verify that your SIM is activated and unlocked. See Set up cellular service.
  2. Start the Settings app on your iPad.
  3. Tap Cellular Data and then verify that Cellular Data is turned on.

Use Connectivity Assist on iPad

With Connectivity Assist on, Wi-Fi + Cellular models of iPad use cellular data along with Wi-Fi to keep your internet connection dependable if Wi-Fi is weak, busy, or not connected to the internet. Turn Connectivity Assist off, and iPad sticks to Wi-Fi only when it’s connected to Wi-Fi networks, even if the connection is weak or busy.

Note: Connectivity Assist is on if you previously had Wi-Fi Assist turned on.

  1. Start the Settings app on your iPad.
  2. Tap Wi-Fi.
  3. Turn Connectivity Assist on or off.

iPad shows the amount of cellular data Connectivity Assist has used. To start a new count, tap Reset Data Usage.

Note: Connectivity Assist only taps into cellular data when it’s needed to keep your connection reliable. It stays off when you’re roaming internationally, when iPad is in cellular Low Power Mode or Low Data Mode, and with some apps that stream audio and video. To check your overall cellular data usage, go to the Settings app and tap Cellular Data.

See also

After your iPad joins a Wi-Fi network, you can change settings for that network, share its password with another nearby device, and choose how iPad joins new Wi-Fi networks and nearby Personal Hotspots.

You can forget a network, use Low Data Mode, and turn on a private Wi-Fi address, which helps reduce tracking of your iPad across networks. You can also hide your IP address from known trackers. You can’t share a password unless the other device is nearby, though.

Manage settings for Wi-Fi and hotspots

  1. Start the Settings app on your iPad.
  2. Tap Wi-Fi, tap the Info button, and do any of the following:
    • Forget the network: Tap Forget This Network.
    • Use Low Data Mode: Turn on Low Data Mode to help reduce iPad’s data usage on the network.
    • Use a private Wi-Fi address: Turn on Private Wi-Fi Address to help reduce tracking of your iPad across different Wi-Fi networks.
    • Limit IP address tracking: Turn on Limit IP Address Tracking to hide your IP address from known trackers.
    • Use cellular data in addition to Wi-Fi: Turn on Use Connectivity Assist. See Use Connectivity Assist.
    • Configure DNS, HTTP Proxy, and other network settings: Tap a setting, then enter the details.

Share a Wi-Fi password

While it’s connected to a Wi-Fi network, your iPad can pass along the Wi-Fi password to another nearby iPhone, iPad, or Mac.

  1. Make sure your iPad is unlocked, connected to the Wi-Fi network, and signed in to your Apple Account.
  2. Make sure of the following: the person you’re with is signed in to their Apple Account on their device, they’re in your contacts list, and their device is nearby.
  3. On your contact’s device, choose the Wi-Fi network.
  4. On your iPad, wait for the Wi-Fi Password notification to appear. Tap Share Password.

Set whether iPad asks to join networks

Your iPad automatically joins known networks. With no known network in range, iPad can notify you when other networks are available.

  1. Start the Settings app on your iPad.
  2. Tap Wi-Fi, then tap Ask to Join Networks.
  3. Choose Off, Notify, or Ask.

Set whether iPad joins Personal Hotspots automatically

Without an available Wi-Fi network, iPad can connect to a nearby Personal Hotspot on another device signed in to your Apple Account.

  1. Start the Settings app on your iPad.
  2. Tap Wi-Fi, then tap Auto-Join Hotspot.
  3. Choose Never, Ask to Join, or Automatic.

See also

Tag: Wi-Fi

With Family Sharing, the organizer can set up Purchase Sharing to share App Store, Apple TV, and Apple Books purchases.

To share purchases, the family organizer must turn on Purchase Sharing and add a payment method. Family members can then opt in to Purchase Sharing, so they can share purchases and view shared purchases. When a family member makes a purchase, the organizer is billed, unless that family member adds a payment method to pay for their own purchases.

When a family member buys something, it’s added to their account, and eligible purchases are shared with the rest of the family. The organizer can also turn off purchase sharing later.

Turn on Purchase Sharing

Purchase sharing means the family organizer pays for family members’ purchases, so the organizer must have a valid payment method on file. Each family member can also add their own payment methods.

  1. Open the Settings app on your iPad.
  2. Tap Family, tap Purchase Sharing, and follow the onscreen instructions.

Access shared content

If you’ve opted in and purchase sharing is turned on, eligible apps and content your family members buy are yours to download and play.

Turn off Purchase Sharing

As the family organizer, you can turn off purchase sharing, and your purchases are then hidden from Family Sharing members. You’ll still see items other members have shared with you.

Note: Even though your items aren’t shared, any purchases you make still use the shared family payment method.

  1. Open the Settings app on your iPad.
  2. Tap Family, then tap Purchase Sharing.
  3. Tap your name and turn off Share Purchases.
  4. If the organizer wants to turn off purchase sharing entirely, they can tap Stop Purchase Sharing.

You can also share Apple and App Store subscriptions with family members.

See also

When you’re in a Family Sharing group, you can share Apple subscriptions and eligible App Store subscriptions with other family members. If your group has purchase sharing turned on, any subscriptions shared with the group are billed to the organizer’s default payment method.

The organizer can also require children in the group to ask for approval before eligible purchases or free downloads. You can share an App Store subscription from Manage Subscriptions. Some subscriptions, like Apple Arcade, let all members of your family download and play, and each player gets a personalized account.

Note: Not all services are available in all countries or regions, and some selections are subject to content restrictions set in Screen Time. Age restrictions for Ask to Buy vary by country or region. In the United States, the family organizer can turn on Ask to Buy for any family member under age 18; for children under age 13, it’s on by default.

Share Apple subscriptions

  1. Start the Settings app on your iPad.
  2. Tap Family, tap Subscriptions, and do one of the following:
    • Tap a subscription you want to share, then follow the onscreen instructions.
    • Tap Manage Subscriptions, then tap a subscription.

See any of the following to learn more.

  • Apple Arcade: See Subscribe to Apple Arcade. All members of your family can download and play Apple Arcade games from the App Store. Each player gets a personalized account—your progress is carried over between devices.
  • Apple Fitness+: All members of your family can access workouts in the Fitness app on their iPhone or iPad.
  • Apple Music: See Subscribe to Apple Music. With a family subscription, each family member gets their own music library and personal recommendations.
  • Apple News+: See Subscribe to Apple News+. All members of your family can read Apple News+ publications for no additional charge.
  • Apple TV: Each family member can watch on their iPhone, iPad, iPod touch, Mac, Apple TV 4K, and supported smart TVs and streaming devices, using their own Apple Account and password.
  • iCloud+: See Subscribe to iCloud+. When you share iCloud+, all family members have access to iCloud+ features and storage. For storage, you only share the space—your photos and documents stay private and everyone keeps using their own accounts.

Share App Store subscriptions

It’s up to you to choose which eligible App Store subscriptions you share with family members. To learn about the App Store, see our article, Get apps in the App Store.

  1. Start the Settings app on your iPad.
  2. Tap Family and tap Subscriptions. Then tap Manage Subscriptions.
  3. Do either of the following:

    • Share all new subscriptions: Turn on Share with Family. When you purchase a new subscription that’s eligible for sharing, it’s shared with your Family Sharing members by default.
    • Change the settings of a specific subscription: Tap a subscription and turn Share with Family on or off.

      If you don’t see Share with Family, the subscription isn’t eligible for sharing.

You can turn off Apple Intelligence features like Siri AI (Beta), summarization features, and more. That includes Messages, email, and notification summaries, priority notifications, and Writing Prompts in Journal, and you can switch to Siri Classic instead of Siri AI. You can also restrict access to Apple Intelligence features in Screen Time.

Note: Apple Intelligence on iPadOS 27 or later is available on an Apple Intelligence-enabled iPad mini (A17 Pro) and iPad models with M1 or later. Apple Intelligence is not available in all languages or regions. Usage limits may apply.*

Go to the Settings app on your iPad and do any of the following to change these settings:

Option Description
Siri AI (Beta) Tap Siri, scroll down, then tap Turn Off Siri. Tap Turn Off Siri again to confirm.

Note: Siri AI is available in beta on iPadOS 27 or later on an Apple Intelligence-enabled iPad mini (A17 Pro) or iPad model with M1 or later set to a supported language. Available in English to start. Siri AI will not initially be available in the EU on iPadOS. Usage limits may apply.

Switch to Siri Classic To use Siri Classic instead of Siri AI, follow the steps above to turn off Siri. Tap Turn on Siri, then tap Siri Classic.
Messages summaries Tap Apps, tap Messages, then turn off Summarize Messages.
Email summaries Tap Apps, tap Mail, then turn off Summarize Message Previews.
Notification summaries Tap Notifications, tap Summarize Notifications, then turn off Summarize Notifications.
Priority notifications Tap Notifications, tap Prioritize Notifications, then turn off Prioritize Notifications.
Personalized Smart Replies in Mail Tap Apps, tap Mail, then turn Personalize Smart Replies on or off.
Voicemail suggestions in Phone Tap Apps, tap Phone, then turn Suggestions in Voicemail on or off.
Call Context cards Tap Apps, tap Phone, tap Apple Intelligence & Siri, then tap Show When Calling.
Writing Prompts in Journal Tap Apps, tap Journal, then turn Get Writing Prompts on or off.
Restrict access to Apple Intelligence features in Screen Time See Block or allow Siri and Apple Intelligence features for restricting access for yourself.
Change how you see suggestions from your apps See Customize where suggestions appear.

*Apple Intelligence is available with Siri and device language set to Chinese (Simplified), Chinese (Traditional), Danish, Dutch, English, French, German, Italian, Japanese, Korean, Norwegian, Portuguese, Spanish, Swedish, Turkish, or Vietnamese. Some features may not be available in all regions or languages. Some devices may not be available in all regions. Siri AI is available in beta in iOS 27, iPadOS 27, macOS 27, watchOS 27, and visionOS 27 and requires an Apple Intelligence–enabled device set to a supported language. Available in English to start. Siri AI will not be initially available in the EU on iOS, iPadOS, and watchOS. Certain Apple Intelligence features that rely on server-side models are subject to daily usage limits, including but not limited to Siri AI, Intelligent Photo Editing Tools, Image Playground, and AFM 3 Cloud models in Shortcuts. Daily limits may vary by feature, request complexity, system demand, system policies, and other factors. Expanded access to such features will be available for a fee in the future. Use of these features is subject to the Apple Intelligence Terms and Conditions.

You can use the Shortcuts bar (at the bottom of the screen) and combination keystrokes known as keyboard shortcuts to quickly perform many common actions. The Shortcuts bar can accept suggested words and spellings. It’s also how you switch between language, emoji, and onscreen keyboards, and you can use keyboard shortcuts, too.

Use the Shortcuts bar to accept suggested words and spellings

As you type, you can do the following with the Shortcuts bar:

  • Accept a suggested word by tapping it in the Shortcuts bar.
  • Accept a suggestion highlighted in the Shortcuts bar by entering a space or punctuation. (If you enter a comma, period, or other punctuation after entering a space to accept a suggestion, the space is deleted.)
  • Reject the suggestions by tapping your original word (shown with quotation marks in the Shortcuts bar).

To turn off the suggestions, go to Settings > General > Keyboard, then turn off Predictive Text.

Use the Shortcuts bar to switch between language, emoji, and onscreen keyboards

The Shortcuts bar switches between the onscreen keyboard, an emoji keyboard, the language keyboard for your region, and other language keyboards that you add.

  1. Do one of the following:
    • Tap the Keyboard Shortcut button in the Shortcuts bar.
    • If you installed additional language keyboards, tap the language button next to the predictive text suggestions (opposite of the Dictation button in the Shortcuts bar).
  2. Choose an option.

Use the Shortcuts bar for other shortcuts

  • Use app-specific shortcuts: Buttons on the outer edges of the Shortcuts bar vary depending on the app you’re using or the task you’re doing. Each app is different—try out the Shortcuts bar to see what you can do.
  • Change keyboard settings: Tap the Keyboard Shortcut button (or the language button that replaced it), then tap Keyboard Settings.
  • Minimize the Shortcuts bar: Tap the Keyboard Shortcut button (or the language button that replaced it), then tap Minimize. To see the full Shortcuts bar, tap the minimized version.
  • Dictate text: Tap the Dictation button, then speak. When you’re finished, tap the Keyboard button at the bottom of the screen.

Use keyboard shortcuts

Keyboard shortcuts on an Apple external keyboard let you perform the following actions on iPad:

  • Quickly switch between apps: Press and hold the Command key, then press Tab until you reach the app you want to open.
  • Open Search: Press Command-Space.
  • Navigate between lists, text fields, and more: Press Tab to navigate between areas of an app. For example, in Notes, with the Folders list showing, press Tab to switch between the Folders list, the Notes list, and the search field.
  • View multitasking and other systemwide shortcuts: (Magic Keyboard for iPad and Smart Keyboard) Press and hold the Switch Keyboard key, then tap categories below the list.
  • View shortcuts for the app you’re using: Press and hold the Command key, then tap categories below the list.

You can change the actions that are performed by the Command key (and other modifier keys like Caps Lock). Go to Settings > General > Keyboard > Hardware Keyboard, tap Modifier Keys, tap a key, then choose the action you want it to perform.

To use additional keyboard shortcuts, go to Settings > Accessibility > Keyboards > Full Keyboard Access, then turn on Full Keyboard Access. See Control iPad using Full Keyboard Access.

Note: You can also set up text replacements that enter words or phrases after you type just a few characters. For example, type “omw” to enter “On my way!” See Set up shorthand for frequently used text on iPad.

It’s also possible to accept suggested words before you finish typing them. Read our article, Use predictive text on iPad.