Got a tip for us?

iPad

The iPad is a tablet computer from Apple that runs the iOS mobile operating system. Similar in functionality to the iPhone, the iPads purpose is often quite different, sometimes even serving as a general desktop computer replacement.

You can access iCloud Drive and store files, create folders, and share documents with friends and family. Your content is on all your devices signed in to the same Apple Account, including a Mac, where iCloud Drive is in the Finder.

iCloud Drive is built into the Files app, and you can also use it on Windows devices with iCloud for Windows, or online at iCloud.com. Storage limits depend on your iCloud storage plan. You can also pick the apps that can store and edit content there.

Turn on iCloud Drive

  1. Open Settings, tap [your name], and then tap iCloud.
  2. Tap Drive, then turn on Sync this iPad.

Browse iCloud Drive

  1. Open the Files app on your iPad.
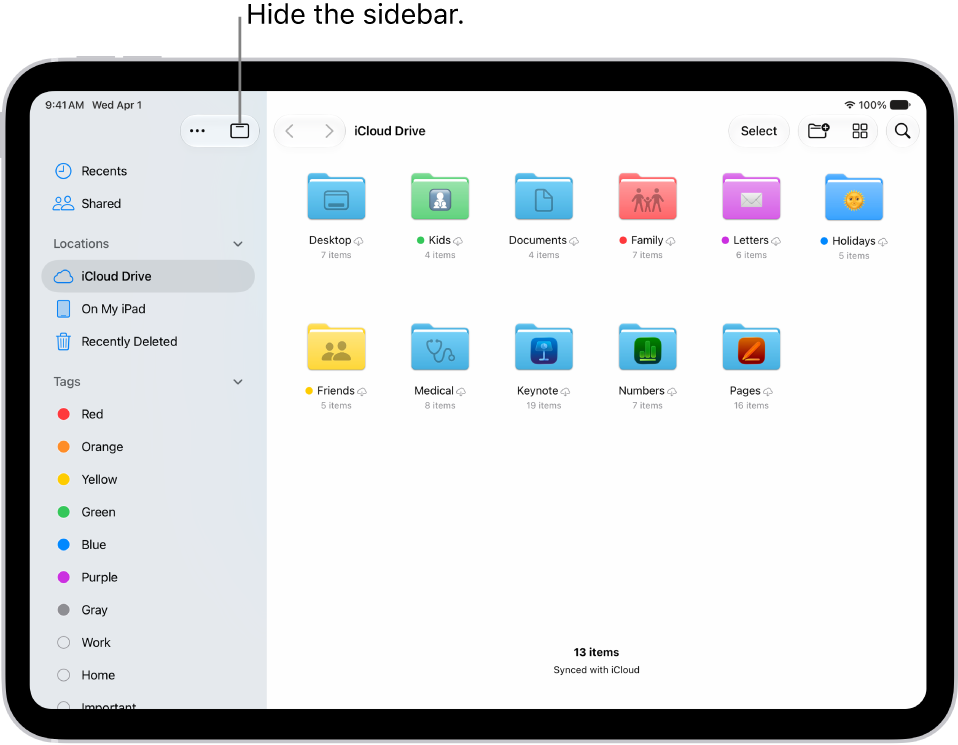
  2. Tap the Sidebar button at the top of the screen.
  3. Tap iCloud Drive below Locations.

    If you don’t see Locations, tap the Sidebar button again. If you don’t see iCloud Drive below Locations, tap Locations.

  4. To open a folder, tap it.

    See Modify files, folders, and view downloads.

Choose which apps use iCloud Drive

You decide which apps can store and edit content on iCloud Drive.

  1. Open Settings, tap [your name], and then tap iCloud.
  2. Tap See All next to Saved to iCloud.
  3. Turn on each app you want saved to iCloud, and turn off each one you don’t want saved.

See also

Tags: Files, iCloud

In the Files app, you can search for and view your documents, images, and other files.

You can focus your search on Recents or a location or tag, and start a new search at any time, too. You can also select an app to open a file, and choose a default app for a type of file.

Here’s how to find and view files and folders in Files on iPad.

Find a specific file or folder

  1. Open the Files app on your iPad.
  2. Tap the Search button and enter a filename, folder name, or document type in the search field.

    When you search, you have these options:

    • Focus the scope of your search: Below the search field, tap Recents or the name of the location or tag.
    • Hide the keyboard and see more results on the screen: Tap the search key on the keyboard.
    • Start a new search: Tap the Clear Text button in the search field.
    • Open a result: Tap it.

Select an app to open a file

When opening a file, you can specify the app you want to open it with.

  1. Open the Files app on your iPad.
  2. Touch and hold the file you want to open.
  3. Choose Open With from the menu. Choose an option.

Choose a default app to always open a file

  1. Open the Files app on your iPad.
  2. Touch and hold the file, then choose Get Info.
  3. Below the Preview, tap the pop-up menu next to Always Open With. Then select an app.

    When you select a new default app to open the file, a prompt appears to verify if you want to change the default app for that file or file type.

Open a file in Quick Look

You can preview an image file or a PDF in Quick Look.

  1. Open the Files app on your iPad.
  2. Touch and hold the file, then tap Quick Look.

    Tip: To open a specific type of file in Quick Look, touch and hold the file, tap Open With, then tap Preview with Quick Look.

Browse files and folders

  1. Open the Files app on your iPad.
  2. Tap Browse at the top of the screen. Then tap a document on the Browse screen.

    If you don’t see the Browse screen, tap Browse again.

  3. To view recently opened files, tap Recents at the top of the screen.
  4. To open a file, location, or folder, tap it.

    Note: If you haven’t installed the app that created a file, a preview of the file opens in Quick Look.

To mark folders as favorites or add tags, read our article, Tag a file or folder.

Change how files and folders are sorted

  1. Open the Files app on your iPad.
  2. From an open location or folder, tap the More button in portrait orientation or the Icons button in landscape orientation.
  3. Choose an option: Name, Kind, Date, Size, or Tags.

See also

Tag: Files

In the Files app, you can organize documents, images, and other files in folders.

You can create a folder, copy or compress a file, and make other changes to a file or a folder, or rename it. You can also modify multiple files or folders at the same time. Depending on the item, some options may not be available, and New Folder only appears where you’re allowed to create one.

Create a folder

  1. Open the Files app on your iPad.
  2. Open a location or an existing folder.
  3. Tap the New Folder button.

    Note: If you don’t see New Folder, you can’t create a folder in that location.

Copy, compress, and make other changes to a file or a folder

  1. Open the Files app on your iPad.
  2. Open a location or an existing folder.
  3. Touch and hold the file or folder. Choose an option: Copy, Move, Share, Compress, Duplicate, or Delete.

The item you select determines which options are available. An app library, which is a folder labeled with the app name, can’t be deleted or moved, for example.

To modify multiple files or folders at the same time, tap Select, tap to select the files or folders you want to modify, then tap an option at the top of the screen (Share, Duplicate, Move, Delete, and so on).

Rename a file or folder

  1. Open the Files app on your iPad.
  2. Open a location or an existing folder.
  3. Touch and hold the file or folder and choose Rename.

With Apple Intelligence, Files recommends a name above the keyboard when you rename a file.

Note: Apple Intelligence on iPadOS 27 or later is available on an Apple Intelligence-enabled iPad mini (A17 Pro) and iPad models with M1 or later. Apple Intelligence is not available in all languages or regions. Usage limits may apply.*

Zip or unzip a file or folder

To save storage space on your iPad, you can zip a file or folder to compress it, and you can unzip a compressed file or folder as well.

  1. Open the Files app on your iPad.
  2. Touch and hold the file or folder you want to zip. Then tap Compress.

To unzip a compressed file or folder, touch and hold it, then tap Uncompress.

Tag a file or folder

  1. Open the Files app on your iPad.
  2. Open a location or an existing folder.
  3. Touch and hold the file or folder, tap Tags, and then tap one or more tags.
  4. Tap Done.

In the sidebar, tagged items appear below Tags.

To remove a tag, tap it again.

Mark a folder as a favorite

  1. Open the Files app on your iPad.
  2. Open a location or an existing folder, touch and hold the folder, and tap Favorite.

*Apple Intelligence is available with Siri and device language set to Chinese (Simplified), Chinese (Traditional), Danish, Dutch, English, French, German, Italian, Japanese, Korean, Norwegian, Portuguese, Spanish, Swedish, Turkish, or Vietnamese. Some features may not be available in all regions or languages. Some devices may not be available in all regions. Siri AI is available in beta in iOS 27, iPadOS 27, macOS 27, watchOS 27, and visionOS 27 and requires an Apple Intelligence–enabled device set to a supported language. Available in English to start. Siri AI will not be initially available in the EU on iOS, iPadOS, and watchOS. Certain Apple Intelligence features that rely on server-side models are subject to daily usage limits, including but not limited to Siri AI, Intelligent Photo Editing Tools, Image Playground, and AFM 3 Cloud models in Shortcuts. Daily limits may vary by feature, request complexity, system demand, system policies, and other factors. Expanded access to such features will be available for a fee in the future. Use of these features is subject to the Apple Intelligence Terms and Conditions.

See also

Tag: Files

In the Files app, you can locate and view your files, organize and rearrange them in folders, compress, rename, and share them with friends, and transfer them to and from iCloud Drive and other locations. Downloads, iCloud Drive, and Recents are all in the sidebar.

  1. Open the Files app on your iPad.
  2. Do any of the following:

    • View files downloaded from email or the internet: Tap the Sidebar button at the top of the screen and tap Downloads in the sidebar. See Find your downloaded files.

      Note: If you don’t see the Sidebar button, tap the Hide Sidebar button.

    • Browse your files on iCloud Drive: Tap the Sidebar button at the top of the screen. See Browse iCloud Drive.
    • View files you opened recently: Tap the Sidebar button at the top of the screen and then tap Recents at the top of the sidebar.
    • View shared files: Tap the Sidebar button at the top of the screen and then tap Shared in the sidebar.
    • Copy, move, share, or delete a file or folder: Locate the file or folder, touch and hold it and then tap Copy, Move, Share, or Delete. See Modify files and folders in Files.
Tag: Files

You can copy, move, customize, share, and delete your documents, images, folders, and other files on iPad.

You can add colors and icons to your folders to make them easier to spot, and change your view of the files in a location or folder to icons, a list, or columns. You can also move a file or folder to a new place.

Here’s how to modify files and folders in Files on iPad.

The Files app displaying multiple folders and locations named Downloads, Letters, Family, and so on. At the bottom of the screen are buttons for Recent files, Shared files, and the Browse tab.

Customize the appearance of your folders

Color and icons make your folders easier to spot.

  1. Go to the Files app on your iPad.
  2. Touch and hold the folder you want to customize, then choose Customize Folder & Tags.
  3. Tap Tags, choose a color, and then tap the Back button.
  4. Select an icon or tap Emoji to add an emoji to the folder.

To remove the icon from the folder, tap Clear below the icons.

Change to icon, list, or column view

In an open location or folder on iPad, you can change your view of the files.

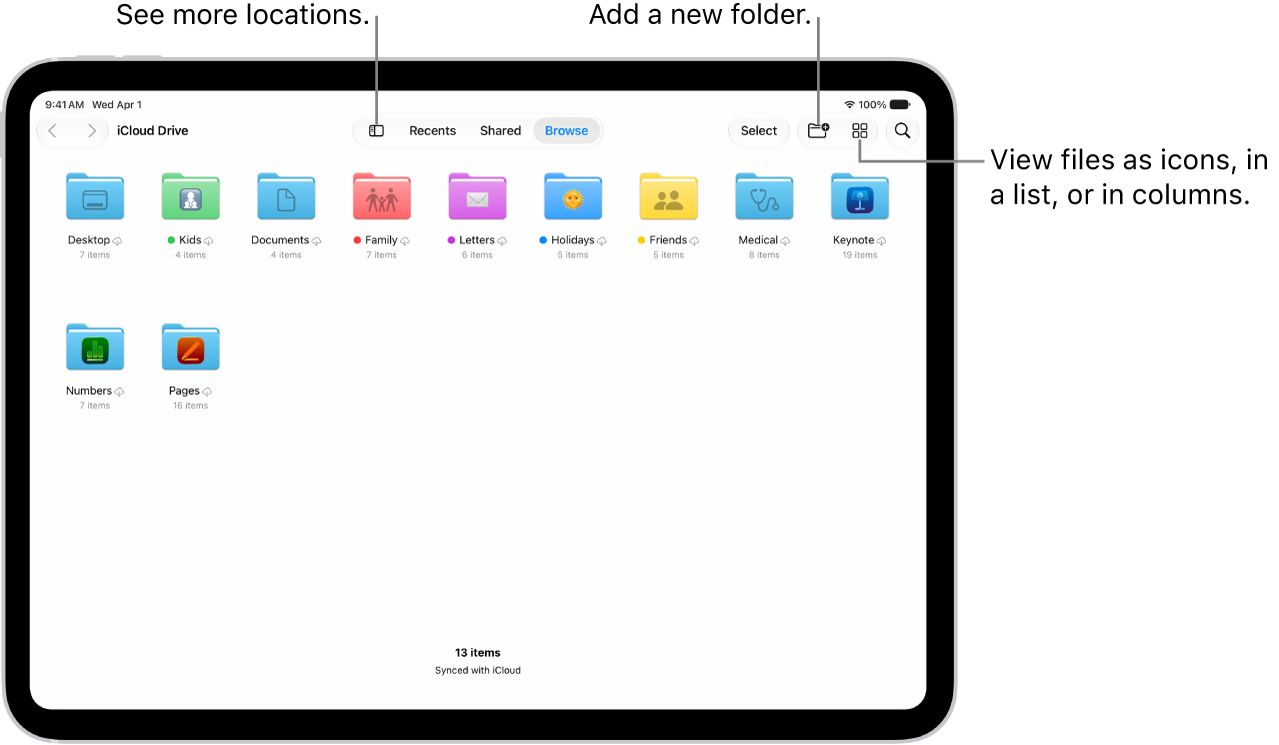
The Files app showing the files and folders in your iCloud Drive. At the top of the screen are buttons for selecting items, creating a new folder, changing the view (List, Icons, Columns), and Search.

  1. Start the Files app on your iPad.
  2. Tap a location at the top of the screen—Recents, Shared, or Browse— or tap the Sidebar button. Tap a location in the sidebar.
  3. Tap the List button, the Icons button, or the ColumnView button and choose how to view the files.

    To look deeper into a file hierarchy in List view, tap the Forward button next to a folder to expand it.

    To look deeper into a folder hierarchy in the Column view, tap an item in the rightmost column. To see a preview of a file along with its metadata (such as its kind, size, and creation date), tap the file in Column view. (If the preview doesn’t appear in the rightmost column, swipe left.) To view the file and perform various actions on it without leaving Files, tap Open below the file preview.

Move a folder to the Dock for easy access

To make a folder you access frequently easy to find and open, move it to the Dock.

  1. Start the Files app on your iPad.
  2. Touch and hold the folder you want to move until a menu opens.
  3. Choose Add To in the menu and tap Dock.

You can tap the folder in the Dock to expand it and see the files in it. To open a file from a folder in an app, drag the file to the app in the Dock or, if the app is already open, directly into the app’s window. For example, if you have Messages open, you can drag a file from a folder directly into a conversation you’ve pulled up.

Rearrange the sidebar

  1. Start the Files app on your iPad.
  2. Tap the Sidebar button to show the sidebar.
  3. Tap the More button at the top of the sidebar, tap Edit Sidebar, and then do any of the following:
    • Hide a location: Turn the location off.
    • Delete a tag and remove it from all items: Tap the Remove button next to the tag. (See Tag a file or folder.)
    • Remove an item from the Favorites list: Tap the Remove button next to the item. (See Mark a folder as a favorite.)
    • Change the order of an item: Touch and hold the Reorder button and then drag it to a new position.

Delete a file or folder

  1. Start the Files app on your iPad.
  2. Locate the file or folder you want to delete.
  3. Touch and hold the item and tap Delete.

See also

Tag: Files

With Screen Time, you can get information about how much time you spend on your devices—including which apps and websites you use and for how long.

Time Allowances help you balance time across entertainment, games, and social media apps, and schedules manage when those apps are available. Content restrictions manage what can be accessed, and you can use Screen Time across all your devices and view your Screen Time summaries. You can also quickly check your device use with a Screen Time widget on your Home Screen.

Note: To use all the latest Screen Time features, you need iPadOS 27, iOS 27, macOS 27, visionOS 27, watchOS 27, or later on all your Apple devices. For a Family Sharing group, upgrade every device to iPadOS 27, iOS 27, macOS 27, visionOS 27, watchOS 27, or later before setting these features up.

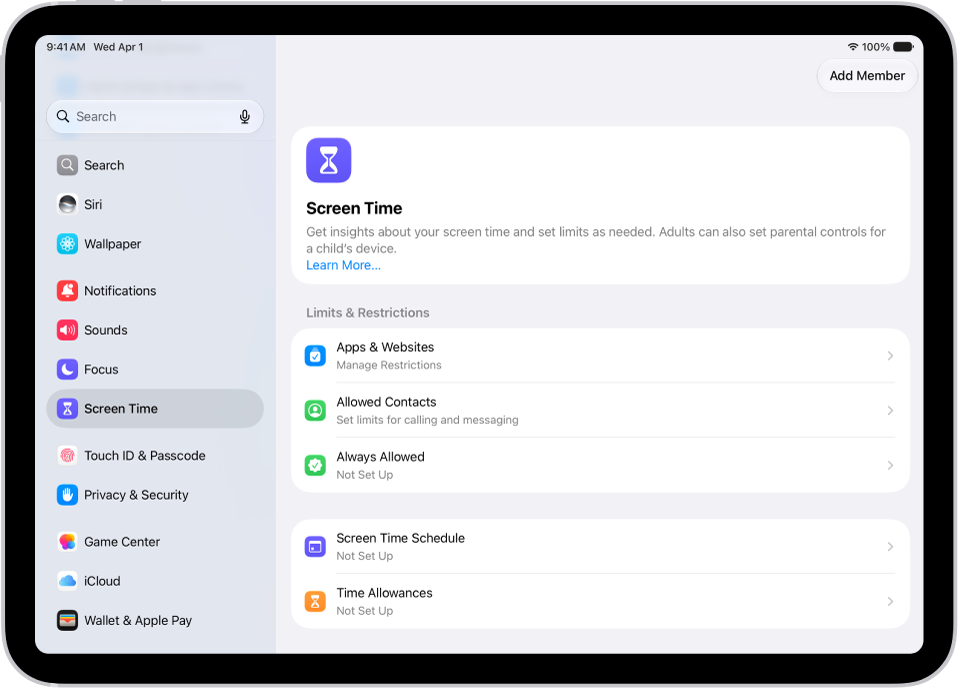
An image of Screen Time in Settings with options for Screen Time Schedules, Time Allowances, and more.

Turn on Screen Time

  1. Open the Settings app on your iPad.
  2. Tap Screen Time and then do any of the following:

    • Tap Screen Time Schedule, then tap Turn On App & Website Activity.
    • Tap Time Allowances, then tap Turn On App & Website Activity.
    • Tap Manage Screen Time, then tap Turn On App & Website Activity.

    Note: You can quickly check your device use by adding a Screen Time widget to your Home Screen.

Use Screen Time across your devices

Syncing your Screen Time settings and reports across your iPad, iPhone, and Mac where you’re signed in to the same Apple Account shares your screen time schedules, time allowances, and usage data across those devices. It also lets you see your combined Screen Time activity across devices.

  1. Open the Settings app on your iPad.
  2. Tap Screen Time, tap Manage Screen Time, turn on Share Across Devices.

Any Screen Time limits or schedules you set apply to your iPad, iPhone, and Mac while Share Across Devices is on. Turn it off, and each device has its own Screen Time settings.

Note: Share Across Devices requires macOS 27, iOS 27, iPadOS 27, watchOS 27, or visionOS 27 or later on all your Apple devices. When you’re setting it up in a Family Sharing group, each device has to run macOS 27, iOS 27, iPadOS 27, watchOS 27, or visionOS 27 or later.

View your Screen Time summaries

With Screen Time turned on, a weekly report gives you an overview of how often you pick up your iPad and other devices, the time you spend on your devices, your most used apps, and more.

  1. Open the Settings app on your iPad.
  2. Tap Screen Time, then tap Daily Average.
  3. Tap Week to show a summary of weekly use, or tap Day to show a summary of daily use.

    You can also scroll down to view a report of your Pickups and Notifications to see how many times you picked up your devices and how many notifications you received. You can swipe left and right on your Screen Time summaries to view your history.

Turn off Screen Time

  1. Open the Settings app on your iPad.
  2. Tap Screen Time and then do any of the following:
    • Turn off Screen Time: Tap Manage Screen Time and then tap Turn Off App & Website Activity.
    • Turn off your Screen Time schedule: Tap Screen Time Schedule and then turn off Schedule.
    • Turn off your Time Allowances for apps: Tap Time Allowances, tap Manage Categories, select a category, and select Delete (your category name) Category.

You can also view your summary by tapping a Screen Time Weekly Report notification when one appears on your screen. (If the notification disappears, you can find it in Notification Center.)

See also

You can create a passcode that you must enter before changing Screen Time settings you selected for yourself. After you set a passcode, you can change or remove it later in Settings.

You can also set up Screen Time Passcode Recovery, so your Apple Account can reset a forgotten Screen Time passcode. The passcode protects only the settings you chose for yourself.

Here’s how to create, change, or remove a Screen Time passcode on iPad.

Create a Screen Time passcode

You can choose to enter a Screen Time passcode before you can change the settings you’ve chosen for yourself.

  1. Open the Settings app on your iPad.
  2. Tap Screen Time, tap Manage Screen Time, and then tap Lock Screen Time Settings.
  3. Enter a four-digit passcode and then enter the passcode again to verify it.

    Note: After setting a passcode for yourself, you can also set up Screen Time Passcode Recovery. If you set up this feature, you can use your Apple Account to reset your Screen Time passcode if you ever forget it.

Change a Screen Time passcode

  1. Open the Settings app on your iPad.
  2. Tap Screen Time and tap Change Screen Time Passcode. Tap Change Screen Time Passcode.
  3. Enter your current passcode, enter a new four-digit passcode, and then enter the new passcode again to verify it.

Remove a Screen Time passcode

  1. Open the Settings app on your iPad.
  2. Tap Screen Time, tap Change Screen Time Passcode, select Turn Off Screen Time Passcode, and enter your current passcode.

See also

There are multiple ways to turn your iPad on and off—you can use the buttons on the top and side of your iPad, or you can use the controls in Settings and Control Center.

An iPad that doesn’t turn on might need its battery charged. And if your iPad isn’t working as expected, restarting it by turning it off and then on can help, and if that doesn’t fix the issue, you can force it to restart.

Here’s how to turn iPad on or off.

Turn on iPad

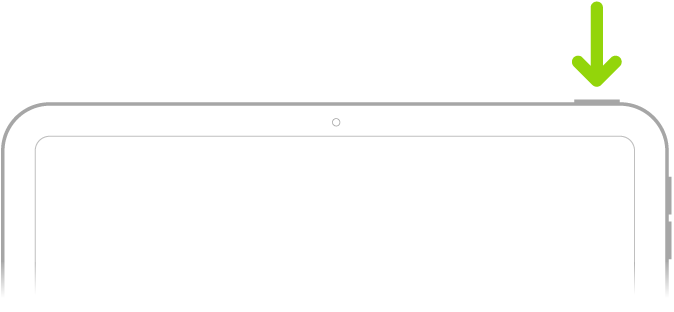
Press and hold the top button until the Apple logo appears.

A green arrow pointing to the button on the top-right of iPad.

When iPad won’t turn on, you might need to charge the battery.

Turn off iPad (models with Face ID or with Touch ID in the top button)

If your iPad doesn’t have the Home button, do the following:

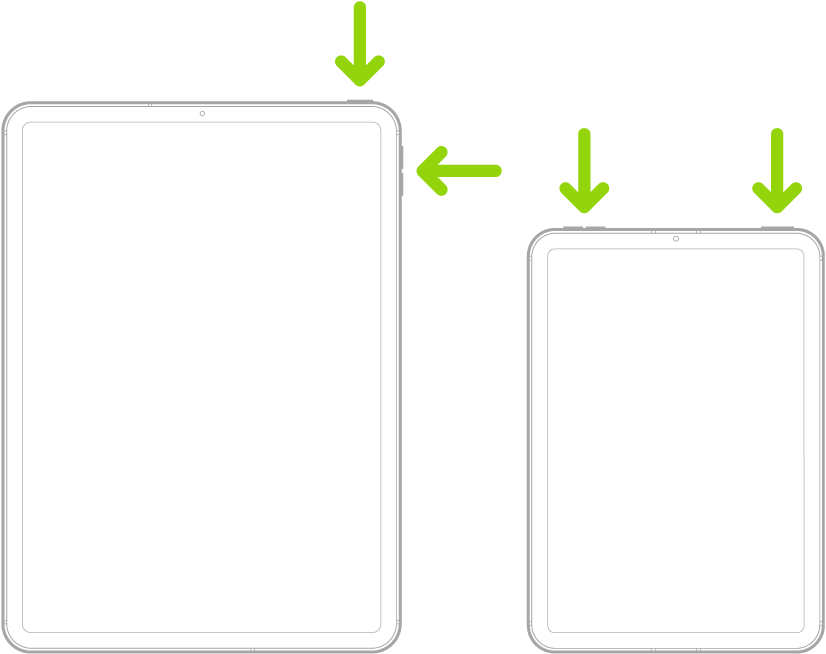
  1. Simultaneously press and hold the top button and either volume button until the Power Off slider appears.

    Two iPad models, each with a top button. One model has volume buttons on the side; the other has volume buttons at the top.

  2. Drag the slider to turn off iPad.

Turn iPad off (models with the Home button)

If your iPad has the Home button, do the following:

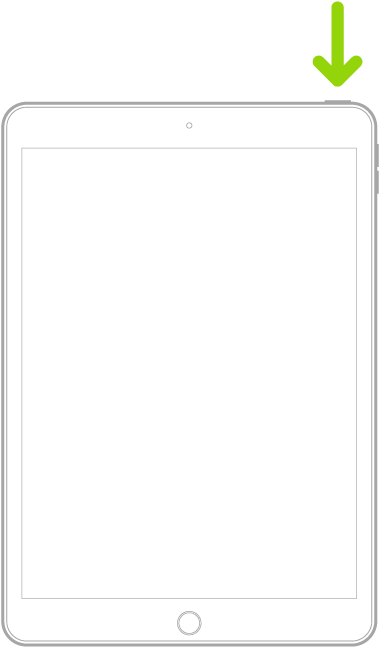
  1. Press and hold the top button.

    An iPad with a Home button. An arrow points to the top button.

  2. Drag the slider to turn off iPad.

Turn off iPad in Control Center

  1. Open Control Center.
  2. Touch and hold the Power button in the top-right corner of your screen.
  3. Drag the slider to turn off iPad.

Turn off iPad in Settings

  1. Open the Settings app on your iPad.
  2. Tap General and scroll down. Tap Shut Down.
  3. Drag the slider to turn off iPad.

Restarting your iPad by turning it off and back on can help when it isn’t working as expected. Still having the issue? Try forcing it to restart.

See also

Tag: Setup

If iPad isn’t responding, and you can’t restart it by turning it off then on, try forcing it to restart. How you force restart iPad depends on your model: one with Face ID or with Touch ID in the top button, or one with the Home button.

Force restart iPad (models with Face ID or with Touch ID in the top button)

If your iPad doesn’t have the Home button, do the following:

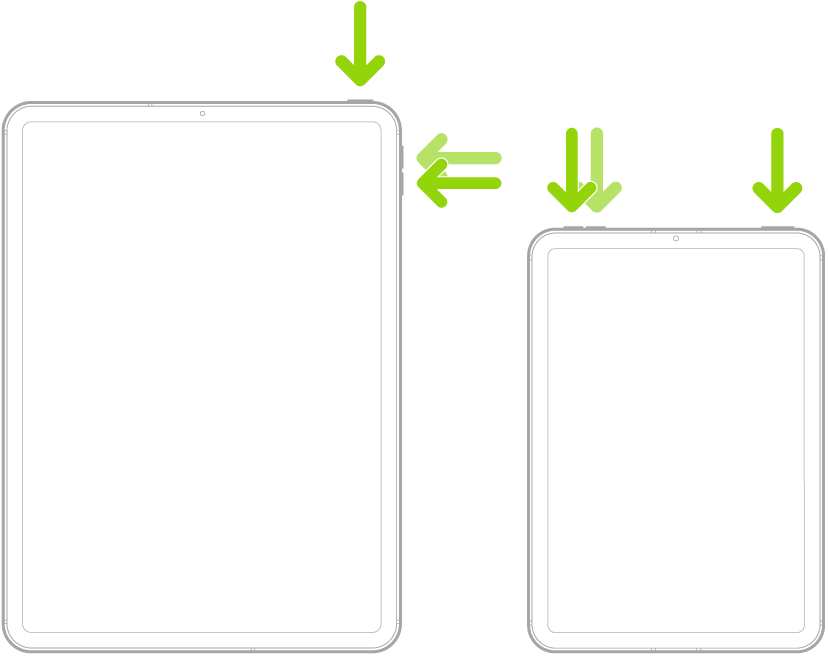
  1. Press and quickly release the volume button nearest to the top button.
  2. Press and quickly release the volume button farthest from the top button.
  3. Press and hold the top button.
  4. When the Apple logo appears, release the top button.

Two iPad models, each with a top button. One model has volume buttons on the side; the other has volume buttons at the top.

Force restart iPad (models with the Home button)

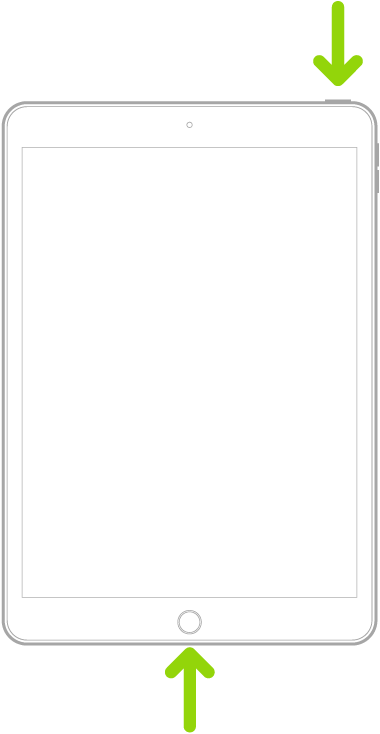
Press and hold the top button and the Home button at the same time. When the Apple logo appears, release both buttons.

An iPad with a Home button. Arrows point to the Home button and the top button.

Tag: iPadOS

Use the Phone app to listen to, delete, read, share, or get a summary of your voicemail messages. You can also check your voicemail messages when Visual Voicemail isn’t available.

You can also share a message, or recover a deleted one. A transcription of each voicemail appears in the bottom half of the screen. Your messages stay until you delete them, unless your carrier erases them first when they aren’t stored in iCloud.

Play, share, or delete a voicemail message

Siri: Ask Siri something like, “Play the voicemail from Eliza.” Learn how to use Siri.

Or without using Siri:

  1. Open the Phone app on your iPad.
  2. Tap Voicemail, then tap a message.
  3. Do any of the following:

    • Play the message: Tap the Play button.

      Messages are saved until you delete them (or until your carrier erases them, if they’re not stored in iCloud).

    • Read a transcript of the message: A transcription of the voicemail appears in the bottom half of the screen.
    • Share the message: Tap the Share button.
    • Delete the message: Tap the Delete button.

      Important: In some countries or regions, deleted messages may be permanently erased by your carrier. Your voice messages may also be deleted if you change your SIM card.

To recover a deleted message, tap Deleted Messages, tap the message, then tap the Undelete button.

Quick tip: Apple Intelligence can show you Siri suggested actions based on the transcript, such as adding a reminder or creating a calendar event. To choose whether you see these suggestions, go to Settings > Apps > Phone and turn Suggestions in Voicemail on or off.

Siri suggested actions are available in English. Apple Intelligence on iPadOS 27 or later is available on an Apple Intelligence-enabled iPad mini (A17 Pro) and iPad models with M1 or later. Apple Intelligence is not available in all languages or regions. Usage limits may apply.*

Check your messages when Visual Voicemail isn’t available

  • On your iPad: Tap Voicemail, then follow the instructions.
  • On another phone: Dial your own mobile number, press * or # (depending on your carrier) to bypass your greeting, then enter your voicemail password.

*Apple Intelligence is available with Siri and device language set to Chinese (Simplified), Chinese (Traditional), Danish, Dutch, English, French, German, Italian, Japanese, Korean, Norwegian, Portuguese, Spanish, Swedish, Turkish, or Vietnamese. Some features may not be available in all regions or languages. Some devices may not be available in all regions. Siri AI is available in beta in iOS 27, iPadOS 27, macOS 27, watchOS 27, and visionOS 27 and requires an Apple Intelligence–enabled device set to a supported language. Available in English to start. Siri AI will not be initially available in the EU on iOS, iPadOS, and watchOS. Certain Apple Intelligence features that rely on server-side models are subject to daily usage limits, including but not limited to Siri AI, Intelligent Photo Editing Tools, Image Playground, and AFM 3 Cloud models in Shortcuts. Daily limits may vary by feature, request complexity, system demand, system policies, and other factors. Expanded access to such features will be available for a fee in the future. Use of these features is subject to the Apple Intelligence Terms and Conditions.

See also

Tag: Phone