Got a tip for us?

iPhone

The iPhone is a smartphone from Apple that runs the iOS mobile operating system. Between its apps, communication features, the camera, mobile internet access, and other functionalities, the iPhone has quickly become an integral part of many peoples tech lives.

The accessibility features for speech on iPhone are built-in tools for communicating in the way that works best for you, whether you’re nonspeaking, at risk of speech loss, or someone with a speech disability. You can have what you type spoken out loud, create a synthesized voice that sounds like you, and more.

You can even control iPhone with your voice, using spoken commands or simple sounds like an S-sound or a mouth pop. Siri can also wait longer for you to finish speaking, and Dictation lets you enter text using just your voice.

To explore accessibility features for speech on an iPhone, go to Settings > Accessibility, then scroll down to the Speech section.

Type to speak

  • Live Speech: If you’re unable to speak or you have a speech disability, type what you want to say and have iPhone speak it.
  • Personal Voice: If you’re at risk of losing your ability to speak, create a synthesized voice that sounds like you.
  • Type to Siri: Type your Siri requests instead of speaking them.

Control iPhone with your voice

  • Use voice commands: Speak commands to navigate and interact with what’s on the screen, dictate and edit text, and more.
  • Use simple sounds: You can use voiced or voiceless sounds—like an S-sound or a mouth pop—to navigate and interact with what’s on the screen.
  • Vocal Shortcuts: Have iPhone perform an action when you speak a word or another sound of your choosing.
  • Have Siri listen for atypical speech: If you have an acquired or progressive condition that affects speech, have Siri recognize a wider range of atypical speech patterns.

Siri can also wait longer for you to finish speaking. And with Dictation, you can enter text using just your voice.

Quick tip: Your go-to accessibility features and settings are a button click away, or you can control them from Control Center.

With Visual Look Up on your iPhone, you can identify and learn about architectural landmarks, popular statues, famous art, plants, pets, books, and more that appear in photos and images. It can also identify food and suggest related recipes, and you can use it in Photos, Safari, Quick Look, and more.

A starred Info button tells you Visual Look Up has something to show you, and it works with a paused video frame, too. It isn’t available in all regions or languages, though.

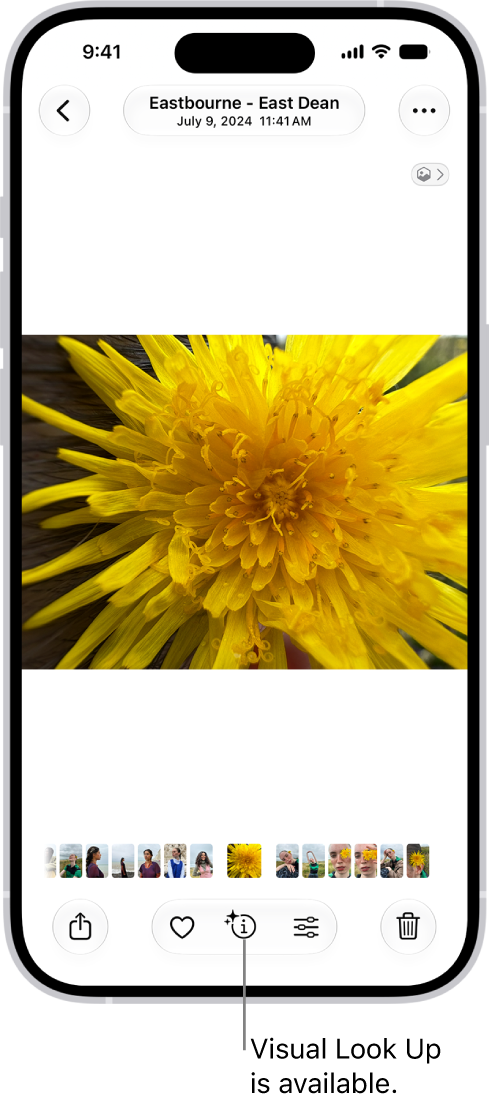
A photo is open in the Photos app library. At the bottom of the screen, the Info button displays an icon indicating that Visual Look Up information is available.

  1. On your iPhone, open a photo or image in full screen, or pause a video on any frame.
    If the Info button displays a symbol with stars such as the Detected Food Info button or the Detected Dog Info button, Visual Look Up is available.
  2. Tap the starred Info button and then tap Look Up at the top of the photo information to view the Visual Look Up results.
  3. Tap the Close button to close the Visual Look Up results and swipe down on the photo or video frame to close the photo information.

Visual Look Up isn’t available in all regions or languages, Apple says.

Tag: Photos

You can start a FaceTime call on your iPhone and move the call to another device where you’re signed in to the same Apple Account. With Continuity Camera and Mic, you can also use iPhone as a webcam and microphone for FaceTime calls on your Mac or Apple TV 4K.

During a FaceTime call, the call can move from your iPhone to your iPad, your Mac, or Apple TV 4K. Your selected contact information for the call must match on both devices, though.

Note: The device you want to hand off to needs the same selected contact information in its FaceTime settings as your call uses, which is shown in Settings > Apps > FaceTime.

Hand off a FaceTime call from iPhone to iPad or Mac

You can hand off a FaceTime call on your iPhone to your iPad or Mac while you’re on it. This requires iOS 16, iPadOS 16, macOS 13, or later, and you also need to be signed in to the same Apple Account on both devices.

  1. During a call in the FaceTime app on your iPhone, do one of the following on the other device:
    • Tap the notification with the suggestion “Move call to this [device].”
    • Tap the FaceTime video call button or the Call button at the top of the screen.
  2. Tap Switch or Join and tap Switch or Join to confirm.

The call moves to the new device. On the original device, a banner appears confirming that the call was continued elsewhere, along with a Switch button, which you can tap if you want to bring the call back.

Hand off a FaceTime call from your iPhone to Apple TV 4K

If both devices are signed in to the same Apple Account, you can start or receive a FaceTime call on your iPhone, then hand off the call to Apple TV 4K (2nd generation or later) and its larger screen. After you hand off the call, Apple TV 4K takes it over, and your iPhone serves as a webcam and microphone for Apple TV 4K until the call ends. To use Continuity Camera with Apple TV 4K, you need iPhone XR, iPhone XS, or later, and Apple TV 4K (2nd generation or later).

On an iPhone, you can report spam messages to Apple, recover messages from the Spam folder that were incorrectly marked as spam, and block specific contacts to stop receiving their messages.

What happens to a report depends on how the message arrived. With SMS, MMS, or RCS, reporting spam can share that information with your carrier and its affiliates, depending on your carrier and country or region. You can also check who you blocked.

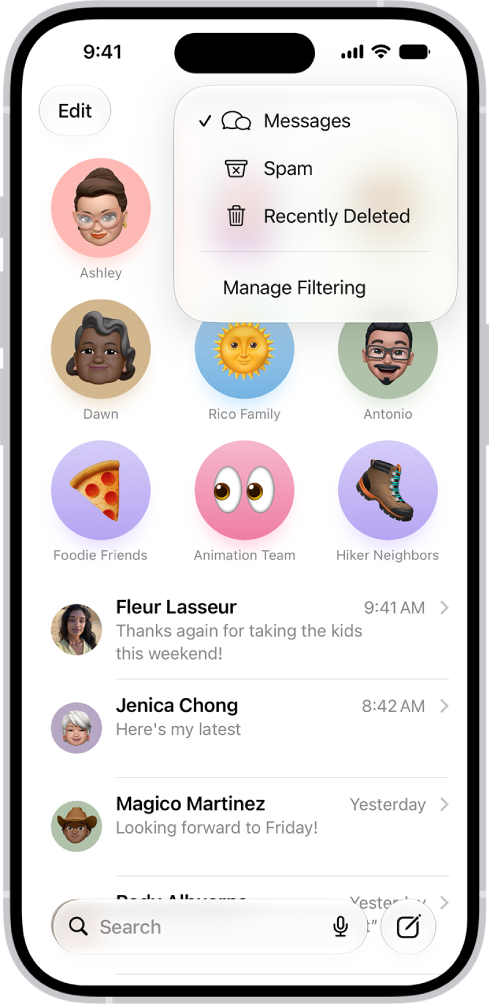
A conversation list in Messages. All messages are shown, because no filter is selected in the Filter menu.

Report spam messages

With iMessage, you can report spam messages to Apple. Spam that arrives with SMS, MMS, or RCS is different: Depending on your carrier and country or region, reporting it shares this information with your carrier and its affiliates.

  1. Open the Messages app on your iPhone.
  2. Do one of the following:

    • If you haven’t opened the message: Swipe left on the message, tap the Delete button, and tap Delete and Report Spam.
    • If you’ve already opened the message: A Report Spam link appears at the bottom of any message from any unknown sender. Tap Report Spam and tap Delete and Report Spam.
      Note: You can’t report a message after you’ve replied to it.
    • If you don’t see the option to report spam messages you receive with SMS, MMS, or RCS: Contact your carrier.

Report a message you received with iMessage, and it’s sent to Apple with the sender’s information, then permanently deleted from your iPhone. If you report and delete messages by accident, you can recover them. Since reporting spam doesn’t stop the sender from sending messages, block the contact if you want to avoid receiving their messages. And if you’d rather not get incoming messages from new numbers, you can filter them.

Recover messages in the Spam folder

Detected spam lands in the spam folder, so it doesn’t appear in your conversation list. You can check whether messages are inadvertently marked as spam.

  1. Open the Messages app on your iPhone.
  2. In the conversation list, tap the Filter button. Tap Spam.
  3. Tap a message that isn’t spam and tap Not Spam. Tap Move to Messages.

The conversation moves to your main conversation list, where you can send a reply. Tap the Filter button, then tap Messages.

Spam filtering is on by default. To turn it on or off, tap the Filter button, tap Manage Filtering, then turn on or off “Filter spam.”

Block messages from a specific person or phone number

Messages from a contact or phone number you block aren’t delivered, and the sender doesn’t know their messages are blocked.

Note: Blocking a contact in Messages blocks them in Mail, Phone, FaceTime, Calendar, and other apps, too.

  1. Open the Messages app on your iPhone.
  2. Go to the conversation with the person you want to block and tap the person’s icon at the top.
  3. Tap Info and scroll down. Tap Block Contact.

You can remove someone’s access to shared items.

Quick tip: Since you can’t block a group conversation, you can simply leave it or stop its notifications instead of blocking everyone in the group.

Check who you blocked

Not getting someone’s messages? Check whether they’re in your Blocked Contacts. Blocking a contact in Messages also blocks them in Mail, Phone, FaceTime, Calendar, and other apps.

  1. Open the Settings app on your iPhone.
  2. Tap Privacy & Security, tap Blocked Contacts, and do any of the following:
    • Unblock a number you’ve blocked: Tap [number] Unknown and swipe left on a number in the list. Then tap Unblock. Or tap Edit, then tap the Remove button.
    • Add additional contacts or numbers directly to the list: Tap Add Blocked Contact.

A sender can’t find out if they’re blocked.

Quick tip: Screen Time offers another way to prevent unwanted messages: When you block messages with it, allow your contacts only.

On an iPhone, you can crop, rotate, or flip an image in Preview. You can also remove the background or adjust the image size.

To rotate the image, you can choose Rotate Left or Rotate Right, and to flip the image, there’s Flip Horizontally or Flip Vertically. The Remove Background option appears only when Preview finds a subject, such as a person, animal, or object. You can also undo a change if you make one you don’t want.

Crop an image

  1. Open the Preview app on your iPhone.
  2. Open an image.
  3. Tap the Crop button.
  4. Drag the blue handles to select an area and then tap Crop. (If Crop doesn’t appear, tap within the selected area.)

Rotate or flip an image

  1. Open the Preview app on your iPhone.
  2. Open an image.
  3. Do any of the following:
    • Rotate the image: Tap the More button. Choose Rotate Left or Rotate Right.
    • Flip the image: Tap the More button and then choose Flip Horizontally or Flip Vertically.

Remove the background from an image

  1. Open the Preview app on your iPhone.
  2. Open an image.
  3. Tap the More button, then tap Remove Background.

Note: You’ll only see the Remove Background option if Preview detects a subject in the image, such as a person, animal, or object.

Adjust the size of an image

  1. Open the Preview app on your iPhone.
  2. Open an image.
  3. Tap the More button, then tap Adjust Size. Choose options, then tap Done.

To undo a change, tap the More button, then tap Undo.

Tag: Preview

On your iPhone, you can change whether or not you’re notified about text messages you receive, and how the notifications appear or sound. For example, you can turn off message notifications so you aren’t distracted when you’re in a meeting, or assign a special sound for certain contacts so you know when you get a message from them.

With notifications off, you still receive messages, and senders see a note that you have notifications silenced. You can also stop sharing your Focus status with one person, and mute the sounds for sent and received messages.

Here’s how to stop, mute, and change message notifications on iPhone.
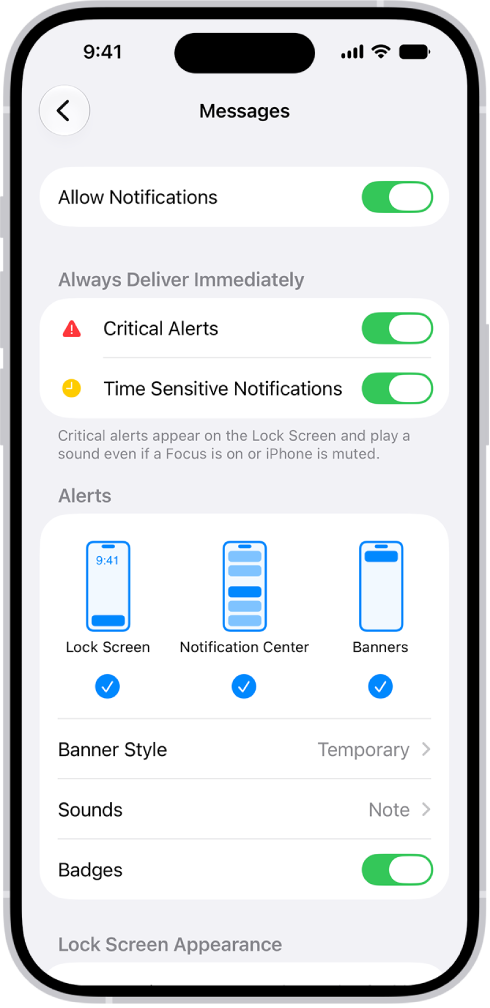
Messages Notification settings in Settings.

Stop all notifications

You can turn off notifications for activity in the Messages app and still receive messages. When you’re ready to read them, open Messages to catch up on the texts that came in while notifications were off.

  1. Start the Settings app on your iPhone.
  2. Tap Notifications, then tap Messages.
  3. Turn off Allow Notifications.

Note: Senders receive a note indicating that you have notifications silenced.

Turn on read receipts to let people know you’ve read their messages.

To get notified again, turn on Allow Notifications. And to hear them, too, check that your volume is audible and the Ring/Silent switch isn’t in Silent mode.

Notifications from other Apple apps and third-party apps can be stopped, too.

Stop sharing your Focus Status with one person

If your Focus or sleep schedule is pausing notifications, your status appears in the Messages app so people know you’re not receiving messages, though you can turn this off in one-to-one conversations.

  1. Start the Messages app on your iPhone.
  2. Tap a conversation, then tap the contact icon at the top of the conversation.
  3. Turn off Share Focus Status.

Change sounds or vibrations for sent and received messages

For alerts, you can mute them or set the sound volume, choose between a tone or sound, or change the notification vibration pattern when the phone is silenced.

  1. Start the Settings app on your iPhone.
  2. Tap Notifications, then tap Messages.
  3. Tap Sounds and then do any of the following:
    • Mute sounds: Tap None. This setting turns off the swoosh sound for sent messages and the tone for messages you receive.
    • Turn off vibrations: Tap Haptics (near the top), then tap None.
    • Choose a tone or sound: Tap Text Tone and tap a sound (or tap Tone Store to download one).
    • Choose a vibration pattern: Tap Text Tone, tap Haptics, and choose an option (or tap Create New Vibration to make your own).
  4. To set how many times a notification repeats, tap Customize Notifications and tap Repeat Alerts. Then choose an option. Alerts repeat at two-minute intervals.

You can also put the Ring/Silent switch in Silent mode.

To adjust the volume to be quieter or louder, go to the Settings app, tap Sounds & Haptics, then use the slider.

Note: Both the None and the Ring/Silent switch setting affect incoming and outgoing sounds, and you can’t mute only one of them.

Change the notification sound for certain people

Choose a specific sound or vibration pattern to play when a particular contact messages you.

  1. Start the Messages app on your iPhone.
  2. In a conversation with one person, tap the contact icon at the top of the conversation.
  3. Tap Info, tap Edit and tap Edit Contact Info. Then tap Text Tone.
    If you don’t see Edit, tap Create New Contact or Add to Existing Contact.
  4. Do any of the following:

    • Specify a tone or sound: Tap a sound below Alert Tones (or tap Tone Store to download one).
    • Specify a vibration pattern: Tap Haptics and then choose an option (or tap Create New Vibration to make your own).
    • Mute notifications for this conversation: Tap None below both Haptics and Alert Tones.

Turn on Emergency Bypass to give this contact the option to override a Focus, so their important messages can get through. You might do this for a family member, caretaker, or colleague, for example.

Mute one conversation

You can stop getting a conversation’s notifications while you still receive its messages.

  1. Start the Messages app on your iPhone.
  2. In the conversation list, do one of the following:
    • Swipe left on a conversation, then tap the Mute button.
    • Tap a conversation, tap the contact or icon at the top of the conversation, then turn on Hide Alerts.

Note: Senders receive a note indicating that you have notifications silenced.

To stop getting messages for one conversation completely, block a specific person or number or leave a group conversation.

Announce messages

Siri can announce messages on your iPhone speaker, supported headphones, and when using CarPlay.

On the Home Screen, in App Library, in Control Center, and in apps, you can use Quick Actions menus, see previews, and more. In Photos, you can preview an image and see a list of options. In Mail, there’s a preview of the message contents and a list of options, too.

Perform quick actions from Control Center, the Home Screen, and App Library

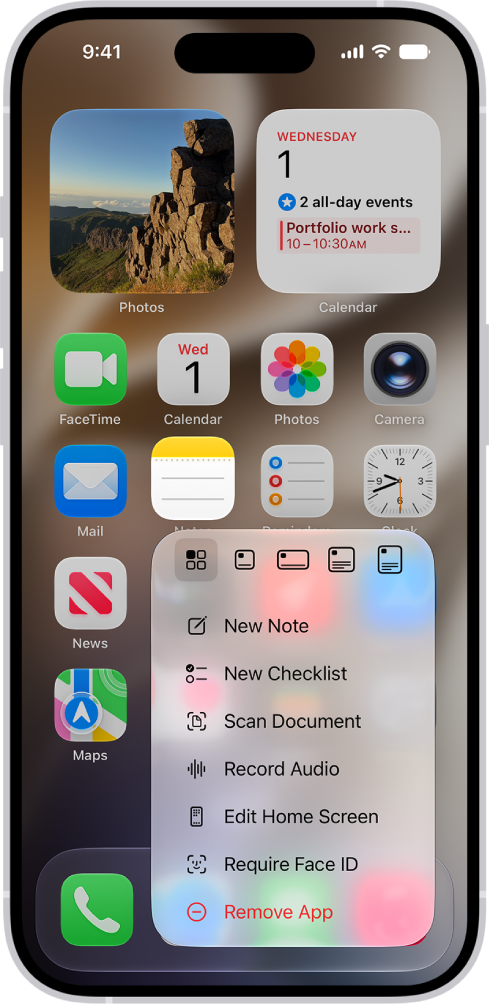
On the Home Screen and in Control Center and App Library, touch and hold apps to open Quick Actions menus.

A blurred Home Screen, with the Camera Quick Actions menu showing below the Camera app icon.

Here are a few examples:

  • Touch and hold Camera, then choose Selfie.
  • Touch and hold Maps, then choose Send My Location.
  • Touch and hold Notes, then choose New Note.

Note: Touch and hold an app too long before choosing a quick action, and all of the apps start to jiggle. If that happens, tap Done on an iPhone with Face ID, or on other iPhone models, press the Home button, and then try again.

See previews and other Quick Actions menus

  • In Photos, touch and hold an image to preview it and see a list of options.
  • In Mail, touch and hold a message in a mailbox to preview the message contents and see a list of options.
  • Open Control Center, then touch and hold an item like Camera or the brightness control to see options.
  • On the Lock Screen, touch and hold a notification to respond to it.
  • When typing, touch and hold the Space bar with one finger to move the insertion point.

You can use the scientific calculator for exponential, logarithmic, and trigonometric functions. You can also view complete expressions with parentheses, trigonometry, and multiple operations before you get the final answer.

You can work with stored values, use trigonometric and hyperbolic functions, choose radians or degrees, and use mathematical constants. You can even generate a random number between 0 and 1. It follows the standard order of operations, too, so multiplication is completed before addition and subtraction.

Note: The Calculator app uses the standard order of operations. For example, multiplication is completed before addition and subtraction. Add parentheses around expressions that you want calculated first.

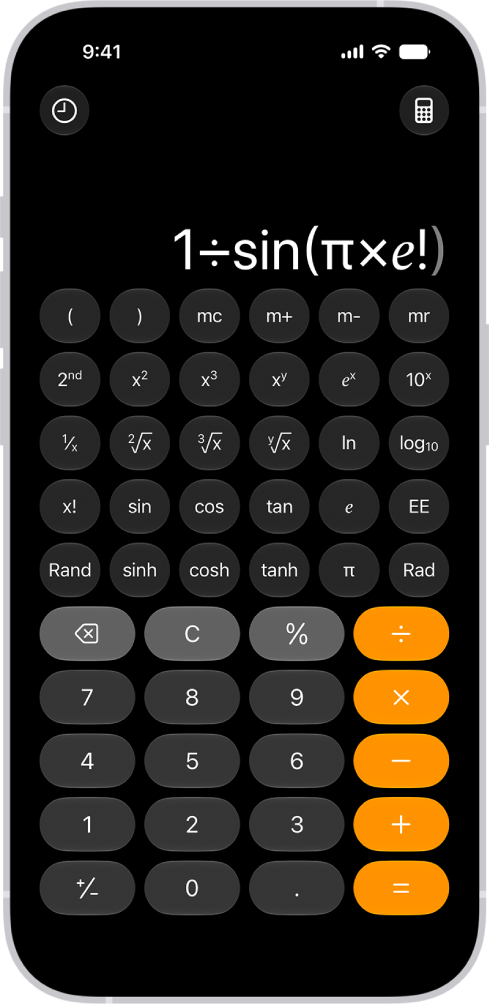
iPhone showing the scientific calculator with memory, exponential, logarithmic, and trigonometric functions.

Switch to the scientific calculator

  1. Open the Calculator app on your iPhone.
  2. Tap the Change Mode button and tap Scientific.

Work with stored values

  1. Open the Calculator app on your iPhone.
  2. Tap the Change Mode button and tap Scientific.
  3. As you calculate, you can do any of the following:
    • Add the value on the screen to memory: Tap m+.
    • Subtract the value on the screen from memory: Tap m-.
    • Recall the stored value in memory: Tap mr.
    • Clear the stored value from memory: Tap mc.

Use exponential and logarithmic functions or notation

  1. Open the Calculator app on your iPhone.
  2. Tap the Change Mode button and tap Scientific.
  3. Do any of the following:
    • Square a value: Enter a number and tap x2. Then tap =.
    • Cube a value: Enter a number, tap x3, and tap =.
    • Raise a value to the power of y: Enter a base number, tap xy and enter the value of y. Then tap =.
    • Raise e to the power of x: Enter the value of x, tap ex, and then tap =.
    • Raise 10 to the power of x: Enter the value of x, tap 10x then tap =.
    • Calculate a factorial: Enter a number and tap x!. Tap =.
    • Calculate a reciprocal: Enter a number, tap 1/x, and tap =.

Quick tip: Instead of tapping the × and 10x keys, tap EE as a shortcut for scientific notation.

Use the keys just below those keys to get the inverse functions: the square root, cube root, yth root, natural logarithm, and logarithm.

To access additional functions (such as yx or powers of 2), tap the “2nd” key near the left.

Use trigonometric and hyperbolic functions

  1. Open the Calculator app on your iPhone.
  2. Tap the Change Mode button and tap Scientific.
  3. Find any of the following:
    • Sine: Tap sin and enter a number. Tap =.
    • Cosine: Tap cos, enter a number, and then tap =.
    • Tangent: Tap tan and enter a number. Then tap =.
    • Hyperbolic sine: Tap sinh, enter a number, and then tap =.
    • Hyperbolic cosine: Tap cosh, enter a number, and tap =.
    • Hyperbolic tangent: Tap tanh, enter a number, and then tap =.

To access the inverse of these functions (such as arcsine or arctangent), tap the “2nd” key near the left.

Use radians or degrees

The scientific calculator uses degrees by default.

  1. Open the Calculator app on your iPhone.
  2. Tap the Change Mode button and tap Scientific.
  3. Tap Rad to switch to radians.

When you’re using radians instead of degrees, the label Rad appears, and the Rad key becomes Deg.

To switch back to degrees, tap the Deg key.

In portrait orientation (with your iPhone held vertically), you’ll find the Rad/Deg key just above the ÷ key. In landscape orientation (held horizontally), it’s near the bottom center.

Use mathematical constants

  1. Open the Calculator app on your iPhone.
  2. Tap the Change Mode button and tap Scientific.
  3. Do any of the following:
    • Insert pi: Tap π.
    • Insert Euler’s number: Tap ℯ.

Generate a random number between 0 and 1

  1. Open the Calculator app on your iPhone.
  2. Tap the Change Mode button and tap Scientific.
  3. Tap Rand.

Hold your iPhone vertically (in portrait orientation), and the Rand key sits just above the Delete key. Turn it horizontally (in landscape orientation), and the Rand key is in the bottom left.

With SharePlay, you can instantly stream supported content, listen to music, play games, and more in sync with a friend by holding your iPhone close to your friend’s iPhone. It works in apps that support SharePlay, where you pick the content you want to share.

Start SharePlay

  1. On your iPhone, in an app that supports SharePlay, tap the content you want to share.
  2. Hold your iPhone next to the iPhone of the person you want to share with.

    If they’re not in your contacts (or vice versa), you first need to share your contact information with them.

  3. Tap SharePlay.

The person you’re sharing with can accept or decline your SharePlay invitation.

Note: iOS 17 or later is required on both iPhone devices. AirDrop must be turned on, and the sender and recipient must be included in each other’s contacts. Some apps that support SharePlay require a subscription. To watch a movie or TV show together, each participant must have access to the content on their own device, through either a subscription or purchase, on a device that meets the minimum system requirements.

SharePlay might not support sharing some TV shows or movies across different regions or countries.

Turning on the Driving Focus helps you stay focused on the road. When you turn it on, text messages and other notifications are silenced or limited.

Calls are limited, too. Incoming calls are allowed only when iPhone is connected to CarPlay, a car Bluetooth® system, or a hands-free accessory. You can set it to turn on automatically when you’re in a moving car.

Here’s how to stay focused while driving with iPhone.

WARNING: The Driving Focus is not a substitute for following all the rules that prohibit distracted driving.

Set up the Driving Focus

You can set up the Driving Focus to turn on automatically when you’re in a moving car. (You can also turn it on manually in Control Center.)

  1. Open the Settings app on your iPhone.
  2. Tap Focus, then tap Driving.

If you don’t see the Driving Focus, tap the Add button, then tap Driving.

  1. Tap Auto-Reply and choose if you want certain people to receive an auto-reply if they try to contact you when the Driving Focus is on

    You can also edit your auto-reply message to customize it.

    Then tap the Back button.

  2. Tap While Driving (below Turn On Automatically), then select when to activate Driving:

    • Automatically: When iPhone detects you might be driving.
    • When Connected to Car Bluetooth: When your iPhone is connected to a car’s Bluetooth system.
    • Manually: When you turn it on in Control Center.
    • Activate With CarPlay: Automatically when iPhone is connected to CarPlay.
Tag: Focus