Got a tip for us?

Reminders

You can view, create, complete, and edit reminders from the Reminders app right in Calendar.

Your scheduled reminders appear alongside your events, at their time in the full-day schedule, or at the top of the calendar if they’re all day. You can create reminders, complete reminders, hide reminders, and edit or delete reminders. You can also add images, notes, or a priority level to a reminder, and choose a specific reminders list for new ones.

Show reminders

You can show scheduled reminders you added to the Reminders app in Calendar.

  1. Open the Calendar app on your iPhone.
  2. Tap the Calendars button.
  3. Select Scheduled Reminders.

All-day reminders show up in the all-day section at the top of the calendar, while reminders scheduled for a specific time sit at that time in the full-day schedule.

Create reminders

  1. Open the Calendar app on your iPhone.
  2. Tap the Add button.
  3. Tap Reminder, then enter a title.
  4. To choose a date for the reminder, tap Date.
  5. Optionally, turn on Time and choose a specific time for the reminder.

A reminder can also hold other information, like images, notes, or a priority level.

Note: You can select a specific reminders list for new scheduled reminders. If you don’t select one, they’re added to the default list you chose for Reminders.

Complete reminders

  1. Open the Calendar app on your iPhone.
  2. Tap the circle next to a reminder’s name.

Complete reminders are dimmed. Deselect the circle next to a reminder to mark it as incomplete.

Note: For a repeating scheduled reminder, future instances stay dimmed, and you can only mark them complete after the most current instance is marked complete.

Hide reminders

  1. Open the Calendar app on your iPhone.
  2. Tap the Calendars button.
  3. Deselect Scheduled Reminders.

Removing reminders from Calendar doesn’t delete the reminders from the Reminders app.

Edit or delete reminders

  1. Open the Calendar app on your iPhone.
  2. Tap a reminder and tap Edit to edit the details or Delete Reminder to delete.

Deleted reminders go to the Recently Deleted list in Reminders for 30 days before being permanently deleted.
In the Reminders app, you can use multiple accounts—such as iCloud, enterprise-managed iCloud, Microsoft Exchange, and Yahoo—and keep all your to-do lists in one place. Your reminders stay up to date on all your devices that use the same accounts.

They appear on your iPhone, iPad, Apple Watch, and Mac when you’re signed in to the same Apple Account. Reminders from iOS 12 or earlier may need an update in iCloud before you get features like attachments and flags.

Note: Some features aren’t available with other accounts. To use all the Reminders features described in this guide, you need updated reminders in iCloud.

Keep your reminders up to date on all your devices with iCloud

  1. Open the Settings app on your iPhone.
  2. Tap your name.
  3. Tap iCloud, tap See All, and turn on Reminders.

Sign in to the same Apple Account on your iPhone, iPad, Apple Watch, and Mac, and your reminders stored in iCloud show up on each one, changes included.

Update your reminders stored in iCloud

Features such as attachments, flags, list colors and icons, and more may require an update to your reminders stored in iCloud if you’ve been using Reminders with iOS 12 or earlier.

  1. Open the Settings app on your iPhone.
  2. Tap your name.
  3. Tap iCloud, tap See All, and make sure Reminders is turned on.
  4. Open the Reminders app.
  5. On the Welcome to Reminders screen, choose one of the following options:
    • Update Now: Begin the update process.
    • Update Later: A blue Update button appears above your lists; tap it when you’re ready to update your reminders.

Note: Updated reminders don’t work with the Reminders app in earlier versions of iOS and macOS, because they aren’t backward compatible.

Add other accounts

If your to-do lists are in other accounts, such as Microsoft Exchange and Yahoo, you can manage them in the Reminders app, too.

  1. Open the Settings app on your iPhone.
  2. Tap Apps and tap Reminders.
  3. Tap Reminders Accounts and tap Add Account.
  4. Do one of the following:
    • Choose an account provider, then enter your account information.
    • If your account provider isn’t listed, tap Other, tap Add CalDAV Account, enter your account information, then turn on Reminders for that account.

Remove an account

If you remove or delete an account, the reminders in it stop appearing on your iPhone, but they remain in your internet account, such as iCloud.com or Microsoft Exchange, and on any other devices you had already set up.

  1. Open the Settings app on your iPhone.
  2. Tap Apps and tap Reminders.
  3. Tap Reminders Accounts. Then tap the account you want to remove.
  4. Do one of the following:

    • Stop using Reminders on the account: Turn off Reminders.

      You can continue to use the account for other services, such as Calendar.

    • Stop using all services on the account: Tap Sign Out (for an iCloud account) or Delete Account (for other accounts).

Your account may be managed by your organization if you don’t see Sign Out or Delete Account. Ask an administrator for removal instructions.

In the Reminders app, you can use iCloud to share to-do lists. You can collaborate and assign tasks to other people who also use iCloud.

People who accept the invitation can add and edit items, and everyone sees the changes. Once a list is shared, you can assign items in it to people, and turn notifications on or off for the shared list.

Here’s how to share lists and collaborate in Reminders on iPhone.

Note: With updated reminders in iCloud, all the Reminders features described in this guide are available. Some aren’t when you use other accounts.

Collaborate on a list using iCloud

People who use iCloud can work on a list with you once you share it. Anyone who accepts the invitation can add and edit items and mark items as completed, and all participants see everyone’s changes. To collaborate, everyone needs to be signed in to their Apple Account, with Reminders turned on in iCloud settings.

  1. Open the Reminders app on your iPhone.
  2. View the list you want to share. Then tap the Share button.

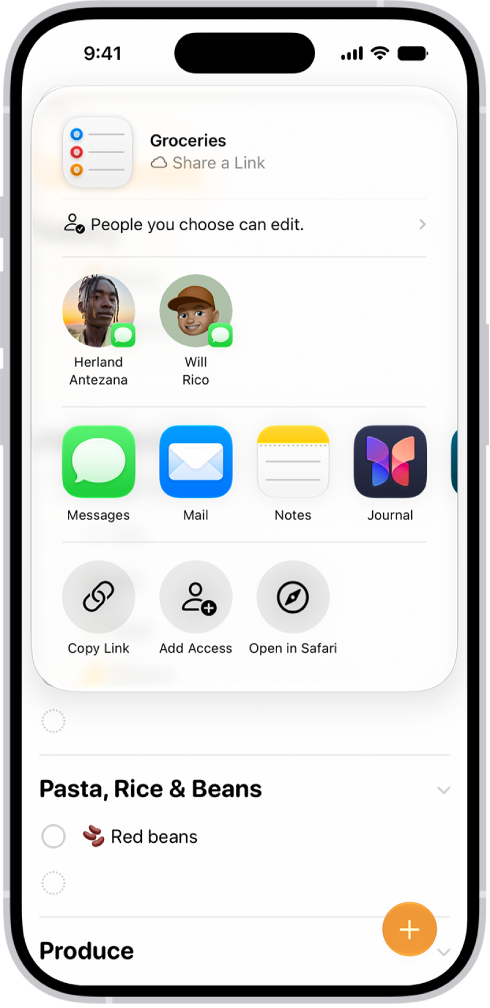
    A Reminders screen showing a grocery list with options for sharing at the bottom.

  3. By default, participants on the list can invite other people. To restrict sharing, tap People you invite can add others and then turn off Allow others to invite.
  4. Choose how to send your invitation (for example, using Messages or Mail).

If you send the invitation in Messages, you get activity updates in the Messages conversation when someone makes changes in the shared list. Tap the updates to go to the shared list.

Assign items in a shared list

You can assign a task to any person on the list, including yourself.

  1. Open the Reminders app on your iPhone.
  2. In the shared list, create or edit a reminder, then do either of the following:
    • Type @ followed by the person’s name or choose a person from the menu above the keyboard.
    • Tap the Person button, then choose a person.

Quick tip: Use the Assigned to Me Smart List to see all items assigned to you at a glance.

Turn notifications on or off for a shared list

  1. Open the Reminders app on your iPhone.
  2. In the shared list, tap the Collaborate button and tap Manage Shared List.
  3. Below Notify When, turn on or off any of the following:
    • Adding Items: Receive an alert when someone adds an item to the list.
    • Completing Items: Receive an alert when someone completes an item on the list.

In the Reminders app, you can create a grocery list to make shopping easier. Items are automatically sorted into categories such as Produce and Seafood. On supported devices, Apple Intelligence* sorts your items even when the list uses more than one language.

You’re not stuck with the defaults. You can change how items are grouped, and the list remembers your preferences. You can also convert an existing list to a grocery list.

Note: If you use updated reminders in iCloud, you’ll have every Reminders feature described in this guide, though some aren’t available when using other accounts.

Create a new grocery list

  1. Open the Reminders app on your iPhone.
  2. Tap the Add List button.
  3. Enter a name for the list, tap List Type, and choose Groceries.
  4. Choose a color and symbol for the list (optional).
  5. Tap the Done button.

With Apple Intelligence*, Reminders can automatically create a list of suggested grocery items from text in other apps—for example, an online recipe in Safari. Note: Apple Intelligence on iOS 27 or later is available on an Apple Intelligence-enabled iPhone 15 Pro, iPhone 15 Pro Max, or iPhone 16 model or later. Apple Intelligence is not available in all languages or regions. Usage limits may apply.

Convert an existing list to a grocery list

  1. Open the Reminders app on your iPhone.
  2. Tap a list and tap the More button.
  3. Tap Show List Info.
  4. Tap List Type, then choose Groceries.
  5. Tap the Done button.

Add an item to your grocery list

  1. Open the Reminders app on your iPhone.
  2. In your grocery list, tap the New Item button. Enter a description.
  3. To enter more information, tap Add Note.
  4. Tap the Edit Details button to edit the item details. For example, you can attach a photo, set a location-based reminder, or flag an important item.
  5. Tap the Done button.

Items added to the list are automatically placed in categories. If you enter grocery items in a language different from the system language of your iPhone, you can add an additional language in Settings. (Grocery categorization is available for supported languages.) *Apple Intelligence is available with Siri and device language set to Chinese (Simplified), Chinese (Traditional), Danish, Dutch, English, French, German, Italian, Japanese, Korean, Norwegian, Portuguese, Spanish, Swedish, Turkish, or Vietnamese. Some features may not be available in all regions or languages. Some devices may not be available in all regions. Siri AI is available in beta in iOS 27, iPadOS 27, macOS 27, watchOS 27, and visionOS 27 and requires an Apple Intelligence–enabled device set to a supported language. Available in English to start. Siri AI will not be initially available in the EU on iOS, iPadOS, and watchOS. Certain Apple Intelligence features that rely on server-side models are subject to daily usage limits, including but not limited to Siri AI, Intelligent Photo Editing Tools, Image Playground, and AFM 3 Cloud models in Shortcuts. Daily limits may vary by feature, request complexity, system demand, system policies, and other factors. Expanded access to such features will be available for a fee in the future. Use of these features is subject to the Apple Intelligence Terms and Conditions.

In the Reminders app, you can create new lists, organize the lists into groups, and pin lists for quick access.

Each new list gets a name, a color, and a symbol, and you choose its type: Standard, Groceries, or Smart Lists. You can also edit and rearrange lists and groups, or delete them, and pin an important list above the other lists for easy access.

Here’s how to organize multiple lists in Reminders on iPhone.

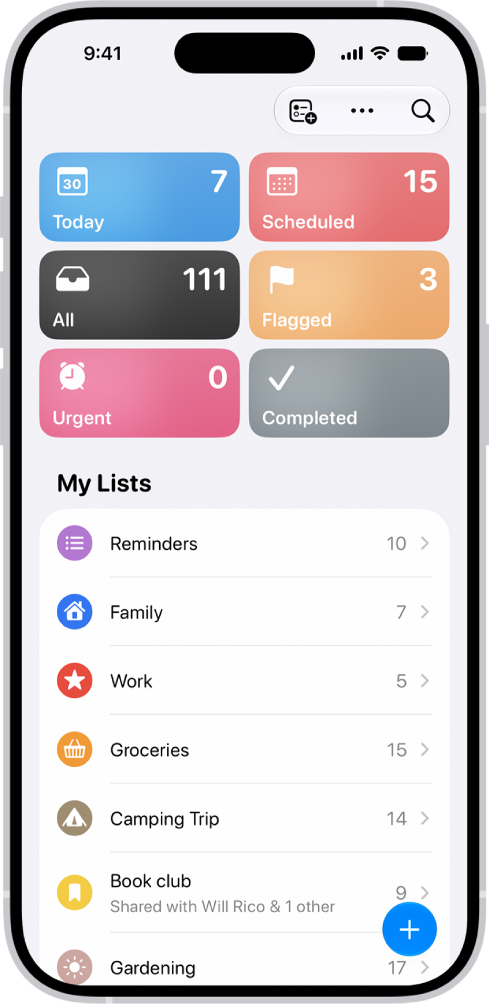
A Reminders screen showing a grid of Smart Lists, such as Today, Scheduled, and Flagged, each showing the number of items. Under the heading ‘My Lists,' shows a list of custom reminder categories like Family, Work, and Camping Trip.

Note: If you use updated reminders in iCloud, every Reminders feature described in this guide is available. With other accounts, some features aren’t.

Make a new list

  1. Open the Reminders app on your iPhone.
  2. Tap the Add List button.
  3. Enter a name and choose a color and symbol for the list.
  4. Tap List Type and choose Standard, Groceries, or Smart Lists.
  5. Tap the Done button.

Pin an important list above the other lists for easy access

  1. Open the Reminders app on your iPhone.
  2. Touch and hold a list and then tap Pin. You can also swipe right on the list and then tap the Pin button.

You can have a maximum of nine pinned lists. To change the position of a pinned list, tap the More button, tap Edit Lists, drag the Reorder button to a new position, then tap the Done button.

Create a group of lists

Groups such as work, school, or shopping can organize your lists.

To create a group, simply drag a list onto another list. You can also do the following:

  1. Open the Reminders app on your iPhone.
  2. Tap the More button and then tap Edit Lists.
  3. Tap Add Group, enter a name and select the lists to include in the group (optional). Then tap the Done button.

Edit and rearrange lists and groups

  1. Open the Reminders app on your iPhone.
  2. Tap the More button and tap Edit Lists. Do any of the following:
    • Rearrange lists and groups: Drag the Reorder button a list or group to a new location. You can even move a list to a different group.
    • Change the name and appearance of a list or group: Tap the Edit Details button.

Delete a list or group

  1. Open the Reminders app on your iPhone.
  2. Swipe left on the list or group. Then tap the Delete button.

If you delete a group, you can choose to keep its lists. Deleted lists or groups move to Recently Deleted, where you can recover them within 30 days. They’re permanently deleted after 30 days.

You can permanently delete items from your Reminders lists. If you accidentally delete an item, you can recover it within 30 days from the Recently Deleted list.

Items left in Recently Deleted are removed automatically and permanently after 30 days. A recovered item moves to the default list, while a permanently deleted item is removed immediately from all your devices.

Here’s how to delete or recover items in Reminders on iPhone.

Delete an item

  1. Open the Reminders app on your iPhone.
  2. While viewing a list, swipe left on an item. Tap Delete.

To undo immediately, tap with three fingers or shake your iPhone.

Recover or permanently delete recently deleted items

  1. Open the Reminders app on your iPhone.
  2. In the list view, tap Recently Deleted.
  3. Do one of the following:
    • Recover an item: Tap the item, then tap Recover. The item moves to the default list.
    • Permanently delete an item: Swipe left on the item, tap Delete, and tap Delete again. The item is removed immediately from all your devices.

After 30 days, items left in Recently Deleted are permanently removed automatically.

In the Reminders app, you can easily filter items across all your lists using Smart Lists. You can create custom Smart Lists to automatically include items filtered by tags, dates, times, locations, flags, and priority, and you can choose more than one tag and combine them with other filters.

There are default Smart Lists, too, and you can convert a list to a Smart List.

Here’s how to use Smart Lists in Reminders on iPhone.

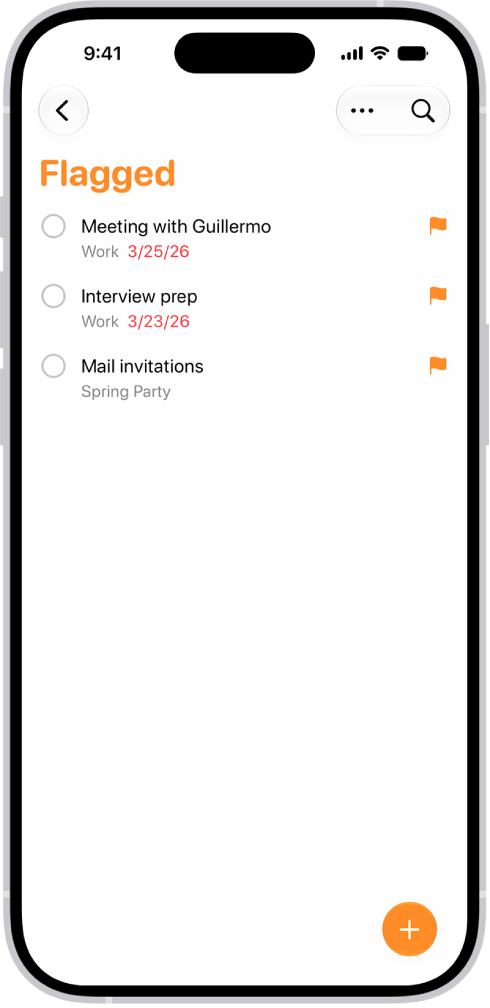
The Flagged Smart List in the Reminders app, which automatically collects all reminders marked with a flag into a single, consolidated list.

Note: Updated reminders in iCloud give you all the Reminders features described in this guide. Some aren’t available when using other accounts.

Automatically organize items using the default Smart Lists

  1. Start the Reminders app on your iPhone.
  2. Tap the More button and then tap Edit Lists.
  3. Turn on or off the following Smart Lists:
    • Today: Items scheduled for today and overdue items
    • Scheduled: Items scheduled by date or time
    • All: All items across all your lists
    • Flagged: Items with a flag
    • Completed: Items with a checkmark
    • Assigned to Me: Items assigned to you in shared lists
    • Groceries: Grocery items
    • Siri Suggestions: Suggested items detected in Mail

Make a custom Smart List

  1. Start the Reminders app on your iPhone.
  2. Tap the Add List button.
  3. Enter a name for the list, tap List Type, and then choose Smart List.
  4. Tap Edit Filters, choose one or more filters, and choose to include items matching any or all of the selected filters. You can filter by tags, dates, locations, and more. Tap the Done button.
  5. Choose a color and symbol for the list (optional).
  6. Tap the Done button.

Convert a list to a Smart List

Converting a list moves its items to the top level of the default list and tags them with the name of the Smart List.

Note: You can’t convert a shared list.

  1. Start the Reminders app on your iPhone.
  2. View the list you want to convert.
  3. Tap the More button, tap Show List Info and scroll to the bottom. Tap Convert to Smart List.