Got a tip for us?

iPhone

The iPhone is a smartphone from Apple that runs the iOS mobile operating system. Between its apps, communication features, the camera, mobile internet access, and other functionalities, the iPhone has quickly become an integral part of many peoples tech lives.

In the Home app, you can run automations based on the time of day, your location, the activation of a sensor, or the action of an accessory. You can use preconfigured automations included with the Home app, or create automations of your own.

An automation can run when people arrive at or leave a location, or at a time of day, like sunrise or sunset. You can also manage and edit automations, and add a Siri shortcut.

Thread-based accessories require a Thread-enabled home hub such as Apple TV 4K, HomePod (2nd generation), HomePod mini, or a compatible third-party Thread border router for you to run automations, receive notifications, and control accessories while away.

Use a preconfigured automation

  1. Start the Home app on your iPhone.
  2. On the Home tab, touch and hold an accessory and then tap Accessory Settings.
  3. Turn on an automation.

To disable an automation, return to the accessory’s setting screen, then turn it off.

Create an automation

  1. Start the Home app on your iPhone.
  2. On the Home tab, tap the Add button.
  3. Tap Add Automation and choose one of the following automation triggers:

    • When arriving at or leaving a location: Tap People Arrive or People Leave. Choose when the automation is activated by people arriving or leaving, the location, and the time the automation works.
    • At a time of day: Tap A Time of Day Occurs. Choose when you want this automation to run.

      If you choose Sunset or Sunrise, times vary as the season changes.

      You can also set an automation to only occur after sunset, which is useful for turning on lights just when they’re needed.

    • When an accessory changes: Tap An Accessory is Controlled, select an accessory and tap Next. Follow the onscreen instructions.

      You might use this, for example, to run a scene when you unlock the front door.

    • A sensor detects something: If you’ve added a sensor to Home, tap A Sensor Detects Something, select an accessory, tap Next, and follow the onscreen instructions.

      You might use this, for example, to turn on lights in a stairway when motion is detected nearby.

Manage and edit automations

  1. Start the Home app on your iPhone.
  2. Tap Automation.
  3. Tap an automation and then do any of the following:
    • Enable or disable the automation
    • Choose when the automation happens
    • Add or remove accessories
    • Test the automation
    • Delete the automation

Add a Siri shortcut

Adding a Siri Shortcut to your automation makes it even more efficient.

  1. When choosing accessories to control with an automation, swipe up and tap Convert To Shortcut.
  2. Tap Next, name the automation (optional), then tap Done.
Tag: Home

You can view your health and fitness information in one place. For example, you can check whether your metrics change over time, and see how well you’re meeting goals for activity, sleep, mindfulness, and more.

Your most important health categories, like Medications, Heart Rate, and Steps, can be pinned to the Summary screen, and you can view your highlights and health trends. You can also view trends, highlights, and details for a specific health category.

Customize your pinned health categories on the Summary screen

You can pin the health categories that matter most to you, like Steps, Heart Rate, Medications, and more, and arrange them however you like.

  1. Start the Health app on your iPhone.
  2. Tap Summary, then tap Edit next to Pinned.
  3. Do any of the following:
    • Pin a health category: Tap the Pin button next to a category.
    • Unpin a health category: Tap the Delete button next to a category.
    • Reorder the health categories in your Pinned list: Drag the Reorder button next to an category up or down.
  4. When you’re finished, tap the Done button.

View your highlights

  1. Start the Health app on your iPhone.
  2. Tap Summary and scroll down to Highlights to see highlights of your recent health and fitness data.
  3. Do the following:
    • View more data about a highlight: Tap its graph.
    • View all highlights: Tap Show All Highlights.

View your health trends

Health can alert you to significant changes in data like your resting heart rate, number of steps, and amount of sleep, which helps you keep track of your health data over time. Trend lines show how much these metrics have changed, and for how long.

  1. Start the Health app on your iPhone.
  2. Tap Summary. Scroll down to Trends to view any recent trends.
  3. If Health has detected trends, you can do the following:
    • View more data about a trend: Tap its graph.
    • View all trends: Tap Show All Health Trends.

To receive notifications about your health trends, tap Summary, tap your picture or initials, tap Notifications, then turn on Trends.

View trends, highlights, and details for a specific health category

  1. Start the Health app on your iPhone.
  2. Tap Browse to display the Health Categories screen, then do one of the following:
    • Tap a category. (To see all categories, scroll up and down.)
    • Tap the search field, then type the name of a category (such as Mobility) or a specific type of data (such as Walking Speed).
  3. Depending on the data type, you may be able to do the following:
    • View details about any of the data: Tap the Details button.
    • See weekly, monthly, and yearly views of the data: Tap the tabs at the top of the screen.
    • Manually enter data: Tap Add Data.
    • Pin to the Summary screen: Tap Pin to Summary. (You may need to scroll down.)
    • View which apps and devices are allowed to share the data: Below Options, tap Data Sources & Access. (You may need to scroll down.)
    • Delete data: Tap Show All Data below Options, swipe left on a data record, and then tap Delete. To delete all data, tap Edit and tap Delete All.
    • Change the measurement unit: Tap Unit below Options, then select a unit.

Learn more about health and fitness

  1. Start the Health app on your iPhone.
  2. Tap Summary, then scroll down to Get More From Health or Articles.
  3. Tap an item to learn more.

In many health categories, the details include recommended apps alongside your data.

Tag: Health

With Apple Intelligence, you can use Visual Intelligence to quickly learn more about what’s around you with the iPhone camera. When you activate Visual Intelligence, you can search for visually similar images online, look up details about a restaurant or business, translate or summarize text, identify plants and animals, and more.

You can choose how to activate it, too, and you can even use Visual Intelligence to ask ChatGPT for information.

Here’s how to learn about what’s around you with Visual Intelligence on iPhone.

Note: Siri AI is available in beta on iOS 27 or later on an Apple Intelligence-enabled iPhone 15 Pro, iPhone 15 Pro Max, or iPhone 16 model or later with Siri and device language set to a supported language. Available in English to start. Siri AI will not initially be available in the EU on iOS. Usage limits may apply.

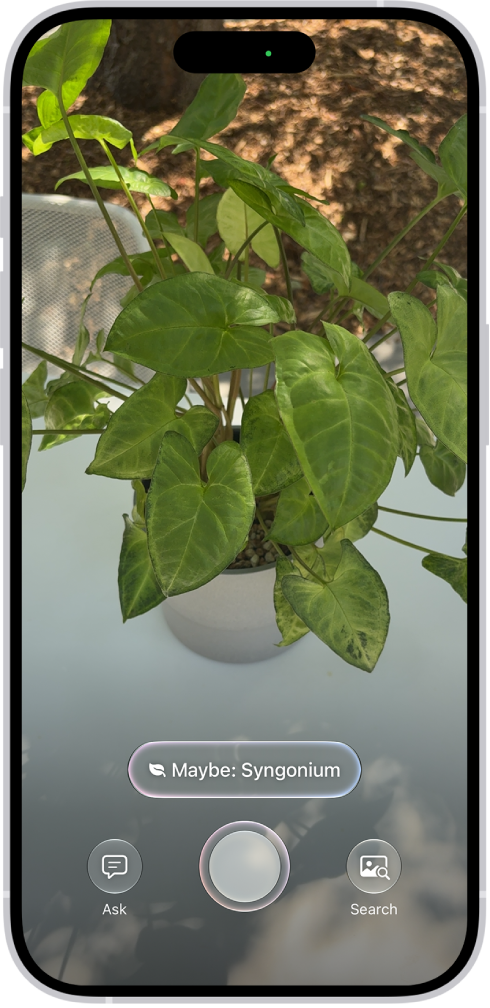
An iPhone in Visual Intelligence showing a plant.

Note: Apple Intelligence on iOS 27 or later is available on an Apple Intelligence-enabled iPhone 15 Pro, iPhone 15 Pro Max, or iPhone 16 model or later. Apple Intelligence is not available in all languages or regions. Usage limits may apply.*

Choose how to activate Visual Intelligence

  • Camera app: If you have Siri AI, open Camera , then tap Siri.
  • Camera Control: On supported models, click and hold the Camera Control.
  • Action button: Customize the Action button on the left side of your iPhone to use Visual Intelligence.
  • Lock Screen: You can add the Visual Intelligence control to the bottom of your Lock Screen to use visual intelligence.
  • Control Center: Swipe down from the top-right corner of the screen to open Control Center, then tap the Visual Intelligence button to use Visual Intelligence. If you don’t see the Visual Intelligence icon , you may need to add it to Control Center.

Use your iPhone to learn about what’s in front of you

When you activate Visual Intelligence, your iPhone camera can help you learn more about your physical surroundings.

  1. Activate Visual Intelligence.
  2. Point your iPhone camera at what’s in front of you. Do any of the following:
    • Get information about a place: Click the Camera Control or tap the name of the business at the bottom of the screen. Tap an option to view hours of operation, place an order for delivery, view the menu or services offered, and more.
    • Identify plants and animals: Tap the result at the bottom of the screen.
    • Create a calendar event: Tap Add to Calendar, then tap Create Event.
    • Interact with text: Depending on the text, choose an option at the bottom of the screen.

Search for visually similar images online

To find items similar to those around you, use Visual Intelligence to search.

  1. Activate Visual Intelligence.
  2. Point your iPhone camera at an object in front of you.
  3. Tap the Search button to search for similar images.
  4. Tap the Close button to close the search results and swipe up from the bottom of the screen to close Visual Intelligence.

Note: Subject to your search provider’s terms of use and data privacy policies.

Use Visual Intelligence to ask ChatGPT for information

With the ChatGPT extension turned on, you can ask ChatGPT about things around you through Visual Intelligence.

  1. Activate Visual Intelligence.
  2. Point your iPhone camera at an object in front of you.
  3. Tap the Ask button to ask ChatGPT about the object. After you tap the Ask button, you can type or dictate a follow-up question in the text field at the bottom of the screen.
  4. Tap the Close button to close the ChatGPT results and swipe up from the bottom of the screen to close Visual Intelligence.

*Apple Intelligence is available with Siri and device language set to Chinese (Simplified), Chinese (Traditional), Danish, Dutch, English, French, German, Italian, Japanese, Korean, Norwegian, Portuguese, Spanish, Swedish, Turkish, or Vietnamese. Some features may not be available in all regions or languages. Some devices may not be available in all regions. Siri AI is available in beta in iOS 27, iPadOS 27, macOS 27, watchOS 27, and visionOS 27 and requires an Apple Intelligence–enabled device set to a supported language. Available in English to start. Siri AI will not be initially available in the EU on iOS, iPadOS, and watchOS. Certain Apple Intelligence features that rely on server-side models are subject to daily usage limits, including but not limited to Siri AI, Intelligent Photo Editing Tools, Image Playground, and AFM 3 Cloud models in Shortcuts. Daily limits may vary by feature, request complexity, system demand, system policies, and other factors. Expanded access to such features will be available for a fee in the future. Use of these features is subject to the Apple Intelligence Terms and Conditions.

In case of emergency, use your iPhone to quickly and easily call for help, share your Medical ID, and alert your emergency contacts, provided that cellular service is available.

If your carrier’s cellular network is unavailable, iPhone displays the SOS only icon and attempts to route any emergency calls through other networks, if available. You can also text emergency services, and dial the emergency number when your iPhone is locked.

On supported models, you may also be able to contact emergency services via satellite if cellular networks are unavailable. Emergency SOS via satellite isn’t available in all countries or regions.

Important: If an emergency call has been made and you don’t need emergency services, don’t hang up. Wait until a responder answers, then explain that you don’t need help.

Quickly call emergency services (all countries or regions except India)

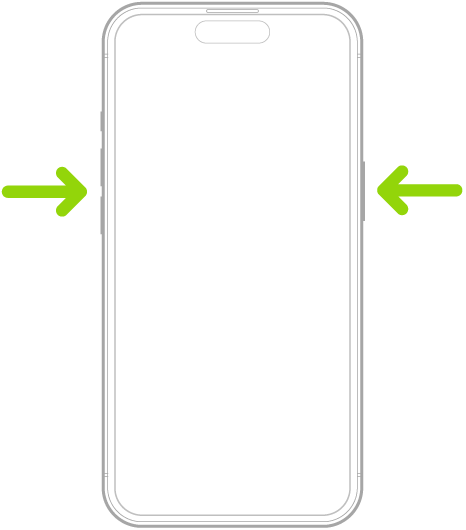
  • Simultaneously press and hold the side button and either volume button until the sliders appear and the countdown on Emergency SOS ends, then release the buttons.

Or, you can enable iPhone to start Emergency SOS when you quickly press the side button five times. Go to Settings > Emergency SOS, then turn on Call with 5 Presses.

An outline of an iPhone with arrows pointing to the side button and either volume button.

Once an emergency call ends, your iPhone sends your emergency contacts a text message alert, unless you choose to cancel. Your iPhone also shares your current location (if available), and your emergency contacts get updates when your location changes for a period of time after you enter SOS mode.

Quickly call emergency services (India)

  • Quickly press the side button three times until the sliders appear and the countdown on Emergency SOS ends.
  • If you’ve turned on Accessibility Shortcut, simultaneously press and hold the side button and either volume button until the sliders appear and the countdown on Emergency SOS ends, then release the buttons.

By default, iPhone plays a warning sound, starts a countdown, then calls the emergency services.

When an emergency call is over, your iPhone alerts your emergency contacts by text message unless you choose to cancel. For a period of time after you enter SOS mode, they receive updates each time your location changes, and your iPhone sends your current location (if available), too.

Dial the emergency number when your iPhone is locked

  1. On the Passcode screen, tap Emergency.
  2. Dial the emergency number (for example, 911 in the U.S.). Tap the Call button.

Text Emergency Services (not available in all countries or regions)

  1. Start the Messages app on your iPhone.
  2. In the To field, type 911 or your local emergency services number.
  3. Type your emergency.
  4. Tap the Send button.

Share live video or existing photos with emergency services (not available in all countries or regions)

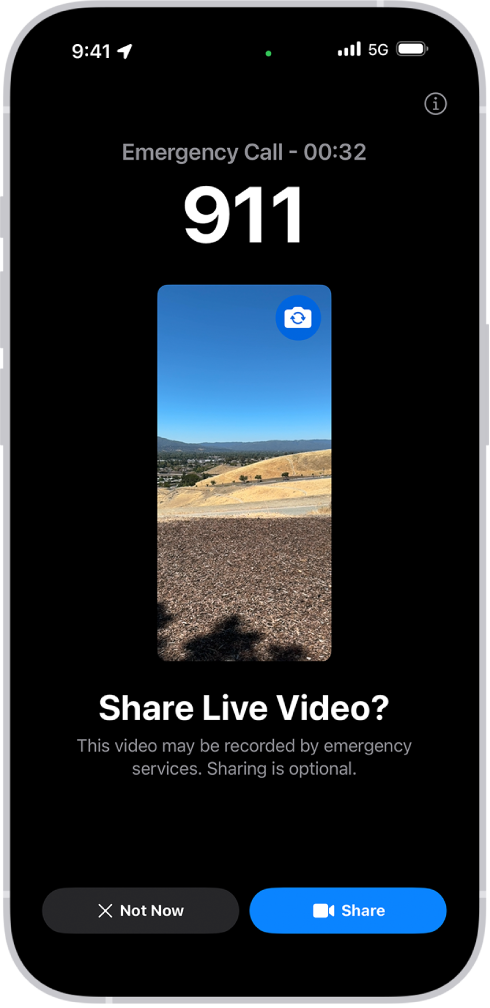
If emergency services request it, Emergency SOS Live Video gives you a way to upload existing photos and videos or stream live video to emergency services.

Note: Emergency services can retain a copy of the live video you stream and keep any videos or photos you share.

An Emergency SOS Live Video screen showing a 911 phone emergency call with a video preview in the middle. At the bottom are buttons for Not Now and Share Video.

  • If you get a request to share video or photos while on an emergency services call, do any of the following:
    • Share live video: Tap Share when prompted to begin streaming live video to emergency services. You can pause or restart sharing at any time by tapping the Camera button. You can stop sharing at any time by tapping the End Call button, and then tapping Stop Sharing Camera or End Call.
    • Share existing photos or videos: Tap Choose when prompted. Select the photos or videos you want to send to emergency services.
    • Decline: Tap Not Now when prompted if you don’t want to share videos or photos with emergency services.

Note: Emergency SOS Live Video is available on iPhone 14 or later, is subject to device limitations, and may not be available in all situations.

Change your Emergency SOS settings

  1. Open Settings and then tap Emergency SOS on your iPhone.
  2. Do any of the following:
    • Turn “Call with Hold and Release” on or off: Hold and release the side and volume buttons to start a countdown to call emergency services.
    • Turn “Call with 5 presses” on or off: Rapidly press the side button five times to start a countdown to call emergency services.
    • Manage your emergency contacts: In Health, tap Set Up Emergency Contacts or Edit Emergency Contacts.

Important information about emergency calls on iPhone

  • Some cellular networks may not accept an emergency call from iPhone if iPhone isn’t activated, if iPhone isn’t compatible with or configured to operate on a particular cellular network, or (when applicable) if iPhone doesn’t have a SIM card or the SIM card is PIN-locked.
  • In certain countries or regions, your location information (if determinable) may be accessed by emergency service providers when you make an emergency call.
  • Review your carrier’s emergency calling information to understand the limits of emergency calling over Wi-Fi.
  • With CDMA, when an emergency call ends, iPhone enters emergency call mode for a few minutes to allow a callback from emergency services. During this time, data transmission and text messages are blocked.
  • After making an emergency call, certain call features that block or silence incoming calls may be disabled for a short period of time to allow a callback from emergency services. These features include Do Not Disturb, Silence Unknown Callers, and Screen Time.
  • On an iPhone with Dual SIM, if you don’t turn on Wi-Fi Calling for a line, any incoming phone calls on that line (including calls from emergency services) go directly to voicemail (if available from your carrier) when the other line is in use; you won’t receive missed call notifications.

    If you set up conditional call forwarding (if available from your carrier) from one line to another when a line is busy or not in service, the calls don’t go to voicemail; contact your carrier for setup information.

  • When using an iPhone with a USB-C connector and compatible accessory, data transfer over USB 3 and DisplayPort connections is unavailable after an emergency session (call or text) has been initiated, and remains unavailable for up to 5 minutes from the end of the session. This time varies by country or region. To continue using your accessory, disconnect and reconnect your device after this period. Charging is not affected and will continue to function.

There are multiple ways to transfer photos, videos, and other files between your iPhone and other devices like an iPad, Mac, or Windows device.

You can transfer files wirelessly with features like AirDrop or apps like Mail and Messages, or you can connect your iPhone to a computer or an external storage device with a cable, and then transfer or sync files. You can also use iCloud to store your files, photos, videos, and more, and keep everything up to date on all your devices where you’re signed in to the same Apple Account.

Important: Transferring, sharing, or syncing may be restricted for some types of data, such as files saved in an app’s proprietary format, files saved in older software versions, and files protected by copyrights.

Transfer files from your iPhone wirelessly

You can use AirDrop to quickly share a file, photo, or other item from your iPhone with a nearby Apple device.

Another way to transfer files from your iPhone to another device is to send the file as an attachment in the Mail or Messages app.

Transfer files by connecting your iPhone with a cable

With a cable, you can connect your iPhone to your Mac or Windows device to transfer files to a file server, an external storage device, or your computer. To transfer files to your Mac or Windows device, you’ll use the Finder, Apple Devices, or iTunes, depending on your computer’s model and operating system.

Note: You can only transfer files from iPhone apps that support file sharing.

Sync your iPhone with other devices

Connecting your iPhone to your Mac or Windows device also lets you sync supported content, such as music, movies, TV shows, and more. Say you add a movie to your iPhone. When you sync, that movie appears on your computer, too.

Syncing files to your Mac or Windows device works through the Finder, Apple Devices, or iTunes. The one you need depends on the model and operating system of your computer.

  • Sync content with your Mac (macOS 10.15 or later): Use the Finder.
  • Sync content with your Windows device (Windows 10 or later): Use Apple Devices for Windows.
  • Sync content with your Mac (macOS 10.14 or earlier) or Windows device (Windows 7 or earlier): Use iTunes.

Automatically keep your files in sync with iCloud

When you store your files, photos, videos, and more in iCloud, you can access them on all your devices and supported web browsers and keep them in sync. Change a file on a device signed in to your Apple Account, and that change shows up on every device signed in to the same Apple Account.

Note: You’ll need OS X 10.10 (or later) or Windows 7 (or later). Your iPhone, your computer, and any supported web browsers you might be using also need to be signed in to the same Apple Account.

Tags: Files, iCloud

You can register an AirTag to your Apple Account using your iPhone. When you attach it to an everyday item, like a keychain or a backpack, you can use the Find My app to locate it if it’s lost or misplaced.

AirTag can only be registered to one Apple Account at a time, but you can share an AirTag with others. You can also get notified if you leave your AirTag behind, and add supported third-party products to Find My.

Here’s how to add an AirTag in Find My on iPhone.

Add an AirTag

  1. Remove the product wrapping and battery tab from the AirTag and then hold it near your iPhone.
  2. Go to the Home Screen on your iPhone.

    Note: To retry pairing, turn your screen off and back on.

  3. Tap Connect on the screen of your iPhone.
  4. Choose a name from the list or choose Custom Name to type a name and select an emoji. Tap Continue.
  5. Tap Continue to register the item to your Apple Account. Then tap Finish.

You can also register an AirTag in the Find My app. Tap the Add button, then choose Add AirTag.

Before you can add an item that’s registered to someone else’s Apple Account, they need to remove it.

Change the name or emoji of an AirTag

  1. Open the Find My app on your iPhone.
  2. Tap Items, tap the AirTag whose name or emoji you want to change, and then tap the More button.
  3. Tap Change Name and Emoji.
  4. Choose a name from the list or choose Custom Name to type a name and select an emoji.
  5. Tap the Done button.

View more details about an AirTag

When you add an AirTag to your Apple Account, the Find My app shows more details about it.

  1. Open the Find My app on your iPhone.
  2. Tap Items, tap the AirTag you want to see more details about, and tap the More button.
  3. Tap the address of the AirTag to see the model, serial number, and the firmware version.

When the battery level is low, a message appears below the AirTag’s location. There’s also a low battery indicator next to its name in the Items list.

Tag: Find My

In the Translate app, use the camera view to translate text around you—for example, a restaurant menu or street signs. You can also translate text in photos from your photo library.

As you move the camera, text is translated in real time, and you can choose a different language. When you freeze the image, you can zoom in to see the overlaid translations, and copy, save, or play a translation.

Note: Translation is available for supported languages.

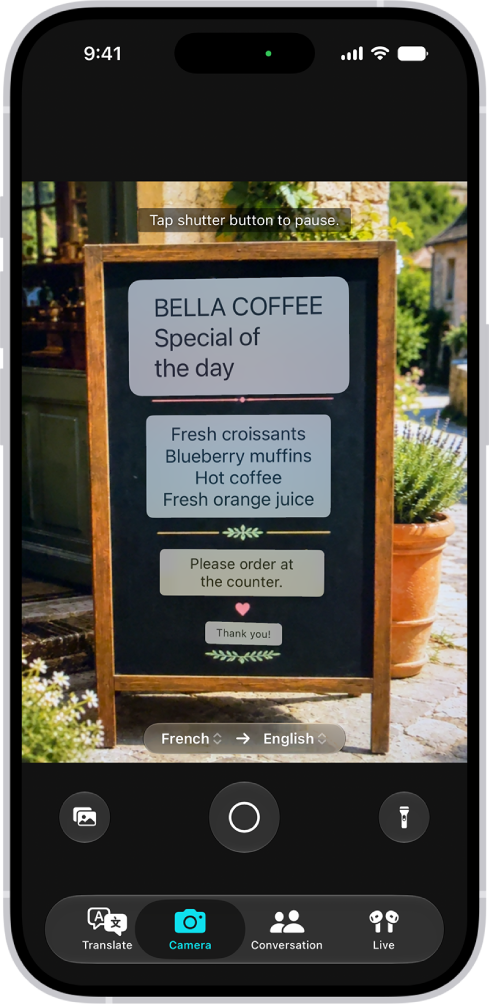
The Camera tab, showing a restaurant menu translated from English to Spanish.

Translate text around you with the camera

  1. Open the Translate app on your iPhone.
  2. Tap Camera and then hold your iPhone so that the text appears on the screen.

    Note: As you move the camera, text is translated in real time.

  3. Tap the Take Picture button to freeze the image and then do any of the following:

    • Switch languages: Tap a language and then choose a different one.
    • Get a closer look: Zoom in to see the overlaid translations.
    • Copy, save, or play the translation: Tap an overlaid translation to see the details. Tap an option.

Translate text in a photo from your library

  1. Open the Translate app on your iPhone.
  2. Tap Camera, tap the Photo Library button, and then select a photo that contains text.
  3. Do any of the following:
    • Switch languages: Tap a language and then choose a different one.
    • Share or save the translated image: Tap the Share button, then choose an option.
Tag: camera

In the Translate app, you can type or speak words and phrases and translate them to another language. Download languages to translate entirely on your iPhone, even without an internet connection.

You can play the audio translation, look up the translation in the dictionary, show it in full screen, or copy it. You can also save your favorite translations, and they stay up to date across devices signed in to the same Apple Account.

Note: Translation is available for supported languages.

Translate a word or phrase

  1. Start the Translate app on your iPhone.
  2. Tap the languages to choose what to translate from and to.

    To swap languages, tap the Language Swap button.

  3. Do one of the following:

    • Type: Tap “Enter text,” type a phrase (or paste text) and tap Next.
    • Speak: Tap the Listen button and then say a phrase.

    Note: Words are translated as you type or speak.

  4. When the translation is shown, do any of the following:

    • Play the audio translation: Tap the Play button.
    • Adjust the playback speed: Touch and hold the Play button and choose a speed.
    • Show the translation in full screen: Tap the Enter Full Screen button.
    • Look up the translation in the dictionary: Tap the Dictionary button.
    • Copy the translation: Tap the Copy button.
    • Delete the translation: Swipe left, then tap the Delete button.

Save and view your favorite translations

  1. Start the Translate app on your iPhone.
  2. To save a translation as a favorite, tap the Favorites button.
  3. To review your favorites, tap the Favorites List button.

Note: The Translate app keeps your favorite translations up to date on every device where you’re signed in to the same Apple Account.

With Handoff, you can start a task on one device and complete it on another. For example, you can start an email on your iPhone but then finish it on your Mac computer’s bigger screen.

You can use Handoff with many Apple apps, for example, Safari, Mail, FaceTime, and Maps, and some third-party apps also work with Handoff. It works between your iPhone, iPad, and Mac, and you can also hand off tasks between your Apple Watch and iPhone.

Here’s how to hand off tasks between your iPhone and your other devices.

Before you begin

For Handoff to work, make sure all of these are in place:

  • Both devices have Wi-Fi and Bluetooth® turned on.
  • You’re signed in to the same Apple Account on both devices.
  • Both devices meet minimum system requirements for Handoff.

Using a VPN? Make sure its configuration doesn’t prevent local networking, which may interfere with some Continuity features.

Turn on Handoff

On both your iPhone and your other Apple device, turn on Handoff.

  • On your iPhone or iPad: Go to Settings > General > AirPlay & Continuity, then turn on Handoff.
  • On your Mac: Choose Apple menu > System Settings, click General in the sidebar (you may need to scroll). Click AirDrop & Continuity, then turn “Allow Handoff between this Mac and your iCloud devices” on or off.

    Note: If your Mac has macOS 12.5 or earlier, choose Apple menu > System Preferences, click General, then select “Allow Handoff between this Mac and your iCloud devices.”

  • On your Apple Watch: Open the Apple Watch app on iPhone, go to My Watch > General, then turn on Enable Handoff.

Hand off a task between your iPhone and other devices

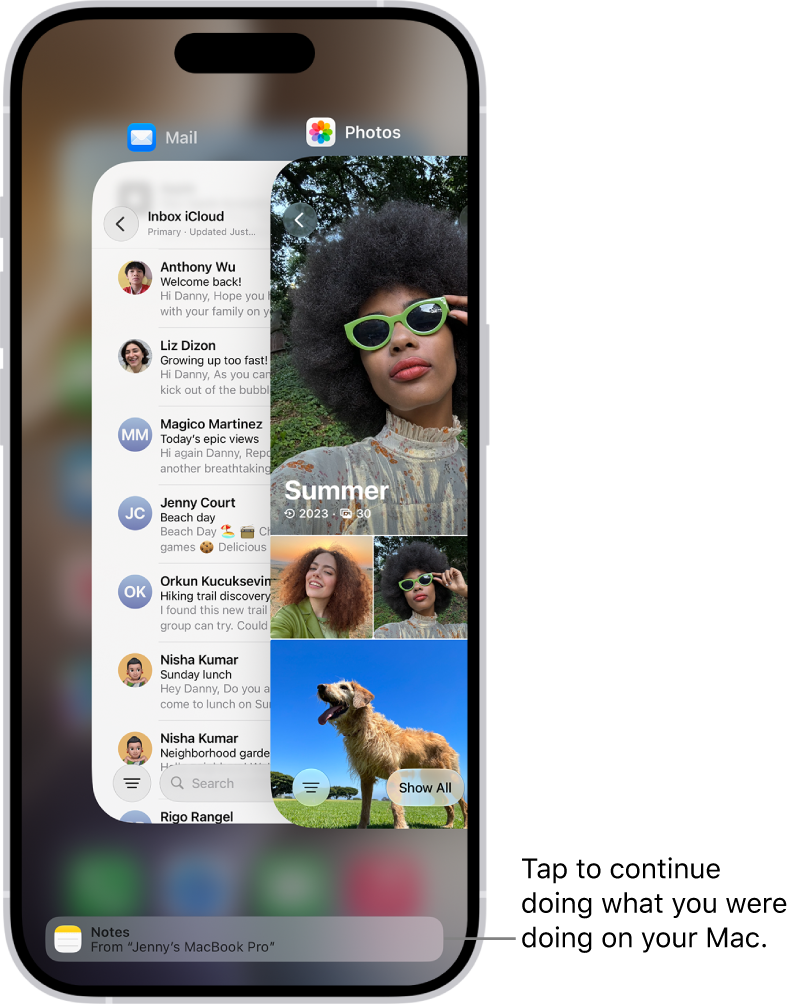
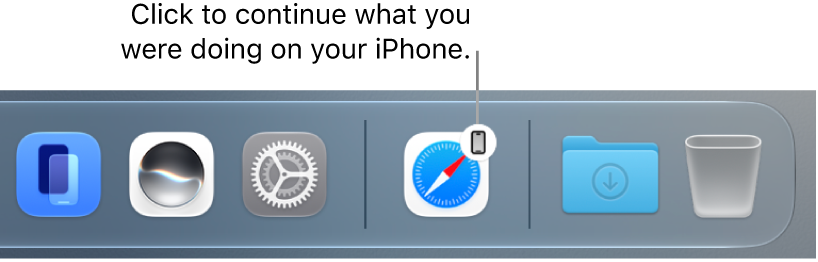
When your devices are near each other, an icon appears whenever a task can be handed off. Just tap or click the Handoff icon to continue working on your other device.

You’ll find the Handoff icon in these places on your devices:

  • On an iPhone: At the bottom of the App Switcher screen.

    The App Switcher on iPhone showing a handoff notification at the bottom of the screen.

  • On an iPad: At the right end of the Dock.
  • On a Mac: Toward the right end of the Dock, if the Dock is at the bottom of the screen. If you set up the Dock to appear on the left or right side of your screen, the Handoff icon appears at the bottom of the Dock.

    The Handoff icon visible in the Dock on a Mac.

Hand off a task from your Apple Watch

With an Apple Watch, you can hand off tasks to your iPhone from certain apps on your Apple Watch.

If Handoff isn’t working

  • Make sure that both devices have Wi-Fi and Bluetooth turned on, and you’re signed in to the same Apple Account.
  • Check that your app supports Handoff. Calendar, Contacts, FaceTime, Keynote, Mail, Maps, Pages, Numbers, Reminders, and Safari, as well as many third-party apps, allow Handoff.

Quick tip: With Handoff on, Universal Clipboard lets you copy and paste text, images, photos, and videos across devices.

iPhone displays the SOS via satellite icon when you’re outside cellular and Wi-Fi coverage, and Emergency SOS via satellite may still be available.

You can connect to Emergency SOS via satellite on your iPhone, and try the demo before going to a remote location.

Here’s how to use Emergency SOS via satellite on your iPhone.

Important: If an Emergency SOS via satellite session has been made and you don’t need emergency services, don’t end the session. Wait until a responder answers, then explain that you don’t need help.

Note: iPhone satellite features are available on supported models. Emergency SOS via satellite isn’t available in all countries or regions.

Connect to Emergency SOS via satellite on your iPhone

  1. Try calling 911 or emergency services even if your normal cellular carrier network isn’t available.

    If your carrier’s cellular network is unavailable, iPhone displays the SOS only icon and attempts to route any emergency calls through other networks, if available.

  2. If the call doesn’t go through, tap Emergency Text via Satellite to text emergency services.

    You can also go to the Messages app and text 911 or SOS, then tap Emergency Services.

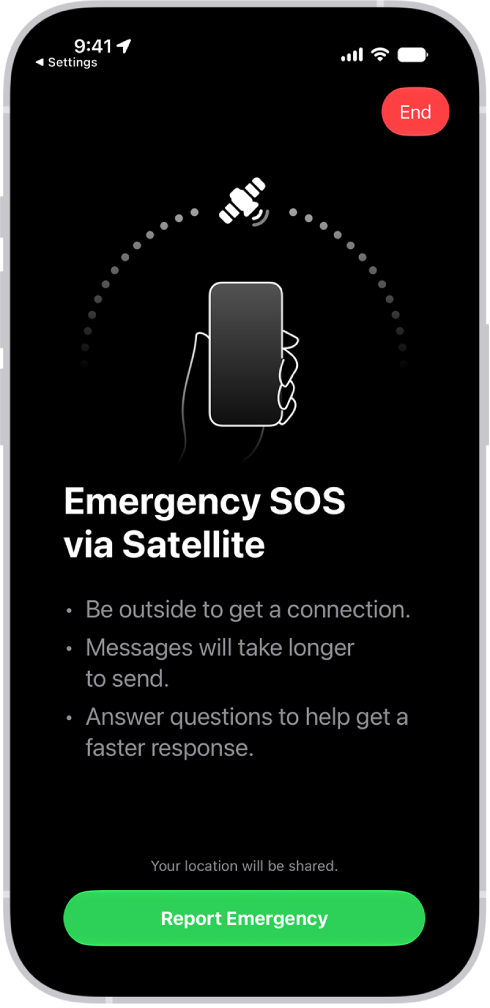
  3. Tap Report Emergency and follow the onscreen instructions.

Important: To help you connect to a satellite, make sure to hold your phone naturally in your hand—you don’t need to raise your arm or hold your phone up, but make sure your phone has a clear line of sight to the sky. If you’re under heavy foliage or surrounded by other obstructions, you might not be able to connect to a satellite.

Once you’re connected, your iPhone starts a text conversation and shares important information, including your Medical ID and, if you set them up, emergency contact details. It also sends your location (including elevation), your answers to the emergency questionnaire, and your iPhone’s battery level. You can also share what you send to emergency services with your emergency contacts.

The Emergency SOS screen, showing that the phone is connected and instructing the user to keep pointing at the satellite. The Report Emergency button is at the bottom of the screen.

Try the demo before going to a remote location

Planning a trip to a remote location? Before you go, you can try the Emergency SOS demo, create your Medical ID, and add emergency contacts.

  1. Open Settings and then tap Emergency SOS on your iPhone.
  2. Scroll down and tap Try Demo.

Note: The Emergency SOS demo doesn’t start a call to emergency services.