








Got a tip for us?

iPhone

The iPhone is a smartphone from Apple that runs the iOS mobile operating system. Between its apps, communication features, the camera, mobile internet access, and other functionalities, the iPhone has quickly become an integral part of many peoples tech lives.

In the FaceTime app, you can answer video and audio calls, decline calls, view video messages or listen to voicemails, and delete calls from your call history. If you’re on a FaceTime audio call and another one comes in, you can put the current call on hold, and Siri can announce incoming calls, too.

Note: Live Voicemail isn’t available in all languages or regions.

Answer a FaceTime call

As a FaceTime call comes in, you can do any of the following:

  • Accept the call: To answer a video call, tap the Accept button, then tap the Join button. To answer an audio call, tap the Accept button.

    If a slider appears, you can drag it right to answer.

  • Decline the call: Tap Decline or the End button.

    For FaceTime video calls, tap Message to send a text message or tap Remind Me to set a reminder to call back. For FaceTime audio calls, tap Message to send a text message or tap Voicemail to send the caller to voicemail. (You may need to tap the incoming call banner to see these options.)

  • Accept an incoming call and place the current call on hold: Tap the Accept button.

    Note: This option is only available if you’re on a FaceTime audio call and you receive another incoming FaceTime audio call. Otherwise, accepting an incoming call will end the current call.

View information when receiving a FaceTime call

When you receive a FaceTime call, a Call Context card with related information may appear. This can include an upcoming or recent birthday during a call to a contact, or it can include tickets, orders, or confirmation numbers during a call to certain businesses. Tap the card to view the information in the related app, such as Mail, Messages, or Wallet.

Note: Apple Intelligence on iOS 27 or later is available on an Apple Intelligence-enabled iPhone 15 Pro, iPhone 15 Pro Max, or iPhone 16 model or later. Apple Intelligence is not available in all languages or regions. Usage limits may apply.*

View a video message or listen to a voicemail

If you miss an incoming video call and the caller leaves a video message, you receive a notification about the video message. A thumbnail image from the video also appears in your FaceTime call history. You can tap the notification or image to view the video message.

Note: You’ll only get video messages from saved contacts, people you’ve called, and people Siri suggests.

If you miss an incoming audio call, the caller can leave a voicemail if you have Live Voicemail turned on in Settings > Apps > Phone. You can see a real-time transcript of the voicemail and pick up the call as the caller is leaving the message. To stop the incoming voicemail without answering or blocking the call, tap Stop.

Quick tip: Tap a contact’s name in the call history and tap the Voicemails button or the Videos button to see all their voicemails or video messages at once.
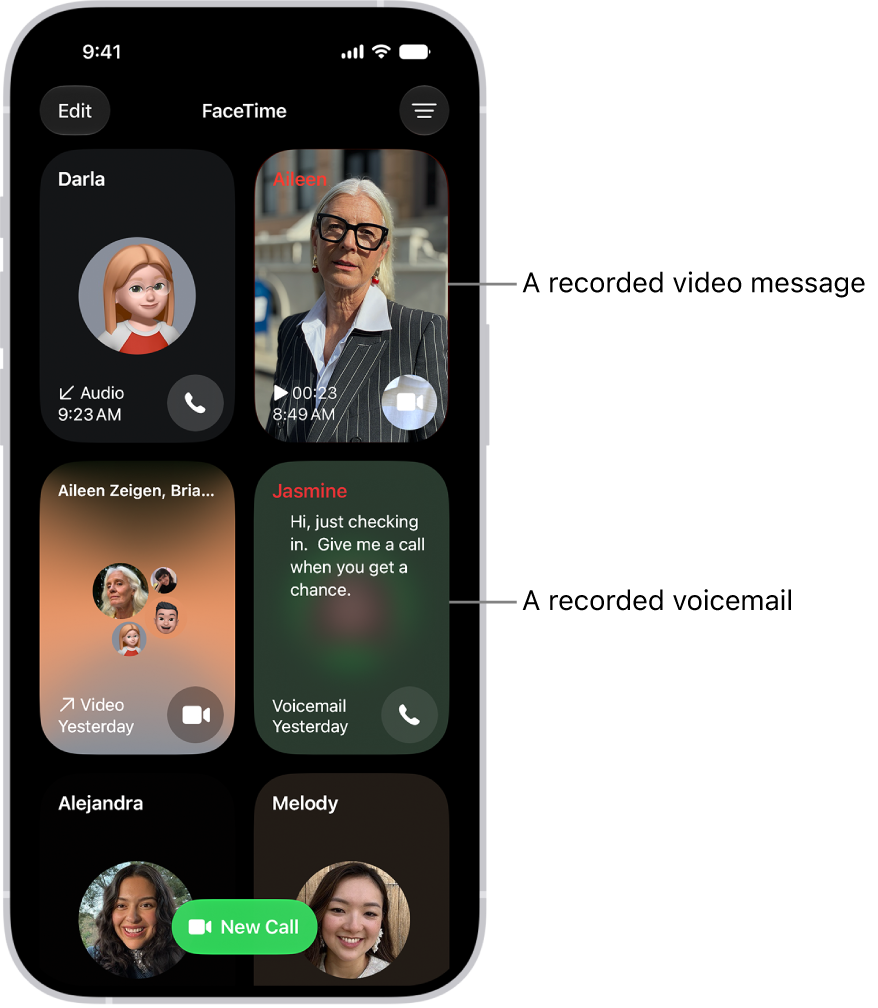
The FaceTime call history, showing a suggested contact, a recorded video message, a voicemail, and a Group FaceTime video call.

Delete a call from your call history

  1. Start the FaceTime app on your iPhone.
  2. Touch and hold the call in your call history. Tap Delete.

*Apple Intelligence is available with Siri and device language set to Chinese (Simplified), Chinese (Traditional), Danish, Dutch, English, French, German, Italian, Japanese, Korean, Norwegian, Portuguese, Spanish, Swedish, Turkish, or Vietnamese. Some features may not be available in all regions or languages. Some devices may not be available in all regions.

Siri AI is available in beta in iOS 27, iPadOS 27, macOS 27, watchOS 27, and visionOS 27 and requires an Apple Intelligence–enabled device set to a supported language. Available in English to start. Siri AI will not be initially available in the EU on iOS, iPadOS, and watchOS. Certain Apple Intelligence features that rely on server-side models are subject to daily usage limits, including but not limited to Siri AI, Intelligent Photo Editing Tools, Image Playground, and AFM 3 Cloud models in Shortcuts.

Daily limits may vary by feature, request complexity, system demand, system policies, and other factors. Expanded access to such features will be available for a fee in the future. Use of these features is subject to the Apple Intelligence Terms and Conditions.
You can select an alternative search engine as the default to search for content on the web. It’s a single setting: you pick the search engine you want to set as the default, and that’s the one your searches use.

  1. Open the Settings app on your iPhone.
  2. Tap Search, then tap Search Engine.
  3. Tap the search engine you want to set as the default and then tap the Back button.
Tag: iPhone

Live Text recognizes text within your photos, videos, and images you find online. You can interact with this text in multiple ways. You can select text to copy, share, or translate, or you can use quick actions to perform tasks like making a phone call, opening a website, or converting currencies.

You can use Live Text in Safari, Photos, Camera, Quick Look, and more. But before you start, make sure Live Text is turned on for all supported languages.

Here’s how to interact with content in a photo or video on iPhone.

Note: Live Text isn’t available in all regions or languages.

Turn on Live Text

Make sure Live Text is turned on for all supported languages before you start using it.

  1. Open the Settings app on your iPhone.
  2. Tap General and tap Language & Region.
  3. Turn on Live Text.

Copy, translate, and look up text in a photo or video

  1. Open a photo or pause a video that contains text.
  2. Tap the Detect Text button and then touch and hold the selected text.
  3. Use the grab points to select specific text. Then do any of the following:
    • Copy Text: Copy text to paste into another app such as Notes or Messages.
    • Select All: Select all the text within the frame.
    • Look Up: Show personalized web suggestions.
    • Translate: Translate text.
    • Search the web: Look up the selected text on the web.
    • Share: Share text using AirDrop, Messages, Mail, or other available options.
  4. Tap the Selected Detect Text button to return to the photo or video.

Perform tasks within a photo or video with quick actions

Depending on the content of the photo or video, you can tap a quick action at the bottom of the screen to do things like make a phone call, get directions, translate languages, convert currencies, and more.

  1. Open a photo or pause a video that contains text.
  2. Tap the Detect Text button.
  3. Tap a quick action at the bottom of the screen.
  4. Tap the Selected Detect Text button to return to the photo or video.
Tag: Photos

Any recording can be exported from Voice Memos to the Files app on your iPhone. By default, recordings are exported in .m4a format, so layered recordings are flattened and Spatial Audio becomes stereo.

You can keep them, though. When you share, you can adjust your sharing options to retain any layers or recording effects, and from the Files app, you can import your recording into Logic Pro, where you’ll edit or enhance it with professional audio editing tools.

  1. Start the Voice Memos app (in the Utilities folder) on your iPhone.
  2. Tap the recording you want to export, tap the More button, and then tap the Share button.
  3. To export a file where the effects and layers can be adjusted later (QuickTime Audio format), tap Options. Then tap Editable. Choose if you want your layers merged or separated. Then tap the Done button.
  4. Scroll down and tap Save to Files, go to the location where you want to save the recording. Then tap Save.

You can personalize the Magnifier app to show your most frequently used controls for easy access. You can also create custom activities for recurring tasks and customize settings of live scene descriptions.

Up to two of your controls can be primary controls, which appear on the main screen when Magnifier opens. You can also set your preferred controls for an activity.

Here’s how to customize controls in Magnifier on iPhone.

Add or remove controls

  1. Open the Magnifier app on your iPhone.
  2. Tap the Settings button and then do any of the following: Show or hide Ask Magnifier, Capture, or Detection Mode: Tap Ask Magnifier, Capture, or Detect, then turn Show in Control Panel on or off.

    • Add or remove other controls: Tap the Insert button or the Remove button next to a control.

    You can choose up to two primary controls.

    Primary controls appear on the main screen when you open Magnifier.

    If you add more than two controls, you can swipe up on the control panel at the bottom of the screen to access secondary controls.

    Reorder other controls: Drag the Reorder button next to a control to move it up or down.

Control Description
Brightness Adjust the brightness.
Contrast Adjust the contrast.
Filters Apply a color filter. When you add the Filters control, you can select just the filters you use most often.
Flashlight Turn on the flashlight.
Focus Lock Lock the magnifier focus.
Cameras Switch between the front and rear cameras, or choose Close-up when you need to see something very small that’s very close to the camera. Note: Close-up is available on iPhone 13 Pro and iPhone 13 Pro Max or later.
Capture Mode Switch between modes for taking single photos, multiple photos, or for taking photos of documents.

Set your preferred controls for an activity

For recurring tasks or situations, you can save the controls you use as activities, then switch between different activities as needed.

An activity for reading a menu at a restaurant is one example.

  1. Open the Magnifier app on your iPhone.
  2. Tap the Activities button. Tap Save Current Settings As New Activity to create a new activity using the current controls.
  3. Enter a name for the activity and then tap the Done button.

Customize settings for Ask Magnifier

Ask Magnifier isn’t available on devices without Apple Intelligence.

Note: Apple Intelligence on iOS 27 or later is available on an Apple Intelligence-enabled iPhone 15 Pro, iPhone 15 Pro Max, or iPhone 16 model or later.

Apple Intelligence is not available in all languages or regions, Apple says.

Usage limits may apply.* Go to the Magnifier app on your iPhone.

  1. Tap the Settings button and tap Ask Magnifier.

    Do one of the following: Input: Choose whether to speak or type your questions by default.

    Default Question: Turn on to ask the same question automatically each time you open Ask Magnifier.

    You can use the default question (“What is this?”) or enter your own.

Customize settings for live scene descriptions

  1. Open the Magnifier app on your iPhone.
  2. Tap the Settings button and then tap Detect.
  3. Tap Scenes and then turn on any combination of Labels or Speech feedback.
  4. To return to the live Magnifier lens, tap the Back button, tap it again, and then tap the Done button.

    *Apple Intelligence is available with Siri and device language set to Chinese (Simplified), Chinese (Traditional), Danish, Dutch, English, French, German, Italian, Japanese, Korean, Norwegian, Portuguese, Spanish, Swedish, Turkish, or Vietnamese.

    Some features may not be available in all regions or languages.

    Some devices may not be available in all regions.

    Siri AI is available in beta in iOS 27, iPadOS 27, macOS 27, watchOS 27, and visionOS 27 and requires an Apple Intelligence–enabled device set to a supported language.

    Available in English to start.

    Siri AI will not be initially available in the EU on iOS, iPadOS, and watchOS.

    Certain Apple Intelligence features that rely on server-side models are subject to daily usage limits, including but not limited to Siri AI, Intelligent Photo Editing Tools, Image Playground, and AFM 3 Cloud models in Shortcuts.

    Daily limits may vary by feature, request complexity, system demand, system policies, and other factors.

    Expanded access to such features will be available for a fee in the future.

  5. Use of these features is subject to the Apple Intelligence Terms and Conditions.

You can choose a default calling option for audio calls on your iPhone. You can also choose whether to use your phone number or your Apple Account to make and receive FaceTime calls.

With your Apple Account, you choose whether people can reach you by email address, phone number, or both. Or you can skip signing in and use FaceTime with just your phone number.

Here’s how to set up FaceTime on iPhone.

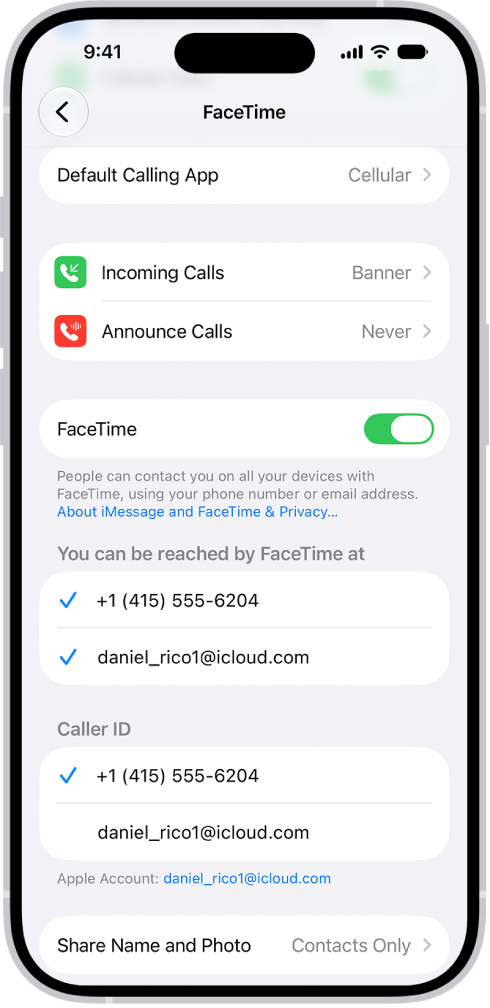
The FaceTime Settings screen, showing the Default Calling App option, the control to turn FaceTime on or off, and the phone number and email address where you can be reached.

Set up FaceTime

  1. Open the Settings app on your iPhone.
  2. Tap Apps, then tap FaceTime.
  3. If FaceTime is turned off, turn it on.
  4. Choose how you want to use FaceTime:

    • With your Apple Account: If you see a sign-in screen, sign in to your Apple Account and enter your password.

      Below “You can be reached by FaceTime at,” choose whether people can reach you through your email address, your phone number, or both. Below Caller ID, choose whether your email address or phone number appears on Caller ID for outgoing calls.

    • With just your phone number: You can skip signing in and use FaceTime with only your phone number as your contact method.
  5. Optionally, tap Default Calling App and then choose a default calling option for audio calls.

To stop using FaceTime, go to the Settings app , tap Apps, then tap FaceTime. Turn off FaceTime (or if you’re signed in to your Apple Account, tap your Apple Account, then tap Sign Out).

In the Find My app on your iPhone, you can create a temporary webpage to share the location of a lost AirTag or other item. For example, you can share the webpage with an airline to help them track your mishandled bag.

You can view and manage the shared item location, and stop sharing location updates when you’re done.

Here’s how to share location of a lost item in Find My on iPhone.

Note: When an item is within proximity of the device sharing your location, you can’t share its location.

Create and share a webpage for location updates

  1. Start the Find My app on your iPhone.
  2. Tap Items, tap the item that you want to share location updates for, and then tap the More button.
  3. Tap Share Item Location.
  4. Follow the onscreen instructions to create and share a temporary webpage.

    Note: To provide updated locations, at least one of your Apple devices where you’re signed in to your Apple Account needs to be online.

  5. Tap Done.

View and manage the shared item location

  1. Start the Find My app on your iPhone.
  2. Tap Items, tap the item with the shared webpage, and tap the More button. Share Item Location.
  3. Tap Share Item Location, then do any of the following:
    • Copy the URL: Tap the field at the top.
    • View the details: View the Visited By and Expiration rows.
    • Share the webpage with additional people: Tap Share Location Link and choose a sharing option (such as AirDrop or Mail).

Stop sharing location updates

Sharing ends after 7 days, when you reunite with the item, or when you stop it manually.

  1. Start the Find My app on your iPhone.
  2. Tap Items and tap the item with the shared webpage. Then tap the More button.
  3. Tap Stop Sharing Item Location.
Tag: Find My

When you’re not driving, you can rearrange the icons on CarPlay Home from the Settings app on your iPhone. You can move an icon, remove one, or add an icon back, and your changes appear the next time you connect to CarPlay.

  1. When you’re not driving, open the Settings app on your iPhone.
  2. Tap General and then tap CarPlay.
  3. Select your vehicle, then tap Customize.
  4. Do one of the following:

    • Move an icon: Drag the Reorder button up or down in the list.
    • Remove an icon: Tap the Delete button next to the icon and then tap Remove.

      Only icons that have the Delete button next to them can be removed.

    • Add an icon back to CarPlay: Below More Apps at the bottom of the page, tap the Insert button next to the icon.

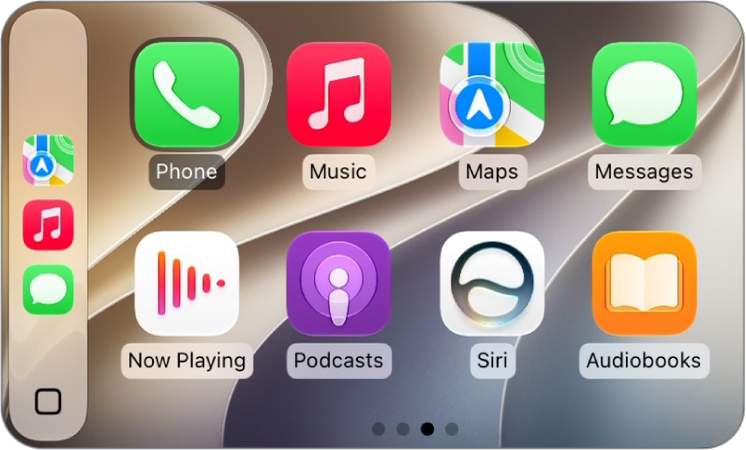
    The CarPlay Home Screen showing Maps, Music, and Messages in the sidebar. To the right is a collection of other app icons.

The next time you connect to CarPlay, you’ll see your icon changes on CarPlay Home.

Tag: carplay

With Music Haptics, you can experience music on iPhone with taps, textures, and refined vibrations that are synchronized with a song’s audio. It’s one switch in Accessibility settings, and you can start or stop Music Haptics as a song plays from Control Center.

Note: Music Haptics is available with supported iPhone models for millions of songs in Apple Music, Music Classical, Shazam, and compatible third-party apps when your iPhone is connected to Wi-Fi or cellular.

  1. Open Settings, tap Accessibility, and then tap Music Haptics.
  2. Turn Music Haptics on.

    To start or stop Music Haptics as a song plays, open Control Center, tap the audio card, then tap the Music Haptics icon. If you see the Music Haptics unavailable icon, Music Haptics isn’t available for the song.

  3. Doing any of the following to customize haptics:

    • Customize: Select Full Mix to play haptics to match the rhythm, beat, and energy of the song. Select Vocals Only to play haptics for vocals or vocal-like melodies.
    • Intensity: Select Light, Medium, or Strong haptic feedback.

Quick tip: The click of a button or another shortcut can control Music Haptics, too.

Tag: Music

In the Home app, you can run automations based on the time of day, your location, the activation of a sensor, or the action of an accessory. You can use preconfigured automations included with the Home app, or create automations of your own.

An automation can run when people arrive at or leave a location, or at a time of day, like sunrise or sunset. You can also manage and edit automations, and add a Siri shortcut.

Thread-based accessories require a Thread-enabled home hub such as Apple TV 4K, HomePod (2nd generation), HomePod mini, or a compatible third-party Thread border router for you to run automations, receive notifications, and control accessories while away.

Use a preconfigured automation

  1. Start the Home app on your iPhone.
  2. On the Home tab, touch and hold an accessory and then tap Accessory Settings.
  3. Turn on an automation.

To disable an automation, return to the accessory’s setting screen, then turn it off.

Create an automation

  1. Start the Home app on your iPhone.
  2. On the Home tab, tap the Add button.
  3. Tap Add Automation and choose one of the following automation triggers:

    • When arriving at or leaving a location: Tap People Arrive or People Leave. Choose when the automation is activated by people arriving or leaving, the location, and the time the automation works.
    • At a time of day: Tap A Time of Day Occurs. Choose when you want this automation to run.

      If you choose Sunset or Sunrise, times vary as the season changes.

      You can also set an automation to only occur after sunset, which is useful for turning on lights just when they’re needed.

    • When an accessory changes: Tap An Accessory is Controlled, select an accessory and tap Next. Follow the onscreen instructions.

      You might use this, for example, to run a scene when you unlock the front door.

    • A sensor detects something: If you’ve added a sensor to Home, tap A Sensor Detects Something, select an accessory, tap Next, and follow the onscreen instructions.

      You might use this, for example, to turn on lights in a stairway when motion is detected nearby.

Manage and edit automations

  1. Start the Home app on your iPhone.
  2. Tap Automation.
  3. Tap an automation and then do any of the following:
    • Enable or disable the automation
    • Choose when the automation happens
    • Add or remove accessories
    • Test the automation
    • Delete the automation

Add a Siri shortcut

Adding a Siri Shortcut to your automation makes it even more efficient.

  1. When choosing accessories to control with an automation, swipe up and tap Convert To Shortcut.
  2. Tap Next, name the automation (optional), then tap Done.
Tag: Home