








Got a tip for us?

Health

A Medical ID provides information about you that may be important in an emergency, like allergies, medical conditions, and your emergency contacts. Your iPhone and Apple Watch can automatically share your Medical ID during an emergency call (U.S. and Canada only) and in person to first responders.

You set it up in the Health app, and you choose whether emergency services and first responders can access it.

Here’s how to set up and view your Medical ID.

Create your Medical ID

Set up a Medical ID in the Health app.

  1. Start the Health app on your iPhone.
  2. Tap your picture, then tap Medical ID.
  3. Tap Get Started or Edit, then enter your information.
  4. Below Emergency Contacts, tap Add Emergency Contact, then add your contacts. After an emergency call ends, your iPhone alerts your emergency contacts with a text message, unless you choose to cancel. Your iPhone sends your current location (if available) and—for a period of time after you enter SOS mode—your emergency contacts receive updates when your location changes.
  5. Tap Done.

Quick tip: To view your Medical ID from the Home Screen, touch and hold the Health app icon, then choose Medical ID.

Allow emergency services and first responders to access your Medical ID

The information in your Medical ID can be shared automatically during an emergency call (U.S. and Canada only), and also appears on the Lock Screen of your iPhone and Apple Watch.

  1. Start the Health app on your iPhone.
  2. Tap your picture, then tap Medical ID.
  3. Tap Edit, scroll to the bottom, and turn on Show When Locked and Emergency Call.

Note: A first responder views your Medical ID from the Lock Screen by swiping up or pressing the Home button (depending on your iPhone model), tapping Emergency on the passcode screen, then tapping Medical ID.
Tag: Health

The Health app offers secure access to information about your vaccinations, allergies, conditions, medications, and more (not available in all countries or regions).

You can use a QR code or a link from a healthcare provider or authority to download a test result record, and you can set up automatic downloads for a range of health records from supporting healthcare organizations. Those organizations can securely send records of your allergies, medical conditions, medications, labs, vaccinations, and more straight to Health.

Note: When iPhone is locked with Face ID, Touch ID, or a passcode, all of the health data in the Health app—other than what you add to your Medical ID—is encrypted.

Set up automatic health record downloads from your healthcare provider

Supporting healthcare organizations can download your records to Health securely and automatically, including your vaccinations, labs, medications, allergies, medical conditions, and more.

  1. Start the Health app on your iPhone.
  2. Tap Summary, then tap your picture or initials.
  3. Tap Health Records and then do one of the following:
    • Set up your first download: Tap Get Started.
    • Set up downloads for additional accounts: Tap Add Account.

A list of nearby organizations appears. If your organization doesn’t appear in the list, enter the name of a clinic, hospital, or other place where you obtain health records. Or enter the name of a city, state, or province to find organizations near there.

  1. Tap the name of your organization.
  2. Tap Connect Account (below Available to Connect) to go to the sign-in screen for your patient portal.
  3. Enter the user name and password you use for the patient web portal of that organization and then follow the onscreen instructions.

When you set up downloads from an organization, new records arrive in Health automatically as they become available.

Note: Your healthcare organization might not appear in this feature. Organizations are added frequently.

Tag: Health

Cycle Tracking in the Health app can provide notifications when your logged cycle patterns are suggestive of perimenopause. You can track related symptoms and find support with educational resources.

You can log stages of perimenopause or menopause, and after logging, you can log related symptoms like hot flashes, night sweats, and sleep changes. When you track menopause, your perimenopause history is saved, and cycle deviation detection, predictions, and fertile window estimates are turned off.

Important: Cycle Tracking in the Health app should not be used for birth control or to diagnose a health condition. Cycle deviation notifications are based solely on the user’s logged cycle history. Cycle deviation notifications inclusive of perimenopause are for ages 40 and above. These notifications are not intended to replace traditional methods of diagnosis, monitoring, or treatment of perimenopause or menopause.

Log stages of perimenopause or menopause

  1. Start the Health app on your iPhone.
  2. Tap Browse, then tap Cycle Tracking.
  3. Scroll down, then tap Menopause Stages.
  4. Tap the Add button and tap Next.
  5. Do one of the following:
    • Log perimenopause: Tap I’m in perimenopause.
    • Log menopause: Tap I’ve reached menopause.

To learn more, tap Learn About Perimenopause and Menopause.

  1. Follow the onscreen instructions.

To track menopause after perimenopause, tap Menopause Stages, tap the Add button, then follow the onscreen instructions. Your perimenopause history is saved and all cycle deviation detection, predictions, and fertile window estimates are turned off.

Once you’ve logged perimenopause and menopause, you can log related symptoms, such as night sweats, hot flashes, sleep changes, and more.

Log bleeding after menopause

  1. Start the Health app on your iPhone.
  2. Tap Browse, then tap Cycle Tracking.
  3. Swipe to select a day and tap Bleeding After Menopause.
  4. Tap Had Bleeding and tap a bleeding level. Tap Done.

Note: When you log bleeding after menopause, you receive a notification recommending that you contact your doctor.

About your health data and privacy

The information you add about yourself in Health is yours to use and share. You can decide what information is stored in Health as well as who can access your data.

Apple says when your iPhone is locked with Face ID, Touch ID, or a passcode, all of your health and fitness data in Health, other than your Medical ID, is encrypted. Any health data synced to iCloud is encrypted both in transit and on Apple servers. And if you have a version of iOS, iPadOS, and watchOS (if you’re using iPad and Apple Watch for cycle tracking) with default two-factor authentication and a passcode, your health and activity data is stored in a way that Apple can’t read it.

This means that when you use the Cycle Tracking feature and two-factor authentication, your health data synced to iCloud is encrypted end-to-end, and Apple doesn’t have the key to decrypt the data and therefore cannot read it.

Tag: Health

After you set up your first sleep schedule, you can set additional schedules. For example, you can create separate schedules for weekdays and the weekend. You can modify any schedule, too, for example, to change its wake up time.

You can also change sleep options like the duration of your wind-down period, how many hours of sleep you want to get, and more. It’s all in the Sleep section of the Health app, under Full Schedule & Options.

Here’s how to edit sleep schedules in Health on iPhone.

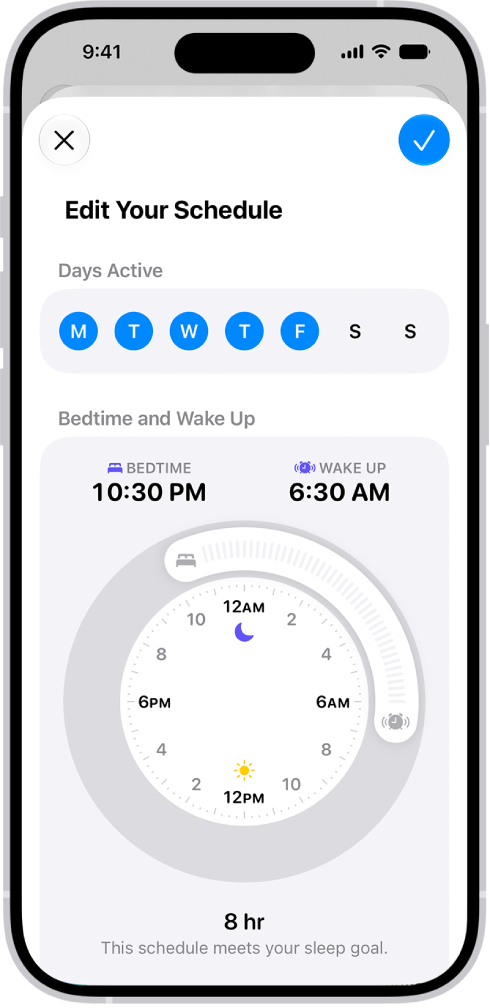
The edit your sleep schedule screen in Health, with a Days Active section and a Bedtime and Wake Up clock.

Add or change a sleep schedule

  1. Open the Health app on your iPhone.
  2. Tap Browse and tap Sleep. Tap Sleep again.
  3. Scroll down to Your Schedule, then tap Full Schedule & Options.
  4. Do one of the following:
    • Add a sleep schedule: Tap Add Schedule.
    • Change a sleep schedule: Tap Edit for the schedule you want to change.
  5. Do any of the following:
    • Set the days for your schedule: Tap a day or remove it from your schedule. The schedule applies only to days shown with solid-color circles.
    • Adjust your bedtime and wake up schedule: Drag the Bedtime button to change your bedtime, the Ringing Alarm button to change your wake up time, or the semicircle between the icons to shift both times simultaneously.
    • Set the alarm options: Turn Alarm on or off.

When Alarm is turned on, you can choose a sound, its volume, a vibration, and the snooze option.

Note: There’s no way to select a song for a sleep schedule alarm, but you can select one for an alarm with the Clock app.

  1. When you’re finished, tap Add or the Done button.

When you tap the Done button, the changes apply to every day in the schedule.

Change only your next schedule

Need a temporary change to a sleep schedule? You can make one.

  1. Open the Health app on your iPhone.
  2. Tap Browse and tap Sleep. Tap Sleep again.
  3. Scroll down to Your Schedule and tap Edit (below Next).
  4. Drag the Bedtime button to change your bedtime, the Ringing Alarm button to change your wake up time, or the semicircle between the icons to shift both times simultaneously.
  5. Choose alarm options.

When Alarm is turned on, you can choose a sound, its volume, a vibration, and the snooze option.

  1. When you’re finished, tap the Done button.

Note: To change your next sleep schedule alarm, you can also use the Clock app.

Your normal schedule resumes after your next wake up time.

Change your wind-down period, sleep goal, and more

  1. Open the Health app on your iPhone.
  2. Tap Browse and tap Sleep. Tap Sleep again.
  3. Scroll down to Your Schedule, then tap Full Schedule & Options.
  4. Scroll down to Additional Details. Then make any of the following changes:
    • Wind-down period: Tap Wind Down and then select how many minutes or hours to give yourself to wind down before your scheduled bedtime. Your Sleep Focus turns on at the beginning of the wind down period.
    • Sleep goal: Tap Sleep Goal and select a time. Any new schedules you set up reflect your new goal.
    • Sleep notifications: Turn Sleep Reminders on or off.
Tag: Health