Got a tip for us?

Battery

Apple’s iPhone 12 series and the company’s new MagSafe chargers promise to solve many of the problems people have with wireless chargers. Wireless charging is a big selling point for the iPhone 12, but not everyone wants to upgrade their phone just to get a frustration-free charging experience.

A common problem that you may be facing, is that your wireless charger simply won’t charge your iPhone. You put your iPhone down, come back in an hour and discover your iPhone has lost charge instead of gained it.

Fix iPhone 12 wireless charging not working

If wireless charging is not working on iPhone 12, iPhone 12 Pro or iPhone 12 Pro Max, continue reading and try these five fixes to see if they can put you back into a powerful position.

Make sure the Charger Is Plugged In

We’ll start with the easiest fix and one that many people overlook. Check to make sure the charger is actually plugged into a power outlet.

You may have inadvertently unplugged either the charger itself or the power strip that the charger was using. Ensure all the power connections are plugged properly and try the next solution if your charger still isn’t working.

Avoid Rushing Things

Are you giving your charger ample time to charge your iPhone? Or are you grabbing your iPhone after 15 minutes because you’re used to fast-charging? Be patient and avoid rushing things.

Most wireless chargers provide 7.5 or 10 watts on the high-end, which is significantly less than the 12 or even 20 watts most plug-in chargers deliver.

Because wireless chargers deliver less power, it’s going to take longer to charge your iPhone.

Take off Your Case

Are you using a case on your iPhone when you are trying to charge? If so, consider taking it off. Most wireless chargers work with a slim case, but can fail if your iPhone is wrapped in a thicker protective case like an Otterbox.

Make sure your iPhone is Aligned properly

Most folks drop their iPhone on a wireless charger and just walk away, assuming their device is gaining charge. What they don’t realize is that wireless charging relies on the proper alignment of the iPhone on the pad. To make a contact that transmits energy to the iPhone, the iPhone’s internal induction coil must line up properly with the induction coil in the wireless charging pad. If the device is even slightly off to the side, then the induction coils won’t line up and the iPhone won’t charge wirelessly.

It’s deceiving because you think the iPhone is charging, but it is not. You have to position the iPhone on the charger pad and wiggle it until you get the right alignment. You’ll be able to tell because the charging indicator on the iPhone will kick on. Once your iPhone is aligned properly, don’t move it as you may lose the connection, and your iPhone won’t charge wirelessly.

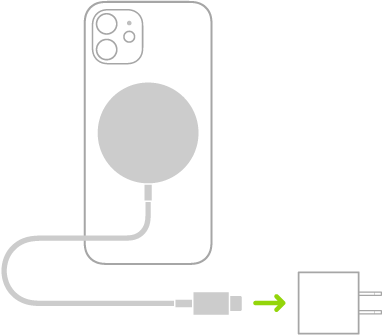
Apple has tried to resolve this issue with the introduction of MagSafe chargers. The iPhone 12 features a ring of magnets in the back casing that aligns perfectly with the MagSafe charging surface. These magnets help secure the iPhone, so it can’t be bumped out of place, ensuring a solid connection.

Ensure your wireless charger is Powerful Enough

When buying a wireless charging unit, ensure it is powerful enough to charge your iPhone. A low-power wireless charging pad may not produce enough energy to juice up your iPhone. If the voltage and current are not sufficient enough, then your iPhone may charge very, very slowly, or not charge at all. When this happens, your iPhone may start to charge, but it quickly will stop when the power transfer cannot keep up with the phone’s demands.

Tag: Battery

In this article, I’ll show you how to calibrate the battery of your iphone. But first of all, let me tell you what it does and why you should do it.

First of all, it’s worth noting that calibrating the battery of your iphone will not improve your iPhone battery life.. Lithium batteries will degrade, as they age, of course, as they undergo repeated charging cycles. Regardless of that, ios will track the operating range of the battery, but the battery trackman requires adjustments.

Have you ever noticed sometimes iOS won’t show the accurate battery percentage that you have on your iphone? Sometimes you might experience unexpected shutdowns or battery will just drop in huge percentages, say you have 20, then it drops to 10 and then your phone will just shut down, even though it says it’s at 10. That’s why you need to calibrate the battery of your iphone.

How to calibrate iPhone battery

To calibrate the battery of your iphone. You will need to let your iphone drain the battery completely. I know a lot of people say that this is risk and it will damage the battery of the iphone, but calibration is done every once in two or three months. So if you do that every once or in two or three months, of course, it won’t damage the battery of your iphone.

Now let’s look at the steps that you need to take in order to calibrate the battery of your iphone. There are a few simple steps that you need to follow in order to make sure that you do the calibration process the right way.

Note: information in this article apply to iPhone 16, iPhone 15, iPhone 14, iPhone 13, iPhone 12, iPhone 11, iPhone X, iPhone 8, iPhone 7,, iPhone 6S and iPhone SE.

Step#1: Let the battery drain.
Step #2: Let the battery drain even more! Let your iphone remain shut down, because there might still be battery left on your iphone.

Have you ever noticed if your iphone is drained out of battery and you plug it into charge once it’s up, it will show like five or six percent battery. That means that there was still battery left when it shut down. So it’s good that you let it just like sit like that shut down for a few hours in order to make sure that the battery is totally drained.

Step #3: After a few hours, go ahead and plug it into charge – always make sure that you use an apple cable or an authorized cable.

Step #4: Now, once your iPhone turn on, What you need to do is just go ahead and press volume up, volume down the side button and go ahead and turn off the device, and let it sit like that for three or four hours, so it will charge completely. Of course the iphone will be off, but it will be charging, so it won’t show the charging indicator here, but just let it sit for like three hours. three hours is enough, but just to be sure, maybe let it sit like three or four hours until it charges completely.

Step#5: After three hours, what you need to do is, with the cable still plugged on your iphone, just go ahead and press the side button and turn on your iphone. Now, once your iphone is back on, what you need to do is force reboot your iphone, so press and release the volume up button, press and release the volume down button and then press and hold the side button until you see the Apple logo. That means that your iphone is doing a forced restart, and this is the last step that you need to do, and once your iphone is back on. All you have to do is just remove the cable, and now the process is done. The calibration of iPhone battery has been finished.

That is it for this article folks. This is how you calibrate the battery of your iphone. This is recommended to be done once in two or three months. Of course, the calibration will help ios better measure the battery of your iphone.

I hope you found this article helpful. Now take time to share this article with a friend to show them how to calibrate iPhone battery percentage.

Thank you for reading.

This article will show you how to automatically turn on low power mode on iPhone at any battery level.

Today, most Smart phone creators are putting huge capacity batteries on their flagship devices like 5000mAh and 6000mAh. Those smartphones can easily get you through a day and a half which is pretty good. Because the vast majority of people love to use their smartphones but they don’t like to charge their phone every now and then. Unfortunately, The Cupertino based brand does not provide large capacity batteries on the
iPhone.
That is why most users
TURN ON Low Power Mode
on their iPhone all the time. The only drawback with Low Power Mode is it stops so many activities from the background like display brightness, mails, and background downloads. It helps you to preserve your battery to get you through the day.
What if you want to automatically turn on low power mode on iPhone at any percentage without having to activate it yourself? Well. In this article, i’ll show you how to make low power mode turn on automatically on iPhone at any battery percentage.

Note, this feature is only available on
iOS 14.

How to automatically turn on low power mode on iPhone in iOS 14

Here are the step-by-step instructions for how to automatically turn on low power mode at any battery percentage on your iPhone:

  1. Launch the Siri Shortcut app. It’s a pre-installed app on the iPhone. If it is not available on your device, head over to Appstore and download it.
  2. Tap on the Automation tab located within the shortcut app.
  3. Now, tap on the Create Personal Automation button. Scroll all the way down and you will see battery level.
  4. Now you will see a toggle to change the percentage you want and then select the fall below 50%. And tap next. You can select any battery percentage level.
  5. Next, tap on Actions and search for Set low power mode. Once you tap on the Set low power mode option, you need to turn Off Ask before running toggle. So that it will automatically turn on low power mode without asking for any permission.
  6. If you see the screen (shown below). It means your Low power mode automation is set.
How to automatically turn on low power mode on iPhone in iOS 14

Now your Low Power Mode will automatically TURN ON whenever your iPhone battery reaches the battery percentage you have set.

As you can see, iOS 14 Automation feature allows you to do many things. If you like this post and want to share your experience with us, please feel free to leave a comment down below. Also, don’t forget to share this article with your friends to teach them how to enable low power mode on iPhone automatically at any Batterypercentage.

There have been reports of iPhone SE 2020 battery draining quickly than usual. Although this iPhone model is quite new, there has been concerns from Apple users that despite the newness of their iPhone, their battery is already draining faster. This can be depressing particularly to those who are always on the go and needs their iPhone for their day to day living. If you notice your iPhone SE 2020 battery draining fast, there are some steps you can take to fix the issue before contacting Apple Support.

One of the issues plaguing iPhone SE 2020 users is faster-than-normal battery drain. Battery issues iPhone SE 2020 are extremely common, particularly after new iOS releases, so the complaints don’t come as much of a surprise.

Some of the issues might be hardware related, but many others are probably software related. In a most cases, poor battery on iPhone SE 2020 is caused by a rogue app or bad habits.

If your iPhone SE 2020 battery drain fast, your first thought might be to downgrade back to an older version of iOS. That’s certainly an option. That said, before you downgrade, you should try and resolve the issues on your own.

Why is iPhone SE 2020 battery draining fast?

There can be a number of reasons why your iPhone SE 2020 battery dies fast. It could be because of a bug from the recent update, or maybe there is some issues with the recently installed apps or current apps on your device. The settings on your iPhone could also affect battery consumption.

iPhone SE 2020 battery drain fix

If your iPhone SE 2020 battery drain fast, the following tips will help you fix the problem. These fixes have worked for us in the past and there’s a good chance they’ll get your issues resolved in no time.

Solution #1: Restart Your iPhone

The first thing you’ll want to do is restart your iPhone. Shut it down, wait a few seconds, and then turn it back on. Often times, this will resolve the problem.

Solution #2: Update Your iPhone

If your iPhone SE 2020 battery dies fast, and there’s a new version of iOS available, try updating to the latest version.

Apple probably won’t call out any battery life fixes in an update’s change log, but there’s always a chance new software does wonders for your iPhone. Before you install a new version of iOS, be sure to read reviews and dig into feedback about the update’s performance on your iPhone.

Solution #3: Check Out Your Apps

If you are still experiencing battery issues on iPhone SE 2020 after performing a restart, and there isn’t an update available, check your applications. Apps, especially third-party applications, will sometimes act up after a new iOS operating system is released and there’s a very good chance it’s one of your apps causing the battery drain issues.

Checking app performance is easy and you might be able to identify a rogue app in a matter of minutes. Here’s how to do that:

  1. Launch the Settings app.
  2. Tap on Battery.
  3. Head into the Battery Usage section.

This section will show you the apps draining your iPhone’s battery life and when they’re doing so. If you’re using an app a lot, it will obviously drain your device’s battery. However, if you notice that an app you rarely use is draining battery life, you might need to take a closer look.

If you see an app you rarely use draining your iPhone’s battery life, try updating the application to the latest version. App developers are busy rolling out iOS updates and an update could resolve the problem.

If you are still having poor battery life on iPhone SE 2020, try deleting the app and see if that returns things to normal.

Solution #4: Use Screen Time

The Screen Time feature on iPhone SE 2020  can help you conserve battery while also eliminating bad habits.

Screen Time includes a set of controls that can help keep your addictive behavior in check. If you aren’t on your iPhone using your apps, you won’t be consuming your battery life.

Screen Time gives you the ability to set limits on how long you can use a given app on a particular day. If you approach the threshold, it’ll give you a warning.

The feature also lets you set these alerts for kids and link them to a ScreenTime Allowance. This allows you to set limits on games, but keep important apps available.

Solution #5: Use Low Power Mode

The Low Power Mode feature on iPhone SE 2020 can help you conserve battery life by disabling services (Hey Siri, automatic downloads, and mail fetch) that could drain your battery.

You can turn Low Power Mode on and off any time you want and your iPhone will also prompt you to turn it on whenever it reaches 20% battery.

You may also want to add Low Power Mode setting to your Control Center. Control Center is the menu that pops up when you swipe up from the bottom part of the screen. Here’s how to do that:

  1. Tap Settings.
  2. Now, tap Control Center.
  3. Next, tap Customize Controls.
  4. Lastly, tap the green plus sign next to Low Power Mode.

Next time you launch Control Center on your iPhone you’ll see a battery icon. Tap it to enable or disable Low Power Mode.

You can also turn Low Power Mode on from the Settings app. Here’s how to do this:

  1. Launch Settings.
  2. Scroll down and tap Battery.
  3. Tap Low Power Mode.
  4. Toggle it On.

Solution #6: Turn On Optimized Battery Charging

Starting with iOS 13, Apple introduced a feature known as
“Optimized Battery Charging.”
This feature can help reduce battery aging.

The feature learns from your daily charging routine and waits to finish charging your device to 100% until you need to use your
iPhone.
In doing so, it will stop your battery from sitting at maximum capacity and could prolong the overall life of your iPhone’s battery.

Here’s how to enable Optimized Battery Charging on your iPhone SE 2020:

  1. Launch the settings app on your iPhone
  2. Scroll down and tap Battery
  3. Tap Battery Health
  4. Turn ON the switch next to Optimized Battery Charging tab

Solution #7: Disable Widgets

If you don’t use widgets, try turning them off and see if battery life improves. Here’s how to disable widgets on iPhone SE 2020:

  1. On your iPhone Home Screen, swipe to the right.
  2. Scroll all the way to bottom of your widgets and tap Edit.

On this screen you’ll be presented with a list of your apps and services. These are your widgets and you might notice that some of them are active. To deactivate a widget:

  • Tap on the red circle with the white line.
  • Now, tap Remove.

At first we recommend disabling the widgets you never use. (at times, that might be all of them.) If you still notice poor battery life on iPhone SE 2020, return to this screen and go through them one-by-one or disable them all.

You can always turn your widgets back on if you discover they aren’t the cause of the poor battery life on iPhone SE 2020.

Solution #8: Turn Off Raise to Wake

iOS’ Raise to Wake feature is handy, but turning it off could help you conserve your iPhone’s battery life.

If you don’t need your iPhone’s screen to automatically turn on whenever you pick it up, head over to the Settings app > Display & Brightness and turn the Raise to Wake feature off.

Solution #9: Disable Vibrations

If your iPhone vibrates every time you receive a notification, and you don’t need it to, try turning the vibrations off. Turning them off will help your iPhone use less power.

To turn off vibrations on iPhone SE 2020:

  1. Launch Settings.
  2. Tap Sounds & Haptics.
  3. Switch Vibrate on Ring and Vibrate on Silent to off position.

You may also need to go into each individual Sound and Vibration and make sure Vibration (which is located at the top of the display ) is set to “None”.

Solution #10: Use Wi-Fi Instead of Cellular

Using your iPhone while it’s connected to a cellular network can drain your battery. If you have a Wi-Fi network at your disposal, connect to it. It could help you save battery.

Solution #11: Stop Background Refresh

Apple’s Background App Refresh refreshes apps in the background in order to show you the latest data when you launch them. It’s a handy feature, however, it can also consume your iPhone’s battery life. If you don’t need it, try turning it off.

Follow these steps to disable Background App refresh:

  1. Launch Settings.
  2. Go to General.
  3. Tap Background App Refresh.
  4. Turn it off for any apps you don’t use.

There is an option to turn it off completely if you don’t want to go through your apps one at a time.

Solution #12: Turn Off Fitness Tracking

iPhone SE 2020 features a motion co-processor that tracks your steps and other movements. If you use your phone for fitness-related activities, you’ll probably want to keep this feature enabled. If you don’t, you may need to disable it and see if that helps your iPhone SE 2020 battery that is draining fast.

To do this, launch the Settings app and go to Privacy. From there, select Motion & Fitness and toggle the Fitness Tracking function off.

You might also want to toggle off apps listed below Fitness Tracking in the menu. If you don’t notice any change, you can always turn everything back on.

Solution #13: Turn Off Assistive Touch

If you’re currently using Assistive Touch on your iPhone, it might be one of the culprits. Turning it off might help your iPhone SE 2020 battery that is draining fast.

If you don’t want or need Assistive Touch active on your phone, try turning it off. Follow these steps:

  1. Launch Settings.
  2. Go to Accessibility.
  3. on Touch
  4. Tap AssistiveTouch.
  5. Toggle it to Off.

Solution #14: Enable Dark Mode

Since the dark mode feature is now available on iOS 13 update and most of Apple iPhones that supports the update, turning on Dark Mode feature can help fix battery draining issue on iPhone SE 2020.
Follow these steps to enable Dark Mode:

  1. Launch the Settings app on your iPhone
  2. Tap on Display & Brightness
  3. Tap on Dark Mode to enable it.

Solution #15: Disable Automatic Downloads

If Automatic Download is enabled, as the title suggest, it automatically downloads and updates apps purchased and installed on your device. This means it constantly refreshes to search for available update especially if connected to a WiFi thereby draining your iPhone’s battery life. 

Follow these steps to Disable Automatic Download:

  1. Launch the Settings app on your iPhone
  2. Go to iTunes & App Store tab
  3. Under the Automatic Download section, you can turn Off for Music, Apps, Books and Audiobooks and App Updates. You have the option to select one or you can select to disable all.

Solution #16: Adjust Screen Display

There is a high possibility that the cause of the battery draining faster on your iPhone SE 2020 is because of the settings on your screen display. Be sure to change your iPhone screen dimmer on for daytime use and enable auto-brightness in order for it to auto adjust based on the lightning conditions with the use of a light sensor that is built-in to your iPhone device.

You can adjust the brightness of the screen manually in two ways:

  • First option: Drag the Sun Icon when you opened the Control Center by swiping up from the bottom of your display.
  • Second option: Open the settings app on your iPhone and tap on Display & Brightness, then drag the slider to adjust brightness

To enable Auto-Adjust function, follow these steps:

  1. Open the settings app on your iPhone SE 2020
  2. Tap on Accessibility
  3. Tap on Display & Text Size
  4. Toggle ON Auto-Brightness tab.

Solution #17: Enable Low-Data Mode

Besides reducing the data usage on your iPhone, Low Power Mode can also can help extend battery thereby helping fix battery draining problems on iPhone SE 2020.

Follow these steps to enable Low Data Mode:

  1. Open Settings
  2. Tap Cellular
  3. Tap on Cellular Options tab
  4. Turn ON Low Data Mode

Solution #18: Manage Location Services Feature

Location Tracking can drain your iPhone’s battery therefore, it’s good to manage your location service feature not to track you on all apps all the time. You can either choose to track you on a particular app “Once” and when an app tries to locate you again a prompt will appear if you want to be tracked or not. This does not only fix battery draining problems but also keeping you secured with privacy as well. 

Here’s how to manage Location Services: 

  1. Open the settings app on your iPhone
  2. Tap Privacy
  3. Tap Location Services
  4. Select While using the App on each of the apps

Solution #19: Reset All Settings

If your apps aren’t the cause of the problem, try resetting all of your settings. This will restore your settings to their factory defaults (so make sure you have your Wi-Fi passwords handy), but it could fix your battery life issues. It has worked for us in the past.

Here’s how to reset your iPhone SE 2020:

  1. Launch Settings.
  2. Go to General.
  3. Scroll down and tap Reset.
  4. Tap Reset All Settings.
  5. If asked, type in your passcode.
Tag: Battery

Charging your iPhone – a task which seems as simple as just plugging your device into a charger. But, have you ever thought about whether you are doing it right?

With so many conflicting opinions found on the internet, it can be difficult to distinguish between the wrong and right ways to charge your
iPhone.
Actually, you may have been charging it wrong all this time.

First of all, it’s important to understand that iPhone’s use lithium-ion batteries, and these batteries are susceptible to their own versions ‘stress’. As such, charging your iPhone wrongly could be detrimental to its continuance and even cause long-term damage to the battery.

We want to make sure you are making the most out of your device and are taking the necessary steps to maximize the battery life of your precious iPhone.

So, in an effort to help you understand how to efficiently charge your iPhone and to clear up any confusion, we have explained the 5 most popular iPhone battery myths. Check them out below:

Myth #1: Never use your iPhone whilst its charging

Many articles on the internet states that using your iPhone whilst it’s charging can be unsafe. They argue that being on your iPhone can cause the phone to explode, damage the battery, or even trigger an electric shock.

Opening apps, answering phone calls, and checking your text messages whilst your iPhone is plugged in iscompletely fine. The only issue you may experience is that your battery may take longer to charge up.

Results: Although it might take longer to charge up, using your iPhone whilst it is connected to power is completely safe. Just make sure you use genuine, high-quality chargers and charging cables.

Myth #2: Charging your iPhone overnight can destroy the battery

Perhaps the most common misconception many people have is that charging their iPhone overnight can damage the battery. A few years ago, this was the case. However, today’s phones have extra protection chips built into the battery so overcharging can’t take place. As soon as your iPhones internal battery reaches its full capacity, charging stops.

Nonetheless, it’s important to note that leaving your iPhone plugged in to charge overnight will use up quite a bit of energy. Every time your iPhone dips to 99%, your device will use energy to obtain full battery – this is known as trickle charging.

Results: Although charging your iPhone overnight is safe and won’t destroy the battery, trickle charging can cause your iPhone to heat up. This isn’t something you need to worry about but if you can, take your iPhone out its case whilst charging, ensure you place it on a flat, hard surface, and if you wake up in the night at any point, unplug it before you go back to sleep.

Myth #3: You must use the official Apple charger to charge your iPhone

Most people believe that they must use the official Apple charger to charge their iPhone. However, this isn’t the case. As long as you aren’t using a cheap knockoff charger, then using a charger which isn’t made by apple is completely fine. When purchasing a charger for your iPhone, make sure you buy high-quality chargers from reputable brands.

Results: Using a third-party charger to charge up your iPhone is absolutely fine. Just ensure that you aren’t using a super-cheap, knockoff, faulty charger – this is when the damage to your iPhone could be caused.

Myth #4: You should always charge your iPhone up to 100% and let the battery drain all the way down to 0%

For many years, a lot of people have been under the impression that allowing their iPhone to completely drain down to 0% before charging it back up to 100% was the best charging method, and that chargingan iPhone in small bursts could cause damage in the long run. But as a matter of fact, it’s better not to fully charge because a high voltage can put the lithium-ion battery under significant stress. The lengthened stress could result in damage to your iPhone battery’s continuance.

Results: Avoid charging your iPhone full cycle (0-100%). Instead, try to top it up regularly in shorter chargers. If it’s possible, keep your iPhone’s battery charged with a good amount of power as the day goes on – partial charging is the way to go.

Myth #5: It doesn’t matter if I never turn my iPhone off

The vast majority of people make the mistake of leaving their iPhone’s on all day whilst using them and leaving them on all night to charge. But much to everyone’s disbelief, turning your iPhone off and resetting the device could actually help to conserve the battery. Your iPhone is a machine that has multiple apps constantly running in the background, so it’s important to give it a break every once in a while.

Restarting your iPhone only takes a few minutes, but that time could help preserve the battery life of your much-treasured device.

Results: If you don’t do it already, try turning your iPhone off at least once a week to reset it or when you go to bed and it’s not in use. Turning it off from time-to-time allows your iPhone to take a break and preserves the battery’s longevity.

Myth #6: Closing All Your Apps saves battery

Last on our list is an oldie, but a goodie. Despite many clearly-stated, unequivocal answers which echo a resounding “No!” I still see people closing their active apps. There hasn’t been a more succinct answer on this topic than from Apple’s Senior Vice President of software engineering Craig Federighi. Answering a customer’s e-mail originally intended for Tim Cook, as he often does, Mr. Federighi categorically denies any necessity for closing apps.

“No and No” from Apple’s VP of software engineering is good enough for us, but to elaborate just a bit, here’s the reason: Essentially, apps that show up in your “recent apps” are in such low power states that they’re not impacting battery life really at all. Coupled with this is the simple fact that you use your iPhone, and if you close all of your apps – no matter how light your usage is – when they need to be reopened, by you or the system, more CPU power and therefore battery power is used getting them open again.

There are a few quick caveats to this approach. With apps that are background-resource-heavy like Facebook and other social media, closing them without disabling “background app refresh” will not do you any good. Also, in the case of location-tracking apps, limiting location services is also recommended. Other features like the iPhone’s “Share My Location” feature are also good ones to turn off for hanging on to your precious juice. Settings like “Bluetooth Sharing” may transmit data from Bluetooth accessories, such as wearables, to their respective apps even when they’re not running, but this transmission should have very minimal effects on your battery life.

If you think there’s an errant app draining your iPhone’s battery, it’s quite easy to manipulate these authorizations. Firstly, you can check an apps background usage from the “Battery” menu in General settings. Tap any app in the list to see a breakdown of battery drain due to on-screen time versus background activity.

Next, from the Privacy menu in the main settings you’ll see location services while the rest of these relevant preferences can be found within the app in question’s dedicated settings, also found in the iPhone’s General settings menu. Beware, of course, not to disable something like background app refresh on a work communication app such as Gmail if you rely on its notifications for work or disable cellular connectivity on WhatsApp if you need to be available even when you’re not on Wi-Fi. Otherwise, you can tweak the aforementioned settings to your liking or use them to limit an app’s access to your iPhone’s resources and see for yourself if an app truly is running wild.

Oh, and as always, using the auto-brightness and True Tone options are also effective ways to limit your usage without having to think too much about it. Finally, you can disable Wi-Fi network when you’re out and about to keep your iPhone from constantly searching for possible networks to connect to.

Results: Don’t close apps, but rather keep them in check with set-it-and-forget-it options in your iPhone’s settings. And use auto brightness!

Making the most out of your battery:

Most of us would love to own a phone where the battery inside it never dies, but with the powerful, battery draining features today’s phones are built with, this is implausible. However, by following the above tips, you could help to extend your battery’s lifespan and keep your iPhone full of juice for longer.

See our article on
how to improve iPhone’s battery life.

Do you know any other iPhone charging myths that we haven’t covered above? Let us know in the comments section below!

Is your iPhone 13 or iPhone 13 Pro Charging Slowly? Here’s how To Speed Up Your Charging.

In most cases, your iPhone 13 shouldn’t take very long to charge, even if the battery is significantly drained. iPhone 13 is designed to hold a charge for a long time, and the recharge stage shouldn’t be too time-consuming. If your iPhone 13 seems to be taking longer than it should to charge, then there are some different things that could be causing it. There are also several possible solutions to your iPhone 13 or iPhone 13 Pro charging slowly.

Believe it or not, there is even better news. It turns out that charging your iPhone 13 or iPhone 13 Pro much faster is not a difficult process. Actually, you can drastically improve your charging time by following the tips described below.

Without any further ado, here is how to fast charge your iPhone 12 13 or iPhone 13 Pro:

iPhone 13 charging slowly? Don’t Engage in Any Phone Activity While Charging

If your iPhone 13 is charging slowly, you should avoid doing anything with the iPhone while it is charging if you want the process to go quicker. Don’t make phone calls, text with anyone, play games, etc. while waiting for the battery to return to maximum power. Some individuals are practically addicted to their phones, but find something else to do while the phone is charging. That’s a sure way to get it back to full-battery status faster.

iPhone 13 Charging Slowly? Buy a powerful power adapter

Along with the fast charging cable that came with your iPhone 13, you’ll need a special charging block, because what’s an Apple product without a bunch of peripherals? It’s a 20-watt adapter with a USB-C port, rather than the usual USB-A port. If you’re just looking to fast charge an iPhone 13 or iPhone 13 Pro, then the $29 official 20-watt USB-C power adapter is all you need.

If you have a newer MacBook, then you may also already have a power adapter that can handle all your fast-charging needs. Many MacBooks — specifically, 2015 models and newer — use USB-C-compatible charging blocks, and you can use one of these to fast charge your iPhone 13 or iPhone 13 Pro when combined with the USB-C to Lightning cable. The most common is the official 30W USB-C power adapter, and it can easily pull double-duty if required.

If you’re rocking a MacBook Pro, then you might have a charger that’s even more powerful than the 29W or 30W varieties, and Apple has confirmed that even the 61W and 87W versions are safe to use with your iPhone 13 or iPhone 13 Pro. Remember, the amount of power used is regulated by your iPhone, so it will never draw more than it can handle and damage itself — and the charger can’t force your phone to accept a wattage that’s too high for it to handle.

Note: If you’re buying an adapter just for fast charging, there’s no need to buy an adapter stronger than 20W; iPhone 13 and iPhone 13 Pro can only handle a 20W charge, so a more powerful charger would just cost more money and not offer any extra benefits. However, it would add future-proofing, if you’re worried about that.

iPhone 13 Charging Slowly? Turn off optimized Battery charging

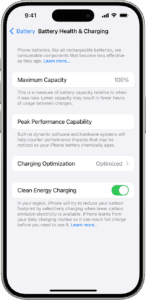
To charge your iPhone 13 or iPhone 13 Pro to 100% quicker, open up the Settings app, head to the Battery Health section, then toggle off the Optimized Battery Charging switch. That seems counterintuitive, but it really works — here’s why.

Turns out, it’s actually not all that healthy for your phone’s battery to continuously charge straight to 100%, and sit at 100%, all of the time. According to Apple, batteries can age more or less depending on factors like charging patterns and temperature — and the more they age, the less charge they can actually hold. Leaving your phone at 100% on a charger for hours and hours on end accelerates that degradation. In other words, the real-world effects of quickly charging your battery and leaving it at 100% over and over again are actually tangible. Even if that impact won’t be felt for a year or two into the phone’s life.

Use this feature sparingly — but when you need it, it’s wonderful to have the option.

iPhone 13 Charging Slowly? Turn on airplane mode temporarily

One of the biggest draws on your battery is the network signal. As a general rule, the worse your signal, the faster your battery will drain.

Consequently, if you reside in a location with a poor signal, charging your iPhone takes longer than if you live in an area with a strong signal — the signal is eating through your power as you charge.
The quick solution? Put your iPhone in Airplane Mode before you plug it in. Testing suggests it could reduce the amount of time needed for a full charge by as much as 25 percent.

Also, it probably makes sense that you should charge your iPhone 13 with it turned off. After all, if your iPhone is not running anything, it can just charge faster. However, there are times when you want to charge your iPhone with it turned on.

For those moments, you can always enable airplane mode.
While this method is not as effective as turning it off completely, it will reduce the load on your iPhone 13 and make it charge much faster.

iPhone 13 Charging Slowly? Turn Your device Off

Simple, obvious, but often overlooked. If your iPhone 13 is switched off while it’s charging, it’s going to charge a lot faster. Nothing will be drawing on the battery while you fill it up.

iPhone 13 Charging Slowly? Do not use a wireless charger

We hear you: Wireless chargers are one of the smartest ways to charge your iPhone. Unfortunately, they are also one of the least effective ways to quickly charge your iPhone 13.

Basically, you really should only be using a wireless charger if no better option is available. It won’t hurt your phone in the long run to use one, but if you want to charge your iPhone 13 faster, this is the only method to avoid.

iPhone 13 Charging Slowly? Charge your device from a wall outlet, not from your computer

Here is another one of those unfortunate facts that keeps you from charging your iPhone 13 faster.

As tempting as it is to charge your iPhone from your desktop or laptop, it will never be as fast as charging from direct power source. Your iPhone can take advantage of a much stronger and more consistent power source.
Typically, non-wall socket USB ports only produce a power output of 0.5A. Wall socket charging usually produce 1A (depending on your device). There’s nothing wrong with receiving a lower amperage — it won’t damage your iPhone — but you’ll definitely be twiddling your thumbs for a lot longer.
When you connect this method to a USB-C charger and turn off your iPhone 13, you’ll get the fastest charging times possible.

iPhone 13 Charging Slowly? Remove your phone case

The idea of removing your iPhone case while charging your iPhone probably sounds like a very bad idea. However, there is very real information that supports this idea.

Basically, your iPhone gets a little hotter when you have a case. When you charge it with your case on, it gets very hot. Not only is that generally dangerous, but excessive heat can cause your iPhone to slow down or start the charging process.

It may sound tedious to remove your phone case every time, but again this is for those who really want to optimize their iPhone charging.

iPhone 13 still Charging Slowly? Charge your iPhone at least once a month with an empty battery

You’ve probably heard that it’s best to drain your iPhone’s battery before charging it. That’s generally true, but it’s also a bit misleading.

Instead, you can use your overall charging time to make your iPhone “die” even once a month, even before it’s fully charged. Why? Well, it helps battery maintenance to keep it running through a natural cycle. In general, the healthier your battery is, the faster it will charge.

iPhone 13 Charging Slowly? Clean the charging port

We’ve talked about this before regarding cleaning your iPhone, but you should actually clean the charging port of your iPhone 13 regularly for proper maintenance.

If you try to charge your iPhone 13 with a dirty port, you may experience delay issues due to an incorrect connection. Moreover, you can cause damage to essential charging components if your charging port is too dirty for too long.

What Charging Tips Do You Have?

I’ve introduced you to nine ways to charge your iPhone 13 or iPhone 13 Pro faster. If you work through the tips methodically, you can save time charging your iPhone.
I’d love to know what else you’d add to this list. Have you found an iOS setting that considerably alters the amount of time it takes to recharge your battery? Do you know about a gadget your fellow readers can buy to make the charging process easier?
Now that you’ve fixed slow charging on iPhone 13 and iPhone 13 Pro, check out Tips and tricks to improve iOS 15 battery life

With the release ofmacOS Catalina 10.15.5, Apple has introduced a new Battery Health management feature for macOS. Similar to what is already found in iOS, this feature aims to extend the life of your MacBook by reducing its wear.

Most people use their MacBooks for up to 5 years or even longer. The battery is usually the first to be used on older MacBooks, as the hardware is usually good enough to survive five years of intensive use. While it is possible to replace the battery on MacBooks, most consumers usually don’t because it is expensive. With the new Battery Health management feature in macOS Catalina 10.15.5, Apple hopes to extend the battery life of MacBooks depending on a person’s usage.

How does Battery Health Management work in macOS Catalina?

The Battery Health management feature in macOS Catalina 10.15.5 analyzes the usage and charging habits of your MacBook and automatically prevents it from being charged to 100% when deemed necessary. A battery that is always 100% charged and connected is not good for its life, which is why Apple introduced this feature. Many MacBook owners use their machine as a desktop replacement, which means it is almost always plugged into a power source. In such cases, the Battery Health management feature prevents your MacBook from charging to 100%, thereby extending battery life.

Enabling Battery Health management does not mean that your MacBook will stop charging the battery to 100%. The feature first analyzes your usage patterns and then makes adjustments accordingly. If you have a very erratic schedule or are always on the go, consider disabling the Battery Health Management feature as it won’t help you much. However, if you’re always near a power source and want to extend the battery life of your MacBook, keep this feature turned on.

Compatible MacBooks

All MacBook and MacBook Pro models with a Thunderbolt 3 port and launched on or after 2016 support the Battery Health Management feature. This means that all MacBooks and MacBook Pro models launched in or after 2016 are compatible with this feature. Older non-battery powered MacBooks and Macs are not compatible with this feature.

Battery Health Management is enabled by default when you update your MacBook to macOS 10.15.5. However, if you get a new MacBook out of the box with macOS Catalina 10.15.5, you will need to enable the Battery Health Management feature manually.

How to disable Battery Health Management on your MacBook

Step-1: Head over to System Preferences -> Energy Saver on your MacBook running macOS Catalina 10.15.5.

Step-2: Click on the “Battery Health” option located at the bottom of the window.

Step-3: In the dialog box that appears, you have the option to disable the battery health management feature. You must click ‘Disable’ again to confirm your selection.

What do you think of the Battery Health management feature of macOS Catalina 10.15.5? Leave a comment and let us know!

See also optimized battery charging not working on iPhone? Fix

Tag: Battery

Optimized battery charging is not working on your iPhone and you don’t know what to do. No problem. In this guide, I’ll explain why optimized battery charging is not working and what to do to fix the issue.
Starting with the iOS 13, Apple introduced theOptimized Battery Charging feature to help iPhone users maximize total battery lifespan. While some people love this feature, others don’t — maybe because it sometimes doesn’t allow their iPhone to charge past 80%. That makes it quite challenging to know whether iPhone’s Optimized Battery Charging feature is working or not. However, if you’ve noticed it’s not, here are step-by-steps instructions to fixthe issue.

How does Optimized battery charging work on the iPhone?

Here’s how the feature works::

    • If you wake up at 8 a.m. every day, Optimized Battery Charging will take note of that wake-up time.
    • When you connect your iPhone to power at night, it’ll charge normally up to 80 percent

charge.

  • At this point, the feature will pause charging.
  • It will continue charging when it recognizes it can fill up your iPhone’s battery without making it sit a full charge for too long.

Apple introduced optimized battery charging because of the way lithium-ion batteries function. All smartphone batteries naturally degrade over time, but letting a lithium-ion
battery sit at 0 or 100 percent charge for a long time can place unnecessary strain on it.

Why isn’t Optimized Battery Charging working?

Optimized Battery Charging, in theory, is a great way for Apple to help reduce the number of times an iPhone user needs to replace their battery.

It may particularly come in handy for users who hold onto their iPhones for extended lengths of time. For those users, battery health is extremely important
since no on wants to replace their battery every year.

Having said that, it seams that Optimized Battery Charging isn’t actually working for a significant number of users.

According to users experiencing this problem, the feature does not stop or start charging at the correct times. Other users have reported that the feature doesn’t do anything
at all on their devices.
In this article, we’ve explained 6 different fixes for iPhone’s Optimized Battery Charging not working as expected.

Optimized battery charging not working on iPhone? How to fix

1. RE-ENABLE OPTIMIZED BATTERY CHARGING

The first thing you should do when you notice that Optimized Battery Charging isn’t working on your iPhone is to reconfirm if the feature is enabled. Optimized battery charging is enabled by default on newer iPhone models, however, it could be disabled on your device.

NOTE: only devices running iOS 13 and higher support optimized battery charging.

To check if optimized battery charging is enabled on your iPhone, simply follow these steps:

  1. Start the settings app on your iPhone and tap Battery.
  2. Tap on Battery Health.
  3. Make sure the ‘Optimized Battery Charging’ feature is enabled. You can also try disabling it and toggle it back on.

Now that you’ve enabled the feature, let’s move to the next solution to help get Optimized Battery Charging working on your iPhone.

2. TURN ON LOCATION SERVICES

To help maximize total lifespan of your iPhone battery, the Optimized Battery Charging feature uses machine learning to learn your usage habit and determine where you spend most of your time (home, work, etc.). Afterwords, the Optimized Battery Charging feature would engage only at the locations where you spend the most time, ideally speaking.

If certain location settings on your iPhone are disabled, or there’s an unexpected discrepancy in your location pattern (for example if you recently traveled, went on vacation, or relocated), there may be a shift (or pause) in the functionality of the optimized charging feature. That is, Optimized Battery Charging wouldn’t work as expected.

Furthermore, there are a number of location settings that must be enabled on your iPhone for Optimized Battery Charging to work. Simply follow the steps below.

NOTE: None of the location information or history used for this Optimized Battery Charging is sent to Apple. The data is locally stored on your iPhone toImprove battery life

Location Services

  1. Start the settings app on your iPhone and go to Privacy.
  2. Now, tap Location Services.
  3. Lastly, tap Location Services to toggle it on if It’s not yet already.

System Customization

    Start the settings app on your iPhone and tap Privacy.

  1. Tap Location Services.
  2. Scroll down and tap on System Services.
  3. Make sure System Customization is enabled. Toggle it on if it’s not yet already.

Significant Locations

  1. Start the settings app on your iPhone and tap Privacy.
  2. Tap on Location Services.
  3. Scroll down and tap on System Services.
  4. Tap Significant Locations. You’d be requested to authorize entry either by Face ID, touch ID or your iPhone password.
  5. Make sure Significant Locations is turned on.

If these settings are enabled on your iPhone, and you did not recently travel (or moved to a different locations), but Optimized Battery Charging still doesn’t work, try the next solution.

3. RESTART IPHONE

Restarting your iPhone could help in fixing minor software glitches and resolve problems preventing Optimized Battery Charging from working on your device. Simply hold down the power button to shut down your iPhone. Wait for a minute and turn it back on and check if optimized battery charging is working. If the feature is not working still, try the next solution.

4. UPDATE IOS 13

As we’ve already pointed out, Optimized Battery Charging feature only works on devices running iOS 13 and higher. If your iPhone is running older version of iOS, you should update your device to take advantage of the feature. In case you’ve already installed iOS 13 on your device but Optimized Battery Charging still doesn’t work, you should ensure that your iPhone is running the latest version of iOS 13. To check if your device is running the latest version of iOS, Start the settings app on your iPhone and head over to General > Software Update. Download and install any update, if available.

If your device is running the latest iOS version and Optimized Battery Charging doesn’t work, try the next solution.

5. USE ORIGINAL CHARGER

If Optimized Battery Charging isn’t working on your iPhone, you may want to try the following:

If you’re using wireless charging, try standard wired charging. If you’re using a third-party charger, try out first-party Apple
Charger for a while. Just check if there’s any change.

6. WAIT IT OUT

It’s worth noting that the algorithm powering the optimized battery charging feature takes a while to gather the essential information (charging and usage habits, location pattern, etc.) for it to work properly. Apple doesn’t specify how long it takes for the feature to gather this data, but it can take days, sometimes weeks.

Personally, the Optimized Battery Charging feature took about a week to work properly, however, users have reported that it took more than 2 weeks.

Therefore, if you have been using your iPhone for a week or so, and you’re sure that the Optimized Battery Charging feature is enabled, don’t worry. The feature is busy working in the background, gathering the necessary data for it to work properly. The only option is to be patient as there is no way to fast-track the data gathering process.

Optimized Battery Charging won’t work? Problem fixed!

Currently, it appears as if Optimized Battery Charging is working appropriately for the vast majority of users, however, isn’t working at all for just as many.

Why? It appears as if the feature actually requires a consistent schedule to work. For instance, if you wake up each day at 8 a.m., then Optimized
Battery Charging is smart enough to know to resume charging an appropriate amount of time before you wake up.
We hope this article has helped you fix optimized battery charging issue on your iPhone. Now share this article with others to teach them what to do when optimized battery charging is not working on their iPhone. We also have plenty of other articles that I suggest you check right now.

Tag: Battery

No matter how big the battery of your iPhone is, it will eventually die. And in addition to some iPhone models supporting fast charging, you need to pause tasks that need to be performed on your iPhone intermittently to charge. The fact that they have life cycles also means that over time the level of performance starts to drop and they don’t last as long as they used to while they were new.

  • [ ] The kind of apps that run on our iPhones, our charging habits sometimes contribute to a faster drop in the performance of these batteries. Here are some common charging habits to avoid andimprove iPhone’s battery performance.

Habits to avoid while charging your iPhone

Bad habit #1: Charging and gaming

Well, I confess, I do this often. We all love to play games on our smartphones and sometimes they can be addictive and hard to resist. But what you need to understand is that, since games now come with advanced graphics and special effects, they require more power and put pressure on your iPhone’s battery.

When you charge and play at the same time, you put extra pressure on your battery. In addition, the short charge and discharge cycles cause it to overheat. Overheating can cause the battery to explode or negatively affect battery life.

Bad habit #2: Charging with a protective cover on

While charging your iPhone it gets a little warmer and this is because batteries emit heat during charging. So it is advisable to remove the phone cover before charging it so that the heat released while charging your phone can dissipate into the atmosphere (at a higher speed).

Heat is the biggest enemy of batteries, and it’s important to avoid exposing your iPhone’s battery to temperatures above 95 ° F (35 ° C). Anything higher will compromise your iPhone’s battery.

Bad habit #3: Charging over night

I often watched videos with my laptop and did homework late at night to see which battery I had left to complete my task. After that, I would plug it into the charger and go to sleep overnight to fully charge – but I never stopped thinking about what happens to the battery overnight after it hits 100%.

Even then, without fast charging, it didn’t take eight hours to fully charge a battery. But since a battery can only receive so much power, how does it stay fully charged without overcharging?

Each iPhone battery has a specific charging limit and at times We are usually used to charging our iPhone’s batteries over night and this can damage our battery. Charging your iPhone all night long constantly charges your phone’s battery and weakens it over time. The temperature also rises if the battery is overcharged. This compromises the safety of the user as excessive heat can cause the battery / phone to explode.
As you may have noticed, your iPhone gets quite hot while charging. The same happens during overnight filling. Heat causes damage to lithium ion batteries – it weakens the battery, reducing the maximum amount of power it can store (known as battery capacity) and compromises its integrity, which can cause your device to explode.

Bad habit #4: Using counterfeit charging accessories

Always charge your iPhone with its original charger and avoid using unofficial / counterfeit accessories to charge your device. This is because the voltage and power requirements vary from battery to battery, and using a charger that provides a higher voltage can overcharge your battery. For example, chargers that support fast charging can supply high voltage to phone batteries, and using it to charge an iPhone that does not support the fast charging function can be harmful to the battery.

Bad habit #5: Avoid constant charging

It’s normal for iPhone users to charge their device’s battery constantly even though they still have enough power. This is common in areas without a constant power supply and people need their iPhones to retain as much power as possible when there is a power shortage – this is completely understandable.

However, you should know thatconstant charging shortens your iPhone’s battery life. The typical estimated life of a lithium-ion battery is about two to three years or 300 to 500 complete charge cycles, whichever comes first. Continuous charging, even when you don’t have to, just means that your battery will complete its life faster.

Charge properly

The above mentioned habits should be avoided if you don’t want a sharp drop in your iPhone’s battery life. There is also an explosion hazard: you can damage your battery and eventually your iPhone by overcharging. Stay safe!

What is the correct way?

So now that you know why these habits are bad and how they affect your battery, what’s the right way to charge your iPhone? How can you reduce the load on your battery, keep it safe and perform well over the years? We have three recommendations for you.

#1. Use fast charging

The first is to take advantage of fast charging if you own an iPhone model that support the feature.
When you wake up in the morning, connect your iPhone to power. Most of us have at least 30 minutes to prepare, by which time fast charging should have your battery up to at least 50 percent. Depending on the battery percentage when you started charging, you could have charge for all day for 30 minutes.

#2. Keep your iPhone cool

The second tip is to keep your iPhone in a cool place while charging. This doesn’t mean you put your iPhone in the freezer or fridge (batteries don’t charge at extremely low temperatures anyway), but to avoid direct sunlight and excessive heat while charging. Look for flat, cool metal surfaces as they will dissipate most of the heat from the phone and provide the best airflow.

#3. Avoid third-party chargers

The final recommendation I have for you is to avoid third-party chargers at all costs – not just the charging brick, but the cable as well. If you need a charger replacement, buy only one from Apple – preferably one designed for your specific iPhone model.
If you learn nothing else from this article, at least remember this: take your iPhone off the charger as much as possible, keep it cool while charging, always use a first party charger and try to keep your battery in the sweet zone of 25-85%.
And that covers pretty much everything about habits to avoid while charging your iPhone. We also have plenty of other articles that i suggest you check right now.

The iPhone 13, iPhone 13 Mini, iPhone 13 Pro, and iPhone 13 Pro Max have problems with their quick battery drain, despite them being the best smartphones in 2021. The reason stems from iOS 15, which hurt the battery life of the iPhone 13 lineup. If you think your iPhone is consuming more battery or the battery drain is faster than usual, here are a few solutions you could try to fix the battery drain issues on your iPhone 13 mini, iPhone 13, iPhone 13 Pro, or iPhone 13 Pro Max.

The iPhone 13, iPhone 13 Mini and iPhone 13 Pro series pack some major improvements and enhancements over previous iPhones. However, they do have their own set of issues, with one of them being battery drain issues that many owners are facing. If you are also frustrated with the battery drain issues on your iPhone 13, check out some possible solutions here.

Several users have taken to social media and online forums to note that their iPhone 13 mini has been experiencing excessive battery drain. They report that their iPhone 13 mini not only drains faster than usual but also overheats during normal use.

Use These Nifty Tips to Fix iPhone 13 mini Battery Drain Problem

To fix battery drain problems on your iPhone 13 mini, iPhone 13, iPhone 13 Pro, or iPhone 13 Pro Max, follow the tips below:

1. Disable Background App Refresh

How to Fix battery drain Issue on iPhone 13, Pro, Max, and mini

The first thing to do when troubleshooting battery drain issues with your iPhone 13 mini is to disable Background App Refresh. Background App Refresh can impact battery life, so turning it off can help make your battery last longer. To do that, go to Settings > General > Background App Refresh and turning off the background app refresh toggle.

2. Use WiFi Whenever Possible

WiFi consumes less battery than a cellular connection, so to maximize battery life on your iPhone 13 mini, consider connecting to WiFi whenever possible. At home or work, for example, WiFi should be activated, saving cellular data and battery life.

3. Use 5G Auto Instead of 5G On

If you don’t have access to WiFi, try to switch to 5G Auto. 5G can consume a lot of your iPhone’s battery life. 5G Auto will only use 5G when it will not reduce battery life significantly. You can change these options by navigating to Settings > Cellular > Cellular Data Options > Voice and Data and choose 5G Auto or LTE. This will potentially fix iPhone 13 mini battery drain issue.

4. Turn off Automatic Downloads and App Updates

The automatic downloads feature is designed to sync apps between all of your devices by downloading apps that were downloaded on one device on the other devices as well. So if you download an app on an iPad, for example, Automatic Download will also download the app on your iPhone and this can cause battery to drain faster. You can turn this feature off by going to Settings > App Store. Toggle off Apps and App Updates.

You can also turn off automatic iOS updates if desired by going to Settings > General > Software Update > Automatic Updates. Tap the toggle to turn updates off.

5. Turn Off Location Services

How to Fix battery drain Issue on iPhone 13, Pro, Max, and mini

If the location services are turned on, your iPhone will consistently update the location of the iPhone, thereby consuming battery life. To fix it, head over to Settings > Privacy > Location Services and then toggle it Off.

6. Adjust Auto-Lock and Turn Off Raise to Wake

If you are still experiencing iPhone 13 mini battery drain issue, it’s a good idea to set the Auto-Lock on the display as low as you can tolerate, which will cause the iPhone’s display to turn off after a short period of inactivity.

You can choose ranges from 30 seconds to never, but the lower end of the spectrum will help preserve battery life by cutting the display when it’s not needed.

Furthermore, if you really want to save iPhone 13 mini battery, turning off Raise to Wake can help. You can access these Settings by going to Settings > Display & Brightness.

7. Use Dark Mode

Dark mode on iPhone 13

Even though some users might naturally prefer a darker interface, it does help to fix the battery drain issue on iPhone 13 mini. This is due to the fact that the display will only light up pixels on the screen that are needed, the rest of them would remain off unless required. You can enable it by going to Settings > Display & Brightness and then selecting the Dark option.

8. Enable Low Power Mode

How to Fix battery drain Issue on iPhone 13, Pro, Max, and mini

Apple’s low power mode on the iPhone works best by itself. The system disables certain aspects of the device that work in the background while giving you the option to resume work normally. It can disable background refresh, automatic downloads, and other aspects. You can enable Low Power Mode by going to Settings > Battery > Low Power Mode and toggle it On.

9. Enable Reduce Motion of Interface

The Reduce Motion aspect of iOS has always proved to be quite helpful in saving the battery life of your iPhone. The option basically turns off animations and allows less strain to be applied to the battery life. You can enable it by going to Settings > Accessibility > Motion and then turn on Reduce Motion.

10. Make Sure Everything’s Up to Date

If your iPhone 13 mini battery is draining faster, make sure you are running the latest version of iOS on your device because Apple has been making improvements and refinements to the operating system. You can check this by going to Settings > General > Software Update. From here, the iPhone will let you know if your software is up to date or if there’s a new version available.

You should also make sure all of your apps are up to date, which you can do by navigating to App Store > your profile and tap on Update All.

11. Delete Unwanted Apps

If you are not using a certain app, it will simply take up space. It might have an impact on battery life in the backend. Moreover, you will save precious storage while you are at it. You can do this from Settings > General > iPhone Storage and then deleting apps that you do not use.

12. Don’t Close Apps

Some battery life guides recommends manually closing apps through the App Switcher to prevent them from running in the background, but this doesn’t save battery life and can in fact cause the iPhone 13 mini battery to drain faster.

Apps in the background are paused when not in active use and aren’t using battery life. Closing out an app purges it from the iPhone’s RAM, requiring a reload when it reopens, which can have a bigger impact on battery.

13. Turn Off Screen Time

Some users have reported success saving battery on their iPhone 13 by turning off Screen Time, Apple’s personal usage monitoring feature. It’s not clear why this is causing iPhone 13 battery issues, but if you don’t use Screen Time then there’s no harm in disabling it. You can do this by going to Settings > Screen Time.

14. Perform a Force Restart

Force restarting your device can clear errors and fix iPhone 13 mini battery drain issues. To do this, press and quickly release the Volume Up button, press and quickly release the Volume Down button, press and hold the Side button until you see the Apple logo on the screen.

15. Reset All Settings

How to Fix battery drain Issue on iPhone 13, Pro, Max, and mini

Another tip to help fix the battery drain issue on your iPhone 13 mini is to reset all settings. There is a possibility that the issue lies in the settings that you are not familiar with and hence, it would make sense to reset all of them. To do that, go to Settings > General > Transfer or Reset iPhone > Reset and then tap on Reset All Settings.

16. Restore and Setup as new iPhone

This is not ideal, but if iPhone 13 mini battery drain issue is persistent, you can hard reset your device and set it up as a new device. This way, you start afresh and get rid of possibly problematic customizations and settings on your device. Once you reset your iPhone, all of your data and settings will be deleted and your device will be as good as new. However, be sure to create a backup of your data before you proceed with this step. Head over to Settings > General > Transfer or Reset iPhone > Erase All Content and Settings to do it.

Other Tips

  • Disable “Hey Siri” so the iPhone isn’t listening for the wake word.
  • Disable Siri completely.
  • Disable Siri Suggestions.
  • Turn off Reduce Transparency
  • Disable AirDrop.
  • Don’t use Live or Dynamic wallpapers.
  • Lower the volume.
  • Lower the brightness level of the Flashlight feature in Control Center.
  • Turn off Location Services all together (not recommended).

This is all there is to it folks. These tips will fix the battery drain issue on your iPhone 13 mini, iPhone 13, iPhone 13 Pro, or iPhone 13 Pro Max. If you’re still having battery drain problems on your iPhone 13 after trying these steps, then you might want to visit your nearest Apple Store to know of any possible hardware related issues.

You might also want to check out:

If the above steps did not help in solving the battery drain issues on your iPhone 13 mini, your only bet is to wait for a new iOS update from Apple which should hopefully fix whatever problem you are facing.

Have you faced battery life problems on your iPhone 13 mini, iPhone 13, iPhone 13 Pro, or iPhone 13 Pro Max? Let us know in the comments if the tips helped you out.