Got a tip for us?

iOS 27

iPhones use ambient light sensors to constantly monitor the brightness of their surroundings so they can adjust the output of the display. This ensures you don’t have cornea-stripping illumination in dark rooms or a screen you can’t read in strong sunshine.

For the most part this is a very useful capability, but if you prefer to set the level yourself then you’ll want to disable the feature. In this article we show where to find the controls that allow you to turn an iPhone‘s auto-brightness off (or on again).

Disabling auto-brightness

One thing to bear in mind before starting: the brightness of the display has a very real effect on how long your iPhone’s battery lasts. Should you wish to have your iPhone 18 Pro Max running at maximum brightness all the time, expect to be recharging once or twice during the day, especially if your app use is heavy.

On the other hand, if you’re happy to have brightness set quite low, you should be able to eke out more life from a single charge, which can be useful if you’re out and about when the dreaded low-power warning appears.

To disable auto-brightness open the Settings app on your iPhone 18 Pro Max and navigate to Accessibility > Display & Text Size.

In here you’ll see the settings for Auto-Brightness with a switch to the right. Toggle the switch so that it no longer shows green and the feature will be disabled.

Manually setting the brightness

With auto-brightness no longer in action, you’ll want to set the levels manually. There are two ways to do this.

The first is to open the Control Center (swipe down from the top right), then slide your finger up or down the brightness bar (the one with a sun icon at the bottom).

Control Center open on the iPhone screen, with icons on the right for viewing other groups of controls.

The other route is to go to Settings > Display & Brightness, then slide the control from left to right, with right being brighter.

That’s it. Now your iPhone 18 Pro or iPhone 18 Pro Max will always have the display at the manually stipulated brightness setting, no matter what your surroundings might be.

If you want to save your eyes in the evening, and maybe sleep a bit better, then we also recommend employing the Night Shift feature.

A broken volume button is often unexpected and can be annoying to deal with. After all, we don’t realize how much we use it until it no longer works. Not being able to turn your volume down when an annoying video plays or your song is too loud can also be embarrassing.

If your iPhone 18 Pro Max buttons aren’t working properly, you should fix them as soon as possible. Luckily, there are plenty of solutions, and you can do many of them yourself.

1. Make Sure Your iPhone’s Volume Buttons Are Enabled

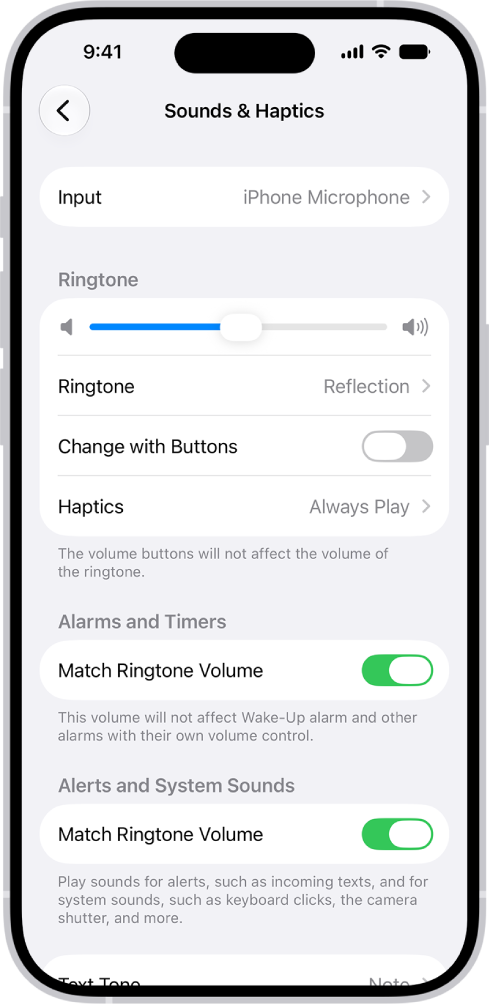
You can prevent the volume buttons from changing the volume of alerts and notifications. When the Change with Buttons setting is off, the volume buttons only control media playback.

To check this, head to Settings > Sounds & Haptics and toggle on Change with Buttons. If it’s already enabled, proceed to the next fix.

The Sounds and Haptics screen in Settings.

2. Remove Your iPhone 18 Pro Max From Its Case

iPhones are expensive, so it’s likely that most of you use a case to protect them. In some instances, your case can interfere with your volume buttons. This is especially true with cases that have layers or have built-in screen protectors.

Simply remove your iPhone case and give your volume buttons another try. If they work now, you’ll need to get a new case. After all, you probably want to keep your iPhone protected.

It’s also possible that prolonged use of a case can cause your volume buttons to get dirty. If that’s the case, proceed to the next step.

3. Clean Your iPhone’s Volume Buttons Using Alcohol

We use our phones so much that dirt and grime can sometimes get under the buttons, especially when not using a case. So, press down on your buttons a few times to check if your buttons are stuck. You might need to clean them if they’re stuck or don’t seem to click down.

Using a 70 percent isopropyl alcohol wipe, 75 percent ethyl alcohol wipe, or Clorox Disinfecting Wipes, you may gently wipe the exterior surfaces of your iPhone. Avoid getting moisture in any openings, and don’t submerge your iPhone in any cleaning agents.

Use the wipe to clean around your volume button the best you can. If you can push down on the buttons, doing so might help you clean it better. There’s no need to overdo it with the alcohol, as it doesn’t take much to work.

After cleaning, wait a few minutes for the alcohol to dry. If your volume buttons are working now, great! If they are only working a bit better, that’s a sign that they are still dirty, and you should keep cleaning them. It’s worth cleaning your entire iPhone if it’s dirty.

4. Reset or Restore Your iPhone

Sometimes, firmware updates can change how the buttons on our phones work. This is especially true for older iPhone models. If you recently updated your iPhone and the volume buttons stopped working, try restarting your iPhone 18 Pro or iPhone 18 Pro Max by turning it off and on again. Go to Settings > General > Shut Down, then drag the slider. Press and hold the side button until the Apple logo appears.

If that doesn’t help, you might need to reset your device. This means backing up your iPhone and erasing all the content settings. A full reset might also work if your volume button stops working after an app download or a jailbreak attempt.

To do this, first, you’ll need to back up your iPhone. Then, go to Settings > General > Transfer or Reset iPhone > Erase All Content and Settings.

This will wipe your phone clean and essentially make it like new. Before restoring a backup, go into the device and test the volume buttons. If they work, restore your backup.

In some cases, restoring your backup might make them not work again. If that’s the case, it might have been an app you tried to download, or your backup could be corrupted. Sadly, this means starting from scratch unless you have an older backup you can try restoring.

5. Update Your iPhone

Not updating your iPhone can also cause issues with your iPhone’s volume buttons. Outdated iPhones might not work with the latest apps, and the volume controls might not work correctly as a result.

There’s also a possibility that a previous Apple update you installed is buggy, and updating again could fix the problem. To be safe, try updating your iPhone 18 Pro Max to see if it resolves the issue.

You can update it by heading to Settings > General > Software Update. Here, you can see if a new iOS version is available. If you’re using a beta version of iOS, it might be time to switch back to the stable public build and report this issue to Apple.

6. Control Your iPhone’s Volume Without Using Volume Buttons

If you use apps like Spotify, you can control the volume within the app without a physical button. If all else fails, there are still ways to control your volume without using the buttons. The easiest way is to use the Control Center.

You can open the Control Center and adjust your volume by swiping down from the top-right corner of your iPhone.

Control Center open on the iPhone screen, with icons on the right for viewing other groups of controls.

If you have AirPods, you can say, “Hey Siri, turn up the volume.” Other Bluetooth headphones typically have built-in volume controls, which you can use as well. This means that you won’t have to keep going to your phone when you want to change the volume.

Control the Volume With AssistiveTouch

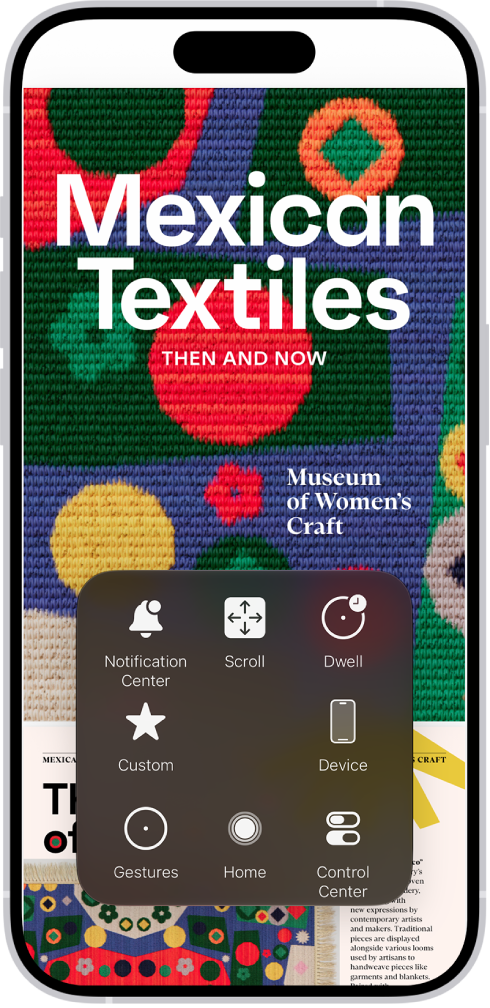
If you’re looking for another way to control the volume, consider using AssistiveTouch. You can set the AssistiveTouch button to open a menu to control your volume on the screen or have it either turn up or down when tapped.

An iPhone with the AssistiveTouch menu visible, showing controls for Notification Center, Device, Control Center, Home, Gestures, and Custom.

To use it, go to Settings > Accessibility > Touch > AssistiveTouch. Here, you can set your device to turn the volume down with one tap and turn it up with two taps.

7. Get Your Volume Buttons Repaired

If cleaning your buttons and resetting your iPhone 18 Pro Max doesn’t fix the volume buttons, you most likely need to get the buttons repaired. This is especially true if you recently damaged your iPhone or exposed it to water.

If your iPhone is under warranty, make an Apple Store appointment at a Genius Bar, and your repair will most likely be free. Otherwise, you will need to pay for a repair out of pocket.

So, next time you upgrade your iPhone, consider learning more about the AppleCare+ extended warranty and see if it’s worth it so you won’t get caught with a costly repair again.

While repairing your iPhone’s volume buttons out of pocket can be expensive, it’s cheaper than buying a new phone. But if you don’t want to pay this price, maybe it’s time to upgrade your iPhone.

Will Apple Discontinue the Volume Button?

Considering Apple has discontinued the Home button and headphone jack, it’s logical to assume that one day the volume buttons might disappear too. For now, the volume buttons remain—even the iPhone 18 Pro Max has volume buttons.

While they don’t break often, it’s bothersome if they do. Luckily, the solutions mentioned above will fix your iPhone volume buttons in most cases, and you’ll be able to change your volume again in no time.

AirDrop is a quick and easy way to send photos and video, and copy files, PDF, or other file types from your iPhone 18 Pro Max to your Mac, your Mac to your iPhone, from your iPhone to a friend’s iPhone, or any scenario including an iPhone, iPad and a Mac. It’s faster and neater than sending files via email. Cellular data charges may apply when you use AirDrop.

You can even use AirDrop to send a link to a webpage to a colleague, share a location on a map, share a contact, and much more.

AirDrop also allows you to share Wallet passes and apps with AirDrop (just press and hold the app icon on the Home screen until you see an option to Share).

You can even share Notes or Pages documents via AirDrop (but remember that you can also add other people to collaborate from the apps themselves).

Make sure that both the sender and recipient have Wi-Fi and Bluetooth turned on and that you’re both using an iPhone, iPad, or Mac. If you are sharing to or from a Mac you will need Wi-Fi enabled on the Mac (AirDrop won’t work if you are using the Wi-Fi to share your wired connection to other devices) and Bluetooth turned on.

How to AirDrop from iPhone 18 Pro Max to iPhone/iPad

To send an item to someone with AirDrop, both you and your recipient must have AirDrop turned on.

On the sending iPhone or iPad…

  1. Check that Bluetooth and Wi-Fi are on: open Control Center by swiping down from the top-right edge and make sure the Wi-Fi and Bluetooth icons are blue.

    Control Center open on the iPhone screen, with icons on the right for viewing other groups of controls.

  2. On the device you are sending from, locate the thing you want to share with your friend. e.g. To share a photo you’d open the Photos app and find that image, if it’s a contact you are sharing, open the Contacts file and find the relevant entry.
  3. Once you have selected the photo or file, tap on the Share icon (it’s a square with an arrow pointing upwards, you’ll see it in most apps although sometimes you will just see the word ‘share’).

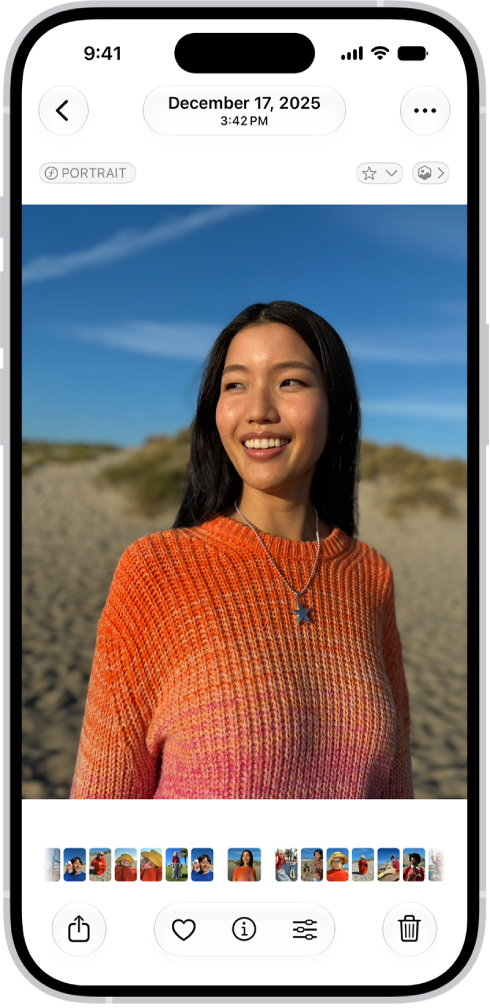
    An open photo with thumbnails of other photos across the bottom of the screen. At the top left is a Back button to go back to browsing.

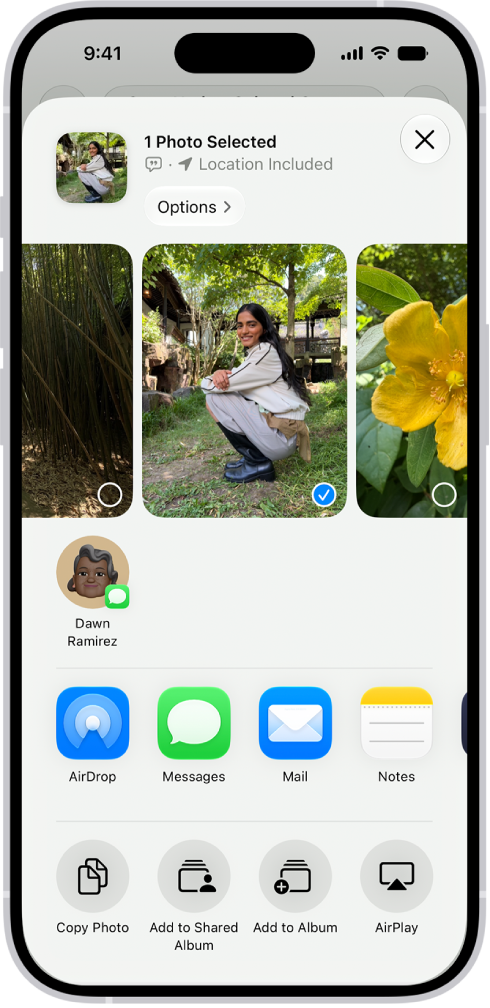
  4. A page will open with various sharing options (Message, Mail, etc). Above that row you’ll initially see the AirDrop icon, but after a few seconds (sometimes minutes) this should be replaced by icons representing people and devices you can share with (it will indicate if it’s an iPhone, iPad or Mac, for example).

    A selected photo is displayed in the top half of the iPhone screen, with a row of share options below. Additional options appear below those, including Copy Photo, Add to Shared Album, Add to Album, and Use as Wallpaper.

  5. Tap on the icon for the person you want to share with and your photo or file will be shared with them – as long as they accept the transfer.
  6. You can send as many files or photos as you like and send them to multiple contacts at the same time.
  7. After sending the photo or file you will see the word ‘Sent’ under the person’s device in your AirDrop row.

On the receiving iPhone or iPad…

  1. As above, check that Bluetooth and Wi-Fi are on: open Control Center by swiping down from the top-right edge and make sure the Wi-Fi and Bluetooth icons are blue.
  2. When your friend attempts to share the content with you an alert will appear on your device asking if you wish to Accept or Decline.
  3. Choose Accept and the content will start to download.
  4. If you are AirDropping between your own devices you won’t see an option to accept or decline, as long as both devices are signed into the same Apple Account.

Where are AirDrop files saved in iPhone

Wondering where the files have gone now that they have been transferred to the other iPhone?

The content should appear in the relevant app – photos in the Photos app, location information in Maps, etc.

What if your iPhone/iPad can’t see/be seen for AirDrop?

If iPad or iPhone you are sharing to isn’t showing up in the list of potential AirDrop destinations there are a couple of possibilities. Bluetooth and Wi-Fi may be off. AirDrop itself may be turned off. Or your ‘friend’ may have it set to only receive from a Contact (and inexplicably don’t have your details).

  1. To establish if one of the above is the case, start by swiping down from the top-right edge on the iPhone or iPad that won’t receive to confirm that Bluetooth and Wi-Fi are on. (Double check the same on the sending device).
  2. Now check that AirDrop isn’t turned off: Open Control Center, touch and hold the top-left group of controls.
  3. This will take you to a second screen where you gain AirDrop and Personal Hotspot options. AirDrop should be on by default but if it isn’t, tap that icon (you should now find that you have fixed the problem).
  4. However, it’s possible that AirDrop is on but that the device is set to only receive from Contacts. In which case, tap the AirDrop icon and switch from Contacts Only to Everyone for 10 Minutes (your friend may want to switch back to Contacts Only later on if they want to avoid being AirDropped by people they don’t know.)
  5. If the iPhone or iPad still isn’t showing up, and you’ve checked all the usual suspects: turned it off and on again, checked the software is up to date, there may be another issue at fault such as your Wi-Fi connection.

Once you are done transferring files, you may want to turn off AirDrop on your iPhone or iPad.

How to AirDrop from iPhone to Mac

Setting up your iPhone 18 Pro or iPhone 18 Pro Max for AirDropping files to a Mac is a similar process to that described above.

On the sending iPhone or iPad…

  1. Check that Bluetooth and Wi-Fi are on: open Control Center by swiping down from the top-right edge and make sure the Wi-Fi and Bluetooth icons are blue.
  2. On the device you are sending from, locate the thing you want to share to the Mac. e.g. To share a photo you’d open the Photos app and find that image, if it’s a contact you are sharing, open the Contacts file and find the relevant entry.
  3. Once you have selected the photo or file, tap on the Share icon (it’s a square with an arrow pointing upwards, you’ll see it in most apps although sometimes you will just see the word ‘share’).
  4. A page will open with various sharing options (Message, Mail, etc). Above that row you’ll initially see the AirDrop icon, but after a few seconds (sometimes minutes) this should be replaced by icons representing people and devices you can share with (it will indicate if it’s an iPhone, iPad or Mac, for example).
  5. Tap on the icon that represents the Mac you want to share with and your photo or file will be shared with that device – as long as the transfer is accepted. (If you are sending files from your own iPhone to your own Mac this way you won’t have to accept the transfer, it will happen automatically.)
  6. The transferred file will download into the Downloads folder (which you can find in the Dock).
  7. After sending the photo or file you will see the word Sent under the person’s device in your AirDrop row.

On the receiving Mac…

  1. Ensure that Wi-Fi is turned on on your Mac. This should be apparent if the curved Wi-Fi icon in the menu at the top right of the screen is black. If it isn’t, click on this icon and choose Turn Wi-Fi On.
  2. When the file is ready to be sent you should receive an alert on the Mac asking you to approve that a file is being shared. (If you are sharing a file to your Mac from your iPhone then you won’t see the alert, the transfer will happen automatically).
  3. Approve the transfer and the file should appear in your Downloads folder (which you can find in the Dock).
  4. If it’s your Mac, using the same Apple Account as the iPhone, you won’t see an alert but the file will automatically transfer to your Downloads folder.

Where do AirDrop files go on Mac?

On a Mac, some items are automatically saved in the Downloads folder, but you may also have the option to choose where to save items—for example, whether to save a photo in the Downloads folder or open it in Photos. For this reason, you may still want to move photos sent this way to Photos and so on.

What if the Mac can’t see/be seen for AirDrop?

There are a few possibilities if the Mac you are attempting to send to isn’t showing up for AirDrop.

  1. Check that Internet Sharing isn’t turned on.
  2. Make sure both devices are connected to the same Wi-Fi network.
  3. Turn on Bluetooth.
  4. Sometimes just opening a Finder window and choosing AirDrop tab is enough to ‘wake up’ AirDrop.
  5. Open a Finder window and click on the AirDrop tab under Favourites. You will see the option ‘Allow me to be discovered by’ and the choice of Everyone, Contacts Only, or No One. Choose Contacts Only or Everyone. (Everyone is probably best if you want to make sure your Mac is seen in this instance).

How to turn off Internet sharing

The Mac could be sharing its internet connection via Wi-Fi, in which case you would see an Arrow pointing upwards where you would normally see the Wi-Fi symbol.

If you are sharing your connection from the Mac to your iPhone or iPad you will have to stop doing this and log both devices onto the same Wi-Fi network.

How to AirDrop from Mac to iPhone/iPad

AirDropping from a Mac used to only be possible via the Finder, but it is now possible to select AirDrop as a Share option. We’ll show you how.

On the sending Mac…

Here’s how to AirDrop via the Finder.

  1. Make sure your Mac has Wi-Fi on. (If you are sharing your internet connection from the Mac to an iPhone or iPad you will have to stop doing this and log both devices onto the same Wi-Fi network.)
  2. Open a Finder window and select AirDrop from the options on the left.
  3. Check that either ‘Everyone’ or ‘Contacts Only’ appears beside ‘Allow me to be discovered by’. If the option ‘No one’ appears here click on it and choose an option that will make your Mac visible. (To increase the chances of your Mac seeing your devices and vice versa we suggest making sure you can be seen by Everyone.)
  4. As long as the iPhone or iPad has AirDrop turned on, and isn’t asleep, you should see it appear in the AirDrop window in the Finder on the Mac.
  5. Drag and drop the image or file onto the icon representing the iPhone.
  6. A blue ring will appear and circle the iPhone icon as the file is transferred.
  7. After sending the photo or file you will see the word Sent appear under the device icon.

Alternatively, you might like to share the file or photo from within an app, by right/control-clicking on it, or by using Quick Look to preview a file and then clicking the Share icon (to Quick Look, click on a file and press the Space Bar). To share from your Mac, follow these instructions:

  1. Look for the Share icon (a square with an arrow pointing out). You’ll see this in the top right of a Quick Look preview, a Safari page, and the Photos app, while in Preview you’ll see it on the left. Click this icon and then from the list that appears choose AirDrop.
  2. If you don’t see the Share icon, it’s likely that there will be an option to ‘Share’ or ‘Collaborate’. Click on this and you should also see AirDrop as an option.
  3. A screen will open that will list the available devices. Just click on the one you wish to share with and wait for the file to transfer.

On the receiving iPhone/iPad…

  1. As above, you’ll need to ensure that Bluetooth and Wi-Fi are turned on.
  2. When the Mac user shares the file or photo you should see an alert asking for your approval of the transfer before it copies over (unless you are sharing to your iPhone from your Mac and they are both logged in using the same Apple Account).

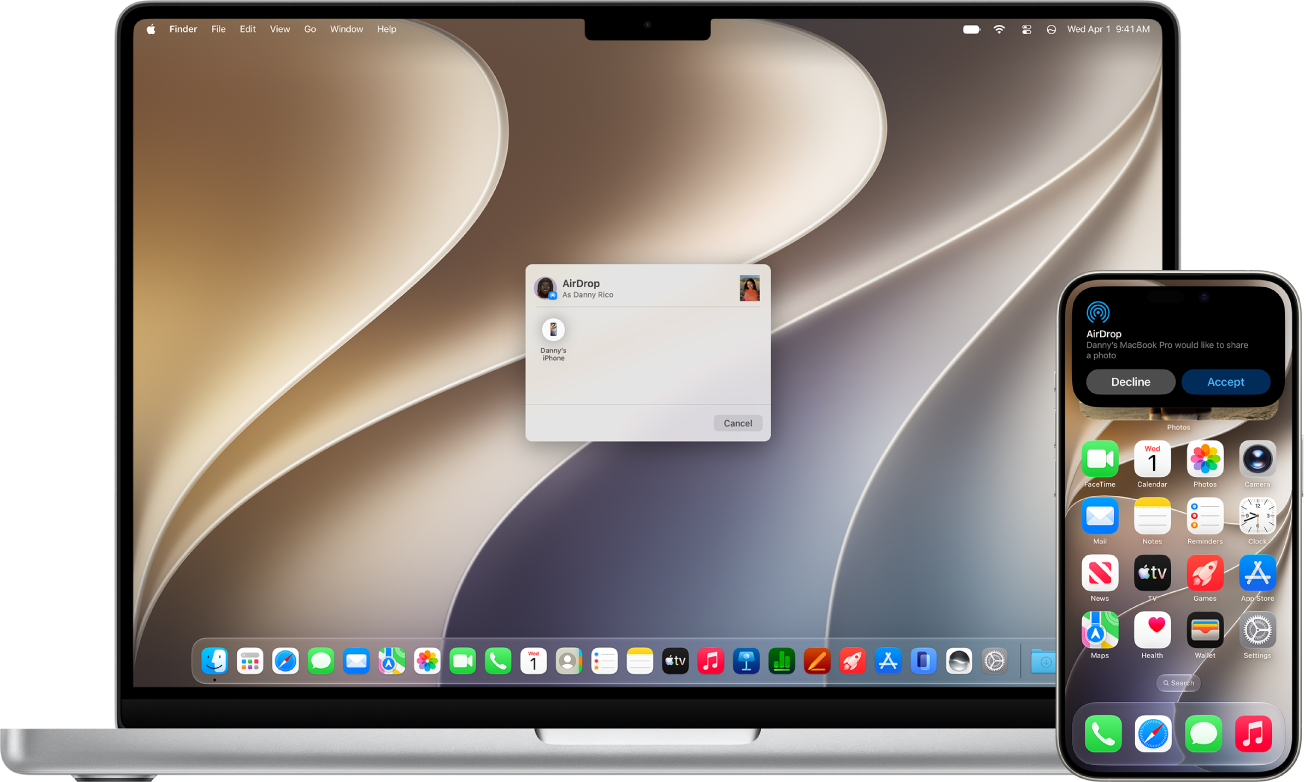
    A Mac is next to an iPhone. The AirDrop dialog is open on the Mac desktop, ready to share a document with the iPhone. The iPhone screen has a notification about receiving the document.

  3. Accept the alert and the file will transfer.
  4. You will see an alert that a file is incoming.
  5. If you were sent an image you will find it in your Photos app on the iPhone 18 Pro Max. Other file types should end up in the relevant app, unless it’s not obvious what app they should go to. For example, we sent a PDF to our iPhone and were given the option of opening it in nine different apps.

If you have any problems with the iPhone or iPad not receiving the file take a look at our advice above.

Long gone are the days when you need to search for a flashlight in some forgotten drawer or storage box, worry whether you still have the correct batteries to turn it on, or groan in frustration when it’s not bright enough anyway. Nowadays, you can just turn to the multi-functional iPhone 18 Pro Max you have in your hand. That is, provided your iPhone’s flashlight is working.

It’s a massive hindrance when your iPhone’s flashlight stops working and you see a grayed-out flashlight icon. So, let’s look at the various solutions you can try to get your iPhone torch working again.

1. Turn Off Low Power Mode

Low Power Mode disables some features on your iPhone 18 Pro or iPhone 18 Pro Max to conserve battery power. When it’s activated, the color of your battery level appears yellow instead of green.

The Low Power Mode prompt automatically comes up when your battery percentage falls below 20 percent. If you want to save battery life, you may also choose to keep your iPhone in Low Power Mode all the time.

But your iPhone’s flashlight is often one of those features that get disabled by this mode. To turn off Low Power Mode, go to the Settings app, select Battery, tap Power Mode, and tap to toggle off Low Power Mode.

2. Charge Your iPhone

Even after you turn off Low Power Mode, you may find that your iPhone’s flashlight still doesn’t work. This may be simply because your device doesn’t have enough battery power left to support the feature at that moment. Therefore, you should plug your iPhone into a power source and start charging it.

The flashlight feature should start working again once your iPhone has sufficient power.

3. Check Your iPhone Isn’t Too Hot

When your iPhone 18 Pro Max gets too hot, the flashlight may stop working. It’s not advisable to continue using an overheating iPhone. If your device exceeds a particular temperature limit, it will eventually shut down until it cools off. You’ll also see a warning appear on your screen if the temperature gets too high.

To allow your device’s temperature to drop naturally, place your iPhone in a cool, dry place away from direct sunlight. Do not attempt to put your device into the fridge, though, as this will cause damage to it. Just find somewhere that’s naturally cool and shady. Once your device cools down, your iPhone’s flashlight should start working again.

4. Remove the Flashlight From the Control Center

If your iPhone’s torch still isn’t working, another potential fix is to remove the flashlight option from the Control Center and then add it back again. Here’s how:

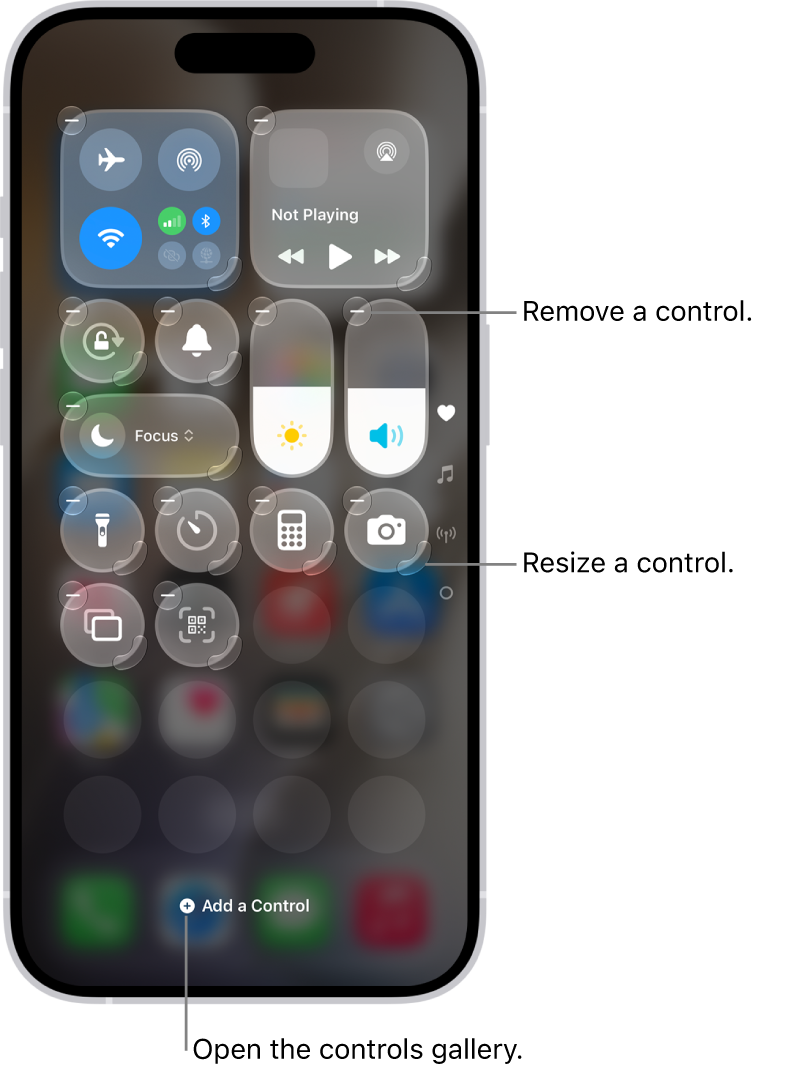
  1. Open Control Center, then tap the Add button at the top left of Control Center to begin editing the controls.

    Control Center open on the iPhone screen, with icons on the right for viewing other groups of controls.

  2. Tap the Remove button at the upper left of the Flashlight control (or Torch, in some regions).

    Control Center being edited, with a Remove button and resize handle on every control.

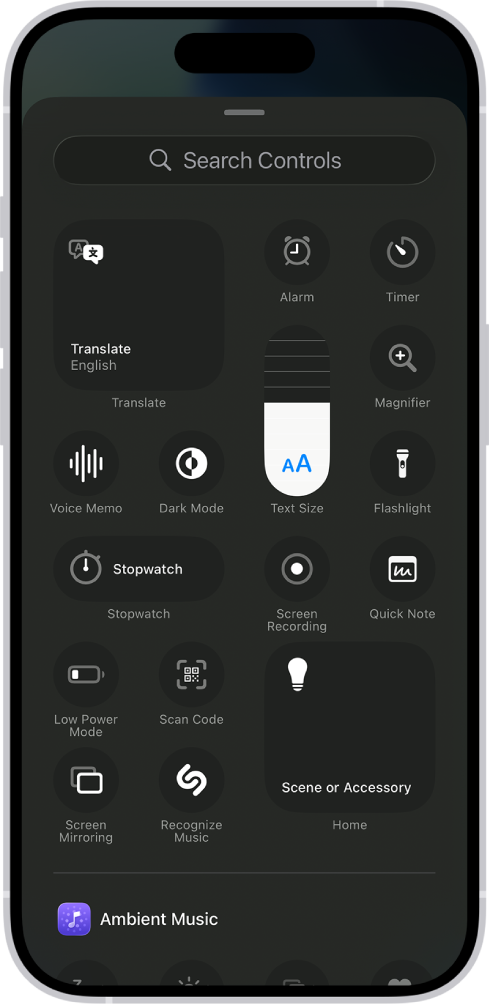
  3. To add the flashlight back, tap Add a Control at the bottom of the screen to open the controls gallery.

    The controls gallery, showing the available Control Center controls.

  4. Tap the Flashlight control (or Torch) to add it to Control Center.

5. Close Your iPhone’s Camera App

Your iPhone’s camera’s flash function uses the same light as the flashlight. If you have the Camera app opened, it’s normal to see the Control Center’s flashlight icon grayed out. This is because you can’t use both features at the same time.

To solve this, just exit the Camera app and access your Control Center again. You should see that the flashlight button can once more be selected as usual.

6. Turn On Your Flashlight Using the Camera Flash

If you can’t turn on your iPhone’s flashlight from the Control Center, a workaround is to turn it on in the Camera app by activating the flash function. Here’s how:

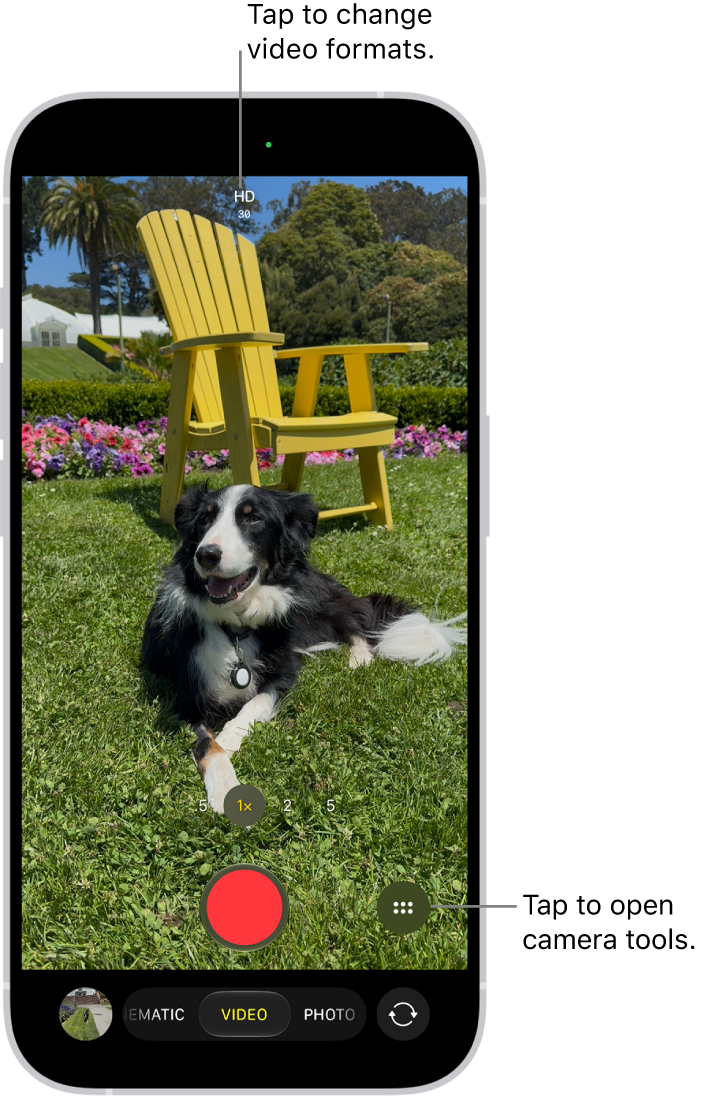
  1. In the Camera app, go to Video mode.

    The Camera in Video mode. The Camera Controls button is in the top-right corner and the video format buttons are in the top-left corner. The Photo and Video Viewer button is in the bottom-left corner. The Record button is at the bottom center, and the Camera Chooser Back-Facing button is in the bottom-right corner.

  2. Swipe up from the bottom menu (on the word, Video) to bring up more options.
  3. Tap the Flash icon. Select On.

7. Toggle the Flash in Your iPhone’s Camera App

To get rid of glitches that stop your iPhone’s flashlight from working, you can also try turning your camera flash on and off. The steps are the same as the workaround to turn on your iPhone’s camera flash, as discussed in the previous solution. But instead of leaving the Flash set to On, toggle between On and Off a few times.

8. Ask Siri to Turn On Your iPhone’s Flashlight

If your camera flash doesn’t seem to be working either, there’s another way to enable your iPhone’s flashlight: Siri. Unless your device is absolutely low on battery, Siri can help you turn on your iPhone’s flashlight even if the icon is grayed out.

First, set up Siri on your iPhone. Next, long-press the Side button on your iPhone or say, “Hey Siri.” When the Siri icon pops up on your iPhone screen, say, “Turn on the flashlight.” Your flashlight should turn on instantly, and Siri will also say that it’s on now.

9. Update Your iPhone’s iOS

iOS updates usually come with fixes for performance bugs and various glitches. So, perhaps all you need to do to fix your iPhone’s flashlight is to update your iPhone 18 Pro Max to the latest version of iOS.

Go to Settings > General > Software Update to see if an update is available for your iPhone. Make sure your iPhone is charging or has more than 50% battery before you proceed with the update process.

10. Restart Your iPhone 18 Pro Max

If the above methods don’t solve the problem and your iPhone’s flashlight still isn’t working, the next step you should try is restarting your iPhone.

You can go to Settings > General > Shut Down, then drag the slider. Then, hold the Side button to restart your iPhone once it powers off.

11. Restore Your iPhone to a Previous Backup

Besides updating and restarting your iPhone, you can also try restoring your iPhone to a previous backup from when the flashlight was still working as usual. However, when you use this method, keep in mind that you will also lose any new data that was added to your device since you made that backup. If you already set up your device, you need to erase all of its content before you can use these steps to restore from your backup. Tap Set Up Manually, tap Restore from iCloud Backup, then follow the onscreen instructions.

12. Reset All Settings on Your iPhone

If all else fails, the last solution you can attempt is to reset your iPhone’s settings by going to Settings > General > Transfer or Reset iPhone. Tap Reset and choose Reset All Settings from the pop-up menu. You won’t lose any data from your iPhone; all this does is revert your iPhone’s settings to factory default values.

Take note that the reset process can take a long time, especially if you have a lot of data on your iPhone. So, if you’re stuck in the dark and urgently need a flashlight, don’t rely on resetting your iPhone right there and then!

Make sure you don’t accidentally choose Erase All Content and Settings. Doing that would delete all the data on your device.

Effective Solutions When Your iPhone’s Flashlight Is Not Working

If you’ve been stuck wondering why the flashlight won’t work on your iPhone 18 Pro or iPhone 18 Pro Max, we hope this list of fixes has helped you resolve the problem effectively.

However, if the issue persists, it’s best for you to contact an Apple Authorized Service Provider. A technician will then examine your device and determine the potential hardware repairs that are needed.

When new, your iPhone works perfectly without any problems, and the chances of facing issues are lower. However, as time goes by, issues may start to surface, and that’s okay. One of the common issues that can affect your iPhone 18 Pro Max camera is blurry images. With this, images shot from your iPhone won’t be clear and crisp.

If you’re facing this issue, various factors could be causing your iPhone’s camera to be blurry. But before rushing to a nearby repair shop, here are different solutions to help you fix your blurry iPhone camera.

1. Remove the Protective Film From Your Camera Lens

You might have installed a protective film on the camera glass to prevent your iPhone camera lens from being damaged if you accidentally drop your device. Such a move is done in good faith to extend your iPhone’s lifespan.

However, a protective film might obstruct the light entering your lens if not installed correctly, leading your iPhone 18 Pro Max to shoot blurry images. This might also be the case if the protective film is scratched. Thankfully, fixing this is easy.

Remove the protective film, and your problem will be fixed. If the front-facing camera is affected, ensure that your screen protector (if you have one installed) is not obstructing the lens.

2. Clean Your Camera Lens

Cameras are allergic to dust, fingerprints, smudges, and other debris. If there are smudges, dust, or any debris on your iPhone’s camera lenses, images won’t be clear because of the obstruction. You can fix this by cleaning your camera lenses. Apple recommends you use a dry microfiber cloth to clean your camera lens.

However, even so, there are cases where this might not work. For example, if there’s debris inside the lens, you have no option but to take your device to an Apple Store or an Apple Authorized Service Provider. You should also do the same if you notice damage to your camera’s protector glass (the glass covering the camera lens).

3. Keep Your Hands Steady While Shooting

Shooting clear images also requires you to be steady. Even if everything else works fine, but your hands are shaky while shooting, your photos will look blurry because of the motion. And camera lenses are specifically sensitive to movement. Keep your hands steady while pressing the Shutter button for the best results.

You can achieve this by not holding your breath while shooting and ensuring that you press the capture button at the end of exhaling. Using volume buttons instead of the Shutter button to capture can also improve stability.

If you struggle with this, you can place your iPhone on a surface, or if you’re ready to spend a few bucks, you can invest in a tripod stand for your iPhone.

4. Disable the AE/AF Lock

Auto-exposure (AE) and Auto-focus (AF) features on your iPhone camera are important for setting fixed focus and exposure values. AE/AF ensures that your device always retains the exposure and focus on the subject. Even if you change the distance between you and the subject by either walking towards or away from it, your device will not refocus.

This is perfect as long as you remain in the same position. But if the distance between your device and the subject changes, the AE/AF lock will cause your images to look blurry. If the feature is enabled, you’ll see a yellow box with AE/AF Lock in your camera’s view.

You can turn it off by tapping anywhere in the camera preview. This will ensure that your iPhone automatically refocuses when you or the subject moves.

5. Reduce Zoom Levels

Another reason that could lead to blurry photos on iPhone 18 Pro Max is if you’ve zoomed in.

But the more you zoom in, the more your images lose details. Images will lose their sharpness and become blurry at maximum zoom levels. If you’ve zoomed in, reduce the zoom until you can capture the image without quality degradation.

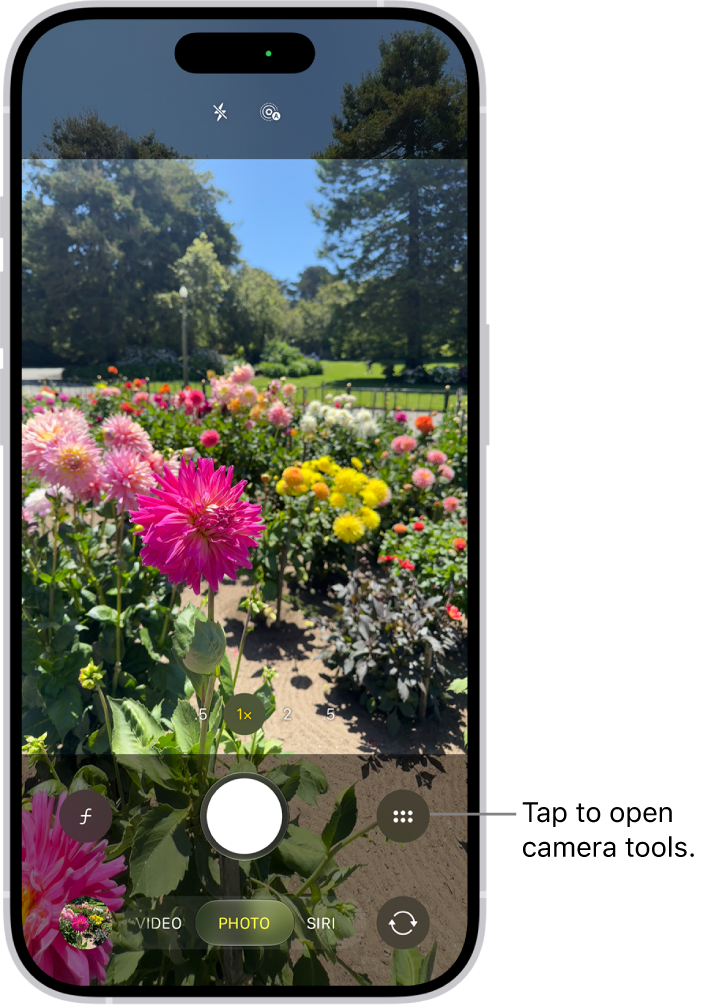
We recommend using optical zoom instead of digital zoom to get the best results. You can see this by tapping the number at the bottom of your image preview with the Camera app open. You can pinch out with two fingers to slightly increase the level to a point where the image still looks detailed. However, just remember that while digital zoom gives you a better range, the quality won’t be nearly as good.

Camera is open in Photo mode. The Camera Controls button is in the top-right corner. The Photo and Video Viewer button is in the bottom-left corner. The Take Picture button is at the bottom center, and the Camera Chooser Back-Facing button is in the bottom-right corner.

6. Remove Accessories From Your iPhone

If you have magnetic or metallic accessories on your iPhone 18 Pro or iPhone 18 Pro Max, they might interfere with your camera’s ability to focus. Common culprits include phone cases and camera accessories like a magnetic lens mount or a lens converter.

These accessories commonly cause motion blur in low-light situations, according to Apple. So, remove the accessories and try taking a photo, then see if the issue has been fixed. If this fixes your blurry iPhone camera, remove the accessory whenever you want to shoot.

7. Restart Your iPhone

As a last resort, you should restart your iPhone. iOS, despite its refinement, is never perfect; you’ll occasionally encounter glitches and bugs. So, if none of the solutions above have fixed your problem, try restarting your device. Simultaneously press and hold the side button and either volume button until the sliders appear, then drag the Power Off slider. Press and hold the side button until the Apple logo appears.
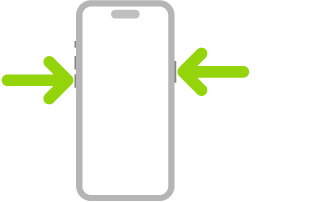
An illustration of iPhone with arrows pointing to the side button on the upper right and a volume button on the upper left.

You might not be a believer in this catch-all solution, but it’s been proven that restarting fixes most smartphone problems. Go ahead and do it, then open your iPhone’s Camera app again and check if your problem is fixed.

Take Clear Pictures on Your iPhone

Taking clear images on your iPhone 18 Pro Max requires the software and hardware to be in great condition or set up correctly. If your iPhone’s camera has been taking blurry pictures, try all the solutions above.

If all else fails and you’re confident you haven’t damaged your iPhone’s camera, you should contact Apple support. An expert should be able to provide a concrete answer for your troubles. They might even recommend a camera repair or replacement if it’s a factory defect.

Frequently missing important texts, emails, or other updates is annoying and could cause major issues if you miss critical communication. Sometimes, you might not even get notifications when your iPhone 18 Pro Max is right in your hands.

To help you with this, we’ve listed some potential solutions to get notifications on your iPhone back to normal.

1. Unmute Your iPhone

The first step is to check whether you have accidentally muted your iPhone. When Silent mode is turned on, you won’t hear incoming notification alerts, and as a result, you may think that you’re not receiving notifications as they arrive.

Press and hold the Action button to turn Silent mode on. Press and hold the Action button again to turn Silent mode off.

If you expected vibration alerts on Silent mode but did not receive them for incoming notifications, you’ll need to review the relevant settings. In those cases, incorrect settings are the main reason why your iPhone isn’t vibrating on Silent Mode.

2. Restart Your iPhone

Sometimes, your iPhone acts up for no apparent reason. Most of the time, a simple reboot can eliminate these glitches that cause temporary malfunctions.

When you don’t see notifications, try turning off your iPhone and turning it back on before moving on to more advanced troubleshooting steps. Simultaneously press and hold the side button and either volume button until the sliders appear, then drag the Power Off slider. Press and hold the side button until the Apple logo appears.

An illustration of iPhone with arrows pointing to the side button on the upper right and a volume button on the upper left.

3. Check Your Internet Connection

When notifications don’t appear on your iPhone 18 Pro Max, particularly for internet-dependent apps, you should check that your network connection is active and stable. Try visiting a few websites in your browser to make sure the pages load.

If your browser or other apps can’t access the internet, chances are that your notification issue is network-related.

Troubleshoot Cellular Data Issues on Your iPhone

For cellular connections, turn off cellular data and turn it back on. Alternatively, enable Airplane Mode and disable it after a few seconds. You’ll find both of these options in the Control Center on your device.
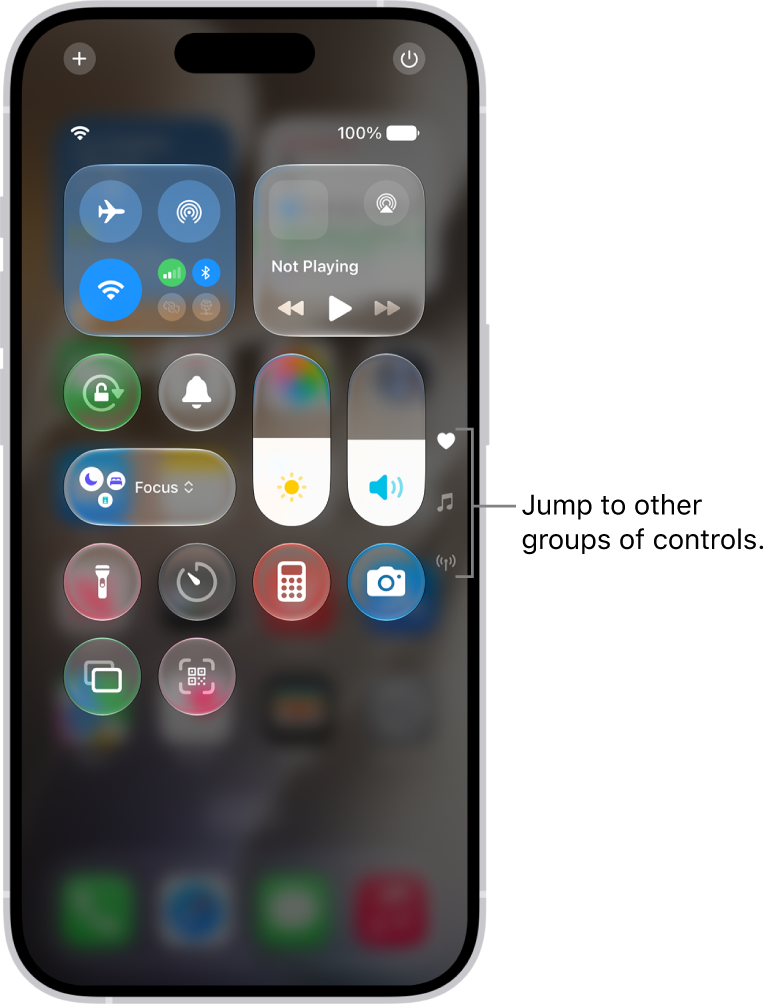
Control Center open on the iPhone screen, with icons on the right for viewing other groups of controls.

Doing either of these should help restore your iPhone’s cellular connection from a temporary issue.

Make sure you still have an active data plan and haven’t run out of data. Reach out to your cellular carrier for further support with this.

Troubleshoot Wi-Fi Connectivity Issues on Your iPhone

When trying to fix an issue on a Wi-Fi connection, rebooting your router helps most of the time.

Disabling Your VPN Could Help

Since VPNs change both your cellular and Wi-Fi connections, they can interfere with notification delivery. For example, if you’re using a free VPN for your iPhone, try disabling it, then check if that fixes the notification issue.

You can disable a VPN connection from the provider’s app or go to Settings > General > VPN & Device Management > VPN to disconnect it.

4. Disable Focus Mode

Focus modes, such as Do Not Disturb, Sleep, and Personal, helps to silence calls, notifications, and other alerts while enabled. When notifications don’t show up on your iPhone, it’s possible that you (or someone else—your kids, maybe) enabled a Focus mode by accident.

To confirm, open your iPhone’s Control Center by sliding down from the top-right corner.

Let’s use Do Not Disturb as our example: note the color of the crescent moon icon. If it’s violet (bluish-purple), that means Do Not Disturb is enabled; tap the icon to disable Do Not Disturb. That will change the crescent moon’s color to white.

5. Disable Driving Focus

Driving Focus mutes notifications when your iPhone is connected to your car’s Bluetooth or when your iPhone detects that you’re in a moving vehicle. This Focus mode does what the name says—prevent a driver from getting distracted by notifications—but sometimes does so erroneously.

For example, if you’re a passenger in a taxi or a train, the feature assumes you’re the driver and silences all calls and notifications on your iPhone. To disable the feature, go to Settings > Focus > Driving. Then, tap the option under the Turn On Automatically section. Set the feature to be activated Manually.

If you want notifications while using Apple CarPlay, you should also toggle off the Activate With CarPlay option. Leaving this enabled will activate Driving Focus when you connect your iPhone to a CarPlay-compatible vehicle.

6. Check and Modify Your Notification Settings

If your iPhone 18 Pro Max doesn’t display notifications for a particular app, check that the app’s notification settings and preferences are correctly configured.

Change App Notifications From the Settings Menu

Launch the Settings app and select Notifications. Next, choose the affected app and make sure Allow Notifications is toggled on.
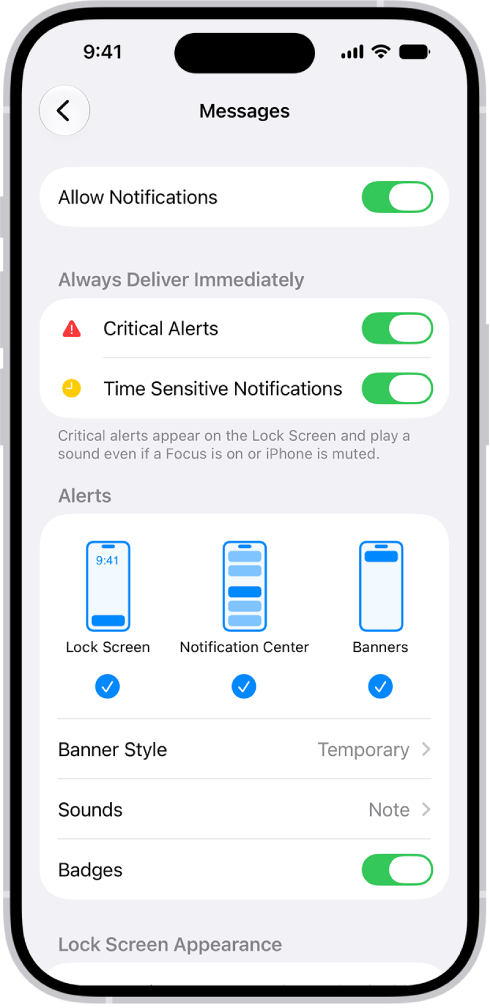
Messages Notification settings in Settings.

In addition, make sure Lock Screen, Notification Center, and Banners are enabled per your preferences. You should also enable Sounds and Badges for the app if you want those to fire for new notifications.

Review Your Scheduled Notification Summary

Scheduled Summary is a notification feature that aims to help you focus better. For example, you can schedule to receive all your social media notifications at one go when you don’t want to get periodically distracted by story replies, likes, and comments.

When an app is part of your Scheduled Summary, you won’t receive notifications from it at other times of the day. Therefore, it might feel as if your notifications aren’t showing up accurately on your iPhone.

Go to Settings > Notifications > Scheduled Summary to review the settings. Toggle off any apps you no longer want to be included in your summary.

Check In-App Notification Settings

Some apps, particularly social media platforms and instant messengers like WhatsApp, Telegram, Instagram, and similar, have dedicated notification settings. These act independently of the notification configuration in your iPhone’s Settings menu that we looked at above.

So, if an app doesn’t show notifications despite having notifications enabled on your iPhone, check its in-app notification settings for any irregularities. For instance, WhatsApp allows you to mute individual conversations permanently. If you forgot to unmute them, you’ll still get new messages without issues but won’t get notified at the time of receipt.

7. Update Your iPhone

There’s a chance that a software bug has messed up your iPhone’s notifications. When you have system issues like this, it’s always smart to download and install the latest software update for your iPhone 18 Pro or iPhone 18 Pro Max.

Go to Settings > General > Software Update to see if there’s an update available. And if there is, tap Update Now and walk through the process to update your device.

8. Update Your Apps

Sometimes, the problem is not with your iPhone but the apps themselves. If you’re not receiving notifications for only a particular app, it may be a bug that can be fixed with an update.

Go to the App Store, type the app name in the Search tab, and hit Search. If there’s an update available, you’ll see an Update button next to the app’s name.

Even if there’s no update available yet, you can try checking out the app’s social media pages or website. Some app developers actively keep users up-to-date on the issues they’ve identified and are working on, so you’ll just need to wait for the next update. If not, you can also contact them on the relevant channels to inform them about the issue.

9. Reset iPhone Settings

Still not receiving notifications on your iPhone 18 Pro Max after all the above fixes? At this point, you should try resetting your device’s settings. Doing this will restore your iPhone’s notification preferences to factory defaults, hopefully fixing whatever is affecting notification delivery.

Go to Settings > General > Transfer or Reset iPhone > Reset > Reset All Settings. Select Reset All Settings on the prompt.

Remember that resetting your iPhone’s settings puts all options back to the default. This means you’ll have to connect to Wi-Fi networks again, re-configure Bluetooth devices, adjust your privacy settings, and more. However, your data isn’t affected by this.

Get Timely Notifications on Your iPhone

Chances are that at least one of the fixes mentioned above will resolve your iPhone’s notification issues. It’s more than likely an accidental setting blocking the notifications than a full-blown problem.

If you still don’t get notifications after executing these fixes, you might have to factory reset your iPhone. And if that doesn’t work either, it’s time to contact Apple for tech support.


You rebooted your iPhone 18 Pro or iPhone 18 Pro Max, turned off Airplane Mode, and restarted your router, yet you still have spotty Wi-Fi. Should you bring your iPhone in for repairs? Not yet.

Consider going through a few more troubleshooting tips. Here are some quick, simple fixes for iPhones that keep connecting and disconnecting from Wi-Fi networks.

1. Forget the Malfunctioning Network

Before doing anything complex, try removing the malfunctioning network from your iPhone 18 Pro Max. Otherwise, it’ll keep joining the Wi-Fi connection. This fix will likely work if you recently changed your Wi-Fi password, your internet has been spotty, or you set up a new router.

So, follow the simple instructions below:

  1. Launch Settings and go to Wi-Fi.
  2. Find the malfunctioning network, then tap the (i) button on the right side of its name. It will open the Information page.

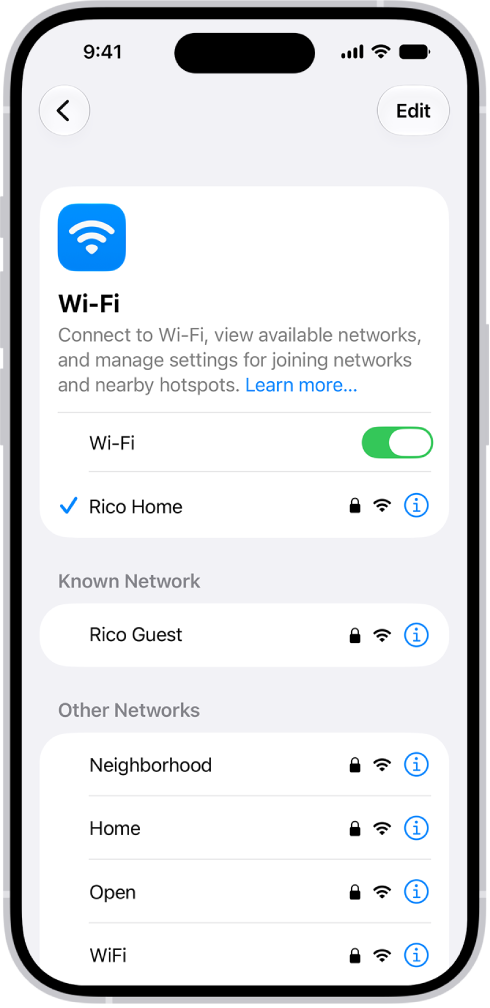
    The Wi-Fi options screen in Settings. Wi-Fi is turned on, and a network is selected.

  3. Hit Forget This Network, then confirm the action by tapping Forget in the dialogue box.
  4. Go back to the Wi-Fi menu and rejoin the network manually. Double-check your password—someone might have changed it without you knowing.

2. Check Your iPhone’s VPN Settings

There are several free VPNs for iPhones. They’ll help you bypass geo-restrictions, access confidential information, or use insecure networks safely.

Just don’t leave them running. VPN apps occasionally cause internet connectivity problems, especially when switching between networks. Disable them if you’re using your home Wi-Fi.

You can turn off your VPN within the respective apps. But if your VPN merges with your iPhone’s built-in VPN client, follow these steps in the Settings app:

  1. Go to Settings > General.
  2. Scroll down to VPN & Device Management—you’ll find it near the bottom of the page.
  3. Tap VPN and remove any active VPN configurations.

3. Turn Off the Connectivity Assist Feature

When Connectivity Assist is on, iPhone uses cellular data along with Wi-Fi to keep your internet connection reliable when Wi-Fi is weak, busy, or not connected to the internet. Let’s say a page has been loading for over 30 seconds. Instead of stubbornly running the same network, your iPhone automatically uses your cellular data.

Although helpful, this feature is expensive.

We suggest turning off Connectivity Assist by default. Just use your data as needed. Otherwise, you’ll drain your cellular data plan if you’re often stuck with weak Wi-Fi.

  1. Go to Settings > Wi-Fi.
  2. Turn off Connectivity Assist.

4. Reset Your Network Settings

Reset your iPhone’s network settings if it disconnects from Wi-Fi even after following the troubleshooting steps above. Doing this can fix several hidden network issues. Just note that your device loses all saved network passwords, Wi-Fi names, and Bluetooth pairings.

  1. Open Settings > General.
  2. Scroll down and tap Transfer or Reset iPhone, which you’ll find at the bottom of the page.
  3. Now, tap Reset > Reset Network Settings, then enter your passcode for confirmation.

5. Update Your iOS

If your iPhone 18 Pro Max still disconnects from Wi-Fi after resetting the network settings, check your iOS version. Update to the latest iOS firmware available. Apple might have fixed the glitch that’s making your device intermittently drop Wi-Fi connections. Here’s what you need to do:

  1. Go to Settings > General > Software Update.
  2. Check if an update is available.

Keep Your iPhone Connected to Wi-Fi

Try all the above tips if your iPhone 18 Pro or iPhone 18 Pro Max keeps dropping the Wi-Fi connection. You should regain internet access shortly. Connectivity problems often stem from minor bugs—they rarely indicate serious hardware or software issues, so don’t panic.

But if none of your devices can connect to Wi-Fi, check the internet connection. Your router or ISP might be to blame. Follow standard troubleshooting steps, like switching to a wired connection, checking your network card, and restarting your router.

If you own an iPhone, Siri is your best friend. It can schedule emails, set reminders, send text messages, initiate phone calls, and even give suggestions based on your iPhone usage.

Depending on Siri is unavoidable if you use it for these tasks. But what happens if Siri suggestions stop popping up on your iPhone 18 Pro Max? No worries, because we have a few fixes you can try.

Check Siri Settings

One reason why Siri suggestions won’t pop up is if your Siri settings are configured incorrectly. So, the first step is to head to your Siri settings to check if it has been turned off. Even if it’s turned on, toggle it off and on to troubleshoot the issue.

To check Siri settings, head to Settings on your device, tap Siri, then tap Suggestions. Turn on Suggest Apps Before Searching, and if you see the option to Reset Hidden Suggestions right below, tap on it to restore suggestions you’ve previously hidden.

Check if Your iPhone Is Updated

Apple frequently releases new software updates, which usually contain bug fixes for issues you might face. So if you haven’t updated your iPhone 18 Pro Max, getting the latest iOS version can resolve your Siri issues.

Head to Settings > General > Software Update to see if a newer iOS version is available. If you have one, follow the prompts to update your iPhone.

Restart Your iPhone

If your Siri suggestions are still not popping up, you can restart your iPhone 18 Pro or iPhone 18 Pro Max to troubleshoot it. However, your iPhone doesn’t have a restart option, so you’ll have to power off your iPhone and turn it back on. Simultaneously press and hold the side button and either volume button until the sliders appear, then drag the Power Off slider. Press and hold the side button until the Apple logo appears.

An illustration of iPhone with arrows pointing to the side button on the upper right and a volume button on the upper left.

Get the Best of Siri Suggestions

Siri suggestions make it easy to start a search the moment you swipe down on your Home Screen. In fact, you wouldn’t need to type anything in Spotlight search to launch your favorite app, as Siri would’ve already suggested it for you.

However, if none of these solutions worked in your favor, you can contact Apple Support or visit a nearby Apple Store for in-person assistance.

FAQ

Q: Do I Need the Latest Version of iOS to Use Siri Suggestions on My iPhone?

No—you usually don’t need the latest version of iOS to use Siri Suggestions on your iPhone 18 Pro Max. But if you’re having problems using the feature, it makes sense to update your software if an update is available. There are many other reasons why you should update your iOS software as well.

Q: Can I Turn Siri Suggestions On for Individual Apps?

Yes! In addition to using Siri suggestions for multiple apps on your iPhone, it’s also possible to enable the feature for just one or a couple of your favorite ones. You’ll need to go to the Settings app on your device, tap Apps, and look for the app where you want to enable Siri Suggestions.

Q: How Do I Clear the Siri Suggestions History on My iPhone?

You can easily clear Siri and Search Suggestions history on your iPhone if you decide that this is something you want to do. Go to Settings > Siri and look for the option to delete your Siri and Dictation history. You can also disable your iPhone’s suggested contacts row.

If your iPhone’s not connecting to your computer, you’re not alone. Many people face this frustrating issue. Luckily, there are easy fixes when your iPhone 18 Pro or iPhone 18 Pro Max doesn’t connect to a PC or Mac. It can be something as simple as a busted cable, a driver issue, or a buggy instance of iTunes.

Whether iTunes or your computer won’t recognize your iPhone, or you’re getting the “0xE” or “unknown” error, our troubleshooting tips right ahead will help you resolve the issue.

1. Trust This Computer When Prompted

Connecting your iPhone to a computer for the first time produces a “Trust This Computer” security prompt. To authorize this action, choose Trust on the iPhone.

Doing so will allow iOS to permit the trusted computer to sync and access data on your iPhone. If you missed the prompt, unplug your iPhone and plug it back again.

2. Check the USB Cable

A broken or frayed USB cable can lead to connection issues and result in the iPhone 18 Pro Max refusing to connect to the computer. Confirm that the iPhone charges when plugged into your computer or a different source, like a wall outlet. If it doesn’t, it’s definitely the cable’s fault.

In that case, try switching to a new cable, or borrow a cable from your friend to see if yours is bad. The cable must support both data and charging.

3. Check the Charging Port for Dirt

Dust and lint accumulating inside the iPhone’s charging port over time can block electrical signals. If your device doesn’t chime or vibrate when connected to your computer, unplug the USB cable and check the charging port for debris.

4. Try a Different USB Port

If it’s not the cable, it might be the port. Try connecting your iPhone using a different USB-A or USB-C port with a cable you know works to see if your computer has a faulty port.

5. Restart Your Devices

Restarting a device clears its memory and reloads the operating system, fixing temporary glitches. Restarting your iPhone 18 Pro Max is pretty easy; you can do it even if the buttons are broken by going to Settings > General > Shut Down.

To restart a Windows PC, click Start > Power > Restart. To restart or power down your Mac, click the Apple menu and choose Restart or Shut Down.

6. Update or Reinstall iTunes

If the iOS version on your iPhone is unsupported by your installed iTunes version, then update iTunes on your Windows PC to eliminate bugs and software incompatibility. If you’re using a PC, use the latest version of the Apple Devices app or iTunes. Click Help > Check for Updates in iTunes to see if there’s a new version available.

If that doesn’t help, uninstall everything related to iTunes, iCloud, and Bonjour in Settings > Apps > Installed apps, then redownload iTunes from the Microsoft Store or Apple’s website.

7. Update Your Computer

Installing all available updates in Start > Settings > Windows Update may squish bugs that could be preventing your iPhone 18 Pro Max from connecting to your PC.

To update your Mac, click System Settings (macOS Ventura and later) or System Preferences (macOS Monterey and older) in the Apple menu, then choose General > Software Update.

8. Fix Driver Issues on Windows

Drivers are software components responsible for how external devices communicate with Windows. A damaged or outdated driver might prevent iTunes from recognizing your iPhone. You can fix this problem by reinstalling Apple’s Mobile Device USB driver.

If You Downloaded iTunes From Apple’s Website

Downloading iTunes from Apple’s website also gets you Apple’s updater which runs at startup. It doesn’t ship with the Microsoft Store version of iTunes because the store automatically updates all apps downloaded through it. If you downloaded iTunes from Apple, follow these steps to reinstall the Apple Mobile Device USB driver:

  1. Disconnect your iPhone from the computer.
  2. Unlock your iPhone, go to the Home Screen, and plug the device into the computer. If iTunes launches automatically, quit the app.
  3. Open a new window in File Explorer.
  4. Enter the following location in the address bar at the top of File Explorer, then hit Enter:
%ProgramFiles%\Common Files\Apple\Mobile Device Support\Drivers
  1. Right-click on the usbaapl64.inf or usbaapl.inf file, and choose Install.
  2. Disconnect your iPhone and restart your computer. Then, reconnect it and open iTunes.

If You Downloaded iTunes From the Microsoft Store

On Windows 10 and later, you can install iTunes via the Microsoft Store which makes updates much simpler. If you have the Microsoft Store version of iTunes, follow the instructions below to reinstall the Apple Mobile Device USB driver:

  1. Disconnect your iPhone, unlock it, and reconnect it to the PC, but quit iTunes if it opens.
  2. Right-click the Start button and choose Device Manager.
  3. Find and expand the Portable Devices section.
  4. Right-click on your iPhone, choose Update driver, and select Search automatically for updated driver software.
  5. Now go to Settings > Windows Update to confirm that no other updates are pending.
  6. Open iTunes and see if your computer recognizes your iPhone.

How to Troubleshoot the Apple Mobile Device USB Driver

If your iPhone 18 Pro Max doesn’t connect to your computer even after following the steps above, you’ll need to troubleshoot the Apple Mobile Device USB driver further with these steps:

  1. Right-click on the Start button and choose Device Manager.
  2. Find the Universal Serial Bus controllers section and look for the Apple Mobile Device USB Driver. If you don’t see the driver, try connecting your iPhone with a different cable or use a different PC to sync your iPhone.
  3. If you see the driver, check if third-party security apps are blocking your iPhone from connecting. Disable any antivirus tools and attempt the connection again. After doing this, it’s worth reinstalling the usbaapl64.inf or usbaapl.inf file again (as discussed above).

9. Reset Your iPhone’s Network Settings

Resetting your iPhone’s network settings won’t remove apps and data but may fix connection problems between the iPhone and the computer. Go to Settings > General > Transfer or Reset iPhone > Reset > Reset Network Settings and enter your passcode to confirm.

Resetting network settings will forget Wi-Fi networks and restore VPN settings, device name, and trust settings to the factory default values.

10. Reset Your Devices

If nothing above has worked, the last step is to reset your devices. To factory reset your iPhone 18 Pro Max, go to Settings > General > Transfer or Reset iPhone > Erase All Content and Settings.

You’ll need to enter your device passcode or your Apple Account password to confirm and start the restoration process.

Resetting your iPhone will wipe all settings, apps, media, and data on the device. So, make an iCloud backup before proceeding to avoid losing any data permanently.

Similarly, you can factory reset your Windows PC by venturing into Settings > System > Recovery > Reset this PC. Again, make sure to create a complete backup in Windows before doing this because doing so will erase all the data on your machine.

If you use a Mac instead, you can erase all content and settings in macOS with a few clicks.

11. Try a Different Computer

If all else fails, connect your iPhone to a different computer to see if that makes a difference. In rare cases, your iPhone won’t sync with certain Windows configurations, and nothing you do will fix it. Trying a different computer is the easiest way to confirm this.

12. Contact Apple Support

If the issue persists, you’ll need to contact Apple Support. Use the Apple Support site to talk to a customer care representative and ask for help. They will be able to assist in ways we couldn’t, especially if your iPhone’s hardware is at fault.

Use Your iPhone and Mac Together

As you can see, there are so many possible reasons why you’re unable to connect your iPhone to your computer. But hopefully, the solutions above fixed your issue, and you’re back to using your iPhone with your Mac or PC. If not, it’s best to get it looked at by an Apple Genius at the nearest Apple Store.

Losing someone is a traumatic experience, so you don’t want to add the potential frustration and distress of being unable to access important information or content that has become imprisoned on their iPhone or Mac. But how can you unlock an iPhone 18 Pro or iPhone 18 Pro Max once the owner has passed away? Here are a few things you can try, plus details of Apple’s Digital Legacy initiative that should make the process much easier.

What is Apple’s Digital Legacy feature?

The Digital Legacy program allows you to designate people as Legacy Contacts so they can access your Apple Account in the event of your death.

  1. Go to Settings > [your name] > Sign-In & Security > Legacy Contact, tap Add Legacy Contact, then follow the onscreen instructions.
  2. In the unfortunate event of your death, that person can then request access to your Apple Account, although it will require a copy of your death certificate to prove they are eligible.
  3. When Apple confirms the status of the device’s owner, it will then grant the nominated person access to the deceased’s data as well as disabling the Activation Lock on their iPhone or Mac.

How to access a deceased person’s iPhone or Mac device

You can use one of the following methods to try to recover the data from a deceased person’s device:

Recover data via iCloud

If you know the login details for the person’s iCloud account or have access to their iCloud email address, then you should be able to use it to recover a large amount of data. Provided the person in question used the service, it will give you the chance to download photos, documents, contacts and other files.

  1. Go to iCloud.com.
  2. Select the Forgotten your Apple Account or Password? option.
  3. Use the iCloud email address to reset the iCloud password.

Recover data on iPhone 18 Pro Max by restoring an iCloud backup

Another option, which once again requires you to have access to the deceased’s iCloud account, is to wipe their device and restore a recent iCloud backup. The reason for using the restore method is that you should still have all of the data left intact.

Before you attempt this, try to ascertain the last time the device was backed up, as you wouldn’t want to erase the data only to find that the backup is from a couple of years ago. If there is a recent one, tap Set Up Manually, tap Restore from iCloud Backup, then follow the onscreen instructions.

What to do if you don’t know the deceased person’s iCloud details

Sadly, this is probably a likely scenario for many people. All that you can do in this event is to contact Apple Support or visit your local Apple Store and explain the situation. Please note that devices locked with a passcode are protected by passcode encryption, and Apple can’t help remove the passcode lock without erasing the device.

Adding a Legacy Contact is the easiest, most secure way to give someone you trust access to the data stored in your Apple Account after your death.

The key take away is to plan for these sad events by finding out these essential passwords in advance. But that is, of course, easier said than done.