




Got a tip for us?

iOS 27

Storage space on an iPhone is definitely at a premium, what with the quality and size of photos and videos increasing all the time and our photo libraries now stretching back years. If you use iCloud though, then there’s an easy way to reduce the amount of space your images are taking up on your iPhone 18 Pro Max without having to remove them from your device.

In this article, we explain how to reduce the amount of storage taken up by photos on your iPhone by moving them to iCloud and help you avoid some of the pitfalls that come from not fully understanding what iCloud offers.

How to save photos to iCloud

iCloud Photos is part of Apple’s iCloud service for storing and syncing data. If you choose to use iCloud Photos, all of your photos and videos on your iPhone, and any other Apple device you own, can be moved to the iCloud and synced from there to all your devices.

The important thing to note here is that while your photos are now in iCloud, if you were to delete them from your iPhone you would actually be deleting them from iCloud. We’ll discuss this in more detail below as it is a common misconception that iCloud Photos is a backup that allows you to delete photos from your iPhone – it isn’t that!

The other issue is the space required. You get 5GB for free when you set up your iPhone, but obviously, this won’t go very far if you’re an avid photographer or chronicler of life. To get more storage you’ll need to move to a paid iCloud+ plan, but this isn’t too bad as Apple offers a wide selection of capacities and you can always increase these later if you find you’re running out of space.

Here’s the current monthly prices for iCloud+ storage:

  • 50GB: $0.99/£0.99
  • 200GB: $2.99/£2.99
  • 2TB: $9.99/£8.99
  • 6TB: $29.99/£26.99
  • 12TB: $59.99/£54.99

It might sound like a lot of money but the alternative is paying even more for a 1TB iPhone 18 Pro Max or backing up your images in another way, of which there are plenty. But we think using iCloud Photos is the simplest and most user-friendly way to save space on your iPhone without deleting your photos.

If you want to use the storage space for your partner or kids as well, then you’ll want to take a look at how to set up Family Sharing.

How to move photos from an iPhone to iCloud

Setting up iCloud Photos on your iPhone 18 Pro Max is very simple. Once you’ve signed up for the iCloud plan that suits your storage requirements, follow these steps:

To set up iCloud Photos:

  1. Go to Settings > [your name] > iCloud.
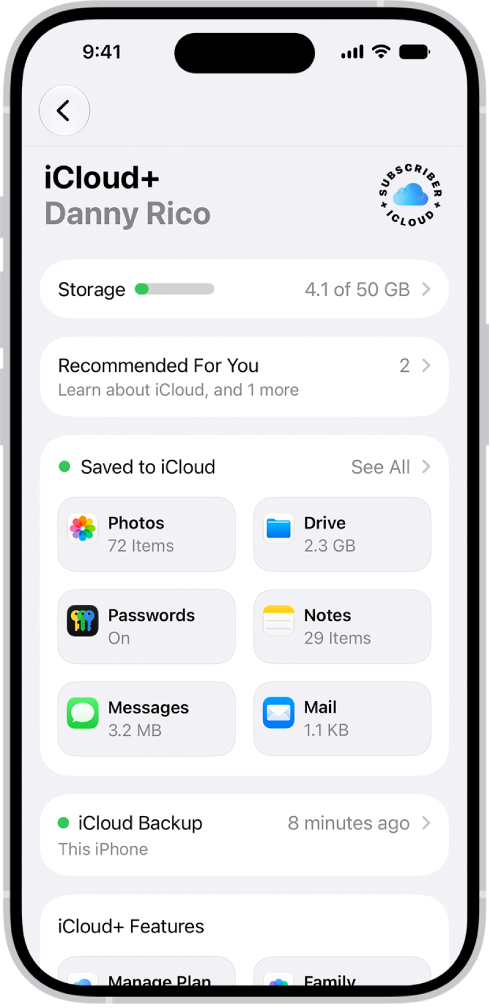
    The iCloud settings screen showing the iCloud storage meter and a list of features—including Photos, iCloud Drive, and iCloud Backup—that can be used with iCloud.

  2. Select Photos.
  3. Enable Sync this iPhone.

This will now sync all of the images in your Photos app to the iCloud server (if it wasn’t already doing that). You’ll want to be on a Wi-Fi connection for this, as it could burn through your data plan if you have a lot of photos and videos to sync.

How to save space on iPhone 18 Pro Max using iCloud Photos

This bit is key if you want to reduce the space your photos library is taking up on your iPhone.

You have the option to switch to a mode that stores the full versions of your photos and videos on the iCloud servers while keeping much smaller (in file size) ones on your iPhone. This means you still have full access to your images, but they won’t take up as much storage space on your device.

Usually, this is turned on by default when you set up the Photos app, but it’s always a good idea to see if this is actually the case. Note, if you don’t have a huge photo library and want the full-size files on your device, this can be achieved by turning off the feature as well.

Here are the steps for enabling the smaller images on your iPhone:

  1. Go to Settings > [your name] > iCloud.
  2. Select Photos, then tap iPhone Storage.
  3. Enable Optimize iPhone Storage.

Now the file sizes of your photos and videos should be more storage-friendly on your iPhone, while the original files and formats are safe on iCloud.

You can download the full-resolution version of any photo and video when you want to. For example, when editing an iMovie of a collection of your videos.

Can I delete photos on my iPhone if they’re on iCloud?

No. No. No. This is a common misconception, but one that can lead to disaster. iCloud does indeed have your files on its servers, but the nature of iCloud is to allow you to sync your photos and videos across all your devices. The problem with misunderstanding this is that when you delete the image from your iPhone or Mac, iCloud syncs this action universally. Meaning that it gets deleted from all your Apple devices, as well as the iCloud servers.

If you’ve accidentally removed a photo from your iPhone 18 Pro or iPhone 18 Pro Max, then all may not be lost as Apple gives you a 30-day grace period to recover these files.

How can I back up my iPhone photos and videos?

As we’ve established, iCloud is great for accessing your photos and videos on any of your devices, but, as a long-term backup solution, you should consider another service or two. The adage of ‘if something is backed up only once, it isn’t backed up at all’ definitely applies here.

Basically, you’ll want to sign up for other storage services such as Google Photos, Flickr or Amazon Photos, as they all offer easy and safe ways to store your images, often for free or at least monthly prices that are affordable and well worth paying to ensure that your photos and videos are secure for the long-term.
Leo Kostizen wants to use iCloud Photos. However, he’s worried that once he’s enabled the cloud-based photo syncing and storage system on his iPhone 18 Pro or iPhone 18 Pro Max and his Mac that a deletion in one place deletes the items everywhere.

If a deletion is made on any device, the same picture is deleted on all devices connected to the cloud…What if I retain full-resolution pictures on my iMac? Will the deletion also be made here?

I can see a grandchild accidentally deleting a few pictures and me not even realizing that they are gone. I always keep a backup but it would be difficult to tell whether I need to restore.

An excellent point and concern. To my knowledge, you can’t lock down Photos to prevent deletions entirely.

Should a photo or video be deleted from iOS or macOS if you have iCloud Photos enabled—yes, it is deleted everywhere, whether you’re deleting an optimized version or the full-resolution one on a Mac.

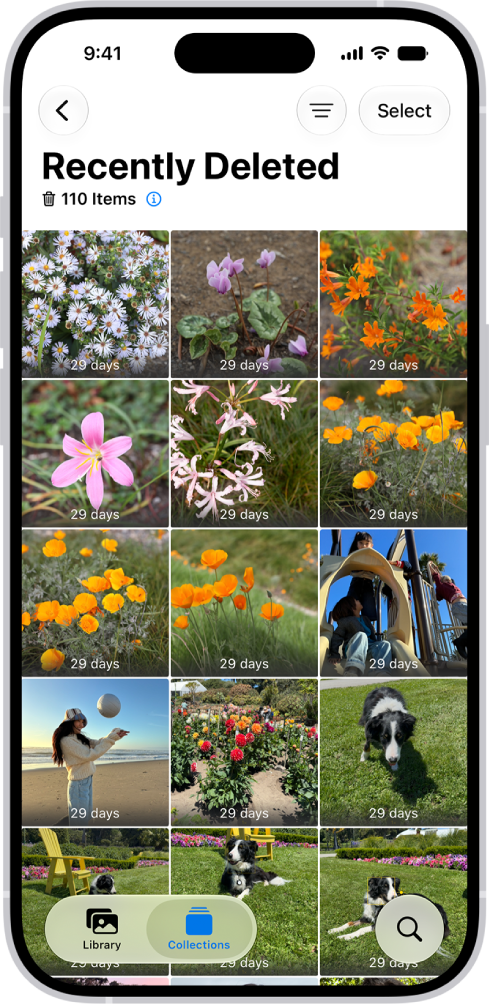
However, the deletion isn’t immediate without an extra step. Instead, iCloud Photos moves it to a Recently Deleted album. Items are moved here and retained for weeks. Deleted photos and videos are kept in the Recently Deleted collection for 30 days.

In Photos, tap Collections, tap the Recently Deleted collection (below Utilities), tap View Album, then unlock your iPhone. You can tap Select, choose one or more items, then tap the More button and tap Recover, and they’re moved back to the main library. You can also immediately delete items if you’re trying to recover storage space, by choosing one or more photos and videos, then tapping the More button and tapping Delete—in that case, they’re immediately deleted.

The Recently Deleted folder in the Photos app. Recently deleted photos appear in a grid on the screen.

iCloud Photos’ mission is to sync photos and video across all your devices, providing access to a single set of media across your hardware and via iCloud.com. Not everybody wants that, however. Some people want different sets of media on different devices. That’s possible, but it comes with risk and challenges.

If you don’t have iCloud Photos already set up, you can skip ahead to the section on backing up media without using iCloud.

Switching from iCloud Photos to locally stored media

If iCloud Photos is enabled on one or more of your devices—that’s on any iPhone or Mac—some copy of your entire set of images and movies are on each device. When Optimize iPhone Storage is turned on, all your full‑resolution photos and videos are stored in iCloud in their original formats, with storage-saving versions kept on your iPhone.

You can check whether Optimize iPhone/Mac Storage is enabled in these locations:

  • In iOS, go to Settings > [your name] > iCloud > Photos > iPhone Storage
  • In macOS, open Photos and go to Photos > Settings > iCloud.

If your set of synced media is optimized, then you don’t have a full-resolution version of all images and videos on that device. Make sure one of your devices does (most likely a Mac), and that it has enough storage to download the full library. The easiest method is to force Photos to perform a download:

  1. In Photos for macOS, go to Photos > Settings > iCloud.
  2. If you don’t have Download Originals to this Mac checked, do so. This will start a full download.
  3. Uncheck the iCloud Photos box.
  4. Photos prompts you to confirm, but offers two choices. Pick Download, which ensures that all images in any state are downloaded to your Mac.

When the operation is complete, iCloud Photos will be disabled and you’ll have a full local copy.

I’d suggest waiting until that point before you disable iCloud Photos on devices that you don’t want to continue syncing with and via iCloud.

Your media remains on iCloud.com as a backup even if you disable all devices from syncing with it. But it’s no longer kept up to date with any device that has iCloud Photos disabled.

Before you downgrade or cancel your iCloud+ plan, download or remove content that exceeds your new storage amount. If your iCloud storage exceeds your new storage plan capacity, iCloud won’t sync or update your information.

On devices that no longer have iCloud Photos enabled, any images you capture or add to the Photos library are retained only locally. If you don’t use iCloud Photos, your Photos Library is part of your iCloud Backup.

Backing up photos without iCloud sync

Your photos and videos are likely some of the most precious things you own, even if they only exist as bits on a computer or mobile device. Once you disable iCloud Photos on your iPhone 18 Pro or iPhone 18 Pro Max, images aren’t necessarily automatically backed up the moment they’re captured or added.

On an iPhone, you have to engage a bit more effort:

  • Sync via a Mac: You can use the Photos app to import images from your iPhone to your Mac. This is manual, so these backups occur only when you physically connect your mobile device via USB to your Mac.
  • Sync via Google Photos: Google can automatically sync photos with Google Photos installed without occupying much storage on your device. (This is also an option for macOS.) Google’s storage prices aren’t far off from Apple’s.
  • Sync via Dropbox: Dropbox can automatically sync images from an iPhone using an app on the device or when you plug in a mobile device (or camera) to a Mac. Dropbox also charges about the same as Apple for cloud storage.

An Apple Account lets you sync all sorts of data across your devices. But what happens when you add your personal Apple Account to a work machine or vice versa? While contacts, calendar entries, and notes may be easy to delete or sort out, you could wind up with unwanted photos and videos from a work account on your personal machine—or, more likely, personal photos on a work account. With iCloud Photos active, those images and movies are synced and backed up across your linked devices!

Warning! Many of the steps below are not reversible. Double-check before proceeding that you’re sure you know the correct accounts on which your media lives.

The solution is fortunately straightforward:

  1. Log out of the wrong Apple Account on all the devices you need to disconnect from that set of iCloud Photos.
  2. Decline when prompted to delete all the media from the device. There’s no reason, as your unwanted images and videos will still be synced in iCloud storage.
  3. Log back in with the correct Apple Account on all the appropriate devices.
  4. Using a Mac to proceed is easiest. With iCloud Photos active, find and delete the media that shouldn’t be in that account’s synced image and video set. When warned that the media will be deleted from all your devices, click or tap Delete. (I offer more tips below on this step.)
  5. When you’ve completed removing all unwanted media, click the Recently Deleted album in the sidebar, then click Delete All and confirm the permanent deletion by clicking Delete.

Now there’s no trace of any images or videos you selected across all synced devices associated with the currently logged-in Apple Account.

If you had iCloud Photos enabled on both work and personal accounts, then you will have to repeat steps 4 and 5 on the account that you remain logged into that has unwanted images. For instance, if you connected a Mac at work to your personal Apple Account, after first following the steps above to remove the Apple Account and unwanted images and videos from your work account, then you will need to go to a device connected to your personal Apple Account and remove unwanted work media.

If you accidentally had a large number of media items sync, selecting them visually or one at a time may be too tedious. Instead, consider using a smart album to select images. This may be possible if, for instance, you have a personal iPhone 18 Pro Max that you took nearly all pictures and shot all video on, and it’s different from any work mobile device you have.

In that case, you could use this method in Photos for macOS:

  1. Choose File > New Smart Album.
  2. In the conditions list, select Camera Model from the first popup. Try to find your iPhone 18 Pro or iPhone 18 Pro Max (or other camera) that may be uniquely associated with the set of images you want to remove from the list of camera models. Select it, and the number of items matched appears.
  3. Name the smart album to identify it and click OK.
  4. Photos creates the smart album and selects it. Choose Edit > Select All or press Command-A.
  5. Press the Delete key, then click Delete.
  6. Click the Recently Deleted album in the sidebar, then click Delete All and confirm the permanent deletion by clicking Delete.

In step 2, you can also click the + to add more conditions:

  • With Any selected after in “Match [popup] of the following conditions” add more camera models to match any of them.
  • With All selected for matching, you could add a date criterion (Date, is in the range) if you know all or most of the media comes from before you started a job; or conversely, after if you’re removing work images from a personal account.

Dara Hogan has a problem that a lot of readers share: two Apple Accounts that are both used for iTunes and iCloud. They wonder about resolving this:

One thing that I don’t fully understand is why iCloud can’t be used as a solution to this problem? Would it be possible for me to set up a new, third Apple Account and to sync both existing accounts to it and then delete them and implement the new, third Apple Account on all my devices?

Dara also notes the reason for staying put, which is a common one for many of you, and is the reason that I continue to use an older Apple Account for iTunes and a newer one for iCloud.

Everything is in sync (which is why I haven’t moved to using just one Apple Account before now). If I add a new contact on my iPhone it pops up on my iMac. Likewise with Calendar entries. Also, the 385 physical CDs that I’ve uploaded to iTunes on my iMac are also there on my iPhone and music I’ve purchased from iTunes on my iPhone are also on my iMac.

So here’s the problem. You can’t migrate your email. You could make sure one Mac (better than iOS for this purpose) was up to date with contacts and calendars, and you’d use Mail or another IMAP-supported mail client to download all email that was stored on the server to local storage.

If you used iCloud Photos or Sync Library or iTunes Match, you’d want to be sure that 100 percent of the synced material is stored locally on the Mac, too. (In iCloud Photos, set the iCloud settings to download full-resolution images.) You’d also need to make sure you’d cleared out iCloud Drive of any files you need.

Then you could disable iCloud and be sure to click every dialog that asks that you want to keep information stored locally. Now, you can create a new Apple Account you plan to use with iCloud synchronization and enable synchronization for all the services.

However, a lot of provisos:

  • You might be able to migrate purchases that you’ve made from your secondary Apple Account — like apps, music, and other content — to your primary Apple Account.
  • If you want to keep using one of the emails associated with your other Apple Accounts—especially to send email using that address as the return address—you need to keep an entry in your mail programs for it. (You can forward iCloud email, though, and that may be enough of a solution for many people.)
  • There may be Apple-associated or third-party connections to the Apple Accounts or associated email addresses, so you may regularly have to log in or enter passwords in any case.

If that all works for you, then a third Apple Account (or consolidating sync to one of the two existing ones) should work out just fine.

If you’re experiencing problems with your AirPods, such as strange battery drains or intermittent audio, it could be that they need resetting. Yes, the classic ‘turning it off and on again’ as sung in unison by IT support technicians the world over.

But how can you do this on a device that has nary a button in sight? In this article we show you the quick way to reboot your wireless earbuds.

Manually resetting your AirPods

Since their introduction in September 2016, AirPods have gone on to be a huge success for Apple, with the majority of reviews heaping praise on the earbuds for their simplicity and reliability.

Of course, this can feel a bit frustrating to read if your AirPods won’t connect to your iPhone 18 Pro Max, or the charge lasts for less time than it normally would.

It should be a case of just opening the charging case and letting the Apple software do its thing. But, if this isn’t the situation for you, there’s a quick method you can try to get things back on track.

On your iPhone 18 Pro Max go to Settings > Bluetooth and tap the More Info button next to your AirPods. From the menu that appears select Forget This Device.

Place the AirPods into the charging case, close the lid, then wait 30 seconds. The muttering of incantations is entirely optional at this point.

AirPods 1, 2, or 3, or AirPods Pro 1 or 2: Open the lid, then press and hold the setup button on the back of the case for about 15 seconds, until the status light flashes amber, then white.

AirPods 4 or 5, or AirPods Pro 3: Open the lid, then double-tap the front of the case three times. When you successfully reset your AirPods, the status light flashes amber, then white.

Now, hold your iPhone close to the case and follow the instructions that appear on the screen. Hopefully your AirPods should connect without issue.

What to do if your AirPods won’t charge

Before making a trip to the Genius Bar to get your AirPods looked at, here are some simple checks you can try.

First, ensure that all of your cables are firmly connected and that the charging case and its supplied charger are plugged in correctly. Next, place your AirPods in the charging case, again being careful that they are seated correctly.

Try charging the case for around 15 minutes. After this, but while still keeping the charger connected and the AirPods inside, open the lid and hold the case close to your iPhone 18 Pro or iPhone 18 Pro Max.

Wait a couple of seconds and you should see the AirPods status windows appear. Look to see if there is a charging icon (the little lightning bolt) next to the AirPods.

If not, you might have a hardware problem that requires technical assistance. In this case, contact Apple Support to arrange an appointment.

Notifications can be very useful: reminding you of upcoming appointments, new episodes of podcasts you enjoy, alerting you to important emails or Messages you don’t want to miss, or letting you know that you’ve received messages on your social media platform of choice. But notification overload isn’t fun. Here’s how to lessen the number of pings you get on your iPhone 18 Pro or iPhone 18 Pro Max.

How to stop notifications for certain apps

There are likely to be some notifications you want to receive and others you’d prefer not to see. In that case it is easy to tweak which apps can send you notifications.

When you first install an app, you’ll usually be asked whether you want to allow notifications. While you may permit this at the time, if the various messages get too much you can always turn off notifications for that specific app via Settings.

Stop notifications on iPhone 18 Pro Max

Here’s the steps required:

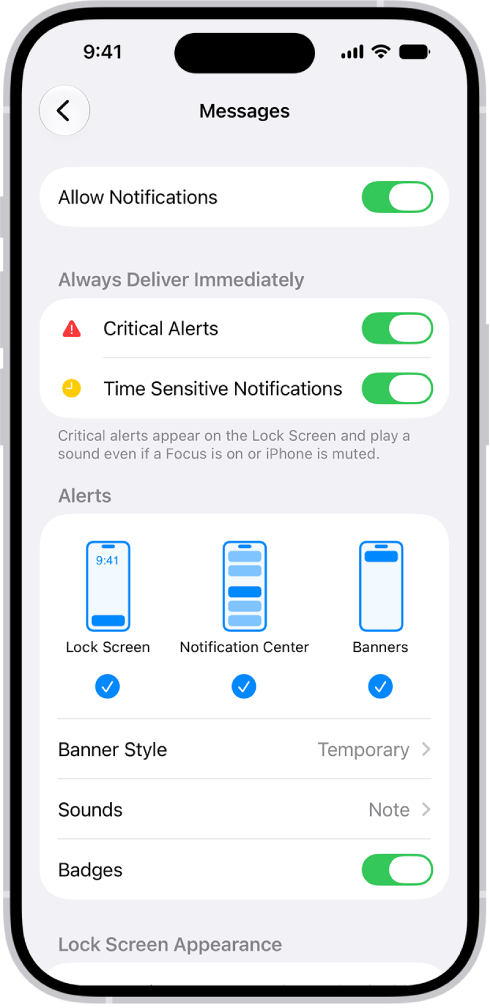
  1. Open Settings > Notifications.
  2. Scroll down and select the app you want to disable.

    Messages Notification settings in Settings.

  3. Turn off Allow Notifications.

How to hide notification previews (keep messages private)

One reason you might want to stop notifications is if they risk revealing information to anyone else. Most notifications display a summary of their contents, which can be a nightmare if you’re trying to plan a party for someone in your family or are awaiting a job interview invite while still at your present place of employment.

Thankfully, it’s possible to remove the content previews without stopping the notifications entirely. Here’s how it’s done:

Hide notification previews on iPhone

  1. Open Settings > Notifications.
  2. Tap a specific app or go to the next step for a general setting.
  3. Tap Show Previews.
  4. Select Never.

How to disable all notifications

There isn’t a direct setting that will allow you to turn off all notifications, but there are features that achieve the same goal. You can use the Scheduled Summary feature that will hold back all non-urgent notifications until a specified time of day. Then you’ll be presented with them when you deem it more convenient.

To set this up, take the following steps:

Turn off notifications on iPhone 18 Pro Max

  1. Open Settings > Notifications.
  2. Tap Scheduled Summary.
  3. Turn on Scheduled Summary, then tap Continue (if it appears).
  4. Select the apps you want to include in your Summary.
  5. Schedule times for the notification summary.

Do iPhone notifications use data?

One reason that you might want to turn off notifications is that you’re worried about the amount of data that might be used up by your iPhone constantly accessing the internet to check for any push notifications. While this process does involve data, it should only be a minimal amount and certainly not enough to burn through your data plan.

If you’re worried about this though, you can check how much data is being used by opening Settings > Cellular > System Services and checking Push Notifications.

Hopefully, all of these tips will help you get on top of all the possible distractions that come with being connected to the internet. If you still find your mind ill at ease, maybe give meditation and mindfulness apps like Headspace or Balance a go, to see if that makes things a little more bearable.

Advertising appears to be a necessary nuisance on the internet. It remains the primary method for paying content creators, allowing sites (such as the one you’re reading) to avoid paywalls or subscriptions – but sometimes adverts go too far in terms of distraction and intrusiveness.

When you find the constant barrage of consumerism too much, you’ll be pleased to know that it’s pleasantly easy to block ads when using Safari on your iPhone 18 Pro Max. In this article, we show how.

How do I stop pop-up ads on my iPhone?

iOS has a built-in pop-up-blocker. Open Settings and go to Apps > Safari, then tap the toggle next to Block Pop-ups.

This is a good start, but for the full-fat ad-blocking experience we’ll need to install a third-party content blocker, which occupies the next step.

How to install an ad blocker on iPhone

Blocking ads on your iPhone 18 Pro or iPhone 18 Pro Max is a three-step process:

  1. Install a third-party content blocker app (such as AdGuard).
  2. In iOS Settings, grant the app permission to block content.
  3. Fine-tune the app’s filters so it blocks adverts in the way you wish.

The way ad blockers work is through Safari extensions. This feature has been around since iOS 9 and isn’t solely restricted to removing pesky adverts – in fact, there’s a wide variety of useful add-ons.

To set up an ad blocker you’ll first need to acquire one from the App Store. You’ll find plenty of options, such as AdBlock Plus and AdGuard. For this tutorial we’ve opted for AdGuard, but the instructions will be virtually identical for any ad blocker.

Install AdGuard and open it. On the main page you’ll notice a message in red that states ‘Protection is disabled’. This is because it requires permission from iOS to do its thing.

Go back to the home screen and select Settings > Apps > Safari > Extensions. You’ll see a list of any ad blockers you have installed.

AdGuard has multiple toggles for the various kinds of content blocking (six, at time of writing). Tap each one related to the blocking you want AdGuard to do and turn on Allow Extension; we’re going to enable them all.

Open AdGuard once more and the red warning should have been replaced by a placid green message (or an orange one if you’ve enabled only some of the permissions), meaning you’re able to start configuring the app. This isn’t as daunting as it sounds, because AdGuard has a set of defaults aimed at ensuring a speedy, ad-free online experience.

Each blocker will have different methods for setting up filters, so check the help sections to discover the way it’s done on that particular app. One of the advantages of AdGuard is that it features a video to take you through the steps: open Settings, then tap About > How to use.

Exempt sites from blocking using whitelists

Consider using the whitelist feature. This instructs the blocker to exempt certain websites, meaning adverts will still appear when you’re visiting them. This is a good thing because it allows the sites to receive revenue and continue providing you with the content you enjoy. Use this feature on sites with unobtrusive advertising which you wish to support.

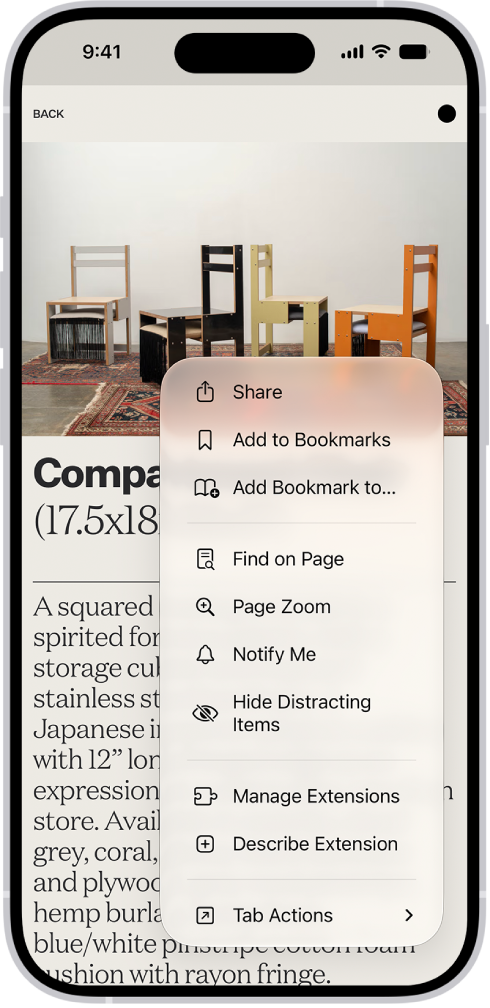
To exempt a website in AdGuard, you’ll need to open Safari and navigate to the site in question. When there, tap the Page Menu button on the left side of the search field, then tap Manage Extensions. Turn each extension on or off.

In Safari, the Page Menu button on a website has been tapped, revealing options including Manage Extensions near the bottom of the screen.

Remember ad blockers only work in Safari, so any articles you click on in Facebook, X or other apps will not have the blocker activated.

An added benefit of a blocker is that you should end up using less data, as adverts are often visual and therefore larger to download than the text on any given web page. You may also see (very slightly) better battery life.

Are ad blockers safe?

For the most part ad blockers are as safe as any other app on the Store. There were some controversial ones which Apple removed, following reports that they were running man-in-the-middle attacks. But for the most part, they are safe to use.

Content Blockers do, by their nature, monitor your web traffic and interfere with your web browsing, and for this reason you should stick to the major apps, such as the ones mentioned above.

Is using an ad blocker a good thing?

Now, here’s the rub.

Everyone likes to enjoy the free content available on the web. Paywalls are generally frowned upon, and not many sites have made them work.

But – and this is important – the only way that sites are able to create such great content and provide it to you at no cost is through advertisers paying them for access to the readership.

It was a similar story when magazines and newspapers ruled the information highway, but back then you couldn’t have the publication automatically eviscerate its ads before you enjoyed the articles. Not unless you had a very dutiful butler with a sharp pair of scissors.

Therefore it’s important that publishers gain that ad revenue in order to pay their staff, continue to exist, and produce features such as the one you’re reading.

Ads can be unpleasant; that’s certainly true. So if you find a regular haunt whose content you enjoy, but uses intrusive ads, write to the editor and complain. This can be fed back to the advertisers and hopefully bring about a change on the site that benefits everyone.

If you do use an ad blocker generally, then consider opting for one with a whitelist, and put your favourite sites on that list. The non-intrusive settings available on apps such as Crystal also allow you to contribute to the financial wellbeing of a site by rewarding advertising that respects the reader.

In the end, it’s up to your own conscience. You can block all ads, take content, and no one will be knocking on your door with a warrant for your arrest.

Just be prepared to live in a world where the streets are littered with dishevelled ex-journalists, holding out their withered hands to you as they plaintively cry “50p for a how-to tutorial, guv’nor?”

And that’s it! We hope this tutorial has been helpful.

The Personal Hotspot feature on your iPhone 18 Pro or iPhone 18 Pro Max is perhaps the most unreliable thing you can ever use to browse the internet. It frequently disconnects your devices, pausing your workflow—or even causing you to lose data.

It’s a frustrating problem caused mainly by Apple’s way of conserving energy and data on iPhones. But sometimes, it can be due to other factors like incorrect network settings and software bugs. However, we have some tips that could help solve this problem, and one of them should work for you.

1. Turn Off Low Data Mode

Low data mode is a feature in macOS that helps you consume fewer data by reducing how much network-based tasks your devices perform. While it’s a great feature, it may be why your iPhone keeps ending the network connection with your Mac.

Turn it off by following these steps on your Mac:

  1. Click the Apple logo on the menu bar to open up the Apple menu.
  2. Select System Settings and choose Wi-Fi on the left pane.
  3. Connect to your iPhone’s hotspot (indicated by a chain link) by clicking Connect when you hover the pointer on your iPhone’s name.
  4. After you connect to the hotspot, click Details when you hover your pointer on your iPhone’s name.
  5. In the sub-menu that appears, toggle off Low Data Mode.
  6. Click OK and return home.

Sometimes, your Apple device may turn off hotspot connections to save energy and data when it detects no activity after 90 seconds. Low data mode turns off background activities that would have otherwise kept the devices connected.

2. Forget and Reconnect to the Hotspot on Your Mac

A small reset can help fix minor issues like these sometimes. Forgetting and reconnecting to the iPhone’s hotspot might just help keep your connection stable. And here’s how to do it:

  1. Click the Wi-Fi icon at the top-right corner of your screen in the menu bar.
  2. Now, click on Wi-Fi Settings from the dropdown menu.
  3. When System Settings opens up, you will find yourself in the Wi-Fi menu.
  4. Find your iPhone’s name in the Known Networks category and click the more icon—indicated by three dots.
  5. Select Forget This Network.
  6. Choose Remove when the confirmation prompt appears.

After you forget the network, you can easily reconnect by clicking Connect on your phone’s name in the Personal Hotspots category of the Wi-Fi settings. If you have your Apple Account signed in to your iPhone and Mac, you won’t need to input a password.

3. Restart your iPhone 18 Pro Max and Mac

A common troubleshooting tip, but restarting your devices might also help you with this hotspot problem. Restarting your device stops and restarts scripts that may be misbehaving because they’ve been running for so long.

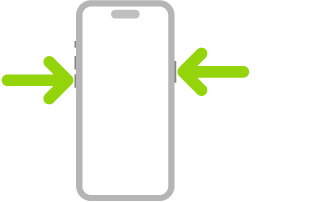
You can easily restart your Mac by clicking Restart in the Apple menu. Simultaneously press and hold the side button and either volume button until the sliders appear, then drag the Power Off slider. Press and hold the side button until the Apple logo appears.

An illustration of iPhone with arrows pointing to the side button on the upper right and a volume button on the upper left.

4. Disable Low Power Mode

Both your iPhone and Mac feature a Low Power Mode to throttle how much power they consume and prolong your battery life. What Low Power Mode does on an iPhone is turn off certain background processes, stop iCloud photo syncing, turn off the screen after 30 seconds, and a few other things.

However, this power throttling can interfere with your iPhone’s hotspot by turning it off to save power. Here’s how to make sure your iPhone 18 Pro or iPhone 18 Pro Max isn’t in Low Power Mode:

  1. Tap Settings on your Home Screen and scroll down to Battery.
  2. Open the Battery options, tap Power Mode, and toggle off Low Power Mode.

You can tell your phone is not in Low Power Mode if the battery icon is not colored yellow.

5. Keep Your iPhone 18 Pro Max Screen On and Disable Auto-Lock

Sometimes, for your iPhone’s hotspot to stay active, you should ensure its screen stays on. This is definitely a battery-drainer; that is why we recommend you do this only with your iPhone plugged in.

Here’s how to keep the screen on:

  1. Open Settings and navigate to Display & Brightness.
  2. Scroll down to Auto-Lock, open the submenu, and tap Never.

If you notice that the Auto-Lock section is grayed out and stuck at 30 seconds, it means you still have Low Power Mode on.

And lastly, remember to change this back when you’re done using the hotspot to minimize battery drain on your iPhone.

6. Plug Your iPhone Directly Into Your Mac

Connecting to your iPhone’s hotspot is also known as tethering, and you can tether your iPhone 18 Pro Max to your Mac with a USB cable. The hotspot connectivity with this method is far more reliable and unlikely to close for no apparent reason.

Here’s how to do it:

  1. Use a USB cable to connect your iPhone to the Mac.
  2. Next, tap Trust on your iPhone if you get a prompt. If your iPhone asks you to enter your device passcode, do that as well.
  3. Head to Settings > Personal Hotspot on your iPhone and toggle on Allow Others to Join.
  4. Now, open System Settings on your Mac and click Network on the left pane.
  5. Turn your Wi-Fi off by clicking Wi-Fi and toggle off the switch.
  6. Go back to the Network menu, and the color underneath iPhone USB should turn green and say connected.
  7. You can now use your iPhone’s hotspot with USB tethering.

An added bonus of using this method is that your iPhone keeps charging while you take advantage of the hotspot.

7. Reset the Network Settings on Both Devices

If all the other options fail, reset the network settings on both devices.

It’s quite easy on an iPhone. You’ll find the option in Settings > General > Transfer or Reset iPhone > Reset > Reset Network Settings. When prompted, enter your passcode and continue.

8. Update iOS

Frequently disconnecting hotspots on iPhones could also be caused by software bugs in older versions of iOS. Apple may have addressed this issue in newer versions of the OS. So, it might be a good idea to update your phone’s software to the latest one to see if there is any improvement.

You’ll find the option to update your phone in Settings > General > Software Update. Make sure you’re connected to stable Wi-Fi and input your password when prompted. Once you finish the installation process, try to connect your Mac to the iPhone’s hotspot again.

Make Your iPhone’s Hotspot Reliable

Now, you can rest easy using your iPhone’s internet without worrying about losing connection. But if your iPhone 18 Pro Max hotspot issues persist, you might have to contact your carrier and see if it’s a problem from their end.

It’s worth noting that some network providers charge an additional fee for the hotspot feature. Also, don’t forget that you can always use your iPhone’s internet connection over a USB cable instead of Wi-Fi.

AirPods aren’t cheap, so you shouldn’t put up with any issues if the sound is glitchy, unbalanced, or not working at all. Despite the fact that you can’t physically open your AirPods or go into the settings on the diminutive headphones, there are still plenty of troubleshooting steps you can take to fix audio issues on your iPhone 18 Pro Max.

So, before you spend a bunch of time chatting to Apple’s technical support, here’s how to fix AirPods sound problems for yourself.

1. Update Your iPhone 18 Pro Max

The first step you should take is to update the operating system for whatever device your AirPods are paired to.

These updates are the best way to fix widespread bugs that have emerged, which might be causing the problems with your AirPods. Go to the Settings app on your iPhone. Tap General, then tap Software Update.

2. Update Your AirPods Firmware

After updating your paired device, you should also update the firmware on your AirPods. This is a little trickier to do because there’s no “Update Firmware” button. In short, return your AirPods to the Charging Case, connect your paired device to the internet over Wi-Fi, and wait.

3. Check the Accessibility Audio Balance

If you need to fix your AirPods because the sound is louder on one side, it might actually be the result of a feature, rather than a bug. Take a moment to learn about Dynamic Head Tracking, which moves the sound in your AirPods as you turn your head so that it always sounds like it’s coming from your paired device.

If you’ve ruled out Dynamic Head Tracking, there might be an issue with your Accessibility settings:

  1. Pair your AirPods to an iPhone 18 Pro or iPhone 18 Pro Max and go to Settings > Accessibility > Audio & Visual.
  2. Scroll down to Balance.
  3. Ensure the slider is set to 0.00 in the middle.

4. Recharge Your AirPods and Charging Case

This may sound simple, but ensuring your AirPods (and the Charging Case) are fully charged up could be all you need to do to fix your sound problems. It’s a good way to fix all manner of AirPods problems.

So, return your AirPods to the case and connect it to a charging cable until it’s fully charged. Then try using your AirPods again to see if the sound issues are fixed.

5. Reset the Volume and Re-Pair Your AirPods

You can fix various problems, like when the audio is too quiet on AirPods, by unpairing and re-pairing the headphones. But before you do that, try turning the audio all the way down. Make sure you’re playing some audio through your AirPods while you adjust the volume to make sure you aren’t changing the ringer volume instead.

After turning your AirPods all the way down, unpair them from your device and forget the Bluetooth connection. On an iPhone 18 Pro Max, you do this by going to Settings > Bluetooth > [Your AirPods] > Forget This Device.

After doing that, pair your AirPods again like you did when they were new. Then turn the volume up again, while playing audio, to see if your AirPods are fixed.

6. Reset Your AirPods

If your AirPods audio is still not working properly, you may need to reset them completely. This is easy to do—just return your AirPods to the Charging Case and hold the Setup button until the light flashes white. For AirPods 4 models, AirPods 5 models, and AirPods Pro 3, double-tap the front of the case while the status light is on, double-tap again when the status light flashes white. When the status light flashes faster, double-tap a third time, until the status light flashes amber, then flashes white.

7. Clean the AirPods Microphone and Speaker Grills

It’s possible your AirPods don’t sound very good because earwax, dirt, or debris is clogging the speaker mesh. Similarly, AirPods Pro may sound glitchy if dirty microphones are causing problems with the active noise cancellation.

Clean your AirPods, paying particular attention to the microphone and speaker grills.

8. Troubleshoot Your Bluetooth Connection

Sound problems could be down to issues with your AirPods Bluetooth connection. This could be caused by a weak signal or interference from other devices and appliances. To troubleshoot your Bluetooth connection, make sure your AirPods are close to the device they’re paired with. Stay in the same room, and try not to let any big object get in between the two.

If your audio is still glitchy, try moving away from any objects that might interfere with your Bluetooth connection. These could include:

  • Poorly shielded cables
  • Microwaves
  • Wi-Fi routers

Lastly, try using the AirPods with a different device to see if the Bluetooth problems were with your original device, rather than the AirPods. Needless to say, if your AirPods audio is glitchy no matter which device you use them with, then you know that you’re dealing with an AirPods problem.

If you do discover that one particular device is causing problems with your AirPods, try disconnecting any other Bluetooth devices from it (including an Apple Watch), then try toggling Bluetooth on and off or resetting the device entirely to fix it.

9. Troubleshoot Your Wi-Fi Connection

Some users reported that they were able to fix the sound on their AirPods by tweaking their Wi-Fi router settings. To be precise, Reddittor u/MaroonFloom fixed their AirPods by setting Wireless-Professional-Bluetooth Coexistence to Pre-Emptive on their router.

The settings on your router are likely to be quite different, but we’d suggest using a web browser to view all your router options and fiddling with any Bluetooth-related options to see if any of them fix your AirPods.

10. Contact Apple for Replacement AirPods

If none of the tips above have been able to fix the sound on your AirPods, then it’s time to speak to Apple. Visit Apple’s Get Support website to speak to a technical advisor. Then point them in the direction of this post to let them know what steps you’ve already tried.

It’s possible there’s a physical problem with one or both of your AirPods and Apple will need to replace them. If your AirPods are covered by the warranty and you haven’t damaged them, you shouldn’t need to pay anything for this.