Got a tip for us?

iPhone 15

It seems like iPhone owners are completely obsessed with the health of their batteries. I’ve lost count of the number of times I’ve been asked how to keep an iPhone’s battery at 100% health, and there are countless YouTube videos and articles telling owners how to do this.

I have bad news for you if you’re one of those people.

There’s only one thing that you can do to keep your iPhone 15 battery health at 100%.

Stop using your iPhone.

Yup, the only way you’re going to keep your iPhone 15 battery at 100% is to stop using it and charging it.

I’ve also got another bit of advice to those who are obsessing over the health of their iPhone 15 battery.

Stop worrying about it.

According to Apple, the battery is rated to hold 80% of its capacity after 500 complete charge cycles. A charge cycle is defined by a complete drain of the battery to zero, followed by a complete charge to 100%.

If you want to know how to find out how many recharge cycles your iPhone 15 has been through, follow the steps below:

  1. Open the Settings app.
  2. Tap General -> About.
  3. Scroll down to the “Battery” section and check the number next to Cycle Count.

So, is there anything else you can do to prolong your iPhone 15 battery health other than using it less?

No.

This is normal battery wear.

That said, there are a few steps you can take to take the stress off your battery to reduce additional wear.

Prevent Your iPhone 15 Battery from Charging Beyond 80%

All iPhone 15 and iPhone 15 Pro models feature a new battery health setting that when enabled prevents the devices from charging beyond 80% at all times.

Apple has detailed how the iPhone 15’s new 80 percent charging limit setting works in an update to a support document.

Here’s Apple’s explanation of what you can expect if you enable the setting:

When you choose 80% Limit, your iPhone will charge up to about 80 percent and then stop charging. If the battery charge level gets down to 75 percent, charging will resume until your battery charge level reaches about 80 percent again.

With 80% Limit enabled, your iPhone will occasionally charge to 100 percent to maintain accurate battery state-of-charge estimates.

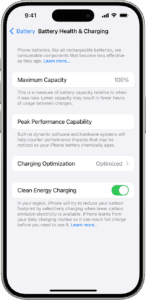
The new 80 percent limit on iPhone 15 series could help prevent the unexpected battery capacity dropoff. Here’s how to set it up:

  1. Open the Settings app.
  2. Tap Battery -> Battery Health & Charging.
  3. Tap Charging Optimization.
  4. Tap the 80% Limit option to enable it.

Screenshot of Battery Health & Charging settings  

Keep your iPhone 15 at room temperature as much as possible

The life span of your iPhone battery can be affected by extreme temperatures. A higher temperature increases the speed of chemical reactions inside the battery, which forces the battery to work harder and faster, thus also causing it to degrade faster.

The most important thing is to keep your phone away from direct sunlight when possible, especially when it’s warm. Your phone might be fine in the grass on an overcast day, but the warmer the temperature, the less your phone can withstand the sun. At the beach, your phone can overheat in just a few minutes in the sun. Same if you put it in a sunny spot in your car.

Instead, get your phone out of the direct light, whether it’s in your pocket, inside a backpack or under a towel/blanket or dashboard. Anyplace that will keep it away from sunlight will work.

It’s fairly easy to protect your phone from the sun, but high temperatures alone can also cause your phone to overheat. After only an hour, the inside of a car can reach 143 degrees when it’s 100 degrees outside, for example, so a phone left in your cup holder could quickly overheat and get damaged. So, to preserve your iPhone 15 battery health, Don’t **keep your phone in a hot environment for an extended period of time, even if it’s not in direct sunlight. **That includes your car, a sauna, the kitchen, the middle of the desert or anywhere near a fire.

Your phone’s optimal internal temperature should be somewhere between 32º and 95º F (0º and 35º C). To prevent overheating, Apple recommends keeping the device in a place where the temperature is between -4º and 113º F (-20º and 45º C).

Apple does have a few settings to prevent overheating and damage, like disabling your phone or preventing further charging when your phone is too hot, but you don’t want to rely on these features to maintain your iPhone 15 battery health. It’s better to take preventative actions than wait for your iPhone to overheat.

You may need to take your iPhone out of its case

If your iPhone gets hot any time you charge it, you may need to take off your case before doing so. Certain cases, especially the bulkier and more protective ones, can trap heat and make the iPhone overheat, affecting the battery’s life span.

Apart from removing the case, don’t use graphics- or processor-intensive apps when your phone is charging. . That includes massive mobile video games like PUBG Mobile or streaming apps like Netflix and Hulu. Using these apps while charging could also cause your phone to overheat.

Use a good-quality charger

You can charge your iPhone with a USB-C cable and power adapter compliant with the USB-C standard, including USB Power Delivery — such as the cable that comes with your iPhone. These cables and power adapters are widely available from Apple and other manufacturers. Having said that, not all charging cables, bricks, and pads are made equally, especially when it comes to the long-term health of your battery.

Be wary of using cheap, no-brand chargers, or chargers that have been sitting around for years, as they may not necessarily stick to the same safety standards as the rest. We’re not saying all of these chargers are dodgy, but to maintain your iPhone 15 battery health it’s always worth going with a high quality charger from Apple or a reputable third-party manufacturer, even if it’s a little bit more expensive.

Talking about cables, there is a reason some charging cables sell for $2.99 and others boast a price tag of $25. The variance in cost is due to Apple’s licensing program known as “Made for iPhone” or “MFI”. Within MFI certified cables lie proprietary components that monitor the amperage flow into your device. These components protect against surges in power and over charging. Non-genuine or “gas station” chargers that are not MFI certified will prompt error messages such as “accessory not supported” as well as damage your battery or even worse – your motherboard.

Take these steps to protect iPhone 15 in long-term storage

Maybe you have several iPhones and want to stash your iPhone 15 for a bit. If you want to preserve the battery’s health, you should do the following before putting it away:

  • Keep the charge at around 50%. You don’t want your battery to be full or empty before you turn it off, or else it could stop holding a charge (if full) or lose capacity and have a shorter life span (if empty).
  • Turn your iPhone off. This prevents your phone from using up more battery.
  • Store your phone in a cool and moisture-free environment. Ideally, the temperature should be less than 90 degrees Fahrenheit (32 degrees Celsius).
  • If you’re putting your iPhone away for longer than six months, turn it on and charge it to 50% every half a year.

If you store your iPhone 15 for a long time, it may be in a low-battery state, which just means you may need to charge it for 20 minutes before it turns on.

All you really need is a Wi-Fi connection.

You’ve finally received your iPhone 15. Maybe you picked it up at your local carrier store or preordered it and got it in the mail — but at long last, Apple’s latest phone is now in your hands. And you need to set it up — but you might need some help doing so.

In this guide, we’ll walk you through all the steps of setting up your iPhone 15, iPhone 15 Plus, iPhone 15 Pro or iPhone 15 Pro Max, from turning on your device and connecting to Wi-Fi to activating your eSIM and transferring all your data.

iPhone 15 Pro in black titanium, white titanium, blue titanium, and natural titanium finishes.

What to do before you start to set up your iPhone 15

Before you start setting up your iPhone 15, you’ll need the following things if you’re moving over from another phone or setting up an iPhone for your first time:

  • Back up your old iPhone. If you’re moving over from an older iPhone, you’ll be transferring data from your existing phone to your new iPhone 15, so it’s best to have an up-to-date backup to restore from. If you don’t have enough storage, you can back up to your computer.
  • Keep your old phone close by. No matter if it’s an Android or iPhone, it’s a good idea to have your previous phone ready. This can actually expedite the setup process.
  • And have your charger with you, just in case. Although your new iPhone 15 should have enough battery to get you through the setup process, you might need power to charge your older iPhone during the transfer.
  • Make sure you’re connected to the Internet. You need to connect to a stable Wi-Fi network to set up your iPhone 15.
  • Have your Apple ID credentials on hand. In case you need to sign in to your Apple account, to restore a backup and more, have your email and password ready. You can also create one during the setup process.

Ready? Let’s get started.

1. Turn on your iPhone 15

The first thing you need to do is turn on your iPhone. Whether you have an iPhone 15, iPhone 15 Plus, iPhone 15 Pro, or iPhone 15 Pro Max, turning it on is the same: Press and hold the side button, on the right side of your iPhone, until you see the Apple logo appear. Wait a few seconds, and the Hello screen should appear. Swipe up to begin.

2. Follow the iPhone onscreen instructions

Now you’ll have to do a couple minor things on your iPhone to get through the first part of the setup, and luckily they’re both easy to do. To start, you’ll have to:

  • Choose a language: If you’re in the US, you should see English listed directly at the top.
  • Select your country or region. Again, if you’re in the US, you should see “United States” at the top.

3. Use Quick Start to set up your iPhone 15

On the next page you’ll see the Quick Start screen, which allows you to automatically set up your iPhone 15 with the help of your previous iPhone or even an iPad. If you go this route, you’ll need to turn on your old device, connect it to Wi-Fi or cellular and then bring it near the new iPhone 15

Next, you’ll be asked to authenticate or connect the two phones. You can either use the camera on your old iPhone to scan the pattern on the new iPhone or enter a verification code. Activation will then take a few minutes.

Note: If you want to do this manually, skip down to the next section.

You’ll then be prompted to do the following, among other things:

  • Join your Wi-Fi network on your new iPhone.
  • Set Up eSIM. You should see two options: Transfer from another iPhone (the best option) or Set Up Later in Settings. If you choose the first option, you’ll be asked to double-press the side button on your old iPhone.
  • Set up Face ID.
  • Choose how you want to transfer your data. You can either do it from iCloud or from your previous iPhone.

It’s a good idea to keep both devices connected to a power source while you do this, because depending on how many apps and how much data you have, it could take a while. Follow all the steps until you’re finished and have access to iOS 17 on your iPhone 15.

4. Set your iPhone 15 up manually

Now, if you’re coming from an Android or other phone or want to set up your iPhone 15 manually, tap Set Up Manually on the Quick Start screen. If you decide to go this route, you’ll need to manually do the following things:

  • Connect to a Wi-Fi network. Wait a few minutes for your phone to activate.
  • Read the Data & Privacy prompt. Hit Continue when you’re finished.
  • Set up Face ID.
  • Create a six-digit passcode to unlock your iPhone 15. This is your backup for unlocking your iPhone 15. Enter the passcode twice.
  • Choose how to restore your apps and data. You can restore from iCloud backup, restore from Mac or PC, transfer directly from iPhone, move data from Android or don’t transfer apps and data.

Depending on your method of restoring your apps and data, you may be asked to enter your iCloud credentials to sign in to your Apple account. You then need to enter a verification code, which may appear on one of your other devices, to verify your identity.

Next, agree to the terms and conditions; customize your settings; update to the latest iOS; and set up Apple Pay, Siri and Screen Time, if necessary. You’ll also be asked whether you want to share your app analytics with developers, which helps developers improve their apps using your data (anonymously).

Finally, set up the True Tone display, choose light or dark mode and select a standard or zoomed view (for those that have impaired vision).

5. You can now use your iPhone 15 running iOS 17

Once you’re finished, you can swipe up to enter your iPhone. You may not see all your applications on your home screen or your photos and videos in your camera roll, so you’ll need to wait a bit while your phone slowly transfers all your apps and data to your new iPhone 15. Depending on how much there is to transfer, this can take as much as a few hours.

Apple’s new iPhone 15 series is now available for purchase worldwide. While not as exciting and feature-packed as the Pro models, the iPhone 15 is still a fantastic option for anyone coming from iPhone 11 or older. If you’re planning to buy it, you might wonder what accessories you get with the new phone. In this article, we’ll walk you through the unboxing experience and find out what’s included in the box and what’s not.

A row of iPhone 15 devices show the lineup’s new colors: black, blue, green, yellow, and pink.

QUICK ANSWER

What is in the iPhone 15 box?

  • Included in the box is the iPhone 15, a USB‑C Charge Cable, SIM ejector tool (non-U.S. models only) and some documentation.
  • , iPhone 15 and iPhone 15 Plus do not include a power adapter or EarPods.

The retail box of the iPhone 15 and iPhone 15 Plus is pretty identical to the iPhone 14 and iPhone 13. The box is pretty small and has a minimal design. It has a picture of the iPhone 15 on the front, the text that says “iPhone” on the left and right sides, and the Apple logo on the top and bottom. Once you remove the seal and open the box, you’re greeted by the iPhone 15 lying face down. Lifting up the phone reveals the inside contents, which are not much. There’s a USB-C cable, documentation, a SIM ejector (if you have a non-US model), and an Apple sticker.

What’s inside the box:

  • iPhone 15 or 15 Plus
  • USB-C cable
  • Documentation
  • 1x Apple sticker
  • SIM ejector (only with non-US models)

You’ll not find a power adapter inside the box; Apple has stopped including that since 2020. Your existing charger with the USB-C connector will work just fine. If you don’t have one, you can purchase one from Apple. You also won’t find headphones or a USB-C to headphone jack connector.

Apple iPhone 15

The iPhone 15 offers a 6.1-inch OLED display, A16 Bionic chipset, and improved cameras.

The new iPhone 15 isn’t a huge leap from the iPhone 14. Perhaps the biggest design change to the whole iPhone 15 lineup is that the Dynamic Island, once unique to the iPhone 14 Pros, is now present on every model of iPhone 15.

Most exciting of all is the new main 48MP camera, which should mean much better image quality both in taking stills and video. There is also the new A16 Bionic chipset that debuted with the iPhone 14 Pro and Pro Max but was missing from the less expensive models last year. Other improvements include faster RAM, as well as adopting the Pro model’s design.

Make sure to immediately put a case on your shiny new iPhone 15 to protect it from scratches, dust, fingerprints, and other potential harm.

Here’s how to set up and activate an eSIM on your iPhone 15.

iPhone 15 Pro in black titanium, white titanium, blue titanium, and natural titanium finishes.

Note: information in this article apply to iPhone 15, iPhone 15 Plus, iPhone 15 Pro and iPhone 15 Pro Max.

Last year, Apple announced its ambitious plans to put an end to the old SIM card by making iPhone 14 the first eSIM-only iPhone… except for those living anywhere outside the US. Despite some rumors suggesting that Apple would expand the eSIM-only iPhone to more countries, the US is still the only country to have the iPhone 15 without a physical SIM tray.

iPhone 15 Plus in black is shown from the back next to iPhone 15 in pink, which is shown from the front.

ESIM is a substitute for a physical SIM that’s embedded in the phone’s circuitry so users can easily swap between SIMs. It also enables people to host more than two SIMs. The iPhone 15 will be able to host up to eight SIMs at once. So, how easy is it to load a new eSIM on the iPhone? It should only take a few steps. Here’s how to set up and activate an eSIM on your iPhone 15.

QUICK ANSWER

To set up an eSIM on your iPhone 15, go to Settings > Cellular and tap Add eSIM. From there, you can tap on Set up eSIM. You might be prompted to scan a QR code provided by your carrier or transfer an existing eSIM from your current device.

The process might be a bit more involved with some carriers. Keep reading, and we can help you get your iPhone 15 eSIM set up on some popular network providers. Some require you to contact the carrier support team, and they might push the eSIM to your phone manually. It’s also possible to transfer eSIM from iPhone to iPhone, or you can convert a physical SIM to an eSIM. Keep reading to learn all the details.

How to activate eSIM on iPhone 15

Depending on where you bought your iPhone 15, setting up an eSIM can be as simple as powering on your device and following on-screen prompts. You should be in for smooth sailing if you purchased your phone directly from your carrier. However, we’ll also dive into some steps you might have to take if you bought your new iPhone unlocked.

Activating eSIM on iPhone 15 during the initial setup

As mentioned, if you bought your iPhone 15 through your mobile carrier, you might not have to do much of anything. Top US carriers like Verizon, T-Mobile, and AT&T support what Apple calls Carrier Activation, so your eSIM might be preloaded on your phone. If that’s the case, here’s all you have to do:

  1. Swipe up on the welcome screen to start setting up your iPhone.
  2. Select your Wi-Fi network of choice and enter your password.
  3. Wait for the Setting Up Cellular display to appear, at which point the iPhone will activate your eSIM.
  4. Press Continue once you see Cellular Setup Complete.

Activating eSIM on iPhone 15 through the settings app

If you’ve already owned an iPhone, there is no need to go through the initial setup process. You can simply add an eSIM in the settings.

  1. Go to Settings > Cellular > Add Cellular Plan. Alternatively, this setting could be under Settings > Mobile Data > Add eSIM.
  2. You’ll now be asked if you want to Transfer From Nearby iPhone or Use QR Code. Pick what applies to your situation.

How to convert your SIM card to eSIM on an iPhone

Some carriers might support quickly converting the physical SIM to eSIM without having to visit a store. Note: this won’t work on a US-based iPhone 15 because it lacks a SIM slot. Here’s what to do.

  1. Open the Settings menu and head to Cellular.
  2. Tap Convert to eSIM. If you don’t see this as an option, your carrier doesn’t support the feature.
  3. If you do see Convert to eSIM, select Convert Cellular Plan.
  4. Tap Convert to eSIM (again).
  5. Once your eSIM activates, remove your physical SIM and restart your iPhone.

Some U.S.-based carriers might have their own appsand sites to easily set up eSIM. Notably, most iPhone models will need to be connected to the internet through Wi-Fi when switching to eSIM, but eSIM-only iPhone 15 sold in the U.S. can be activated without a Wi-Fi-enabled internet connection.

How to set up an eSIM with iPhone 15 on Verizon

How you add an eSIM to a Verizon Wireless iPhone 15 depends on your specific situation. The process is different if you’re changing devices in an existing line, or if the line is new. Let’s walk you through both methods.

How to set up an eSIM on iPhone 15 if you’re switching devices on Verizon

  1. Go to the My Verizon website and log in.
  2. Go into Activate a Device on an Existing Line.
  3. Pick which type of eSIM to activate. For iPhone 15, simply choose the IMEI.
  4. Follow the instructions provided by Verizon.

Set up an eSIM on iPhone 15 if you’re adding a new Verizon line

  1. You can use the My Verizon app to enable an eSIM on a new account. This can also be done from the Bring your own device page, where you can become a new customer and set up an eSIM.
  2. Those adding a line can use the Add a linepage on My Verizon. It can also be done from the app.
  3. Activating your eSIM, regardless of the process, simply requires following the on-screen instructions.

How to set up an eSIM with iPhone 15 on AT&T

Adding an eSIM is a bit more annoying with AT&T, simply because it usually requires more involvement from the carrier. Sometimes, you’ll have to call and have them set it up manually, if you are simply changing devices. You can also use the Bring Your Own Device AT&T page, but that doesn’t always work, depending on your account or device. Regardless of the option, AT&T will have to push this eSIM to your device, and you’ll get a notification to activate it.

  1. Call AT&T or access the Bring Your Own Device page.
  2. Once you request an eSIM, AT&T will request the phone’s IMEI and EID.
  3. Make sure you are connected to Wi-Fi.
  4. The carrier will push the eSIM to your device. You’ll get a notification that says AT&T Cellular Plan Ready to be Installed.
  5. Hit Continue and follow instructions.

How to set up an eSIM with iPhone 15 on T-Mobile

The process is very similar when setting up an eSIM on an iPhone 15 with T-Mobile. You’ll need some help from the carrier (or Uncarrier).

  1. Contact T-Mobile and provide the team with your device’s EID.
  2. Make sure your device is connected to Wi-Fi.
  3. When T-Mobile support pushes the eSIM to your device, select the notification.
  4. Hit Continue.
  5. Go to Cellular.
  6. You’ll be able to see the eSIM activating. The device will be ready soon enough.

How to set up an eSIM with iPhone 15 on Google Fi

Google tends to be up-to-date on all technologies, so it’s no surprise that their setup process for activating an eSIM is so simple. All it takes is downloading the app and following instructions.

  1. Of course, you’ll need a Google Fi account, so go to the website to sign up if you haven’t. Make sure to opt in for eSIM activation.
  2. Download and launch the Google Fi iPhone app.
  3. Sign into your account and follow the instructions.
  4. Hit Get Started to begin eSIM activation.
  5. If you have a second device you can use, use it to go to the Quick Setup page and follow the instructions to get a QR code.
  6. Go to Settings > Cellular > Add eSIM > Use QR Code.
  7. Scan the QR code provided to you by Google Fi.
  8. If you don’t have a secondary device handy, select Don’t have a computer?.
  9. Follow the instructions to finish the eSIM activation.