Got a tip for us?

iPhone

The iPhone is a smartphone from Apple that runs the iOS mobile operating system. Between its apps, communication features, the camera, mobile internet access, and other functionalities, the iPhone has quickly become an integral part of many peoples tech lives.

On iPhone 15 and later, you can set a maximum battery level, like 80%, to help reduce battery wear, especially if you charge your iPhone frequently or keep it connected for long periods. iPhone may also recommend a charge limit based on your charging patterns.

When Charge Limit is on, iPhone stops charging when it reaches your selected percentage. But it will occasionally charge to 100%, even with a lower limit set.

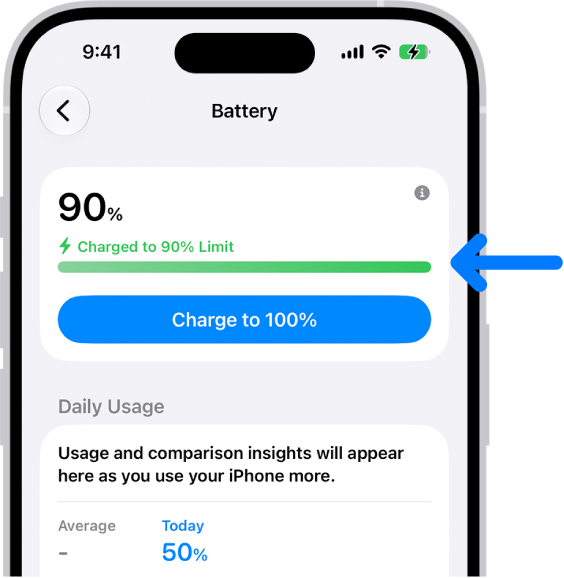
The charging information card in iPhone Battery settings. The card shows the battery at 90% with the message “Charged to 90% Limit.” A button provides the option to “Charge to 100%.

What to expect

  • Your iPhone will occasionally charge to 100%—even with a lower limit set—to keep the battery percentage display accurate. This may happen more often if your iPhone isn’t regularly able to complete a full charge.

Set a Charge Limit

  1. Start the Settings app on your iPhone.
  2. Tap Battery and then tap Charging.
  3. Choose the charge percentage that works best for you. You can change or remove the limit anytime.

Change the Charge Limit

  1. Start the Settings app on your iPhone.
  2. Tap Battery and then tap Charging.
  3. Choose the charge percentage that works best for you. If you choose 100%, do any of the following:
    • Temporarily override charge limit: Tap Allow Until Tomorrow. The charge limit will return to your set percentage at 6:00 a.m.
    • Set a new charge limit: Tap Set Limit to 100%. The charge limit will remain at 100% until you change it again.

If you need to temporarily override your charge limit and charge your iPhone to full sooner than scheduled, go to the Settings app, tap Battery, then tap Charge to 100%.

Tag: Battery

With Family Sharing, the organizer can set up Purchase Sharing to share App Store, Apple TV, and Apple Books purchases.

To share purchases, the family organizer must turn on Purchase Sharing and add a payment method. Family members can then opt in to Purchase Sharing, so they can share purchases and view shared purchases. When a family member makes a purchase, the organizer is billed, unless that family member adds a payment method to pay for their own purchases.

When a family member buys something, it’s added to their account, and eligible purchases are shared with the rest of the family. The organizer can also turn off purchase sharing later.

Turn on Purchase Sharing

When the family organizer turns on purchase sharing, they’re the one paying for family members’ purchases, so they need a valid payment method on file. Family members can add their own payment methods, too.

  1. Go to Settings app on your iPhone.
  2. Tap Family, tap Purchase Sharing, and follow the onscreen instructions.

Access shared content

Once purchase sharing is on and you’ve opted in, you can grab eligible apps and content your family members buy.

Turn off Purchase Sharing

You can switch off purchase sharing if you’re the family organizer. Family Sharing members then stop seeing your purchases, but you’ll still see items other members have shared with you.

Note: Even though your items aren’t shared, any purchases you make still use the shared family payment method.

  1. Go to Settings app on your iPhone.
  2. Tap Family, then tap Purchase Sharing.
  3. Tap your name and turn off Share Purchases.
  4. If the organizer wants to turn off purchase sharing entirely, they can tap Stop Purchase Sharing.

As you type, you can use the iPhone keyboard to enter emoji, Memoji, and stickers to express yourself in messages and documents. As you enter text, suggested emoji appear above the keyboard, and you can replace typed text with a suggested emoji.

While entering text in supported apps, you can also make a new sticker from images in your photo library, or create a Memoji. Use a Live Photo, and the sticker even moves.

Add an emoji, Memoji, or sticker

  1. Tap a text field. Then tap the Emoji button or the Next Keyboard key to switch to the emoji keyboard.

    • Swipe left or right to browse emoji, Memoji, and stickers, or do one of the following:
      • Jump to a category: Tap a symbol below the emoji keyboard.
      • See Emoji, Memoji, and stickers you recently used: Tap the Recent Stickers button below the keyboard below the emoji keyboard.
  2. Tap an image to add it to your text field.

    To see variations of an emoji—such as different skin tones—touch and hold the emoji, then drag your finger and release it on the variation you like.

  3. Tap ABC to return to the regular keyboard.

Quick tip: Suggested emoji appear above the keyboard as you enter text. Just tap one to replace your typed text with that emoji.

Make a sticker

Supported apps let you make a new sticker from images in your photo library while you’re entering text.

  1. Tap a text field. Then tap the Emoji button or the Next Keyboard key to switch to the emoji keyboard.
  2. Tap the Stickers button. Then tap the Add Stickers button.

    To search your photo library, enter a term in the search field at the top of screen, or tap a category such as People or Animals.

    Tip: To create a Live Sticker that moves, use a Live Photo.

  3. Tap the photo you want to use. Tap Add Sticker.

Your sticker collection gets the new sticker automatically.

Make or edit Memoji

In supported apps, you can create a Memoji as you enter text, plus edit, delete, or duplicate one that you already created.

  1. Tap a text field. Then tap the Emoji button or the Next Keyboard key to switch to the emoji keyboard.
  2. Tap the Memoji button. Tap the Add button to make your first Memoji or tap the More button to edit, delete, duplicate, or make additional Memoji.
  3. Follow the onscreen instructions to make your Memoji. Then tap the Done button.

Your new Memoji is automatically added to your Memoji collection.

Use the Find My app to locate and play a sound on a missing iPhone, iPad, iPod touch, Mac, Apple Watch, AirPods, or Beats headphones (supported models).

There’s a catch, though: in order to locate a device, you must turn on Find My [device] before it’s lost. Once it’s on, you can see the device’s location on a map, get directions to it, and even locate or play a sound on a friend’s device.

Note: Turn on Precise Location for the Find My app, and you’ll be able to see how far away your devices are from you.

No access to the Find My app after losing your iPhone? You can still locate it or play a sound on it with Find Devices on iCloud.com.

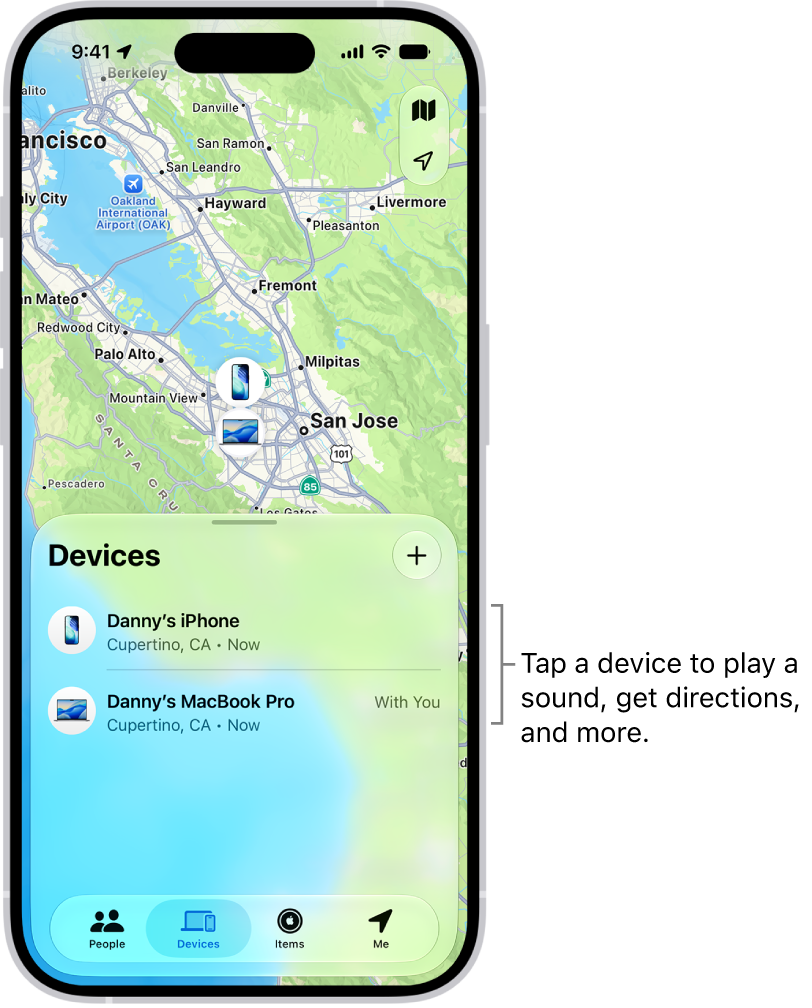
The Find My screen open to the Devices list. There are two devices in the Devices list: Danny’s iPhone and Danny’s iPad. Their locations are shown on a map.

About locating a device

  • You can use Find My on your iPhone to see the location of your device on a map. If the device is online, you see its location, and it plays a sound to help you find it. If the device is offline, you see its location, but it doesn’t play a sound.
  • For AirPods and supported Beats headphones, you can locate them when they’re near your device and connected to Bluetooth®. For supported AirPods, you can also see their location via the Find My network for up to 24 hours after they last connected to your device, even if they’re not nearby.
  • For iPhone Wallet with MagSafe and Find My support, you can see its location when it’s attached to your iPhone and its last known location if it detaches from your iPhone.

See the location of your device on a map

The Find My app shows your device’s current or last known location.

Tap Devices , then tap the name of the device you want to locate.

  • If the device can be located: It appears on the map so you can see where it is.
  • If the device can’t be located: You see “No location found” below the device’s name. Below Notifications, turn on Notify When Found. You receive a notification when it’s located.

Important: Make sure you allow notifications for the Find My app.

Play a sound on your device

  1. Start the Find My app on your iPhone.
  2. Tap Devices. Then tap the name of the device you want to play a sound on.
  3. Tap Play.

    • If the device is online: A sound starts after a short delay and gradually increases in volume. Then plays for about two minutes. If applicable, a Find My [device] alert appears on the device’s screen.

      A confirmation email is also sent to your Apple Account email address.

    • If the device is offline: You see Sound Pending. The sound plays the next time the device connects to a Wi-Fi or cellular network. For AirPods and Beats headphones, you receive a notification the next time your device is in range of your iPhone or iPad.

With separated AirPods, you have additional options to play a sound.

Stop playing a sound on a device

When you find your device, you may want to turn off the sound before it stops automatically. To do that, use one of the following:

  • iPhone, iPad, or iPod touch: Press the power button or a volume button, or flip the Ring/Silent switch. If the device is locked, you can also unlock it, or swipe to dismiss the Find My [device] alert. If the device is unlocked, you can also tap OK in the Find My [device] alert.
  • Apple Watch: Tap Dismiss in the Find My Watch alert, or press the Digital Crown or side button.
  • Mac: Click OK in the Find My Mac alert.
  • AirPods or Beats headphones: Tap Stop in Find My.

Get directions to a device

If you see your device’s location on the map, you can get turn-by-turn directions to it.

  1. Start the Find My app on your iPhone.
  2. Tap Devices. Then tap the name of the device you want to get directions to.
  3. Tap Directions to open the Maps app.

If you’re near your supported AirPods, you can tap Find for additional directions.

Locate or play a sound on a friend’s device

A friend who loses a device can sign in to their Apple Account on Find Devices on iCloud.com to locate it or play a sound on it.

With Family Sharing set up, Find My can locate a family member’s missing device.

Tag: Find My

You can set the Photos app to show certain people, days, and holidays less frequently or not at all in your memories, featured photos, and the Photos widget. You can also turn off memories and featured photos in the Photos app and the widget on your iPhone Home Screen.

For a person, you can choose Feature This Person Less or Never Feature This Person, and you can feature them again later.

Show a person less frequently or not at all

  1. Start the Photos app on your iPhone.
  2. Open a photo of the person you want to show less often.
  3. Tap the More button, then tap Don’t Feature a Person.

    If there’s more than one person in the photo, tap the person you want to feature less, then tap Next.

  4. Choose Feature This Person Less or Never Feature This Person.
  5. Tap Confirm.

To feature someone again, tap Collections , tap your account in the top-right corner, then tap Reset People & Pets Suggestions.

Turn off memories, holidays, and other featured content

In the Photos app, you can turn off memories or featured photos, and keep holiday events in your home country or region out of memories and featured content.

  1. Start the Photos app on your iPhone.
  2. Tap Collections.
  3. Tap your account in the top-right corner.
  4. Do any of the following:
    • Hide featured content and memories: Turn off Show Featured Content to prevent Photos from automatically generating featured photos and memories.
    • Turn off holiday events: Turn off Show Holiday Events to prevent Photos from creating memories and featured content about holidays.
Tag: Photos

On supported models, you can change the pressure required to lightly press the Camera Control or the speed required to lightly double-press it. You can also change the gesture you use to access controls like Zoom or Depth, disable that gesture, or disable the Camera Control entirely.

If you’re not sure how firm a light press should be, you can practice the gesture first to test the pressure. All of these options are in Accessibility settings, under Camera Control.

  1. Open Settings, tap Accessibility, and then tap Camera Control.
  2. Do any of the following:
    • Disable the Camera Control entirely: Turn off Camera Control.
    • Use a light press gesture to access controls: Turn Light-Press on. Turn it off to disable the gesture.
    • Use a swipe gesture to access controls: Turn on Swipe. Turn it off to disable the gesture.
    • Adjust the pressure required to lightly press the Camera Control: Choose a firmness option below Light-Press Force. You can practice the gesture to try out the pressure you set.
    • Adjust the speed required to lightly double-press the Camera Control: Below Double Light-Press Speed, choose how fast you need to press for iPhone to recognize a light double press.

You can also customize the Camera Control to open the Magnifier app.

With Apple Intelligence, you can use Workout Buddy to get encouragement during your workouts based on real-time analysis of your fitness history and data from your current workout.

It also lets you know when you’ve hit a new milestone, like running your fastest 10K or crossing 500 miles. And you can receive insights on your progress for pace, distance, and workout duration. It works with workout types like runs, walks, rides, and hikes. You’ll need Bluetooth headphones and an iPhone 15 Pro, iPhone 15 Pro Max, or iPhone 16 model or later.

You can use Workout Buddy with any of these workout types:

  • Outdoor and Indoor Run
  • Outdoor and Indoor Walk
  • Outdoor and Indoor Cycle
  • Hiking
  • Elliptical
  • Stair Stepper
  • High Intensity Interval Training (HIIT)
  • Functional and Traditional Strength Training

Note: Workout Buddy on iOS 27 or later is an Apple Intelligence feature available on iPhone 15 Pro, iPhone 15 Pro Max, and iPhone 16 models or later with Bluetooth headphones when device language is set to English or Spanish. Apple Intelligence is not available in all regions or languages.*

Set Up Workout Buddy

  1. Start the Fitness app on your iPhone.
  2. Tap Workout and scroll to a workout type. Then tap the Waveform Bubble button.
  3. Turn on Use Workout Buddy, choose a voice, and then tap the Close button.
  4. When you’re ready to start your workout, tap the Start button.

Hit a milestone during your workout, like reaching your 100th mile for the year or closing all your Activity rings, and Workout Buddy may give you audio motivation. Once you end the workout, Workout Buddy gives you a summary, including metrics like the total time, calories burned, and more.

*Apple Intelligence is available with Siri and device language set to Chinese (Simplified), Chinese (Traditional), Danish, Dutch, English, French, German, Italian, Japanese, Korean, Norwegian, Portuguese, Spanish, Swedish, Turkish, or Vietnamese. Some features may not be available in all regions or languages. Some devices may not be available in all regions. Siri AI is available in beta in iOS 27, iPadOS 27, macOS 27, watchOS 27, and visionOS 27 and requires an Apple Intelligence–enabled device set to a supported language. Available in English to start. Siri AI will not be initially available in the EU on iOS, iPadOS, and watchOS. Certain Apple Intelligence features that rely on server-side models are subject to daily usage limits, including but not limited to Siri AI, Intelligent Photo Editing Tools, Image Playground, and AFM 3 Cloud models in Shortcuts. Daily limits may vary by feature, request complexity, system demand, system policies, and other factors. Expanded access to such features will be available for a fee in the future. Use of these features is subject to the Apple Intelligence Terms and Conditions.

Tag: Fitness

With AssistiveTouch on iPhone, you can adapt the touchscreen to fit your needs. If certain gestures don’t work for you, you can replace them with a tap or alternate gesture, or use a simple sound. You can also use AssistiveTouch when you need to press iPhone buttons.

AssistiveTouch works with or without a compatible adaptive accessory, such as a joystick. When it’s on, the AssistiveTouch menu button appears on the screen, and you can customize the top-level menu with up to eight icons.
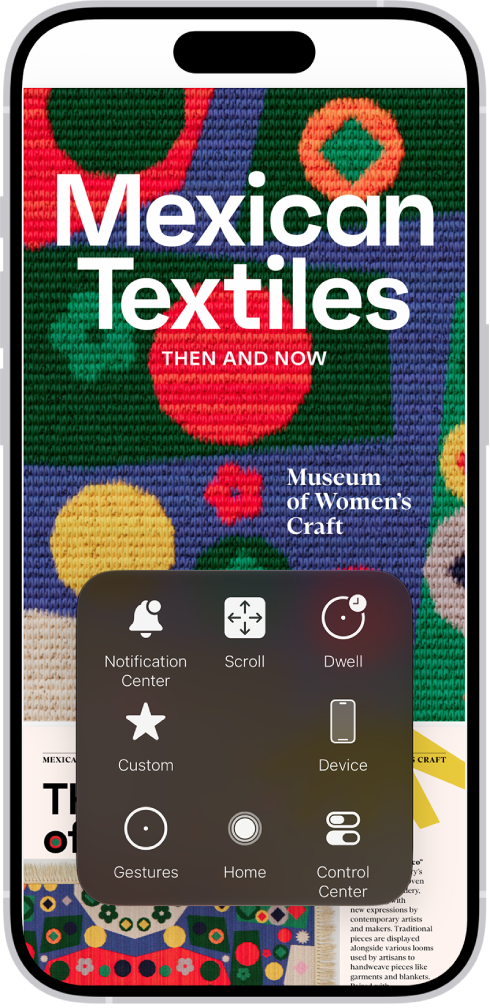
An iPhone with the AssistiveTouch menu visible, showing controls for Notification Center, Device, Control Center, Home, Gestures, and Custom.

AssistiveTouch lets you perform actions such as these:

  • Go to the Home Screen
  • Double-tap
  • Perform multifinger gestures
  • Perform scroll gestures
  • Activate Siri
  • Access Control Center, notifications, the Lock Screen, or the App Switcher
  • Adjust the volume on iPhone
  • Shake iPhone
  • Take a screenshot
  • Use 3D Touch (on supported iPhone models)
  • Use Apple Pay
  • Use Emergency SOS
  • Speak screen
  • Adjust dwell settings
  • Restart iPhone

Set up AssistiveTouch

Siri: Ask Siri something like, “Turn on AssistiveTouch.”

Or do the following:

  1. Open Settings, tap Accessibility, tap Touch, and then tap AssistiveTouch.
  2. Turn on AssistiveTouch. The AssistiveTouch menu button appears on the screen.
  3. To customize AssistiveTouch, tap any of the following:
    • Customize Top Level Menu: Tap an icon to change its action. Tap the Decrement button or the Increment button to change the number of icons in the menu. The menu can have up to eight icons.
    • Single-Tap, Double-Tap, Long Press, or 3D Touch: Assign custom actions that run when you interact with the menu button. 3D Touch is available only on supported iPhone models.
    • Create New Gesture: Add your favorite gestures.
    • Idle Opacity: Adjust the visibility of the menu button when not in use.
    • Confirm with AssistiveTouch: On an iPhone with Face ID, confirm payments with Face ID by using AssistiveTouch instead of double-clicking the side button.

Quick tip: After you set up the Accessibility Shortcut, triple-click the side or Home button to turn AssistiveTouch on or off quickly.

Use AssistiveTouch

When AssistiveTouch is on, tap the AssistiveTouch menu button , then choose an action or gesture.

To return to the previous menu, tap the arrow in the center of the menu. To exit the menu without performing a gesture, tap anywhere outside the menu.

To move the AssistiveTouch menu button, drag it to a new location on the screen.

When you need to perform a multifinger gesture, do the following:

  • Pinch and Rotate: Tap Custom, then tap Pinch and Rotate. When the two pinch circles appear, touch anywhere on the screen to move the pinch circles, then drag them in or out to perform a pinch or rotate gesture. When you finish, tap the menu button.
  • Multifinger swipe or drag: Tap Device > More > Gestures, then tap the number of digits needed for the gesture. When the circles appear on the screen, swipe or drag in the direction required by the gesture. When you finish, tap the menu button.

Control iPhone with a pointer device

Assistive pointer devices can connect over Bluetooth® or USB. That includes trackpads, mouse devices, and game controllers.

  1. Open Settings, tap Accessibility, tap Touch, and then tap AssistiveTouch.
  2. Turn on AssistiveTouch.
  3. Below Pointer Devices, tap any of the following:
    • Devices: Pair or unpair devices and customize buttons.
    • Mouse Keys: Allow the AssistiveTouch pointer to be controlled using the keyboard.
    • Pointer Style: Adjust the size, color, and auto-hide settings.
    • Show Onscreen Keyboard: Display the onscreen keyboard.
    • Sound on Click: Play a sound when the pointer device is clicked.
    • Always Show Menu: Show the AssistiveTouch menu when a pointer device is connected.
    • Tracking Sensitivity: Adjust how quickly the pointer moves when you drag the mouse or your finger on the trackpad.

Set up Dwell Control

When you keep the cursor still on a screen element or part of the screen, iPhone performs a selected action.

  1. Open Settings, tap Accessibility, tap Touch and tap AssistiveTouch. Turn on Dwell Control.
  2. Adjust any of the following:
    • Fallback Action: Turn on to revert the dwell action to the selected fallback action after performing an operation.
    • Movement Tolerance: Adjust the distance the cursor can move while dwelling on an item.
    • Hot Corners: Perform a selected action—such as take a screenshot, open Control Center, activate Siri, scroll, or use a shortcut—when the cursor dwells in a corner of the screen.
    • Extended Predictions: Under Keyboard, turn on Extended Predictions to get more word suggestions while typing.
    • Key Dwell Time: Under Keyboard, adjust the amount of time it takes to tap on a keyboard key by tapping the Decrement button or the Increment button. You can also enter a number of seconds.
    • Slide to Type: Under Keyboard, turn on Slide to Type to type by drawing a path with your cursor along the keyboard.
    • Time needed to initiate a dwell action: Tap the Decrement button or the Increment button.

Use simple sounds to perform gestures

Make a simple sound, like a mouth pop or an S-sound, and AssistiveTouch can have iPhone perform a gesture or other action.

  1. Open Settings, tap Accessibility, tap Touch, tap AssistiveTouch, and turn AssistiveTouch on.
  2. Tap Sound Actions, then tap a sound.
  3. Select the gesture or other action you want performed when you make the sound.
  4. To perform the gesture or action, just make the sound.

Create custom gestures

You can add gestures you use often (such as touch and hold or two-finger rotation) to the AssistiveTouch menu. You can even create several gestures with, for example, different degrees of rotation.

  1. Open Settings, tap Accessibility, tap Touch, tap AssistiveTouch, and then tap Create New Gesture.
  2. Perform your gesture on the recording screen. For example:

    • Touch-and-hold gesture: Touch and hold your finger in one spot until the recording progress bar reaches halfway. Lift your finger. Be careful not to move your finger while recording, or the gesture will be recorded as a drag.
    • Two-finger rotation gesture: Rotate two fingers on the iPhone screen around a point between them. (You can do this with a single finger or stylus—just create each arc separately, one after the other.)

    If you record a sequence of taps or drag gestures, they’re all played back at the same time. For example, using one finger or a stylus to record four separate, sequential taps at four locations on the screen creates a simultaneous four-finger tap.

  3. If your gesture doesn’t turn out quite right, tap Cancel. Then try again.
  4. When you’re satisfied with your gesture, tap Save. Name the gesture.

To use your custom gesture, tap the AssistiveTouch menu button , tap Custom, then choose the gesture. When the blue circles representing your gesture appear, drag them to where you want to use the gesture, then release.


On supported models, you can instantly measure a person’s height from the floor to the top of their head, hair, or hat, and even measure a person’s seated height in the Measure app.

A line appears at the top of the person’s head, with the height measurement just below it, and you can take a photo of the measurement. You can access and share that image from Photos or Files whenever you want, and reset the height to take the measurement again.

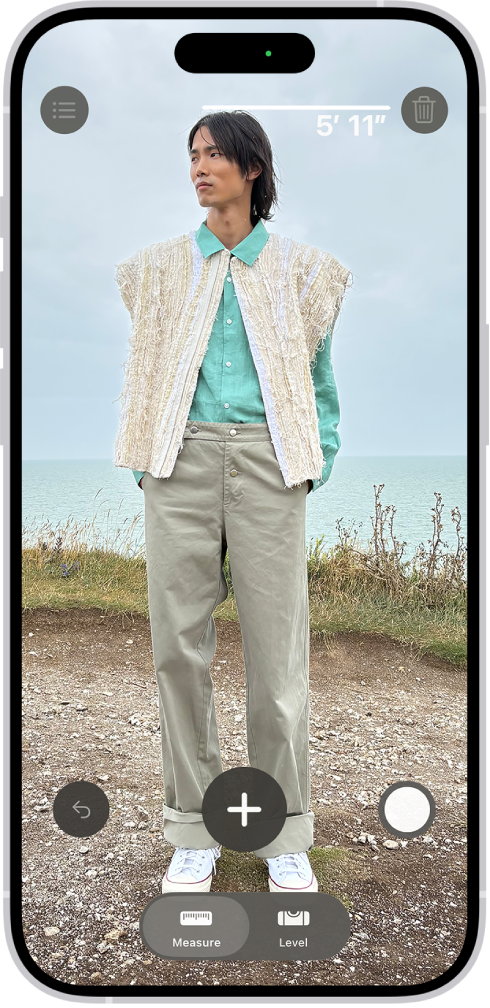
A person’s height being measured in the Measure app, with the height measurement showing at the top of the person’s head. The Take Picture button is near the lower-right corner for taking a picture of the measurement. The green Camera In Use indicator appears at the top.

  1. Start the Measure app (in the Utilities folder) on your iPhone.
  2. Position iPhone so that the person you want to measure appears on the screen from head to toe.

    After a moment, a line appears at the top of the person’s head (or hair, or hat), with the height measurement showing just below the line.

  3. To take a photo of the measurement, tap the Take Picture button.
  4. To save the photo, tap the screenshot in the lower-left corner, tap Done, and choose Save to Photos or Save to Files.

The height measurement image is available in Photos or Files on iPhone, so you can access and share it whenever you want.

To take the measurement again, reset the height by turning iPhone away for a moment.

Tag: Measure

You can keep your fitness routine on track by sharing your activity with your family and friends, and you can even share with a trainer or coach. You can view highlights and get notifications when others meet their goals, finish workouts, and earn achievements.

You can add or remove a friend, view your friends’ activity, and change your friend settings.

Here’s how to share your activity in Fitness on iPhone.

Add or remove a friend

  1. Start the Fitness app on your iPhone.
  2. Tap Sharing, tap the Sharing button, and tap Invite a Friend.

    Note: If you’re sharing for the first time, tap Sharing , then tap Get Started.

  3. Do any of the following:

    • Add a friend from your contacts: Enter a contact’s name and then tap the name.

      You can also tap the Add Contact button to select contacts.

    • Add a friend’s phone number: Enter a phone number.
    • Add a friend’s email address: Enter an email address.
  4. Tap the Send button.

If a friend hasn’t accepted an invitation, tap their name in the Invited area of the Sharing screen, then tap Invite Again.

If you want to unsend an invitation you’ve sent, swipe left next to the friend’s name, then tap Delete.

To remove a friend, tap a friend you’re sharing with, tap the More button, then tap Remove Friend.

View your friends’ activity

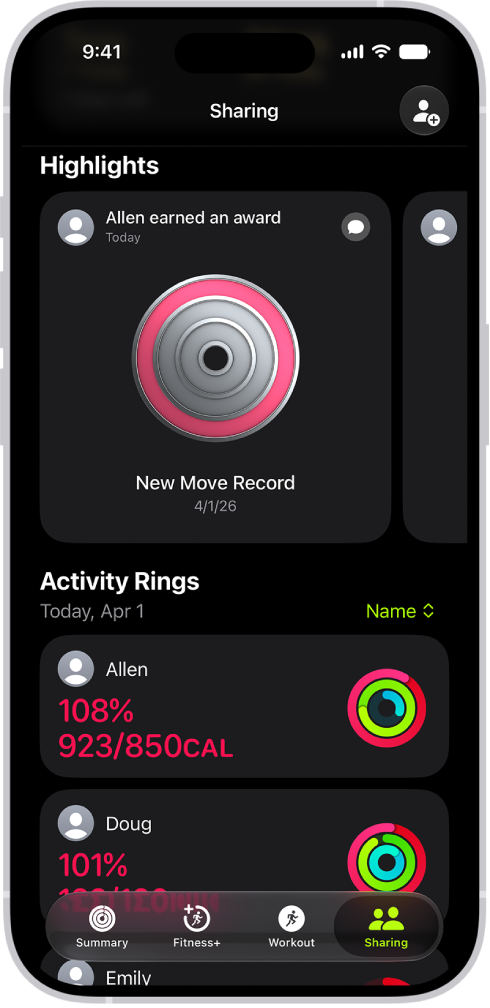
The Fitness Sharing screen, with activity rings and activity highlights shared between a person and their friends.

Highlights show your friends’ activity, like workouts they’ve finished or goals they’ve met. And for the last 7 days, you can view their activity rings and a summary of activities they’ve completed.

  1. Start the Fitness app on your iPhone.
  2. Tap Sharing, then do any of the following:
    • View highlights: Swipe left or right below Highlights to see how all of your friends are doing.
    • Reply to a friend’s activity: Swipe left or right below Highlights and tap the Message button. Tap a reply, or tap Custom Reply to enter a response.
    • View a friend’s activity: Tap a friend’s name below Activity Rings to see a summary of their activity rings for the last 7 days and recently completed activities like workouts and meditations.

Change your friend settings

You can easily adjust friend settings.

  1. Start the Fitness app on your iPhone.
  2. Tap Sharing and then tap a friend.
  3. Tap the More button and then do any of the following:
    • View the friend’s contact card: Tap View Contact.
    • Mute notifications for the friend: Tap Mute Notifications.
    • Hide your activity progress with a friend: Tap Hide My Activity.
    • Stop sharing your activity with a friend: Tap Remove Friend.
Tag: Fitness