Got a tip for us?

iPhone

The iPhone is a smartphone from Apple that runs the iOS mobile operating system. Between its apps, communication features, the camera, mobile internet access, and other functionalities, the iPhone has quickly become an integral part of many peoples tech lives.

In the Photos app on iPhone, you can duplicate a photo or video while preserving the original version. You can also copy a photo and then paste it into another document such as an email, text message, or presentation.

A duplicate copy appears next to the original in your library, and you can copy several photos or videos at once.

Here’s how to duplicate and copy photos and videos on iPhone.

Duplicate a photo or video

  1. Open the Photos app on your iPhone.
  2. Open a photo or video and then tap the More button.
  3. Tap Duplicate.

You’ll find the duplicate copy next to the original in your library.

Copy a photo

  1. Open the Photos app on your iPhone.
  2. Open a photo, then tap the More button.
  3. Tap Copy and then paste the photo into another document.

Copy multiple photos or videos

  1. Open the Photos app on your iPhone.
  2. Tap Select and then tap the thumbnails you want to copy.
  3. Tap the More button, then tap Copy.
  4. Paste the copies into another document.
Tag: Photos

You can report a problem with a game that you downloaded from the Apple Games app on your iPhone. You can also request a refund. Both start on the Report a Problem website, where you’ll use your Apple Account and follow the onscreen instructions.

  1. On your iPhone, go to the Report a Problem website. Sign in to your Apple Account.
  2. Tap I’d like to and then choose an option from the pop-up menu.
  3. Follow the onscreen instructions.

Use your iPhone camera to record videos, including slow-motion and time-lapse videos.

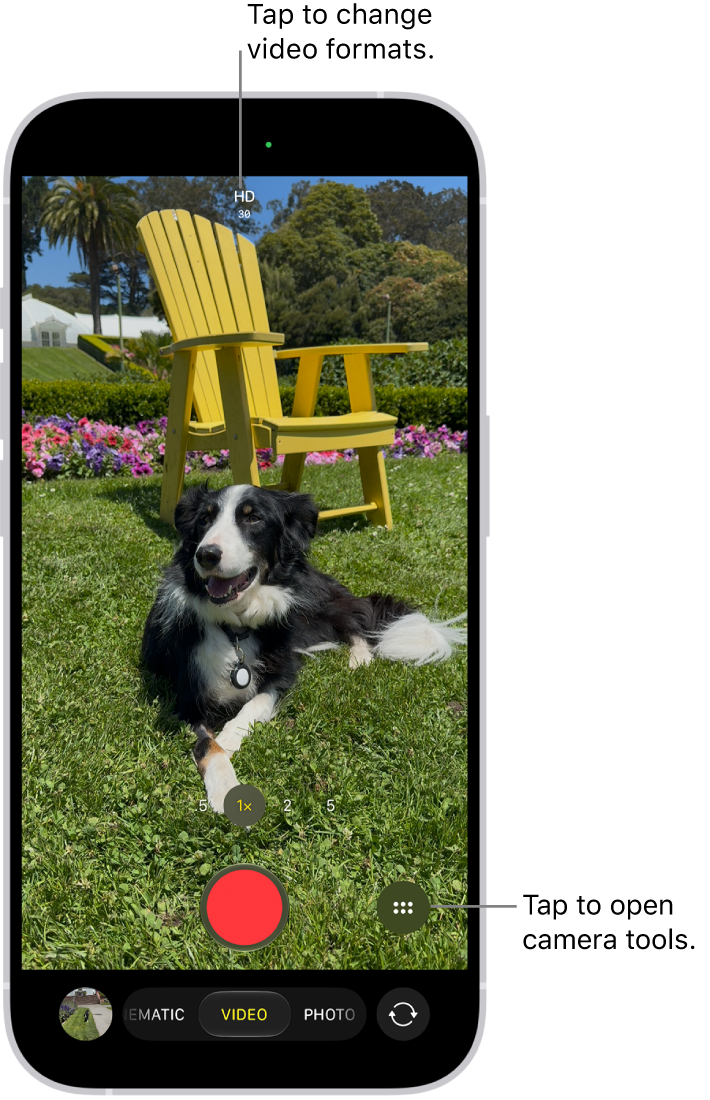
Depending on your iPhone model, you can record in HD, 4K, HD (PAL), and 4K (PAL) formats. You can zoom in and out, and zoom more precisely on supported models, and with supported AirPods, you can even record a video from the AirPod stem. When Camera is in use, a green dot appears at the top of the screen for your security.

Here’s how to record a video with your iPhone camera.

Note: Video recording isn’t available during a phone or FaceTime call.

Record a video

  1. Open Camera on your iPhone.

    The Camera in Video mode. The Camera Controls button is in the top-right corner and the video format buttons are in the top-left corner. The Photo and Video Viewer button is in the bottom-left corner. The Record button is at the bottom center, and the Camera Chooser Back-Facing button is in the bottom-right corner.

  2. Tap Video to switch to Video mode.
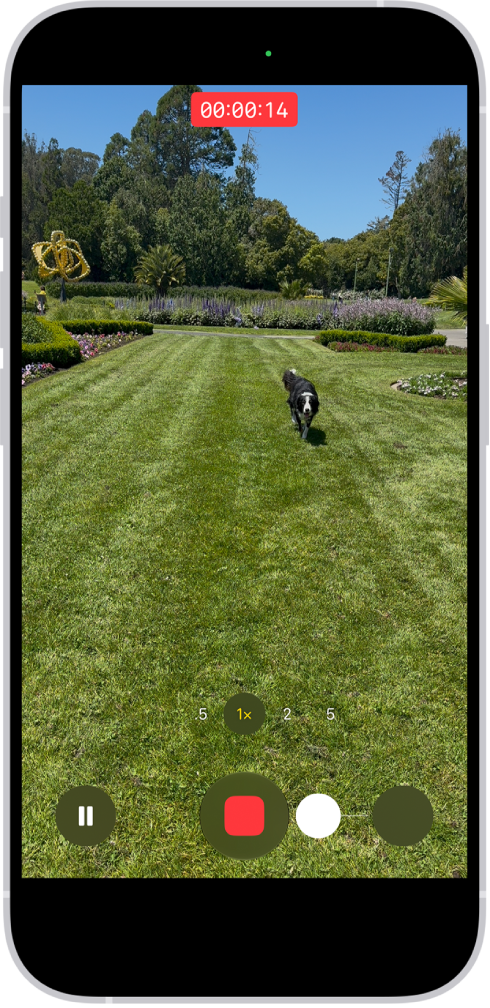
  3. Tap the Record button, press either volume button, or click the Camera Control on (supported models) to start recording. While recording, you can do the following:

    • Tap the white Shutter button to take a still photo.
    • Tap the Pause button to pause recording.
    • Pinch the screen to zoom in and out.
    • Tap .5x, 1x, 2x, 3x, 4x, 5x, or 8x (depending on your model) to zoom in and out.

      For a more precise zoom control, touch and hold 1x, then slide the dial.

    • On supported models, use the Camera Control to zoom in and out.
  4. Tap the Record button, press either volume button, or click the Camera Control on (supported models) to stop recording.

With supported models of AirPods and AirPods Pro, you can press the AirPod stem to record a video.

With an Apple Watch, you can record a video using the Camera Remote.

Note: A green dot at the top of the screen tells you Camera is in use. It’s there for your security.

Record Dual Capture video

On supported models, you can record Dual Capture video, capturing the action in front of you and yourself at the same time.
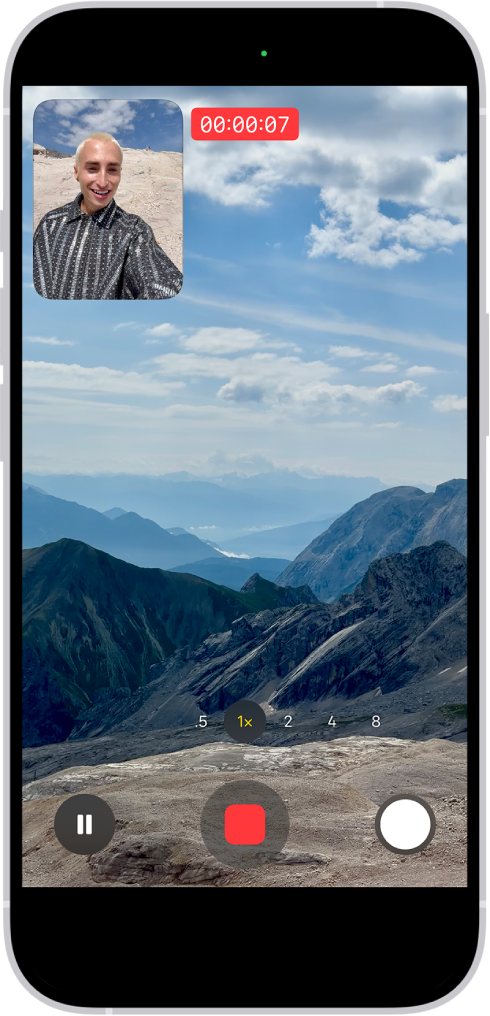
The Camera in Video mode recording a Dual Capture video. A window in the top-left of the frame displays what the front-facing camera is recording, and the rest of the frame displays what the back camera is recording.

  1. Open Camera on your iPhone.
  2. Select Video mode.
  3. Tap the Camera Controls button, then tap Dual Capture.
  4. Tap the screen to show the Record button and then tap the Record button to start recording.
  5. To turn off Dual Capture, tap the Dual Capture button.

Change video recording formats

High-quality formats like HD, 4K, HD (PAL), and 4K (PAL) are available, depending on your iPhone model, and so are frame rates of 24, 25, 30, 60, or 120 fps.

When Camera is open and Video mode is selected, tap the resolution and frame rate values at the top of the screen to see the formats available on your iPhone. Tap a resolution or frame rate value to use it.

Options vary by iPhone model, so follow the instructions below to enable additional formats.

  1. Start the Settings app on your iPhone.
  2. Tap Camera and tap Record Video.
  3. Select from the list of video formats and frame rates that your iPhone supports.

Note: Larger video files come from faster frame rates and higher resolutions.

In the Photos app, you can play back videos recorded at faster frame rates at slower speeds.

Note: PAL is a television video format used in many countries and regions in Europe, Africa, Asia, and South America.

Use Action mode

On supported models, Action mode provides improved stabilization while recording in Video mode. Tap the Camera Controls button, then tap Action. Tap the Action Mode On button onscreen to turn it off.

Quick tip: The Action mode button can stay on your camera screen all the time. Go to Settings > Camera > Indicators, then turn on Action Mode.

Action mode works best in bright light. If you want to use Action mode in lower light, go to Settings > Camera, tap Record Video, then turn on Action Mode Lower Light. Action mode has a maximum capture resolution of 2.8K.

Record a video in Photo mode

Instead of switching to Video mode, you can record a video while in Photo mode. While recording, move the Record button into the lock position to take still photos at the same time.

  1. Open Camera on your iPhone.
  2. Touch and hold the Shutter button to start recording.
  3. Slide the Shutter button to the right and let go over the lock for hands-free recording.

    • Tap the Shutter button to take a still photo while recording.
    • Pinch the screen to zoom in and out.

    The camera frame fills the screen. At the bottom of the screen, the Shutter button moves to the right, demonstrating the movement of recording hands-free.

To stop recording, release or tap the Record button.

Quick tip: In Photo mode, press and hold the volume up or volume down button, and you’ll start recording a video. On supported models, you can also click and hold the Camera Control to record in full resolution.

Tap the thumbnail at the bottom of the screen to view the video in the Photos app.

Record a slow-motion video

In Slo-mo mode, your video records as normal, then plays back in slow motion. Later, you can edit the video to choose which parts play in slow motion.

  1. Open Camera on your iPhone.
  2. Select Slo-mo mode.

    On supported models, you can tap the Camera Chooser Back-Facing button to record in Slo-mo mode with the front camera.

  3. To start recording, tap the Record button, press either volume button, or click the Camera Control on (supported models).

    You can tap the Shutter button to take a still photo while recording.

  4. To stop recording, tap the Record button, press either volume button, or click the Camera Control on (supported models).

    To set a portion of the video to play in slow motion and the rest at regular speed, tap the video thumbnail, then tap the Edit button. Slide the vertical bars below the frame viewer to define the section you want to play back in slow motion.

Depending on your model, you can change the slow motion frame rate and resolution. To change slow-motion recording settings, go to Settings > Camera, then tap Record Slo-mo.

Quick tip: Video mode can record slow-motion videos on iPhone 16 Pro models, iPhone 17 Pro models, or iPhone 18 Pro models. Just tap the format and resolution values on the screen and select 120 FPS.

Record a time-lapse video

To create a time-lapse video showing an experience over a period of time, like a setting sun or traffic flowing, capture footage at selected intervals.

  1. Open Camera on your iPhone.
  2. Select Time-lapse mode.
  3. Position your iPhone to frame your subject. Then place it on a stable surface or tripod.
  4. Tap the Record button or click the Camera Control (on supported models) to start and stop recording.

Quick tip: In low-light situations, a tripod helps iPhone 12 or later capture time-lapse videos with more detail and brightness.


Tag: camera

Using Search in the Music app, you can quickly browse through music categories, see recent searches, and search Apple Music or your library. You can browse a category such as Pop or Fitness, or search for a song, artist, or lyric. You can even find a song in Apple Music based on its lyrics.

Quick tip: You can search by simply describing what you’re looking for in natural language, like “hit songs from movies” or “nostalgic songs from the ’90s.”

  1. Open the Music app on your iPhone.
  2. Tap Search, then do any of the following:

    • Tap a category such as Pop or Fitness.
    • Tap the search field to quickly find items you recently searched for—a song or artist, for example.
    • Tap the search field, tap Apple Music, then enter what you’re searching for (such as a song, artist, or lyric).

      Tip: You can search for a song in Apple Music based on its lyrics. In the search field, enter a few of the words you remember to find a song.

    • Tap the search field, tap Library, then enter what you’re searching for (such as a song, album, or playlist).
  3. Tap a result to play it.

Siri: Ask Siri something like, “Play the song with the lyrics” and then say a key phrase from the lyrics.

Services and features aren’t available in all countries or regions, and features may vary by region, according to Apple.

Tag: Music

You can customize your start page, change the text size on websites, and change display and privacy settings. Sign in to iCloud with the same Apple Account on multiple devices to keep your open tabs, bookmarks, browsing history, and Reading List up to date across all your Apple devices.

Your start page is where every new tab begins, and you can give it new background images and choose what appears on it.

Here’s how to customize your Safari settings on iPhone.

Customize your start page

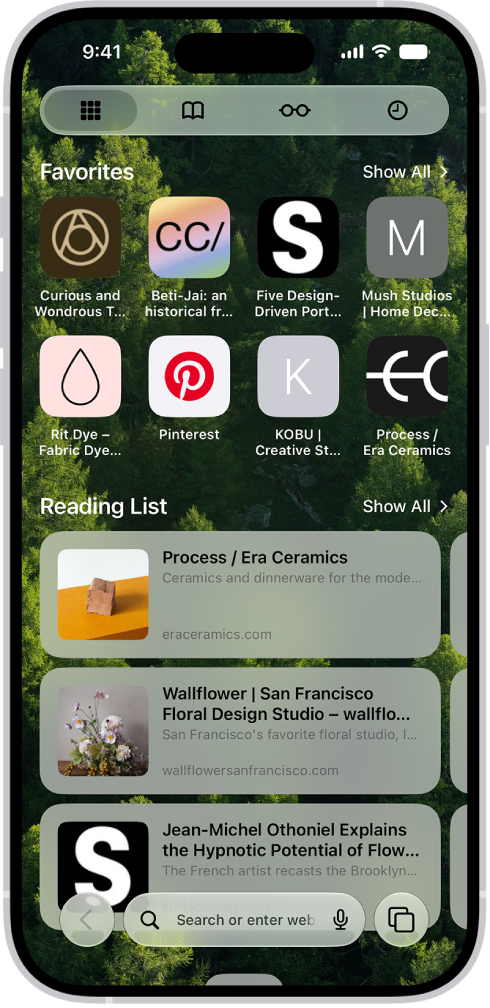
Every new tab you open begins on your start page, which you can customize with new background images and options.

The start page in Safari, which shows favorite websites, the Privacy Report, and websites saved to the Reading List.

  1. Open the Safari app on your iPhone.
  2. Tap the Tabs button, then tap the Add button.
  3. Scroll to the bottom of the page and then tap Edit.
  4. Choose the options you want to appear on your start page:
    • Use Start Page on All Devices: Use these settings on all your Apple devices where you have Use Start Page on All Devices turned on and you’re signed in to the same Apple Account using two-factor authentication.
    • Tab Group Favorites: Display shortcuts to your favorite bookmarked websites in the current Tab Group.
    • Favorites: Display shortcuts to your favorite bookmarked websites.
    • Suggestions: See websites you visit most, websites shared in other apps (such as Calendar and Maps), and links shared with you in Messages, Mail, and more.
    • Privacy Report: Stay updated on how many trackers and websites Safari blocked from tracking you.
    • Reading List: Show webpages currently in your Reading List.
    • Recently Closed Tabs: Go back to tabs you previously closed.
    • iCloud Tabs: Show open tabs from other Apple devices where you’re signed in to the same Apple Account and Safari is turned on in iCloud settings or preferences.
    • Background Image: Choose the image you want to appear in the background each time you open a new start page in this Tab Group. To use a photo as your background, tap Select Image from Library.

Customize the Page menu

The Page menu is where you can add your favorite Page and Tab Actions.

  1. Open the Safari app on your iPhone.
  2. Tap the Page Menu button on the left side of the search field. Then tap Customize Menu.
  3. Tap the Insert button to add Page or Tab Actions to the Page menu.

    Tap the Remove button to remove an action.

  4. Tap the Done button. Tap the Done button again.

Make the content larger or smaller for a website

To zoom in or out on a webpage, use the Page Menu button.

  1. Open the Safari app on your iPhone.
  2. Tap the Page Menu button on the left side of the search field and tap Page Zoom.
  3. Tap the large A to increase the font size or the small A to decrease it.

When the font size defaults to 100%, an indicator briefly appears.

Change the display controls for a website

Among other things, you can hide the search field and switch to Reader.

  1. Open the Safari app on your iPhone.
  2. Tap the Page Menu button and then do any of the following:

    • Hide the search field: Tap Hide Toolbar (tap the bottom of the screen to get it back).
    • See a streamlined view of the webpage: Tap Show Reader (if available).

      To return to the normal view, tap the Page Menu button, then tap Hide Reader.

    • See what the webpage looks like on a desktop computer: Tap Request Desktop Website (if available).
    • See a summary of the webpage (requires Apple Intelligence): Tap Summarize.

      Note: Apple Intelligence on iOS 27 or later is available on an Apple Intelligence-enabled iPhone 15 Pro, iPhone 15 Pro Max, or iPhone 16 model or later. Apple Intelligence is not available in all languages or regions. Usage limits may apply.*

You can also adjust Safari settings in Accessibility settings. Go to the Settings app , tap Accessibility, then tap Per-App Settings. Tap Safari to adjust settings. If Safari isn’t listed, tap Add App, then tap Safari to add it.

Choose where to save downloads

Downloading a file in Safari? You get to choose whether to save it to iCloud or on your iPhone.

  1. Open the Settings app on your iPhone.
  2. Tap Apps, then tap Safari.
  3. Tap Downloads and then choose one of the following:
    • iCloud Drive: Select this option to save downloads to the Downloads folder in iCloud Drive. This allows you to access the downloaded file on any iPhone, iPad, or Mac where you’re signed in to the same Apple Account.
    • On My iPhone: Select this option to save downloads to the Downloads folder on your iPhone.
    • Other: Select this option to save downloads in a location other than a Downloads folder.

Share website passwords with a group

If you create a group of trusted contacts, you can share a set of passwords that stay up to date for everyone in the group. You can remove someone at any time.

Adjust privacy settings

You can choose what privacy settings you want across Safari, and create individual exceptions for websites. *Apple Intelligence is available with Siri and device language set to Chinese (Simplified), Chinese (Traditional), Danish, Dutch, English, French, German, Italian, Japanese, Korean, Norwegian, Portuguese, Spanish, Swedish, Turkish, or Vietnamese. Some features may not be available in all regions or languages. Some devices may not be available in all regions. Siri AI is available in beta in iOS 27, iPadOS 27, macOS 27, watchOS 27, and visionOS 27 and requires an Apple Intelligence–enabled device set to a supported language. Available in English to start. Siri AI will not be initially available in the EU on iOS, iPadOS, and watchOS. Certain Apple Intelligence features that rely on server-side models are subject to daily usage limits, including but not limited to Siri AI, Intelligent Photo Editing Tools, Image Playground, and AFM 3 Cloud models in Shortcuts. Daily limits may vary by feature, request complexity, system demand, system policies, and other factors. Expanded access to such features will be available for a fee in the future. Use of these features is subject to the Apple Intelligence Terms and Conditions.

Tag: Safari

Use Safety Check to periodically review and update information you share with people, apps, and devices.

From Safety Check, you can stop sharing your location with others in Find My, remove others’ access to shared content like Photos, Notes, and Calendar, reset system privacy permissions for apps, restrict Messages and FaceTime to the device in your hand, and more. It’s all in one place, in Privacy & Security settings. From there, you just follow the onscreen instructions.

  1. Open Settings, tap Privacy & Security, and then tap Safety Check.
  2. Tap Manage Sharing & Access, tap Continue, and then follow the onscreen instructions.

You might also be sharing information that Safety Check can’t review or change—for example, accounts and passwords, social media sharing, and information shared from another device.

Important: In an emergency, you can also use Safety Check to quickly reset access to your device and personal information. Go to Settings > Privacy & Security > Safety Check, tap Emergency Reset, tap Start Emergency Reset, then follow the onscreen instructions.

You can open and save PDFs in the Books app that you receive in Mail, Messages, or other apps. Once a PDF is in Books, you can share it with AirDrop, Mail, or Messages, print it, or mark it up. Apple Books isn’t available in all countries or regions, though.

Note: Apple Books isn’t available in all countries or regions.

Open a PDF you receive in another app in Books

  1. Tap the PDF attachment to open it.
  2. Tap the Share button and then tap Books from the list options.

Share or print a PDF

  1. Open the Books app on your iPhone.
  2. Tap Library and tap the More button below the PDF.
  3. Tap the Share button. Choose a share option such as AirDrop, Mail, or Messages, or tap Print.

Mark up a PDF in Books

  1. Open the Books app on your iPhone.
  2. Open the PDF.
  3. Tap the page and tap the Markup button to use the drawing and annotation tools.

View each memory in your Memories collection as a movie that’s set to music. Every collection and album in the Photos app can play as a memory movie, too, which you can watch or edit to make more personal.

With Apple Intelligence, you can create a custom memory movie of the story you want to see. Just type a description, and Apple Intelligence chooses photos and videos, builds a storyline with unique chapters, and sets it to music. While a memory movie plays, you can pause it, mute it, or go backward or forward.

Note: Apple Intelligence on iOS 27 or later is available on an Apple Intelligence-enabled iPhone 15 Pro, iPhone 15 Pro Max, or iPhone 16 model or later. Apple Intelligence is not available in all languages or regions. Usage limits may apply.*

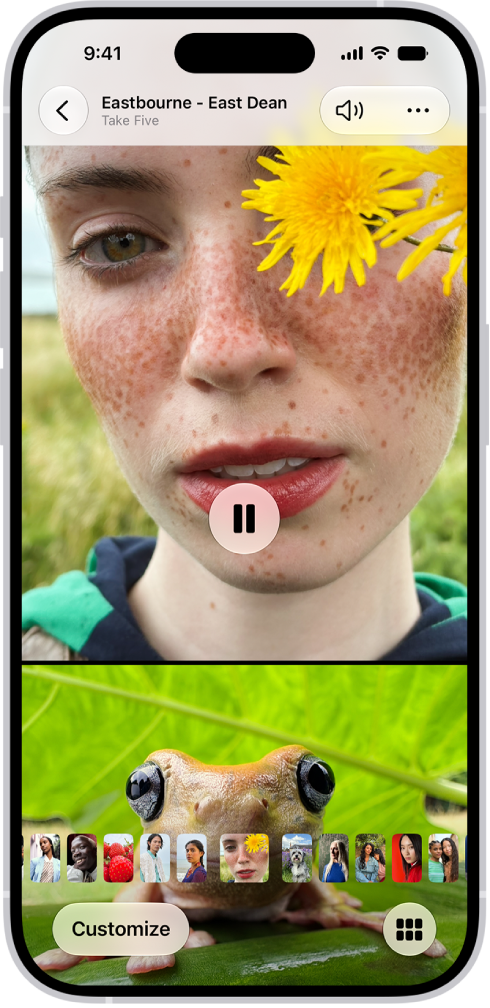
A memory is playing in the middle of the screen. At the bottom of the screen are the Memory Mixes and Browse buttons. At the top of the screen are the Back, Mute, and More buttons. At the top center of the screen are the location of the photo and the name of the song playing.

Play a memory movie

  1. Open the Photos app on your iPhone.
  2. Tap Collections.
  3. Swipe left under Memories to scroll through a selection of your memories, or tap Memories to view them all.
  4. Tap the Play button in the bottom-right corner of a memory to play it.
  5. As the memory movie plays, do any of the following:
    • Pause: Tap the screen and tap the Pause button.
    • Go backward or forward: Swipe left or right. Or tap the screen. Slide the frames at the bottom of the screen left or right.
    • Mute: Tap the screen, then tap the Mute button.
    • Close a memory: Tap the screen and tap the Close button.

Play a memory movie from a collection or album

The collections and albums you have in the Photos app can all be viewed as memory movies.

  1. Open the Photos app on your iPhone.
  2. Tap Collections.
  3. Select an existing collection or album. Then tap the Play button to watch the photos and videos as a memory movie.

Create a memory movie with Apple Intelligence

Want a custom memory movie of a particular story? Create one right in Photos. Type a description, and Apple Intelligence picks the best photos and videos and sets them to music, with a storyline built from unique chapters and a narrative arc.

  1. Open the Photos app on your iPhone.
  2. Tap Collections, tap Memories, and tap Create.
  3. Enter a description of the movie you want to create, then tap Done.

*Apple Intelligence is available with Siri and device language set to Chinese (Simplified), Chinese (Traditional), Danish, Dutch, English, French, German, Italian, Japanese, Korean, Norwegian, Portuguese, Spanish, Swedish, Turkish, or Vietnamese. Some features may not be available in all regions or languages. Some devices may not be available in all regions. Siri AI is available in beta in iOS 27, iPadOS 27, macOS 27, watchOS 27, and visionOS 27 and requires an Apple Intelligence–enabled device set to a supported language. Available in English to start. Siri AI will not be initially available in the EU on iOS, iPadOS, and watchOS. Certain Apple Intelligence features that rely on server-side models are subject to daily usage limits, including but not limited to Siri AI, Intelligent Photo Editing Tools, Image Playground, and AFM 3 Cloud models in Shortcuts. Daily limits may vary by feature, request complexity, system demand, system policies, and other factors. Expanded access to such features will be available for a fee in the future. Use of these features is subject to the Apple Intelligence Terms and Conditions.

In the Mail app, you can print a message or an attachment. For an email, Print is with the Reply options, and for an attachment or picture, it’s in the Share options, so you can print either one without leaving Mail.

Print an email

  1. Open the Mail app on your iPhone.

    In the message, tap the Reply button, then tap Print.

Print an attachment or picture

  1. Open the Mail app on your iPhone.
  2. Tap an attachment to view it, tap the Share button, and choose Print.
Tag: Mail

You can relay phone calls and text messages through your iPhone to your iPad or Mac, so it’s easy to stay in touch no matter which device you’re on. Cellular charges may apply, though, and Wi-Fi Calling isn’t available from all carriers.

Note: Cellular charges may apply. Wi-Fi Calling isn’t available from all carriers.

Before you begin

Here’s what needs to be true for this to work:

  • Both devices have Wi-Fi turned on and are connected to the same Wi-Fi network.
  • You’re signed in to the same Apple Account on both devices.
  • You’re signed in to FaceTime with the same Apple Account and have your phone number turned on in FaceTime settings on both devices.

When you’re using a VPN, its configuration shouldn’t prevent local networking, as that may interfere with some Continuity features.

Set up your iPhone to allow phone calls on your other devices

  1. On your iPhone, open the Settings app.
  2. Tap Apps, then tap Phone.
  3. Tap Calls on Other Devices, turn on Allow Calls on Other Devices, and choose the devices you want to allow to make and receive calls.

As long as they’re near your iPhone, signed in to the same Apple Account, and on the same Wi-Fi network, the devices you choose can make and receive calls.

Make or receive phone calls on your iPad or Mac

Your iPad and Mac can make and receive phone calls once you’ve set up your iPhone to allow calls on your other devices.

  • Make a call: On your iPad or Mac, tap or click a phone number in Contacts, Calendar, FaceTime, Messages, Spotlight, or Safari. Or open the Phone app, tap or click the Keypad button and type a number, or search for a contact. If you make a call from another device by relaying it through your iPhone with Dual SIM, the call is made using your default voice line.
  • Receive a call: On your iPad or Mac, swipe, tap, or click the notification to answer or ignore the call.

Note: No Phone app on your iPad? Just Download it from the App Store.

Send and receive messages on your iPad or Mac

You can send and receive messages on your iPad or Mac, too, whether they’re iMessage or SMS/RCS/MMS messages.

If phone calls and text messages on your iPad and Mac aren’t working

  • Make sure that you’re signed in to the same Apple Account on both devices.
  • Make sure that your iPhone and Mac have Wi-Fi turned on.
  • Your devices must be within 30 feet (10 meters) of one another.

You can also use Handoff to transfer a FaceTime call from one device to another, on top of making and receiving phone calls on your iPad or Mac.