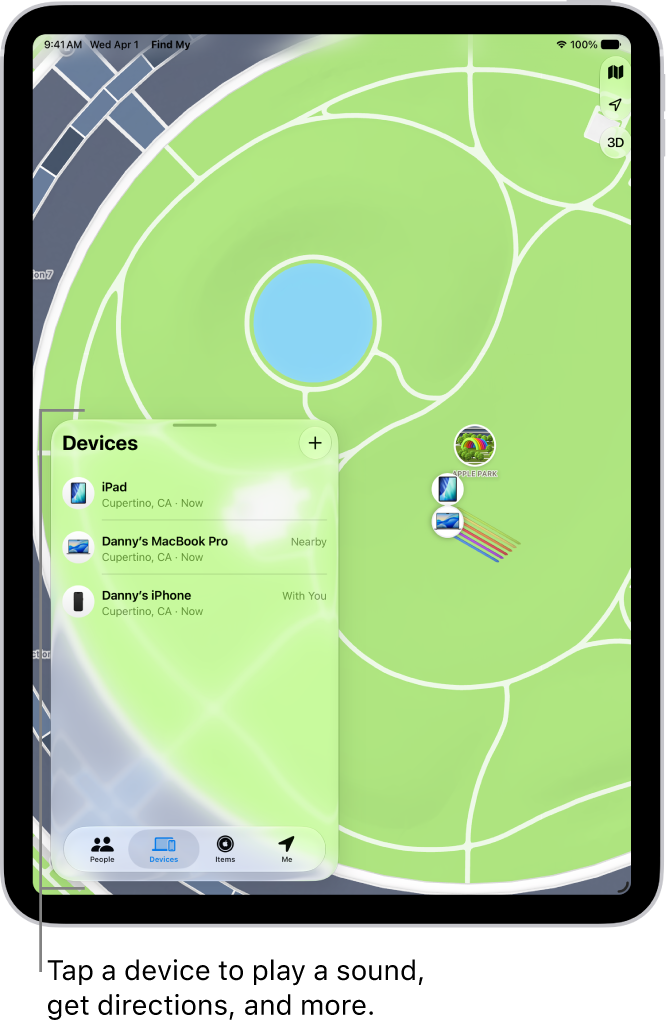
If your AirPods are lost, Find My can help you locate them on your iPhone, iPad, Mac, Apple Watch, or on the web at iCloud.com/find. You can also turn on separation alerts to warn you if you’ve left your AirPods behind.
There’s an important catch, though. Find My can only locate offline AirPods if the Find My network was on before they were lost. With it on, supported models show up for up to 24 hours after they last connect. You can also play a sound on your AirPods or mark them as lost.
About using Find My with AirPods
- You can use Find My with all AirPods models, but some models may have additional features to help you find them. If you’re not sure which AirPods you have, see Which AirPods do I have?
- You must pair AirPods with iPhone or iPad where you’re signed in to your Apple Account to see your AirPods in Find My on your iPhone, iPad, Mac, or Apple Watch, or on the web at iCloud.com/find.
- For the best experience with Find My, make sure your paired device has the latest version of iOS, iPadOS, macOS, or watchOS installed.
- To locate your AirPods, you must turn on Find My on a paired device (such as your iPhone or Mac) before they’re lost. See Turn on the Find My network.
- You can turn on the Find My network to see the location of some AirPods models even when they’re out of range of your device. If the Find My network is turned off (or if your AirPods don’t support the Find My network), the Find My app shows the last time and place they were connected.
- If your AirPods are out of range or need to charge, you might see their last known location, “No location found,” or “Offline” in Find My. If they come back online, you get a notification on devices you paired with them.
Turn on the Find My network
Even if they’re not nearby, you can see the location of AirPods Pro, AirPods Max, AirPods 3, AirPods 4 with Active Noise Cancellation (ANC), or AirPods 5 with Wireless Charging Case in Find My for up to 24 hours after they last connected to your device. That’s only when the Find My network is on.
Important: To use the Find My app to locate AirPods when they’re offline, you need to turn on the Find My network before they’re lost.
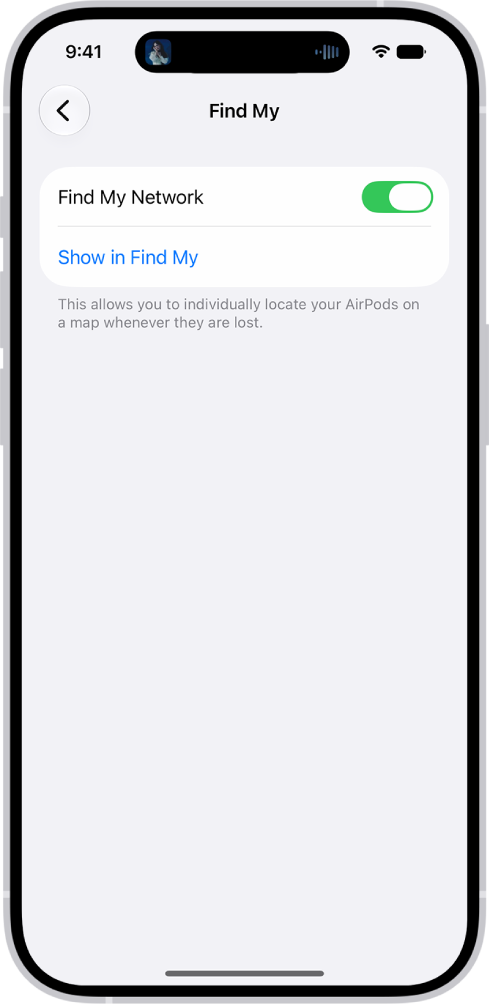
- Wear your AirPods, and make sure they’re connected to your iPhone or iPad.
- Start the Settings app on your iPhone or iPad.
- Tap the name of your AirPods near the top of the screen.
- Scroll down and turn on Find My Network (if you don’t see that option, first tap Find My).
Note: If your AirPods 3, AirPods 4 (ANC), AirPods 5 with Wireless Charging Case, AirPods Pro, or AirPods Max are used with multiple Apple Accounts (for example, if you lend or share AirPods), only the person who turned on the Find My network can see them in the Find My app. You may also get an alert if someone else’s AirPods are traveling with you.
Turn on separation alerts
With the Find My network on, the Find My app can alert you if you’ve left your AirPods Max, AirPods 3, AirPods Pro, AirPods 5 with Wireless Charging Case, or AirPods 4 (ANC) behind. Set trusted locations, like your home, and you’ll get a notification on your iPhone, iPad, Mac, or Apple Watch if your AirPods are left anywhere else. If the network isn’t on yet, see Turn on the Find My network, above.
Important: If you want to receive separation alerts, make sure you allow notifications for the Find My app.
-
Do one of the following:
- iPhone or iPad: Go to the Find My app, tap Devices and select your AirPods. Then tap Notify When Left Behind.
- Mac: Go to the Find My app, then click Devices. Select your AirPods and click the Info button. Click Notify When Left Behind.
- Apple Watch: Go to the Find My app, select your AirPods, and then tap Notify When Left Behind.
-
Turn on Notify When Left Behind.
On iPhone, iPad, and Mac, you can also set a trusted location. Choose a suggested location, or choose New Location, then select a location on the map.
See the location of your AirPods on a map or find them nearby
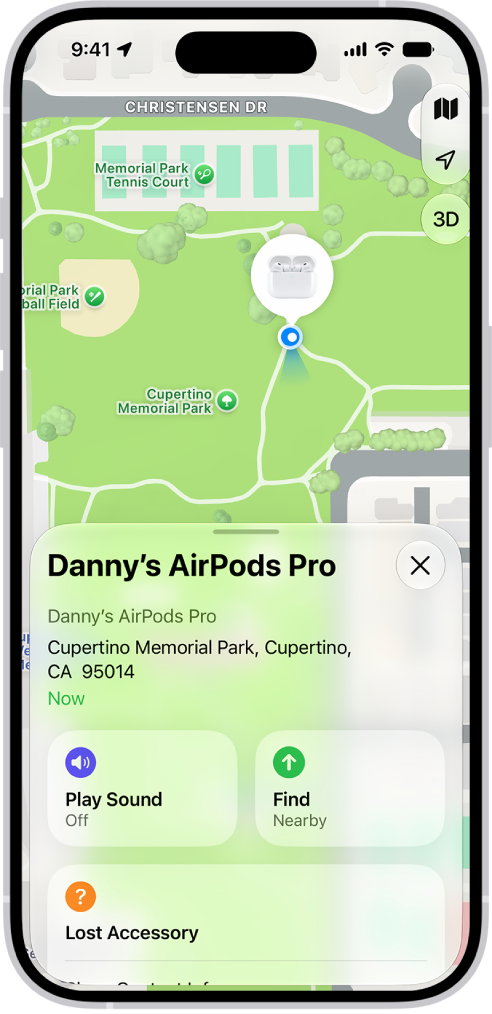
The Find My app shows the current or last known location of your AirPods.
When they’re somewhere close by, like in another room of your house, your iPhone or iPad can also help guide you to your AirPods Pro, AirPods Max, AirPods 3, AirPods 4 (ANC), or AirPods 5 with Wireless Charging Case. With AirPods Pro 2 or AirPods Pro 3, a UWB-capable iPhone can even find the precise location of the charging case.
-
iPhone or iPad: Go to the Find My app, tap Devices, then select your AirPods.
To find your AirPods 3, AirPods 4 (ANC), AirPods 5, AirPods Pro, or AirPods Max nearby, tap Find, then follow the onscreen instructions.
If you have AirPods Pro 2 or AirPods Pro 3, you may see an arrow pointing in the direction of your AirPods and a message telling you approximately how far away they are. You may have an option to turn on the flashlight, which can help you find your AirPods in a dark environment.
- Mac: Go to the Find My app, click Devices, then select your AirPods.
- Apple Watch: Go to the Find My app, then select your AirPods (requires a Wi-Fi or cellular connection).
- iCloud.com: Go to iCloud.com/find, sign in to your Apple Account, select All Devices, then select your AirPods.
When your AirPods are separated, most AirPods models show the location of only one at a time. To find both, locate the one that’s on the map, return it to its case, and refresh the map to find the other one.
With AirPods Pro 2, AirPods Pro 3, AirPods 4 (ANC), or AirPods 5 with Wireless Charging Case, though, the map shows the location of each of your AirPods and the charging case.
Play a sound on your AirPods
If your AirPods aren’t in their case, playing a sound on them can help you locate them. On AirPods 5 with Wireless Charging Case, AirPods 4 (ANC), AirPods Pro 2, and AirPods Pro 3, the charging case can play a sound, too.
- iPhone or iPad: Go to the Find My app, tap Devices, select your AirPods, then tap Play Sound.
- Mac: Go to the Find My app, click Devices, select your AirPods, then click Play.
- Apple Watch: Go to the Find My app, select your AirPods, then tap Play Sound (requires a Wi-Fi or cellular connection).
-
iCloud.com: Go to iCloud.com/find, sign in to your Apple Account, select All Devices, select your AirPods, then click Play Sound.
Note: You can’t play a sound on the charging case for your AirPods 4 (ANC), AirPods 5 with Wireless Charging Case, AirPods Pro 2, or AirPods Pro 3 from iCloud.com.
To help you locate them, your AirPods play the sound for a few minutes or until you stop it. If your AirPods aren’t connected to your device and the Find My network is off, they’ll play it the next time they join a Wi-Fi or cellular network.
Quick tip: Muting one of your AirPods makes them easier to find one at a time when they’re separated from each other. To do that, tap or click Left or Right while the sound plays on your AirPods.
Mark AirPods as lost
Misplaced your AirPods Max, AirPods Pro, AirPods 3, AirPods 4 with Active Noise Cancellation (ANC), or AirPods 5 with Wireless Charging Case? You can mark them as lost and create a message with your contact information.
In case you’ve lost just one AirPod, or your AirPods get separated from the case, AirPods Pro 3, AirPods Pro 2, AirPods 5 with Wireless Charging Case, and AirPods 4 (ANC) also let you mark each of your AirPods and the case as lost separately.
- iPhone or iPad: Go to the Find My app, tap Devices, select your AirPods, turn on Lost Mode, then follow the onscreen instructions.
- Mac: Go to the Find My app, click Devices, select your AirPods, click the Info button, turn on Lost Mode, then follow the onscreen instructions.
- Apple Watch: Go to the Find My app, tap a device, tap Lost Mode, then turn on Lost Mode.
Note: You need to turn on the Find My network before your AirPods are lost, or you won’t be able to mark your AirPods as lost.
This guide is for iOS 27, iPadOS 27, macOS 27, tvOS 27, watchOS 27, or later.