








Got a tip for us?

iPhone

The iPhone is a smartphone from Apple that runs the iOS mobile operating system. Between its apps, communication features, the camera, mobile internet access, and other functionalities, the iPhone has quickly become an integral part of many peoples tech lives.

You can save a map of an area and use it when your iPhone is offline. Even when you can’t access Wi-Fi or cellular service, you can view information like hours and ratings on place cards, get turn-by-turn directions for driving, walking, cycling, or riding transit, and see your estimated time of arrival.

Automatic Updates is on by default, so your downloaded maps are kept up to date. And you can remove downloaded maps to free up storage space.

Note: Offline maps aren’t available in all countries or regions.
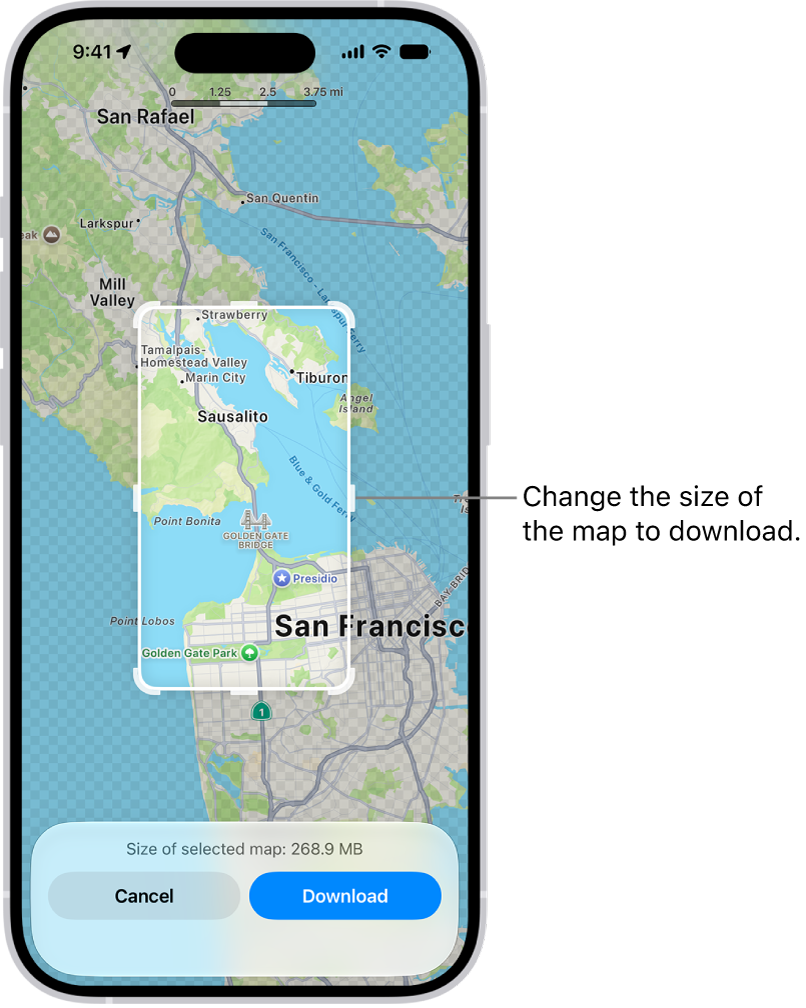
A map of a national park. The park is framed by a rectangle with handles, which can be moved to change the size of the map to download. The selected map’s download size is indicated near the bottom of the map. The Cancel and Download buttons are at the bottom of the screen.

Download maps

  1. Open the Maps app on your iPhone.

    Do one of the following: Touch and hold the map until a pin marker appears, then tap Download.

  2. Tap your picture or initials next to the search field, tap Offline Maps, tap Add Offline Map, and then enter a location in the search field or tap Current Location.

Adjust the selected area, then tap Download.

  1. To reduce the size of the map you download, select a smaller area.

If you don’t change your settings, downloaded maps update automatically.

Quick tip: When you sync your iPhone with Apple Watch, your downloaded maps go wherever you go, even when your iPhone isn’t nearby.

Open or edit a map you downloaded

When you download maps to use offline, they appear in your list of offline maps.

  1. Open the Maps app on your iPhone.
  2. Tap your picture or initials next to the search field. Then tap Offline Maps.
  3. Select a map and then do any of the following: Rename a map: Tap Rename, enter a new name, then tap Save.
    • Change the area covered by a map: Tap Resize on the image of the map, adjust the selected area and tap Download.
    • Delete a map: Tap Delete Map.

Control map data downloads

Depending on your data storage needs and preferences, you can change settings like when to download or update a map.

  1. Open the Maps app on your iPhone.
  2. Tap your picture or initials next to the search field. Then tap Offline Maps.

    Do any of the following: Download over cellular: Tap Wi-Fi Only, then tap to select Wi-Fi + Cellular.

    • Automatically update all maps: Turn on Automatic Updates.
    • Automatically delete unused maps: Turn on Optimize Storage.
    • Use online maps: Turn off Only Use Offline Maps.

Remove downloaded maps

To free up storage space on your iPhone, you can remove downloaded maps.

  1. Open the Maps app on your iPhone.
  2. Tap your picture or initials next to the search field. Then tap Offline Maps.

    Do one of the following: Manually remove a map: Swipe left on the map, then tap Delete.

    • Automatically delete unused maps: Turn on Optimize Storage.
Tag: Maps

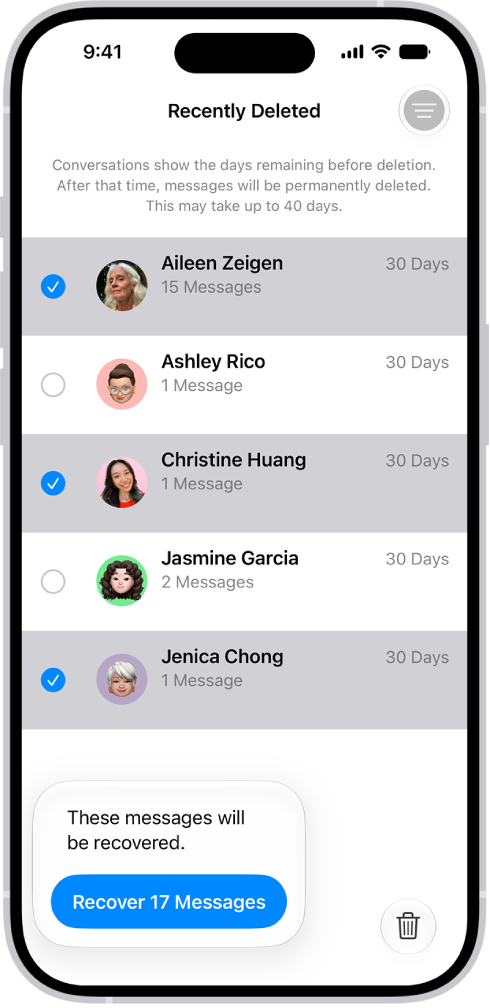
You can recover text messages you deleted on your iPhone for up to 30 days. They’re in Recently Deleted, in the conversation list. And if you use Messages in iCloud, a message you recover on your iPhone comes back on all your devices that use Messages in iCloud.

Recovering all messages deleted within two conversations.

  1. Start the Messages app on your iPhone.
  2. In the conversation list, tap the Filter button and tap Recently Deleted.
  3. Select the conversations whose messages you want to restore and tap Recover.
  4. Tap Recover Messages.

With Messages in iCloud, a message or conversation you recover on your iPhone comes back on all your devices where Messages in iCloud is on.

Note: Deleting and recovering messages affects only your iPhone and other Apple devices that use the same Apple Account. Messages, attachments, and conversations on anyone else’s device can’t be recovered.

Future messages from a blocked contact aren’t automatically deleted if you block them in a conversation with non-iMessage participants, then delete the conversation and recover it.

If you remove a message from a conversation using Undo Send, it’s permanently deleted. And audio messages that expire before being saved aren’t recoverable.

iPhone can provide subtitles, closed captions, and transcriptions so you can follow along more easily with audio and video. On supported models, you can also get automatic subtitles, including in another language.

In a supported app, subtitles and closed captions can be turned on when they’re available, and you can customize how they look. You can also choose accessible captions, like subtitles for the deaf and hard of hearing (SDH). Subtitles transcribed from spoken audio are labeled in the list of subtitles, too.

Note: Generated subtitles and viewing subtitles in multiple languages is supported on iOS 27 or later and is available on iPhone 15 Pro, iPhone 15 Pro Max, and iPhone 16 models or later. Generated subtitles are available in English (U.S. and Canada) when the content doesn’t include them.

Turn on subtitles and captions in supported apps

If subtitles and closed captions are available, you can turn them on when you play video content in a supported app. iPhone usually shows standard subtitles and captions, though you can also choose special accessible captions if they’re available, such as subtitles for the deaf and hard of hearing (SDH).

Note: In supported apps, subtitles may appear automatically. The list of subtitles labels the ones transcribed from spoken audio “Transcribed” and the ones translated into another language “Translated”.

  1. While playing video content, tap the More Controls button. Tap Subtitles.
  2. Choose from the list of available subtitles and captions.

Customize the subtitles and captions in supported video apps

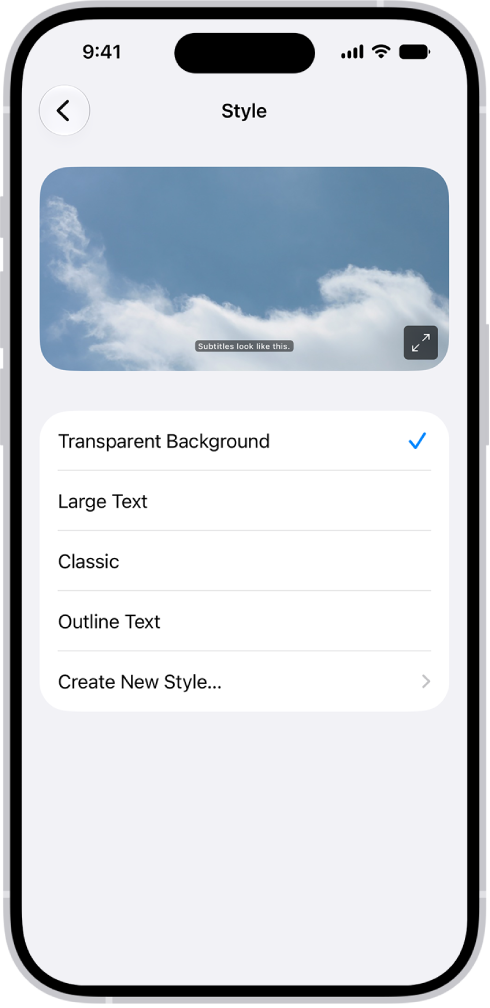
An iPhone showing an example of subtitles with a custom style.

  1. Open Settings, tap Accessibility, and then tap Subtitles & Captioning.
  2. If you prefer closed captioning or subtitles for the deaf and hard of hearing when available, turn on Closed Captions + SDH.
  3. Tap Style and choose an existing caption style or create a new style based on the following:
    • Font, size, and color
    • Background color and opacity
    • Text opacity, edge style, and highlight

Manage when subtitles automatically appear

In a supported app, subtitles may appear automatically if the video is in another language, if your iPhone is muted, or if you skip back a few seconds. Generated subtitles from videos in Photos and Messages can show up automatically, too.

  1. Start the Settings app on your iPhone.
  2. Tap Accessibility, tap Subtitles & Captioning, and tap Automatic Subtitles.
  3. Do any of the following:
    • Automatically show subtitles in your preferred language: Turn on When Languages Don’t Match.
    • Automatically turn on subtitles when volume is muted: Turn on Show When Muted.
    • Temporarily turn on subtitles when you skip back in a video: Turn on Show on Skip Back.

View generated subtitles in another language

Using on-device translation, your iPhone can generate subtitles in another language in supported apps. For that to work, the video needs English subtitles, and you need to have added more than one preferred language in Settings. Then you can view the subtitles translated into one of your other languages.

  1. While playing video content, tap the Captions button.
  2. Tap Languages, then choose the language you’d like to view subtitles in.

The Health app offers secure access to information about your vaccinations, allergies, conditions, medications, and more (not available in all countries or regions).

You can use a QR code or a link from a healthcare provider or authority to download a test result record, and you can set up automatic downloads for a range of health records from supporting healthcare organizations. Those organizations can securely send records of your allergies, medical conditions, medications, labs, vaccinations, and more straight to Health.

Note: When iPhone is locked with Face ID, Touch ID, or a passcode, all of the health data in the Health app—other than what you add to your Medical ID—is encrypted.

Set up automatic health record downloads from your healthcare provider

Supporting healthcare organizations can download your records to Health securely and automatically, including your vaccinations, labs, medications, allergies, medical conditions, and more.

  1. Start the Health app on your iPhone.
  2. Tap Summary, then tap your picture or initials.
  3. Tap Health Records and then do one of the following:
    • Set up your first download: Tap Get Started.
    • Set up downloads for additional accounts: Tap Add Account.

A list of nearby organizations appears. If your organization doesn’t appear in the list, enter the name of a clinic, hospital, or other place where you obtain health records. Or enter the name of a city, state, or province to find organizations near there.

  1. Tap the name of your organization.
  2. Tap Connect Account (below Available to Connect) to go to the sign-in screen for your patient portal.
  3. Enter the user name and password you use for the patient web portal of that organization and then follow the onscreen instructions.

When you set up downloads from an organization, new records arrive in Health automatically as they become available.

Note: Your healthcare organization might not appear in this feature. Organizations are added frequently.

Tag: Health

You can change the sounds iPhone plays when you get a call, message, and alert. Haptic feedback is the vibration you feel on your iPhone when you perform some actions, such as when you touch and hold any icon on the Home Screen.

Each alert sound has a paired vibration pattern, and you can change it or record your own. You can even give certain people their own ringtone and text tone.

Change ringtone settings

  1. Open the Settings app on your iPhone.
  2. Tap Sounds & Haptics and then do any of the following below Ringtone:
    • Change your ringtone: Tap Ringtone and tap a ringtone to preview it and select it.
    • Adjust ringer volume: Drag the volume slider.
    • Change the haptic pattern: Tap Haptics and then choose a pattern or tap Create New Vibration to record your own.
    • Control ringer volume with buttons: Turn Change with Buttons on or off.

You can also change the sounds iPhone plays for certain people. Go to the Contacts app, tap a person’s name, tap Edit, then choose a ringtone and text tone.

Change the sound for alerts and other actions

AirDrop, calendar alerts, reminder alerts, new mail, sent mail, new voicemail, and text messages can each have a different sound.

  1. Open the Settings app on your iPhone.
  2. Tap Sounds & Haptics.
  3. Tap a sound category, such as Text Tone or Calendar Alerts. Tap a sound to select it.

Change the vibration pattern for a sound

Every alert sound has a paired vibration pattern, and for any sound, you can change the vibration or create a custom pattern.

  1. Open the Settings app on your iPhone.
  2. Tap Sounds & Haptics.
  3. Tap a sound category, such as Text Tone or Calendar Alerts.
  4. Tap Haptics and then choose a pattern or tap Create New Vibration to record your own.

Set separate volumes for alarms and alerts

Alarms, timers, alerts, and system sounds all match your ringtone volume by default. If you’d rather, you can set two separate volumes, one for alerts and system sounds and one for alarms and timers.

  1. Open the Settings app on your iPhone.
  2. Tap Sounds & Haptics. Then turn off Match Ringtone Volume under Alarms and Timers or Alerts and System Sounds.
  3. Drag the slider to set the volume.

Change other sound settings

  1. Open the Settings app on your iPhone.
  2. Tap Sounds & Haptics and then do any of the following:
    • Play a click or vibration when you type on the keyboard: Tap Keyboard Feedback to choose Sound, Haptic, or both.
    • Play a sound when you lock iPhone: Turn Lock Sound on or off.
    • Play haptics for system controls and interactions: Turn System Haptics on or off.

If you’re unable to speak or have lost your speech over time, you can use Live Speech on iPhone to have what you type spoken out loud during in-person conversations and in apps like FaceTime. You can choose from dozens of system voices or use a Personal Voice you create.

You can also save phrases and have them spoken out loud, and allow audio from other apps in calls, too.

Note: Live Speech is not available in all languages.

Have what you type spoken out loud

  1. Start the Settings app on your iPhone.
  2. Tap Accessibility and tap Live Speech. Then turn on Live Speech.
  3. Triple-click the side button or Home button (depending on your iPhone model). Tap Live Speech (if the Accessibility Shortcut is set up with more than one feature).
  4. Tap the Live Speech window, type what you want to have spoken and then tap Speak.

You can also paste copied text into the window, or tap suggested words that appear above the keyboard as you type.

If you’re on a FaceTime call, the other end of the call gets Live Speech. If not, your iPhone outputs Live Speech through its speaker.

Have saved phrases spoken out loud

Live Speech gives you a list of phrases you use often to choose from, and you can sort your phrases into custom categories like school or work.

  1. Start the Settings app on your iPhone.
  2. Tap Accessibility and tap Live Speech. Then turn on Live Speech.
  3. Tap Phrases and then do any of the following:
    • Create a new category: Tap the Add category button, enter a category name, select an icon, and tap Add Category.
    • Add a new saved phrase: Tap a category, tap the Add phrase button, enter a phrase, and then tap Save.
  4. Triple-click the side button or Home button (depending on your iPhone model). Tap Live Speech (if the Accessibility Shortcut is set up with more than one feature).
  5. Tap the Phrases window and then do any of the following:
    • Speak a phrase from a saved category: Scroll to the left to select a category, then tap a phrase.
    • Quickly add a new phrase: Tap the Add phrase button in any category, enter a phrase and tap done. Then tap the phrase.
    • Quickly speak a recently used phrase: Tap Recent and then tap a phrase.

To remove a phrase, swipe left on it, then tap Delete.

Allow audio from other apps in calls

If you use apps that assist with speaking and communication, it can help to make audio from apps audible in voice and video calls.

  1. Start the Settings app on your iPhone.
  2. Tap Accessibility, tap Audio & Visual, and tap Add Audio in Calls.
  3. Turn on Allow Apps to Add Audio in Calls.

With this option on, calls include both audio and microphone input. Muting the microphone silences all audio during a call.

With handwriting mode in VoiceOver, you can enter text by writing characters on the screen with your finger. In addition to typing or dictation, use handwriting mode to enter your iPhone passcode silently or to open apps from the Home Screen.

To use it, you set the rotor to Handwriting. You can also use it to move quickly through a long list.

Here’s how to write with your finger in VoiceOver on iPhone.

Use handwriting mode

  1. Set the rotor to Handwriting.

    If Handwriting isn’t in the rotor, go to Settings > Accessibility > VoiceOver > Rotor, then add it.

  2. To choose a character type (lowercase, numbers, uppercase, or punctuation), swipe up or down with three fingers.

    To hear the selected character type, tap with three fingers.

  3. Trace a character on the screen with your finger.

    You can also do any of the following:

    • Enter an alternate character (a character with an accent, for example): Write the character and then swipe up or down with two fingers until you hear the character you want.
    • Enter a space: Swipe right with two fingers.
    • Go to a new line: Swipe right with three fingers.
    • Delete the previous character: Swipe left with two fingers.
  4. To exit handwriting mode, do a two-finger scrub (move two fingers back and forth three times quickly, making a “z”), or set the rotor to a different setting.

Enter your passcode silently with handwriting mode

  1. On the passcode screen, set the rotor to Handwriting.
  2. Write the characters of your passcode with your finger.

Select an item on the Home Screen

  1. On the Home Screen, set the rotor to Handwriting.
  2. Start writing the name of the item with your finger.

If there are multiple matches, continue to spell the name until it’s unique, or swipe up or down with two fingers to choose from the current matches.

Quickly navigate a long list

  1. Select the index to the right of the list (for example, next to your Contacts list or in the VoiceOver Item Chooser).
  2. Set the rotor to Handwriting and then use your finger to write the letter you want to go to.

If you’re at risk of speech loss or someone with a speech disability, you can use Personal Voice on iPhone to create a synthesized voice that sounds like you.

You can use your Personal Voice with Live Speech and have what you type spoken out loud during in-person conversations, in Phone and FaceTime calls, and in assistive communication apps. It’s saved securely on your iPhone. To create one, you must first set a passcode.

Note: Personal Voice is available in English (U.S.), Mandarin Chinese (China mainland), and Spanish (Mexico) and is available on iPhone 15 Pro models, iPhone 16 models and later.

  1. Start the Settings app on your iPhone.
  2. Tap Accessibility and then tap Personal Voice.
  3. Tap Create a Personal Voice and then follow the onscreen instructions.

    (If you need to pause your recording session, tap Done. To resume, tap the name of your Personal Voice, then tap Continue Recording.)

Turn on Share Across Devices, and your Personal Voice can be used on all of your devices with iCloud. And with Allow Apps to Request to Use turned on, apps can ask to use your Personal Voice.

Note: To see the option to create your Personal Voice, you must first set a passcode. Personal Voice is available on supported iPhone models and is not available in all languages.

Your Personal Voice, Apple says, is saved securely on your iPhone for you to use during Phone and FaceTime calls, in-person conversations, and third-party alternative and augmentative communication (AAC) apps.

Important: Personal Voice can be used only with Live Speech and with third-party apps that you allow, such as Augmentative and Alternative Communication (AAC) apps. You can use Personal Voice only to create a voice that sounds like you on device, using your own voice, and for your own personal, noncommercial use.

Your Legacy Contact won’t be able to access your Personal Voice.

After you set up iCloud Drive, you can share folders and individual files with friends and colleagues. When you make changes to a shared folder or file, others see your changes automatically, and if you allow people to make edits, their changes appear automatically as well.

You can also send a copy of a file or folder, invite more people to collaborate, or share it with more people using a link.

Files and folders you share in iCloud Drive have these important characteristics:

  • If you collaborate on a folder, all items added to that folder by you or other participants are automatically shared.
  • The link to a shared file includes its name. If the name or content is confidential, be sure to ask recipients not to forward the link to anyone else.
  • If you move a shared file to another folder or location, the link no longer works, and people lose access to the item.
  • Depending on the app, users might need to reopen a file or tap the original link to see the latest changes.

Share or collaborate on a file or folder

For a file or folder you own in iCloud Drive, you can invite other people to view its contents or collaborate on them.

A file or folder can be shared so only people you pick can open it, or so anyone with the link can.

Allow changes to the contents of a file or folder, or restrict access so people can only view the contents.

  1. Open the Files app on your iPhone.
  2. Go to a location and then touch and hold the file or folder you want to share.
  3. Tap the Share button, tap the menu under the item’s title, and tap Share a Link.
  4. To change who can access the file or folder and whether they can edit or just view and download, tap People you choose can edit and then do any of the following:

    • Only allow people you invite or approve to access the file or folder: Tap People you choose.

      Note: When you select “People you choose,” you can turn on Access Requests, which lets other people with the link ask you to approve their access.

    • Allow anyone with the link to access the file or folder: Tap Anyone with the link.
  5. Under New Participants Can, choose whether participants can edit or view and download only.
  6. Choose how you want to send your invitation.

Send a copy of a file or folder

  1. Open the Files app on your iPhone.
  2. Go to a location and then touch and hold the file or folder you want to share.
  3. Tap the Share button and tap the menu under the item’s title. Then tap Send a Copy.
  4. Choose how you want to send your copy.

Invite more people to collaborate on a folder or file

If a folder or file you already shared has access set to “People you choose,” you can share it with more people.

  1. Open the Files app on your iPhone.
  2. Tap Shared.
  3. Touch and hold the folder or file you want to share.
  4. Tap Manage Shared Folder or Manage Shared File.
  5. Tap Add Participant and choose a method for sending the link.
  6. Enter any other requested information. Send or post the invitation.

Share a folder or file with more people using a link

When you set access to a shared folder or file to “Anyone with the link,” anyone who has the link can share it with others.

  1. Open the Files app on your iPhone.
  2. Tap Shared.
  3. Touch and hold the folder or file you want to share.
  4. Tap Manage Shared Folder or Manage Shared File. Then tap Copy Link.
  5. Choose a method for sending the link, enter any other requested information, and send or post the invitation.

Change access and permission settings for everyone

Owners of a shared folder or file can change its access at any time. It affects everyone you shared the link with.

  1. Open the Files app on your iPhone.
  2. Touch and hold the folder or file whose permissions you want to change.
  3. Tap Manage Shared Folder or Manage Shared File, then tap Sharing Options.
  4. Change either or both of the options.
    • Access option: When you change the access option from Anyone with the link to People you choose, the original link no longer works for anyone, and only people who receive a new invitation from you can open the folder or file.
    • Permission option: When you change the permission option, everyone who has the file open when you change the permission sees an alert. New settings take effect when the alert is dismissed.

Change access and permission settings for one person

As the owner of a shared folder or file with access set to “People you choose,” you can change one person’s permission without affecting anyone else’s. You can also remove that person’s access.

  1. Open the Files app on your iPhone.
  2. Touch and hold the folder or file whose permissions you want to change.
  3. Tap Manage Shared Folder or Manage Shared File.
  4. Tap the person’s name, then select an option.

Stop sharing a folder or file

If you’re the owner of a shared folder or file, you can stop sharing it.

  1. Open the Files app on your iPhone.
  2. Open the location of the folder or file you want to stop sharing.
  3. Touch and hold the folder or file. Tap Manage Shared Folder or Manage Shared File.
  4. Tap Stop Sharing.

Anyone who has the file open when you stop sharing it gets an alert. After they dismiss it, the item closes, the file disappears from their iCloud Drive, and the link stops working. Share the item again later with access set to “Anyone with the link,” and the original link works again. With “People you choose,” only the people you reinvite to share the item can use the original link again.

Tags: Files, iCloud

You can permanently delete items from your Reminders lists. If you accidentally delete an item, you can recover it within 30 days from the Recently Deleted list.

Items left in Recently Deleted are removed automatically and permanently after 30 days. A recovered item moves to the default list, while a permanently deleted item is removed immediately from all your devices.

Here’s how to delete or recover items in Reminders on iPhone.

Delete an item

  1. Open the Reminders app on your iPhone.
  2. While viewing a list, swipe left on an item. Tap Delete.

To undo immediately, tap with three fingers or shake your iPhone.

Recover or permanently delete recently deleted items

  1. Open the Reminders app on your iPhone.
  2. In the list view, tap Recently Deleted.
  3. Do one of the following:
    • Recover an item: Tap the item, then tap Recover. The item moves to the default list.
    • Permanently delete an item: Swipe left on the item, tap Delete, and tap Delete again. The item is removed immediately from all your devices.

After 30 days, items left in Recently Deleted are permanently removed automatically.