Got a tip for us?

Apple Watch

Siri is an intelligent assistant that’s built into your Apple Watch to help you get answers, find what you need, and get things done.

Once Siri is on, it needs to be activated before you ask a question or make a request. You can also type to Siri, and Apple Watch must be connected to the internet. Siri AI, the new version of Siri powered by Apple Intelligence, is available on watchOS 27 or later, too.

Here’s how to use Siri on Apple Watch.

Note: Siri is designed to protect your information and to let you choose what you share.

Turn on Siri

  1. Start the Settings app on your iPhone.
  2. Tap Siri.
  3. Tap Turn On Siri and then follow the onscreen instructions.

    Tip: Tap Try Siri AI (Beta)* to get Siri AI, the new version of Siri powered by Apple Intelligence on watchOS 27 or later. See Get started with Siri AI on Apple Watch.

Activate Siri and make requests

You need to activate Siri before you can ask a question or make a request, even after you turn it on.

Note: To use Siri, Apple Watch must be connected to the internet. Cellular charges may apply.

  • Raise your wrist and speak into your Apple Watch.

    To turn off the Raise To Speak feature, go to the Settings app on your Apple Watch, tap Siri, then turn off Raise to Speak.

  • Say “Hey Siri” or just “Siri,” followed by your request.

    To turn off “Ask Siri,” go to the Settings app on your Apple Watch, tap Siri, tap Listen for “‘Siri’ or ‘Hey Siri'” (or “Hey Siri”), then choose Off.

    Note: The use of “Siri” only is not available in some languages and regions.

  • Press and hold the Digital Crown until you see the listening indicator, then speak your request.

    To turn off the Press Digital Crown feature, go to the Settings app on your Apple Watch, tap Siri, then turn off Press Digital Crown.

Quick tip: You can lower your wrist after you activate Siri; you’ll feel a tap when there’s a response.

If Siri asks you a question, or you want to continue the conversation, hold down the Digital Crown and speak.

Siri can speak responses to you, as it does on iOS, iPadOS, and macOS. You can also hear Siri responses through a Bluetooth headset or speakers connected to your Apple Watch.

Type to Siri and Siri Pause Time

You can type Siri requests if you have difficulty speaking, or ask Siri to wait longer for you to finish speaking.

  1. Start the Settings app on your Apple Watch.
  2. Tap Accessibility and tap Siri. Turn on Type to Siri.
  3. If you want Siri to wait longer for you to finish speaking, tap Longer or Longest under Siri Pause Time.

Turn off Siri

  1. Start the Settings app on your iPhone.
  2. Tap Siri.
  3. Tap Turn Off Siri at the bottom and then tap Turn Off Siri.
  4. If you have Siri AI, but want to use the previous version of Siri, tap Turn On Siri. Tap Use Siri Classic.

*Apple Intelligence is available with Siri and device language set to Chinese (Simplified), Chinese (Traditional), Danish, Dutch, English, French, German, Italian, Japanese, Korean, Norwegian, Portuguese, Spanish, Swedish, Turkish, or Vietnamese. Some features may not be available in all regions or languages. Some devices may not be available in all regions. Siri AI is available in beta in iOS 27, iPadOS 27, macOS 27, watchOS 27, and visionOS 27 and requires an Apple Intelligence–enabled device set to a supported language. Available in English to start. Siri AI will not be initially available in the EU on iOS, iPadOS, and watchOS. Certain Apple Intelligence features that rely on server-side models are subject to daily usage limits, including but not limited to Siri AI, Intelligent Photo Editing Tools, Image Playground, and AFM 3 Cloud models in Shortcuts. Daily limits may vary by feature, request complexity, system demand, system policies, and other factors. Expanded access to such features will be available for a fee in the future. Use of these features is subject to the Apple Intelligence Terms and Conditions.
Tag: Siri

Siri AI is your conversational AI assistant with entirely new capabilities, including personal context understanding, broad world knowledge, onscreen awareness, and the ability to take action in apps. These new capabilities make Siri a more capable assistant by allowing you to find what you need to get more done.

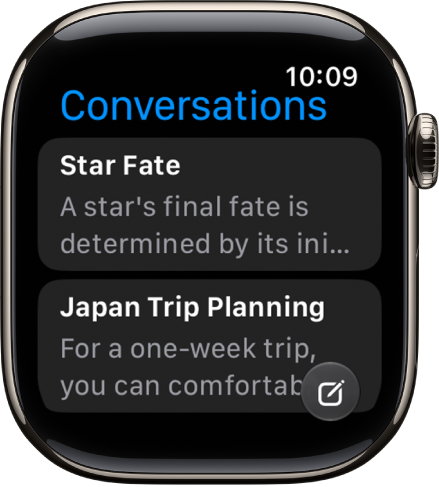
Siri AI has broad world knowledge, so you can ask about virtually any topic, including important facts, recipes, and restaurant recommendations. It can also take action in apps, like setting a new goal for your Activity rings, and the Siri app keeps your conversations together.

The Siri app showing two conversations. A button to start a new conversation appears at the bottom of the screen.

Note: Siri AI is available in beta on watchOS 27 or later on Apple Watch Series 9 and later, Apple Watch Ultra 2 and later, and Apple Watch SE 3 when paired with an Apple Intelligence-enabled iPhone 15 Pro, iPhone 15 Pro Max, or iPhone 16 model or later with Siri and device language set to a supported language. Available in English to start. Siri AI will not initially be available in the EU on iOS and watchOS. Usage limits may apply.*

Get Siri AI on Apple Watch

  1. Open the Settings app on a supported iPhone.
  2. Tap Siri and then do one of the following:
    • If Siri is off: Tap Turn on Siri and then tap Try the new Siri (Beta).
    • If Siri is on, but you decide to use the previous version: Tap Try the new Siri (Beta).
  3. Follow the onscreen instructions.

Ask about any topic

Siri AI has broad world knowledge, which is combined with your personal context to give you detailed, up-to-date, and relevant insights to your questions. Ask about virtually any topic—from tips on how to improve your tennis backhand to details about the world around you.

Siri AI: Activate Siri, then ask a question. For example, say something like, “What’s the best time of year to visit Japan?” or “What’s a good way to teach someone how to play chess?”

Get detailed answers with Siri AI

Find what you need

Siri AI has broad world knowledge and understands your personal context, which means you can ask about virtually any topic—from important facts to recipes and restaurant recommendations. Siri AI can draw on personal context understanding and help users find what they need in the moment across their apps, including messages, emails, photos, and more. For example, search for your driver’s license number, easily find the door code for your upcoming house rental, or pull up the details from a note you saved.

Siri AI: Activate Siri, then say something like, “What’s the last thing I added to my ‘Weekend Projects’ note?” or “Where is next week’s dance class?”

Ask Siri to find what you need

Take action in apps

Siri AI understands your personal context and can take action in apps to help you quickly get things done. For example, share your flight details with your family, play the song your trainer recommended, or set a new goal for your Activity rings with just a single voice request—without having to open any of your apps.

Siri AI: Activate Siri, then say something like, “Update my exercise goal to 45 minutes.” or “Cancel my lunch with Jasmine tomorrow.”

Take action with Siri AI

Discover the Siri app

Siri AI comes with a dedicated Siri app that brings all your conversations in one place, so you can ask a question on your iPhone or any other device, and pick up where you left off on your Apple Watch. You can also pin conversations for easy access or start a new one.

Use the Siri app

Siri is designed to protect your information and to let you choose what you share.

*Apple Intelligence is available with Siri and device language set to Chinese (Simplified), Chinese (Traditional), Danish, Dutch, English, French, German, Italian, Japanese, Korean, Norwegian, Portuguese, Spanish, Swedish, Turkish, or Vietnamese. Some features may not be available in all regions or languages. Some devices may not be available in all regions. Siri AI is available in beta in iOS 27, iPadOS 27, macOS 27, watchOS 27, and visionOS 27 and requires an Apple Intelligence–enabled device set to a supported language. Available in English to start. Siri AI will not be initially available in the EU on iOS, iPadOS, and watchOS. Certain Apple Intelligence features that rely on server-side models are subject to daily usage limits, including but not limited to Siri AI, Intelligent Photo Editing Tools, Image Playground, and AFM 3 Cloud models in Shortcuts. Daily limits may vary by feature, request complexity, system demand, system policies, and other factors. Expanded access to such features will be available for a fee in the future. Use of these features is subject to the Apple Intelligence Terms and Conditions.
See also

Tag: Siri AI

With Siri AI, you have a dedicated Siri app that brings together all your conversations in one place, so you can ask a question on your iPhone and pick up where you left off on your Apple Watch.

You can also pin conversations for easy access, delete them, or start a new one. And when you’re signed in to the same Apple Account on your devices, your conversation history syncs across platforms.

The Siri app showing two conversations. A button to start a new conversation appears at the bottom of the screen.

Note: Siri AI is available in beta on watchOS 27 or later on Apple Watch Series 9 and later, Apple Watch Ultra 2 and later, and Apple Watch SE 3 when paired with an Apple Intelligence-enabled iPhone 15 Pro, iPhone 15 Pro Max, or iPhone 16 model or later with Siri and device language set to a supported language. Available in English to start. Siri AI will not initially be available in the EU on iOS and watchOS. Usage limits may apply.

Start or continue a conversation

  1. Start the Siri app on your Apple Watch.
  2. Do one of the following:
    • Start a new conversation: Tap the New Conversation button, then speak your request.
    • Continue a conversation: Activate Siri, then speak your request.

View your conversation history

You can view your conversation history, and it syncs across platforms if you’re signed in to the same Apple Account.

  1. Start the Siri app on your Apple Watch.
  2. Scroll down to see your conversation history.

Pin and delete conversations

  1. Start the Siri app on your Apple Watch.
  2. Do one of the following:
    • Pin a conversation: Swipe left on a conversation. Then tap the Pin button
    • Delete a conversation: Swipe left on a conversation and tap the Delete button

*Apple Intelligence is available with Siri and device language set to Chinese (Simplified), Chinese (Traditional), Danish, Dutch, English, French, German, Italian, Japanese, Korean, Norwegian, Portuguese, Spanish, Swedish, Turkish, or Vietnamese. Some features may not be available in all regions or languages. Some devices may not be available in all regions. Siri AI is available in beta in iOS 27, iPadOS 27, macOS 27, watchOS 27, and visionOS 27 and requires an Apple Intelligence–enabled device set to a supported language. Available in English to start. Siri AI will not be initially available in the EU on iOS, iPadOS, and watchOS. Certain Apple Intelligence features that rely on server-side models are subject to daily usage limits, including but not limited to Siri AI, Intelligent Photo Editing Tools, Image Playground, and AFM 3 Cloud models in Shortcuts. Daily limits may vary by feature, request complexity, system demand, system policies, and other factors. Expanded access to such features will be available for a fee in the future. Use of these features is subject to the Apple Intelligence Terms and Conditions.
Tag: Siri AI

Apps can send notifications to keep you informed—meeting invitations, messages, noise alerts, and Activity reminders are just a few examples. Apple Watch can display notifications as they arrive, but if you don’t read one right away, it’s saved so you can check it later.

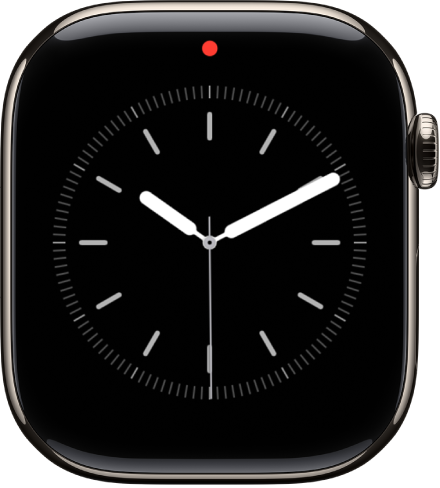
A notification looks different depending on whether the display is active or idle. When you have unread notifications, a red dot appears at the top of your watch face, and they wait for you in Notification Center.

WARNING: For important information about avoiding distractions that could lead to dangerous situations, see Important safety information for Apple Watch.

Respond to a notification when it arrives

  1. If you hear or feel a notification, raise your wrist to view it.

    How the notification looks depends on whether the display is active or idle.

    • Active display: A small banner appears at the top of the display.
    • Idle display: A full screen notification appears.
  2. Tap the notification to read it.
  3. To clear a notification, swipe down on it. Or scroll to the bottom of the notification and tap Dismiss.

See notifications you haven’t read

Notification Center saves any notification you don’t read when it arrives, and a red dot at the top of your watch face means you have unread notifications.

A red dot at the top center of the watch face, indicating unread notifications.

  1. From the watch face, swipe down to open Notification Center. From other screens, touch and hold the top of the screen. Swipe down.

    Note: You can’t open Notification Center when viewing the Home Screen on Apple Watch. Instead, press the Digital Crown to go to the watch face or open an app, then open Notification Center.

  2. Swipe up or down or turn the Digital Crown to scroll the notifications list.
  3. Tap the notification to read or respond to it.

Quick tip: Siri can read your Notification Center notifications aloud, through the Apple Watch speaker or Bluetooth headphones, as soon as you say “Read my notifications.”

To clear a notification from Notification Center without reading it, swipe it to the left, then tap the Delete button. To clear all notifications, scroll to the top of the screen, then tap Clear All.

If you use group notifications, tap a group to open it, then tap a notification.

Quick tip: To keep the red dot off the watch face, go to the Settings app on your Apple Watch, tap Notifications, and turn off Notifications Indicator.

See also

Instantly mute incoming calls, stop timers, and dismiss notifications and alerts by covering the display. You can also mute and dismiss notifications with a wrist flick.

It’s easy. Cover to Mute works on alerts like an incoming phone call or an expired timer, and a haptic tap confirms the notification is muted. Both gestures are on by default, and you can still take follow-up action, like answering the phone call.

Cover the display to temporarily mute an alert

Rest the palm of your hand on the display for at least 3 seconds to quickly silence an alert—such as an incoming phone call or when a timer expires. A haptic tap confirms the notification is muted. You can still take follow-up action such as answering the phone call or resetting the timer.

By default, Cover to Mute is turned on. To turn it off, go to the Settings app on Apple Watch, then tap Gestures.

Perform a wrist flick to mute and dismiss notifications

A quick turn of your wrist, over and back, dismisses anything and returns you to the watch face. When your hands are full, you can still mute incoming calls, stop timers, dismiss notifications, and more.

By default, Wrist Flick is turned on. To turn it off, go to the Settings app on Apple Watch, then tap Gestures.

If you need to silence notifications for an extended period, you can turn on Silent Mode, Do Not Disturb, or another mode in Control Center. For details, see our guide, Silence notifications for extended periods on Apple Watch.

See also

When you don’t want to get alerts and notifications for an extended period, you can turn on Silent Mode, Theater Mode, or Do Not Disturb. You can also use a Focus that you can customize with a schedule, allowable notifications, and more.

Silent Mode mutes alerts, but you still receive haptic notifications. Theater Mode goes further, keeping the display dark when you raise your wrist. Alarms and timers still sound when your watch is charging, even in Silent Mode.

To immediately silence something such as a phone call or alarm, see Use gestures for notifications and alerts on Apple Watch.

Choose a mode for extended silencing

Silent Mode Theater Mode Do Not Disturb Focus
Sounds Off Off Off Off (with exceptions you set)
Haptics On (if you allow) On (if you allow) Off Off (with exceptions you set)
Visual notifications On Off Off Off (with exceptions you set)
Display On Off On On (except for customizable modes like Sleep)
Options — — Can turn on for 1 hour, until you leave location, until event ends, or indefinitely Can set schedules and customize allowed notifications
Good for Quiet environments where you want to see and feel notifications Dark venues like theaters and movies Meetings, appointments, and instances when you want to prevent all notifications Sleep, work, and other activities with specific notification needs
Learn More Turn on Silent Mode Turn on Theater Mode Turn on Do Not Disturb Turn on Focus

Turn on Silent Mode

Silent Mode mutes all alerts, notifications, and sound effects, but you still receive haptic notifications.

Note: Even in Silent Mode, alarms and timers still sound while Apple Watch is charging.

  1. Press the side button to open Control Center on Apple Watch.
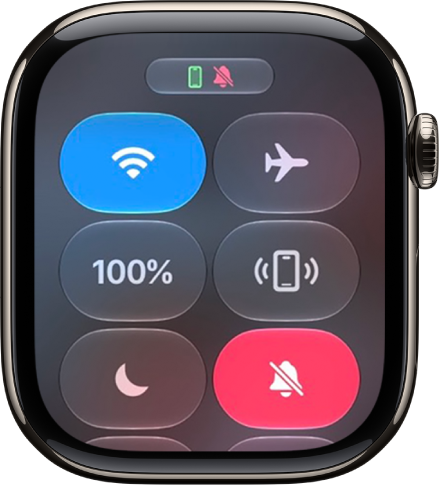
  2. Tap the Silent Mode button.

    Control Center with the Silent Mode button selected.

You can also go to the Apple Watch app on your iPhone, tap My Watch, tap Sounds & Haptics, then turn on Silent Mode.

Turn on Theater Mode

With Theater Mode, the Apple Watch display stays dark. It doesn’t turn on when you raise your wrist. Theater Mode turns on Silent Mode as well, and you still receive haptic notifications.

  1. Press the side button to open Control Center on Apple Watch.
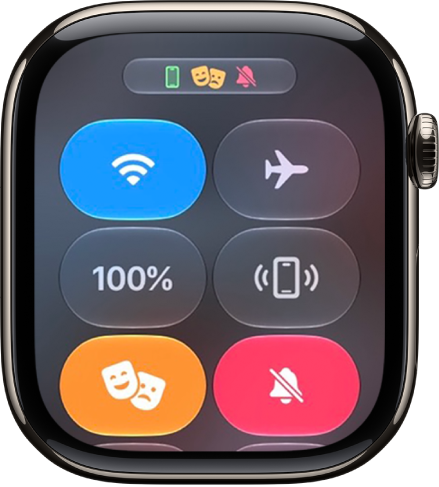
  2. Tap the Theater Mode button.

    Control Center with Theater Mode button highlighted to show Theater Mode is on.

The Theater Mode status icon at the top of the screen shows when Theater Mode is on.

To wake Apple Watch when Theater Mode is on, tap the display, press the side button, or turn or press the Digital Crown.

Turn on Do Not Disturb or a Focus

To prevent sound and haptic notifications, do the following:

  1. Press the side button to open Control Center on Apple Watch.
  2. Tap the Do Not Disturb button and then choose Do Not Disturb or a Focus.
  3. Tap On or choose an ending point—such as On for 1 hour or On until I leave.

To set up your own Focus, read our guide, Create a custom Focus.

See also

Focus helps you stay in the moment so you can concentrate on what matters most to you. It reduces distractions by allowing only notifications you want to receive (ones that match your focus)—and lets other people and apps know you’re unavailable.

You can choose from the default Focus settings—Do Not Disturb, Personal, Sleep, and Work—or create a custom Focus on your iPhone. You can choose who is allowed to contact you, which apps can send you notifications, and whether you receive time-sensitive notifications. And when you set up Focus on your iPhone, your Apple Watch automatically uses the same preferences, so turning on a Focus on your watch turns it on for your iPhone, too.

Turn a Focus on or off

Turning on a Focus on your Apple Watch automatically activates it on your iPhone too.

  1. Press the side button to open Control Center on Apple Watch.

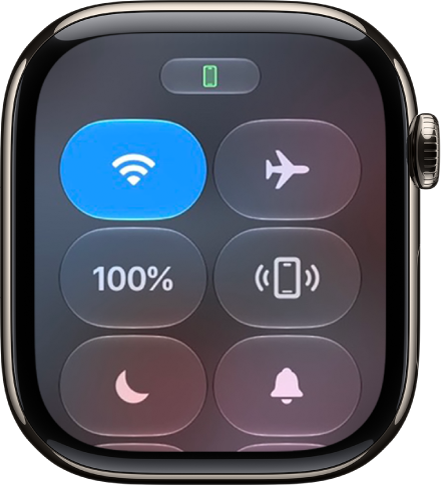
    If no Focus is on, the Do Not Disturb button is gray.

    In Control Center, the Focus button is gray when Focus is turned off.

  2. Tap the Focus control, then choose a Focus.
  3. Select how long you want the Focus to stay active.

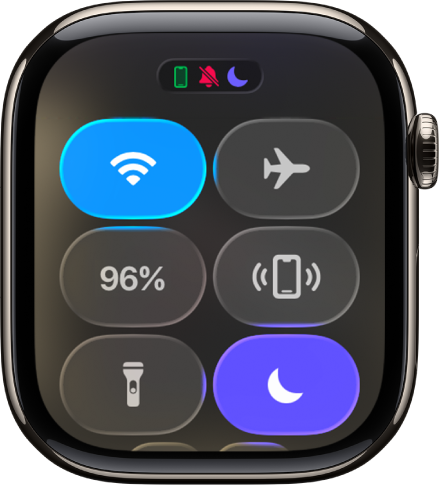
An active Focus shows its Focus icon in Control Center, at the top of the watch face, and next to the time in apps.

In Control Center, Do Not Disturb is turned on.

To turn off a Focus, tap the Focus control in Control Center.

Create a custom Focus

A Focus you customize on your iPhone automatically appears on your Apple Watch too, and you can pick a color, icon, and name for it.

  1. Open the Settings app on your iPhone.
  2. Tap Focus and tap the Add button.
  3. Choose a Focus type, then follow the onscreen instructions.

Choose a Focus watch face

You can choose a different watch face for each Focus on your iPhone, so it displays whenever that Focus is active. With Work Focus active, for example, your Apple Watch can display the Simple watch face.

  1. Open the Settings app on your iPhone.
  2. Tap Focus, then choose a Focus.
  3. Scroll down to Customize Screens. Then tap Choose (below the Apple Watch image).
  4. Select a watch face and then tap Done.

Create a Focus schedule

Whether you set up a schedule for a Focus on your iPhone or Apple Watch, it automatically works on both devices.

To create a schedule on your iPhone, go to Settings app, tap Focus, choose a focus, then tap Add Schedule.

To create a schedule on your Apple Watch, follow these steps:

  1. Open the Settings app on your Apple Watch.
  2. Tap Focus, tap a Focus—Work, for example—then tap Add new.
  3. Tap the From and To fields and enter the times you want the Focus to begin and end.
  4. Scroll down, then choose days when the Focus is active.
  5. Tap the Back button in the top-left corner to save the Focus.
  6. Repeat this process to add other events to the Focus.

Turn off or delete a Focus schedule

If you’re on vacation, for example, you can temporarily turn off a Focus schedule or delete it permanently.

  1. Open the Settings app on your Apple Watch.
  2. Tap Focus and choose a Focus. Tap a schedule.
  3. Scroll down, then turn off Enabled or tap Delete.

Share your Focus settings across all your devices

Your iPhone and Apple Watch share the same Focus settings, and so do your other Apple devices that are signed in to the same Apple Account.

  1. Open the Settings app on your iPhone.
  2. Tap Focus and then turn on Share Across Devices.

See also

Tag: Focus

By default, the notification settings for the apps on an Apple Watch that you set up for yourself mirror the settings on your iPhone. But you can customize how some apps display notifications.

You can choose how apps send notifications from the Apple Watch app on your iPhone, or change notification settings directly on Apple Watch. Swiping left on a notification gives you quick options, too, like Mute 1 hour or Mute for Today. And you can choose whether notifications show on the Lock Screen.

Note: An Apple Watch you manage for a family member doesn’t use mirrored settings.

Choose how apps send notifications

  1. Start the Apple Watch app on your iPhone.
  2. Tap My Watch, then tap Notifications.
  3. Tap the app (for example, Messages), tap Custom, and choose an option. Options may include:
    • Allow Notifications: The app displays notifications in Notification Center.
    • Send to Notification Center: Notifications are sent directly to Notification Center without Apple Watch making a sound or displaying the notification.
    • Notifications Off: The app sends no notifications.
  4. Notification grouping: Choose how notifications for the app are grouped. Options include:
    • Off: Notifications aren’t grouped.
    • Automatically: Apple Watch uses information from the app to create separate groups. For example, News notifications are grouped by the channels you follow.
    • By App: All the app’s notifications are grouped.

Quick tip: In some apps, you can choose the specific kind of notifications you receive. Calendar, for instance, can allow notifications only for certain calendars or specific actions, such as when you get an invitation or someone changes a shared calendar. And in Mail, you get to choose which email accounts are allowed to send notifications.

Change notification settings directly on Apple Watch

You can manage other notifications preferences directly on Apple Watch by swiping left on a notification and tapping the More button. Options may include:

  • Mute 1 hour or Mute for Today: For the next hour or for the rest of the day, notifications are sent directly to Notification Center without Apple Watch making a sound or displaying the notification. To see and hear these notification alerts again, swipe left on a notification, tap the More button, then tap Unmute.
  • Add to Summary: Future notifications from the app appear in the Notification Summary on your iPhone.

    To have the app once again notify you immediately, go to the Settings app on your iPhone, tap Notifications, tap the app, then tap Immediate Delivery.

  • Turn off Time Sensitive: Time-sensitive notifications are always delivered immediately, even if you’re using a Focus that delays most notifications. However, if you want to prevent this app from delivering even time-sensitive notifications immediately, tap this option.
  • Turn off: The app sends no notifications. To reenable notifications from the app, go to the Apple Watch app on your iPhone, tap My Watch, tap Notifications, tap the app you want to adjust, then tap Allow Notifications.

Show notifications on the Lock Screen

How notifications appear on the Lock Screen of Apple Watch is your choice.

  1. Start the Settings app on your Apple Watch.
  2. Tap Notifications.
  3. Choose the following options:
    • Show Summary When Locked: With this option on, Apple Watch shows a notification summary—or short look—when it’s locked. The summary includes the notifying app’s name and icon along with a brief headline.
    • Tap to Show Full Notification: When you raise your wrist to see a notification, you see a quick summary. Full details a few seconds later. For example, when a message arrives, you see who it’s from first. The message appears. Turn on this option to stop the full notification from appearing unless you tap it.
    • Show Notifications on Wrist Down: By default, notifications don’t appear on Apple Watch when your wrist is down. Turn on this option to make notifications appear, even when Apple Watch is turned away from you.

See also

Your heart rate is an important way to monitor how your body is doing. You can check your heart rate during a workout; see your resting, walking, workout, and post-workout heart rates, and your heart rate during a Breathe session; or take a new reading at any time.

Heart rate data is on by default, and it feeds the Heart Rate app, workouts, and Breathe and Reflect sessions. You can see graphs of your data, too.

Here’s how to check your heart rate on Apple Watch.

Note: Make sure that your wrist and your Apple Watch are clean and dry. Water and sweat can cause a poor recording.

Turn on heart rate data

Your Apple Watch monitors your heart rate by default for workouts, the Heart Rate app, and Breathe and Reflect sessions. Turning heart rate data back on is always an option if you’ve switched it off.

  1. Open the Settings app on your Apple Watch.
  2. Tap Privacy & Security and tap Health.
  3. Tap Heart Rate, then turn on Heart Rate.

You can also open the Apple Watch app on your iPhone, tap My Watch, tap Privacy, then turn on Heart Rate.

See your heart rate

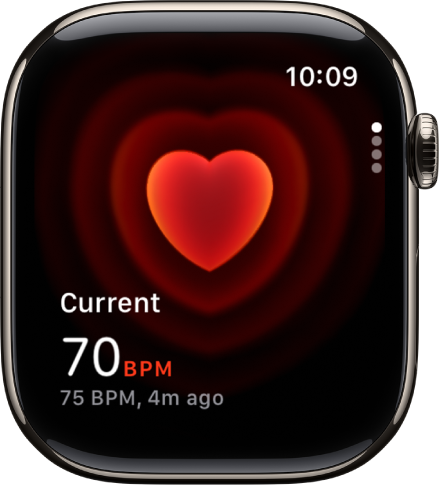
Go to the Heart Rate app on your Apple Watch to view your current heart rate.

A Heart Rate screen, with your current heart rate showing in the bottom left, and your last reading in smaller type below that.

As long as you’re wearing it, your Apple Watch keeps measuring your heart rate.

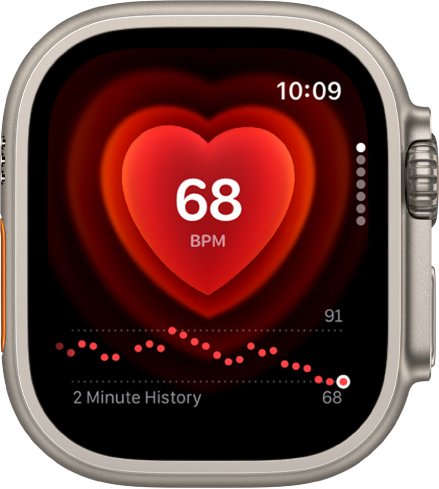
On Apple Watch Series 12 and Apple Watch Ultra 4, you can view a chart of your heart rate measurements as it updates in real time. To turn off these measurements, go to the Apple Watch app on your iPhone, tap Apps, tap Heart, then turn off Continuous Measurements.

The Heart Rate app showing a heart rate reading. A graph of heart rate data appears at the bottom of the screen.

See a graph of your heart rate data

  1. Open the Heart Rate app on your Apple Watch.
  2. Turn the Digital Crown to Range, Resting Rate, or Walking Average to show your heart rate throughout the day.
  3. To learn more about your heart rate data, tap the Info button.

To see your heart rate data over a longer period of time, go to the Health app on your iPhone, tap Browse, tap Heart, then tap an entry. You can show heart data for the last hour, day, week, month, or year.

View your recovery heart rate variability

Apple Watch Series 12 and Apple Watch Ultra 4 can show your recovery heart rate variability, or HRV, which measures the overall variation in time between heart beats.

  1. Open the Heart Rate app on your Apple Watch.
  2. Turn the Digital Crown to Heart Rate Variability to view your data.
  3. To learn more, tap the Info button.

Note: The back of your Apple Watch needs skin contact for features like wrist detection, haptic notifications, blood oxygen level measurements, and the heart rate sensor. Wearing your Apple Watch with the right fit—not too tight, not too loose, and with room for your skin to breathe—keeps you comfortable and lets the sensors do their job.

See also

Tag: Health

Apple Watch has an electrical heart rate sensor that, along with the ECG app, allows you to take an electrocardiogram (or ECG). It’s quick.

To use the ECG app, update your iPhone 11 or later or iPhone SE (2nd generation or later) to the latest version of iOS and Apple Watch to the latest version of watchOS. Then you set it up in the Health app and record from your wrist, and at the end of the recording, you receive a classification.

Note: The ECG app isn’t available on Apple Watch SE 3 or in all countries or regions.

  1. Open the Health app on your iPhone and then follow the onscreen steps to set up ECG.

    If you don’t see a prompt to set up, tap Browse at the bottom-right, tap Heart, then tap Electrocardiogram (ECG).

  2. Open the ECG app on your Apple Watch.
  3. Rest your arm on a table or in your lap.
  4. With the hand opposite your watch, hold your finger on the Digital Crown. Wait while Apple Watch records the ECG.

    You don’t need to press the Digital Crown during the session.

At the end of the recording, you receive a classification. You can then tap Add Symptoms and choose your symptoms. Tap Save to note any symptoms, then tap Done. To view your results on iPhone, go to the Health app on iPhone, tap Browse at the bottom-right, tap Heart, then tap Electrocardiograms (ECG).

Important: To ensure the best reading after swimming, showering, heavy perspiration, or washing your hands, clean and dry your Apple Watch. It may take 1 hour or more for Apple Watch to completely dry. ECG is designed to function between 32 and 95 °F (0 and 35 °C).

See also

Tag: Health