Got a tip for us?

iPhone

The iPhone is a smartphone from Apple that runs the iOS mobile operating system. Between its apps, communication features, the camera, mobile internet access, and other functionalities, the iPhone has quickly become an integral part of many peoples tech lives.

Control iPhone and its apps using a few simple gestures: tap, touch and hold, swipe, scroll, and zoom. For example, with these gestures you can open an app from its icon on the Home Screen, see more apps, see more of a list in Photos, and zoom in on a photo or webpage.

Symbol Gesture
An icon symbolizing the tap gesture. Tap. Briefly touch an item on the screen with one finger. For example, to open an app, tap its icon on the Home Screen.
An icon symbolizing the touch and hold gesture. Touch and hold. Press an item on the screen until something happens. For example, if you touch and hold the wallpaper of the Home Screen, the app icons begin to jiggle.
An icon symbolizing the swipe gesture. Swipe. Move one finger across the screen quickly. For example, swipe left on the Home Screen to see more apps.
An icon symbolizing the scroll gesture. Scroll. Move one finger across the screen without lifting. For example, in Photos, you can drag a list up or down to see more. Swipe to scroll quickly; touch the screen to stop scrolling.
An icon symbolizing the zoom gesture. Zoom. Place two fingers on the screen near each other. Spread them apart to zoom in, or move them toward each other to zoom out. You can also double-tap a photo or webpage to zoom in, and double-tap again to zoom out. In Maps, double-tap and hold, then drag up to zoom in or drag down to zoom out.
Tag: iPhone

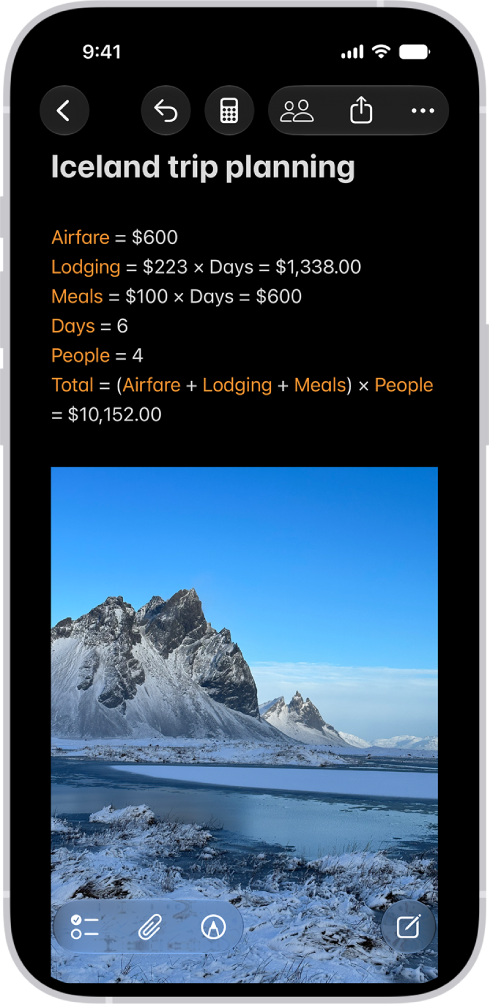
You can solve mathematical expressions, create and use variables, or graph equations, for example, when learning new concepts in class, doing day-to-day budgeting, planning an event, remodeling your home, and more.

You can update values, and choose to show results automatically or as suggestions. You can even use a light background, and a Math Note can include a drawing of the problem.

Here’s how to solve math with Math Notes in Calculator on iPhone.

Note: Math Notes works with common mathematical symbols and the same operations as the scientific calculator, plus select numeric systems for written math and variable names.

A Math Note open in Calculator, with declared variables, equations, and a drawing of the math problem.

Solve expressions

  1. Start the Calculator app on your iPhone.
  2. Tap the Change Mode button and tap Math Notes.
  3. Tap to open a previous Math Note, or tap the New Note button to start a new one.
  4. Do any of the following:
    • Type a math expression, then include an equal sign.
    • Tap the Handwriting button, write a math expression horizontally, then include an equal sign.
    • Tap the Handwriting button, write a stack of numbers, then draw a horizontal line below the numbers to add the numbers in the stack. Write a different symbol to the left of each number if you want a different operation.
  5. Tap the equal sign to see what Math Notes understood in what you wrote. To correct mistakes, you can fix any of the following:
    • Unrecognized math and unsolvable expressions: Tap any dotted red lines to see details about the error.
    • Ambiguous characters: Tap any dotted blue lines to clarify what you wrote.

In horizontal expressions, Math Notes follows the standard order of operations, so multiplication is completed before addition and subtraction, for example. Put parentheses around expressions you want calculated first. For vertically stacked math, Math Notes evaluates expressions from top to bottom.

Math Notes converts any units and currency in expressions automatically, and you can even mix different systems, like 42 meters + 143 feet. Units and currency available here match those in the Convert mode of the basic or scientific calculator.

Update values

  1. Start the Calculator app on your iPhone.
  2. Tap the Change Mode button, tap Math Notes, and tap the note you want to update.
  3. Do one of the following:
    • Erase the number, then enter a new value.
    • Tap the number, then slide left and right to adjust the value using the scrubber that appears above the number.

Graphs using the values update automatically, and when the value is assigned to a variable, any equations using that variable update their results or graphs automatically, too.

Use variables in expressions and equations

  1. Start the Calculator app on your iPhone.
  2. Tap the Change Mode button and tap Math Notes.
  3. Tap to open a Math Note, or tap the New Note button to start a new one.
  4. To declare a variable, type or write a letter or word to use as the variable, followed by an equal sign.
  5. Type or write a value or expression after the equal sign to assign a value to the variable.
  6. Type or write the variable name in an expression or an equation to use it.

Note: Math Notes reads entries from top left to bottom right, so declare a variable (for example, x = 5) before you use it in an expression (such as x + 10 =). If you write an expression without declaring the variable first, you’ll get an error. Variable names can only contain characters from the Latin alphabet, and you can’t use variables in vertical math.

Use equations with two or three variables to graph in two or three dimensions.

Show results automatically or as suggestions

How your iPhone responds to the math problems you enter in Math Notes is up to you.

  1. Start the Calculator app on your iPhone.
  2. Tap the Change Mode button and tap Math Notes.
  3. Tap to open a previous Math Note, or tap the New Note button to start a new one.
  4. Enter text, or tap the Handwriting button and begin writing with your finger.
  5. Tap the More button, tap Math Results, and then do one of the following:
    • If you want problems to be solved: Choose Insert Results. Answers appear automatically when you type or write a solvable math problem.
    • If you want suggestions to appear: Choose Suggest Results. When you type or write an equal sign or select a solvable math problem, a Solve button appears that, when tapped, inserts the answer.
    • If you don’t want any math results: Choose Off. Answers don’t appear when you type or write an equal sign after an expression.

Use a light background

By default, Math Notes uses a dark background, though you can switch to a light one.

  1. Start the Calculator app on your iPhone.
  2. Tap the Change Mode button and tap Math Notes.
  3. Tap to open a previous Math Note, or tap the New Note button to start a new one and enter text or write.
  4. Tap the More button and tap Use Light Background.

Notes can show lines or grids, too.

Tag: Notes

In the Reminders app, you can create a grocery list to make shopping easier. Items are automatically sorted into categories such as Produce and Seafood. On supported devices, Apple Intelligence* sorts your items even when the list uses more than one language.

You’re not stuck with the defaults. You can change how items are grouped, and the list remembers your preferences. You can also convert an existing list to a grocery list.

Note: If you use updated reminders in iCloud, you’ll have every Reminders feature described in this guide, though some aren’t available when using other accounts.

Create a new grocery list

  1. Open the Reminders app on your iPhone.
  2. Tap the Add List button.
  3. Enter a name for the list, tap List Type, and choose Groceries.
  4. Choose a color and symbol for the list (optional).
  5. Tap the Done button.

With Apple Intelligence*, Reminders can automatically create a list of suggested grocery items from text in other apps—for example, an online recipe in Safari. Note: Apple Intelligence on iOS 27 or later is available on an Apple Intelligence-enabled iPhone 15 Pro, iPhone 15 Pro Max, or iPhone 16 model or later. Apple Intelligence is not available in all languages or regions. Usage limits may apply.

Convert an existing list to a grocery list

  1. Open the Reminders app on your iPhone.
  2. Tap a list and tap the More button.
  3. Tap Show List Info.
  4. Tap List Type, then choose Groceries.
  5. Tap the Done button.

Add an item to your grocery list

  1. Open the Reminders app on your iPhone.
  2. In your grocery list, tap the New Item button. Enter a description.
  3. To enter more information, tap Add Note.
  4. Tap the Edit Details button to edit the item details. For example, you can attach a photo, set a location-based reminder, or flag an important item.
  5. Tap the Done button.

Items added to the list are automatically placed in categories. If you enter grocery items in a language different from the system language of your iPhone, you can add an additional language in Settings. (Grocery categorization is available for supported languages.) *Apple Intelligence is available with Siri and device language set to Chinese (Simplified), Chinese (Traditional), Danish, Dutch, English, French, German, Italian, Japanese, Korean, Norwegian, Portuguese, Spanish, Swedish, Turkish, or Vietnamese. Some features may not be available in all regions or languages. Some devices may not be available in all regions. Siri AI is available in beta in iOS 27, iPadOS 27, macOS 27, watchOS 27, and visionOS 27 and requires an Apple Intelligence–enabled device set to a supported language. Available in English to start. Siri AI will not be initially available in the EU on iOS, iPadOS, and watchOS. Certain Apple Intelligence features that rely on server-side models are subject to daily usage limits, including but not limited to Siri AI, Intelligent Photo Editing Tools, Image Playground, and AFM 3 Cloud models in Shortcuts. Daily limits may vary by feature, request complexity, system demand, system policies, and other factors. Expanded access to such features will be available for a fee in the future. Use of these features is subject to the Apple Intelligence Terms and Conditions.

When you dictate text on iPhone, you can use commands for punctuation, formatting, capitalization, and more. In some languages, you can insert emoji using your voice while dictating. The commands listed below are always available while you’re dictating text.

They’re easy to remember. Say “period” or “comma,” and you get the punctuation mark, or say “new paragraph” to start a new paragraph. You can also change, insert, and delete text with your voice.

Note: Dictation may not be available in all languages or in all countries or regions, and features may vary.

When using Dictation, cellular data charges may apply.

Punctuation

Command Result
Period .
Comma ,
Exclamation point !
Question mark ?
Dollar sign \$
Open parenthesis (
Close parenthesis )
Quote “
End quote “
Colon :
Semicolon ;
Hashtag #

As you dictate text in some languages, Dictation adds certain punctuation automatically.

Format text

Command Result
Cap Capitalize the next word
Caps on … caps off Capitalize the first character of each enclosed word
All caps Make the next word all uppercase
All caps on … all caps off Make the enclosed words all uppercase
No caps on … no caps off Make the enclosed words all lowercase
No space Eliminate the space between two words (not available for all languages)
No space on … no space off Run a series of words together (not available for all languages)
New paragraph Start a new paragraph
New line Start a new line

Change, insert, and delete text

In U.S. English, you can use Dictation commands to edit text on iPhone 12 and later, except iPhone SE.

Command Result
Change … to … Replace existing text with new text
Insert … before … Insert new text before existing text
Insert … after … Insert new text after existing text
Select … Select text
Delete … Delete text
Delete all Delete all text
Undo Undo the action
Redo Redo the action

Insert emoji

In certain languages, you can insert emoji while dictating. Say “heart emoji” to get the heart emoji, for example, or “car emoji” for the car emoji. You’ll find more examples of emoji commands and the results they produce below.

Command Result
Smiley emoji The smiley emoji.
Halo emoji The halo emoji.
Laugh out loud emoji The laugh out loud emoji.
Heart eyes emoji The heart eyes emoji.
Amazing emoji The amazing emoji.
Yum emoji The yum emoji.
Congrats emoji The congrats emoji.
Goofy emoji The goofy emoji.
Sick emoji The sick emoji.
Scream emoji The scream emoji.
Hug emoji The hug emoji.
Fingers crossed emoji The fingers crossed emoji.
Purple heart emoji The purple heart emoji.
Cheers emoji The cheers emoji.
Celebrate emoji The celebrate emoji.
Speech balloon emoji The speech balloon emoji.
Puppy emoji The puppy emoji.
Music emoji The music emoji.
Rainbow emoji The rainbow emoji.
Present emoji The present emoji.

You can send a copy of any file to others. If you have a document you want to send that isn’t digitized, you can scan it with the Files app first.

To send a smaller version, you can compress a file before you share it. You can also reply to a document you received. And if your files are stored in iCloud Drive, you can invite others to collaborate on files with you.

Here’s how to send files from the Files app on iPhone.

Send a file

  1. Open the Files app on your iPhone.
  2. Touch and hold the file you want to send and tap Share.

    Tip: To send a smaller version of the file, tap Compress before you tap Share, touch and hold the compressed version of the file (identified as a ZIP file), then tap Share.

  3. Choose an option for sending (for example, AirDrop, Messages, or Mail). Tap Send.

Reply to a received document

Saved an attachment from the Mail app? Reply to the email quickly, and you can return the attachment if you want.

  1. Open the Files app on your iPhone.
  2. Touch and hold the file you want to reply to and then tap Reply to.

Scan a document

  1. Open the Files app on your iPhone.
  2. Open the location or folder where the document you want to scan is located.
  3. Tap the More button and tap Scan Documents.

Quick tip: There’s no need to send copies of files or folders stored in iCloud Drive. Instead, you can invite others to view or edit their contents.

Tag: Files

You can make a screen recording to capture what’s happening on your iPhone screen and save it as a video. You can even turn on the microphone to add audio.

Recording starts after a 3-second countdown, and your screen recordings are saved to your photo library automatically. The Screen Recording control is in Control Center, and you can review your screen recordings with your other media types in the Photos app.

Note: Recording your screen and using screen mirroring at the same time isn’t possible, and some apps might not let you record their content.

Record the iPhone screen

  1. Swipe down from the top-right corner of the screen to open Control Center.

    If you don’t see the Screen Recording control, add it to Control Center.

  2. Tap the Screen Recording button and then wait for the 3-second countdown to start recording.
  3. Swipe up to dismiss Control Center and then perform the action you want to record.
  4. To stop recording, do one of the following:

    • If your iPhone has a Dynamic Island: Tap the red circle. Then tap the Stop Screen Recording button.
    • For all other models: Tap the timer (highlighted in red) in the top left of the screen. Tap Stop.

Take a screen recording with audio

  1. Swipe down from the top-right corner of the screen to open Control Center.
  2. Touch and hold the Screen Recording button, tap Microphone to turn it on, and tap Start Recording.
  3. Wait for the 3-second countdown, then start recording.

Review your screen recordings

Screen recordings are automatically saved to your photo library.

  1. Open the Photos app on your iPhone.
  2. Tap Collections, scroll down to Media Types, and then tap Screen Recordings.
Tag: Photos

During a call in the FaceTime app, you can turn Portrait mode or your camera on or off, switch between cameras, or show both front and rear cameras on supported models.

Portrait mode blurs the background on its own and keeps the focus on you. You can also switch to the rear camera. And with Dual Capture, you can share both cameras.

Here’s how to use camera controls during a FaceTime call on iPhone.

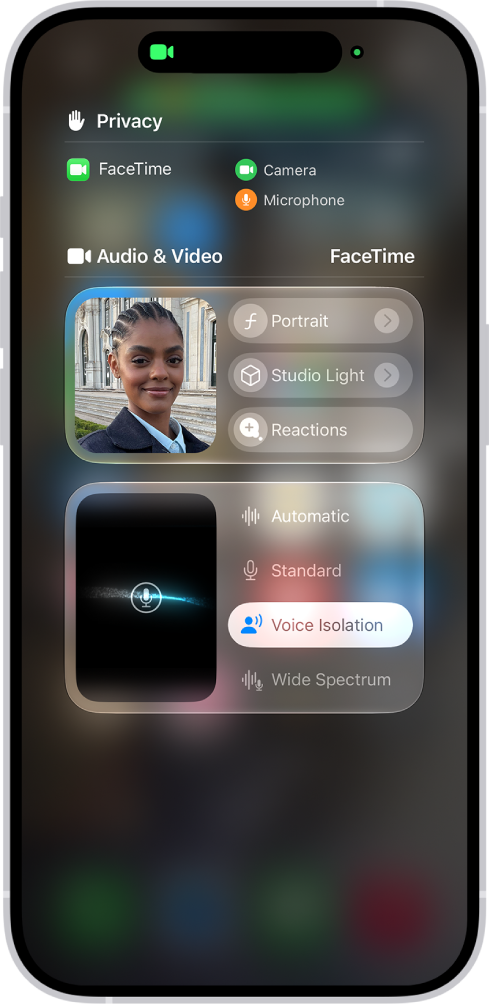
The Control Center, showing options for audio and video effects.

Blur the background with Portrait mode

Portrait mode works the same way during a FaceTime call as it does in Camera, automatically blurring the background and putting the visual focus on you.

  1. During a call in the FaceTime app on your iPhone, tap your tile.
  2. Tap Portrait.

To turn Portrait mode off, tap the button again.

You can also turn on Portrait mode in Control Center. Open Control Center, then tap FaceTime Controls.

Switch to the rear camera

  1. During a call in the FaceTime app on your iPhone, tap your tile.
  2. Tap the Flip to Back Camera button.

To switch back to the front-facing camera, tap the Flip to Front Camera button again.

Note: With the rear camera on, tapping 1x adjusts the image, and the label updates to show the current zoom (from 0.5x to 6x). Pinching your fingers in or out adjusts the zoom too.

Share both cameras with Dual Capture

Dual Capture, available on iPhone 17 or later with iOS 27 or later, lets you share both cameras. The person you’re talking with sees your face in a small window within the rear camera view.

Note: The other participant needs iOS 27, iPadOS 27, macOS 27, or later.

  1. During a one-on-one call in the FaceTime app on your iPhone, tap your tile.
  2. Tap the Flip to Back Camera button.

    By default, both the front and back camera show.

  3. To share only the rear camera, tap the Hide Front Camera button

    The front camera stays hidden while the back camera remains showing. This setting persists on future calls until you tap the Show Front Camera button again.

Turn off your camera

  1. During a call in the FaceTime app on your iPhone, tap the screen to show the controls.
  2. Tap the Camera Switch button. Tap it again to turn the camera back on.

In the Image Playground app, you can use Apple Intelligence to create original images within seconds. Get started using simple text descriptions, photos, and people from your Photos library. You can also use Image Playground to create images in Messages, Lock Screen wallpapers, contact posters, and more.

You can choose a style, like Illustration, add up to three people from your Photos library, and pick an aspect ratio. Everything you make is saved to your gallery automatically.

Here’s how to create original images with Image Playground on iPhone.
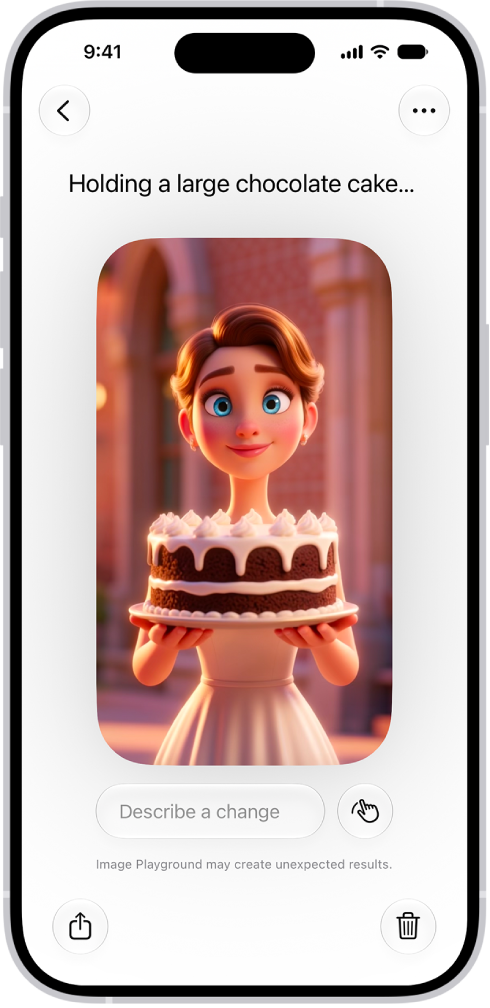
The Image Playground app window showing a created image of a woman holding a cake.

Note: Apple Intelligence on iOS 27 or later is available on an Apple Intelligence-enabled iPhone 15 Pro, iPhone 15 Pro Max, or iPhone 16 model or later. Apple Intelligence is not available in all languages or regions. Usage limits may apply.*

Create an image

  1. Start the Image Playground app on your iPhone.
  2. Tap the New Image button.
  3. Do any of the following to customize your image:
    • Describe it: Enter a description.
    • Choose a style: Tap the Style button and then choose an Apple Intelligence style (like Any Style or Illustration) or tap ChatGPT** to describe the style you want. Note: If you choose Any Style, you can describe the style you want as part of your image description. If you choose Genmoji, you can save it with your stickers.
    • Add a person from your Photos library: Tap the Add Person button and select a person. You can add up to three people. Note: If you provide a text description that doesn’t match the person you selected, your image is personalized based on the photo you selected rather than the text description.
    • A photo of something else, like a pet, nature, or food: Tap the Add Photo button and choose an option.
    • Choose the aspect ratio: Tap the Aspect Ratio button and then choose an option.
  4. Tap the Submit button to create your image.

All changes are automatically saved to your gallery. If you created a Genmoji, tap Add Emoji to add it with your stickers. To view the images in your gallery, tap the Back button. All the versions you create for a single idea are grouped together.

Besides the Image Playground app, you can use Image Playground features to create original images in apps like Messages and Freeform. You’ll also find Image Playground in Pages, Keynote, Apple Invites, supported third-party apps, and more.

Edit an existing image

  1. Start the Image Playground app on your iPhone.
  2. Tap an image in the gallery.
  3. Do any of the following to refine your image:
    • Describe a change: Enter a description to transform the background, change the style, or add something entirely new.
    • Make targeted edits: Tap the Edit button and then tap, brush, or circle a specific object. You can move it, resize it, or swap it out with another image. Use the buttons at the bottom of the screen to add elements, or to change or remove the object you selected. Tap Apply Change when you’re ready to save your edits. Note: Swipe up or down to move between versions of your image. You can move to a different version at any time and keep refining from there.
  4. When you’re finished, tap the Done button.

Share, copy, or delete an image

  1. Start the Image Playground app on your iPhone.
  2. Tap an image, then do any of the following:
    • Share your image: Tap the Share button and choose a share option.
    • Copy your image: Tap the More button, then tap Copy or Duplicate.
    • Delete your image: Tap the More button and then tap Delete.

Note: If you delete an image from Image Playground, it disappears from every device where you’re signed in to the same Apple Account.

In Screen Time settings, you can block access to image creation features, like Image Playground.

The recommended age for realistic images is 18+, according to Apple.

*Apple Intelligence is available with Siri and device language set to Chinese (Simplified), Chinese (Traditional), Danish, Dutch, English, French, German, Italian, Japanese, Korean, Norwegian, Portuguese, Spanish, Swedish, Turkish, or Vietnamese. Some features may not be available in all regions or languages. Some devices may not be available in all regions. Siri AI is available in beta in iOS 27, iPadOS 27, macOS 27, watchOS 27, and visionOS 27 and requires an Apple Intelligence–enabled device set to a supported language. Available in English to start. Siri AI will not be initially available in the EU on iOS, iPadOS, and watchOS. Certain Apple Intelligence features that rely on server-side models are subject to daily usage limits, including but not limited to Siri AI, Intelligent Photo Editing Tools, Image Playground, and AFM 3 Cloud models in Shortcuts. Daily limits may vary by feature, request complexity, system demand, system policies, and other factors. Expanded access to such features will be available for a fee in the future. Use of these features is subject to the Apple Intelligence Terms and Conditions.

**ChatGPT uses generative models and outputs may vary. Check important information for accuracy. When using the ChatGPT extension, you choose what content to send to ChatGPT. Your request and attachments, as well as limited data associated with the request, such as current time zone, country, device type, language, and feature being used when making the request, are sent to ChatGPT to answer your request and enable ChatGPT to provide you accurate and relevant results.


You can use NameDrop to quickly share new contact information with a nearby iPhone or Apple Watch (Apple Watch Ultra models, Apple Watch Series 7 and later, and Apple Watch SE 2nd generation or later). It’s meant for sending new contact information, not for updating a contact you already have, and you can turn off NameDrop, too.

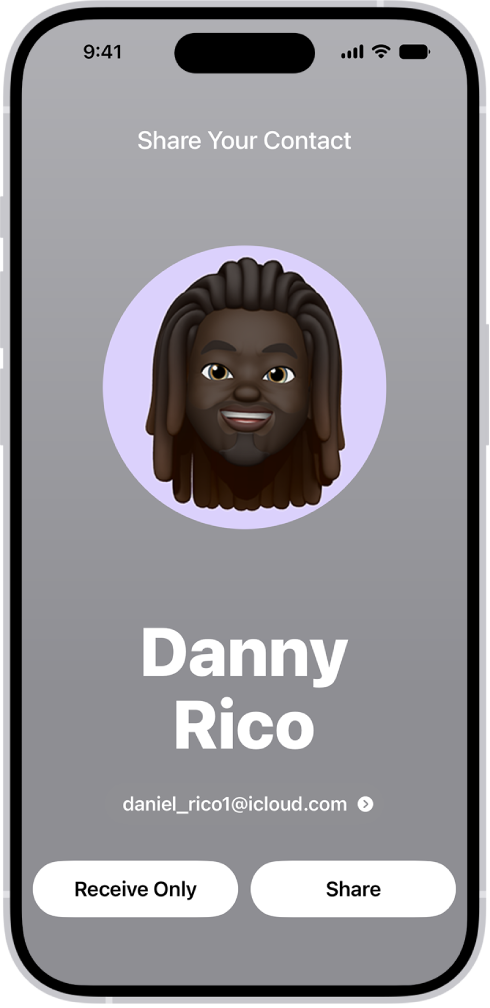
A NameDrop screen showing the user’s name and number. Below it are buttons to Receive Only or Share.

Note: NameDrop only works for new contact information, not for updating an existing contact.

Use NameDrop on iPhone

  1. Hold the display of your iPhone a few centimeters from the top of the other person’s iPhone or Apple Watch.
  2. Continue holding your devices near each other until NameDrop appears on both screens.
  3. Choose to share your contact card and receive the other person’s, or to only receive the other person’s.

If you’re sharing your contact card, tap the Show Disclosure Triangle, select the fields you want to include, then tap Save. The same fields will be selected by default next the time you use NameDrop.

If you lock your iPhone or move the two devices away from each other before the NameDrop transfer completes, you cancel the transfer.

Turn off NameDrop on iPhone

NameDrop is on by default. To turn off NameDrop (and other Bring Devices Together features), go to Settings > General > AirDrop, then turn off Bring Devices Together.

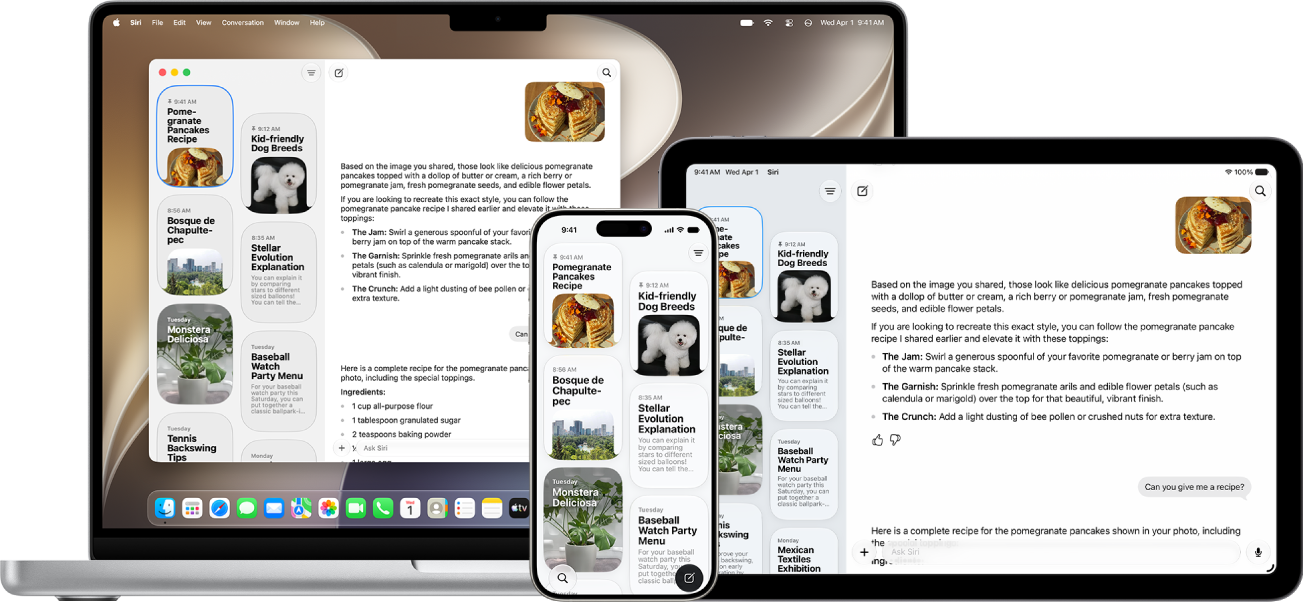
With Siri AI (Beta), you have a dedicated Siri app that brings all your conversations together in one place. You can ask a question on your iPhone and pick up where you left off on your other Apple devices when you’re signed in to the same Apple Account.

You can type or speak your request, add a picture, photos, or files to the conversation, and ask follow-up questions. You can also pin conversations for easy access, search them, or start a new one, and your conversation history syncs across platforms.

Siri AI is available in beta on iOS 27 or later on an Apple Intelligence-enabled iPhone 15 Pro, iPhone 15 Pro Max, or iPhone 16 model or later with Siri and device language set to a supported language. Available in English to start. Siri AI will not initially be available in the EU on iOS. Usage limits may apply.*

The Siri app on an iPhone, iPad, and Mac.

Start or continue a conversation

  1. Start the Siri app on your iPhone.
  2. Tap the new conversation button to start a new conversation, or tap a conversation you want to continue.
  3. Do one of the following to enter your request:
    • Type your request: Enter your request using the keyboard and tap the Ask Siri button.
    • Speak your request: Tap the Microphone button, then speak your request. Tap the Keyboard button to type to Siri.
  4. Do any of the following:
    • Take a picture: Tap the Add button, tap Camera, and then take a picture using your iPhone.
    • Add photos: Tap the Add button, tap Photos, and select a photo to add to the conversation.
    • Add files: Tap the Add button and tap Files. Then select a file to add to the conversation.
    • Ask follow-up questions: Enter follow-up questions.

View your conversation history

When you’re signed in to the same Apple Account, your conversation history syncs across platforms, and you can view it.

  1. Start the Siri app on your iPhone.
  2. If the Siri app opens to a new conversation, tap the Close button to see your conversation history.
  3. To change how your conversation history is displayed, tap the Options button in the top-right corner and then tap Grid or List.

Search and pin conversations

  1. Start the Siri app on your iPhone.
  2. If the Siri app opens to a new conversation, tap the Close button to see your conversation history.
  3. Do any of the following:
    • Search a conversation: Tap the Search button and enter what you’re searching for. Then tap the Search button on the keyboard.
    • Pin conversations: Touch and hold the conversation you want to pin and tap Pin.

Rename conversations

  1. Start the Siri app on your iPhone.
  2. If the Siri app opens to a new conversation, tap the Close button to see your conversation history.
  3. Touch and hold a conversation, then tap Rename.
  4. Enter the new name for the conversation and tap OK.

Delete Siri conversations

  1. Start the Siri app on your iPhone.
  2. Do one of the following:
    • Delete one Siri conversation: Touch and hold the conversation you want to delete, tap Delete, and then tap Delete to confirm.
    • Delete multiple Siri conversations: Tap the Options button in the top-right corner and tap Select. Then select the conversations you want to delete. Tap the Trash button, then tap Delete to confirm.

Change Siri app settings

In Siri settings, you can decide how long to keep conversations and what shows up when you open the Siri app.

  1. Start the Settings app on your iPhone.
  2. Tap Siri.
  3. Do any of the following:

    • Choose what appears when you open the Siri app: Tap Opens To and choose Recent Conversations or A New Conversation.
    • Choose how long to keep conversations: Tap Keep Conversations, then choose an option.

      Note: If you choose 30 days or 1 year, older conversations are permanently deleted.

    • Choose a conversation preview length: Tap Preview, then choose an option.

Screen Time settings control which Siri features you can use, along with the content Siri can access.

*Apple Intelligence is available with Siri and device language set to Chinese (Simplified), Chinese (Traditional), Danish, Dutch, English, French, German, Italian, Japanese, Korean, Norwegian, Portuguese, Spanish, Swedish, Turkish, or Vietnamese. Some features may not be available in all regions or languages. Some devices may not be available in all regions. Siri AI is available in beta in iOS 27, iPadOS 27, macOS 27, watchOS 27, and visionOS 27 and requires an Apple Intelligence–enabled device set to a supported language. Available in English to start. Siri AI will not be initially available in the EU on iOS, iPadOS, and watchOS. Certain Apple Intelligence features that rely on server-side models are subject to daily usage limits, including but not limited to Siri AI, Intelligent Photo Editing Tools, Image Playground, and AFM 3 Cloud models in Shortcuts. Daily limits may vary by feature, request complexity, system demand, system policies, and other factors. Expanded access to such features will be available for a fee in the future. Use of these features is subject to the Apple Intelligence Terms and Conditions.
Tag: Siri AI