Tips and tricks for all things Apple! Whether you want to learn tips for a Mac, iPhone, iPad, Apple Watch, or much more, you will find many tricks, tips, tutorials, and excellent walkthroughs for Apple devices and software here.
The iPhone 14 is a powerful smartphone, but, like any other electronic device, it requires some maintenance to work propery. Like a ship that can sail forever, as long as people are willing to maintain it, your iPhone 14 will keep working as long as you maintain its battery health.
Here’s why maintaining your iPhone 14 battery is critical and how you can do that to get more years from your device.
Note: information in this article apply to iPhone 14, iPhone 14 Plus, iPhone 14 Pro and iPhone 14 Pro Max.
The best iPhone 14 battery health tips
1. Don’t turn off Optimized Battery Charging
Overcharging your battery is a bad thing. Optimized Battery Charging learns from your daily charging routine and uses AI to understand your charging patterns. Using that, it holds the charging and waits to charge past 80% until you need to use your iPhone.
For example, let’s say you go to sleep every day at 9 PM and wake up at 5 AM. Before going to bed, you plug in your iPhone every night at 9 PM to charge. Now, your iPhone will normally charge up to 80%, and after that, it will not charge. Then, around 3 or 4 AM, your iPhone will automatically resume charging and go to 100% before you wake up at 5 AM.
Optimized Battery Charging is turned on by default on iPhone. You can check if it’s turned on by following the steps below:
Open the Settings app on your iPhone.
Go into Battery.
Tap Battery Health & Charging.
Make sure optimized battery charging is switched on.
2. Don’t expose your iPhone to excessive heat
Heat, water, and dust are the biggest enemies of any electronic device. And your iPhone’s lithium-ion battery is no exception. Too much heat can negatively affect it and cause its battery health to degrade greatly if you often overheat your iPhone.
So, to maintain your iPhone 14 battery health, ensure your phone doesn’t get extremely hot. You can prevent your iPhone 14 from getting hot by removing the case, refraining from using too many intensive apps for extended amount of time, not leaving your iPhone in a locked car on a sunny day, and so on.
3. Avoid charging your iPhone to 100% and discharging it completely
Charging the battery to both extremes is bad for its health. To maintain iPhone 14 battery health, try not to charge it entirely up to 100% and discharge it to 0 to 5%.
Important: Don’t overthink this too much. Keep the above fact in mind but charge your iPhone as you normally would at your convenience. If you ask me, I often charge my iPhone up to 80% or 90% and plug it back when the battery falls to around 30%.
4. Don’t leave your iPhone plugged into charging for hours or overnight
Optimized Battery Charging is a great feature that prevents overcharging problem. Still, it’s better if you take precautions and do not leave your phone plugged into charging for several hours or overnight.
Charging your iPhone wirelessly is quite convenient. However, it may generate a lot of heat which can affect your iPhone battery. To extend your iPhone 14 battery life, try to use wired charging instead of wireless or MagSafe alternatives.
6. Fast charge only when needed
With fast charging, the battery is forced to take in a lot of power in a short span. This is great for quick top-ups but isn’t good for long-term battery health.
I have a 61W MacBook charger that can charge my iPhone 14 quite faster. I use this in rare cases. For everyday use, I use a 10W Apple adapter (or sometimes my 20W iPad adapter) which slowly fills my iPhone battery, maintaining its battery health.
7. Use Apple or MFi-certified chargers and cables
Almost all adapters can charge your iPhone, and due to Apple not bundling a charger in the iPhone 14 box, you may be tempted to purchase a cheaper option.
If you want to maintain your iPhone 14 battery health, use an Apple adapter or one that’s MFi-certified. Chargers from other reputed manufacturers like Samsung should also have all safety checks and may not harm your iPhone. But note the wattage of the charger before using it with your iPhone.
Besides that, also limit yourself to using a proper Apple or MFi-certified Lightning cable.
8. Disable features you don’t use
Another great iPhone 14 battery health tip is to reduce the load on it. And one of the best ways to do that is by disabling certain iPhone features you may not need. This includes things like disabling Background App Refresh, disabling automatic updates, keeping Automatic Brightness enabled, having cellular settings to Auto 5G, and such.
9. Restart your iPhone regularly
To maintain your iPhone 14 battery health, you should make it a habit of turning your phone off and on regularly. This will fix a lot of minor problems and keep your device fast and responsive.
10. Keep your iPhone updated
Apple introduces new improvements with software updates. Sometimes, unnecessary battery drain and other similar problems can be fixed by iOS updates. So, to maintain iPhone 14 battery health, keep your device updated.
Go to Settings.
Tap General.
Select Software Update.
Note: Your iPhone can download, prepare, and install an iOS update if its battery is over 50%. However, software updates exert considerable pressure on the battery, and thus it’s better to perform the update with your iPhone plugged into charging.
11. Planning not to use iPhone for a long time? Store it at 50% charge
Finally, if you have two devices or if you regularly switch to Android, you may keep one of your iPhones stored in the drawer. When you do that, ensure the iPhone battery is charged to around 50% before storing it for an extended period. Never store it fully charged or fully discharged.
Protect your iPhone 14 Battery Health
The above tips will help extend your iPhone 14 battery health and ensure you’re able to use the device for a few years without notable battery problems.
However, no matter what you do, slowly, the iPhone battery and all other batteries like that in AirPods, Apple Watch, Apple Pencil, iPad, etc., degrade. This can’t be stopped. But the above iPhone 14 battery health tips will help.
Finally, you can keep note of your iPhone battery health by going to Settings > Battery > Battery Health & Charging. From here, note the percentage next to Maximum Capacity. If it’s seriously reduced, you’ll see a message asking you to get the battery serviced.
You may be irreparably harming your iPhone’s battery. Here are the best iPhone 14 battery tips to help prolong your battery’s health.
Nestled within each iPhone, among a litany of silicon, capacitors, and diminutive solder points is a battery. This battery is a consumable resource and eventually will be depleted and need replacing to continue having acceptable battery life on your phone.
Ideally, you’ll have quite some time before it’s necessary to replace your battery. To ensure you get as long a life as possible, here are the best iPhone 14 battery tips to prolong your battery.
iPhone 14 battery tips
Avoid excessive heat
The first iPhone 14 battery tip is to avoid exposing your device to high heat. Heat is a battery’s enemy. Cold is no friend to batteries either, resulting in a shorter use time, but that is only temporary until your battery warms back up again.
Apple says your iPhone can safely run in temperatures of up to 95 degrees Fahrenheit. Beyond that, irreversible damage can occur to the battery.
You can inadvertently heat your iPhone too high in numerous ways. Placing it screen-side up in the sun, charging it while in the sun, or clipping it in front of a heating vent in your car while navigating are all frequent actions. Your iPhone does have built-in protection systems to temporarily disable your iPhone in these situations to prevent further damage, but it’s best not to get to that in the first place.
Don’t keep your iPhone in direct sunlight or don’t have the heat full blast when using a car vent mount. Never leave your iPhone in a vehicle in the summer, and definitely keep it off of hot surfaces.
Stay away from zero
Another iPhone 14 battery tip is to avoid dropping your phone’s battery level too far. Years ago, it made sense to occasionally deplete a device’s battery then fully recharge it to help calibrate the internal sensor so that the displayed percentage was accurate. With modern batteries, this is no longer the case.
Dropping your iPhone down to 0% battery is very damaging to your battery and will reduce its overall lifespan.
Keep your iPhone 14 battery from dying completely, but try to avoid unnecessary charging too. If you’re going to leave for a few hours, plugging in your iPhone to a fast charger is a great way to top of the battery while getting ready.
For the best battery health, recharge your iPhone regularly throughout the day so you never fully deplete it.
The golden rule is to keep your battery topped up somewhere between 30% and 80% most of the time. Top it up when it drops below 50%, but unplug it before it hits 100%. For this reason, you might want to reconsider leaving your iPhone plugged in overnight.
Pushing in the last charge from 80-100% causes a lithium-ion battery to age faster.
Maybe it’s better to recharge in the morning instead, at the breakfast table or on your office desk. That way, it is easier to keep an eye on the battery percentage during charging.
iOS users can use the Shortcuts app to set a notification when the battery level reaches a certain percentage. This is done under the tab “Automation” and then “Battery Level”.
Giving your phone a full recharge is not fatal for a phone battery, and it seems almost counter-intuitive not to do so, but giving it a full recharge every time you charge it will shorten its lifespan.
Likewise, at the other end of the scale, avoid allowing your iPhone battery to get below 20%.
Lithium-ion batteries don’t feel good about going too far below the 20% mark. Instead, see the extra 20% “at the bottom” as a buffer for demanding days, but on weekdays start charging when the warning for Low Battery level appears.
In short, lithium-ion batteries thrive best in the middle. Don’t get a low battery percentage, but also not too high.
Long term storage
The next iPhone 14 battery tip is to never leave the battery at 100% if you’re going to store your phone for an extended period Perhaps you are keeping an old iPhone around to use as a backup or saving to give to someone later.
Before storing the iPhone, discharge the battery to between 50% and 80%. Come back to it periodically, and make sure the battery hasn’t discharged to flat, also.
Storing the phone fully charged is harmful to the battery as well. When you return the device to service, you may find out that the battery will no longer hold a charge like it used to.
Conclusion
By applying the above iPhone 14 battery tips, your battery will offer solid usage for 18 months to 24 months before it depletes below 80%. Fortunately, when the time does come to swap out your battery, Apple offers an affordable replacement service.
These camera tips, tricks, and settings can help you take better photos and videos on your iPhone 14, iPhone 14 Pro or iPhone 14 Pro Max.
there are a number of Camera settings that you can change on your iPhone 14 or iPhone 14 Pro to take even better photos and videos. Read on as we detail how to do just that.
While you can switch between camera modes and change some options directly in the native Camera app, some of the settings can only be found within the iOS Settings app.
1. Turn on the Grid
Framing a person or an object in a photo or video is not always easy. Thankfully, having Grid enabled in the Camera app simplifies everything. Grid makes it much easier to hold your iPhone in the right position, center your main focus, and more.
Open the Settings app on your iPhone.
Scroll down and tap on Camera.
Look for the Grid option in the Composition section and turn it on.
Now you’ll see the grid lines every time you open the Camera app on your iPhone 14.
2. ProRAW and ProRes
A cool iPhone 14 Pro camera trick lets you capture images in ProRAW format directly in the Camera app. For those unfamiliar, a RAW photo is basically the original image captured from the sensor, with minimal or no post-processing. It contains all the data about things like brightness, shadows, and colors that can be edited later in image editing software like Adobe Lightroom.
The iPhone 14 and iPhone 14 Pro also supports ProRes video, which is a codec with minimal compression that ensures higher quality files that are better for post-editing.
To enable both ProRAW and ProRes, follow the steps below:
Open Settings.
Go to Camera.
Tap Formats.
If you have an iPhone 14 Pro, you can also choose between taking ProRAW photos with 12-megapixel or 48-megapixel resolution. After turning these options on, you’ll see ProRAW and ProRes buttons in the Camera app. Just tap them when you want to capture photos and videos using these formats.
Please note: none of these options are available for non-Pro iPhone models. It’s also worth noting that ProRAW photos and ProRes videos take up much more space in iPhone storage than regular formats.
3. Mirror Front Camera
By default, every photo you take using the front camera of your iPhone is flipped. This is because, rather than capturing exactly what you see on the screen, iPhone flips the image so that things like text are displayed correctly. However, if you prefer to capture selfies exactly as they appear in the Camera app preview, you can.
The best iPhone 14 camera tip we can offer is to show you how to turn on the Mirror Front Camera option. Simply follow the steps below:
Start the Setting app on your iPhone.
Scroll down and tap on Camera.
Under the Composition section,turn on Mirror Front Camera.
With this option turned on, your selfies will look exactly as you see them in the preview.
4. Macro Control
iPhone 14 Pro and iPhone 14 Pro Max offers a Macro mode feature in the ultra-wide lens, which lets users capture really close-up images. This mode is automatically turned on depending on the distance between the iPhone and the object you are pointing at, which may annoy some users. Thankfully, you can choose to turn this option on manually only when you want to use it.
To do this, follow the steps below:
Start the Settings app on your iPhone.
Go into Camera.
Scroll down and enable the Macro Control option.
Now the Macro button will appear when the iPhone is really close to an object, and it will only activate if you tap on it.
5. Photographic Styles
A cool iPhone 14 and iPhone 14 Pro camera trick is Photographic Styles. These are presets with different tone and warmth values that can dramatically change how your photos look while still preserving things like sky color and skin tones.
You can choose a Photographic Style directly from the Camera app. Alternatively follow the steps below:
Launch the Settings app on your iPhone.
Tap Camera.
under the Photo Capture section, tap the Photographic Styles option
6. Change the video resolution
The Camera app on the iPhone 14 and iPhone 14 Pro lets you quickly switch between different resolutions and frame rates before shooting a video. However, changing these options from the Settings app lets you choose even more resolutions and frame rates.
For example, you can set your iPhone to record videos in 720p resolution to save storage space, shoot slow motion videos in 1080p resolution at 240 fps for better quality and smoothness, or even capture Cinematic Videos in 4K resolution at 24 fps or 30 fps on the iPhone 14.
Go to Settings.
Tap Camera.
Tap the Record Video, Record Slo-mo, or Record Cinematic menus.
Choose the option that works best for you.
7. Preserve Settings
Our next iPhone 14 and iPhone 14 Pro camera tip is to save your preferred settings. When you’re taking pictures or filming with your iPhone 14 or iPhone 14 Pro, there are a lot of adjustments you can make, such as changing the exposure level, choosing a filter, or enabling ProRAW. By default, every time you close the Camera app, these settings are reset. But if you want to keep them on, there’s a cool trick to do that.
Open the Settings app on your iPhone.
Scroll down and tap on Camera.
Tap Preserve Settings.
You can select which options you want to keep the same settings every time you open the Camera app.
8. Bonus: Swipe up for more
Our final iPhone 14 and iPhone 14 Pro camera tip is to try swiping your finger upward on the screen to reveal a menu with extra options whenever you’re about to take a photo or record a video with the Camera app, . There you can change Photographic Styles, the Aspect Ratio, apply filters, set the Aspect Ratio, and more.
Conclusion
These are the best iPhone 14 and iPhone 14 Pro Camera tricks, tips and settings that you need to know to elevate your photography game to a whole new level. Are there any other iPhone 14 and iPhone 14 Pro Camera tricks you know? Share it with us in the comments section below.
Need some iPhone 14 charging tips? These are the facts and habits you need to maximize your phone battery’s longevity.
iPhone users — casual and enthusiasts alike — are forever searching for longer battery life. While fast charging keeps us topped up every day, the absence of replaceable batteries means eventually, the lithium-ion cells enclosed in our phones are going to age and deteriorate, making it harder to maximize battery life.
If you’ve used iPhones a couple of years, you’ve probably noticed the battery doesn’t seem to last as long as it did when your handset was brand new. Three years down the line, many phones struggle to make it through the day on a single charge. Holding onto a phone even longer can even spell trouble for system stability.
Unfortunately, battery capacity inevitably declines with age. However, there are cool iPhone 14 charging tips you can use to prolong the life of your battery. If you’ve ever wondered what the best way to charge your iPhone’s battery is, here are some scientifically proven tips to maximize battery life.
iPhone 14 charging tips
Partial charging is a healthy habit
One particularly persistent battery myth is that you need to occasionally fully discharge and recharge to erase “battery memory.” This couldn’t be more wrong for lithium-ion batteries. It’s a leftover myth from lead-acid cells, and it’s pretty undesirable to charge your iPhone 14 in this way.
Partial charging is just fine for lithium-ion batteries and can have some great benefits for cell longevity. To understand why it’s important to appreciate how a battery charges. Li-ion batteries draw constant current and operate at a lower voltage when closer to empty. This voltage gradually increases as the cell charges up, leveling off at around a 70% charge before the current begins to fall until the capacity is full.
Notably, operating at a low voltage is good for a battery’s lifespan, increasing the number of available charging cycles before you’ll start to see a significant reduction in capacity. Roughly speaking, every 0.1V decrease in cell voltage doubles the cycle life, according to Battery University. Therefore, charging up your phone in that 30% to 80% range keeps the voltage lower and might slightly prolong the battery’s lifespan.
Smaller but regular top-ups are much better for Li-ion batteries than long full charge cycles.
Using up just 20% of your battery between charges isn’t practical, but topping up when you’ve used about half will see an improvement in your battery life over the long term. Especially if you avoid charging up to full each time too. The bottom line is that smaller, regular top-ups are better for Li-ion batteries than long full charge cycles.
Avoid idle charging
Charging overnight is a very common habit, but it’s best to avoid, despite the convenience of waking up with a full battery in the morning. Each full charge counts as a ‘cycle’, and the iPhone 14 is only built to last for a set number.
If you charge overnight, you are guaranteed to miss when the phone exceeds the magic 80% mark that is best for extended long-term life.
While the iPhone 14 has built-in sensors to shut off charging when it hit 100%, if still turned on it’ll lose a small amount of battery while idle.
What you may get is a “trickle charge” as the charger attempts to keep the iPhone at 100% as your phone naturally loses on its own charge during the night. This means that your iPhone is constantly bouncing between a full charge and a little bit below that full charge – 99% to 100% and back again during a longer-than-required charge. It can also heat the iPhone up, which is also bad for the battery.
So, a great iPhone 14 charging trick is to charge during the day than to charge overnight.
Your best policy is to have Do Not Disturb and Airplane Mode switched on. Better still, you could completely switch off your iPhone, but that may not be possible if you rely on it as an alarm or wish to be ready to take calls at all hours.
If you are leaving your iPhone plugged in for a long period of time, removing the case can prevent it over-heating.
A final iPhone 14 charging tip that’s worth mentioning is parasitic load. This occurs when the battery is being drained significantly at the same time as being charged, such as watching a video or gaming while charging.
Parasitic loads are bad for batteries because they distort the charging cycle and induce mini-cycles — where part of the battery continually cycles and deteriorates faster than the rest of the cell. Worse still, parasitic loads occurring when a device is fully charged also induce higher voltage stress and heat on the battery.
Gaming or watching videos while charging is bad because it distort charging cycles.
The best way to avoid parasitic loads is to turn your iPhone off while charging. But that’s not really realistic. Instead, it’s best to keep the workload light while the device is plugged in, leaving it idle most of the time. Browsing the web is probably fine. Also, remember to unplug it once the battery is topped up enough.
Heat is the enemy of long battery life
Along with all of the above iPhone 14 charging tips, temperature is an equally key contributor to longevity and maximizing battery life. In fact, it’s arguably the biggest killer of long-term battery health. Like high voltages, high temperatures stress the battery and make it lose capacity far more quickly than when kept at lower temperatures.
A cell kept between 25 – 40 degrees Celsius (77 – 86 degrees Fahrenheit) should retain around 85% to 96% of its capacity after the first year with sensible charging cycles. Raising the temperature regularly above 40°C (104°F) and charging to 100% sees this fall to just 65% capacity after the first year, and a 60°C (140°F) battery temperature will hit this marker in as little as three months.
The ideal temperature to maximise battery cycle life is below 40°C
A battery dwelling in a full state-of-charge exposed to a high temperature is the worst of all worlds and the number one thing to avoid when charging your iPhone. So a cool iPhone 14 charging trick is to never leave your phone under your pillow to charge at night or plugged in on the dashboard of your car on a hot day.
Use MFi Certified charging accessories
Another iPhone 14 charging tip is to use the charging accessory that came with your phone, as it is sure to have the correct rating. Or make sure that a third-party charging accessory is approved by Apple. Cheap alternatives from Amazon or eBay may damage your iPhone, and there have been several reported cases of cheap charging accessories actually bursting into flames.
That said, your iPhone should draw only the power that it needs from a charger.
How to maximize battery life long-term
Lithium-ion battery technology is well understood these days, and iPhones are built around our use cases, but bad habits and myths still permeate the public consciousness. While most of these habits won’t severely negatively impact your iPhone’s battery life in the medium term, the decline in removable phone batteries means we should take extra precautions to maximize battery life and thus our iPhone’s longevity.
Broadly speaking, smaller regular charge cycles and keeping your phone cool are the main iPhone 14 charging tips to keep in mind.
Here’s a TL;DR summary of the iPhone 14 charging tips above:
What’s the best way to charge your iPhone 14?
Avoid full cycle (0-100%) and overnight charging. Instead, top up your iPhone more regularly with partial charges.
Ending a charge at 80-90% is better for the battery than topping up to completely full.
Heat is the battery killer. Don’t cover your iPhone when charging, and keep it out of hot places.
Don’t play intensive games, stream videos, or run other intensive workloads while charging to avoid heat and mini-cycles.
iPadOS 16 brings with it a whole host of new features. In this article, i’ve explained the best iPadOS 16 tips and tricks you should try first.
iPadOS 16 brings a number of new features and changes to the iPad experience, including Stage Manager, new Messages tweaks and much more, but with so many changes on offer, where do you start?
We’re here to make the adjustment far easier with the best iPadOS 16 tips and tricks.
Best iPadOS 16 tips and tricks
Without further ado, here is a list of the Best iPadOS 16 Tips and Tricks in 2022:
1. iPadOS 16 Tips and Tricks: Edit or unsend iMessages
Apple has really ramped up Messages this year, adding in some features users of apps like WhatsApp will be familiar with. Accidentally texted something inappropriate to your boss? With the new Messages app in iPadOS 16, you can quickly recall that message before it does any damage.
Open the Messages app on your iPad.
Type your message as you normally do.
Once you’ve sent it – long press that message. You’ll see both ’Edit’ and ’Undo send’ as options in the drop-down menu. Choose whichever you want to use at the time.
Please note, if the person you’re sending it to doesn’t have iOS 16 or iPadOS 16, it won’t appear as unsent for them, they’ll still see the message.
2. iPadOS 16 Tips and Tricks: Recover recently deleted messages
In iPadOS 16, you can recover recently deleted messages for up to 30 days after deleting them.
Open the Messages app on your iPad.
Go to the Recently Deleted section.
Tap Recover All to restore all deleted messages.
If you only wish to get back one or a few chats, tap inside their tiny round box to select them. After that, tap Recover.
3. iPadOS 16 Tips and Tricks: Scheduled send emails
In iPadOS 16, you can schedule an email in your iPhone’s Mail app so it gets sent at any time of your choice.
Open the Mail app on your iPad.
Draft your email the way you normally would, complete with the recipient, subject, and message.
When you are done with the email and ready to send it, tap and hold the Send icon (the big blue arrow). You’ll see a pop-up menu.
Choose when you want to send the message.
Apple gives you a few quick-pick choices, including Send 9:00 PM Tonight and Send 8:00 AM Tomorrow. If you want to choose a custom time, tap Send Later… and you can choose the date and time from a calendar view, then tap Done.
4. iPadOS 16 Tips and Tricks: Delete Duplicate Photos
Apple’s latest Photos app lets you quickly and easily delete duplicate photos to help you save iPad and iCloud storage.
Open the Photos app on your iPad.
Tap on ’Albums’.
Scroll all the way down until you see ’Duplicates’ in the list near the bottom of the page. Now you can either hit ‘merge’ near each match, or hit ’select’ at the top and then manually choose each image you want to delete and hit the delete trash can icon at the bottom.
5. iPadOS 16 Tips and Tricks: new Weather app
In iPadOS 16, Apple introduced a brand new Weather app to the iPad. The new app takes full advantage of the large display and includes animated backgrounds reflecting current weather conditions. Each module in the weather app can be tapped to provide additional data.
6. iPadOS 16 Tips and Tricks: Collaborate on projects
One of the big new features of iPadOS 16 is working with others. Collaboration is the real-time sharing of an original document, so everyone can work on it simultaneously. It’s rather like Google Docs, but what’s neat is that you can initiate a collaboration through Messages or FaceTime directly from the share sheet. Just select Collaborate and select the conversation where you want to share it.
You can also share tab groups from Safari with the group. When you do, you’ll see icons of who is looking at what tab in real-time.
7. iPadOS 16 Tips and Tricks: Metal 3 and other gaming enhancements
For the first time, iPadOS 16 is bringing Metal 3 APIs to the iPad. Apple is looking for iPads to be gaming machines with Metal 3-enabled, hardware-accelerated 3D graphics. Additionally, Apple has a new API that allows larger asset packs to download in the background while you play the game.
With your Game Center account, you can find friends, track progress in various games, and view leaderboards for various games. Gaming on iOS has largely been the domain of phones. However, Apple is pushing to get more gamers onto the iPad. It has designed these moves to do just that.
8. iPadOS 16 Tips and Tricks: Turn Reference Mode on or off
Reference Mode is a display mode for professional content creation workflows, like color grading, editing, and content review, where accurate colors and consistent image quality are critical. To use Reference Mode, you need
12.9-inch iPad Pro (5th generation or later)
Reference Mode enables your iPad Pro to match the color requirements of your workflow. It targets a D65 white point and disables all dynamic display adjustments for ambient surround, like True Tone, Auto-Brightness, and Night Shift. You can also adjust the white point and luminance manually.
Reference Mode might affect battery life. Here’s how to turn the feature on or off.
Open the Settings app,.
Tap Display & Brightness.
Turn Reference Mode on or off.
9. iPadOS 16 Tips and Tricks: Turn Stage Manager on and off
Stage Manager is Apple’s multitasking feature available with iPadOS 16.1 which enables you to organize apps and windows in a single view. Stage Manager requires an iPad powered by an M1 chipset, so it won’t be much use if you haven’t upgraded your iPad in a few years.
Stage Manager is an optional feature. You can use it as little or as often as you’d like, with a quick tap of a button toggling it on or off. That button is located in the iPad’s Control Center. To access it follow the steps below:
Swipe down from the top right corner of your iPad’s screen to bring up control center.
There you’ll see a new icon that has three dots on the left side, with a rectangle to the left of the dots. Tap on the icon to turn on Stage Manager.
If you want to revert back to the more traditional iPad layout, open Control Center again and tap the Stage Manager button to turn it off.
10. iPadOS 16 Tips and Tricks: See the password for the Wi-Fi network you’re on
One feature that arguably should have existed for a long time is the ability to see the password for the network you’re connected to. In iPadOS 16 you can.
Open the Settings app on your iPad.
Tap ’Wi-Fi’.
Tap the info icon next to the network you’re connected to.
Here, you’ll see ’Password’. Tap it, and it’ll use FaceID to check it’s you, and reveal the passkey.
Your favorite iPadOS 16 tips and tricks
So these were some of the best iPadOS 16 tips and tricks you should try on your iPad first. My favorite iPadOS 16 tips and tricks include ability to edit/unsend messages, ability to collaborate with others on a project, and ability to schedule emails in Mail. There’s surely plenty more hidden iPadOS 16 tips and tricks to discover, so I’ll keep tapping, swiping and noting anything I find. Did we miss out on something important that needs to be added to the list? Which are your favorite iPadOS 16 tips and tricks? Drop a comment and let us know.
Apple released macOS Ventura to the public in the fall, and the update brings notable improvement for Mac users. Here are the best macOS Ventura tips and tricks you should try first.
With macOS Ventura, Apple has brought major additions to the stock apps and bridged the gap between iPhone and Mac. Beyond the headline features, Apple has also made numerous tweaks and changes to macOS that aim to make the time you spend using your Mac more efficient, more functional, and more enjoyable. To that end, we’ve pulled out the best macOS Ventura tips and tricks, some of which may have gone under your radar, and we’ve highlighted five of them below. Keep reading to learn some of the best macOS Ventura tips and tricks in 2022.
Best macOS Ventura tips and tricks
1. Stage Manager
Unlike iPad, Apple doesn’t limit Stage Manager to a few Mac models only. All MacBook models are compatible with the Stage Manager function. The option is disabled by default. You can turn it on from the Mac Control Center.
Once you enable Control Center, the system automatically organizes your apps and windows in a single view on Mac. The function helps you focus while moving between tasks. You can even create a group of apps for specific tasks or projects. For example, you can group Lightroom, Photoshop, and Canva and pin them in Stage Manager to summon with a single click.
Similarly, you can group social media or writing apps and focus on a single project, removing other obstructions. While Stage Manager is off to a rocky start, it will be interesting to see how Apple continues to evolve it in future updates.
2. utilize Continuity Camera
You no longer need to settle with a below-average webcam during important video meetings on your MacBook. With this MacOS Ventura trick, you can set your iPhone to wirelessly connect to the Mac as a web camera, allowing you take advantage of the phone’s better cameras instead of relying on the lower-resolution cameras that are often built into MacBook laptops. The new feature, named Continuity Camera, works with most iPhone models that are running iOS 16. Just remember to enable Wi-Fi and Bluetooth on both devices and sign in using the same Apple account.
Once you enable Continuity Camera from Settings > General > AirPlay & Handoff menu on iPhone, you will find an option to use your phone camera as the default
You do require separate hardware from a third-party manufacturer like Belkin to hold your iPhone on top of your Mac and need to change the default camera from your preferred video calling app like Zoom, FaceTime, Teams, or Google Meet.
Your iPhone camera on Mac does support Center Stage to stay centered in the camera frame during video calls, Studio Light, Portrait Mode to blur the background, and Desk View to show your desk and face at the same time.
3. Give Apple Mail a Try
Thanks to macOS Ventura trick, Apple Mail now lets users unsend an email they have just sent, schedule emails to hit the perfect timing in the recipient’s time zone, and get reminders to follow up or come back to a message later. The Mail app also has an improved search function to deliver more accurate and astute results and provides suggestions before you start typing.
In short, Apple Mail receives a major feature boost with the macOS Ventura update. If you have ditched Mail in favor of Outlook or Spark on Mac due to a lack of features, it’s time to give Mail another shot after the latest update.
4. Use Spotlight Like a Pro
Spotlight is a major part of the macOS experience, and Apple has enhanced its capabilities with the Ventura update. Simply hit the Command Space keys on your Mac and find images in Photos, Messages, Notes, the Finder, and the web right from the Spotlight Search. You don’t need to open any respective app and navigate dozens of menus to find a photo.
Spotlight even lets you use Live Text to search for an image based on the text inside it. Spotlight also supports quick actions to set the alarm, start Focus, find the name of a song using Shazam integration, run a shortcut, and more.
The default search function on Mac does miss out on a few features, as we usually find in third-party alternatives, but it’s still a promising start with the macOS Ventura update. The update also brings richer search results when finding info about an actor, TV show, movie, sports event, and business. Go ahead, give Spotlight Search a try, and be amazed by the search results.
5. Share Your Photo Library
The default Photos app on Mac allows you to create and share a separate photo library among up to six family members. While creating an iCloud Shared Photo Library, you can select specific photos, people, and scenes like Forest, Sky, Beach, etc., and invite others to collaborate. Everyone can add, delete, edit, or favorite shared photos and videos. The same will appear under every user’s Memories tab in the Photos app.
Unfortunately, you can only create one iCloud Shared Photo Library. You can’t create multiple photo libraries with friends and family.
See also: Apps crashing on macOS Ventura? Here’s the Fix
These New MacOS Ventura Tips and Tricks Make Your Mac Much Better
So these were some of the best macOS Ventura tips and tricks you would love to try on your Mac today. My favorite macOS Ventura tips and tricks include using the stage manager, and using an iPhone as a wireless webcam with Camera Continuity. There’s surely plenty more hidden macOS Ventura tips and tricks to discover, so I’ll keep tapping, swiping and noting anything I find. Did we miss out on something important that needs to be added to the list? Which are your favorite macOS Ventura tips and tricks? Share your thoughts in the comment section below.
In this article, we’ve listed 20 best Apple Watch Series 8 tips and tricks you should definitely know about.
Best Apple Watch Series 8 Tips and Tricks
1. Get Email Notifications When Not Connected to iPhone
Apple Watch users have long been able to receive email notifications from third-party email accounts pushed from their paired iPhone. But in watchOS 9, you can also be alerted when an important message arrives when you’re wearing your Apple Watch, but away from your iPhone.
The option uses iCloud servers to securely access the third-party account, and needs to be manually enabled. To set it up, launch the Watch app on your iPhone, tap My Watch, tap Mail, then turn on Email Notifications under “When Not Connected to iPhone.”
2. View Activity Rings During Workout
Previously if you were doing an Apple Watch workout and you wanted to see how it was impacting your activity rings, you had to exit out of the Workout app and switch to the Activity app.
Now you don’t have to, because with this Apple Watch Series 8 trick, you can get a glance of your activity rings right in the workout display simply by scrolling up with the Digital Crown.
3. Follow Podcasts
In watchOS 9, Apple finally fixed its hobbled Podcasts app, and for the first time you can now follow and unfollow podcasts directly from your Apple Watch.
Tap Listen Now -> You Might Like, then tap a show and select Follow. You can also find the same options by searching for a show and tapping on it.
4. Add Calendar Events on Your Wrist
Thanks to this Apple Watch Series 8 trick, you aren’t just limited to viewing calendar events synced from your iPhone on your wrist – you can now add them too. Simply tap the ellipsis (three dots) button that appears in the corner of the screen when you stop scrolling, then tap New Event.
On the next screen you can add all the usual details including event title, location, start date and time, end date and time, and whether to make it a repeat event. Before you Add the event, you can also choose which calendar to add it to, add invitees, opt to receive alerts, and include any notes.
5. Astronomy Watch Face
Apple in iOS 16 added new dynamic wallpaper options to its revamped iPhone Lock Screen settings, and the watch face that arguably mirrors these enhancements in watchOS 9 is Astronomy.
Astronomy is actually a revamped version of the original Astronomy watch face, but it has been remastered and includes a new star map and current cloud data based on your location. You can set the Earth, Moon, or Solar System as the main view, and customize the font. It supports two complications, and turning the Digital Crown lets you fast forward or rewind to see the moon phase/planet location on another day.
6. Retrace Your Steps With Backtrack
You don’t need an Apple Watch Ultra to use the redesigned Compass app’s Backtrack feature. With an Apple Watch Series 8 , you can use it to track your route and then help you retrace your steps in case you get lost.
Tap the footprints icon in the bottom-right of the screen, then tap Start to begin recording your route. When you’re ready to retrace your steps, tap the pause icon in the bottom-right of the screen, then tap Retrace Steps.
Your starting location will appear on the compass, and a bouncing white arrow will point you in the right direction. Follow the path back to return to where you first turned on Backtrack, then when you’ve arrived at your starting location, tap the footsteps icon and you’ll be able to delete your steps.
7. Change Watch Face Based on Focus
In iOS 16, you can customize pretty much everything about your Focus. It’s not just the Home Screen and Lock Screen that you can set – with this Apple Watch Series 8 trick, you can select one of your Apple Watch faces to activate on your wrist for a specific Focus mode.
On your iPhone, go to Settings -> Focus, select an existing Focus or create a new one. Set any notification silence options for people and apps when your Focus is active, then under “Customize Screens,” tap Edit under the watch face option. Choose a watch face from your Apple Watch face gallery, then tap Done.
That’s all there is to it. With your chosen Apple Watch face now linked to your Focus Mode, it will be activated automatically on your wrist the next time you enable the Focus on your iPhone.
8. View Edited Messages
In iOS 16, Apple added the ability to edit texts sent over iMessage, and with Apple Watch Series 8 , you can view any edits to a received message that have been made.
Simply tap and hold the word Edited in blue below the message to reveal the edits. Tap Hide Edits to make them disappear again.
9. Edit Reminders
Previously, the Reminders app only let you view or add reminders. With this Apple Watch Series 8 trick, you can now Edit existing reminders and add key details, including date and time, location, tags, and notes. You can also move reminders between lists right on your wrist.
10. Change Calendar View
Not only can you now add calendar events in the Calendar app on Apple Watch, you can also switch to day, list, and week views.
Simply tap the ellipsis (three dots) button that appears in the corner of the screen when you stop scrolling, then under “View Options,” choose from Up Next, Day, and List. When you’ve made your choice, tap Done.
11. Add Favorites to the Dock
Accessed with a press of the Side button, the Dock was originally the place you went for quick access to your most recently used apps. With this cool Apple Watch Series 8 tip, however, you can change it to list your favorite apps in order of preference.
Open the Watch app on your iPhone, then tap Dock. Under “Dock Ordering,” select Favorites, then tap the Edit button to choose your favorite apps. You can have up to 10 docked apps on Apple Watch, and you can drag the three lines beside each app to re-order them.
12. Turn Off Cellular Data
For years now on iPhone you’ve been able to turn off cellular data without losing the ability to make and receive calls. Previously, the same option wasn’t offered on cellular Apple Watch models – whenever your cellular service was enabled, so was cellular data, eating your battery right up.
In watchOS 9, Apple has helpfully added separate switches for your watch’s basic cellular/mobile service and mobile data, so now you can control them independently. You can find the settings in your watch’s Settings app, under Cellular/Mobile Data.
13. Kickboard Swim Detection and SWOLF Score
In good news for swimmers, Apple Watch Series 8 can now automatically detect when you’re using a kickboard during a pool swim workout.
The Workout app can even give you your SWOLF score, one of the key swim-specific metrics. SWOLF is calculated using a combination of your stroke count and your time spent in the water. The fewer strokes and the less time you take, the lower your SWOLF score, as a measure of your swimming efficiency.
14. Text Size Control
In another boon for accessibility, Apple has added a Text Size control to the Control Center in watchOS 9, so now it’s even easier to ensure Apple Watch apps that support Dynamic Type adjust to your preferred reading size.
15. Dictation Auto-Punctuation
Dictation is a popular feature on Apple Watch for sending messages, since it converts your speech to text, which is so much quicker than typing on a tiny keyboard. This Apple Watch Series 8 trick lets you automatically insert punctuation into your sentences in real time, so you no longer have to say “comma” or “question mark” out loud.
The feature should be turned on by default, but if it isn’t, you can go to Settings -> General -> Dictation and turn on Auto Punctuation.
16. Apple Watch Mirroring
With iOS 16 and watchOS 9, Apple introduced a new Apple Watch Mirroring feature that lets you see and control your Apple Watch screen from your paired iPhone. It’s designed to make the watch experience more accessible for people with physical and motor disabilities, but it can also be useful if, say, your Apple Watch screen is cracked or unresponsive.
To enable it, launch the Settings app on your iPhone, tap Accessibility, then under “Physical and Motor,” tap Apple Watch Mirroring, before toggling on the feature in the next screen.
A graphical representation of your Apple Watch will appear on your iPhone’s screen, while a blue outline will appear around the face of your Apple Watch to indicate that mirroring is enabled. You’ll now be able to control your Apple Watch by tapping and swiping on the watch image that appears on your iPhone. You can even tap the Side button and swipe the Digital Crown to mimic the same physical actions that you would perform on your watch.
17. Quick Actions
With this Apple Watch Series 8 trick, users with upper body limb differences can now do even more with a double-pinch gesture to respond to alerts on their Apple Watch, including answer or end a phone call, take a photo when the viewfinder and shutter button are showing in the Camera app, play or pause media in the Now Playing app, and start, pause, or resume a workout. You can also use quick actions to snooze an alarm or stop a timer.
To enable Quick Actions, Open the Watch app on your iPhone, tap Accessibility, then under “Motor,” tap Quick Actions. Choose from one of the following options: On, When AssistiveTouch is Enabled, and Off. You can also choose their appearance to be Full or Minimal.
With Quick Actions on, when you see an alert on your Apple Watch, you’ll be prompted to perform a Quick Action. For example, when you’ve paused a workout, a prompt lets you know that you can double-pinch to resume it (tap index finger to thumb twice quickly).
18. Control Your iPhone With Apple Watch
In a sort of reverse take of Apple Watch Mirroring, you can also control your iPhone with your Apple Watch. On your watch, go to Settings -> Accessibility, then select Control Nearby Devices. Select your iPhone (or iPad) from the list.
Once connected, you’ll see a series of control buttons enabling you to perform a variety of actions on your iPhone, including Go to Home Screen, Open App Switcher, Open Notification Center, Open Control Center, and Activate Siri. Tapping the More button will also give you media playback controls.
19. Find Your Car
The redesigned Compass app includes the ability to create Compass Waypoints and then find the distance and direction between them. The feature can also be used to find your parked car.
If your car has CarPlay or Bluetooth connectivity, you don’t actually have to do anything to set it up. Provided your iPhone is paired with your car in some capacity, your Apple Watch can recognize when you’ve parked and disconnected, and it will drop a waypoint where your car is located.
Launch the Compass app, then look for a blue waypoint on your compass dial. If you turn the Digital Crown, the dial will zoom in and out, giving you a better idea of how far away your car is. Tap the waypoint to get more information about it, then tap Select to see a pointer that will guide you to your car.
If you find yourself relying on this feature frequently, you can even add a Parked Car Waypoint complication to your Watch face that will lead you to your vehicle.
20. Add Favorite Timers
If you use certain timer durations frequently, why not favorite them? Thanks to this Apple Watch Series 8 trick, you can.
Simply open up the Timer app, swipe left on a recently used timer, then tap the star icon that appears. The favorited timer will now live at the top of your timer list, until such a time when you swipe left on it and tap the red X to remove it.
Your favorite Apple Watch Series 8 tips and tricks?
So these were some of the best Apple Watch Series 8 tips and tricks you would love to try today. My favorite Apple Watch Series 8 tips and tricks include the ability to get Email notifications when not connected to iPhone and the ability to follow podcasts. There’s surely plenty more hidden Apple Watch Series 8 tips and tricks to discover, so I’ll keep tapping, swiping and noting anything I find. Did we miss out on something important that needs to be added to the list? Which are your favorite Apple Watch Series 8 tips and tricks? Share your thoughts in the comment section below.
If you’ve just purchased a new iPhone 14 Pro or iPhone 14 Pro Max, you may be slightly overwhelmed or simply interested in what new tips and tricks you should try out. To try and help, we’ve outlined forty of the best iPhone 14 Pro and iPhone 14 Pro Max tips and tricks that will help you to get the most out of your new device.
If you haven’t heard yet, Dynamic Island and Always-On-Display are two of the big-ticket features on the iPhone 14 Pro and iPhone 14 Pro Max, but those items are just the beginning. You’ll be excited to learn that there are several new hidden iPhone 14 Pro and iPhone 14 Pro Max tips and tricks that could completely change how you use your phone.
If you want to take a closer look at some of the hidden iPhone 14 Pro and iPhone 14 Pro Max tips and tricks, like using Emergency SOS via satellite, here’s what you need to know.
Best iPhone 14 Pro and iPhone 14 Pro Max tips and tricks
Here is a list of the Best iPhone 14 Pro and iPhone 14 Pro Max Tips and Tricks you need to try first:
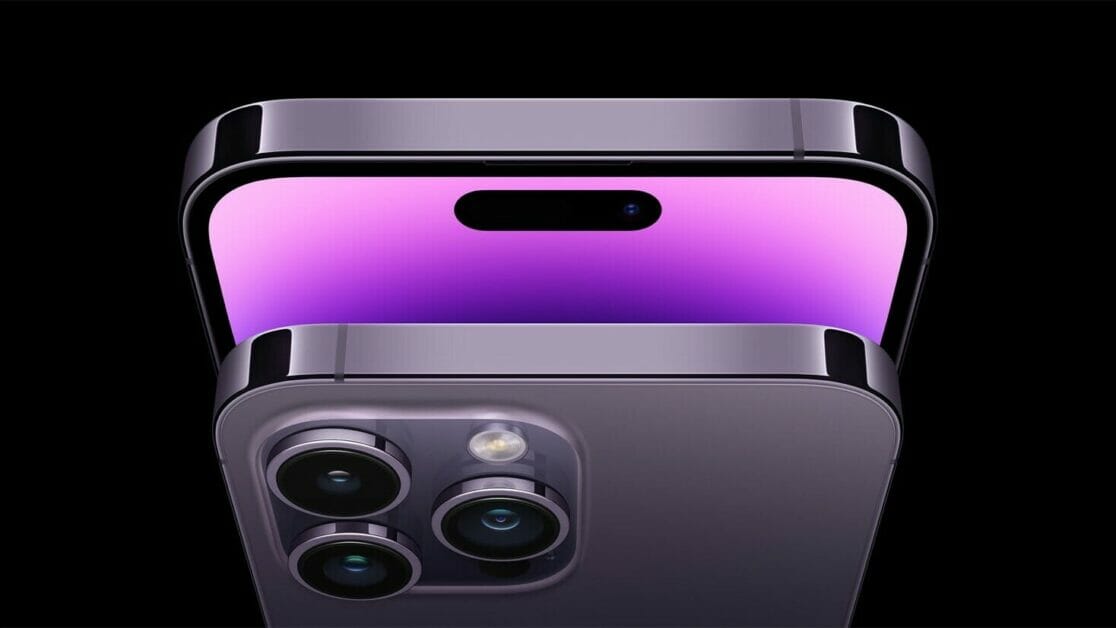
1. Use Apple’s Dynamic Island Feature
Dynamic Island is Apple’s new “notch” for the iPhone 14 Pro and iPhone 14 Pro Max. Instead of looking like a blacked-out dead space at the top of the screen, it can morph into different shapes and sizes. You can even interact with it. It can change to show you incoming calls, alerts, notifications, Face ID authentication, turn-by-turn navigation, music playing, and so on. You can tap or long press on the area to access different functions or launch apps. Think of it as a multi-tasking shortcut – one that still hides iPhone’s TrueDepth front camera as well as the sensors that enable Face ID.
Dynamic Island isn’t just limited to notifications or alerts, but also ongoing activities such as directions in the Maps app, music that might be playing, or how much is left in your timer. Those remain visible at the top of your phone in Dynamic Island, and they’re interactive, so you can tap, swipe, or long-press. Say you order a Lyft and then proceed to browse the web or play a game. The Dynamic Island will show your Lyft ride’s estimated time of arrival at the top of your screen as you use other apps. At any time if you want to open Lyft, tap Dynamic Island. Or, say you’re in an ongoing call and then minimise it, Dynamic Island will elongate horizontally and show the call duration on the left with a voice waveform on the right.
If you have two apps running in the background, Dynamic Island can split into two sections, so you’ll see a smaller pill on the left for one app and a small circle on the right for another app. For instance, if you have a song playing from the Music app and a timer set on the Clock app, you’ll see the song’s art on the left pill and the timer icon inside the circle on the right. You can only see a maximum of two apps appear on Dynamic Island when they’re running in the background.
The most impressive thing about Apple’s Dynamic Island feature is how it can intuitively morph into different shapes to display all sorts of glanceable info. For instance, when you put your phone on silent, connect your AirPods, access Face ID, or plug your charger, the cutout will expand and display the activity and then immediately go back to normal.
Also, if there’s an ongoing background activity, such as a call, playlist, podcast, or timer, the cutout will stay expanded until it ends. You can tap it to go to the app or long-press it to explore options, allowing for better multitasking.
For instance, if you get a call while scrolling through your Instagram feed, the cutout will expand to show you who’s calling and the option to accept or deny it. Once you pick up the call, the cutout will stay expanded during the duration of the call. You can long-press the cutout to access various options to cut the call, switch to FaceTime, mute yourself, and more.
Similarly, if you’re listening to music while reading an e-book, you can long-press the cutout to see options to pause the song, skip forward or back, or jump to a particular part in the song. And if there are multiple ongoing background activities, the iPhone 14 Pro’s Dynamic Island will form a new circular bubble beside the pill-shaped cutout. All of this without leaving the app you’re in.
2. Use Always-On display with your iPhone 14 Pro or iPhone 14 Pro Max
With Always-On display, your iPhone 14 Pro or iPhone 14 Pro Max dims the Lock Screen while still showing helpful information, like the time, widgets, and wallpaper, all while using new technologies that make the display incredibly power efficient.
This can be useful when you just want to glance at the time or see relevant information from your Lock Screen widgets without unlocking your iPhone and going directly into an app.
The display always remains on by intelligently lowering its brightness and refresh rate to as low as 1Hz to save battery life. Always-On display is on by default on iPhone 14 Pro and iPhone 14 Pro Max. To turn Always-On display off or on, follow these steps:
Go to Settings > Display & Brightness.
Scroll down to Always On and turn Always-On display off or on.
3. Capture steadier video with Action mode
With Action mode on iPhone 14 Pro and iPhone 14 Pro models, you can capture smooth hand-held video even when you’re moving around a lot.
Open the Camera app and swipe to Video mode.
Tap the button to turn on Action mode.
Tap the Shutter button and record your video.
Action mode works best with lots of light, and the Camera will show “More light required” if things are too dark. You can change your settings to use Action mode in lower light.
In the Settings app, tap Camera.
Tap Record Video.
Turn on Action Mode Lower Light.
Action mode can capture video at either 1080p or 2.8k resolution up to 60 frames per second. It supports Dolby Vision HDR or, on iPhone 14 Pro models, Apple ProRes video formats.
4. Manage Crash Detection on your iPhone 14 Pro
When your iPhone 14 Pro detects a severe car crash, it will display an alert and will automatically initiate an emergency phone call after 20 seconds unless you cancel. If you are unresponsive, your iPhone will play an audio message for emergency services, which informs them that you’ve been in a severe crash and gives them your latitudinal and longitudinal coordinates with an approximate search radius.
When a crash is detected, Crash Detection won’t override any existing emergency calls placed by other means.
Crash Detection is on by default. You can turn off alerts and automatic emergency calls from Apple after a severe car crash in Settings > Emergency SOS, then turn off Call After Severe Crash. If you have third-party apps registered to detect crashes on your device, they will still be notified.
5. Use Emergency SOS via satellite on your iPhone 14 Pro
With this iPhone 14 Pro trick, you can use Emergency SOS via satellite to text emergency services when you’re out of cellular and Wi-Fi coverage.
Emergency SOS via satellite can help you connect with emergency services under exceptional circumstances when no other means of reaching emergency services are available. If you call or text emergency services and can’t connect because you’re outside the range of cellular and Wi-Fi coverage, your iPhone tries to connect you via satellite to the help that you need.
If you need to contact emergency services, follow these tips to help connect your iPhone to a satellite:
Hold your phone naturally in your hand. You don’t need to raise your arm or hold your phone up, but don’t put it in a pocket or backpack.
Make sure that you’re outside with a clear view of the sky and the horizon.
Be aware that trees with light foliage might slow down the connection, and dense foliage might block it. Hills or mountains, canyons, and tall structures can also block the connection.
In case you need to turn left or right or move to avoid a blocked signal, your iPhone provides guidance—just follow the onscreen instructions.
To text emergency services via satellite
First, try calling emergency services. Even if your normal cellular carrier network isn’t available, you might be able to make the call.
If your call won’t connect, you can text emergency services via satellite:
Tap Emergency Text via Satellite.
You can also go to Messages to text 911 or SOS, then tap Emergency Services.
Tap Report Emergency.
Using simple taps, answer the emergency questions to best describe your situation.
You can also choose to notify your emergency contacts that you contacted emergency services, along with your location and the nature of your emergency.
To connect to a satellite, follow the onscreen instructions.
After you’re connected, continue following the onscreen instructions to stay connected while you send your message to emergency services.
Once you’re connected, your iPhone starts a text conversation with emergency responders by sharing critical information like your Medical ID and emergency contact information (if you have set them up), the emergency questionnaire answers, your location (including elevation), and remaining battery life for your iPhone.
6. Hidden and Recently Deleted albums protection
The Hidden album in the Photos app is clearly not hidden, seeing as you can easily find it, making it impractical for adequately hiding private photos and videos. While Apple does have an option to make the Hidden album “invisible,” anyone with access to your phone can make it visible again and view everything inside.
Thanks to an iPhone 14 Pro trick, you can now lock the Hidden album. You don’t actually need to do anything to toggle this feature on. If you want to check it out, launch the Photos app and go to the Albums tab at the bottom of the screen. If you scroll down, you’ll see a tiny lock next to the Hidden and Recently Deleted albums. To view what’s inside, use Face ID or your passcode.
7. View and share saved Wi-Fi passwords
Apple has allowed iOS users to share Wi-Fi passwords for a while now, but only by placing two Apple devices near each other. And if that feature didn’t automatically work, you couldn’t just dig out the password from your settings. Plus if you wanted to share a saved Wi-Fi password with someone else, like an Android user or someone on a computer, you had to know the password. Until now.
In Settings, go to Wi-Fi and tap the tiny information icon to the right of the network you want the password for. To view the network password, tap the Password section and then use Face ID or enter your passcode to view it. You can then tap Copy to copy the password into your clipboard and share it.
8. Find and remove any duplicate photos and videos
Maybe you’ve saved the same photo multiple times or downloaded a video more than once, and so you’ve got duplicates littered in your photo album. It may not be a problem if you’ve got the storage to spare, but if not, it might be a good idea to go back and remove every single duplicate — which is now easy to do thanks to an iPhone 14 Pro trick.
In Photos > Albums, you should now see a new Duplicates album under Utilities, where Apple scans through all of your photos and shows you any photo or video you’ve saved more than once. From there, you can either delete any duplicates, or simply press Merge, which will keep the photo with the highest quality (and relevant data) and then move the others to the trash.
Although you’ll probably want to go through each set of duplicates, to ensure that they’re actually exact copies and not similar photos, you can also hit Select > Select All > Merge to remove every single photo and video that Apple thinks is a duplicate, all at once.
9. Pin your favorite tabs in Safari
Safari caps your open tabs at 500, and if you’re nearing that limit, it might be pretty darn hard to find the exact tab you’re looking for. You could scroll endlessly, but there’s now an easier way to find the exact tab you’re looking for.
In Safari, if you press down on an open tab, you now have the option to hit Pin Tab. This will move that tab to the top of Safari, where it will exist as a tiny tab preview, permanently pinned there, which you can then tap to view.
If you press down and unpin a tab, it will move to first in your grid of open tabs.
10. Pair Nintendo Switch Joy-Cons with your iPhone
Apple has long allowed you to pair third-party controllers, like the PS5 Sony DualSense and Xbox Core Controller, to your iPhone and iPad, in order to more comfortably play mobile video games like the Apple Arcade library, Minecraft and Call of Duty. And you can add another console controller to that list.
If you own a Nintendo Switch, you can now pair your Joy-Con controllers to your iPhone 14 Pro. To start, hold down the little black pairing button on the Joy-Con, until the green lights start running back and forth. This means the device is in pairing mode. Next, open your iPhone and go to Settings > Bluetooth and select the Joy-Con from the list. Repeat this step with the other Joy-Con.
11. Recover recently Deleted Chats in Message
If you have the habit of deleting messages in the Message app and happen to require them at a later point in time, you can recover the deleted messages on your iPhone 14 Pro. The deleted messages are moved to the Recently Deleted folder in the Message app itself. Here’s how to access the Recently Deleted folder in Message,
Open the Messages app.
Tap the Edit button at the top left.
Select the Recently Deleted folder.
Select the chat you want to Recover the messages from.
Note: Deleted messages will be available in the Recently Deleted folder for 30 days, after which the messages will be deleted permanently.
12. Easily Delete contacts
With previous versions of iOS, deleting a contact on iPhone was a tiresome process. You had to go to the detailed information of the contact, select the Edit option, and then scroll down all the way to finally select the Delete Contact option. Apple has finally heard the requests of its users as it has made the process of deleting a contact easier in iOS 16. You can now simply tap and hold on a particular contact to delete it from your list.
13. Disable ‘Lock to End Call’
One of the quirks that iPhone users (especially the new users who switch from Android) complain about is that pressing the lock button ends the call. You can finally disable the ‘Lock to End Call’ feature with this iPhone 14 Pro trick.
Open the Settings app.
Go to Accessibility.
Select Touch.
Toggle off Lock to End Call.
14. End call using Siri
With iPhone 14 Pro, other than tapping the on-screen end call button or side button of the device to end a call, you can have your virtual assistant, Siri, hang up a call for you in a very high-handed way. While you are on a call, just say “Hey Siri, hang up” and the assistant will do it for you.
While this is a convenient and hands-free way to end a call, it is recommended to use it with caution as the caller on the other end will be able to hear your command to Siri.
15. Restart your iPhone 14 Pro with Siri
Another iPhone 14 Pro trick is rebooting your device with Siri. Just wake your assistant up with a “Hey Siri” call and say “reboot ” or “restart”. When Siri asks for confirmation, reply with a “Yes” or “No” and that’s it! You don’t even have to unlock your device to complete the action using Siri, so it can be done entirely remotely.
16. Dictate emojis with Siri
You could previously dictate texts with Siri, but if you’re the type who thinks emojis are worth a thousand words, your iPhone’s digital assistant couldn’t really helped you. Dictate a lovely message to your sweetie that ends with a heart emoji, and Siri will quite literally type “heart emoji” in the text. It really kills the mood.
iOS 16 makes Siri smarter about dictated emojis, and now, telling the assistant “heart emoji” will yield a nice red heart right there in your text message.
17. Skip Siri confirmation
Previously, if you ask Siri to send a message to a contact and dictate the content, it asks for confirmation. The positive side is that you can check if Siri has transcribed your message correctly.
Nonetheless, it is another added step and takes more time. With this iPhone 14 Pro trick, you can turn it off and send messages automatically with Siri. Here’s how,
Open the Settings app.
Go to Siri & Search.
Tap Automatically Send Messages.
Toggle onAutomatically Send Messages.
18. Make Siri listen longer
While we’re on the subject of Siri improvements, let’s talk about an accessibility feature that Apple actually revealed back in May, a month before its iOS 16 preview. Back then, Apple promised a host of accessibility features was coming to the iPhone, and one of the promised additions that caught my eye was the ability to the adjust Siri’s pause time.
Adjusting the pause time will make the digital assistant wait longer before responding to your request. It’s ideal for anyone with impaired speech, but really if you find yourself rushing to complete a Siri command before the assistant leaps into action, you’ll appreciate this iOS 16 addition as well.
Go to Settings.
Tap Accessibility.
Tap Siri.
19. Merge Duplicate Contacts
If your Contacts app is riddled with duplicates that you haven’t been able to fix, then this iPhone 14 Pro trick is for you. The update includes a dedicated feature for merging duplicate contacts, solving problems with multiple contacts once and for all.
In the iOS 16 Contacts app, if you have more than one contact card for the same person, the app will automatically detect the duplicate and let you know that duplicates were found.
The “Duplicates Found” interface is at the top of the app, and if you tap it, the Contacts app is able to merge all of the duplicate contact cards into one.
Prior to now, there was no built-in way to quickly manage duplicate contacts in the iOS Contacts app, so the new iOS 16 feature should be a relief for those dealing with Contacts issues. This feature did previously exist on the Mac, but it was not available on iOS devices.
20. Copy and Paste Photo Edits
Want all of your photos to have the same aesthetic, or have improvements you want to make to an entire batch of images? That’s possible with this iPhone 14 Pro trick, which lets you copy edits from one photo and apply them to another photo with a tap. Here’s how:
Open Photos and select the edited image.
Tap the Three Dots at the top right.
Tap Copy Edits.
Go to the image you want to paste the edit and tap the Three Dots at the top right.
Tap Paste Edits and done.
The same edits are now applied to the selected image too.
21. Sort Playlists in Apple Music
Playlists are great, but in Apple Music, they’re fixed in the order you created them. If you want to change things up, you’ll have to open the editor and do it by hand. Now, with this hidden iPhone 14 Pro trick, you can easily sort Playlists by title, artist, album, or release date.
22. Use Face ID in Landscape Mode
The iPhone 14 Pro models support Face ID in landscape mode, making it easier to unlock the iPhone when it’s not held in the standard portrait orientation.
23. Lock Notes with a Passcode
Rather than creating a new password for a note, you can now simply use your device passcode or Face ID/Touch ID to lock a note, which is much easier.
Open the Notes app.
Tap and Hold the note you want to lock.
Select Lock Note.
Tap Use iPhone Passcode.
24. Enable haptic feedback on the Keyboard
There’s a keyboard setting in iPhone 14 Pro that lets you enable haptic feedback that can be felt when you’re typing. The vibrations are for each key tap, offering users a physical confirmation that a letter has been pressed. Here’s how to enable it:
Go to Settings.
Tap Sounds & Haptics.
Select Keyboard Feedback.
Toggle on Haptic.
25. Add Quick Note to Control Center
Apple introduced Quick Note as one of the best new iPadOS 15 features earlier last year. What makes this a useful feature is its ability to let you start taking notes from anywhere on your device. So whenever an interesting idea strikes, or if you wish to pen down important points in a meeting, you need not open the Apple Notes app and use the Quick Notes instead. Now, with the release of iOS 16, Apple has extended this productivity-centric feature to provide a quick and simplified note-taking experience on iPhone as well. Here’s how to add this tile to your Control Center:
First, open the Settings app on your iPhone and select “Control Center“.
Under the “More Controls” section, find “Quick Note” and tap the green “ ” button next to it. That’s it! The Quick Note icon will now show up in the control center.
Note: If you want the Quick Note icon to appear higher in the control center, touch and hold the three horizontal lines next to Quick Note to drag the icon to your desired location in the Control Center.
Once the Quick Note icon is available in your device’s Control Center, taking a Quick Note is merely a tap away. Here’s how it works:
First, bring up the control center on your iPhone.
Then, tap on the Quick Note icon (sticky note with a squiggly line).
Now, a Quick Note window will appear on the iPhone screen to let you jot down your thoughts or anything that you want to take note of. Since it provides all the familiar formatting tools and features, including a document scanner and markup, so you can take notes with the desired efficiency. Make sure to tap “Save” at the top-right corner to save your note.
26. Schedule Emails in the Mail App
Have you ever tried to remember to email someone about something on a particular date in the not-so-distant future, but ended up forgetting to send it when the day eventually came around? If that sounds familiar, scheduling emails could be the perfect way to ensure it doesn’t happen again.
Whether it’s a birthday or other celebration, or maybe something business-related that you need to bring up on a specific future date, This iPhone 14 Pro trick offers you the ability to schedule emails ahead of time. Here’s how to schedule emails in the Mail app,
Open Mail app.
Tap Add New icon located at the bottom right corner and draft your mail.
Press and hold the Upwards Arrow, representing Send.
27. Convert currency through the Camera
Currency conversion is a convenient tool to save your pocket from taking any heavy losses in over-priced deals especially if you travel abroad a lot. Usually, we browse the web to convert currency. Following this method can get hectic, especially if you’re traveling abroad. However, with this hidden iPhone 14 Pro trick, you can convert currency directly from your Camera and no longer need to manually enter the currency values online.
Here’s how to convert currency directly through your iPhone’s camera:
Open the Camera and point it to the text.
Tap the Scan icon at the bottom right corner.
When done, tap the Convert icon at the bottom left.
You can now see the currency value converted!
28. Get Translations Directly From the Camera App
Apple in iOS 16 has brought its system wide translate feature to the Camera app, allowing the iPhone to be used to translate signs, packaging, and more in real time.
Using the translate feature is as simple as opening up the Camera app and pointing it at the text you want to translate. Tap on the text selection button in the app to select the detected text, and then choose the translate option to get an instant translation.
You can pause the view to get translations overlaid on text, and zoom in for a closer look. It’s a useful feature that’s perfect for signs and other wording that you might not understand when you’re traveling.
29. Edit messages in iMessage
I think it’s safe to say that everyone has relied too much on autocorrect when sending an iMessage, leading to potentially embarrassing typos. Prior to iOS 16, you had to own the mistake and accept that it would exist on the recipient’s phone, forever. However, with this iPhone 14 Pro trick, you have the ability to edit a message within 15 minutes after it was sent.
You’ll need to act fast after you realize your mistake. But once you do and you’re still within the 15-minute window, all you need to do is long-press on the message, then select Edit from the list of options.
The text field will show back up, letting you fix your error and then save it.
On the recipient’s end, if they’re using iOS 16 as well, a small “Edited” label will appear below the message that no longer shows any signs of wrongdoing.
For those on older versions of iOS, they’ll receive a second message with the corrected text.
30. Unsend messages in iMessage
The process for completely deleting a message you’ve sent within the last 2 minutes — helpful if you send it to the wrong contact or thread — is nearly identical to editing a message.
Once you realize the error of your ways, long-press on the message until you see a menu pop up. From that menu, tap Undo Send. There’s a small animation that shows the message disappearing, followed by a line of text in the thread letting everyone know a message was removed.
Easy-peasy, right?
31. Create a sticker from images
With this iPhone 14 Pro trick, you can create stickers from images and share these stickers with other applications. It is shared as a sticker in iMessage and as a PNG image in other instant messaging services. Here’s how to do it,
Open the Photos app.
Select the image you want to create as a sticker.
Tap and Hold the image.
You can copy the image and paste it as a sticker in iMessage or any other service you want. Or you can share the image from the same page. You can also save the sticker in notes.
32. Personalize Lock Screen
One of the things you look at the most on your iPhone is the lock screen. iOS 16 brings the most substantial update to the iPhone’s lock screen yet. Press and hold to edit your lock screen. You can swipe to try out several different styles. Each style changes the color filter for the background photo and the font on the lock screen so everything complements each other. This feels a bit like Apple’s take on Google’s Material You, which launched with Android 12.
You can also customize the fonts for the time and date, and add lock screen widgets like temperature, activity rings and a calendar. The widgets are akin to complications on the Apple Watch lock screen.
You can even set up multiple customized lock screens with different widgets and easily swipe to switch between them. There’s also a photo shuffle option that automatically changes the pictures on your lock screen.
33. Skip CAPTCHAs using Private Access Tokens
The CAPTCHA — which stands for Completely Automated Public Turing test to tell Computers and Humans Apart — has been a necessary evil across the internet. CAPTCHAs are designed to make sure that a person is accessing a website or service, and not a bot. I find them annoying, as they often involve reading strangely written letters or having to find all the images that have a truck. Tapping on images of traffic lights or deciphering squiggly text to prove you are human is now a much less common nuisance for iPhone users, as this iPhone 14 Pro trick lets you bypass CAPTCHAs in supported apps and websites.
This cool iPhone 14 Pro trick can be found in the Settings app under Apple ID > Password & Security > Automatic Verification. When enabled, Apple says iCloud will automatically and privately verify your device and Apple ID account in the background, eliminating the need for apps and websites to present you with a CAPTCHA verification prompt.
34. Transfer an eSIM Between iPhones via Bluetooth
This iOS 16 trick allows an eSIM to be transferred between iPhones via Bluetooth while setting up cellular service.
In the Settings app on an iPhone running iOS 16, tapping on ”Set up eSIM” brings up an option to transfer an eSIM and its associated phone number from another iPhone via Bluetooth. To transfer an eSIM from another iPhone, Apple says to make sure the other iPhone is nearby, unlocked, has Bluetooth turned on, and is running iOS 16 or later.
Open the Settings app on your new iPhone.
Tap Cellular.
Above the Cellular Data section, tap the Set Up eSIM button.
When prompted, tap the Transfer From Another iPhone button.
From there, you’ll be prompted to the next screen which provides the following message: “To transfer a phone number from another iPhone, make sure your other iPhone is passcode protected, nearby, unlocked, has Bluetooth turned on, and is running iOS 16 or later.
35. Use Spotlight on the Home Screen
This hidden iPhone 14 Pro trick lets you access Spotlight search from the Home Screen without swiping down or left. You’ll find it right above the dock, which makes it easier to search for apps, contacts, documents, images, and more. Spotlight can fetch results using the information from images stored in Messages, Notes, and Files, like text, objects, people, and so on.
36. Set a Reminder to Check Emails Later
At times, you might want to check an important email later. With this iPhone 14 Pro trick, you can add a reminder to check messages in the future. Simply swipe right on an email and select Later. Ask the Mail app to remind in an hour, tonight, tomorrow, or later.
37. Drag and Drop Subjects With Visual Lookup
Apple’s updated Visual Lookup feature in iOS 16 can separate subjects from the background of an image with a simple long-press action. You can use it to grab an object from a picture and drop it as a sticker into the Messages app, for example. Thanks to machine learning, you no longer need to spend time drawing outlines using third-party apps to get a sticker you want.
38. Use Live Text in video
Live Text was already great with iOS 15. You could grab information from a photo by selecting the text available, a telephone or address, for example.
Now, with Live Text in videos, text is completely interactive in paused video frames, so you can use functions like copy and paste, lookup, and translate.
In addition, Live Text with iOS 16 adds recognition of Japanese, Korean, and Ukrainian text. Last but not least, data detected in photos and videos is actionable with a single tap. Track flights or shipments, translate foreign languages, convert currencies, and more.
Here’s how to use Live Text in a video:
Open the Photos app and open the preferred video.
Scroll the video to the point where you want to extract the text.
Pause the video, tap and hold on to the text on video.
Live Text will automatically recognize text and show you the following options copy, select all, look up, translate, search web and more.
Tap on the desired option to use the text as needed.
Also, the Live Text feature can be used over Map to copy the address.
39. Add the battery percentage to the status bar
With this iPhone 14 Pro trick, you can add the battery percentage back to the status bar. Simply go into Settings, then choose Battery, then toggle on the new Battery Percentage option. It might even be enabled by default, but that only appears to be the case for some users.
40. Track your orders in Apple Pay
Let’s wrap up by highlighting some features in Apple’s existing apps that have gotten overshadowed by other changes. For instance, in the Wallet app, the big change brought about by iOS 16 is Apple Pay Later, in which you can divvy up your purchase into four installment payments. But that’s not the only new capability available when you buy things with Apple Pay in iOS 16.
You’ll also be able to track orders of your Apple Pay purchases directly from within the Wallet app. The feature only works with participating merchants, but considering how widespread Apple Pay has become since Apple introduced it in 2014, you’d imagine that there will be a lot of retailers providing order tracking info to you via Wallet.
Your favorite iPhone 14 Pro and iPhone 14 Pro Max tips and tricks
So these were some of the best iPhone 14 Pro and iPhone 14 Pro Max tips and tricks you would love to try today. My favorite iPhone 14 Pro and iPhone 14 Pro Max tips and tricks include using dynamic island, ability to edit/delete messages, ability to end calls with Siri, and ability to schedule emails in Mail. There’s surely plenty more hidden iPhone 14 Pro and iPhone 14 Pro Max tips and tricks to discover, so I’ll keep tapping, swiping and noting anything I find. Did we miss out on something important that needs to be added to the list? Which are your favorite iPhone 14 Pro and iPhone 14 Pro Max tips and tricks? Share your thoughts in the comment section below.
AirPods are wireless Bluetooth earbuds designed by Apple Inc. In this article, i’ll explain the advantages of Apple AirPods in 2022.
AirPods were first announced on September 7, 2016, alongside the iPhone 7. Within two years, they became Apple’s most popular accessory.[3][4] The most recent model, AirPods (3rd Generation), are a replacement to the 1st and 2nd Generation models although the 2nd Generation is still sold on Apple’s website. These models are Apple’s entry-level wireless headphones, sold alongside the AirPods Pro and AirPods Max. Check out some of the benefits of Apple AirPods.
Advantages of Apple AirPods
Here are 11 benefits that you get by owning Apple AirPods:
1. AirPods don’t have wires to tangle
One of the major advantages of Apple AirPods is that they are true wireless. This means they have neither cords or wires between them nor to an audio source (iPhone, iPad, MacBook, etc.). Since they have no wires, the mic, controls and battery are built into the housing of the earbuds.
With Apple AirPods, you are able to do away with the multiple wired gadgets in your life. You can do your things handsfree, meaning that you will be able to pick your calls without the need to place your iPhone on your ears. The hands-free earbuds will do the work for you. It is also true that you will never have to unwind any knots formed by the wires of your headphones or earbuds. It also becomes easy to work out as you listen to music from your iPhone through the Apple AirPods. In short, it is convenient to use the Apple AirPods.
2. You can connect your AirPods to all of your Apple devices at once
Another great advantage of Apple AirPods is that It’s incredibly easy to connect them to all your Apple devices at the same time, whether you want to listen to music on your phone or watch a movie on your tablet.
After unboxing the AirPods, unlock your iPhone, then open the AirPods’ charging case next to the phone (or your iPad). Don’t do anything else. After a second or two, there will be a pop-up on your iPhone asking if you want to connect the AirPods to it. Tap Connect. A few seconds later, the pop-up will display the current battery level of your AirPods and the charging case.
Yes, it’s just that easy.
3. AirPods are so easy to use
Another advantage of Apple AirPods is that they are incredibly easy to use. Just insert the buds into your ears and they work instantly and seamlessly with your iPhone. When you are done using them, pop them into a white case that replenishes their power. They are sleek, innovative and convenient.
4. Use AirPods before sleep
Another fringe benefit of having Apple AirPods is that some people use their earbuds to fall asleep at night—think earplugs, but with soothing sounds. Apple AirPods can function a bit like a white noise machine, but one that only you can hear. This is particularly useful if you live in an urban area or your partner snores, and this would not be possible with wired or standard wireless headphones.
5. AirPods have good sound quality
The fact that the Apple AirPods are wireless does not mean that they will not give you the best quality sound. AirPods produce the best quality sound.
The AirPods’ bass won’t make your world shake, but it’ll hit with surprising impact on songs like Woodkid’s “Iron.” There’s enough of everything — bass and treble extension, soundstage, clarity, and detail — in Apple’s tuning to render a convincing reproduction of most genres of music.
I say the AirPods aren’t technically amazing, but that’s only when comparing against existing standards for sound quality. In the category of truly wireless earbuds, the AirPods are the best you can get.
6. AirPods are highly convenient
Another advantage of Apple AirPods is that you have the freedom to walk as you talk. In fact, with the Apple AirPods, you can work and even do chores at home without the need for you to hold the phone. You can listen to music and even receive calls and resume the playback as you wish. You could actually drive as you use the AirPods. You will, however, need to make sure that you are careful enough not to cause an accident.
For starters, having two earbuds without an interconnecting cable is a lot simpler of an equation than what we’ve seen in the past. Just think about the myriad inconveniences that you can avoid by getting rid of that cable. This is especially true for the gym where having a cord is simply the worst.
7. AirPods can work even with non Apple devices
Another advantage of AirPods is that you can pair them with non Apple devices such as phones, tablets, computers, TV sets, MP3 Players and so on. This means that you can listen to your programs on TV or computer by pairing the AirPods with these devices. This way, you can enjoy your programs without the need of bothering other people in the room.
8. AirPods have extended battery life
This is an often overlooked point, but if you compare Apple AirPods to regular wireless earbuds, the battery life is technically better with the AirPods if you count the charge case—which you should. Taking the new third Generation AirPods as an example, the battery life on a single charge is about six hours, however, practically speaking it’s more like 30 hours since you will absolutely be using them with the charge case. This means more often than not, your Apple AirPods will be charged and ready to go since, in effect, they have three to four times the battery capacity of your regular wireless earbuds.
9. AirPods are highly portable
The portability of Apple AirPods is another benefit that AirPods enjoy. Apple AirPods are easier to carry around because you don’t have to worry about messy wires. You can literally place them anywhere you want since they don’t take up much space. Put them in your pocket, backpack, or hold them in your hand.
Flexibility and freedom of movement are some of the Apple AirPods advantages. AirPods’ portability is what amplifies this factor. You can go wherever you want with them and enjoying your music, podcasts, etc. For sports users, Apple AirPods are a must-have.
There are still many more uses of Apple AirPods portability. You can use them at work, when traveling, at the gym, in your bedroom, in the car, in the shower – anywhere! The options are unlimited, as long as you know what you want out of them.
10. AirPods are affordable and stylish
Apple AirPods look stylish and sophisticated. They are sporty in looks and design. They are made in such a way that they will remain firm when you are working out. You will love their looks even if you are a casual user of earbuds. They are also affordable despite their stylish looks and nature.
11. AirPods are durable
Durability is a factor that should be looked into while buying a headset whether they are wired or not. And compared to the wired earphones, the Apple AirPods definitely are more durable. The simple reason being that the wire can easily wear out. The connection point between the wire and the connector is always a problematic area for wired earphones. Twisting and turning eventually will meet its toll. Unlike conventional wired headphones, AirPods have no cables to break their fall if they slip out of your ear or accidentally dropped from your grasp. AirPods have a durable plastic coating that protects the important inner components from damage. This plastic housing is thick enough to effectively shield the electrical components in the earbuds. Normal wear and tear should not affect them as they just lie on your ears all the time. As long as you take care of your AirPods when they are away from your body, they should be fine for a long time.
These are advantages of AirPods
So, these, according to us, are the 11 of the most important benefits of owning an Apple AirPods. they’re lightweight, easy to use, durable. They don’t have wires to tangle and get caught on something when your move. They sync easily with your iPhone and other Apple products. They have good sound for such a tiny hardware. The carrying case are wirelessly charged. The AirPods will last around 6 hours on a single charge and wit the case you can recharger and use for up to 30 hours. Plus, although they work best when used with an Apple product, they can be paired with any Bluetooth device, from smart TVs to smartphones. They are very convenient.
An app can create a lot of value for a business. Developing an app can create new possibilities for your business. You can offer new features to your customers and connect more easily with them. But it’s important to consider whether your business is ready before investing in an app. Read more here.
There are many advantages to having an app. If you have a loyal customer base, it’s much easier to connect with them through an app. An app makes you able to offer your customers new and convenient features. A strong brand is completely built on good communication with your customers. For this, an app can be a valuable asset. Customers that use your app can easily set their own preferences which allow you to meet their needs and demands. It will also give you a better basis for targeted ads. If you want to start developing an app, you can find different softwares that can help.
But even though there are many advantages of having an app, the timing for it needs to be right. Developing an app is an investment that takes a lot of time and money. If you’re not ready for an app, it can be a better idea to build a receptive website. Read more about when to build an app for your business here.
1. If you have a loyal customer base
One of the best things to look at when deciding whether or not to build an app is your customer base. If you already have a loyal customer base, you can be pretty confident that they will make use of the new possibilities that an app brings to your business. If you’re still in the early days and building your customer base, it might be a bit too soon to invest in the development of an app.
2. Your business requires a smartphone feature
If you are sure that your business needs a smartphone feature to grow, developing an app is usually a good idea. If your products or services are elevated with the use of a smartphone feature, this is a good indication. This could be the use of a GPS location or a camera. Think about how much value this will create for your business and your customer. If you find that it will create a sufficient amount of value, an app could be worth the investment.
3. If you need an interactive feature
As mentioned, interacting with your customers is the essence of creating a successful business. So even if you don’t necessarily need a smartphone feature, an increased interaction with your customer can be grounds enough for building an app. An app can be a good way to introduce new interactive features to elevate your business’ service or product. The same thing goes if your platform has an interactive content-based involvement with customers, an app can be a valuable asset. If you do decide to build an app, you also need to have the time and money to maintain it and optimize it for SEO.