Got a tip for us?

macOS 27

Reminders takes advantage of Apple Intelligence to examine information in your reminders and make them, or their organizational structure, more useful to you.

Get suggested reminders

While working in other apps, you can prompt Apple Intelligence to extract items from Reminders. While looking at a recipe, for instance:

  1. Tap or click the Share button, and the Suggestions section should appear in a moment with all the ingredients to add to a shopping list or all the steps in a recipe.
  2. Tap or click the plus button to add items, or tap or click Include All.
  3. Tap the blue checkmark button or click Add to finish.

You can refine this by making a selection before tapping or clicking the Share button. In our testing, Suggestions first showed the steps. Selecting the ingredients section first produced the comprehensive shopping list.

Categorize your reminders

If you would prefer your device to divide up your reminders within a list by category, you can use Auto-Categorize. Select a list, then tap the More button and choose Auto-Categorize, or right-click/Control-click the list and choose Auto-Categorize. The results may vary. When we tested it, we had a hard time figuring out what it did.

To turn Auto-Categorize off on an iPhone or iPad, tap the Siri button, then choose Turn Off from the Auto-Categorize section; on a Mac, right-click or Control-click the list, choose Auto-Categorize to turn it off. Then click or tap either Keep or Remove to determine what happens to your existing sections.

Write naturally

As with Calendar, on devices with Apple Intelligence, you can type loosely—if not using completely natural language—and Reminders suggests or fills in task-related elements.

What Notes adds

Notes makes limited use of Apple Intelligence, offering it in two places in the app.

Summarize a transcript

You can record a call from FaceTime or Phone—starting in iOS 18.1, iPadOS 26, and Tahoe—which is automatically transcribed as text in an entry in Notes and saved in that entry as an audio file. The transcription doesn’t require Apple Intelligence, but a summary created after the recording ends does.

Record a call in either app after a call starts by tapping or clicking the More button, then choose Call Recording. In iOS 18.1, tap the Record button.

Add Siri AI answers

You can tell Siri to insert its answers to your questions into a note by the note’s name. You can also ask Siri to format the answer in a particular way so that when it’s inserted, it looks the way you want. For example, you can take a long response from Siri and ask it to format it as a bulleted list.

Make or improve images with Magic Wand

The Magic Wand tool in Notes lets you create images directly in a note, even from the text of the note. To try it, tap the drawing button to reveal drawing tools and then select the Magic Wand. Then simply draw a circle to trigger it.

Magic Wand automatically incorporates any text in the note in the image generation prompt. However, with Apple Intelligence, you can add additional elements by typing a description in the Describe an Image field and tapping the send button. Tap the minus button next to an element to remove it from the image.

Starting in iOS 27 and iPadOS 27, you can also start by using the drawing tools to create a sketch, then switch to the Magic Wand, circle your drawing, and it incorporates that along with text in the note.

Tap Done to insert the image in your note. You may have to swipe down on the canvas to reveal the Done button.

Siri has been around in one form or another since the end of 2010. It first arrived on iPhones, and later came to other Apple devices. Although Apple tweaked and improved Siri in various ways over the years, it has been showing its age for quite a while. Even the version available in mid-2026, featuring Apple Intelligence and an optional ChatGPT integration, couldn’t hold a candle to modern AI chatbots and digital assistants from other large tech companies. So, the new Siri AI is both welcome and long overdue. However, to appreciate how much better it is, we want to remind you what the old Siri was like.

First, Siri’s capability to use real-world knowledge left a lot to be desired. If you asked Siri about something in the real world—say, the plot of a movie or a recipe for risotto—it would likely as not suggest webpages you could visit to learn about those things. It couldn’t just tell you.

Siri could retrieve information from, and add information to, various apps (such as Calendar, Contacts, and Reminders), and could even make limited inferences (“Show me messages Pat sent me last week”), but it couldn’t tell you anything about what’s on your screen right now, what your camera is looking at, or what time your upcoming flight leaves. That is, it lacked both situational and personal context.

And, the old Siri was largely stuck in a “one request at a time” model, with only a limited capacity for follow-up requests. You could, for example, ask about the weather in Toronto and then say, “What about Vancouver?” and Siri could remember the immediate context—that you want to know about the weather there, too. That was helpful as far as it went, but there was no way to carry on an extended conversation or revisit an earlier one.

Beyond these examples, the old Siri frequently left us with the impression that it could work with only a limited list of requests, but because Apple never revealed what that list was, everything was a guess. A great many requests were met with some variation on “I’m sorry, I didn’t understand that.”

It’s not as though the old Siri wasn’t useful! It certainly was. But anyone who had tried out Alexa, Google Assistant, ChatGPT, Claude, or other such providers immediately felt that Siri was way behind the times, which is true. Siri AI brings it, if not into the future, at least into the very recent past.

Extended conversations

Siri can now do much more than answer a simple follow-up question. Like other AI chatbots, it can now carry on extensive conversations, with each response building on and taking into account the context of what was said before. This makes for a much more natural interaction.

Personal context

Siri can now understand what Apple calls “personal context,” which is to say, information that can be pulled from the various apps on your device—data associated with Calendar, Contacts, Mail, Messages, Notes, Photos, Reminders, and so on. That means Siri can incorporate information found in any of those apps into its responses and actions. This can come in handy if you remember seeing something—text or a photo, say—but you don’t remember where or when. Siri can figure that out now.

For instance, you can ask, “Did I talk to Phil Fumble in the past six months?” and Siri can consult your email archive, calendar, and messages to deliver an answer that might have taken you 10 minutes to figure out—if you didn’t give up along the way—while also providing summaries of the topics discussed.

In the future, this should expand to more third-party apps.

Expanded Visual Intelligence

Visual Intelligence lets your device describe what it sees on its screen, in a screenshot, or in the Camera app—and even act on it, like extracting information from a poster or a bill. This means you can ask Siri about anything on your screen, or have it do something with that information. Although part of this capability was previously available on iPhones and iPads, the feature now has expanded powers and is also available on Macs.

Access to web-based data

Although Siri could previously gather information from a limited number of websites (like Wikipedia and IMDb), it can now access the web broadly, incorporating information it finds into its responses and no longer saying things like “I found these articles on the web that might help you.”

In-app and cross-app actions

For years, Siri has been able to change system settings, open apps, and more. In iOS 27, iPadOS 27, and macOS 27, thanks to an underlying framework called App Intents, Siri can take a much wider set of actions in a larger number of apps. For example, you can ask Siri to send a message in Messages containing the title of the song now playing in Music. Most of Apple’s apps already support actions like these, and third-party apps are getting there.

The Siri app

A new Siri app lets you revisit and continue previous conversations, among other things, and sync your conversations across devices.

Merged Siri and Spotlight UI

Instead of doing one thing to search your device and another to interact with Siri, you can now go to a single place for both.

Other changes

Among numerous other smaller changes, the set of features formerly known as Writing Tools, and now called Write/Edit with Siri, look and behave a bit differently. And, a couple of features—more expressive voices and enhanced dictation—are available only to those with new-enough and powerful-enough devices.

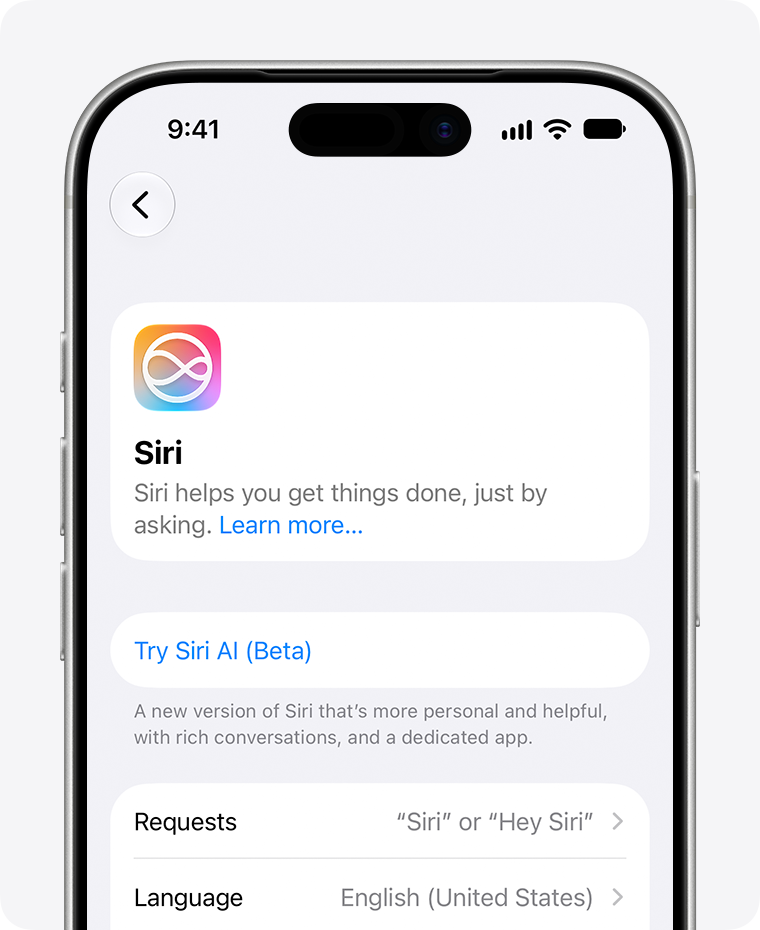
The Siri pane is where you configure Siri AI, and where you can check whether Siri AI is engaged at all.

The settings you can configure are:

  • Requests: This setting determines what name(s), if any, Siri listens for. Click or tap this and select “Siri” or “Hey Siri,” “Hey Siri,” or Off.
  • Language: Select the language Siri uses for both listening and speaking. Initially, only English is supported for Siri AI, though Apple plans to add more languages over time. As a result, if you set language to anything other than English, your device reverts to the old Siri—with the old icon—rather than Siri AI, with the new icon.

    Your Siri language and your system language must also match exactly, which is covered in how to turn on the new Siri.

  • Voice: It has long been possible to choose among various male- and female-sounding voices and even different dialects, and Siri AI adds even more choices. But now, you can also adjust Siri’s speed and expressiveness. If you want a zippy, flat, “just the facts” response; a relaxed, cheerful response; or anything in between, you can go to Settings > Siri on iPhone or iPad, or System Settings > Siri on a Mac, and click or tap Voice. On this pane, you can select a base voice and then drag the Pace and Expressivity sliders as sample responses are played to dial in exactly the tone you prefer.

This feature requires more advanced chips than are needed for Apple Intelligence. See the requirements for expressive voices.

  • Responses: You have two choices as to how Siri responds to requests:

    • Spoken Response: Siri speaks responses when you speak to Siri, but provides textual responses when you type to Siri.
    • Silent Response: Siri almost always provides textual responses. But note that even with this setting, Siri speaks responses if you’re driving or wearing headphones—and possibly in other limited situations.
  • Siri App: The following three settings apply to the Siri app:

    • Opens To: Select what appears when you open the app: either Recent Conversations or A New Conversation.
    • Keep Conversations: Select 30 Days, 1 Year, or Forever. Note that there’s no longer a Delete Siri & Dictation History button, though you can manually delete any or all of the history items in the Siri app.
    • Preview: Select None or 1–5 lines.

To control Siri conversation syncing across your devices, go to Settings > Your Name > iCloud on iPhone or iPad, or System Settings > Your Name > iCloud on a Mac, then tap See All, followed by Siri. You can disable Sync this Device (enabled by default). The Keep Conversations setting is synced with the main Siri retention setting: change it here, and it’s changed globally, not just for iCloud.

  • ChatGPT: Click or tap ChatGPT to change options specific to this third-party AI engine:

    • Use Extension: On by default, this lets Siri tap into OpenAI’s ChatGPT when you explicitly ask it to (see how to use ChatGPT with Siri AI and Image Playground). Turn it off, and the option to use ChatGPT disappears from other places in your operating system.
    • ChatGPT Account: If you have a free or paid ChatGPT account, you can click Sign In and provide your credentials, in which case your account is used for all ChatGPT requests. Read how to use ChatGPT with Siri AI for the privacy implications.
    • Capabilities: Requests and Image Creation via ChatGPT have advanced capabilities, but only up to a point; if you exceed your daily limit, you go back to restricted access for 24 hours. The labels next to Requests and Image Creation let you know what’s available to you at this moment.
    • Upgrade to ChatGPT Plus: If you don’t already have a paid ChatGPT account, you can click this button to subscribe to ChatGPT Plus for $24.99 per month, which removes the daily limits described above, but with a privacy trade-off.
    • Voice: If you want Siri to use a different voice for responses that come from ChatGPT than your usual Siri voice, click Choose, select Custom, and choose the accent and voice you prefer.
  • Automatic Visual Look Up: This switch is labeled “Identify objects and places that appear in screenshots.” However, we’re currently unsure what effect this is intended to have, as we are seeing Visual Intelligence hints in screenshots regardless of whether this switch is turned on. We’ll discuss this in an update to this book if and when we learn how it works.
  • App Access: Use these controls to determine which apps Siri can access. (Everything is turned on by default.) Click or tap an app, and then use the switches to turn the features on or off:

    • Learn from this application: When this is on, Siri collects data about how you use the app to be used in suggestions elsewhere.
    • Show Siri Suggestions: A limited number of (mostly Apple) apps have another switch, the wording of which may vary, that you can use to determine whether suggestions from Siri show up in this app. Note that the wording (for example, “Suggestions from Messages” and “Allow suggestions and content from this app to appear in Search, Look Up, and on the Lock Screen”) makes it sound as though the switch controls whether content from this app appears in other apps, which may also be true, but that’s not the primary function of the switch.
  • Turn Off Siri: Unlike in the previous two generations of Apple’s operating systems, you can no longer disable Apple Intelligence completely, and if you want to disable Siri (along with portions of Apple Intelligence), you must scroll to the bottom of the pane, click or tap the red Turn Off Siri button, read a long description of all the things that will stop working if you do, and then click or tap Turn Off Siri.

Even if you turn off Siri, “Visual Intelligence will continue to work but with more limited capabilities,” though Apple doesn’t spell out what those limitations are, and other Apple Intelligence features such as Write/Edit with Siri, Image Playground, and Shortcuts continue to work. All this is Apple’s heavy-handed way of pushing these new features, even if you actively dislike them and don’t ever want to use them.

One thing you might be surprised not to see here is a setting for the keyboard shortcut that invokes Siri on a Mac (see how Siri AI and Spotlight merged). Although you can change the Spotlight keyboard shortcut and the shortcuts used for Siri screenshots (in System Settings > Keyboard > Keyboard Shortcuts > Spotlight and Screenshots, respectively), there’s no evident way to change the Siri shortcut to anything else.

Focus uses Apple Intelligence to help you manage interruptions dynamically by evaluating the kinds of alerts and other attention-grabbing indicators that get through to you.

Intelligent Breakthrough & Silencing appears as an option in any Focus mode. Instead of rigid exclusions and inclusions, this option uses machine learning to understand how you work and adapts which attention-getting activities are delivered to you when your Focus mode is engaged.

Alternatively, you can use the Reduce Interruptions mode, which is essentially just a custom Focus mode with Intelligent Breakthrough & Silencing locked to the “on” position.

Even though you need Apple Intelligence to use Reduce Interruptions, the mode appears on all your devices regardless of whether syncing is enabled. On devices without Apple Intelligence, you don’t get the intelligent benefits.

With either Intelligent Breakthrough & Silencing or Reduce Interruptions engaged, Apple Intelligence processes each incoming notification separately and decides whether it’s important enough to break through and display it.

Importantly, Apple explains this analysis only vaguely and generically:

  • The support documentation notes only, “The Reduce Interruptions Focus understands the content of your notifications and shows you the most important ones, but silences notifications that are less important.”
  • In marketing copy, Apple says merely that the feature “highlights notifications that might need immediate attention.”
  • When Apple executive Craig Federighi introduced Apple Intelligence in the keynote at the company’s 2024 Worldwide Developer Conference, he said, in reference to Reduce Interruptions, “It understands the content of your notifications to selectively surface only the ones that might need immediate attention, like a text about today’s daycare pickup.”

Apple also uses the term “notifications,” not the phrase “notifications and incoming calls,” so we can’t tell you for sure whether phone calls and FaceTime calls (as well as those from third-party calling apps) are analyzed for origin and other factors.

Given how coy Apple is about particulars, we can’t predict whether this option or mode will work well for you. It’s possible it will identify—through context clues from the sender, the text in the alert, calendar entries, and other data—exactly the best alerts to send you. Or it might miss incredibly important stuff or allow inconsequential stuff through. It’s impossible to know without you testing it out for yourself.

Because you can use other customization options that let you override which people and apps are either always included or excluded, you can potentially use those to mitigate any true disaster of a missed alert.

iOS 27, iPadOS 27, and macOS 27 feature not only Siri as an underlying capability but also an app named Siri that lets you see, continue, and manage previous Siri interactions and conversations—and even start a new one right in the app.

Revisit old conversations

The app automatically shows every request and conversation you’ve had with Siri. (These appear in a sidebar on a Mac or iPad, but they’re the first thing you see when you open the app on an iPhone.) You can scroll through them and select one to see what was said. You can also do the following:

  • Switch views: To toggle between list view (the default) and grid view, click or tap the Filter button and choose Grid or List.
  • Search: Click or tap the Search button to search past conversations.
  • Continue a conversation: Select a conversation and type in the Ask Siri field at the bottom.
  • Add a file or photo: Click or tap the plus button and choose either Photos or Files, then navigate to whatever you want to add to the conversation. On an iPhone or iPad, you can also choose Camera from this menu to take a photo or video.
  • Delete a conversation: On a Mac, select one or more conversations and choose Conversation > Delete Conversation, press ⌘-Delete, or right-click/Control-click and choose Delete from the contextual menu. On an iPhone or iPad, you can either swipe left and tap the Delete button, or touch and hold and then tap Delete; you can also tap Filter > Select, tap or drag to select multiple conversations, and then tap the Delete button at the bottom of the list. In all cases, click or tap Delete to confirm.
  • Pin a conversation: You can pin a selected conversation, which anchors it at the top of the list. To pin on a Mac, choose Conversation > Pin Conversation, or right-click or Control-click and choose Pin from the contextual menu. On an iPhone or iPad, you can swipe left and tap the Pin button, or touch and hold and choose Pin.
  • Share a response: To share a specific response—not a conversation as a whole—as a PDF, you can click the Share button on a Mac, or touch and hold the response on an iPhone or iPad and choose Share.

In any conversation in the Siri app, you can click or tap the microphone button to speak your request rather than type it.

Start new conversations

To start a new conversation in the app, click or tap the New Conversation button and start typing.

Sync conversations across devices

As long as you’re signed in to your Apple Account on each of your devices—and have Sync this Device turned on in Settings > Your Name > iCloud > See All > Siri on iPhone or iPad, or System Settings > Your Name > iCloud > See All > Siri on a Mac—all your Siri conversations sync automatically via iCloud. To prevent syncing conversations from any of your devices, turn that switch off.

Conversations that you have while your iPhone is connected to a CarPlay system are marked with a little car icon.

Set retention time

Your device can store all your Siri conversations indefinitely, or it can delete them after 30 days or a year. To configure this, go to Settings > Your Name > iCloud > See All > Siri on iPhone or iPad, or System Settings > Your Name > iCloud > See All > Siri on a Mac, then choose 30 Days, 1 Year, or Forever from the Keep Conversations pop-up menu.

Safari has several features that rely on Apple Intelligence, ranging from subtle (page highlights) to dramatic (describe an extension).

View page summaries

Safari offers Apple Intelligence-generated summaries for most webpages. Click or tap the Page icon on the left side of the address bar, then click or tap Summarize. Safari switches into Reader mode, with a brief summary at the top of the page.

Organize tabs automatically

Drowning in tabs? Safari can reduce clutter by grouping them. Enable this feature on a Mac by going to Safari > Settings > Tabs and choosing Automatically Create Topics from the “Organize tabs” pop-up menu; on an iPhone, tap the Tab Overview button, then tap the Filter button and choose Organize Tabs > Automatically Create Topics; on an iPad, tap the Tab Overview button, then tap the More button and choose Organize Tabs > Automatically Create Topics.

Having done that, browse normally—which, for most of us, means opening lots of tabs. Safari examines the contents of each page and groups them by similarity, reducing the amount of space open tabs take up. Click a group to expand its contents. (This grouping type apparently has no name.)

Use Notify Me to monitor pages for changes

Safari can monitor a webpage and let you know when it changes. To set a notification, click or tap the Page icon in the address bar and choose Notify Me. Describe the type of change you’re looking for (such as a new news article or a change in a particular number), click Edit to adjust when and how often Safari should check, and click Done. When Safari notices the change in question, a notification appears.

You can close the tab, but you must enable notifications for Safari in Settings > Notifications on iPhone or iPad, or System Settings > Notifications on a Mac to receive these…notifications.

Safari checks daily by default. You can tap Edit—either while creating the notification or afterward—to switch to hourly, weekly, or monthly checks, and set the time of day. Manage these notifications in Settings > Apps > Safari > Notify Me on iPhone or iPad, or System Settings > Apps > Safari > Notify Me on a Mac. Delete a notification by clicking or tapping the Edit link on the tracked page, then clicking and tapping Delete and confirming, or via the Settings link.

Describe an extension to create it

Can’t find the extension you need? Safari can create a custom extension for you on the fly. It syncs to your other devices via iCloud but can’t be shared with anyone else. To create an extension, click or tap the Page icon in the address bar and choose Describe an Extension. A new dialog appears.

Here, you can click one of the existing categories to get ideas or start from scratch by typing something in the “Describe something else” field at the bottom and clicking Next. Safari then displays a new page that may include existing extensions from the App Store that perform a similar function. Ignore those and click the Create button at the bottom. Safari churns for a bit, with a progress indicator at the top of the page. When it’s ready, you can click Try.

If you like what you see, click Save; if not, click Edit to describe changes. Each extension has its own toolbar icon, which you can use to invoke it later. If you use this extension on a page other than where you created it, you’ll be prompted to grant permission.

This is a cool feature, but a word of caution: you can’t create anything complex, like an ad blocker. Instead, it’s for small things like modifying the contents of a page or taking action on various text or graphics.

The Photos app has numerous Apple Intelligence features.

Collections

Collections is a mix of manually created items, metadata-sorted categories, pre-Apple Intelligence on-device machine learning selections, and new Apple Intelligence groupings. Click or tap Collections to see categories like Albums (created by you); Media Types (metadata); and People & Pets, Memories, and Trips (all machine learning). Featured Photos also appears, which is an album that adds new images daily from your library based on some kind of hidden algorithm about what Photos thinks you’d like best.

Collections includes a Utilities section, which is where you’ll find Apple Intelligence features.

Utilities

The Utilities section is a grab bag of things, including media that Photos can’t upload to iCloud, duplicated items, and recently saved ones. Apple Intelligence also makes use of this section by including categories it creates by analyzing your photo library.

You may not see all of these Utilities sets, depending on what’s in your Photos library.

Here are the Apple Intelligence-related groupings:

  • Receipts: Photos of receipts as identified by Apple Intelligence appear here. On one of our devices, this category also showed a variety of other things, such as a junior-high report card, shipping labels, and even a plastic stake that came with a potted plant. The other saw letters photographed at library archives, shipping labels, and even pages from a book—but mostly receipts.
  • Handwriting: Any photo containing what Apple Intelligence identifies as handwritten text is in this category. For one of us, this category was slightly more successful than Receipts, but not uniformly so. The other sees a fair number of images that had a handwriting font, and pictures of sushi and holiday cards.
  • Identity Documents: Photos of passports, driver’s licenses (more formally, driver licenses), ID cards, debit and credit cards, and other documents that might serve to prove one’s identity appear here, with mixed success.
  • Illustrations: Apple Intelligence apparently has a broad and eclectic view of what might be considered an illustration. Among other things, One of us saw photos of artwork from museums alongside drawings his kids made in first grade, graffiti, and even a furnace wiring diagram. The other, a printing and comics historian, found many printed cartoons and old line-drawing illustrations in his set.
  • Documents: As with the Illustrations category, this shows anything vaguely document-like, as guessed by Apple Intelligence. For one of us, that included posters, menus, and signs—along with a carton of milk, a ketchup packet, and one of our kids holding a bag of chips. The other found the detritus of menus, screen captures, and pictures of his children being read books when young.

Generate reworked images

Apple offers three tools for taking a photo and generating new versions that add or remove information using generative imaging.

To use any of these tools, first select a photo and click Edit or tap the Edit button. Then click the Tools tab or tap the Tools button.

The first time you use any of these features, Photos must download the tool from Apple, which may take a few seconds to a few minutes. You should see a dialog that explains the delay.

All of these tools create new imagery based on existing data—you’re inventing parts of an image. That may be appropriate for personal images, or, once you consider it, you might not want to use any of these tools. Think about how the images will be received when shared, or if used in a professional, web, or print context, too.

Photos edited using artificial intelligence features (Clean Up, Extend, and Spatial Reframing) are invisibly tagged with a SynthID watermark.

Clean Up

The Clean Up tool in Photos lets you remove people and objects from the background of photos, automatically filling that space with new image information that blends seamlessly with the surroundings.

After selecting Clean Up, Photos may highlight certain areas of the photo with an animated, glowing effect. To remove one of those areas, click or tap it. You can also circle an object or brush over it with your pointer, finger, or Apple Pencil to remove it; the area may glow to indicate the selection. On a Mac, if the width of the Clean Up “brush” is too large or too small, use the Size slider.

Click or tap Clean Up to apply the changes. If and when you’re satisfied with the results: on a Mac, click Save Changes, then Done; on an iPhone or iPad, tap the yellow checkmark, then tap Done.

In this section, there’s also a Retouch brush that lets you smooth out details. However, it doesn’t use Apple Intelligence.

Reframe

If a photo was taken from an inauspicious angle, you can now adjust the angle—within limits—for a more pleasing effect, thanks to the Spatial Reframing feature of Apple Intelligence.

Select the Reframe tool. A glowing animation passes over the image. You can use your mouse or fingers to drag the image in any direction and watch as Photos dynamically fills in bits that were otherwise obscured. On a Mac, you can use Rotate, Pan, Straighten, and Zoom sliders, which also show the extent of the limits of how you can reframe the image. On an iPhone or iPad, use two fingers for zoom.

When you have the angle you want, click or tap Reframe.

Extend

Suppose a photo is cropped too narrowly, or that the subject is off-center. Photos can use Apple Intelligence to fill in areas adjacent to the area actually captured by generating new pixels that seamlessly blend in with what’s already in the photo. Select the Extend tool. Drag the frame to resize and/or reposition it and click or tap Extend. The results can be seemingly accurate or wildly disturbing.

Make Memories from prompts

You can make memories—rather, Memories with a capital M—using Apple Intelligence. Type a description, and Apple claims the feature will tell a coherent story sculpted from your photos and videos. To try this out, choose File > New Memory Movie, type a description, and wait to see what Photos comes up with.

One of us has had poor results with this feature, especially with music that bears no relation to the subject matter, but your experience may differ.

Use descriptive searches

Even if you never add a title or other metadata to an image in Photos, the app has long been able to figure out what (and who) is in it, so you could search for bridge or rainbow or dogs and usually get reasonable matches. Descriptive searching expands this concept, enabling you to type a whole phrase describing what you’re looking for, even if it involves a combination of attributes.

In our testing, this feature has been frighteningly accurate and helpful. We entered things like Morgen with the kids, Soren playing music, and California scenery and got results that meet those descriptions precisely.

Apple released Siri AI in 2026: a digital assistant that works with voice recognition and typing, and represents a major expansion of the previous Apple Intelligence system woven throughout their operating systems. Siri AI marks the biggest step forward in this area the company has ever taken.

Siri listens or lets you type requests, and then tries to respond by executing a task or providing an answer. Apple Intelligence is more subtle, using artificial intelligence algorithms for analysis, synthesis, or generation, like summarizing notifications, transcribing audio, rewriting text, or creating images from prompts.

What each term actually means

Throughout Apple’s updated operating systems you’ll see the terms Siri AI, Apple Intelligence, Visual Intelligence, and Spotlight. They are four different things:

  • Siri AI appears as just “Siri” in all interfaces, and it’s a digital assistant you can address by voice or typing. It processes requests and general questions.
  • Apple Intelligence is the company’s catch-all term for anything that requires advanced processing capability to analyze, synthesize, or generate something, like allowing for Live Translation or creating images from your description in Image Playground.
  • Visual Intelligence refers to the analysis that can be performed against static images and via the Camera app to describe what’s in them. It can also extract details, like event information from a poster, and transform it into something else, like a calendar event.
  • Spotlight is what Apple calls the search feature in iOS, iPadOS, and macOS, though it often appears just as an icon or a field with Search in it. Spotlight searches local files, data in apps (like people’s cards in Contacts), the web, and more. Starting with Siri AI, Spotlight and Siri are combined into one entity that, when triggered, appears as Search or Ask, where you can type.

All devices that support Apple Intelligence can use Siri AI and Visual Intelligence. However, for two advanced features, expressive voices and advanced dictation, you need a recent iPhone, iPad, or Mac model that must also meet minimum memory requirements.

Siri on an unsupported device

If you don’t have a device that supports Apple Intelligence but can use the 27 update, your Siri will be akin to the “old” Siri. To find out whether your device qualifies, see which iPhones, iPads, and Macs support Siri AI.

Where Siri AI came from

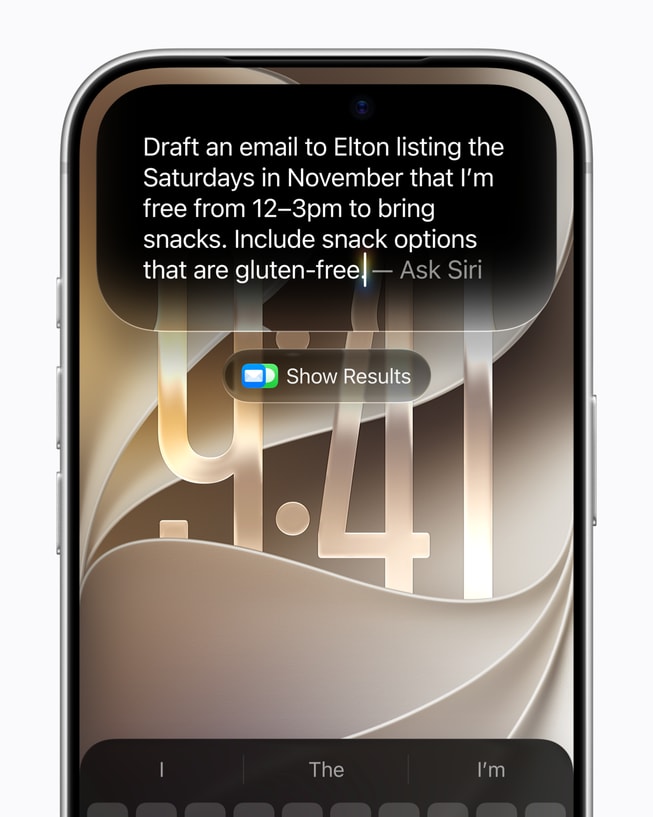
Siri AI is the latest evolution of Apple’s original voice-only assistant. On supported devices, you can trigger Siri AI by voice, through a button press, or by swiping and typing, among other methods. Then you can ask it questions, or just search stuff that’s on your device.

Calendar

Apple Intelligence lets you describe an event to Calendar more naturally than you previously could. Before the latest releases, you needed to have some structure and order. With iOS 27, iPadOS 27, and macOS 27, you can be a bit more freeform, and Calendar plucks out the details required. You can’t speak off the cuff, as you would with a chatbot, but it’s still better than it was before.

It’s similar to natural-language event creation in some third-party apps, but slightly more expansive in what it recognizes and matches against, such as locations.

For instance, you can’t say, “Grab coffee with Stacey Butler at that place we had coffee at last year for a couple of hours in the morning on September 15.” But you can say, “Grab coffee with Stacey Butler at the Fremont Coffee Company on September 15 for two hours starting at 10 in the morning.” The bolded parts are what Siri highlights in red or gray.

Red indicates that it’s matched what it thinks you want and has filled that into the event. Gray indicates a choice, such as a person with multiple emails or phone numbers in your contacts: tap or click to choose, and then they’re added as an invitee, and their name is now highlighted in red, too. That will also simplify the event title, removing ambiguous inline elements, such as turning “Grab coffee with Stacey Butler at the Fremont Coffee Company” to “Grab coffee with Stacey.”

Finder

Starting in macOS 27 Golden Gate, the macOS Finder offers to name files and folders automatically based on their contents. Select a file or folder and press Return to select the name. Hover over it with your pointer and one or more suggested names appear in a pop-up menu. Click one of these to use it as the new name.

If you dislike this feature, you can turn it off: Go to Finder > Settings > General and uncheck “Suggest file names.”

macOS also suggests names for new, untitled documents you create in most apps once they have a bit of content. The suggested names appear in the title bar and in the Save dialog when you save the file for the first time. One of us has found these suggestions to be wildly inaccurate during testing, but your experience may be different.

The naming may also happen automatically when you use AirDrop to transfer files from another Apple device, such as the contents of a screenshot when you AirDrop it from an iPhone to a Mac. In this case, you’re not prompted to approve the name.

Home

With Apple Intelligence, Apple Home reduces the amount of “attention noise” that motion-detecting cameras can generate. Home combines related activity notifications, so a series of motions doesn’t result in the current stream of alerts. It can also stitch together video from multiple cameras, allow natural-language searches for recorded events, and provide summaries you can read without watching the video.

So far, we haven’t been able to get this appear for us. We’ll update this section when we can.

To use the Home-related Apple Intelligence features, you have to subscribe to the 2 TB iCloud+ tier or higher. Your home hub must be a HomePod (2nd generation or later), HomePod mini, or Apple TV updated to the latest release, like tvOS 27. The Home app and Home accessories must have access to location services.

Lock Screen

In iOS 27 and iPadOS 27, you can use Apple Intelligence in two ways with your Lock Screen: one is good; the other…mmm, not so much.

Extend a Lock Screen image

You can extend an image you pick for the Lock Screen using the same approach as Extend in Photos. To reach the point where you can use Extend:

  1. Lock your device.
  2. Touch and hold a spot on the Lock Screen that isn’t taken up with a notification—the time display is a safe place. If you have a Touch ID device, you have to scan your fingerprint after touching and holding the Lock Screen.
  3. The Lock Screen shrinks in. Tap the add button to add a new Lock Screen. (You can also swipe left until you see an Add New screen with an add button in its center, and tap that.)
  4. Tap Photos and select an image.

Pick an image that doesn’t fill the entire screen proportionately, or you can pinch to shrink an image smaller than the screen. In either case, tap Extend, and the image will be filled in—make sure the results don’t look bizarre.

Create an image with Image Playground

When you reach step 4 above, you can now select Image Playground and generate an image for your Lock Screen. We don’t recommend this, for the reasons set out here.

Maps

Apple says Maps has an “enhanced Flyover” experience. This translates to less weird-looking landscape and building interpolation from satellite and street-level data when you look at cities using Maps’s 3D perspectives.

Maps now also features Local Lists, which are ostensibly algorithmically generated guides to local areas based on aggregated searches. Apple uses the word “trending” a couple of times in describing this feature, so it’s unclear if it’s just search-related—which gives zero insight into the quality of a restaurant or an experience—or factors in other data. (This may or may not involve Apple Intelligence.)

Also, Apple says that Maps offers “natural language search expands to cover routing.” We have not yet seen an example of this in action.

Notification Center

If you receive more than a handful of texts, you know how quickly Messages notifications can add up—sometimes hundreds of messages in an active multi-party group chat. You can review every message individually, and that may be appropriate or required. With the summary feature for notifications available with Apple Intelligence enabled on supported devices, you might find yourself fully informed without reading 100 messages.

Summarization is straightforward and available across notifications. For Messages, go to Settings > Notifications on iPhone or iPad, or System Settings > Notifications on a Mac, and enable Summarize Notifications. With that turned on, you can tap or click the menu item and scroll through apps, including Messages, to enable or disable summarization previews. Once turned on, notifications summarize single messages or groups of messages.

You can go a step further within Notification settings by choosing an individual app: setting Notification Grouping to Automatic makes the summaries more useful for loads of messages from that app! Go to Settings > Notifications > App Name on iPhone or iPad, or System Settings > Notifications > App Name on a Mac, and tap Notification Grouping or click the “Notification grouping” pop-up menu to modify the setting.

Passwords

Before iOS 27, iPadOS 27, and macOS 27, Passwords could already identify passwords that are too weak, or that have appeared in data breaches. Passwords like these that need changing are marked with a red exclamation point and feature a Change Password button that takes you to the appropriate page on the website. Version 27 takes that concept further, letting you go to the site, choose a strong new password, save your settings on the site, and save the new password in Passwords—all with one click or tap.

But there’s a catch: the site has to support the mechanism Passwords uses—and most of them don’t. If none of the logins are both in need of a change and have the necessary site architecture, you’ll see a banner telling you that you’ll be notified if there are passwords eligible to be automatically fixed. That’s what we see, so we can’t describe precisely what happens when a password meets those criteria.

Phone

Apple Intelligence brings Call Context to the Phone app: during a call, Phone offers information from other apps that seems contextually appropriate, like a reservation number or a flight number when you’re calling an airline. We have yet to experience an example of this.

Siri AI has the same basic requirements as Apple Intelligence. If your device is capable enough for Apple Intelligence, it can install iOS 27, iPadOS 27, or macOS 27 and use Siri AI. watchOS 27 also provides ancillary access via a paired iPhone on supported Apple Watch models. Apple Vision Pro can also use Apple Intelligence.

Siri AI minimum hardware

You can use Apple Intelligence and Siri AI on these devices:

  • Mac: Any Mac with Apple silicon, including the MacBook Neo (A18 Pro)
  • iPhone: iPhone 15 Pro, iPhone 15 Pro Max, iPhone Air, or any iPhone 16 or iPhone 17 model or later
  • iPad: Any A17 Pro or M-series iPad:
    • 11-inch iPad Pro: 3rd generation or later
    • 12.9-inch iPad Pro: 5th generation or later
    • 11-inch iPad Air: 5th generation (M1, 2022) or later
    • 13-inch iPad Air: 1st generation (M2, 2024) or later
    • iPad mini: A17 Pro (2024) or later

Note: The regular iPad series (no extra qualifiers) does not have an advanced enough processor for Apple Intelligence.

  • Apple Watch: Apple Watch Series 9 or later, Apple Watch Ultra 2 or later, or Apple Watch SE 3 when paired with an Apple Intelligence-enabled iPhone nearby
  • Apple Vision Pro: All models

Two features carry stricter requirements than this list: Siri AI’s expressive voice and the more advanced dictation.

Siri AI language support

As is often the case, Apple is launching a new feature in English only at first to support the greatest number of users across their base and work out bugs in the beta release. Apple said they will “quickly expand support for more languages.” The Siri language you choose has to match your system language, or your device falls back to the old Siri.

Apple Intelligence has greater support, partly because it’s been under continuous development for a couple of years. Apple supports English, Danish, Dutch, French, German, Italian, Norwegian, Portuguese, Spanish, Swedish, Turkish, Vietnamese, Chinese (simplified), Chinese (traditional), Japanese, and Korean.

Region limitations and delays

Apple has an ongoing dispute with the European Union about how it provides third-party and other access to some of their core features. As a result, Apple said that Mac and Apple Vision Pro users in the EU will have Siri AI access in supported languages at launch, but Siri AI won’t be available on iPhone, iPad, or Apple Watch. Their statement: “Apple is working hard to find a path forward that preserves its users’ privacy and security.”

Apple said they need to work through regulatory issues in China before they launch Siri AI and new Apple Intelligence features in that country. However, news reports in mid-August 2026 indicated Apple had trained an AI model with a Chinese partner that would allow it to offer Apple Intelligence features in China at launch.

More generally, Apple offers the proviso that “some features may not be available in all regions or languages.”