Got a tip for us?

Apple Watch

We explain 7 valuable ways you can check and improve heart health with Apple Watch.

Whether you own an Apple Watch Series 6, Apple Watch Series 7, Apple Watch Series 8, Apple Watch Ultra, or the second-gen Apple Watch SE, you should be able to find some useful features to check and improve your heart health in this guide.

Check and improve heart health with Apple Watch: 7 features

1. High and low heart rate notifications

If you’d like an alert when your heart rate dips below or rises above a certain threshold and remains there for 10 minutes while inactive, this feature is available for those 13 years old and up.
If you didn’t turn it on the first time opening the Heart Rate app or want to change it:

  1. On your iPhone, open the Apple Watch app.
  2. Tap the My Watch tab, then tap Heart.
  3. Tap High Heart Rate, then select a BPM.
  4. Tap Low Heart Rate, then select a BPM.

2. Irregular heart rhythm notifications

The irregular rhythm notification feature on your Apple Watch will occasionally look at your heartbeat to check for an irregular rhythm that might be suggestive of atrial fibrillation (AFib).

If you get a notification, the irregular rhythm notification feature on your Apple Watch identified an irregular rhythm suggestive of AFib and confirmed it with multiple readings. If you have not been diagnosed with AFib by a physician, you should talk to your doctor.

To make sure this feature is set up, follow the steps below:

  1. On your iPhone, open the Health app.
  2. Tap the Browse tab, then head over to Heart > Irregular Rhythm Notifications.
  3. Once enabled, you can turn irregular rhythm notifications on or off in the Apple Watch app on your iPhone: Open the Apple Watch app, tap the My Watch tab, then go to Heart > Irregular Rhythm.

3. ECG and AFib History

Apple Watch Series 4 and newer offers an electrical heart rate sensor that, along with the ECG app , allows you to take an electrocardiogram (or ECG).

ECGs are for Apple Watch users at least 22 years old. If you haven’t used it before or didn’t set it up when you first got your watch:

  1. Open the Health app on your iPhone.
  2. If you don’t see a prompt to set up, tap Browse located at the bottom right, tap Heart, then tap Electrocardiogram (ECG).
  3. Open the ECG app on your Apple Watch.
  4. Rest your arm on a table or in your lap.
  5. With the hand opposite your watch, hold your finger on the Digital Crown, then wait while Apple Watch records the ECG.

At the end of the recording, you receive a classification. You can then tap Add Symptoms and choose your symptoms. Tap Save to note any symptoms, then tap Done.

To view your results on iPhone, open the Health app on iPhone, tap Browse located at the bottom right, then tap Heart > Electrocardiograms (ECG).

You can also set up the more recent AFib History feature – this regularly checks for signs of AFib in the background

  1. Head back to the Health app on your iPhone
  2. Go to Browse > Heart > look for Set Up near the bottom under AFib History

Apple highlights that after an ECG “Regardless of the result, if you aren’t feeling well or are experiencing any symptoms, you should talk to your doctor.”

4. Cardio Fitness

Here’s how Apple describes Cardio Fitness (VO2 max):

“Cardio fitness is a measurement of your VO2 max, which is the maximum amount of oxygen your body can consume during exercise. Your cardio fitness level is a strong indicator of your overall physical health and a predictor of your long-term health.”

If you haven’t set it up before,

  1. open the Health app on your iPhone.
  2. Tap Summary and swipe down near the bottom and look for Cardio Fitness (under “Get More From Health” – you can also look under Browse > Heart > Cardio Fitness)
  3. Choose the blue Set Up button
  4. Follow the prompts like confirming your health details (must be at least 20 years old)
  5. You can choose to turn Low Cardio Fitness Notifications

Now you’ll see cardio fitness show up under the Heart section in the Health app

5. Heart rate variability (HRV)

What is HRV? It’s the measurement of how the interval of time between heartbeats changes, measured in milliseconds – notably this is a metric that changes a lot, so looking at broad trends, not daily numbers is most helpful.

Heart Rate Variability is an important metric that many Apple Watch users often ignore. HRV can provide you with good guidance regarding your health.

For example, if you’re taking steps to improve your fitness and overall health, you should gradually increase your average heart rate variability over time.

A downward trend in your HRV over several days is worth paying attention to!

This could signify that you’re training too hard, not sleeping enough, getting sick, eating poorly, encountering too much stress, or failing to hydrate properly.

Higher HRV is associated with reduced morbidity and mortality and improved psychological well-being and quality of life.

The best place to locate heart rate variability information is by using the Health app on your iPhone.

The information is not readily available on your Apple Watch. Here’s how you can track the details around your Heart Rate Variability (HRV).How to Analyze HRV (Heart Rate Variability) on your Apple Watch

  1. Open the Health App on your iPhone.
  2. Tap on the Browse tab located at the bottom of your screen.
  3. Now, tap on Heart and choose Heart Rate Variability.
  4. This report shows your HRV for the current day, week, month, and year.

6. View your heart data history

Your heart rate is an important way to monitor how your body is doing. You can check your heart rate during a workout; see your resting, walking, workout, and post-workout heart rates, and your heart rate during a Breathe session; or take a new reading at any time.

On Apple Watch

  1. Open the Heart Rate app on your Apple Watch. to see daily data (app with heart icon)
  2. You’ll see your current heart rate, swipe or scroll down with the Digital Crown
  3. Now you can see your resting rate, walking average, workout heart rate, and heart rate recovery data (if you’ve done a workout recently)

On iPhone

To see your heart rate data over a longer period of time, follow the steps below:

  1. Open the Health app on your iPhone.
  2. Tap on Browse.
  3. Tap on Heart.
  4. Tap an entry. You can show heart data for the last hour, day, week, month, or year.

7. Bonus features – Vascular Age and Blood Pressure

Compatible with Apple Health, the Withings Body Cardio smart scale offers a Vascular Age feature that measures the “speed at which the blood pressure pulse propagates through the circulatory system.”

With those measurements, the smart scale is able to determine your arterial stiffness and health with a comparison to the average of people in your age group.

Body Cardio also tracks weight, BMI, body composition (water, fat, bone, and muscle), heart rate tracking, and more.

And if you want a seamless way to measure and track your blood pressure with Apple Health, the Withings BPM Connect is a great option.

Valuable ways to check and improve heart health with Apple Watch

These are the best Apple Watch features that will help your heart health. Have you been using some or all of these features with your Apple Watch? I’d love to hear your experiences in the comments section below!

There are a lot of Apple Watch secret features you probably didn’t know about.

If you own an Apple Watch Series 6, Apple Watch Series 7, Apple Watch Series 8, Apple Watch Ultra, or the second-gen Apple Watch SE, you’re probably used to taking calls on it, monitor your health and exercise habits, as well as checking your notifications right on your wrist while your iPhone stays in your pocket.

But the truth is that your Apple Watch has a ton of hidden features that you are probably not aware of.

To make the most of owning an Apple Watch, you’ll need to know about a few secret features that will make interacting with the wearable easier.

Here are ten hidden Apple Watch features that’ll help your productivity at work and in your day-to-day life.

1. Mute notifications with ease

While the Apple Watch will give you the notifications you need to be aware of, it can also be annoying. Thankfully, it’s pretty easy to mute notifications. Simply cover the Watch with the palm of your hand for three seconds.

To enable this hidden Apple Watch feature, follow the steps below:

  1. open the Watch app on your iPhone.
  2. Look for the Sounds & Haptics menu.
  3. Toggle Cover to Mute to on.

2. Mute the Apple Watch completely

If you don’t want your wearable to make any sounds, use this nifty Apple Watch secret feature to mute it. There’s no physical button to mute the device like on the iPhone. Follow the steps below:

  1. Touch and hold the bottom of the watch face. Wait for Control Center to show, then swipe up.
  2. Tap the Silent Mode button. This turns on Silent Mode. You can still receive haptic notifications.

3. Hide notifications from others

If you don’t want others to be able to glance at your Apple Watch notifications and read the contents, you can enable a privacy feature from the iPhone’s Apple Watch app. Follow the steps below:

  1. Open the Watch app on your iPhone.
  2. Tap the Settings app.
  3. tap the Notifications menu.
  4. Enable Tap to Show Full Notification.

This secret Apple Watch feature ensures only you can read the contents of notifications. You’ll have to tap on a notification to see the text. Those around you will only see the notification’s app icon unless you tap it.

4. Cut the notification spam

Since all iPhone notifications will ping or vibrate on the Apple Watch, you’re potentially looking at an annoying experience. The good news is that you can use this Apple Watch secret feature to choose the apps that can send notifications to the wearable. Follow the steps below:

  1. Open the Apple Watch app on your iPhone.
  2. Tap My Watch, then tap Notifications.
  3. Select Mirror iPhone Alerts From list and enable only the apps you want to push notifications to the Apple Watch.

You can make sure that only critical notifications reach your Watch this way. All other notifications will be available on the iPhone.

5. Quickly launch the most recent Apple Watch app

The Apple Watch also runs watchOS apps. These are the counterparts of the apps you have installed on your iPhone. If you want to launch the most recent app quickly, simply double-tap on the Digital Crown to make it happen.

6. Turn off Bluetooth to speed up Apple Watch updates

The Apple Watch and iPhone pair via Bluetooth, and that’s how you update the wearable. To speed up the software update, you can disable Bluetooth on your iPhone, which should force the update over Wi-Fi. This should speed up the download, as Wi-Fi is much faster than Bluetooth.

7. Turn on the iPhone’s flashlight to find it

Have you ever misplaced your iPhone at home or think you’ve lost it? Chances are maybe it went under the couch, but how can you find out for sure? If you have an Apple Watch, then you can use it to ping your iPhone, instead of rushing over to your computer and iCloud.com.

I mean, you could use iCloud.com to ping your phone, but then your inbox will get hit with a flood of emails saying that a noise has been sent — annoying! Using your Apple Watch to find your iPhone is much easier.

Note: Your phone needs to be turned on and have Bluetooth enabled for this to work, and it will only ping the iPhone your Apple Watch is paired with; you can’t currently find other devices in this manner.

The Apple Watch’s Control Center has a Ping option to locate your missing iPhone. Tap it, and the iPhone will play a sound, which should help you retrieve it. Sometimes that submarine-style ping isn’t enough to help you track down your device. If you tap and hold the Find iPhone button on your Apple Watch, it’ll make your iPhone’s LED light flash as well as chime.

8. Reorder your Apple Watch faces

When you add a new watch face on Apple Watch, it is added to the end of your list. If you’d like to reorder watch faces to make them easier to swipe between on your Apple Watch, follow the steps below.

  1. Open the Watch app on iPhone
  2. Tap Edit to the right of My Faces
  3. Press, hold, and drag the 3 lines to the right of watch faces to reorder
  4. Tap Done when finished.

Now you can more quickly get to the watch faces you’d like by swiping from right to left on the edge of your Apple Watch.

You can also reorder the Apple Watch faces from the wearable’s screen. Tap and hold on one and then drag it around the display to place it in its proper place. Then swipe left or right on the screen to switch between Watch faces.

9. Tip calculator

If you’re dining out and need to calculate your tips quickly, just open the Apple Watch calculator app, enter the bill amount, tap on Tip, and have your watch figure out the amount. You can edit tip percentages, see both the tip amount and total amount in the calculator, and even add a number of people to split the check with.

10. Control your iPhone Camera using the Apple Watch

Speaking of featuring shortcuts for your iPhone, the Apple Watch can control your iPhone’s camera. You can take advantage of this Apple Watch hidden feature if you need to record yourself or want to take a group picture.

One of the apps on the Apple Watch is similar to the iPhone’s camera app. When you open it, it’ll turn on your phone’s camera. The app will has a three-second timer by default so you don’t appear tapping your watch in that selfie. Just prop your iPhone on a table or shelf, or a tripod if you want to get fancy, and you’re ready to control the camera remotely.

To find the camera app on your Apple Watch, simply look through your apps by pressing down on the digital crown, then choose the one with the camera icon. This will open the camera on your iPhone and show a preview of what the camera sees on your watch’s display.

You can pick from the front or back camera from your watch, as well as options like flash, live photo, and HDR. Holding down the shutter button will record a video.

From outrageous pricing to a closed ecosystem that locks its users in, there are many disadvantages of an Apple Watch.

Apple Watch is a wearable smartwatch that allows users to accomplish a variety of tasks, including making phone calls, sending text messages and reading email. Apple released the Apple Watch on April 24, 2015. Here are eight disadvantages of an Apple Watch in 2024.

1. You’ll Need an iPhone to Start Using the Apple Watch

One big disadvantage of an Apple Watch is that you can’t set it up without using an iPhone. The Watch must be paired with an iPhone to link an Apple ID. You can’t even activate the watch using another Apple product, like a Mac, Apple TV, or iPad. The Apple Watch app only works with the iPhone.

Apple’s choice to make its smartwatch a companion device to the iPhone has been controversial. An iPhone is expensive, and not everyone wants to shell out the cash to use the watch. Also, companies like Google have been more lenient. Android watches are compatible with other operating systems, including iOS.

You can’t use an Android device to set up an Apple Watch. The Watch is designed to be a companion device to an iPhone for much of its functionality. This is particularly true of the Wi-Fi model, though Apple also sells an Apple Watch with cellular connectivity that operates more like a standalone device.

Once you’ve set up your Apple Watch with cellular you can do many of the things you’d normally rely on an iPhone for, like receive text messages, take phone calls, and access functions that depend on the internet. Unfortunately, this isn’t advisable due to the power drain placed on your Watch when using cellular data.

You’re unlikely to receive all-day battery life if using your cellular Apple Watch away from your iPhone for prolonged periods. Wi-Fi models depend on your iPhone so you miss out on a lot of functionality when your paired iPhone is out of range. The exception here is when you’re in the presence of a Wi-Fi network that you’ve connected to before (when your iPhone was present).

2. Apple Watches do not work with Android phones

An Apple Watch and an Android phone might offer some users the best of both worlds, but it’s never that simple when it comes to Apple and Google.

If there’s one notable disadvantage of an Apple Watch, it’s the lack of compatibility with operating systems beyond iOS.

With a device as popular as this, it’s not surprising that Android phone users might want to consider pairing their smartphone with an Apple Watch. However, that’s not a very good idea as the two are just not designed to work with each other. To be clear, an Apple Watch can technically be used with an Android phone with a number of workarounds. However, there will be many issues to overcome, resulting in an experience that’s just not worth it for most consumers. Not to mention, an iPhone will still be needed to begin with.

The Apple Watch will only work with iPhones, which isn’t ever likely to change. To activate an Apple Watch, you’ll need an iPhone with the Watch app installed. There’s no substitute for this on Android, even if your device supports Bluetooth connectivity.

The main issue with using these two devices together is that they cannot be paired with each other. Considering that’s the main purpose of a smartwatch, the lack of pairing support and the inability to share data negates the point of owning a smartwatch and smartphone. More to the point, an Apple Watch needs to be connected to an iPhone during the initial setup process. Unless an iPhone is accessible to the Android phone user, they won’t even be able to get started with an Apple Watch.

In short, anyone can wear an Apple Watch, including Android phone users. However, the reality is that anyone looking to have a proper smartwatch experience should stay within their own OS lanes. Android users should use Wear OS or third-party platform watches, iPhone users should use Apple Watches.

3. Notifications on Apple Watch can be overwhelming

The Apple Watch is able to shoulder the tsunami of notifications you receive on a daily basis, letting you glance at updates without getting sucked into your iPhone. But most people don’t need or want such constant access to updates.

A more complex reason is that some alerts are only useful for learning information rather than doing something with that information without the iPhone. Furthermore, if you still view your iPhone regularly throughout the day, dealing with notifications on two screens instead of one can add to the mental load, rather than reducing screentime as intended.

Never-ending notifications can be harmful to both productivity and mental health. The Apple Watch make it possible never to miss another notification. But this isn’t necessarily a good thing.

4. Apple Watches are overprice

Yes, you want it. But do you want it to the tune of $799?

Generally speaking, you want to buy the newest watch you can afford so that it continues to receive software updates from Apple. The latest update, watchOS 10, launched on the Apple Watch Series 4 and newer models, though no one can say with certainty whether the Series 4 will get the next big software update. But the problem is the price.

In 2022, Apple launched its latest batch of smartwatches including the $399 Series 8 and the new $249 SE.

Oh. Did I mention there is a $799 model of the Apple Watch? The Apple Watch Ultra is made out of titanium, costs $799 and is built for extreme athletes. But a Peloton class with Olivia Amato is about as extreme as my workouts get, so these exciting new features were lost on me. If you’re like me and exercise is something you do to stay healthy, you don’t need to spend $799 on the Ultra.

For the same price, you can purchase a mid-range iPhone. The phone will have a bigger screen, higher specs, better functionality, and a built-in camera.

Apple Watches have their benefits, but in terms of value for money, there is no comparison.

First of all, you need an (overpriced) iPhone (a current model) in order to actually use your watch. Have an Android phone, or (like me) have no phone at all? Too bad, so sad. No Apple Watch for you.

Hypothetically, assume you have an iPhone. Then you buy an Apple Watch. Then your iPhone gets dropped down some stairs (hey, it happens). Now you need a new phone. Well, you better go plop down the (nearly) thousand dollars on a new iPhone… otherwise your exorbitantly priced watch just became a useless brick attached to your arm.

So what? It’s psychotically expensive. And, yeah, it forces you to use only specific pieces of technology for the indefinite future – effectively locking you out of any other technological advancements that happen outside of the Apple Watch/iPhone world. That doesn’t inherently make this a bad watch… does it?

Yes. Yes, it absolutely does. Add to this the fact that the Apple Watch hit the market a year later than the Android-powered smartwatches (which have more flexibility and more power than Apple’s gadget), and the Apple Watch instantly becomes a status symbol that declares to the world, “I have too much money, I want to be locked into a hardware ecosystem, and I like my technology to be out of date before I buy it.”

In such a situation, you are left wondering whether the watch is a fashion statement or a gadget. But the problem is that the device seems likely to fail on both counts. Viewed as a gadget, the device is just too expensive given its limited functionality. Yet it’s going to be an uphill battle to sell a square, bulky touchscreen device as a fashion statement. In trying to be both a gadget and a luxury item, it’s at high risk of falling in the no-man’s land between the two.

See also: Why Are Apple Watches so Expensive? (Top 10 Reasons)

5. Apple Watch Need Regular Charging

Another disadvantage of an Apple Watch is that it needs charging every one or two days. This is understandable given the functionality but it’s something you should think about if you’re planning on replacing a traditional watch.

Having an Apple Watch means one more electronic device that you’ll need to keep charged. And if you forget, your new watch won’t even be able to tell time.

The current lineup of Apple Watch models will easily get you through a full day before needing a charge. In my testing, both of the new Apple Watch models get at least 32 hours of runtime, but this is on the low end compared to other wearable devices on the market.

For runners using watches, battery life is indispensable to the experience. It can be a huge barrier, effectively rendering a run non-existent if the battery runs out. If there’s even a remote risk, the value is diminished.

Apple hasn’t strayed from its 18-hour battery life claim in what feels like a lifetime. If you ask, Apple Watch loyalists won’t hesitate to tell you their charging regimen to get around the fact that it needs daily charging. But the Garmin and Polar fans love getting a minimum of 14 days on a single charge and somewhere between 30-40 hours of GPS activity. In comparison, you get roughly 5-6 hours of GPS activity on the Apple Watch. That’s more than enough for the average person, but it still requires endurance athletes to do a little math or specifically remember to charge up their watch before a run. With a Garmin or Polar, you don’t have to think about it at all. You can just go.

The Apple Watch Ultra has twice the battery life of the regular Apple Watch. And while this is great, it still pales in comparison to Garmin. Let’s take a look:

Battery Life:

  • Apple Watch Ultra: Up to 3 days
  • Garmin Epix: Up to 10 days
  • Garmin Epix Solar: Up to 17 days
  • Garmin Fenix 7: Up to 18 days
  • Garmin Fenix 7 Solar: Up to 30 days
  • Garmin Enduro 2: Up to 45 days

Or if we take a look at how the battery life holds up during regular GPS Mode:

  • Apple Watch Ultra: 12 hours
  • Garmin Epix: 42 hours
  • Garmin Fenix: 57 hours
  • Garmin Enduro 2: 150 hours

On top of that, longer battery is more convenient than scheduled fast charging if you prioritize sleep tracking. All in all, battery life is still a big reason why some people opt for Fitbit, Garmin, and Polar devices. Now if Apple were to figure out multi-day battery life? That’d be an entirely different story.

6. Fitness Tracking Is Sometimes Unreliable

Fitness tracking is a relatively new concept. This means that the data that you receive from them isn’t always entirely accurate.

Data tracking issues apply to both Apple Watches and fitness trackers. They can give you a lot of information that you wouldn’t otherwise have. But the accuracy of that data is not something that anybody’s health should rely on.

7. Apple Watches Are Not Convenient for Phone Calls

Apple is improving the Apple Watch all the time, but the watch is not yet convenient for making phone calls. It’s easy to argue that it never will be.

Holding your wrist to your ear is never going to be comfortable, and until everybody changes their mind about this, you’re always going to look pretty strange doing so.

Apple Watches do work well with hands-free headsets like airpods, but the benefit of a watch over a phone in this scenario is debatable.

8. A Fitness Tracker Might Be More Practical

Apple Watches are designed to be used as fitness trackers. They achieve this goal, but there’s a reason that many people opt for a dedicated device instead.

Fitness trackers are significantly cheaper, often much smaller, and usually have much longer battery lives. For example, some fitness trackers last for up to 30 days without a charge.

If you’re looking for a device that can track your activity 24 hours a day, an Apple Watch might, therefore, not be the best choice.

Conclusion

Apple Watch has improved a lot in recent years, and it has also become a lot more popular. But, with so many disadvantages of an Apple Watch, it hasn’t yet become must-have accessories. If you’re an Apple fanatic and want to try something new—or you’ve simply been looking at new watches to try—the Apple Watch will likely appeal to you. But before you commit to a purchase, you need to critically think about these disadvantages of an Apple Watch.

Want to buy an Apple Watch Ultra or maybe you just bought a new Apple Watch Ultra, but you’re not really sure if it’s original or fake? Read on to know how to spot a fake Apple Watch Ultra and distinguish it from the original.

Nowadays we have so many extremely well-built Apple Watch Ultra replicas that we’re not really sure sometimes just by looking at the device if it’s actually an original watch made by apple. In this article, I’m going to show you exactly how to identify if an Apple Watch Ultra is fake or original.

A person uses Apple Watch Ultra while climbing rocks in a mountainous setting.

How to spot a fake Apple Watch Ultra

Real Apple Watch Ultra vs fake Apple Watch Ultra design

A close-up of two bandaged hands resting on a boulder shows Apple Watch Ultra worn on one of the wrists.

An original Apple Watch Ultra and the fake Apple Watch Ultra share some similarities in their design, but the real Watch Ultra is larger and chunkier than the fake Apple Watch Ultra.

The original Apple Watch Ultra follows the same design principles that Apple has always had for the watch, with a rectangular shape and rounded edges and corners. While keeping the rounded sides with silver titanium, the face of the Apple Watch Ultra is flat.

Counterfeit Apple Watch Ultra meanwhile, don’t feature a flat display. Having said that, it’s worth noting that some replica Apple Watch are also more streamlined in their design, with a curved display. So you should not use this as the only way to spot a fake Apple Watch Ultra.

Made from titanium, a genuine Apple Watch Ultra is designed to be able to withstand more extreme environments.

The fake Apple Watch Ultra meanwhile, is made from either aluminium or stainless steel, depending on the clone and it comes in 44mm and 45mm case options, so quite a bit smaller than the original Watch Ultra.

Turning over to the rear of the Apple Watch Ultra, you’ll find a new ceramic back. This cream ceramic material replaces the metal from previous models. Not only does it give the Apple Watch a different look, it once again adds to the durability of this smartwatch (notice a trend here?). You’ll also find four pentalobe screws which allow you to crack open this bad boy with ease.

The titanium sides extend slightly above the face to offer some protection. On the crown side of the watch, there’s a new crown guard. This elevates the Digital Crown and side button above the side of the watch. It lets you press the buttons more easily with gloves on, and offers more rugged protection.

A profile view of Apple Watch Ultra highlights the larger Digital Crown as well as the side button.

On the other side of the watch is a new customizable Action Button and redesigned speaker grill. You’ll also find a microphone in each corner of the Apple Watch Ultra. There are dual speakers on the original Watch Ultra, as well as a three-mic array with beamforming.

The clone Apple Watch Ultra on the other hand, has a single speaker and microphone. In addition, the function button on genuine Apple Watch Ultra is more prominent than the one on a clone Apple Watch Ultra.

Heading to the front, the new flat face gives the genuine watch a nicer feel straight on, and also offers some protection. The new Action Button and crown guard offer extra functionality and give the watch a more fleshed-out look. It is a great, polished design, that’s quite different from a replica Apple Watch Ultra.

The side button has its own housing that protrudes from the case and the digital crown has deeper ridges, making both easier to control if your fingers are sweaty, dusty or wearing gloves.
You can’t miss the bright orange Action button on the left of the Apple Watch Ultra. It sits flush with the case and has an indentation that helps you feel it under your thumb.

The Digital Crown on the original Apple Watch Ultra is more tactile than the one on the fake Apple Watch Ultra, allowing it to be used when wearing gloves.

Real Apple Watch Ultra vs fake Apple Watch Ultra packaging

It’s not just the Apple Watch Ultra itself that’s been redesigned—the packaging has too. Apple has opted for a squarer box than the regular rectangular one.

What’s in the Apple Watch Ultra box?

  • Apple Watch Ultra
  • Apple Watch Ultra Band
  • Apple Watch Magnetic Fast Charger to USB-C Cable
  • Paperwork

Opening the box up, and you’ll see an image of a mountainscape printed on the packaging. On the top of the stack is a new set-up book, below which is the Apple Watch and strap. There’s also Apple Watch Magnetic Fast Charger to USB-C Cable (1m). To be precise, the packaging is quite a bit nicer than what you get with the fake Apple Watch Ultra.

Real Apple Watch Ultra vs fake Apple Watch Ultra bands

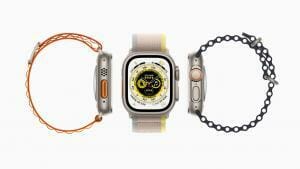
Three Apple Watch Ultra devices, each with a different band, are shown in profile and overhead.

The Apple Watch Ultra comes with a choice of three new watch bands: a textile Alpine Loop, an elastomer Ocean Band and a nylon Trail Loop. These are also more rugged straps with secure fasteners that fit the larger 49mm frame.

However, the majority of fake Apple Watch Ultra bands were not designed with the Apple Watch Ultra’s form factor in mind and thus don’t fit well with the Apple Watch Ultra.

Besides, if you find a band that’s not Trail Loop, Alpine Loop, or Ocean Band in the Apple Watch Ultra box, that’s a bad sign. Each of the above Apple Watch bands have hardware that matches the titanium finish, making them a great fit for the Apple Watch Ultra. Fake Apple Watch Ultra bands are made of cheap materials that don’t match Apple Watch Ultra titanium finish.

Real Apple Watch Ultra vs fake Apple Watch Ultra features

While a genuine Apple Watch Ultra run on watchOS, a clone Apple Watch Ultra run on an Android OS disguised to look like watchOS.

While the original Apple Watch Ultra come with inbuilt apps such as Fitness, Messages, ECG, Walkie-Talkie,and a Blood Oxygen app, as well as features like Fall Detection, Car Crash detection, high and low heart rate notifications, irregular rhythm notifications and cycle tracking with ovulation estimates, a clone Apple Watch Ultra doesn’t offer such apps and features.

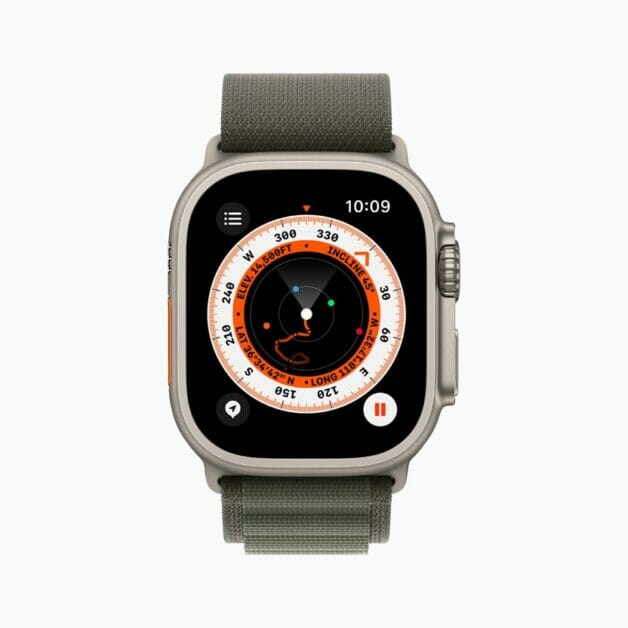
Counterfeit Apple Watch Ultra also don’t have other notable features such as Compass Backtrack, advanced sleep tracking with sleep stages and access to the Apple Watch app store, among the usual Apple Watch features like smartphone notifications and multiple exercise modes.

Apple Watch Ultra with a green Alpine Loop displays the Compass app with a waypoint marked.

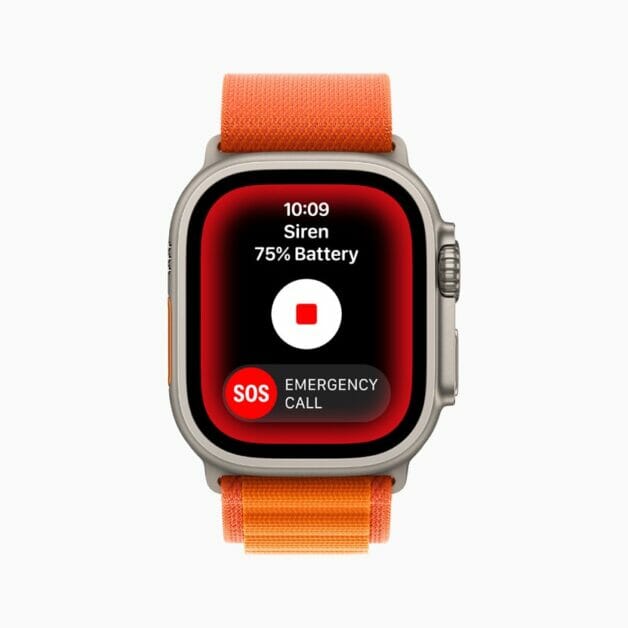
The Watch Ultra does have a couple of extra features over the fake Apple Watch Ultra like the siren, Night Mode on the Wayfinder face and the programmable Action button as well as the ability to use it as a dive computer.

Apple Watch Ultra displays the audible siren feature.

Real Apple Watch Ultra vs fake Apple Watch Ultra price

Apple products are known worldwide for their premium prices compared to any other products. Of course, we acknowledge the existence of deals and promos across the board that could have possibly let you buy an authentic Apple Watch Ultra for dirt-cheap. So just because you got your Apple Watch Ultra for $600 or less doesn’t necessarily mean it’s fake – although it’s likely.

You can get an Apple Watch Ultra for $799 from any Apple store.

If you got your pair brand-new for under ‌$600 from a Black Friday sale or some other super-low discount price, then either you’re lucky, or your Apple Watch Ultra is not authentic.

Real Apple Watch Ultra vs fake Apple Watch Ultra Serial number

Serial Number makes it easier for Apple consumers to check the authenticity of their Apple products. Serial Numbers are unique to each model of the Apple product. The Apple Watch Ultra has that unique Serial Number as well.

Apple runs a website that lets users check if their products are still under warranty. This is great for checking real products, of course, but it also has the added benefit of telling you when you’re using a fake product.

To check if the Apple Watch Ultra is fake or original, you’ll just need it’s serial number. Thankfully, it’s easy to find the serial number for the Apple Watch Ultra.

remove the band from the watch, then look for the serial number inside the band slot.

Once you have the Apple Watch Ultra serial number, head to the Apple’s Check Coverage website and enter it into the field at the top, then fill out the CAPTCHA and click Continue.

If you’re brought to either a page that asks you to enter the purchase date, or one that tells you what warranty options you have available, your Apple Ultra is legit. But if you instead get an error message saying that Apple is “unable to check coverage for this serial number,” it’s definitely a fake Apple Watch Ultra.

Real Apple Watch Ultra vs fake Apple Watch Ultra conclusion

The original Apple Watch Ultra and the fake Apple Watch Ultra share a few core features, though the genuine Watch Ultra has many extras, along with a larger and more rugged build.

At first glance, it is quite easy to mistake a clone for an original Apple Watch Ultra, as the makers pay high attention, especially to the Watch appearance. If you look closely using all the methods discussed in this guide, you can spot a fake from a genuine Apple Watch Ultra.

If you need to close an app on your Apple Watch Ultra, we have you covered. The only reason to close an Apple Watch app is if one is malfunctioning, or if you want to remove it from your recent list for organizational purposes.

QUICK ANSWER

To close an app on your Apple Watch Ultra, press the side button, then swipe left over the app you want to close and tap the X.

How to close apps on your Apple Watch Ultra

Closing apps on your Apple Watch Ultra is simple. Locate the side button just below your Digital Crown and then follow the steps below:

  1. Press the side button on your Apple Watch Ultra to bring up your app dock.
  2. Swipe left over the app you want to close and tap the red X.

How to force-quit apps on your Apple Watch Ultra

If an app starts to glitch or won’t close normally, you can also force-quit.

  1. From the app’s screen, press and hold the side button until the power-down menu appears.
  2. Press and hold the Digital Crown until the app closes and you return to the watch screen.

How to automatically close background apps on Apple Watch Ultra

To preserve battery life, you can also disable Background App Refresh. This feature keeps your apps updated so they are ready when you need them. For example, email or sports scores will continue to update in the background so information is available as soon as you open the relevant app. If the feature is disabled, you may have to wait for items or messages to load. On the other hand, disabling Background App Refresh will also help minimize notifications from pesky apps.

  1. Launch the Settings app on your Apple Watch Ultra.
  2. Scroll down to and tap Background App Refresh.
  3. To disable the feature for all apps, tap the toggle next to Background App Refresh.
  4. To disable the feature for specific apps only, scroll down and tap the toggle next to the app for which you want to manage refresh settings.

Best answer: Yes. An Apple Watch is so much more than just a timepiece. It can track your sleep and keep tabs on vital health information. There are even settings that might save your life someday.

When deciding whether you should buy an Apple Watch in 2023, be sure to think about what features are essential to your purpose.

Should you buy an Apple Watch in 2023?

Here are all the reasons why you should buy an Apple Watch in 2023.

1. Access your messages and notifications easily without grabbing your iPhone

One of the main reason why you should buy an Apple Watch is having the ability to see notifications without having to grab your iPhone. You receive a tone and a light vibration on your wrist to let you know there is a new notification.

You can also mute alerts and keep the light vibration enabled if you don’t want to be disturbed by the noise. With this, the Apple Watch lets you easily stay up to date with what’s happening without getting distracted.

You can quickly respond to notifications without grabbing and unlocking your iPhone, such as answering a phone call or quickly responding to a text message.

2. Multiple Health Features

If there is one reason why you should buy an Apple Watch, is that it can potentially save your life. There have been numerous stories on the internet of how the Apple Watch has saved someone’s life, such as when the watch has detected an unusually high heart rate when resting, convincing them to get checked out by a doctor.

Without receiving that notification from the Apple Watch, those users would not have discovered that they had a health issue that could have been fatal if it went undetected.

Besides heart rate monitoring, the Apple Watch Series 4 and newer models, including the new Apple Watch Ultra, offers ECG functionality, allowing you to check your heart rhythm for atrial fibrillation.

Newer Apple Watch models are also capable of measuring your blood oxygen level, track your sleep, and measure your temperature to help you get an idea of when you might be ovulating. With a wide range of health features, the Apple Watch enables you to keep track of your health while still being everything a smartwatch offers.

3. It can be an incredible emergency device in a disaster or serious accident

Another reason why you should buy an Apple Watch is that it provides users with some key life-saving features that can come in handy in unexpected emergencies. In 2022, Apple introduced Crash Detection, which means the watch can detect if a user has been in a car crash.

It automatically calls emergency services if you don’t respond to the on-screen prompt within a certain period of time. The Apple Watch can detect if you have been in a car crash thanks to a high g-force accelerometer and a new gyroscope in the Series 8, SE, and Ultra models.

The other feature that the Apple Watch provides is Fall Detection. This feature works similarly to Crash Detection. The Apple Watch can detect if you’ve taken a hard fall and will ask if you are ok. If you don’t respond after a minute, the Apple Watch will contact emergency services to get you help.

These two features are just some of the Apple Watch features that can save your life.

4. Great Fitness Device

Fitness tracking is one area where the Apple Watch excels. Since the first generation, the Apple Watch has focused on being a device for fitness and exercise.

The Workout app on the Apple Watch lets you select from multiple workouts to track various metrics such as time, active and total calories burned, heart rate, and more during the workout, depending on which one you select. You can even set up custom workouts in watchOS 9.

Another way to stay active with Apple Watch is by closing your activity rings. They have become popular among Apple Watch users. The activity rings are daily goals that help you stay active throughout the day and can be an excellent tool for reminding you to exercise or even stand up from time to time. You can even collect awards for completing your rings and challenge friends to a friendly competition.

Apple even has a partnership with Nike to offer a Nike Apple Watch band designed for runners. So, if you live an active lifestyle, you will enjoy using an Apple Watch.

5. It’s great for music lovers, acting as a control hub for listening on the go

The Apple Watch features a dedicated Music app. When your watch connects to your iPhone, it can act as a controller for the music playing on the phone. However, you can transfer music to your watch to play songs independently. The Apple Watch lets you connect a pair of AirPods over Bluetooth, meaning you can easily listen to music directly from the watch wirelessly.

This can come in handy in situations where you might be working out or participating in an activity where carrying around your iPhone can be a burden. The Apple Watch with AirPods is an excellent combination for listening to music on the go.

6. No Need to Carry Your iPhone All the Time

Apple started offering cellular variants of its smartwatch in 2017 with the Apple Watch Series 3. Thanks to LTE capabilities, you can leave your phone behind while still being able to receive phone calls, send text messages, stream music from Apple Music, and more. All you have to do is go through the Watch app on your iPhone and get started with setting up your carrier.

Doing this will add the Apple Watch to your carrier plan if you are in the US. You will have to pay for the service, but you can find the cheapest Apple Watch data plan possible, so you don’t have to overspend every month for connectivity. While designed to work with iPhone, the Apple Watch can act independently, and with the excellent battery life in the Apple Watch Ultra, it can be a very versatile device on your wrist.

7. The Apple Watch Can Be Affordable

A common barrier to smartwatch adoption is the price, mainly because a smartphone can do many of the same things on the surface. However, the Apple Watch provides features and an experience only a smartwatch can offer.

The 2022 Apple Watch lineup consists of three versions: the Apple Watch Series 8, SE, and Ultra. While the Apple Watch SE may not be the most exciting of the three, it is a solid value, coming in at $249. You can even get the cellular variant for just $299.

Even at that low price, it brings most of the features that Apple Watch users love. You don’t have to spend a lot of money to add an Apple Watch to your ecosystem.

These are the reasons why you should buy an Apple Watch in 2023

With all these advantages of an Apple Watch, it’s hard to argue that iPhone users shouldn’t buy an Apple Watch. With a suite of valuable and potentially life-features, it’s a hard product to pass up.

So, if you want to buy an Apple Watch, consider purchasing the Series 8. But if you’re on a tight budget, the Apple Watch SE is an excellent option.

An Apple Watch is the best smartwatch out there. If you’re just carefully unwrapping a new one from its clever, elongated packaging, congratulations!

I’ve been privileged to use every new Apple Watch from the first model, right up to the new Apple Watch Ultra, so I’ve had some experience in setting them up. In this article, I’ll share with you what I do, and the settings I change, to make sure the Apple Watch is up and ready to go in double-quick time.

1. Getting started with your Apple Watch is easy

The best thing about the Apple Watch? You really don’t have to be an expert in order to get everything started. The very first thing you should do is to charge your watch, and you’ll need to keep the charging plinth nearby during the setup process as the Apple Watch may need to be placed on charge again, especially if there are software updates to install during the process.

Once the Apple Watch is fully charged, turn it on by pressing and holding the button located below the Digital Crown for a few seconds. When it’s active, check your iPhone because, there’s a good chance, an alert is already displayed on the screen asking if you want your phone to begin the pairing process. It really is that simple, plus the required Watch app comes pre-installed on an iPhone too. Simplyhit Continue on the iPhone’s screen to get going and follow the onscreen prompts.

2. Set up your Apple Watch from scratch

If you’ve had an Apple Watch previously, your new Apple Watch can be set up to mirror the settings you previously configured, including installed apps, Siri preferences, and even which wrist you normally wear it on. If you want to set it up as a new Apple Watch, simply tap Customize Settings and look for Set Up as a New Apple Watch at the bottom of the screen. If this is your first Apple Watch, then this option won’t appear. The whole process will take less than 10 minutes to complete.

3. Be smart with your passcode

I’m not a fan of the Apple Watch’s passcode, but appreciate it has to be used in certain occasions. If you set one up, then you’ll need to tap in the PIN code every time you put the Apple Watch back on your wrist after taking it off. Sometimes i do forget, and that means some notifications don’t come through until I remember.

If you intend to use an Apple Pay, then using a passcode is a must. I suggest you keep it short, as you have to tap it out on the small screen. Yes, I know this probably goes against all the usual security warnings, but the thought of regularly tapping out a 12-digit PIN on my wrist isn’t a sweet one.

4. Remember to check for watchOS updates

It’s very likely the latest version of watchOS is waiting to be downloaded once the process of setting the Apple Watch is complete. Follow the steps below:

  1. Open the Watch app on your iPhone.
  2. Tap General.
  3. Tap Software Update.
  4. If an update is available, it’ll start downloading immediately.

I always do this straight away, since it’s better than waiting for iOS to show me an alert, plus I want all the latest features and fixes before I get into using the Watch.

This is where you’ll need to use the charger again. Once the process of downloading the update is complete, you need to put the Apple Watch back on the charger for it to install. The battery also needs to have more than 50% charge, which, provided you charged the Apple Watch to 100% before setting it up, won’t be a problem. It’s so much more convenient to get software updates sorted at this time. It does need a little time though, so get ready to spend about an hour doing all this.

5. Have fun choosing a watch face

While you’re waiting for the update to download, go ahead and take a look at the watch faces available. On the Watch app’s main screen, tap the image of the watch face currently set to your watch, then look for the Face Gallery option located at the bottom of the screen. Tap it, and you’ll be presented all the watch faces available.

Each one can be customized with different colors, different designs, and different complications. I have a few that I suggest you try, mostly because they are more watch-like and less cluttered. I like to see the time — not a screen full of numbers and fitness metrics. For example, the California and Chronograph faces with a black background, and the “Pepsi” (which denotes the blue and red around the dial) GMT face are some of my favorites. If you want something bolder, then Numerals Duo is great, and so is the Unity Lights face.

If you have an Apple Watch Series 7 or Apple Watch Series 8, the Contour watch face is exclusive, so you may want to show it off, as is the Wayfinder face on the Apple Watch Ultra. I stick with the Wayfinder face on the Ultra but usually opt for the World Time with a red accent on the Apple Watch SE 2. For complications, I like the temperature, battery level, activity rings, and moon phase. When you’re done, just tap Add, and it’ll instantly transfer to your Apple Watch.

6. Important Apple Watch settings to change

One of the cool things about the Apple Watch is that by default, virtually all essential health and fitness features are active, the always-on screen works straight away if you have an Apple Watch Series 8 or Ultra, plus it takes a lot of the information from your iPhone to ensure the Watch operates seamlessly. You really don’t have to do very much at all, and it feels like “part of you” right from the start.

There are a couple of things I change, though. I don’t like the Apple Watch chiming, and the volume is turned up by default, meaning you get an audible alert with notifications. To change this, follow the steps below:

  1. Go to Settings.
  2. Tap Sounds and Haptics.
  3. Either use the little speaker icons to raise or lower the volume or use Silent Mode to mute sounds entirely.

You can also set Silent Mode by pulling up the Quick Settings from the Watch face and tapping the bell icon. I also activate the hand washing timer, which you can access by following the steps below:

  1. Go to Settings.
  2. Tap Handwashing.

It’s automatic, so it’s no hassle to use, and it’s surprisingly accurate.

Finally, I don’t use Siri often enough to find the Raise to Speak option helpful, so I turn this option off. Follow the steps below:

  1. Go to Settings.
  2. Tap Siri.

I leave the Hey Siri command on, though, and find the Apple Watch is very reliable with listening out for it — and for understanding my commands too.

7. Add other Apple Watch bands to your collection

The Sport band and Sport Loop band are the default choices for the Apple Watch, and one of these is most likely the one that has come fitted to your new Apple Watch. Personally, I find the Sport Loop the most comfortable and convenient for everyday, all-day use. It’s easy to tighten when you exercise to get the most accurate heart rate reading, and it’s soft enough to wear overnight and track your sleep. Plus, it looks beautiful. I also really like the Braided Solo Loop band, although it’s a significant investment at $100.

That’s really all there is to setting up your new Apple Watch.

The new Apple Watch SE 2 (2022) pairs an up-to-date processor with many of Apple’s latest smartwatch features, including watchOS 9 and low power mode. Check out all Apple Watch SE 2 tips, tricks and hacks below.

Even if you know how to use the Apple Watch for the basics (ie. fitness tracking, making calls, checking notifications) there are hidden Apple Watch SE 2 tips and tricks that make it even better. While we wouldn’t go as far as to call all of them “Apple Watch SE hacks,” these features are the lesser-known ways to upgrade your smartwatch experience.

Whether you’ve owned an Apple Watch SE 2 for a while or recently acquired one, there’s more to the device than meets the eye. Some of the most useful Apple Watch SE 2 features are ones that you might not see during setup or everyday use. Many of these Apple Watch SE hacks are buried deep in the settings menu or hidden within certain apps or tools.

All of our favorite Apple Watch SE 2 hidden features work on other Watch models as well.

But where should you start? Below are the best Apple Watch SE 2 tips, tricks and hacks we discovered this year.

1. Favorite frequently used timers

One of the most well-known Apple Watch features — setting a timer — offers a hidden tool you didn’t know about. You can create a list of favorite timers on your Apple Watch that appears at the top of the timer app. This way, the timers you use on a regular basis are conveniently located in the app.

Follow the steps below to favorite a timer:

  1. Swipe left on a timer in ‘recents’.
  2. Tap the orange star button.

Yes, it’s really that simple. When you’ve favorited a timer, it will appear in a new menu above ‘recents’ called ‘favorites.’ You can even favorite multiple timers for quick access.

2. See step count on your watch face

If you haven’t seen a step-count complication when changing your Apple Watch face before, it’s because there isn’t one — not natively, at least. While there are complications for the weather, timers, your Apple Watch rings and other useful tidbits of information, there isn’t a built-in way to see your step count on your Apple Watch face. But with the help of a third-party Apple Watch app, you can hack it.

  1. Download a pedometer app of choice on your Apple Watch. I’ve found the easiest way is to download the app on your iPhone, then sync your Apple Watch. You can check that the app is downloaded to your smartwatch if you scroll down within the “My Watch” tab in the Watch app.
  2. Now, edit your Apple Watch face to add the third-party complication.

3. Optimize charging for battery health

The Apple Watch SE 2 (2022)supports optimized battery charging, a setting that’s perhaps better known for preserving the iPhone’s battery health. But ever since watchOS 7, the Apple Watch has offered optimized battery charging, too. Over time, the Apple Watch’s battery health is prone to deteriorate due to a combination of factors. Optimized charging can help the battery health last longer.

The feature is enabled on the new Apple Watch SE by default, but it’s good to check that it is enabled. Follow the steps below:

  1. Open the settings menu on Apple Watch
  2. Tap on Battery.
  3. Select battery health.
  4. Toggle on Optimized Battery Charging.

When optimized charging is enabled on your new Apple Watch SE, you might notice your watch pauses charging between 75% and 80% capacity. This should only happen when your watch believes you’ll leave it charging for an extended period of time. It will predict when to complete the charge based on your past charging schedule and location.

4. Enable Low Power Mode

Another Apple Watch SE 2 trick to maximize Watch’s battery life is with the new Apple Watch low power mode. The low power mode feature disables certain battery-draining features such as the always-on display and background health sensor readings. When you track a work out while low power mode is enabled, GPS and heart rate readings are limited, too.

To turn on low power mode, follow the steps below:

  1. Swipe up to open the Control Center on your Apple Watch.
  2. Tap the bubble that shows your battery percentage.
  3. Toggle on low power mode.
  4. You’ll be prompted to review the impact of low power mode, with the option to turn the feature on or turn it on for a certain duration. You can turn on low power mode for 1 Day, 2 Days or up to 3 Days.

5. Control your watch with hand gestures

Learning how to control the new Apple Watch SE with hand gestures will let you use certain features of your smartwatch without touching the display or pressing either of the buttons. With this Apple Watch SE 2 trick, you won’t even need to use your opposite hand. You’ll be able to control your Apple Watch by pinching your fingers or clenching your fists. Hand gestures are part of the Apple Watch’s AssistiveTouch features, which primarily exist to make the Apple Watch experience more inclusive. Simply follow the steps below:

  1. Open the Watch app on your iPhone.
  2. Scroll down and tap Accessibility from the menu on the My Watch tab.
  3. Tap AssistiveTouch from the Motor menu.
  4. Toggle on AssistiveTouch.
  5. Tap Hand Gestures from the Inputs menu.
  6. Toggle on Hand Gestures.

In the same menu you used to toggle on hand gestures, you can review the navigation functions associated with each gesture. There are four gestures: Pinch, Double Pinch, Clench and Double Clench — you can select which actions you want assigned to each motion.

6. Change the digital crown orientation

You may not be aware that there’s a hidden Apple Watch SE 2 trick that allows you to switch the orientation of your Watch so the digital crown faces a different direction. While most people with an Apple Watch wear it with the digital crown located on the upper right side next to the display, there’s a way to turn the button around. If you wear your Apple Watch on your right wrist, the digital crown probably already faces your forearm. But if you wear it on your left wrist, the digital crown probably points toward your hand. Follow the steps below:

  1. Open the settings menu on your Apple Watch.
  2. Tap General.
  3. Select orientation.
  4. Select Left or Right depending on which way you want your Apple Watch digital crown to face.

When you switch from right to left, or vice versa, the display will turn upside down. Play around with these settings to figure out which orientation is the most comfortable for you.

7. Keep apps open longer

By default, your Apple Watch will return to your clock or watch face from an app after two minutes when you lower your wrist or idle. So if you’re reading a message or have an app open, your Apple Watch might go back to your current watch face shortly after entering always-on mode, closing whatever app you have open. Some people might find this annoying, but luckily there’s a cool Apple Watch SE 2 trick that allows you to change it.

  1. Open the settings menu on your Apple Watch.
  2. Tap General.
  3. Select Return to Clock.
  4. Change from ‘Always’ or ‘After 2 minutes’ to ‘After 1 hour.’

Alternatively, you can scroll down and customize the return to clock setting for each individual app downloaded on your Apple Watch.

8. Use Siri as a translator

Whether you’re traveling to a foreign country or trying to learn a new language, you can use this hidden Apple Watch SE 2 trick to help you with the translations. With real-time translation support for 11 different languages, the Apple Watch’s built-in voice assistant can tell you how to say almost anything instantly.

Just activate Siri and say: “how do I say {word or phrase} in {language}” to use Siri’s real-time translation tool. Not only does Siri display the translation typed out, but it will also speak the translated word or phrase out loud. That way you can theoretically use it to give a cab driver instructions, or simply work on your enunciations.

9. Find out what song is playing

You might’ve heard of Shazam, an app that can identify songs playing out loud. Say you’re at a restaurant or bar and hear a tune you want to save for later, but don’t want to bug the server or bartender for the playlist information. Most people are familiar with the smartphone version of the app, but Shazam actually works on Apple Watch, too.

To use this hidden Apple Watch SE 2 hack, you need to download Shazam on your Apple Watch. From there, you can open the Shazam app on your wrist when you want to find out what song is playing. You can ask Siri to identify the song, too: Press your Apple Watch’s digital crown and ask, “What song is playing?” Siri will listen and name the song it identifies.

10. Make Apple Watch Text Larger

Apple Watch text can be tiny, taking int account the new Apple Watch SE compact size. You can make it bigger by following the steps below:

  1. Open the Settings menu on Apple Watch.
  2. Scroll down and tap on “Display & Brightness”.
  3. Tap on “Text Size.”
  4. Tap on the “Aa” on the right side of the display to make the text bigger, and tap on the “Aa” icon on the left side to make it smaller again.

When you adjust the text size, any app that supports Dynamic Type will show your preferred text size. If you want to make text even more visible, toggle on the “Bold Text” option below text size.

11. Control Your Apple TV With Your Watch

If you own an Apple TV set-top box, you can easily control it using the Remote app on your Apple Watch, which can come in handy if you lose your remote.

  1. Press on the Digital Crown to get to your App List or App Grid, depending on your App View.
  2. Look for the “Remote” app, which is labeled as Remote and has a blue icon with a triangle in the center.
  3. Tap on it.
  4. Wait a moment as the watch syncs to the ‌Apple TV‌ sets in your home.
  5. Choose the ‌Apple TV‌ you want to control.
  6. Now, you can turn on the ‌Apple TV‌ by tapping on the little TV icon in the bottom left of the display, and scroll through the interface using swipe gestures. To launch an app or make a selection, just tap.

Tip: Tap on the “ ” button to add an ‌Apple TV‌ that your watch is not linked to and go to Settings > General > Remotes on the ‌Apple TV‌ set. The Remote feature is compatible with the third-generation ‌Apple TV‌ and later.

12. Get Help in an Emergency

This hidden Apple Watch SE 2 trick lets you get help quick in an emergency. You just need to enable an SOS feature on the new Apple Watch SE that will call emergency services with the press of a button.

  1. Go to the Settings menu on the Apple Watch.
  2. Scroll down to “SOS.”
  3. Enable “Hold Side Button.”

With the SOS feature toggled on, your Apple Watch SE will begin dialing emergency services in the country where you’re located if you hold down the side button. The side button is the rounded rectangular button located below the Digital Crown.

By holding down this button, your Apple Watch will call emergency services, but you will have a countdown to stop the call in case it gets activated by accident.
Tip: If you want the new Apple Watch SE to be able to automatically call emergency services if you take a hard fall, enable Fall Detection in this same section, and make sure Crash Detection is turned on too. If you slip and are knocked unconscious or have an accident on a bike, skateboard, car or other mode of transportation, your Apple Watch can get you help.

13. Remove Apps From Your Apple Watch

If you have a bunch of apps on your new Apple Watch SE that you don’t need, you can delete them.

  1. Unlock your Apple Watch and go to the App View.
  2. Long press on the Apple Watch display.
  3. Tap on “Edit Apps.”
  4. Scroll through the list or swipe through the grid (depending on your view choice) to locate apps you don’t want.
  5. Tap on the small “x” on the app to delete an app or swipe to get to the delete interface if you use the List view.
  6. Confirm that you want to delete the app.

Please Note: there are native apps that cannot be removed from the Apple Watch including Activity, Compass, App Store, Heart Rate, Maps, Mail, and Messages, but there are a number that you can get rid of to have a cleaner look.

You can remove Alarms, ECG, Blood Oxygen, Memoji, Find Items, Cycle Tracking, Mindfulness, Sleep, and other similar apps. If you want them back later after deleting them, you will need to redownload them from the ‌App Store‌.

14. Share a Photo From Your Apple Watch

Another cool Apple Watch SE 2 trick lets you share photos right from your wrist without having to open up your ‌iPhone‌, which can be useful for a quick image transfer. If you come across an image on your Apple watch that you want to share, you can send it to someone else right from your wrist.

  1. Launch the ‌‌Photos‌ app on your Apple Watch.
  2. Select a photo that you want to share and tap it.
  3. Tap on the small share icon located at the bottom right of the photo.

You’ll be presented with the most recent contacts to send it to, or you can scroll down and send it to anyone using Messages or Mail.
Select a contact, and then write a message if you want to add one.
Tip: The ‌Photos‌ app on Apple Watch can display one album from your ‌iPhone‌ photos. To change it, open up the Watch app on ‌iPhone‌, scroll down and select ‌‌Photos‌, and tap on “Sync Album” to choose an album to sync to your Apple Watch.

Apple allows you to sync up to 500 photos, but be aware that the number of photos that you choose affects the storage space on your Apple Watch. In the Watch app under ‌Photos‌, you can also choose to sync memories and sync featured photos. With these options enabled, your featured memories and images will show up in the ‌Photos‌ app, and the selection will change daily.

15. Set a Photo as Your Watch Face

Another hidden Apple Watch SE 2 trick lets you set one of your own photos as your watch face so you can glance down at your favorite places, people, or pets whenever you go to check the time. It’s easiest to set a photo as a watch face on ‌iPhone‌, following these instructions:

  1. Launch the Watch app on ‌your iPhone.
  2. Tap on ”Face Gallery.”
  3. Scroll down and tap on ”Photos”.
  4. You can select an album of photos, such as your Favorites, or choose to select up to 24 individual photos from your Camera Roll. There’s also an option for Dynamic, which uses photos from your Memories.
  5. Tap on ”Album” to choose an album, select ”Choose ‌Photos‌…” to choose photos, or tap on ”Dynamic” to have it pull from Memories.
  6. If you want to add a tint to your photos, pick a color from the top bar.
  7. Scroll down to ”Time Position” and choose ”Top” or ”Bottom,” and then select your Complications if you want to use them.
  8. Scroll back up to see a preview of your watch face, and tap ”Add” if it looks good.
  9. Tap on the ”My Watch” tab.
  10. Tap on the “‌Photos‌” watch face that you created.
  11. Choose ”Set as Current Watch Face.”

Tip: There’s also a “Portraits” watch face that accompanies the ‌Photos‌ face. With the Portraits face, you can choose a photo that you’ve captured using Portrait mode and set it as a watch face. With the data from the portrait photo, there is a sense of depth to the watch face, with the time able to be placed behind the subject in some images. To set it, follow the steps above, but choose Portraits instead of ‌Photos‌ at step 3.

Note that this effect only works with photos of people, and not pets or objects captured in Portrait mode.

Your favorite Apple Watch SE Tips and tricks?

These are our favorites Apple Watch SE 2 (2022) tips and tricks. What are your favorite tips and tricks for the new Apple Watch SE? Drop a comment and let us know.

If you just bought an Apple Watch Ultra, here are 18 best Apple Watch Ultra tips and tricks to make the most out of your wearable.

The Apple Watch ultra is packed with unique features that you’ll want to take advantage of. It’s Apple’s most rugged Apple Watch with improved GPS, a 49mm casing, a more durable display, extra long battery life, a built-in Action button, and more. Let’s jump straight into it and check out some of the best Apple Watch Ultra tips and tricks to help you master your device.

Apple’s WatchOS 9 update, which arrived in September, brought even more features to the Apple Watch. Additions include more detailed sleep monitoring and a new app for tracking medications. But of course, you need to know exactly how to use these Apple Watch features, or else you’ll be at a loss.

Fortunately,mastering an Apple Watch is pretty easy. Here are the best tips and tricks for Apple Watch Ultra that will help you master your watch in no time.

Best Apple Watch Ultra tips and tricks in 2023

1. Adjust all of your Activity goals

Apple makes it easy for users to change their goals for the amount of time they stand and exercise. Previously, you could only change your Move (or calories) goal.

So instead of using the defaults — 30 minutes of exercise and a cumulative 12 standing hours a day — it’s a good idea to change either one to fit your actual daily routine.

This Apple Watch Ultra trick makes it possible for you to hit your own targets when you actually start your day, not when Apple tells you to. For example, if you use sleep tracking overnight and need to charge your watch more often in the morning, you won’t feel like you’ve lost an hour of time needed to close those rings. Follow the steps below:

  1. Start the Activity app on your watch.
  2. Scroll to the bottom and tap Change Goals.
  3. Make your adjustments for all three metrics and start closing those rings.

2. So long, random screenshots

The best Apple Watch Ultra trick we can show you is how to stop random screenshot on the Watch. To take a screenshot, you simply press the Digital Crown and side button at the same time. It’s a simple and convenient method, unless you’re like me and find yourself frequently triggering it accidentally, filling up the Photos app with random pictures of your watch face.

To turn off the ability to take screenshots altogether, follow the steps below:

  1. Start the Settings app on your watch or use the Watch app on your phone.
  2. Tap on General.
  3. Scroll down until you find Screenshots. Tap this option.
  4. Toggle off the switch next to Enable Screenshots for a clutter-free camera roll.

3. Customize which apps appear in your dock

If you have a lot of apps installed on your Apple Watch, it can be difficult to find the right ones when you need them. That’s where this Apple Watch Ultra trick comes in handy. If you’re not familiar, the dock on the Apple Watch is equivalent to the app switcher on the iPhone. You can trigger it by tapping the side button, which pulls up a carousel of recently used apps.

However, you can also customize the dock to show any apps you want instead of your most recent apps. To do this on your watch, follow the steps below:

  1. open the Settings menu on your watch.
  2. Tap Dock and select the Favorites option.

But I recommend setting this up in the Phone’s Watch app instead so that you can customize these apps.

  1. Start the Watch app on your iPhone.
  2. Tap on Dock.
  3. After selecting your Favorites option, you’ll see a list of apps divided into two sections: Favorites and Do Not Include. Favorites are the apps that are currently in your dock, while the latter lists all of the other apps on your watch that aren’t included.
  4. Tap the Edit button located at the top right corner to customize the Favorites list to your liking.

4. Choose the Portrait mode photos you want to see on your wrist

The next Apple Watch Ultra trick lets you set Portrait mode photos as the background for your watch face. But first, you have to dig into the settings in the Watch app on your iPhone. To do this, follow the steps below:

  1. Launch the Watch app on your iPhone.
  2. Navigate to the Face Gallery tab at the bottom of the screen.
  3. Tap the Portraits option under the New Watch Faces category.
  4. Tap the Choose Photos option under Content to select up to 24 photos that will rotate automatically when you raise your wrist or tap the screen.

5. Keep the Apple Watch’s screen awake for a longer period of time

The next Apple Watch Ultra trick lets you stop the screen from going idle right away. Perhaps you were in the middle of reading a long text message and got distracted, or maybe you want to keep an eye on your timer. Once you tap the Apple Watch’s screen, it typically stays active for 15 seconds. But you can extend that to 70 seconds by following the steps below:

  1. Launch the Settings menu on your watch.
  2. Tap Display & Brightness.
  3. Tap Wake Duration.
  4. Select the Wake for 70 Seconds option.

6. Stop every app from automatically installing

Every time you install an app on your iPhone, it will automatically install its Apple Watch counterpart if there is one. This can clutter up your watch’s app grid pretty quickly, making it hard to find the apps you do want to use on your watch. Thankfully, there’s a cool Apple Watch Ultra trick that lets you stop this behavior. Follow the steps below:

  1. Open the Watch app on your iPhone.
  2. Go to Settings.
  3. Choose General.
  4. Slide the switch next to Automatic App Install to the Off position.

You can also do this on the watch by following the steps below:

  1. Open Settings menu on your Apple Watch.
  2. Tap App Store.
  3. Toggle off the switch next to Automatic Downloads.

From now on, you’ll install individual apps on your watch by opening the Watch app on your phone, then scrolling to the bottom where you’ll find a list of available apps.

7. Silence those noisy notifications

An Apple Watch can come in handy when you want to discreetly check an alert or the time. But loud notifications can defeat the purpose. Turn on your Apple Watch’s silent mode by following the steps below:

  1. Swipe up from the bottom of the screen to reveal the Control Center.
  2. Tap the icon that looks like a bell to trigger Silent Mode.

You can also do this by following the steps below:

  1. Open settings on your Apple Watch.
  2. Scroll down and tap Sound & Haptics.
  3. Toggle on the switch next to Silent Mode.

There’s also a volume slider for adjusting how loud or quiet incoming notifications sound if you’d rather not mute them completely.

8. Have Siri only speak out loud when you’re wearing headphones

Siri can be useful for quickly setting timers, starting workouts or checking the weather from your watch. But you might not always want to have Siri speak out loud. You can easily change this so that Siri only provides audible feedback when you’re wearing headphones. Follow the steps below:

  1. Open the Settings menu on your Apple Watch.
  2. Scroll down to Siri.
  3. Under Siri Responses section, tap the Headphones Only option.

When your Bluetooth headphones are connected to your Apple Watch, you should now see the name of your headphones appear above the Siri volume setting in the watch’s settings menu.

9. Make text easier to read by increasing the font size

Reading notifications and news headlines can be difficult on a screen that’s so small. Luckily, there’s a hidden Apple Watch Ultra trick that lets you increase the font size to make things a bit easier on your eyes. To do so, follow the steps below:

  1. Launch the Settings app on your watch.
  2. Tap Display & Brightness.
  3. Scroll down to Text Size.
  4. Rotate the Digital Crown or tap the letters that appear on either side of the meter to adjust the text size on your watch.

10. Stop those annoying reminders to breathe

The Breathe reminder is designed to help you take a few minutes to clear your mind and control your respiration, potentially helping you feel more centered and calm. But if you’re like me and never follow the prompt, use this hidden Apple Watch Ultra trick to turn it off so you no longer have to be reminded to breathe. Follow the steps below:

  1. Open the Watch app on your iPhone.
  2. Scroll down and tap theMindfulness app option.
  3. Next, select Notifications off.

11. Unlock your Apple Watch with your iPhone

Typing in your passcode to unlock your Apple Watch can be a pain, but there’s cool Apple Watch Ultra trick that lets you do it easily. You can choose to have your Apple Watch unlock automatically when your iPhone is unlocked. Follow the steps below:

  1. Tap the Digital Crown and navigate to the Apple Watch’s Settings menu.
  2. Scroll down to Passcode.
  3. Make sure the switch next to Unlock with iPhone is toggled on. Your iPhone will now also display an alert saying that your iPhone is being used to unlock your Apple Watch whenever you put this into practice.

12. Make it easier to find your apps

The honeycomb app grid looks great at first glance, but it can be a pain to find the app you want to launch, particularly if you have a lot of apps installed on your watch. Instead of in a grid, the watch can display all of your apps in an alphabetical list. Follow the steps below:

  1. Either in the Watch app on your phone or in the Settings app on the Watch, tap App View.
  2. Tap on List View.

Now, when you press the Digital Crown to leave your watch face, you’ll see a list of apps that you can quickly scroll through and find what you’re looking for.

13. Control when you’ll see Siri

You can activate Siri on your Apple Watch in three different ways. You can raise your wrist toward your mouth and start talking, long-press the Digital Crown or use the wake phrase, “Hey, Siri.”

I’ve found that I often accidentally trigger Siri when trying to check the time or read a notification while I’m talking to someone else (but my watch thinks I’m trying to talk to Siri). It’s annoying, but it can be changed using this hidden Apple Watch Ultra trick. Follow the steps below:

  1. Either in the Watch app on your phone or in the Settings app on the Watch, select Siri.
  2. You’ll see three buttons to control when you’ll see Siri.
  3. Slide each button to the Off position for any of the options you don’t want to use.

14. Rearrange Control Center

Just like Control Center on your iPhone, Control Center on the Apple Watch is where you turn to quickly adjust settings like do not disturb and airplane mode and to activate the flashlight.

You may find the default list of options in the Control Center isn’t the best fit for how you use your watch, however, and you want to rearrange the list. For me, that means moving the Bedtime toggle from near the bottom of the list to the top. That way when I want to track my sleep over the weekend when I don’t have sleep goals set, I can swipe up and tap the icon. Follow the steps below:

  1. To access the Control Center on your watch, swipe up from the bottom of the watch face, or when in an app you can long-press on the bottom of the screen until you see Control Center start to slide up.
  2. After which you just need to slide your finger up to access it.
  3. Change the order, or hide some buttons in the Control Center by tapping the Edit button at the bottom of the list.
  4. The icons will begin to jiggle and show a red minus sign to hide an option.
  5. Drag and drop the icons into your preferred order, or tap the red minus button to remove the option altogether.
  6. When you’re done, tap Done or press the Digital Crown on the side of your watch to go back to the watch face.

15. Track Your Temperature

The Apple Watch Ultra includes a temperature sensor that can be used to track your temperature at night. Apple added this function primarily for women to monitor their cycles and fertility, but it can be used by anyone and can be an indicator if you’re getting sick.

To take advantage of this Apple Watch trick, simply wear your Watch to bed with sleep tracking enabled. Your device will take periodic temperature readings, which you can then view in the Health app.

  1. On your ‌iPhone‌, open the Health app.
  2. Tap Browse, then tap Body Measurements.
  3. Tap Wrist Temperature.

If you see “Needs More Data” at the top of the chart, your baseline temperature has not yet been established and you’ll need to wear your Apple Watch for more nights. The number of nights required will be displayed below the chart.

Note that Apple warns that the Apple Watch temperature sensing feature is not intended for medical purposes as wrist temperature is not as accurate as other temperature sensing methods.

16. Get Even More Battery Life on Apple Watch Ultra

The Apple Watch Ultra‌ offers up to 60 hours of battery life, which is great for multi-day usage without needing to charge.

This functionality is enabled through a combination of Low Power Mode and additional battery saving settings for Workouts. 60 hour battery life is exclusive to the ‌Apple Watch Ultra‌ thanks to its larger battery, and other models are limited to 36 hours maximum with Low Power Mode.
To get extended battery life, ‌Apple Watch Ultra‌ models need to have workout settings enabled for fewer heart rate and GPS readings.

  1. Open the Settings app on your ‌Apple Watch Ultra‌.
  2. Scroll to the bottom and tap Workout.
  3. Enable the switch next to Low Power Mode.
  4. Below ”During Low Power Mode,” enable the switch next to Fewer GPS and Heart Rate Readings.

With Low Power Mode turned on and these Low Power Mode options for workouts enabled, the ‌Apple Watch Ultra‌ is able to preserve battery life for walking, running, and hiking workouts by cutting down on the frequency of heart rate and GPS readings and disabling alerts, splits, and segments.

17. Use Night Mode on Apple Watch Ultra

The ‌Apple Watch Ultra‌ comes with an exclusive Wayfinder watch face that has a built-in Night Mode. ‌This Apple Watch Ultra lets you ‌ turn the display red, making it easier to see when lighting is poor. Red light also preserves night vision, so you won’t be temporarily blinded when out on a hike if you look at your Apple watch Ultra in the dark.

Here’s how to turn on ‌Night Mode‌:

  1. If it isn’t already active, swipe to the new Wayfinder watch face.
  2. Turn the Digital Crown to engage ‌Night Mode‌.
  3. To turn it off, rotate the Digital Crown in the opposite direction.

Please Note: Night Mode only works when the Wayfinder watch face is being used – it’s an exclusive feature to Wayfinder and cannot be enabled when any other watch face is displayed.

18. Customize the Action Button on Apple Watch Ultra

The ‌Apple Watch Ultra‌ includes an Action button that is not available on any other Apple Watch model, and it can be set to perform numerous tasks. It can start a workout, launch the stopwatch, set a waypoint in the Compass app, activate the Compass app backtrack feature, start a dive, activate the Flashlight, or activate any Shortcut.

There are even deeper functions available depending on what’s assigned. If you have the Action Button set to start a Workout, for example, you can choose a specific workout. And in the middle of a compatible workout, it can perform a secondary function such as marking segments or laps in a track workout.
If you want to change the function of your Action Button after setup, here’s how:

  1. Start the Settings app on your Apple Watch Ultra.
  2. Scroll down and tap Action Button.
  3. Tap the menu under “Action” and select one of the following options: Workout, Stopwatch, Waypoint, Backtrack, Dive, Flashlight, and Shortcut.
  4. Tap the arrow located at the left-hand corner to go back to Action Button settings.
  5. Tap the menu under ”App” if it appears, then select an app to perform the action. Some actions, such as Flashlight, don’t show the App option.
  6. Tap the arrow to go back.
  7. Tap the menu under “First Press” if it appears, then select an action. Some features allow different actions to happen on the first and second press of the button.

Tips appear on the screen under “Gestures” explaining how the Action button works with the settings that you’ve assigned to it.

You’re also able to configure your Action Button on the Apple Watch app on ‌iPhone‌.

  1. Start the Watch app on your ‌iPhone‌.
  2. Tap the My Watch tab if it’s not already selected.
  3. Tap Action Button.
  4. Under ”Action,” tap the currently selected action to change it.
  5. Select from one of the following options: Workout, Stopwatch, Waypoint, Backtrack, Dive, Flashlight, and Shortcut.
  6. Tap Action Button to return to the previous menu.
  7. Tap the menu under “App” if it appears, then select an app to perform the action. Some actions, such as Flashlight, don’t show the App option.
  8. Tap the arrow to go back.
  9. Tap the menu under “First Press” if it appears, then select an action. Some features allow different actions to happen on the first and second press of the button.

Your favorite Apple Watch Ultra tips and tricks?

These are our favorite Apple Watch Ultra tips and tricks. What are your favorite Apple Watch Ultra tips and tricks? Also, if you know of any other useful Apple Watch Ultra tips and tricks we’ve not included here, we’d love to know them in the comments section below.

So you got yourself an Apple Watch Ultra, and you’re not sure where to start? Luckily, the Apple Watch is already easy enough to set up and use. But changing a few settings can make it even more convenient.

For example, you can decide how you’d like to activate Siri, select which apps appear in your dock, make your apps appear in a list view rather than a grid and set Portrait Mode photos from your iPhone as your watch background.

Here’s a look at the Apple Watch Ultra settings you should change to get the most out of your watch.

Adjust all of your Activity goals

With the release of WatchOS 7 in 2020, Apple added the option to change your goals for the amount of time you stand and exercise. Previously, you could only change your Move (or calories) goal.

So instead of using the defaults — 30 minutes of exercise and a cumulative 12 standing hours a day — you can change either one to fit your actual daily routine.

This small change will make it possible for you to hit your own targets when you actually start your day, not when Apple tells you to. For example, if you use sleep tracking overnight and need to charge your watch more often in the morning, you won’t feel like you’ve lost an hour of time needed to close those rings.

  1. Open the Activity app on your watch.
  2. Scroll to the bottom and tap Change Goals.
  3. Make your adjustments for all three metrics and start closing those rings.

So long, random screenshots

To take a screenshot on the Apple Watch Ultra, you press the Digital Crown and side button at the same time. It’s a simple and convenient method, unless you’re like me and find yourself frequently triggering it accidentally, filling up the Photos app with random pictures of your watch face.

To turn off the ability to take screenshots altogether:

  1. Open the Settings app on your watch or use the Watch app on your phone.
  2. Go to General.
  3. Scroll down until you find Screenshots. Tap this option.
  4. Toggle off the switch next to Enable Screenshots for a clutter-free camera roll.

3. Customize which apps appear in your dock

If you have a lot of apps installed on your Apple Watch Ultra, it can be difficult to find the right ones when you need them. That’s where the Apple Watch’s dock comes in handy. If you’re not familiar, the dock is essentially the iPhone’s app switcher, but for the Apple Watch. You can trigger it by tapping the side button, which pulls up a carousel of recently used apps.

However, you can also customize the dock to show any apps you want instead of your most recent apps. To do this on your watch, follow these steps:

  1. Open the Settings menu.
  2. Tap Dock.
  3. Select the Favorites option. But I recommend setting this up in the Phone’s Watch app instead so that you can customize these apps.
  4. Open the Watch app on your iPhone.
  5. Tap Dock.
  6. Once the Favorites option is selected, you’ll see a list of apps divided into two sections: Favorites and Do Not Include. Favorites are the apps that are currently in your dock, while the latter lists all of the other apps on your watch that aren’t included. Tap the Edit button in the top right corner to customize the Favorites list to your liking.

4. Choose the Portrait mode photos you want to see on your wrist

You can set Portrait mode photos as the background for your watch face. But first, you have to dig into the settings in the Watch app on your iPhone. To get started:

  1. Launch the Watch app.
  2. Navigate to the Face Gallery tab at the bottom of the screen. Then, tap the Portraits option under the New Watch Faces category.
  3. Tap the Choose Photos option under Content to select up to 24 photos that will rotate automatically when you raise your wrist or tap the screen.

5. Keep the Apple Watch Ultra screen awake for a longer period of time

There are times when you might not want your Apple Watch’s screen to go idle right away. Perhaps you were in the middle of reading a long text message and got distracted, or maybe you want to keep an eye on your timer. Once you tap the Apple Watch’s screen, it typically stays active for 15 seconds. But you can extend that to 70 seconds by following these steps:

  1. Open the Settings menu on your watch.
  2. Tap Display & Brightness.
  3. Select Wake Duration.
  4. Choose the Wake for 70 Seconds option.

6. Stop every app from automatically installing on your Apple Watch Ultra

Every time you install an app on your iPhone, it will automatically install its Apple Watch counterpart if there is one. This can clutter up your watch’s app grid pretty quickly, making it hard to find the apps you do want to use on your watch.

  1. Open the Watch app on your phone.
  2. Tap on Settings.
  3. Tap General.
  4. Slide the switch next to Automatic App Install to the Off position.

You can also do this on the watch by opening the Settings menu, tapping App Store and toggling the switch next to Automatic Downloads.

From now on, you’ll install individual apps on your watch by opening the Watch app on your phone, then scrolling to the bottom where you’ll find a list of available apps.

7. Silence those noisy notifications

Apple Watch ultra can can come in handy when you want to discreetly checking an alert or the time. But loud notifications can defeat the purpose. Turn on your Apple Watch’s silent mode.

  1. Swipe up from the bottom of the screen to launch the Control Center.
  2. Tap the icon that looks like a bell to trigger Silent Mode.

You can also do this by opening the Apple Watch’s Settings menu, scrolling down to Sound & Haptics and toggling the switch next to Silent Mode. There’s also a volume slider for adjusting how loud or quiet incoming notifications sound if you’d rather not mute them completely.

8. Have Siri only speak out loud when you’re wearing headphones

Siri can be useful for quickly setting timers, starting workouts or checking the weather from your watch. But you might not always want to have Siri speak out loud. You can easily change this so that Siri only provides audible feedback when you’re wearing headphones.

  1. Open the Settings menu on your Apple Watch,
  2. scroll down to Siri and navigate to the Siri Responses section.
  3. Tap the Headphones Only option.

When your Bluetooth headphones are connected to your Apple Watch, you should now see the name of your headphones appear above the Siri volume setting in the watch’s settings menu.

9. Make text easier to read by increasing the font size

Reading notifications and news headlines can be difficult on a screen that’s so small. Luckily, you can increase the font size on the Apple Watch Ultra to make things a bit easier on your eyes. To do this:

  1. Launch the Settings app on your watch.
  2. Tap Display & Brightness.
  3. Scroll down to Text Size.
  4. Rotate the Digital Crown or tap the letters that appear on either side of the meter to adjust the text size on your watch.

10. Stop those annoying reminders to breathe

The Breathe reminder is designed to help you take a few minutes to clear your mind and control your respiration, potentially helping you feel more centered and calm. But if you’re like me and never follow the prompt, take a few seconds to turn it off so you no longer have to be reminded to breathe.

  1. Open the Apple Watch app on your iPhone,.
  2. Scroll down and tap the Mindfulness app option.
  3. Next, select Notifications off.
  4. Unlock your Apple Watch with your iPhone

Typing in your passcode to unlock your Apple Watch Ultra can be a pain, but there’s an easier way to do it. You can choose to have your Apple Watch unlock automatically when your iPhone is unlocked.

  1. Tap the Digital Crown and navigate to the Apple Watch’s Settings menu.
  2. Scroll down to Passcode, and make sure the switch next to Unlock with iPhone is toggled on.

Your iPhone will now also display an alert saying that your iPhone is being used to unlock your Apple Watch whenever you put this into practice.

12. Make it easier to find your apps

The honeycomb app grid looks great at first glance, but it can be difficult to find the app you want to launch, particularly if you have a lot of apps installed on your Apple watch Ultra. Instead of in a grid, the watch can display all of your apps in an alphabetical list.

  1. Either in the Watch app on your phone or in the Settings app on the Watch, tap App View.
  2. Tap List View.

Now, when you press the Digital Crown to leave your watch face, you’ll see a list of apps that you can quickly scroll through and find what you’re looking for.

13. Control when you’ll see Siri

There are three different ways to activate Siri on your Apple Watch Ultra. You can raise your wrist toward your mouth and start talking, long-press the Digital Crown or use the wake phrase, “Hey, Siri.”

I’ve found that I often accidentally trigger Siri when trying to check the time or read a notification while I’m talking to someone else (but my watch thinks I’m trying to talk to Siri). It’s annoying, but it can be changed.

  1. Either in the Watch app on your phone or in the Settings app on the Watch, select Siri.
  2. You’ll find three buttons to control when you’ll see Siri. Slide each button to the Off position for any of the options you don’t want to use.

14. Rearrange Control Center

Just like Control Center on your iPhone, Control Center on the Apple Watch is where you go to quickly adjust settings like do not disturb and airplane mode and to activate the flashlight.

You may find the default list of options in the Control Center isn’t the best fit for how you use your watch, however, and you want to rearrange the list. For me, that means moving the Bedtime toggle from near the bottom of the list to the top. That way when I want to track my sleep over the weekend when I don’t have sleep goals set, I can swipe up and tap the icon.

To access the Control Center on your watch Ultra:

  1. Swipe up from the bottom of the watch face, or when in an app you can long-press on the bottom of the screen until you see Control Center start to slide up, after which you just need to slide your finger up to access it. The same trick works to view your notifications from anywhere.
  2. Change the order, or hide some buttons in the Control Center by tapping the Edit button at the bottom of the list. The icons will begin to jiggle and show a red minus sign to hide an option. Drag and drop the icons into your preferred order, or tap the red minus button to remove the option altogether.
  3. When you’re done, tap Done or press the Digital Crown on the side of your watch to go back to the watch face.