Got a tip for us?

iPad

The iPad is a tablet computer from Apple that runs the iOS mobile operating system. Similar in functionality to the iPhone, the iPads purpose is often quite different, sometimes even serving as a general desktop computer replacement.

When you dictate text on iPad, you can use commands for punctuation, formatting, capitalization, and more. In some languages, you can insert emoji using your voice while dictating.

The commands listed below are always available while you’re dictating text. To insert an emoji, you can say something like “heart emoji” or “car emoji,” and in some languages, Dictation automatically adds certain punctuation as you go.

Here are the commands for dictating text on iPad.

Note: Dictation may not be available in all languages or in all countries or regions, and features may vary.

When using Dictation, cellular data charges may apply. See View or change cellular data settings.

Punctuation

Command Result
Period .
Comma ,
Exclamation point !
Question mark ?
Dollar sign \$
Open parenthesis (
Close parenthesis )
Quote “
End quote “
Colon :
Semicolon ;
Hashtag #

For some languages, Dictation automatically adds certain punctuation as you dictate text.

Format text

Command Result
Cap Capitalize the next word
Caps on … caps off Capitalize the first character of each enclosed word
All caps Make the next word all uppercase
All caps on … all caps off Make the enclosed words all uppercase
No caps on … no caps off Make the enclosed words all lowercase
No space Eliminate the space between two words (not available for all languages)
No space on … no space off Run a series of words together (not available for all languages)
New paragraph Start a new paragraph
New line Start a new line

Change, insert, and delete text

Dictation commands to edit text are available in U.S. English on supported iPad models.

Command Result
Change … to … Replace existing text with new text
Insert … before … Insert new text before existing text
Insert … after … Insert new text after existing text
Select … Select text
Delete … Delete text
Delete all Delete all text
Undo Undo the action
Redo Redo the action

Insert emoji

You can insert emoji while dictating in certain languages. For example, say “heart emoji” for the heart emoji or “car emoji” for the car emoji. See below for more examples of emoji commands and the corresponding result.

Command Result
Smiley emoji The smiley emoji.
Halo emoji The halo emoji.
Laugh out loud emoji The laugh out loud emoji.
Heart eyes emoji The heart eyes emoji.
Amazing emoji The amazing emoji.
Yum emoji The yum emoji.
Congrats emoji The congrats emoji.
Goofy emoji The goofy emoji.
Sick emoji The sick emoji.
Scream emoji The scream emoji.
Hug emoji The hug emoji.
Fingers crossed emoji The fingers crossed emoji.
Purple heart emoji The purple heart emoji.
Cheers emoji The cheers emoji.
Celebrate emoji The celebrate emoji.
Speech balloon emoji The speech balloon emoji.
Puppy emoji The puppy emoji.
Music emoji The music emoji.
Rainbow emoji The rainbow emoji.
Present emoji The present emoji.

See also

You can dictate text instead of typing it on an Apple external keyboard. As you speak, iPad automatically inserts punctuation for you, and you can insert emoji by saying their names, like “mind blown emoji” or “happy emoji.” You can also switch between keyboards with iPad.

Note: Dictation may not be available in all languages or in all countries or regions, and features may vary. Cellular data charges may apply (Wi-Fi + Cellular models).

  1. Open Settings, tap General and tap Keyboard. Then turn on Enable Dictation.
  2. Tap the Dictation button in the Shortcuts bar (at the bottom of the screen) and then speak.

    As you speak to insert text, iPad automatically inserts punctuation for you. You can insert emoji by saying their names (for example, “mind blown emoji” or “happy emoji”).

  3. When you finish, tap the Keyboard button at the bottom of the screen.

Quick tip: On the Magic Keyboard for iPad or Smart Keyboard, press the Switch Keyboard key-D to quickly switch to dictation.

See also

With an Apple external keyboard, you can switch between the language keyboard for your region, an emoji keyboard, other language keyboards you add, and the onscreen keyboard. A keyboard shortcut cycles through them. The emoji keyboard even lets you search for an emoji with a common word, like “heart.”

Switch between language keyboards and the onscreen emoji keyboard

  1. On the external keyboard, press and hold the Control key.
  2. Press the Space bar to cycle between the language keyboard for your region, the emoji keyboard, and other language keyboards that you add.

    When you select the emoji keyboard, you can do the following:

    • Search for an emoji: Enter a commonly used word or phrase—such as “heart” or “smiley face”—in the search field above the emoji keyboard.
    • Enter an emoji: Tap it; or use the arrow keys on the external keyboard to select it. Then press Return.

Quick tip: To jump to the emoji keyboard quickly, press the Switch Keyboard key-E on Smart Keyboard or the Magic Keyboard for iPad.

With Magic Keyboard for iPad and Smart Keyboard, you can also press the Switch Keyboard key to choose between keyboards. If you want to use the Switch Keyboard key to show only the emoji keyboard instead of switching languages, go to Settings > General > Keyboard > Hardware Keyboard, then turn on Press the Switch Keyboard key for Emoji.

Quick tip: With a Chinese, Korean, Japanese, or Hebrew keyboard added, you can press the Caps Lock key to switch between Latin script and the other keyboard you’re using. If you’d rather the Caps Lock key not switch languages, go to Settings > General > Keyboard > Hardware Keyboard and turn off Switch Languages using Caps Lock.

Switch to the onscreen keyboard

  1. Do one of the following:
    • Tap the Keyboard Shortcut button in the Shortcuts bar (at the bottom of the screen).
    • If you installed additional language keyboards, tap the language button next to the predictive text suggestions (opposite of the Dictation button in the Shortcuts bar).
  2. Tap Show Keyboard.

To hide the onscreen keyboard, tap the Hide Keyboard button.

Note: On Magic Keyboard for iPad and Smart Keyboard, the Switch Keyboard key can show only the emoji keyboard rather than switching languages. To set that up, go to Settings > General > Keyboard > Hardware Keyboard and turn on Press the Switch Keyboard key for Emoji. Then, to switch between other language keyboards, you press and hold the Control key and press the Space bar.

See also

In the Books app, you can find today’s bestsellers, view top charts, explore series, and browse lists curated by Apple Books editors. After you select a book or audiobook, you can read or listen to it right in the app.

You can browse the Book Store or Audiobook Store, or search for a specific title, author, series, or genre. You can also read a sample or listen to a preview before you buy, and all purchases use the payment method associated with your Apple Account.

Note: Apple Books isn’t available in all countries or regions.

  1. Start the Books app on your iPad.
  2. Tap Book Store or Audiobook Store to browse titles, or tap Search to look for a specific title, author, series, or genre.

    Tip: Tap Sections at the top of the screen to view titles in categories like Top Charts and Book Clubs, or genres like Biographies & Memoirs and Young Adults.

  3. Tap a book cover to see more details, read a sample, listen to a preview, or mark as Want to Read.
  4. Tap Buy to purchase a title, or tap Get to download a free title.

    All purchases are made with the payment method associated with your Apple Account.

On iPad models with Wi-Fi + Cellular, you can allow books and audiobooks to download automatically over your cellular network when you aren’t connected to Wi-Fi. Go to Settings > Apps > Books, then turn on Automatic Downloads. Tap Downloads, then choose Always Allow, Ask If Over 200 MB, or Always Ask.

When you purchase access to movies, TV shows, music, music videos, ebooks, audiobooks, or ringtones from Apple, you also have the option to permanently download these items to a compatible iPhone, iPad, Mac, or PC. Apple cannot revoke your downloaded content, and you can always access your downloaded content without an internet connection.

See also

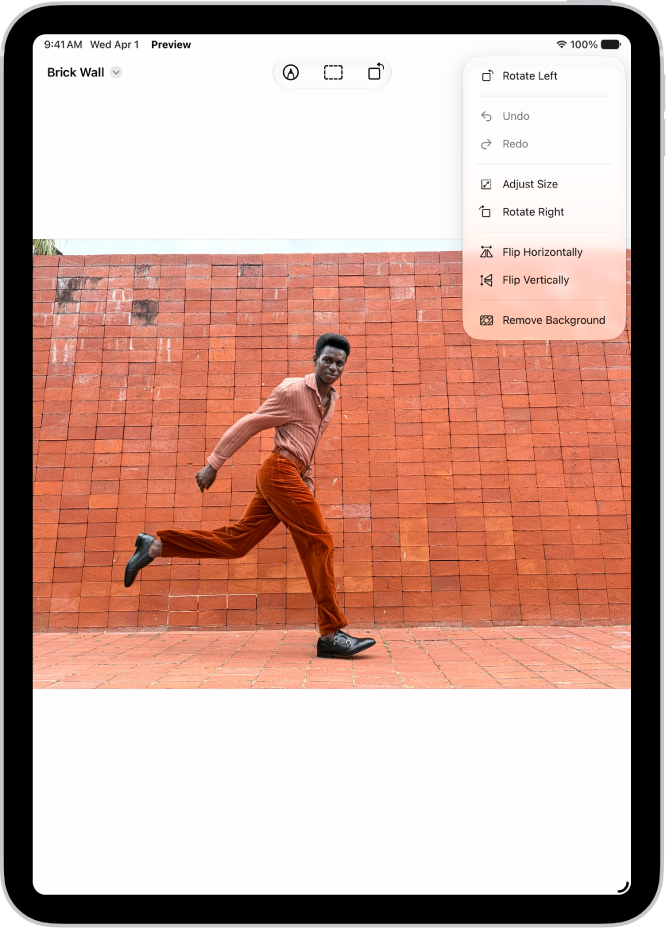
You can crop, rotate, or flip an image in Preview on your iPad. You can also remove the background or adjust the image size.

You can choose Rotate Left or Rotate Right, or Flip Horizontally or Flip Vertically, and there’s a way to undo a change, too. You can also export or compress PDFs and images in Preview, and add, delete, rotate, move, or crop PDF pages in Preview on iPad.

  1. Start the Preview app on your iPad.
  2. Open an image.
  3. Do any of the following:
    • Crop the image: Tap the Crop button. Drag the blue handles to select an area, tap within the selected area, and then tap Crop.
    • Rotate the image: Tap the Rotate Left button. You can also tap the More button and choose Rotate Left or Rotate Right.
    • Flip the image: Tap the More button and then choose Flip Horizontally or Flip Vertically.
    • Remove the background: Tap the More button, then tap Remove Background.
    • Adjust the image size: Tap the More button, then tap Adjust Size. Choose options, then tap Done.

To undo a change, tap the More button, then choose Undo.

See also

Tag: Preview

You can remove the background from an image in the Preview app on your iPad. You just open an image, and Remove Background is one of the options. You can also open and view PDFs and images, edit an image, or annotate a PDF or image in Preview.

Preview app window showing a photo with a hand holding grapes in the foreground. The background of the photo shows the sky and the ocean.

  1. Open the Preview app on your iPad.
  2. Open an image.
  3. Tap the More button, then choose Remove Background.

See also

Tag: Preview

You can reply to an email with a PDF attachment in Preview on iPad. You just fill out or annotate the PDF attachment in the Preview app and attach the updated PDF to your reply in the Mail app. You can optionally add text to the reply, too.

  1. Go to the Mail app on your iPad.
  2. Open an email with a PDF attached and then tap the attachment to open it in the Preview app.
  3. Fill out or annotate the PDF.
  4. Go back to the Mail app and open the original email.
  5. Tap the Reply button, tap the Attachment button, and tap Attach File.
  6. Locate the updated PDF, then tap to select it.
  7. Optionally, add text to the reply.
  8. Tap the Send button.

See also

Tags: Mail, Preview

You can manage PDFs and images in the Preview app on your iPad. You can save the file and return to the main menu, copy the PDF or image to the Clipboard, or export a PDF or image in a different format. You can also create a duplicate, move the file, or rename it.

  1. Go to the Preview app on your iPad.
  2. Open a PDF or image.
  3. Do any of the following:
    • Save the file and return to the main menu: Tap the Back button.
    • Rename the file: Tap the Actions Menu button next to the filename and tap Rename. Enter a new filename and tap the Done button on the onscreen keyboard.
    • Copy the PDF or image to the Clipboard: Tap the Share button, then tap Copy.
    • Create a duplicate: Tap the Actions Menu button next to the filename. Tap Duplicate.
    • Export PDF or image in a different format: See Export or compress PDFs and images.
    • Move the file: Tap the Actions Menu button next to the filename and tap Move. Tap the Actions Menu button next to Preview and select a new location.

See also

Tag: Preview

You can export a PDF or an image as an HEIC, JPEG, PDF, PNG, or TIFF file in the Preview app. You can compress the file, too. You can also manage PDFs and images, add, delete, rotate, move, or crop PDF pages, and edit an image in Preview.

  1. Go to the Preview app on your iPad.
  2. Open a PDF or image.
  3. Tap the Actions Menu button next to the filename. Then tap Export.
  4. Select a file format.

    Available formats are HEIC, JPEG, PDF, PNG, and TIFF.

  5. Optionally, use the slider to adjust the file size.

See also

Tag: Preview

You can scan a document to create a PDF in the Preview app. iPad automatically captures the page, or you can capture the scan yourself instead of automatically, and you can scan additional pages. You can crop, rotate, or adjust the coloring of the scan, and add, delete, or move PDF pages in Preview, too.

  1. Go to the Preview app on your iPad.
  2. Tap Scan Documents.
  3. Position the iPad camera so the text or document appears on the screen.

    iPad automatically captures the page. To capture the scan yourself instead of automatically, tap Auto (the label changes to Manual), then tap the Shutter button.

  4. Repeat the step above to scan additional pages.
  5. Tap the thumbnails at the bottom of the screen to crop, rotate, or adjust the coloring of the scan.
  6. Tap the Done button when you’re finished scanning.

See also

Tag: Preview