Got a tip for us?

iPad

The iPad is a tablet computer from Apple that runs the iOS mobile operating system. Similar in functionality to the iPhone, the iPads purpose is often quite different, sometimes even serving as a general desktop computer replacement.

In the Home app, you can invite other people to control all your smart accessories, or invite a guest to control some or all of your doors, locks, and security system accessories during specific times.

Residents get local access to all accessories in the home at any time, plus optional remote access, while guests get local-only access to specific doors, locks, and security systems. People you invite can accept in the notification or in the Home app.

Note: Remote access and guest access only work with a home hub, such as an Apple TV 4K or a HomePod speaker.

Invite residents to control accessories

At any time, Home Residents have local access to all accessories in the home, plus optional remote access.

  1. Open the Home app on your iPad.
  2. On the Home tab, tap the Add button, tap Add People, and then tap Resident.
  3. Tap the Add button to choose people with an Apple Account from your contacts list, or enter their Apple Account email addresses in the To field.
  4. Tap Invite.
  5. Ask the invitee to do one of the following:
    • In the notification: (iPhone or iPad) Tap Accept.
    • In the Home app: (iPhone or iPad) Tap the More button, tap Home Settings, and then tap the invitee’s name.
    • On Apple TV 4K: Tap Show Me on Apple TV and turn on one or more Apple TVs.

Invite guests to control accessories

Home Guests get local-only access to specific doors, locks, and security system accessories, limited to a set schedule.

Note: Home Guests access requires iOS 18, iPadOS 18, or later.

  1. Open the Home app on your iPad.
  2. On the Home tab, tap the Add button and tap Add People. Then tap Guest.
  3. Tap the Add button to choose people with an Apple Account from your contacts list, or enter their Apple Account email addresses in the To field.
  4. Select any of the following for the guest schedule:
    • Anytime: The guest can access the selected accessories anytime.
    • Specific Dates: The guest can only access the selected accessories on the dates specified.
    • Specific Days & Times: The guest can only access the selected accessories on the days and during the times specified.
  5. Select which doors, locks, and security system accessories the guest can access.
  6. Tap Invite.
  7. Ask the invitee to do one of the following:
    • In the notification: (iPhone or iPad) Tap Accept.
    • In the Home app: (iPhone or iPad) Tap the More button, tap Home Settings, and then tap the invitee’s name.

Allow others to access your AirPlay-enabled speakers and TVs

  1. Open the Home app on your iPad.
  2. Tap the More button, then tap Home Settings.
  3. Tap Speaker & TV and choose an option.

You can allow everyone, anyone on the same network, or only people you’ve invited to share the home. You can also require a password that allows speaker access.

Allow Resident and Guest Attribution

With Attribution, your name can appear in activity history and notifications when you arrive, leave, or interact with accessories.

Note: Home members who use Face Recognition to identify people based on their photo library will still see your name.

  1. Open the Home app on your iPad.
  2. Tap the More button, then tap Home Settings.
  3. Tap a person and then enable Attribution.

See also
Tag: Home

You can use the Home app to set up HomePod and control many HomePod settings.

You can send and receive Intercom messages and choose who’s allowed to use them, and use HomePod with HomeKit Secure Video. Any home member can choose when they get Intercom messages, while only an owner or admin chooses who can send or receive them. HomePod can even notify you when someone you know is at the door.

Here’s how to set up HomePod in Home on iPad.

Note: HomePod is not available in all countries or regions.

Use Home to send and receive Intercom messages

  1. Start the Home app on your iPad.
  2. Tap the More button, then tap Home Settings.
  3. Tap Intercom, then configure these settings:

    • When you can receive Intercom messages
    • Who is allowed to send or receive Intercom messages
    • Which HomePod speakers can use Intercom

    Note: Any member of the Home can choose when they receive Intercom messages. Only a home owner or admin can choose who can send or receive Intercom messages and which HomePod speakers can use Intercom.

  4. Tap Back, then tap Done.
  5. Tap the Intercom button, say something like “Who ate the last cookie?” then tap Done.

    Your Intercom message is sent to all the HomePod speakers in your home, and to the iOS, iPadOS, and watchOS devices of all members of your home who can send and receive Intercom messages.

Use HomePod and HomeKit Secure Video to announce guests

With a HomeKit Secure Video camera or doorbell, HomePod can tell you when someone you know is at the door. If the person isn’t recognized, it can send you a message instead.

Note: To announce guests, first turn on Face Recognition.

  1. Start the Home app on your iPad.
  2. On the Home tab, tap the More button and then tap Home Settings.
  3. Tap Cameras & Doorbells and then tap your camera or doorbell.
  4. Tap Doorbell Chime and then choose which HomePod speaker or speakers to enable.

Use Home to add and edit HomePod alarms and timers

  1. Start the Home app on your iPad.
  2. Tap the right side of a HomePod tile, swipe up, and do any of the following:
    • Add an alarm: Tap New, create the alarm and then tap Done.
    • Edit an alarm: Tap the alarm, change the time, then tap Done.
    • Turn alarms on or off: Tap the switch next to an alarm.
    • Delete an alarm: Swipe left over the alarm, then tap Delete.
    • Create a new timer: Tap New Timer, enter a timer label (optional) and choose the length of the timer. Tap Start.
    • Pause and restart a timer: Tap the Pause button; tap the Play button to restart the timer.
    • Remove a timer: Tap the Delete button.

Change HomePod settings

  1. Start the Home app on your iPad.
  2. Tap the right side of a HomePod tile.
  3. Tap the Settings button and then configure HomePod settings.

    You can assign HomePod to a different room, add an automation, create a stereo pair with two HomePod speakers of the same kind in the same room, and more.

Use HomePod to listen for alarm sounds

HomePod can alert you when it detects an alarm sound in your home.

  1. Start the Home app on your iPad.
  2. Tap the right side of a HomePod tile.
  3. Tap the Settings button, then tap Sound Recognition.
  4. Turn on Smoke & CO Alarm, then choose which HomePods will listen for alarms.

HomePod listens for certain sounds, notifying you when alarm sounds may be recognized.

Important: Sound Recognition may detect smoke and carbon monoxide alarm sounds and send you notifications when recognized. Sound Recognition should not be relied upon in circumstances where you may be harmed or injured, or in high-risk or emergency situations.

Add a Siri-enabled accessory

Enabling Siri on compatible Apple Home accessories extends access to HomePod throughout your home. With Siri on those accessories, you can get help with everyday questions or tasks, control the accessories with your voice, and play your favorite music and podcasts.

See also

Tag: Home

In the Home app, you can run automations based on the time of day, your location, the activation of a sensor, or the action of an accessory. You can use preconfigured automations included with the Home app, or create automations of your own.

An automation can run when people arrive at or leave a location, or at a time of day, like sunrise or sunset. You can also manage and edit automations, and add a Siri shortcut.

Use a preconfigured automation

  1. Open the Home app on your iPad.
  2. On the Home tab, touch and hold an accessory and then tap Accessory Settings.
  3. Turn on an automation.

To disable an automation, return to the accessory’s setting screen, then turn it off.

Create an automation

  1. Open the Home app on your iPad.
  2. On the Home tab, tap the Add button.
  3. Tap Add Automation and choose one of the following automation triggers:

    • When arriving at or leaving a location: Tap People Arrive or People Leave. Choose when the automation is activated by people arriving or leaving, the location, and the time the automation works.
    • At a time of day: Tap A Time of Day Occurs. Choose when you want this automation to run.

      If you choose Sunset or Sunrise, times vary as the season changes.

      You can also set an automation to only occur after sunset, which is useful for turning on lights just when they’re needed.

    • When an accessory changes: Tap An Accessory is Controlled, select an accessory and tap Next. Follow the onscreen instructions.

      You might use this, for example, to run a scene when you unlock the front door.

    • A sensor detects something: If you’ve added a sensor to Home, tap A Sensor Detects Something, select an accessory, tap Next, and follow the onscreen instructions.

      You might use this, for example, to turn on lights in a stairway when motion is detected nearby.

You can also tap the right side of an automation tile, tap the Settings button, then add, enable, or disable automations.

Manage and edit automations

  1. Open the Home app on your iPad.
  2. Tap Automation in the sidebar.
  3. Tap an automation and then do any of the following:
    • Enable or disable the automation
    • Choose when the automation happens
    • Add or remove accessories
    • Test the automation
    • Delete the automation

Add a Siri shortcut

Adding a Siri Shortcut to your automation can make it even more efficient.

  1. Open the Home app on your iPad.
  2. When choosing accessories to control with an automation, swipe up and tap Convert To Shortcut.
  3. Tap Next, name the automation (optional), then tap Done.

See also

Tag: Home

In the Home app, you can control your accessories even when you’re away from home. To do so, you need a home hub, which is a device such as Apple TV 4K or HomePod speakers, and Home turned on in iCloud.

Go to Settings > [your name] > iCloud, tap See All, then turn on Home.

You must be signed in to the same Apple Account on your home hub device and your iPad.

If you have an Apple TV 4K or HomePod, and you’re signed in to the same Apple Account as your iPad, it’s set up automatically as a home hub.

See also

Tag: Home

In the Home app, you can create scenes that allow you to control multiple accessories at once. A “Reading” scene, for example, might adjust the lights, play soft music on HomePod, close the drapes, and adjust the thermostat.

The first accessory you select decides which room the scene is assigned to, so if you first select your bedroom lamp, the scene goes to your bedroom.

Here’s how to create and use scenes in Home on iPad.

Create a scene

  1. Start the Home app on your iPad.
  2. On the Home tab, tap the Add button, then tap Add Scene.
  3. Tap Custom and enter a name for the scene (such as “Dinner Party” or “Watching TV”). Then tap Add Accessories.
  4. Select the accessories you want this scene to include and then tap Done.

    The first accessory you select determines the room the scene is assigned to. If you first select your bedroom lamp, for example, the scene is assigned to your bedroom.

  5. Set each accessory to the state you want it in when you run the scene.

    For example, for a Reading scene, you could set the bedroom lights to 100 percent, close the drapes, choose a low volume for the HomePod, and set the thermostat to 68 degrees.

  6. Test the scene and choose whether or not to show it on the Home tab (scenes appear on the Home tab by default) and tap Done.

Use scenes

To use a scene, do one of the following:

  • Run a scene: Tap the scene on the Home tab.

    If you’ve decided not to show the scene on the Home tab, tap the More button, choose the room the scene is assigned to, then tap the scene.

  • Edit a scene: Touch and hold a scene, then tap Edit Scene.

    You can change the scene’s name, test the scene, add or remove accessories, and more.

See also

Tag: Home

You can use the Home app to securely add, control, and automate HomeKit and Matter-enabled accessories, such as lights, locks, and thermostats. And when you set up security cameras that support HomeKit Secure Video, you can capture video and receive a notification when a camera recognizes someone or when a package is left at the door.

You can create automations to run automatically at certain times, or when you activate a particular accessory, like when the front door is unlocked. With the aid of a home hub—an Apple TV 4K or HomePod speakers—you can also control your home remotely, so you and others you invite can securely control your home while you’re away. You can even group multiple speakers to play the same audio, and send and receive Intercom messages on supported devices.

Note: Matter-enabled accessories need a home hub, for example a HomePod speaker or an Apple TV 4K. For Thread accessories, the home hub has to be Thread-enabled, such as Apple TV 4K (3rd generation) Wi-Fi + Ethernet or HomePod mini, as well as a supported third-party border router or any device that supports Thread pairing.

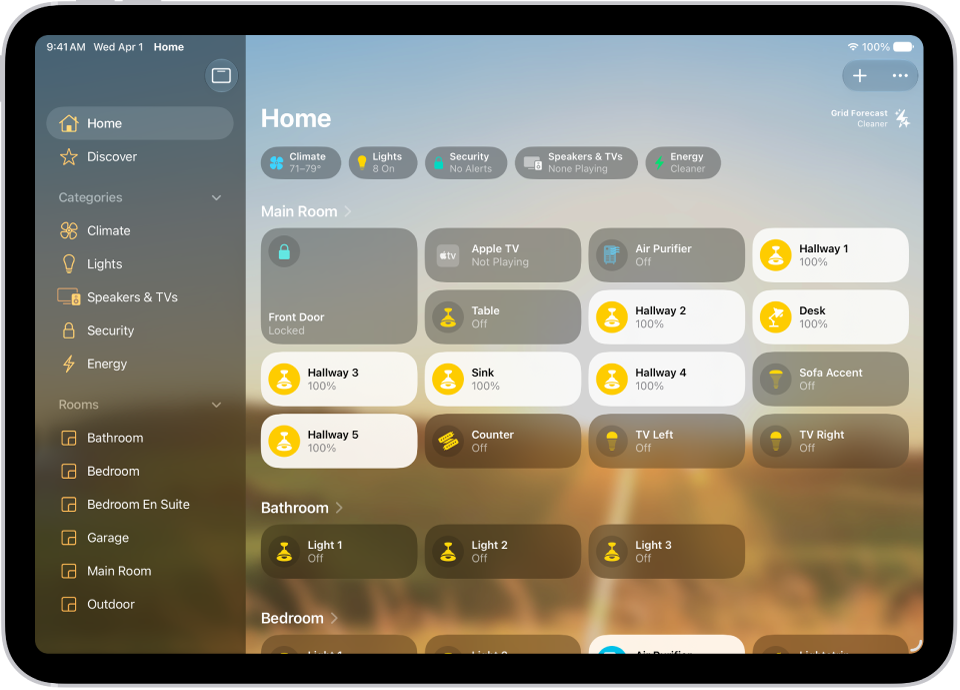
Home overview

The Home app lets you easily navigate and control your accessories. In the Home app, tap Home in the sidebar to show the following sections:

  • Categories: Tap a category such as Lights, Security, Climate, Speakers, or Water to show all related accessories on one screen, organized by room.
  • Cameras: Video from up to four cameras can appear below Cameras. Swipe left to see more cameras.
  • Scenes: Create scenes to control multiple accessories with a tap or Siri request—tap a scene to close the blinds and turn on the lights in the evening, for example.
  • Favorites: Add to Favorites the accessories you use most often to quickly control them from the Home tab.
  • Rooms: Accessories are organized by room, letting you find just the accessory you need.

The Home app with the sidebar on the left, showing Home, Automation, and Discover tabs near the top left. Categories and Rooms in the home appear below. To the right of the sidebar, at the top, are the Intercom, Add, and More Options buttons. Category buttons appear near the top. Below that are scenes, camera images, and a room with its accessories.

Edit Home

You can organize the Home app in ways that suit you best.

Tap Home in the sidebar, tap the More button, then do any of the following.

  • Rearrange items: Select Edit Home View, then drag tiles to a different position. Tap Done when you’re finished.
  • Reorder sections: To change the way sections are ordered in the Home screen, choose Reorder Sections, then drag the Reorder button next to a section to a new position. Tap Done when you’re finished.
  • Resize icons: Select Edit Home View, tap a tile, tap the Resize button, then tap Done.

To learn more about how to create and accessorize a smart home with your Apple devices, tap Discover in the sidebar.

See also

Tag: Home

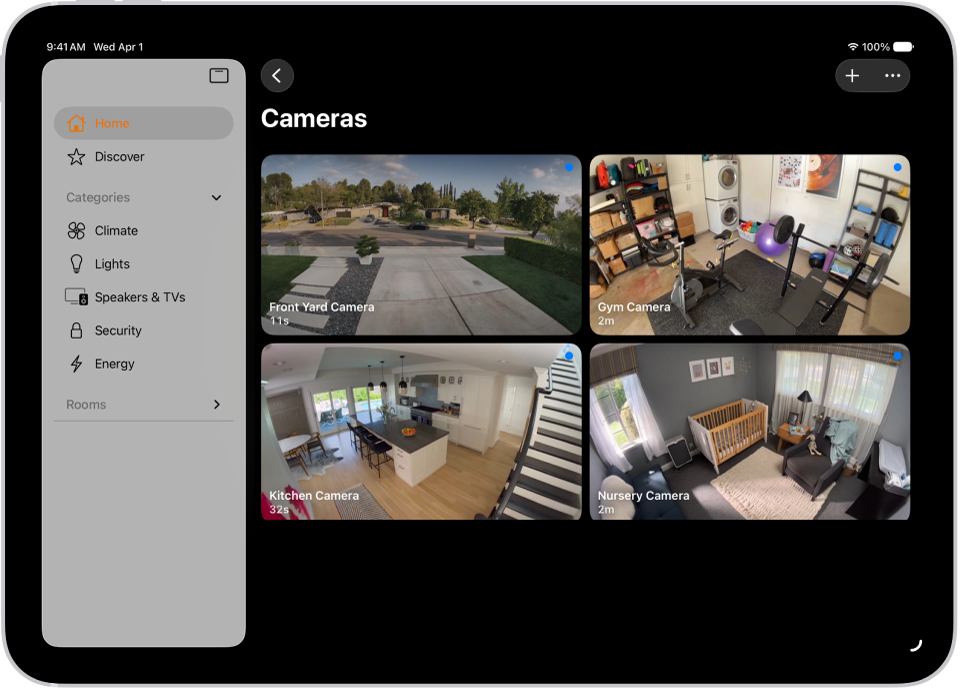
You can use the Home app to view video activity captured by your home’s cameras. With any Apple Home-compatible camera, you can view video streams, choose who can view them, and set up notifications when activity is detected. When you add a camera, you can choose streaming options and assign it to a room, such as your front porch. By default, up to four cameras show up as favorites on the Home tab.

With one or more HomeKit Secure Video cameras, you get these extra features:

  • Encrypted video: Video captured by your cameras is privately analyzed and encrypted on your home hub device (Apple TV 4K or HomePod) and securely uploaded to iCloud so that only you and those you share it with can view it.
  • Record video: If you subscribe to iCloud+, you can view the last 10 days of activity from one to an unlimited number of cameras. The 50 GB iCloud+ plan supports a single camera, the 200 GB iCloud+ plan supports up to five cameras, and the 2 TB, 6 TB, and 12 TB iCloud+ plans support an unlimited number of cameras.

    Note: Video content doesn’t count against your iCloud storage limit.

  • Activity Zones: Create zones that focus your camera on the most important areas within its view.
  • Face recognition: Receive notifications when people you’ve tagged in the Photos app are within the camera’s view.

The Home app with the sidebar on the left. Home is highlighted. On the right are images from five security cameras.

Camera options

When you add a camera in the Home app, you can choose streaming options and assign the camera to a room. With a HomeKit Secure Video camera, you can also choose recording options. By default, up to four cameras are marked as favorites and appear on the Home tab. To edit those settings later, tap the Camera tile, then tap the Settings button to see these options:

  • Room: A camera can be located in a room inside your home, or you can create a room for an outside location such as your front porch or back yard.
  • Notifications: Choose to receive notifications when the camera detects activity, changes status, or goes offline.
  • Recording options for HomeKit Secure Video cameras: You can create separate recording settings for when you’re home and when you’re away. For example, when you’re home, you might choose to stop streaming and recording from a camera inside your home, but continue to stream and record from an outdoor camera.

    Note: The Home app uses the location of devices belonging to members of the home to switch between Home and Away modes. For example, when you leave for work with your iPad, the camera switches from the When Home settings to the When Away settings.

Set up notifications

  1. Open the Home app on your iPad.
  2. Tap the More button, then tap Home Settings.
  3. Tap Cameras & Doorbells.
  4. Tap a camera and turn on Activity Notifications.

    All Apple Home-compatible cameras can send a notification when motion is detected. HomeKit Secure Video cameras can additionally send notifications based on these factors:

    • The time of day
    • When someone is or isn’t home
    • When a clip is recorded
    • When any or a specific type of motion is detected

      When you choose a specific motion, you receive a notification when the camera detects people, animals, or vehicles, or when a package is delivered. For a package to be detected, it must be within the camera’s view after delivery.

      Choosing a specific motion, rather than any motion, results in fewer clips (and fewer clip notifications) and less video to review. For example, if you choose to detect people, your camera doesn’t capture the movement of leaves on a tree or a squirrel leaping from branch to branch.

Create Activity Zones for HomeKit Secure Video cameras

To point your HomeKit Secure Video camera at the areas within its view that matter most, like your front walkway but not the sidewalk behind it, create zones. You’ll then get an alert when motion is detected in these zones.

Note: Activity Zones are available only for cameras that are set up to record when a specific motion is detected, and they don’t affect motion detection automations.

  1. Open the Home app on your iPad.
  2. On the Home tab, tap the camera tile. Then tap the Settings button.
  3. Tap Select Activity Zones. Tap the video to create a zone.

    To have your camera detect motion only outside the zone you defined, tap Invert Zone.

  4. Create any additional zones you want within the camera’s view—one for the driveway and another for the mailbox, for example.
  5. Tap Done.

To remove an activity zone, tap Select Activity Zones, tap inside a zone, then tap Clear.

View video

  1. Open the Home app on your iPad.
  2. On the Home tab, tap the camera tile.

    Live video should play automatically.

  3. If you’ve chosen to record video, swipe through the timeline at the bottom of the screen to browse recorded clips.
  4. Tap a clip to play it.
  5. Pinch the clip open left and right to show the timeline and then drag to go forward or back through the video.
  6. Tap Live to switch back to live video.

Set up the camera to detect specific motion, and the timeline displays unique symbols for people, animals, vehicles, and packages.

Note: With more cameras in your home than Home Hubs that can analyze their video, some of the cameras’ video may not be analyzed. Clips still get recorded, but they’ll have the Unanalyzed Video badge, a sign that the video wasn’t analyzed for specific motion.

Live and recorded video is also available in the Home app on a Mac with macOS 10.15.1 or later.

Choose access options

To allow other people to view video from your cameras, follow these steps:

  1. Open the Home app on your iPad.
  2. Tap the More button, then tap Home Settings.
  3. Below the People heading, tap a person.
  4. Tap Cameras and choose an option.

To learn how to allow other people to view video from your cameras, see Invite others to control accessories in your home.

See also

Tags: camera, Home

To send and receive email using the Mail app, you need to add the email accounts you want to use. When you first open Mail, you’re asked to set up an account. At any time, you can add more email accounts to your iPad, or remove accounts you no longer need.

You can also set a fetch schedule for an account, or temporarily stop using one.

Here’s how to add and remove email accounts on iPad.

Add an email account

To get all your email in one place, add one or more email accounts to the Mail app. Then you can send email from any of those accounts with ease.

  1. Start the Settings app on your iPad.
  2. Tap Apps and then tap Mail.
  3. Tap Mail Accounts, then tap Add Account.
  4. Enter your email address, tap Next, and enter your email account information.

Note: With multiple accounts set up, you can choose which one to send from while composing your email message. For how it works, read our article, Send an email from a different account.

Set a fetch schedule for your email account

For an account that doesn’t support Push notifications, set a schedule to check that account for new emails.

  1. Start the Settings app on your iPad.
  2. Tap Apps and then tap Mail.
  3. Tap Mail Accounts and then tap Fetch New Data.
  4. Under Fetch, choose a schedule.

    Automatically is the default selection, which means new data is downloaded when your iPad is charging and connected to Wi-Fi. To fetch more often outside of these conditions, choose a timed schedule.

Temporarily stop using an email account

Turning off an account in Settings temporarily stops sending and receiving email from it on your iPad. It’s easy to turn it back on at any time.

  1. Start the Settings app on your iPad.
  2. Tap Apps and then tap Mail.
  3. Tap Mail Accounts and tap the email account you want to turn off.
  4. Do one of the following:
    • Turn off an iCloud email account: Turn off Use on this iPad.
    • Turn off another email account: Turn off Mail.

Quick tip: Focus filters let you get notifications only from specific email accounts during times you choose. You could silence your work email account’s notifications on the weekends or while you’re on vacation, for example. To set one up, check out our guide, Set up a Focus on iPad.

Delete an email account

If you remove an email account, it disappears from both the Mail app and all the apps on your iPad that use it.

Note: This only removes the email account from your iPad. It doesn’t cancel it, so to close the account completely, visit your email account provider.

  1. Start the Settings app on your iPad.
  2. Tap Apps and then tap Mail.
  3. Tap Mail Accounts. Tap the email account you want to remove.
  4. Tap Sign Out or Delete Account.

    Note: If you change your mind later, you can add the email account back to your iPad. Follow the steps in Add an email account.

Add the Mail app back to your Home Screen

The Mail app may not be on your Home Screen, but you can find it in the App Library and add it back.

  1. On the Home Screen, swipe left until you see the App Library.
  2. Enter “Mail” in the search field.
  3. Touch and hold the Mail app icon. Tap Add to Home Screen.

To get your Home Screen just right, check out our article, Move apps and widgets around.

See also

Tag: Mail

With the Mail app, you can send, receive, and organize messages from all your email accounts in one place. You can add accounts from different email services, like iCloud, Exchange, or Gmail, write and send a new message, and reply to an email, delete it, and more while you’re reading it.

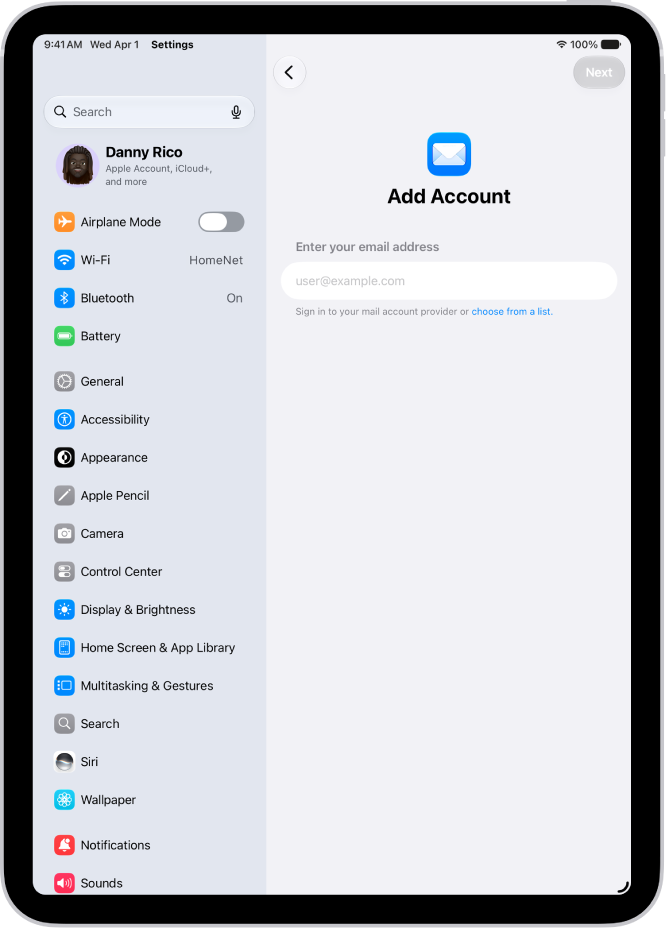
The Add Account screen showing a field to enter your email address.

Add an email account

You can add all your email accounts from different email services—like iCloud, Exchange, or Gmail (Google). To add an account, go to Settings > Apps > Mail. Tap Mail Accounts, then tap Add Account.

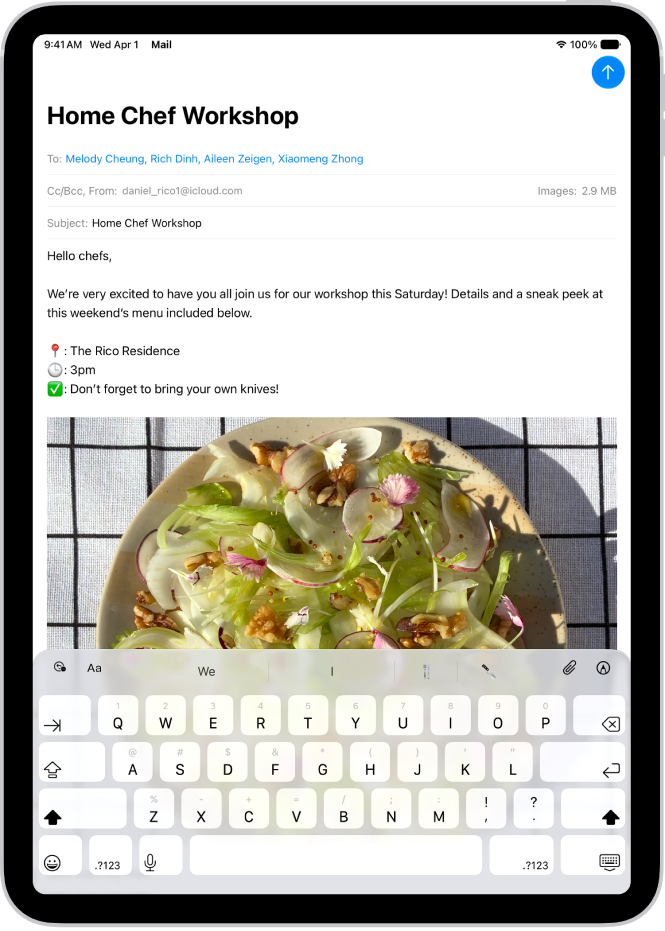
An email draft is open in the Mail app. The button to send the message is in the top-right corner. Tap to send the message, or touch and hold to schedule a time to send it later.

Send an email

Tap the Compose button to start a new email message. Add a recipient, subject, and your text, then tap the Send button to send your message.

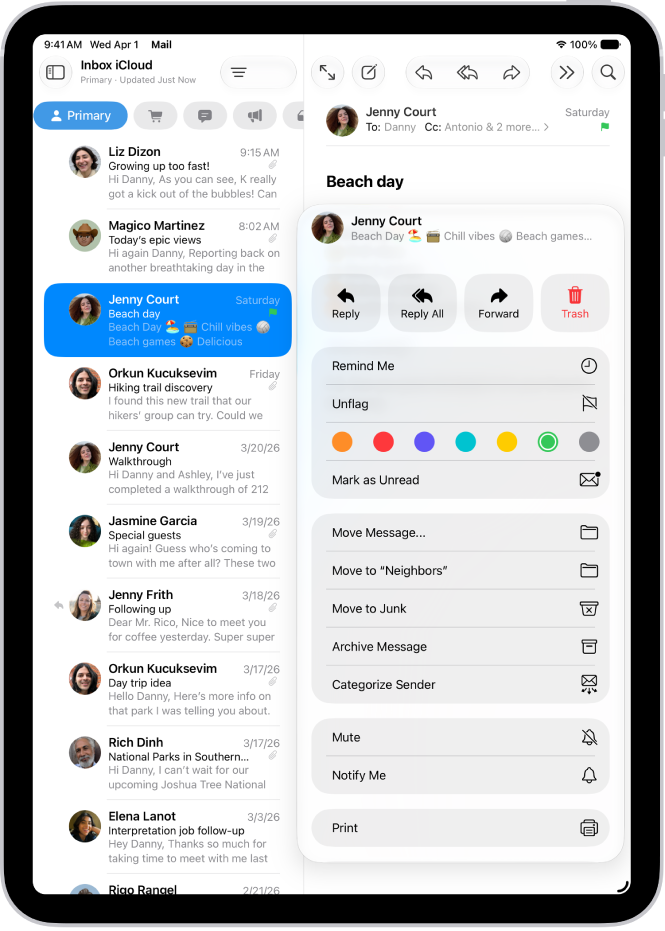
An open email. The menu with options for adding or removing a flag is shown on the right.

Reply to an email message, delete it, and more

You can perform many actions on an email message while viewing it. Open the message, then tap the More Actions button in the bottom-right corner to open the actions menu.

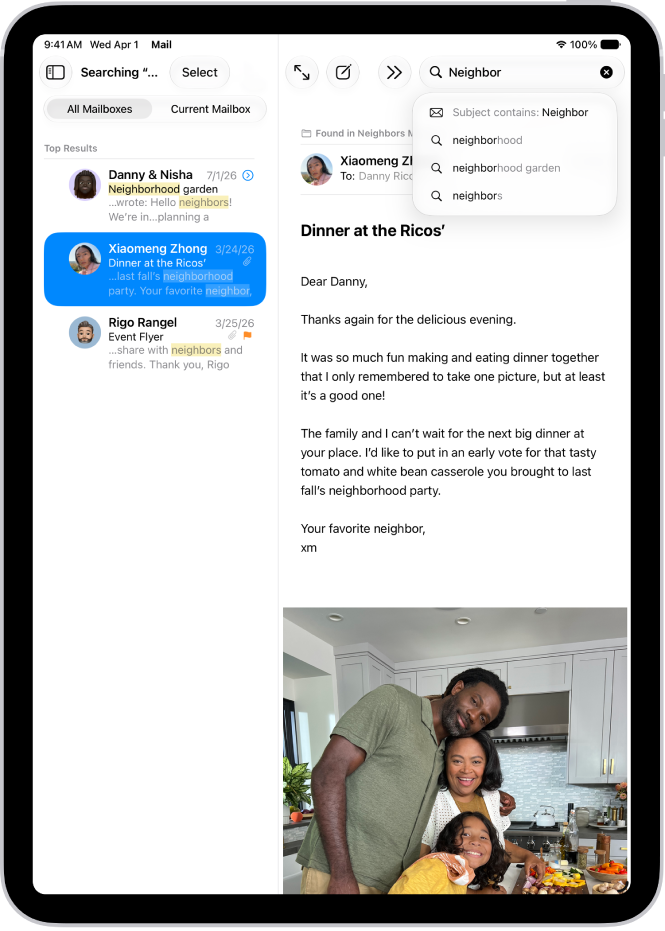
A message is open in the Mail app, and search terms are being typed in the top right.

Find emails fast

You can easily find emails using the search feature in Mail. Tap the Search button to reveal the search field. Tap a suggestion to narrow your search to a specific timeframe or to filter by attributes like flagged or unread.

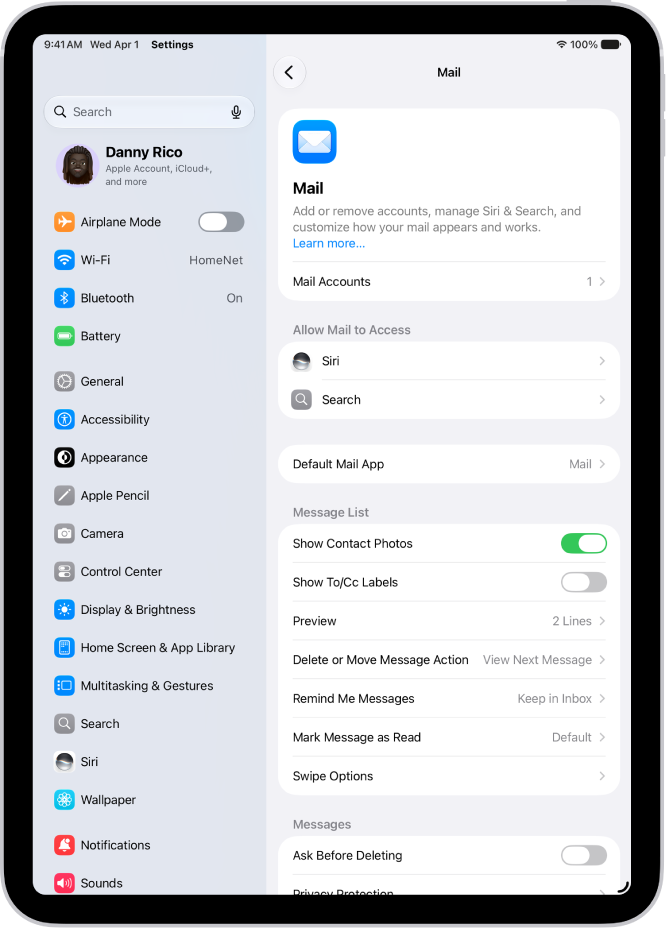
The Mail settings screen.

Change Mail settings

You can customize your email signature, change your swipe options, and more in Mail settings. Go to Settings > Apps > Mail.

For more help with Mail, these guides have you covered:

Tag: Mail

In the Mail app, you can reply to or forward emails yourself, or use Apple Intelligence to draft quick, personalized responses.

When you reply, you can quote text from the sender to clarify what you’re responding to. You can also follow up on emails, set up an automatic reply, and use Smart Reply. You can reply to just the sender, or to the sender and the other recipients.

Here’s how to reply to and forward emails in Mail on iPad.

Reply to an email

  1. Open the Mail app on your iPad.
  2. Tap in the message. Do one of the following:
    • Reply to just the sender: Tap the More Actions button.
    • Reply to the sender and the other recipients: Tap the Reply All button.
  3. Type your response. Then tap the Send button to send.

Quote some text when you reply to an email

To clarify what you’re responding to, you can include text from the sender when you reply to an email message.

  1. Open the Mail app on your iPad.
  2. In the sender’s message, touch and hold the first word of the text and drag to the last word. (See Select, cut, copy, and paste text.)
  3. Tap the More Actions button, tap Reply, and then type your message.

Note: You can turn off the indentation of quoted text in Mail’s settings. Go to Settings > Apps > Mail > Increase Quote Level (below Composing), and turn off Increase Quote Level.

Forward an email

You can send an email message forward to new recipients.

  1. Open the Mail app on your iPad.
  2. Tap the message, then tap the Forward button.

    If there are attachments in the original message—like photos or documents—you can decide whether to include them in the forwarded message. Choose Include or Don’t Include.

  3. Enter the email addresses of the new recipients.
  4. Tap in the message, then type your response. The forwarded message appears below.

Follow up on emails

An email message you send that doesn’t receive a response for several days goes back to the top of your inbox automatically as a reminder to follow up.

To turn off Follow Up Suggestions, go to Settings > Apps > Mail, then turn off Follow Up Suggestions.

Set up an automatic reply in Mail

Using iCloud.com, you can set up an automatic reply for incoming email messages or have messages forwarded automatically to another inbox.

Use Smart Reply

Smart Reply, an Apple Intelligence feature, can quickly draft an email response in your personalized writing style.

Note: Apple Intelligence on iPadOS 27 or later is available on an Apple Intelligence-enabled iPad mini (A17 Pro) and iPad models with M1 or later. Apple Intelligence is not available in all languages or regions. Usage limits may apply.*

  1. Open the Mail app on your iPad.
  2. Tap the Sidebar button, tap an email, and then tap the Reply button.
  3. In the keyboard, tap a suggested reply.

    Apple Intelligence drafts a reply in the email. To refine your reply, see Use Writing Tools to write, improve, and summarize content.

  4. When you’re ready to send your reply, tap the Send button.

*Apple Intelligence is available with Siri and device language set to Chinese (Simplified), Chinese (Traditional), Danish, Dutch, English, French, German, Italian, Japanese, Korean, Norwegian, Portuguese, Spanish, Swedish, Turkish, or Vietnamese. Some features may not be available in all regions or languages. Some devices may not be available in all regions. Siri AI is available in beta in iOS 27, iPadOS 27, macOS 27, watchOS 27, and visionOS 27 and requires an Apple Intelligence–enabled device set to a supported language. Available in English to start. Siri AI will not be initially available in the EU on iOS, iPadOS, and watchOS. Certain Apple Intelligence features that rely on server-side models are subject to daily usage limits, including but not limited to Siri AI, Intelligent Photo Editing Tools, Image Playground, and AFM 3 Cloud models in Shortcuts. Daily limits may vary by feature, request complexity, system demand, system policies, and other factors. Expanded access to such features will be available for a fee in the future. Use of these features is subject to the Apple Intelligence Terms and Conditions.

See also