Got a tip for us?

iPad

The iPad is a tablet computer from Apple that runs the iOS mobile operating system. Similar in functionality to the iPhone, the iPads purpose is often quite different, sometimes even serving as a general desktop computer replacement.

You can write, send, and schedule email messages from any of your email accounts.

You can change the font style and color of text, use bold or italic, add a bulleted or numbered list, and add a hyperlink. With the onscreen keyboard, you can also switch to the smaller QuickType keyboard. You can edit a link later, too, and as you add recipients, Mail suggests people from your Contacts.

Here’s how to send email in Mail on iPad.
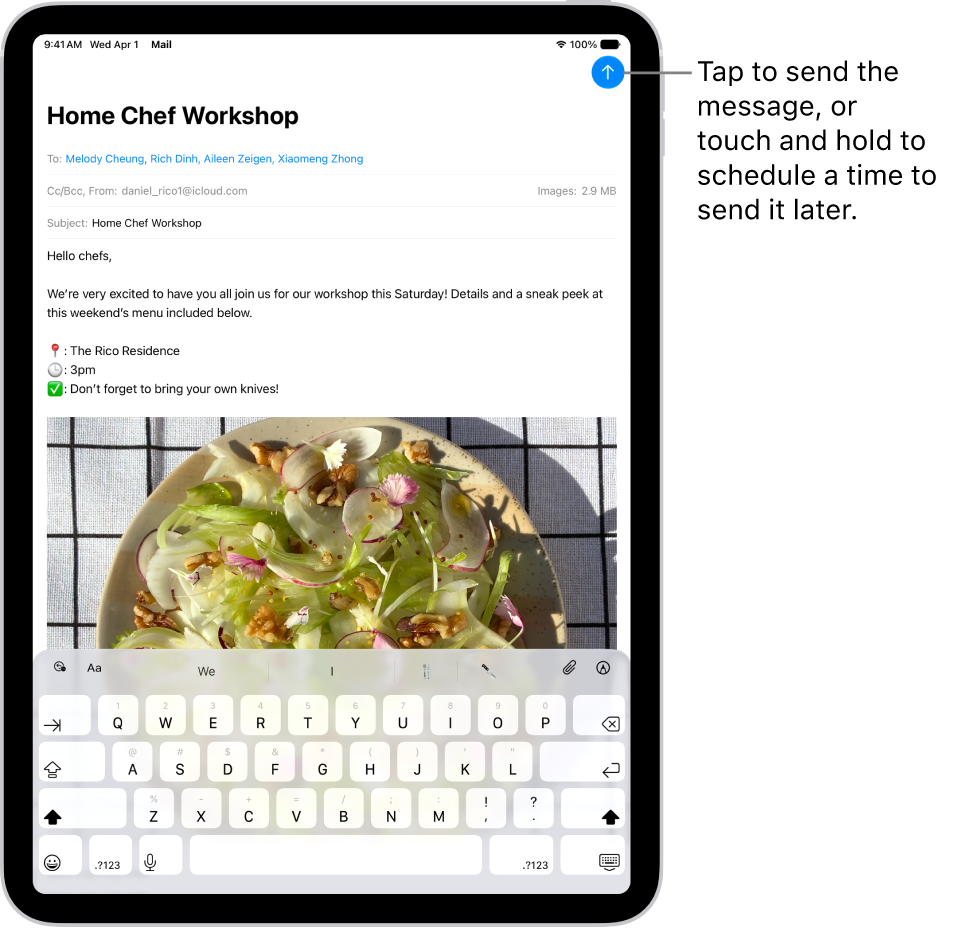
An email draft is open in the Mail app. The button to send the message is in the top-right corner. Tap to send the message, or touch and hold to schedule a time to send it later.

Write and send an email

  1. Go to the Mail app on your iPad.
  2. Tap the Compose button.
  3. Tap in the email and type your message.

    With the onscreen keyboard, you can tap individual keys. Or pinch closed with three fingers to use the smaller QuickType keyboard, then slide your finger from one letter to the next, lifting your finger only after each word.

  4. To change the formatting, tap the Text Format button above the keyboard.

    You can change the font style and color of text, use a bold or italic style, add a bulleted or numbered list, and more.

  5. Tap the Send button to send your message.

Quick tip: As you compose messages, you can create stickers and add them. See our guide, Add emoji, Memoji, and stickers with the iPad keyboard.

Add recipients

  1. Start the Mail app on your iPad.
  2. Tap the Compose button and tap the To field. Then type the names of recipients.

    As you type, Mail automatically suggests people from your Contacts, along with email addresses for people who have more than one email address.

    You can also tap the Add Contact button to open Contacts and add recipients from there.

  3. If you want to send a copy to other people, tap the Cc/Bcc field. Do any of the following:

    • Tap the Cc field, then enter the names of people you’re sending a copy to.
    • Tap the Bcc field, then enter the names of people whose names you don’t want other recipients to see.

Add a hyperlink to an email message

  1. In Safari or another web browser, copy the URL of a webpage.
  2. As you compose a message in Mail, highlight the text you want to link.
  3. Tap Paste.

Edit a link in an email draft

  1. Start the Mail app on your iPad.
  2. In a message you’re writing, tap a link or linked text and tap the down arrow.
  3. Do any of the following:
    • Show Link Preview: Change the hyperlinked text to a rich embedded website preview image.
    • Open Link: Go to that website in a web browser.
    • Edit Link: Change the URL of the link.
    • Remove Link: Delete the link from your message draft.
    • Edit Text Description: Change the text that’s linked.

Capture an email address from a photo

With Live Text in the Photos app on iPad, you can interact with an email address on a business card, poster, and more, so you can quickly begin emails without entering an address manually.

  1. Start the Photos app on your iPad.
  2. Open a photo and then tap the email address you want to capture.
  3. After the yellow frame appears around detected text, tap the Live Text button.
  4. Tap or use the grab points to select the email address and tap New Mail Message.

Quick tip: The same Live Text feature can capture an email address with the Camera app. Read our article, Use Live Text with your iPad camera.

Schedule an email with Send Later

  1. Start the Mail app on your iPad.
  2. In a message you’re writing, touch and hold the Send button. Then choose when you want to send the message.

    To see more options, tap Send Later.

Automatically send a copy to yourself

  1. Start the Settings app on your iPad.
  2. Tap Apps and then tap Mail.
  3. Turn on Always Bcc Myself (below Composing).

Send an email from a different account

When you have more than one email account, you can pick the one to send email from.

  1. Start the Mail app on your iPad.
  2. In your message draft, tap the Cc/Bcc, From field.
  3. Tap the From field and then choose an account.

Use Writing Tools to summarize, proofread, and modify your email

With Apple Intelligence, you can use Writing Tools to summarize selected text with a tap, proofread your work, and create different versions of the same text to help you find the right wording and tone. See Use Writing Tools with Apple Intelligence.

Note: Apple Intelligence on iPadOS 27 or later is available on an Apple Intelligence-enabled iPad mini (A17 Pro) and iPad models with M1 or later. Apple Intelligence is not available in all languages or regions. Usage limits may apply.*

*Apple Intelligence is available with Siri and device language set to Chinese (Simplified), Chinese (Traditional), Danish, Dutch, English, French, German, Italian, Japanese, Korean, Norwegian, Portuguese, Spanish, Swedish, Turkish, or Vietnamese. Some features may not be available in all regions or languages. Some devices may not be available in all regions. Siri AI is available in beta in iOS 27, iPadOS 27, macOS 27, watchOS 27, and visionOS 27 and requires an Apple Intelligence–enabled device set to a supported language. Available in English to start. Siri AI will not be initially available in the EU on iOS, iPadOS, and watchOS. Certain Apple Intelligence features that rely on server-side models are subject to daily usage limits, including but not limited to Siri AI, Intelligent Photo Editing Tools, Image Playground, and AFM 3 Cloud models in Shortcuts. Daily limits may vary by feature, request complexity, system demand, system policies, and other factors. Expanded access to such features will be available for a fee in the future. Use of these features is subject to the Apple Intelligence Terms and Conditions.

See also

Tag: Mail

In the Mail app, you can read emails yourself or have Apple Intelligence summarize them for you. You can also add contacts and preview an email’s contents without opening it.

If you don’t have time for a primary message right away, Remind Me brings it back to the top of the list at a time and date you choose. You can also quickly mark multiple emails as read, and add Remind Me to the toolbar in the Mail app.

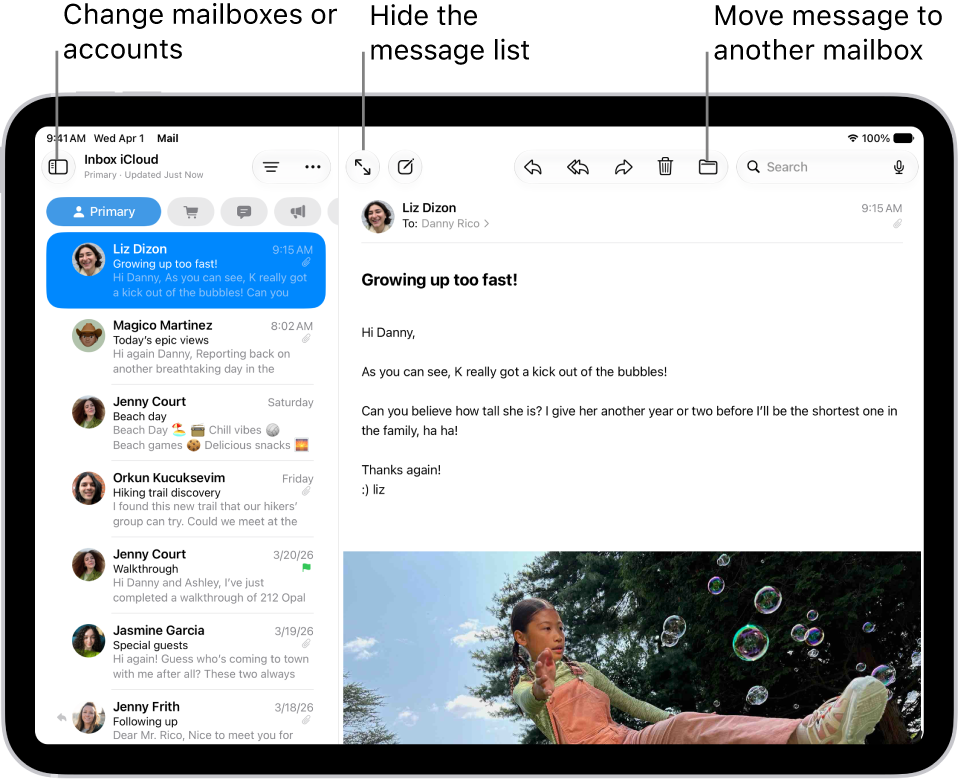
The Mail Inbox, with the list of emails on the left and an open email on the right.

Quick tip: When you check your email, Apple Intelligence may suggest actions, like adding a reminder or creating a calendar event. To accept one, click the suggestion.

Note: Suggested actions in Mail on iPadOS 27 or later is an Apple Intelligence feature available on iPad mini (A17 Pro) and iPad models with M1 or later in supported regions when device language is set to English.*

Read an email

  1. Open the Mail app on your iPad.
  2. Tap the message you want to read.

    Tip: Tap the Expand Message button to hide the message list when reading a message.

Use Remind Me to come back to a Primary message later

If a primary message has to wait, you can set a time and date for a reminder, and the message returns to the top of your inbox.

  1. Open the Mail app on your iPad.
  2. Tap a Primary message, tap the Reply button at the bottom right of the message, tap Remind Me, and then choose when to be reminded.

Quick tip: For easier access, add Remind Me to the toolbar in the Mail app. Check out our guide, Customize the Mail toolbar.

Quickly mark multiple emails as read

  1. Open the Mail app on your iPad.
  2. While viewing a message list, tap the More button, tap Select, and then select the messages you want to mark.

    Important: When you select a Transactions, Updates, or Promotions message, you’re selecting all the messages in that category from the sender.

  3. Tap the Mark button at the bottom of the message list and then choose Mark as Read.

Note: The unread count on your Home Screen only reflects your Primary category. If you’d rather see your total number of unread messages across all categories instead, go to Settings > Notifications > Mail > Customize Notifications and turn on All Unread Messages.

Preview a Primary message and a list of options

If you want to see what a Primary message is about but not open it completely, you can preview it.

  1. Open the Mail app on your iPad.
  2. In the Primary message list, touch and hold a message to preview its contents and see a list of options for replying, moving it, and more.

Show a longer preview for every email

By default, Mail shows two lines of text for each email message in your inbox, but you can choose to see more lines without opening the message.

Go to Settings > Apps > Mail > Preview (below Message List), then choose up to five lines.

Show the whole conversation

Go to Settings > Apps > Mail, then turn on Organize by Thread (below Threading).

Note: You can also change other settings here, like Collapse Read Messages or Most Recent Message on Top.

Show To and Cc labels in your Inbox

Go to Settings > Apps > Mail, then turn on Show To/Cc Labels (below Message List).

You can also view the To/Cc mailbox, which gathers all mail addressed to you. To show or hide it, tap the Show Sidebar button in the upper-left corner of the Mail app, tap Edit above Mailboxes, then select “To or Cc.”

Add someone to your contacts or make them a VIP

If you add someone to your contacts, it’s easy to find their email messages later. Or make them a VIP, so every message you receive from them is starred automatically.

  1. Open the Mail app on your iPad.
  2. In a message, tap a person’s name or email address and then do one of the following:
    • Add a new contact: Tap View Contact Card and then tap Create New Contact. Fill in any other contact information and then tap the Done button.
    • Add the email address to an existing contact: Tap View Contact Card, then tap Add to Existing Contact. Select a contact, then tap the Done button.
    • Add to your VIP list: Tap Add to VIP.

Show or hide contact photos

  1. Open the Mail app on your iPad.
  2. In an inbox, tap the More button at the top of the screen. Select or deselect Show Contact Photos.

Summarize your email

Apple Intelligence can help you summarize a complex email, or catch up on a long email thread in seconds.

Note: Apple Intelligence on iPadOS 27 or later is available on an Apple Intelligence-enabled iPad mini (A17 Pro) and iPad models with M1 or later. Apple Intelligence is not available in all languages or regions. Usage limits may apply.*

Go to the Mail app on your iPad.

A short summary automatically appears under each email in your inbox.

  • Tap the Sidebar button, tap an email, then tap Summarize.

    Note: You may need to scroll to the top of the screen for the Summarize button to appear.

A summary appears at the top of the screen. If the message is part of an email thread, the contents of the thread are summarized.

*Apple Intelligence is available with Siri and device language set to Chinese (Simplified), Chinese (Traditional), Danish, Dutch, English, French, German, Italian, Japanese, Korean, Norwegian, Portuguese, Spanish, Swedish, Turkish, or Vietnamese. Some features may not be available in all regions or languages. Some devices may not be available in all regions. Siri AI is available in beta in iOS 27, iPadOS 27, macOS 27, watchOS 27, and visionOS 27 and requires an Apple Intelligence–enabled device set to a supported language. Available in English to start. Siri AI will not be initially available in the EU on iOS, iPadOS, and watchOS. Certain Apple Intelligence features that rely on server-side models are subject to daily usage limits, including but not limited to Siri AI, Intelligent Photo Editing Tools, Image Playground, and AFM 3 Cloud models in Shortcuts. Daily limits may vary by feature, request complexity, system demand, system policies, and other factors. Expanded access to such features will be available for a fee in the future. Use of these features is subject to the Apple Intelligence Terms and Conditions.

See also

When you subscribe to iCloud+, you can add up to five custom email domains and create email addresses for those domains on your iPad. You can then send and receive mail in Mail on your iPhone, iPad, and Mac, on iCloud.com, and in an email app on a Windows device.

You can add a domain you already own or buy a new one, and import your existing email messages. You need a primary iCloud Mail address first, though.

Note: Sign in to the same Apple Account on each device. Any device where you’re not signed in to your Apple Account, or where the Mail feature is off, won’t show your custom email domains and mail.

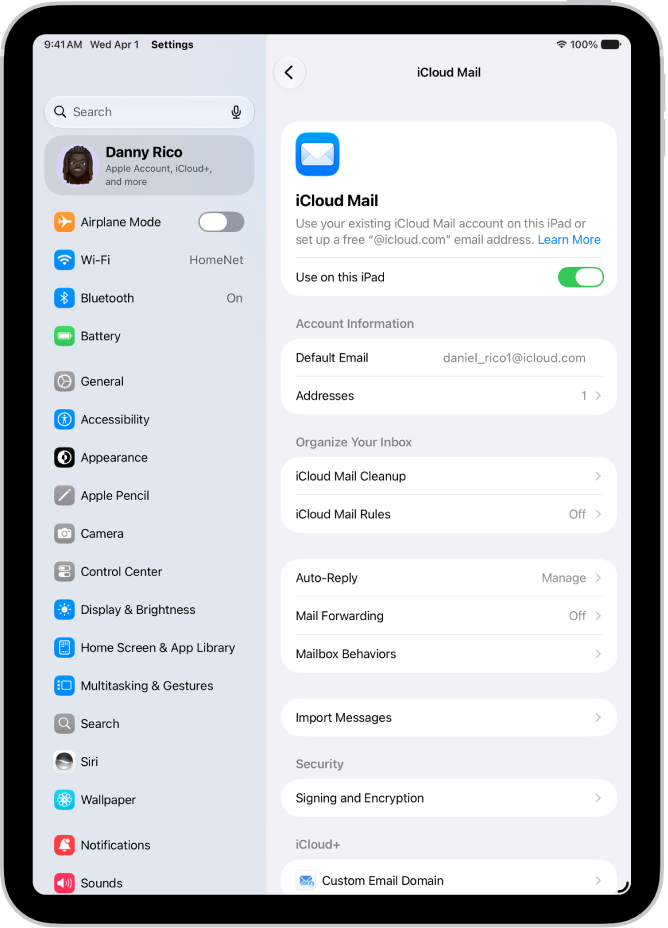
The Settings app, open to the iCloud Mail screen. Custom Email Domain is at the bottom of the menu.

Add a custom email domain to iCloud Mail

If you already own a custom email domain, you can bring it to iCloud Mail, or you can buy a new one.

Note: Adding a custom email domain on iPad won’t work until you have a primary iCloud Mail address.

  1. Open Settings, tap [your name], tap iCloud and tap Mail (under Saved to iCloud). Then make sure Use on this iPad is turned on.
  2. Tap Custom Email Domain. Tap one of the following:

    • Buy a Domain: Choose this option if you don’t yet have a custom domain. After you purchase it, you can create custom email addresses.
    • Use a Domain You Own: Choose this option if you already have a domain, and you want to use it with iCloud Mail. You can configure email addresses you already have at that domain, and create more.
  3. Follow the onscreen instructions.

    If you’re adding a domain you already own, some registrars require you to change DNS records to set up your domain.

Import existing email messages

When you or a member of your Family Sharing group has set up a custom email domain for iCloud Mail, iCloud.com can import existing email messages from your previous email provider, though that’s not available for all email providers.

Create and delete email addresses

After you add a custom domain name, it’s easy to create and delete email addresses for that domain.

  1. Open Settings, tap [your name], tap iCloud and tap Mail (under Saved to iCloud). Then make sure Use on this iPad is turned on.
  2. Tap Custom Email Domain. Then tap the domain you want to make changes to.
  3. Tap Manage Email Addresses, then do one of the following:
    • Add a new email address: Tap Create Email Address, enter the new address, and tap Continue.
    • Delete an email address: Swipe left on an email address, tap Delete, and tap Remove.
    • Add People: Tap to invite someone to your custom email domain.

Remove a custom email domain

If you no longer want to use a custom email domain, your iPad can remove it. When you remove a custom email domain, iCloud Mail can’t send or receive email for any addresses at that domain.

  1. Open Settings, tap [your name], tap iCloud and tap Mail (under Saved to iCloud). Then make sure Use on this iPad is turned on.
  2. Tap Custom Email Domain. Then tap Edit next to Your Domains.
  3. Tap the Delete button and tap Delete.
  4. If you’re moving your domain to a new provider, make sure to do the following:
    • Go to your domain registrar to update the domain records to your new email provider and remove iCloud-related records.
    • Set up any email addresses you want to continue using with your new provider.

Note: If you remove a custom email domain, your primary @icloud.com address can still send and receive email.

Allow all incoming messages to your domain

If you use your iCloud email address as a catch-all address, you receive all messages sent to your custom email domain, even when the exact address they were sent to hasn’t been created yet.

  1. Open Settings, tap [your name], tap iCloud, and then tap Mail (under Saved to iCloud).
  2. Tap Custom Email Domain and tap your custom domain.
  3. Turn on Allow All Incoming Messages.

If the domain owner allows all incoming messages, any messages that aren’t sent to an active email address go to the domain owner’s inbox. If this setting isn’t turned on, those messages are returned to the sender.

Note: Messages sent to deleted email addresses automatically go back to the sender.

See also

Tags: iCloud, Mail

You can install extensions to customize the way your browser works, and they’re handy for finding coupons when shopping, blocking content on websites, and more.

With Apple Intelligence, Safari can even build an extension you describe, to customize or add to any webpage. You can also change Safari extension settings, and extensions that are available on other platforms show up on your other devices, too.

Here’s how to get extensions to customize Safari on iPad.

Add Safari extensions

  1. Go to the Safari app on your iPad.
  2. Tap the Manage Extensions button on the right side of the search field and then tap Manage Extensions.
  3. Search for extensions, scan Recommendations, or tap Browse Extensions to look in the App Store.
  4. When you find one you want, tap the price, or if the app is free, tap Get, and follow the onscreen instructions.

Note: If an extension you install for Safari on iPad is also available on other platforms, it shows up in Safari settings on any iPhone, iPad, or Mac that’s signed in to the same Apple Account, so it’s easier to find and download.

Create your own extension

With Apple Intelligence, Safari lets you describe and create an extension to customize or add to any webpage you visit.

Note: Apple Intelligence on iPadOS 27 or later is available on an Apple Intelligence-enabled iPad mini (A17 Pro) and iPad models with M1 or later. Apple Intelligence is not available in all languages or regions. Usage limits may apply.*

  1. Start the Safari app on your iPad.
  2. Go to the webpage you want to create an extension for.
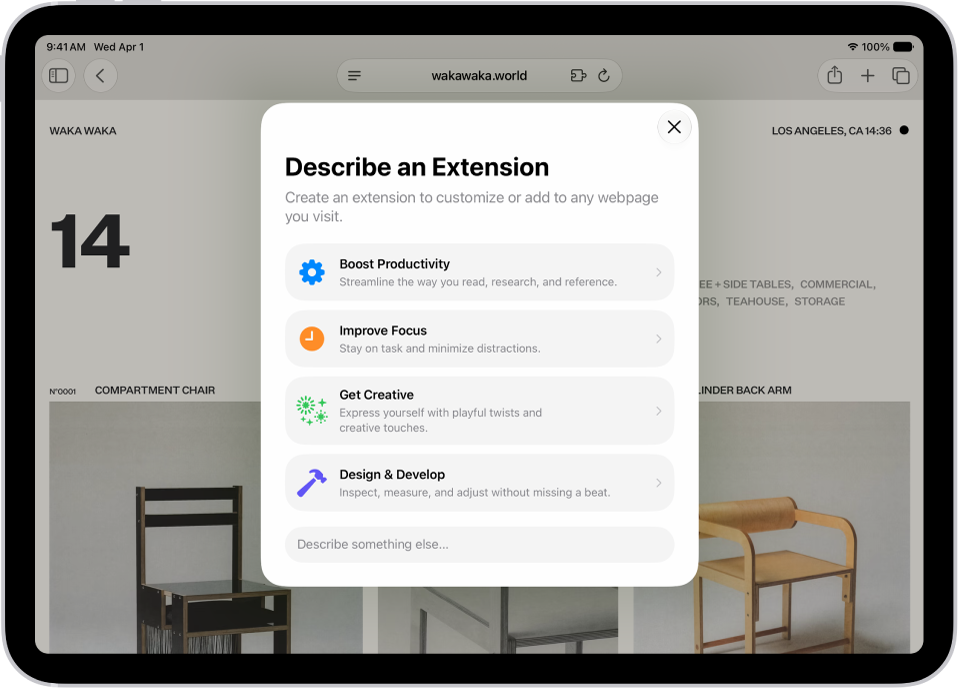
  3. Tap the Page Menu button, then tap Describe Extension.
  4. Enter a description of what you want to create, or select one of the suggested categories.

    Safari window showing Describe an Extension options.

    Safari checks the App Store to see if a matching extension already exists.

  5. Choose an item from the list of matching App Store extensions; if there are no results, tap Create.
  6. Tap the resulting extension to make changes to it, or tap Try to try it out.
  7. While you’re trying out the extension, tap Edit to make additional changes, or tap the checkmark button to save it.

To delete a custom extension, tap the Page Menu button, tap Manage Extensions, select the extension, then tap Delete Extension.

Change Safari extension settings

You can use an extension to customize the way your browser works. You can turn Safari extensions on or off at any time.

  1. Start the Safari app on your iPad.
  2. Tap the Manage Extensions button on the right side of the search field and then tap Manage Extensions.
  3. Tap each extension you want to give permissions to and then follow the onscreen instructions to choose how much access to give each extension.

    Important: Check the extensions you have installed and make sure you’re familiar with what they do.

You can manage extensions further in Settings > Apps > Safari > Extensions.

Change Safari extension settings for an individual website

You can turn an extension on or off for an individual website without changing your overall Safari settings.

  1. Start the Safari app on your iPad.
  2. Tap the Manage Extensions button on the right side of the search field and then tap Manage Extensions.
  3. Turn each extension on or off.

Remove an installed Safari extension

  1. Swipe down on the Home Screen and then search for the extension you want to remove.
  2. Touch and hold the extension icon, tap Delete app and then follow the onscreen instructions.

*Apple Intelligence is available with Siri and device language set to Chinese (Simplified), Chinese (Traditional), Danish, Dutch, English, French, German, Italian, Japanese, Korean, Norwegian, Portuguese, Spanish, Swedish, Turkish, or Vietnamese. Some features may not be available in all regions or languages. Some devices may not be available in all regions. Siri AI is available in beta in iOS 27, iPadOS 27, macOS 27, watchOS 27, and visionOS 27 and requires an Apple Intelligence–enabled device set to a supported language. Available in English to start. Siri AI will not be initially available in the EU on iOS, iPadOS, and watchOS. Certain Apple Intelligence features that rely on server-side models are subject to daily usage limits, including but not limited to Siri AI, Intelligent Photo Editing Tools, Image Playground, and AFM 3 Cloud models in Shortcuts. Daily limits may vary by feature, request complexity, system demand, system policies, and other factors. Expanded access to such features will be available for a fee in the future. Use of these features is subject to the Apple Intelligence Terms and Conditions.

See also

Tag: Safari

You can set up a shortcut to quickly start Live Recognition when VoiceOver is on. If VoiceOver is off, the same shortcut opens the Magnifier app in Detection Mode instead.

You can use a VoiceOver gesture or the Accessibility Shortcut, and you can even assign a different gesture. It’s one of many accessibility features for vision on iPad.

  • Use a VoiceOver gesture: When VoiceOver is on, triple-tap the screen with four fingers to turn Live Recognition on or off. To assign a different gesture, go to Settings > Accessibility > VoiceOver > Commands > Touch Gestures.
  • Triple-click the top button or Home button: Go to Settings > Accessibility > Accessibility Shortcut, then select Live Recognition. See Quickly turn accessibility features on or off.

See also

All apps are required to ask your permission before tracking you or your iPad across websites or apps owned by other companies for advertising or to share your information with data brokers.

After you grant or deny permission, you can change it later, and you can also stop all apps from requesting permission. The list shows every app that asked, and you can turn permission on or off for each one.

Review or change an app’s permission to track you

  1. Open Settings, tap Privacy & Security, and then tap Tracking.

    The list shows the apps that requested permission to track you. You can turn permission on or off for any app on the list.

  2. To stop all apps from asking permission to track you, turn off Allow Apps to Request to Track (at the top of the screen).

For more information about app tracking, tap “Learn more” near the top of the screen.

See also

You can use VoiceOver Recognition on iPad to scan your surroundings and get live descriptions of the scenes detected in the camera view. With Apple Intelligence, you can also get information and ask questions about onscreen images and interface elements, even in apps and on webpages that don’t provide accessibility information.

With Live Recognition, you choose the kinds of visual information you want VoiceOver to describe.

Here’s how to hear what’s on your screen and around you with VoiceOver on iPad.

Important: VoiceOver Recognition should not be relied upon in circumstances where you could be harmed or injured, in high-risk situations, for navigation, or for the diagnosis or treatment of any medical condition.

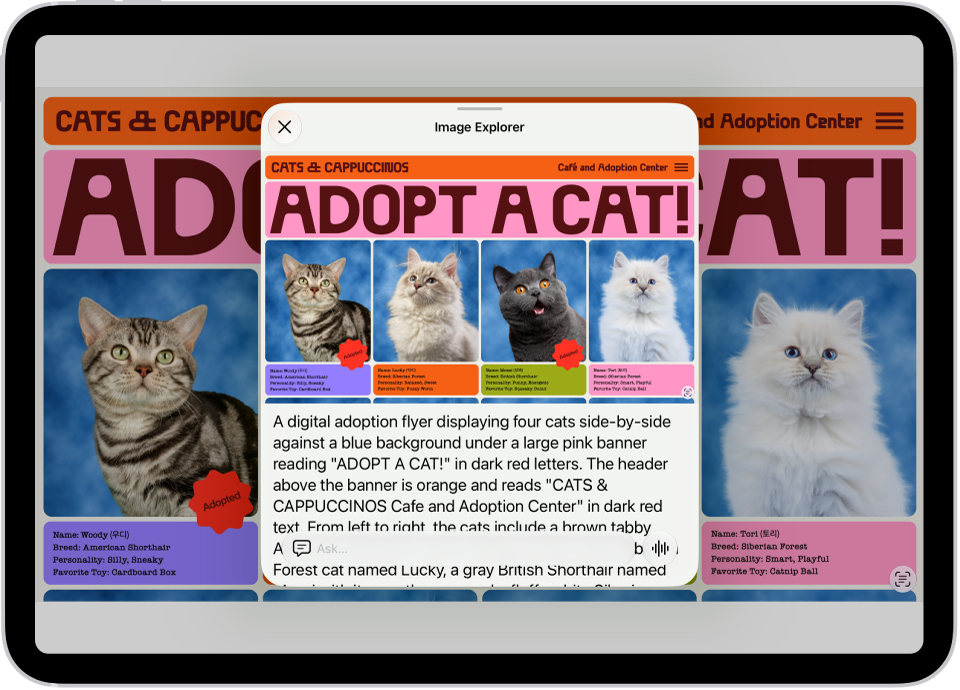
An Image Explorer screen giving a description of a cat adoption flyer.

Get descriptions and ask questions about your surroundings with Live Recognition

  1. With VoiceOver on, triple-tap the screen with four fingers to start Live Recognition.
  2. Do any of the following:

    • Ask questions and get information about your surroundings: Double-tap when you hear Ask to turn it on or off. The default question “What is this?” is asked automatically unless you Customize Live Recognition settings.
    • Get descriptions about your surroundings: Choose the kinds of visual information you want VoiceOver to describe, like scenes, people, doors, furniture, or text. Select a category and then double-tap to turn it on or off. If you turn on Point and Speak, you can point your finger at text and have VoiceOver read it aloud.

      Note: Detection of people, doors, and furniture is available only on supported iPad models.

    • Get information about a document: Double-tap when you hear Document Capture to turn it on or off.
  3. Position iPad so the rear camera can detect what’s around you. VoiceOver describes what the camera detects.

    To interrupt VoiceOver speech and move to the next detected item, tap the screen with two fingers.

To turn off Live Recognition, triple-tap the screen with four fingers. Or if the VoiceOver cursor is focused on an interface element for Live Recognition, do a two-finger scrub (move two fingers back and forth three times quickly, making a “z”).

Quick tip: You can set up a shortcut that quickly starts and stops Live Recognition. See our guide, Set up shortcuts for Live Recognition.

Detection Mode in the Magnifier app can also detect and describe scenes, people, and more. Check out our article, Get live descriptions of visual information around you with Magnifier.

Customize Live Recognition settings

  1. Open the Settings app on your iPad.
  2. Tap Accessibility, tap VoiceOver, tap VoiceOver Recognition, and tap Live Recognition.
  3. Do any of the following:

    • Set a default question that’s asked automatically: Turn on Default Question which is “What is this?” by default. You can also enter your own default question.
    • Choose whether to speak or type by default: Tap Speak or Type.
    • Use the volume buttons to take a picture: Turn on Use Volume Buttons to Recapture.
    • Select what options appear in the rotor: Tap Live Recognition Rotor, then tap an option, like People, Doors, Scenes, or Ask. You can also drag each option up or down to rearrange the order in the rotor.

    Note: Detection of people, doors, and furniture is available only on supported iPad models.

    • Create a custom activity that you can quickly turn on: Tap Activities, tap the Add button, and then enter an activity name. Select the detection modes that are on by default in the activity. You can also turn on Speech, Braille, Sounds, and Haptics for different detection modes.

Get descriptions and ask questions about images

VoiceOver Recognition describes the people, objects, and text in images, even in apps and on webpages that don’t provide accessibility information. And with Apple Intelligence, you can also ask questions about images and get enhanced descriptions.

Note: Apple Intelligence on iPadOS 27 or later is available on an Apple Intelligence-enabled iPad mini (A17 Pro) and iPad models with M1 or later. Apple Intelligence is not available in all languages or regions. Usage limits may apply.*

  1. Open the Settings app on your iPad.
  2. Tap Accessibility, tap VoiceOver and tap VoiceOver Recognition. Do any of the following:

    • Explore content in an image, get descriptions, and ask questions: Turn on Explore Image.
    • Ask questions and get information about images: Turn on Ask About Image.
    • Get detailed descriptions of images: Turn on Intelligent Image Description.
  3. To get descriptions of text found in images, turn on Text Recognition.
  4. Go to an app such as Photos or Safari and select an image.
  5. Swipe down to hear more options and then double-tap when you hear Intelligent Image Description, Explore Image, or Ask About Image.
  6. Move your finger around the image to find out the position of each object.

    Note: Image descriptions aren’t available in all languages.

Add custom descriptions of images in Photos

  1. Open the Photos app on your iPad.
  2. Double-tap the image you want to add a custom description to.
  3. Double-tap the Edit button, then double-tap the Markup button.
  4. Double-tap the Add button and then double-tap Image Description.
  5. Enter your image description.
  6. Double-tap the Done button, then double-tap the Done button again.

After you add a custom description to a photo in the Photos app, you’ll hear the description when you select the photo in the photo picker, and when you double-tap it.

Get descriptions of interface elements

When apps and webpages don’t provide accessibility information, VoiceOver Recognition still describes interface elements.

  1. Open the Settings app on your iPad.
  2. Tap Accessibility, tap VoiceOver, and then tap VoiceOver Recognition.
  3. Tap Screen Recognition and turn on Screen Recognition.
  4. Tap Apply to Apps and select an app from the list to improve the accessibility of a specific app.

*Apple Intelligence is available with Siri and device language set to Chinese (Simplified), Chinese (Traditional), Danish, Dutch, English, French, German, Italian, Japanese, Korean, Norwegian, Portuguese, Spanish, Swedish, Turkish, or Vietnamese. Some features may not be available in all regions or languages. Some devices may not be available in all regions. Siri AI is available in beta in iOS 27, iPadOS 27, macOS 27, watchOS 27, and visionOS 27 and requires an Apple Intelligence–enabled device set to a supported language. Available in English to start. Siri AI will not be initially available in the EU on iOS, iPadOS, and watchOS. Certain Apple Intelligence features that rely on server-side models are subject to daily usage limits, including but not limited to Siri AI, Intelligent Photo Editing Tools, Image Playground, and AFM 3 Cloud models in Shortcuts. Daily limits may vary by feature, request complexity, system demand, system policies, and other factors. Expanded access to such features will be available for a fee in the future. Use of these features is subject to the Apple Intelligence Terms and Conditions.

See also

With Hover Text on iPad, you can move the pointer over text and other items on the screen (such as icons) to view a larger version of them. Or use Hover Typing to display a separate window with a larger version of text that you’re typing.

Hover Text works with a pointing device such as a trackpad or mouse, and on supported models, Apple Pencil (2nd generation) or Apple Pencil Pro. You don’t need a pointing device for Hover Typing, and you can customize both.

Before you begin

You’ll need a pointing device, such as a trackpad or mouse, connected to your iPad to use Hover Text. Apple Pencil (2nd generation) or Apple Pencil Pro can also serve as the pointing device on supported iPad models.

You don’t need to connect a pointing device to use Hover Typing.

Show a larger version of text when you hover over it

  1. Start the Settings app on your iPad.
  2. Tap Accessibility, tap Hover Text, and then turn on Hover Text.
  3. Move the pointer over text to display a larger version of it. Or hover the tip of a supported Apple Pencil over the text.
  4. If you have a connected keyboard, you need to press and hold the Control key to show the Hover Text window.

If you use iPad with a connected keyboard, you can have the Hover Text window automatically displayed when you move the pointer over text, without needing to press and hold a key every time. Go to Settings > Accessibility > Hover Text, then turn on Activation Lock. To use activation lock, quickly press the Control key three times.

You can change the key you press to activate Hover Text and activation lock. Tap Activation Modifier, then choose another key.

Show a larger version of text you’re typing

  1. Start the Settings app on your iPad.
  2. Tap Accessibility, tap Hover Text, tap Hover Typing, and turn on Hover Typing.
  3. As you type in a text entry field, a larger version of what you’re typing is displayed.

    To temporarily hide the Hover Typing window, swipe on it. It reappears when you start typing again.

Customize Hover Text

  1. Start the Settings app on your iPad.
  2. Tap Accessibility, then tap Hover Text.
  3. Customize any of the following:
    • Display mode: Choose where to show the Hover Text or Hover Typing window—inline (near the cursor), at the top of the screen, or directly above the onscreen keyboard.
    • Content: Choose to show Text, Color, or Text & Color.
    • Scrolling speed: Choose a faster or slower speed (for scrolling in the Hover Text window when viewing large blocks of text).
    • Font: Choose a custom font.
    • Size: Adjust the slider to change your preferred reading size.
    • Text Color: Choose a text color by Grid, Spectrum, or Sliders.
    • Background Color: Choose a background color by Grid, Spectrum, or Sliders.
    • Border color: Choose a border color by Grid, Spectrum, or Sliders.
    • Activation Modifier: Choose Control, Option, or Command.
    • Activation Lock: Turn on Activation Lock.

Customize Hover Typing

  1. Start the Settings app on your iPad.
  2. Tap Accessibility and tap Hover Text. Tap Hover Typing.
  3. Customize any of the following:
    • Display mode: Choose where to show the Hover Text or Hover Typing window—inline (near the cursor), at the top of the screen, or directly above the onscreen keyboard.
    • Font: Choose a custom font.
    • Size: Adjust the slider to change your preferred reading size.
    • Text Color: Choose a text color by Grid, Spectrum, or Sliders.
    • Insertion Point Color: Choose an insertion point color by Grid, Spectrum, or Sliders.
    • Background Color: Choose a background color by Grid, Spectrum, or Sliders.
    • Border color: Choose a border color by Grid, Spectrum, or Sliders.
    • Misspelled Word Color: Choose a color for misspelled words by Grid, Spectrum, or Sliders.
    • Autocorrected Word Color: Choose a color for autocorrected words by Grid, Spectrum, or Sliders.

See also

Connect your iPad to Bluetooth® accessories to stream music and videos, play games, connect to keyboards, and more.

iPad must be within about 33 feet (10 meters) of the accessory to pair, and you might need to enter its PIN or passcode, which you’ll find in the instructions that came with it. After you connect, you can rename the accessory, unpair it, or disconnect it.

Here’s how to connect iPad to Bluetooth accessories.

Pair your iPad with a Bluetooth accessory

  1. Put your Bluetooth accessory in discovery mode. If you aren’t sure how to make it discoverable, check the instructions that came with your accessory.
  2. On your iPad, open Settings and then tap Bluetooth and make sure Bluetooth is turned on.
  3. Tap the name of the accessory when it appears onscreen, below the devices list.

    You might need to enter the accessory PIN or passcode. Check the instructions that came with your accessory.

Note: To pair, iPad needs to be within about 33 feet (10 meters) of the Bluetooth accessory.

Rename a Bluetooth accessory

After you connect to a Bluetooth device, you can rename it.

  1. Start the Settings app on your iPad.
  2. Tap Bluetooth, then tap the info button next to the accessory you want to rename.
  3. Tap Name, enter a name for the accessory, and tap the Done button.

Note: Not all Bluetooth accessories support renaming.

Unpair a Bluetooth accessory

  1. Start the Settings app on your iPad.
  2. Tap Bluetooth, tap the Actions Available button next to the accessory you want to unpair, and then tap Forget This Device.
  3. Tap Forget Device to confirm.

If you don’t see the devices list, make sure Bluetooth is turned on.

Note: Unpairing AirPods also unpairs them automatically from other devices where you’re signed in to your Apple Account.

Disconnect from all Bluetooth accessories

If you need to quickly disconnect from all Bluetooth accessories and devices without turning Bluetooth off, open Control Center, then tap the Bluetooth button. Your Bluetooth accessories and devices disconnect from your iPad until the next day.

Note: The use of certain accessories with iPad may affect wireless performance. Not all iOS or iPadOS accessories are fully compatible with iPad. Turning on Airplane Mode may eliminate audio interference between iPad and an accessory. Reorienting or relocating iPad and the connected accessory may improve wireless performance.

See also

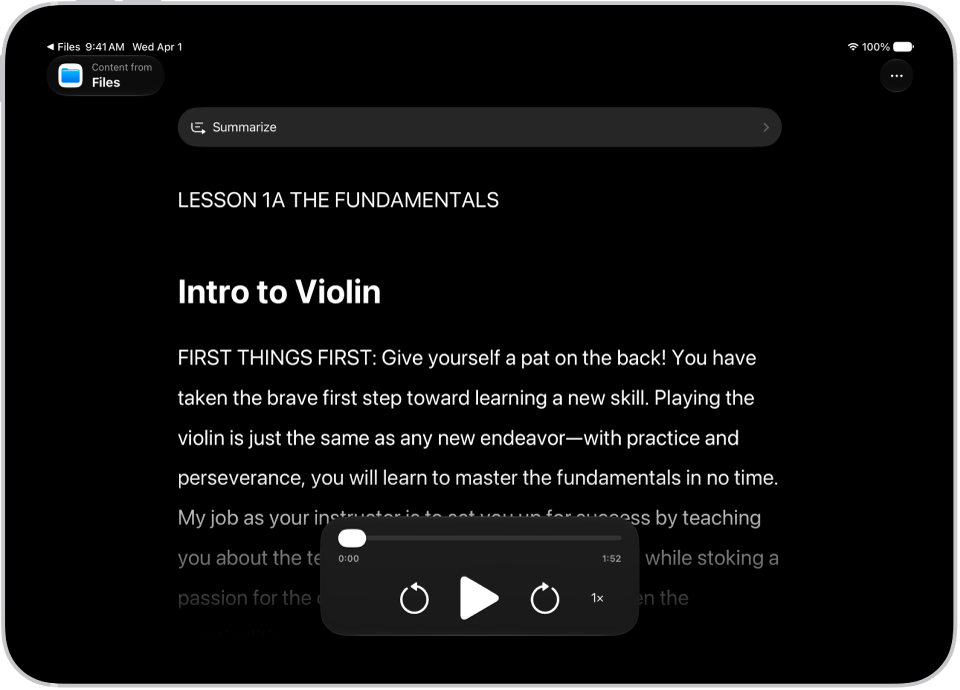
With Accessibility Reader on iPad, you can read or listen to text in a full-screen view, and customize fonts, layouts, and background colors. You can use it with any app on your iPad.

With Apple Intelligence, you can also format content for easier reading, summarize text, and translate it into one of your preferred languages. Accessibility Reader is built into the Magnifier app, too, so you can customize text around you, like in restaurant menus or books. See View your captured text in a format for easier reading and Listen to your captured text.

The Accessibility Reader screen showing content from Files in white text on a black background.

Turn on and use Accessibility Reader

  1. Open the Settings app on your iPad.
  2. Tap Accessibility and tap Read & Speak.
  3. Tap Accessibility Reader and turn on Accessibility Reader.
  4. To customize Accessibility Reader, do any of the following:

    • Set up autoplay: Turn on Autoplay in Accessibility Reader.
    • Automatically format and structure content for readability with Apple Intelligence: Turn on Content Cleanup.
  5. To start using Accessibility Reader, do one of the following:

    • Use the Accessibility Shortcut: Open an app, triple-click the top button or Home button on your iPad and tap Accessibility Reader.

      Note: To learn how to add Accessibility Reader to your Accessibility Shortcuts, see Use the Accessibility Shortcut.

    • Use Control Center: Open an app, open Control Center, then tap Accessibility Reader.
    • Use the share menu in any app to send content directly to Accessibility Reader: Tap the Share button, then select Accessibility Reader.

Use Apple Intelligence in Accessibility Reader

With Apple Intelligence, Accessibility Reader can translate text into one of your preferred languages, summarize long text, and format content for easier reading.

Note: Apple Intelligence on iPadOS 27 or later is available on an Apple Intelligence-enabled iPad mini (A17 Pro) and iPad models with M1 or later. Apple Intelligence is not available in all languages or regions. Usage limits may apply.*

  1. Open any app on your iPad and open Accessibility Reader.

    See Turn on and use Accessibility Reader.

  2. Do any of the following:

    • Summarize text: Tap Summarize at the top of the content to show a summary. To hide it, tap the summary again.
    • Translate text: Tap the Translate button. Choose one of your preferred languages. To see your content in the original language, tap the Translate button. Tap View Original.

      Note: Translation is available for the languages in your Preferred Languages list. To add a language, see Change the language and region on iPad.

    • Reformat content: Tap the More button and tap Cleanup Content. When you do this, text and some visual elements that aren’t relevant to the content, such as ads, are removed. To remove Cleanup Content formatting, tap the More button again and tap Remove Formatting.

Customize text color, font, and spacing in apps

  1. Open any app on your iPad and open Accessibility Reader.

    See Turn on and use Accessibility Reader.

  2. Tap the More button and then tap the Customize Reader button.
  3. Select a theme, then tap Edit.
  4. Do any of the following:

    • Text Color: Choose a color or tap Custom Color.
    • Background Color: Choose a color or tap Custom Color.
    • Text Size: Drag the slider left or right to make the text smaller or larger.
    • Font: Choose a font.
    • High Legibility Characters: Turn on High Legibility Characters for System Fonts.

      Note: This option is only available when using System Font.

    • Bold Text: Turn on Bold Text.
    • Line Spacing: Choose the Default button, the Loose button, or the Open button to customize the space between lines.
    • Word Spacing: Choose the Default button, the Loose button, or the Open button to customize the space between words.
    • Character Spacing: Choose the Default button, the Loose button, or the Open button to customize the space between characters.
    • Readable Content Width: Choose the Default button, the Loose button, or the Open button to customize the text width.
    • Hyperlinks: Turn Show Links on or off. When you turn on Show Links, you can customize the color.
    • Playback: Turn Highlighting on or off. When you turn on Highlighting, you can customize the style or highlight color.
    • Rename: Enter a name for the settings you choose.
    • Reset to Default: Reset all themes to their default settings.

    Tip: Rename a theme with your custom settings so you can easily find it and reuse it later.

Listen to spoken text in apps

  1. Open any app on your iPad and open Accessibility Reader.

    See Turn on and use Accessibility Reader.

  2. Do any of the following:

    • Listen to the text: Tap the Play button.
    • Pause the text: Tap the Pause button.
    • Skip backward or forward: Tap the Rewind button or the Forward button.
    • Increase or decrease the speed: Tap the Speaking Rate One Times button. Then select a speed.
    • Go to a specific time: Drag the slider left or right.

    Note: You can hide or show audio controls in Accessibility Reader: Tap the More button, then tap Hide Audio Controls or Show Audio Controls.

*Apple Intelligence is available with Siri and device language set to Chinese (Simplified), Chinese (Traditional), Danish, Dutch, English, French, German, Italian, Japanese, Korean, Norwegian, Portuguese, Spanish, Swedish, Turkish, or Vietnamese. Some features may not be available in all regions or languages. Some devices may not be available in all regions. Siri AI is available in beta in iOS 27, iPadOS 27, macOS 27, watchOS 27, and visionOS 27 and requires an Apple Intelligence–enabled device set to a supported language. Available in English to start. Siri AI will not be initially available in the EU on iOS, iPadOS, and watchOS. Certain Apple Intelligence features that rely on server-side models are subject to daily usage limits, including but not limited to Siri AI, Intelligent Photo Editing Tools, Image Playground, and AFM 3 Cloud models in Shortcuts. Daily limits may vary by feature, request complexity, system demand, system policies, and other factors. Expanded access to such features will be available for a fee in the future. Use of these features is subject to the Apple Intelligence Terms and Conditions.

See also