Got a tip for us?

iPad

The iPad is a tablet computer from Apple that runs the iOS mobile operating system. Similar in functionality to the iPhone, the iPads purpose is often quite different, sometimes even serving as a general desktop computer replacement.

You can customize the notifications that let you know about upcoming calendar events, invitations, and more. You can also make sure your events and other calendar information are kept up to date on all your devices.

You can choose whether notifications appear for specific occasions, like upcoming events, and turn on customized notifications for specific calendars. iCloud keeps your calendar current on all your devices. If you don’t want to use iCloud for your calendar, you’ll sync your calendar information between your iPad and your computer instead.

Customize Calendar notifications

  1. Open the Settings app on your iPad.
  2. Tap Notifications and tap Calendar.
  3. Turn on Allow Notifications.
  4. Choose how and where you want the notifications to appear—for example, on the Lock Screen, in Notification Center, as banners at the top of the screen, with an alert sound, and so on.

Turn on customized notifications for specific calendar events

After customizing Calendar notifications, you choose the specific occasions they appear for, like upcoming events or invitee responses.

  1. Open the Settings app on your iPad.
  2. Tap Notifications and tap Calendar.
  3. Tap Customize Notifications, turn the specific customized notifications on or off.

Keep your calendar up to date across your devices

When you’re signed in to the same Apple Account on every device, iCloud can keep your calendar information up to date on each.

  1. Open the Settings app on your iPad.
  2. Tap your name, then tap iCloud.
  3. Tap See All next to Saved to iCloud.
  4. Tap iCloud Calendar and turn on Use on this iPad.

You don’t have to use iCloud for your calendar. Instead, you can sync calendar information between your iPad and your computer. Check out our guide, Transfer files between your iPad and other devices.

See also
With the Continuity Camera and Continuity Sketch features, you can draw a sketch, take a photo, or scan a document using your nearby iPad and have it appear instantly on your Mac, exactly where you want it—like in an email, note, or folder. You can also mark up a file on your Mac with your iPad using Continuity Markup.

Both devices need Wi-Fi and Bluetooth® turned on and the same Apple Account. Depending on where it’s inserted, you can mark up a photo or scan, crop it, or apply a filter.

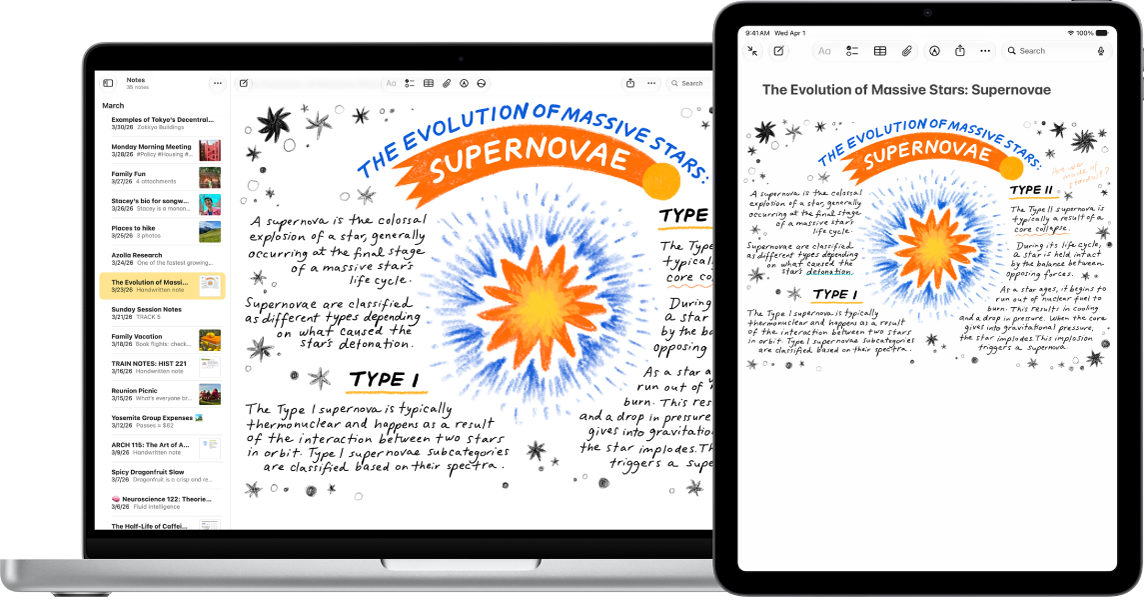
An iPad showing a sketch, next to a Mac where the sketch appears in a note.

Before you begin

Before you start, check that everything on this list is in place:

  • Both devices have Wi-Fi and Bluetooth® turned on.
  • You’re signed in to the same Apple Account on both devices.
  • Both devices meet minimum system requirements for Continuity Camera, Continuity Sketch, and Continuity Markup.

If you’re running a VPN, its configuration shouldn’t prevent local networking, because that may interfere with some Continuity features.

Where the photo or scan is inserted determines whether you can mark it up or adjust other aspects, like cropping it or applying a filter.

Insert a sketch, photo, or scan from your iPad

Draw a sketch on your iPad, and Continuity Sketch makes it appear on your Mac. Continuity Camera does the same on your Mac for photos you take or documents you scan on your iPad.

  1. On your Mac, Control-click where you want to insert the sketch or photo—for example, in an open window, like a note or email message.

    You can also Control-click the desktop or a folder in a Finder window.

  2. Choose an option from the pop-up menu.

    You may need to click “Insert from iPhone or iPad” before seeing the options.

  3. Do any of the following:

    • Add a sketch: On your iPad, draw a sketch using your finger.

      On iPad, you can also use Apple Pencil.

    • Take a photo: On your iPad, take a photo. Then tap Use Photo or Retake.
    • Scan a document: On your iPad, scan a document. Your iPad detects the edges of the document and autocorrects any skewing of the image. If you want to adjust the area included in the scan, drag the frame or its edges. When you’re ready, tap Keep Scan or Retake. You can continue to scan documents until you’re done and tap Save.

You might be able to mark up the photo or scan, or crop it, apply a filter, and adjust other aspects, depending on where it’s inserted.

Note: If you take scans on your iPad, they aren’t saved on the device.

Use your iPad to mark up a file on your Mac

With Continuity Markup, your iPad can add text, make drawings, and crop and rotate images, PDF documents, and more on your Mac.

  1. On your Mac, click the desktop to open the Finder.
  2. Control-click the file you want to mark up and choose Quick Actions. Choose Markup.

    The file opens.

  3. In the toolbar, click the iPad button or click the Markup button (the button may have an arrow next to it) and then choose your device.
  4. Use the Markup tools to draw, add text or shapes, and more.

    On iPad, you can also use Apple Pencil.

  5. When you’re done, tap Done on your iPad.
  6. To save your changes, click Done on your Mac.

If Continuity Camera, Continuity Sketch, or Continuity Markup aren’t working

  • Make sure you’re signed in to the same Apple Account on both devices.
  • Make sure that both devices have Wi-Fi and Bluetooth turned on.
  • Make sure your device meets minimum system requirements for Continuity Camera.

iPad has an easy setup process to help you get going when you first turn on your device. Whether you’re just getting started or want to make sure you have the basics set up, you’re in the right place.

When you begin, you can wirelessly transfer many of your apps, settings, and content to your new iPad. You can also connect to Wi-Fi, set up cellular service, and sign in to your Apple Account to access Apple services such as the App Store, Apple Music, FaceTime, and iCloud.

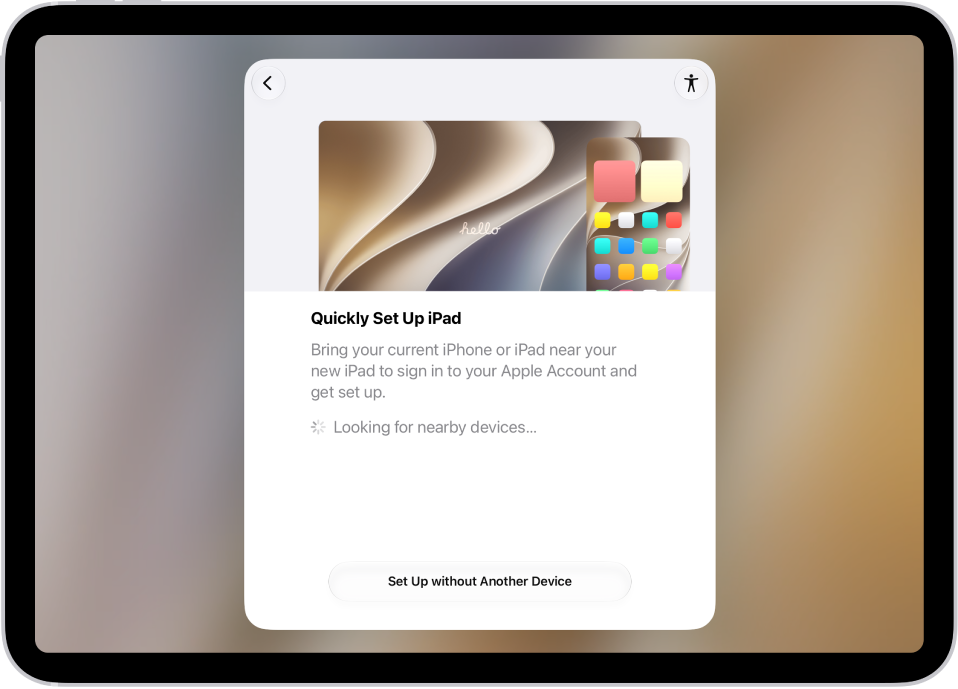
The Quick Start screen, with options to set up your iPad by bringing it close to another iPhone or iPad, or setting it up without another device.

Transfer your apps and info onto your new iPad

When you first turn on your new iPad and begin the setup process, many of your apps, settings, and content can transfer wirelessly from your previous iPad straight to this iPad. Just bring the two devices close together and follow the onscreen instructions.

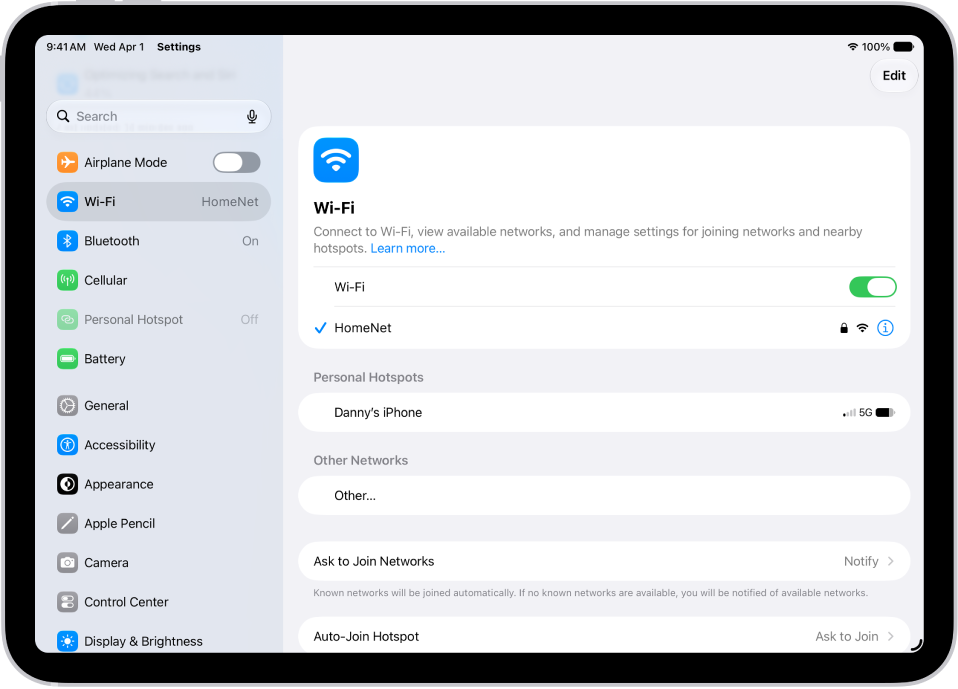
The Settings screen showing available Wi-Fi networks.

Connect to Wi-Fi and set up cellular service

To connect your iPad to your home Wi-Fi network, go to the Settings app, tap Wi-Fi, turn on Wi-Fi, then choose your network. iPad automatically connects to your Wi-Fi network whenever you’re home.

To use an eSIM to connect your iPad with Wi-Fi + Cellular to your cellular network, go to the Settings app, then tap Cellular Data. Or on supported iPad models, install a nano-SIM provided by your carrier.

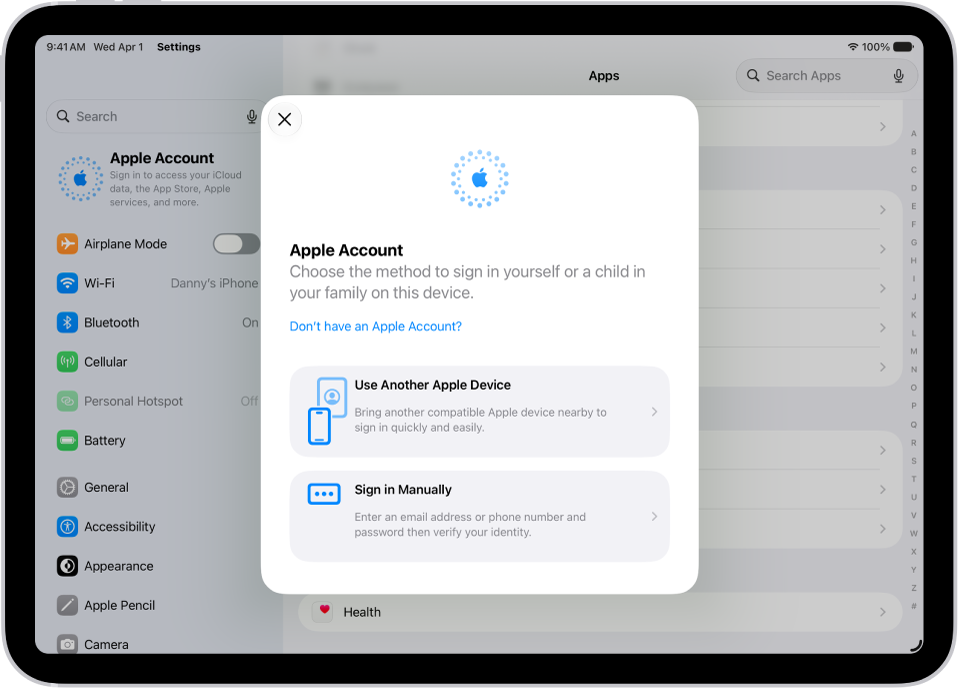
The Settings app, with the Apple Account sign-in dialog in the middle of the screen.

Sign in to your Apple Account

Your Apple Account gives you access to Apple services like iCloud, FaceTime, iMessage, the App Store, the iTunes Store, Apple Books, Apple Music, and more.

To sign in to your Apple Account, go to the Settings app, then tap Apple Account.

With a signed-in iPhone running iOS 17 or later or another iPad running iPadOS 17 or later, you can simply bring your iPad near your other device. If not, you’ll sign in manually.

To verify that you’re signed in, go to the Settings app, then tap your name. Your Apple Account appears below your name.

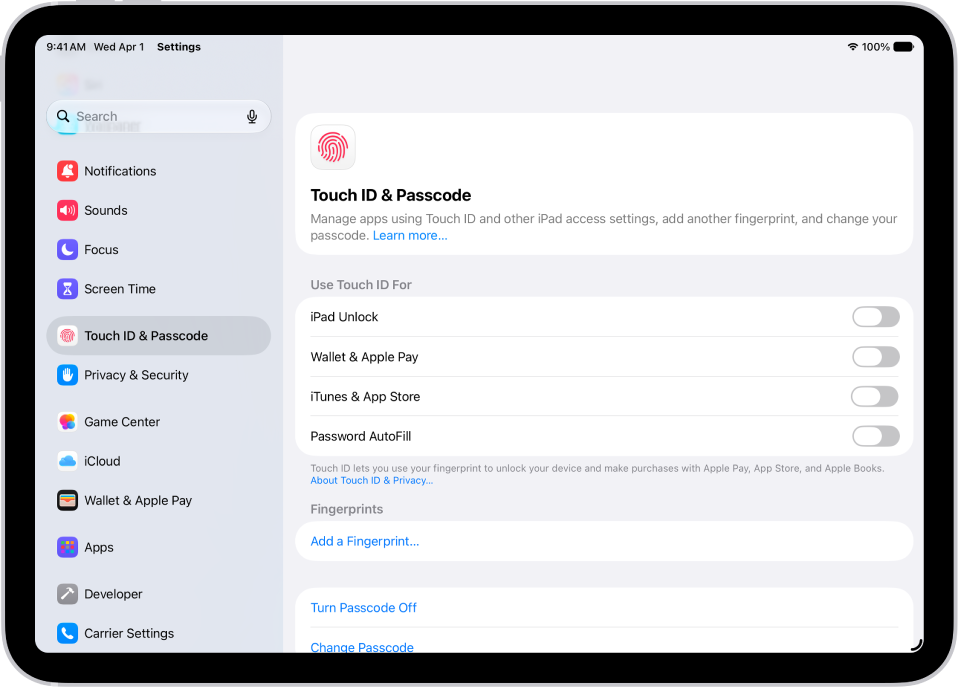
A screen showing settings for Touch ID & Passcode, with options to add a fingerprint and turn passcode on.

Set up Face ID or Touch ID

Face ID, which uses face recognition, or Touch ID, which uses your fingerprint, lets you securely unlock your iPad, make purchases, and sign in to many apps. Face ID and Touch ID data never leaves your device, for your security, and it isn’t saved anywhere else.

Do one of the following, based on your iPad model:

  • Set up Face ID: Go to the Settings app, tap Face ID & Passcode, tap Set up Face ID, then follow the onscreen instructions.
  • Set up Touch ID: Go to the Settings app, tap Touch ID & Passcode, tap Add a Fingerprint, then follow the onscreen instructions.

A screen showing settings for the Find My app, with options to turn on notifications.

Turn on Find My iPad

Turning on Find My iPad means you can locate your iPad if it’s ever lost or stolen.

Go to the Settings app, tap your name, tap Find My, tap Find My iPad, then turn on Find My iPad.

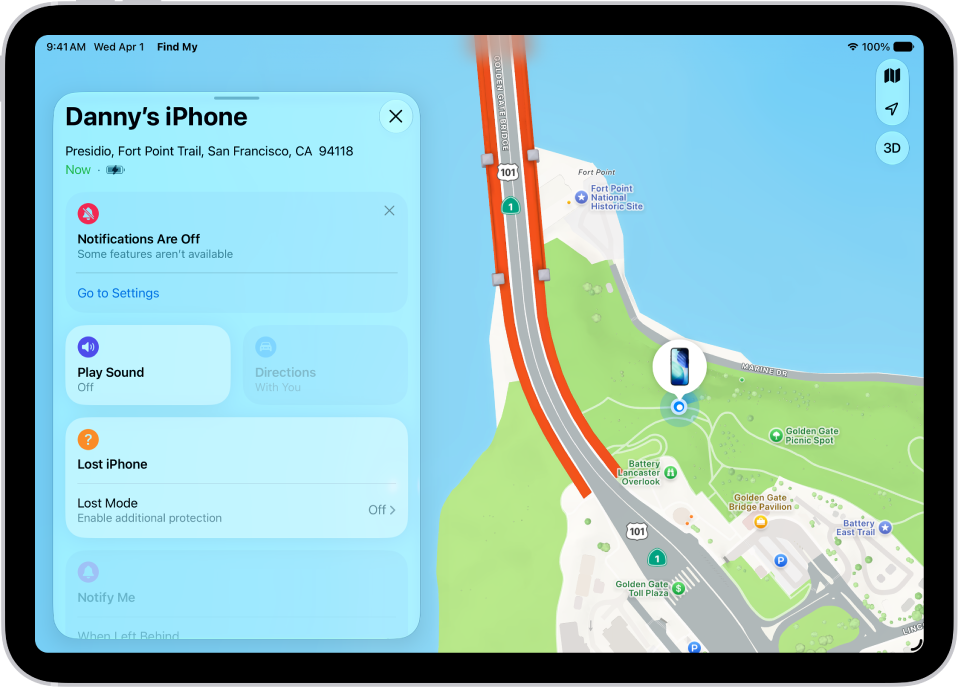
To be notified when you leave your iPad behind, go to the Find My app, tap the name of your iPad, then tap When Left Behind. You can also see the location of your devices on the Find Devices website.

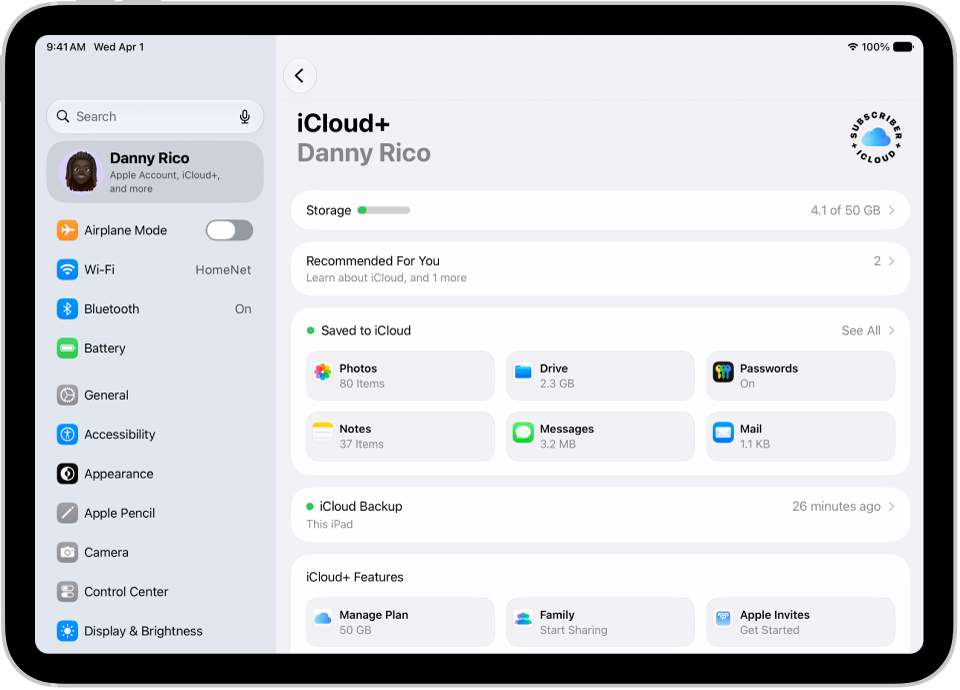
The iCloud settings screen showing the iCloud storage meter and a list of apps and features, including Photos, iCloud Drive, and iCloud Mail that can be used with iCloud.

Store your data in iCloud

Your photos, videos, and more remain secure in iCloud if your iPad is ever replaced, lost, damaged, or stolen, since iCloud keeps your important info safe and synced across your devices.

To turn on or change the features you want to use with iCloud, go to the Settings app, tap your name, then tap iCloud.

For more help getting set up, see these guides:

The availability of features, Apple says, may vary depending on your iPad model and country or region.

Tags: iCloud, Setup

In the Calendar app, you can set up multiple calendars to keep track of different kinds of events. You can keep everything in one calendar, but additional calendars are easy to set up and a great way to stay organized.

You’ll create an iCloud calendar with a name and color. You can also subscribe to an external read-only calendar or a holiday calendar, see multiple calendars at once, and unsubscribe from a calendar later.

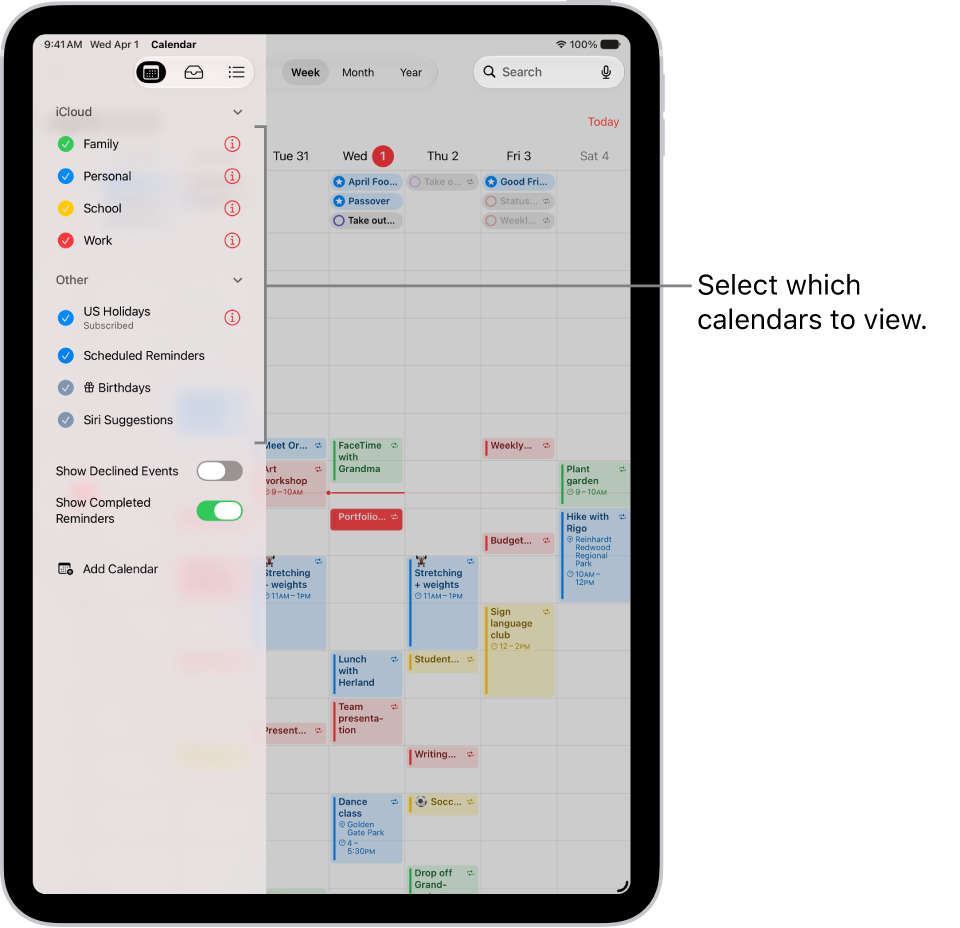
The Calendars list, with checkmarks indicating which calendars are active. The Done button for closing the list is in the top-right corner. The Add Calendar button is in the bottom-left corner.

Set up a calendar

  1. Open the Calendar app on your iPad.
  2. Tap the Calendars button at the top left and then tap Add Calendar at the bottom of the screen.
  3. Do one of the following:

    • Create an iCloud calendar: Tap Add Calendar and enter a name for the calendar. Choose a color for it.
    • Subscribe to an external read-only calendar: Tap Add Subscription Calendar, enter the URL of the .ics file you want to subscribe to (and any other required server information), and then tap Find.
    • Add a Holiday calendar: Tap Add Holiday Calendar, then tap the holiday calendar you want to subscribe to.

      See Use the Holidays calendar.

You can also subscribe to an iCalendar (.ics) calendar by tapping a link to it.

Unsubscribe from a calendar

You can unsubscribe from a calendar you’re subscribed to and also report the calendar as junk.

  1. Open the Calendar app on your iPad.
  2. Tap the Calendars button at the top left and tap the Info button next to the calendar you want to remove.
  3. Tap Unsubscribe and tap Unsubscribe or Unsubscribe and Report Junk.

    Note: When you tap Unsubscribe and Report Junk, the calendar is reported to Apple as a suspected junk subscription.

See multiple calendars at once

  1. Open the Calendar app on your iPad.
  2. To view multiple calendars, tap the Calendars button. Do any of the following:
    • Select the calendars you want to view.
    • Tap US Holidays to include national holidays with your events.
    • Tap Birthdays to include birthdays from Contacts with your events.

Turn on calendar event alerts

For calendars you create or subscribe to, event notifications are something you can turn on.

  1. Open the Calendar app on your iPad.
  2. Tap the Calendars button at the top left.
  3. Tap the Info button next to a calendar.
  4. Turn Event Alerts on or off.
  5. Tap the Done button.

Change a calendar’s color

  1. Open the Calendar app on your iPad.
  2. Tap the Calendars button at the top left.
  3. Tap the Info button next to the calendar, then choose a color.
  4. Tap the Done button.

The server sets the color for some calendar accounts, such as Google.

Move an event to another calendar

  1. Open the Calendar app on your iPad.
  2. Tap the event and tap Calendar. Select a calendar to move the event to.

See also

iCloud securely stores your photos, videos, documents, backups, and more—and keeps them updated across all your devices—automatically. With iCloud, you can also share photos, calendars, notes, folders, and files with friends and family.

iCloud provides you with an email account and 5 GB of free storage for your data, and for more storage and additional features, like Apple Invites, Private Relay, or Hide My Email, you can subscribe to iCloud+. You choose the apps and features you’d like to sync with iCloud, too.

Note: Some iCloud features have minimum system requirements. The availability of iCloud and its features varies by country or region.

Set up iCloud

  1. Start the Settings app on your iPad.
  2. Tap your name.

    If you don’t see your name, tap Apple Account, then sign in to your Apple Account.

  3. Tap iCloud, tap See All, and turn on the apps and features you want to sync with iCloud.

    For example, turn on iCloud Drive to make your files in iCloud Drive available to your other devices.

    The iCloud settings screen showing the storage meter and a list of features—including Photos, iCloud Drive, and iCloud Backup—that can be used with iCloud.

Use iCloud with apps on iPad

You can also store the following information in iCloud, where it stays up to date across your iPad and other Apple devices:

  • iCloud Backup

    iCloud can keep your iPad backed up automatically.

    Back up iPad

  • Photos

    Store your full-resolution photo library in iCloud and keep it in sync across all your devices. You can also share photos and videos with shared albums or an iCloud Shared Photo Library.

  • iCloud Drive

    Keep your files in iCloud Drive, access them from any device, and share folders and documents with others.

    Set up iCloud Drive

  • Messages

    Keep your conversations up to date and available across all your devices.

    Set up Messages

  • Mail

    Get an iCloud email address and access iCloud Mail across all your Apple devices.

  • Passwords

    Sync your passwords and passkeys securely across all your devices with iCloud Keychain.

    Use passwords

  • Find My

    Locate a missing device and share locations with friends and family.

    Locate a missing device

  • And more…

    iCloud also keeps apps like Contacts, Calendars, Notes, and Reminders in sync, along with data from compatible third-party apps and games.

If you subscribe to iCloud+, you get access to Apple Invites, HomeKit Secure Video support, iCloud Private Relay, Hide My Email, and more, along with additional storage.

You can get to your iCloud data on iPad, too, along with Apple Vision Pro, Mac, Windows devices, Apple TV 4K, Apple Watch, and iCloud.com.

See also

Tag: iCloud

In addition to the apps that come with iPad and that you use with iCloud, iPad works with Microsoft Exchange and many of the most popular internet-based mail, contacts, and calendar services. You can set up accounts for these services.

You can choose your email service from a list, or add another account if yours isn’t listed. You can set up a contacts account and a calendar account with a provider like iCloud or Microsoft Exchange, too.

Here’s how to set up mail, contacts, and calendar accounts on iPad.

Set up a mail account

  1. Start the Settings app on your iPad.
  2. Tap Apps and then tap Mail.
  3. Tap Mail Accounts, then tap Add Account.
  4. Enter your email address, tap Next, and enter your email account information.

    You can also tap “choose from a list” under the email address field to select the email service you want to use—for example, iCloud, Microsoft Exchange, or Gmail (Google).

    If your email service isn’t listed, tap Add Other Account, tap Mail Account, then enter your email account information.

For the steps, read our guide, Add and remove email accounts.

Set up a contacts account

  1. Start the Settings app on your iPad.
  2. Tap Apps, then tap Contacts.
  3. Tap Contact Accounts and then tap Add Account.
  4. Do one of the following:
    • Tap a provider—for example, iCloud or Microsoft Exchange—then enter your account information.
    • Tap Other, tap Add LDAP Account or Add CardDAV Account (if your organization supports it), then enter the server and account information.

To manage Contacts accounts, see our article, Add or remove accounts in Contacts.

Set up a calendar account

  1. Start the Settings app on your iPad.
  2. Tap Apps and then tap Calendar.
  3. Tap Calendar Accounts, then Add Account.
  4. Do one of the following:
    • Choose a provider: Tap a provider—for example, iCloud or Microsoft Exchange—then enter your account information.
    • Add a CalDAV, CardDav, or LDAP account: Tap Add Other Account, choose an option, and then enter your server and account information.
    • Subscribe to iCal (.ics) calendars: Tap Other, tap Add Subscribed Calendar, and then enter the URL of the .ics file to subscribe to; or import an .ics file from Mail.

If you also use calendars, see our guide, Set up multiple calendars.

Turn on iCloud Keychain on your iPad, and your accounts stay up to date on every device that has iCloud Keychain turned on.

See also

Tags: Calendar, Mail

When you use your iPad with another Apple device—like your Mac, iPhone, or Apple Watch—you can take advantage of Continuity features that let you use your devices in unique ways. You can work across your devices, hand off tasks, share files and photos, and stream video and audio. With Sidecar, your iPad even becomes a second display for your Mac.

Your iPad can extend your Mac desktop, or show one app on both screens while you control different aspects of it. And AirDrop makes sharing between iPhone, iPad, and Mac as easy as dragging and dropping.

Note: There are minimum system requirements for Continuity features, and some of these features need Wi-Fi and Bluetooth®.

Extend your workspace with an iPad

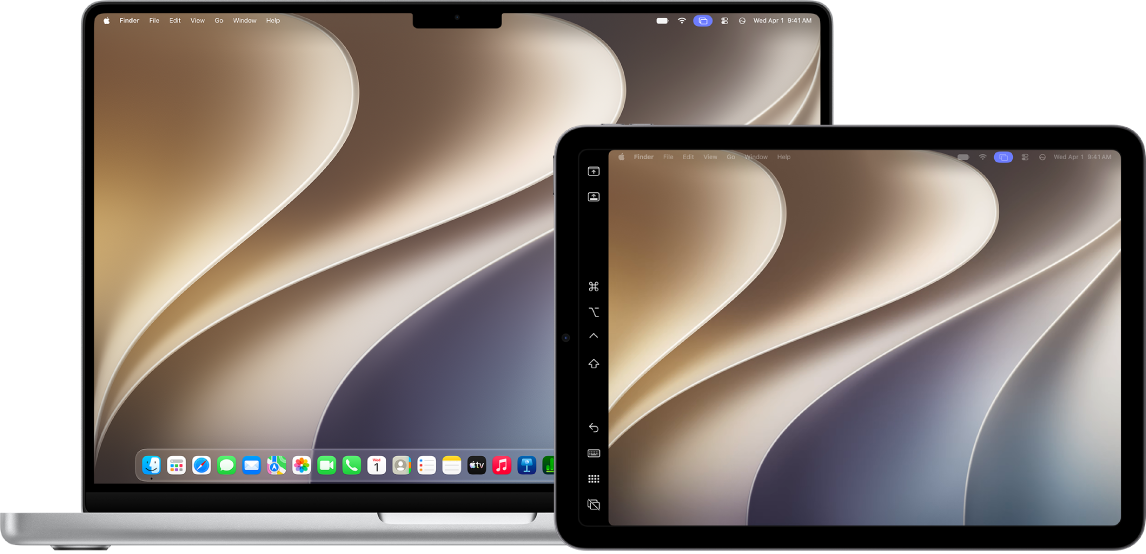
A MacBook Air and an iPad sitting side by side. Both screens show the Mac desktop with a purple Screen Mirroring icon in the menu bar.

Sidecar turns your iPad into a second display for your Mac. You can extend your Mac desktop, or you can show the same app on both screens and control different aspects of it. For more, see our article, Use your iPad as a second display for your Mac.

Quickly share content between devices

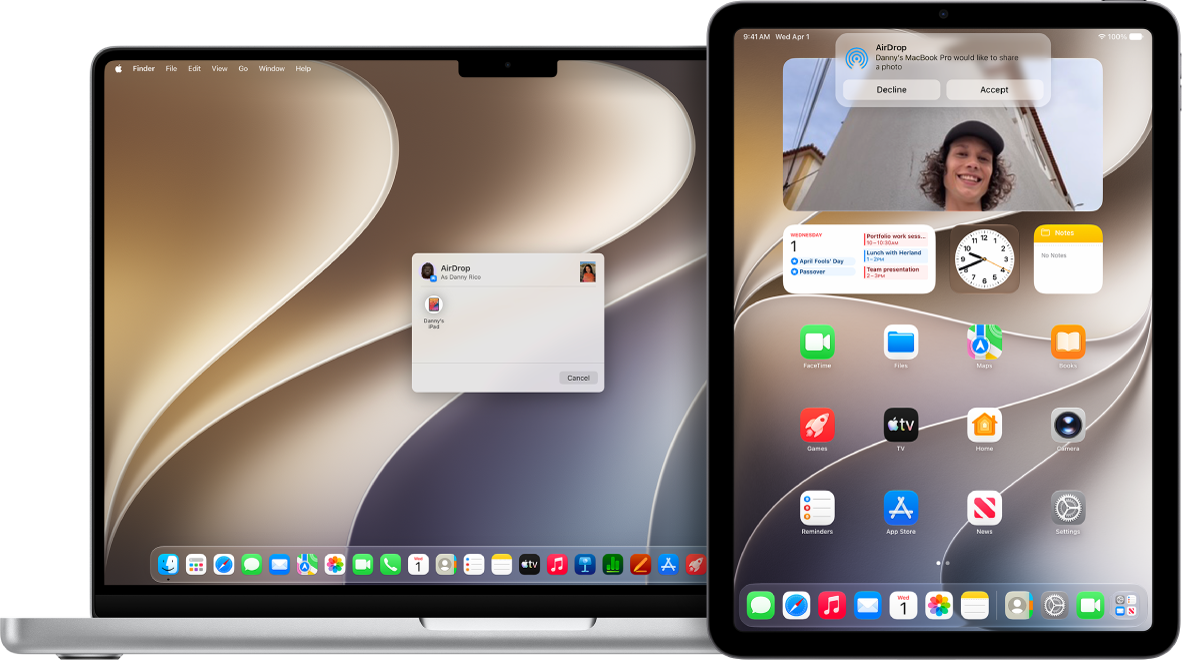
A Mac is next to an iPad. The AirDrop dialog is open on the Mac desktop, ready to share a document with the iPad. The iPad screen has a notification about receiving the document.

With AirDrop, you can share photos, videos, contacts, and more with anyone near you who has an Apple device. Sharing between iPhone, iPad, and Mac is as simple as dragging and dropping. Check out our guide, Use AirDrop on iPad to send items to nearby Apple devices.

Sharing content between your devices is easy, from handing off tasks between devices to copying text on an iPad and pasting it on your Mac or sending a file from your iPhone to your iPad.

AirDrop lets you quickly share photos, videos, contacts, and anything else, wirelessly, with anyone near you. Sending to iPhone, iPad, and Mac takes nothing more than dragging and dropping. See our article, Use AirDrop on iPad to send items to nearby Apple devices.

With Universal Clipboard, you’re able to copy text, images, photos, and videos on one Apple device, then paste the content on another. Let’s say you copy a recipe from Safari on your iPad: You can then paste it into Notes on your nearby Mac. Read our guide, Copy and paste between iPad and other Apple devices.

With Handoff, you’re able to start a document, an email, or a message on one device, then pick up where you left off on another. Mail, Safari, Maps, Messages, Reminders, Calendar, Contacts, Pages, Numbers, and Keynote are among the apps that support it. See our guide, Hand off tasks between iPad and your other devices.

Insert sketches, photos, and scans

An iPad showing a sketch, next to a Mac where the sketch appears in a note.

With Continuity Sketch, a sketch you draw on your iPad appears on your Mac. And with Continuity Camera, you can take a photo or scan a document on your iPad, then have it show up on your Mac. See our article, Insert sketches, photos, and scans from your iPad on Mac.

Even more Continuity features

Other ways to use your devices together

Continuity features aren’t the only way to use your Mac with your other Apple devices, and you can also:

There are multiple ways to transfer photos, videos, and other files between your iPad and other devices like an iPhone, Mac, or Windows device. You can transfer files wirelessly with features like AirDrop or apps like Mail and Messages, or connect your iPad to a computer or an external storage device with a cable, and then transfer or sync files.

You can also use iCloud to store your files, photos, videos, and more, and keep everything up to date on all your devices where you’re signed in to the same Apple Account. Transfers work only for files from iPad apps that support file sharing, though.

Important: Transferring, sharing, or syncing may be restricted for some types of data, such as files saved in an app’s proprietary format, files saved in older software versions, and files protected by copyrights.

Transfer files from your iPad wirelessly

AirDrop is a quick way to share a photo, file, or other item on your iPad with a nearby Apple device. See our article, Use AirDrop on iPad to send items to nearby Apple devices.

Sending a file as an attachment in the Mail or Messages app is another way to transfer files from your iPad to another device.

Transfer files by connecting iPad with a cable

To transfer files to an external storage device, a file server, or your computer, connect your iPad to your Mac or Windows device with a cable. When you transfer files to your Mac or Windows device, the model and operating system of your computer determine whether you use the Finder, Apple Devices, or iTunes.

Note: You can transfer files only from iPad apps that support file sharing.

  • Transfer files with your Mac (macOS 10.15 or later): Use the Finder.
  • Transfer files to your Windows device (Windows 10 or later): Use Apple Devices for Windows.
  • Transfer files to your Mac (macOS 10.14 or earlier) or Windows device (Windows 7 or earlier): Use iTunes.
  • Transfer files to a storage device, a file server, or a service like Box or DropBox: See Transfer files from iPad to a storage device, a server, or the cloud.

Sync your iPad with other devices

Supported content, like movies, music, TV shows, and more, can also sync when you connect your iPad to your Mac or Windows device. Add a movie to your iPad, for example, and after a sync, it appears on your computer too.

Syncing files with your Mac or Windows device also happens through the Finder, Apple Devices, or iTunes, depending on your computer’s model and operating system.

  • Sync content with your Mac (macOS 10.15 or later): Use the Finder.
  • Sync content with your Windows device (Windows 10 or later): Use Apple Devices for Windows.
  • Sync content with your Mac (macOS 10.14 or earlier) or Windows device (Windows 7 or earlier): Use iTunes.

Automatically keep your files in sync with iCloud

Storing your files, photos, videos, and more in iCloud keeps them synced and accessible on all your devices, as well as on supported web browsers. Change a file on any device signed in to your Apple Account, and the change appears on every other device signed in to the same Apple Account.

Important: OS X 10.10 (or later) or Windows 7 (or later) are required. You must be signed in to the same Apple Account on both your iPad and your computer, as well as any supported web browsers you might be using.

See also

Tags: Files, iCloud

You can attach photos, videos, and documents to an email message for recipients to easily download and save. You can also scan a paper document and send it as a PDF, or draw right in a message.

Depending on the file size, attachments might appear inline with the text, or as the Insert Attachment button at the end of the message. Documents come from Files, including the ones in Recents or Shared. And if your file exceeds the maximum size your email account allows, you’ll be able to send it using Mail Drop.

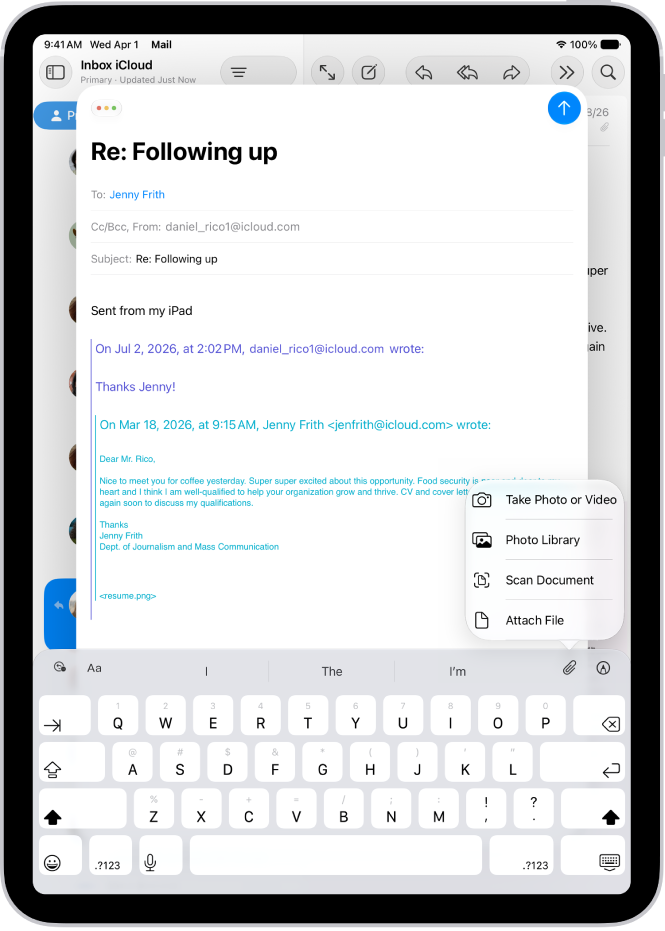
A draft email being composed with the attachment options above the keyboard.

Attach a photo, video, or document to an email

Documents, videos, and photos you attach and send in your email messages are easy for recipients to download and save.

  1. Go to the Mail app on your iPad.
  2. Tap in the message where you want to insert the attachment, tap the Insert Attachment Actions button, and do one of the following:

    • Attach a document: Tap Attach File and then locate the document in Files.

      In Files, tap Recents or Shared, then tap a file, location, or folder to open it.

    • Attach a saved photo or video: Tap Photo Library, then choose a photo or video. Tap the Done button to return to the message.
    • Take a new photo or video and attach it to the message: Tap Take Photo or Video, then take a new photo or video. Tap Use Photo or Use Video to insert it into your message, or tap Retake if you want to reshoot it.

Note: If the file exceeds your email account’s maximum size, the onscreen instructions help you send it using Mail Drop.

Scan and attach a document to an email

You can scan a paper document and send it as a PDF.

  1. Open the Mail app on your iPad.
  2. Tap in the message where you want to insert the scanned document and tap the Insert Attachment Actions button above the keyboard.
  3. Tap Scan Document and then position iPad so that the document page appears on the screen—iPad automatically captures the page.

    To capture the page manually, tap the Take Picture button or press a volume button.

  4. Scan additional pages, then tap Save when you’re done.
  5. To make changes to the saved scan, tap it and then do any of the following:

    • Crop the image: Tap the Crop button.
    • Apply a filter: Tap the Show Filter Settings button.
    • Rotate the image: Tap the Rotate button.
    • Delete the scan: Tap the Delete Scan button.

Create and attach a drawing to your email

Some ideas are hard to put into words, so you can draw in an email message to demonstrate them. Your drawing goes into the message as an attachment recipients can view and download.

  1. Open the Mail app on your iPad.
  2. Tap in the message where you want to insert a drawing and then tap the Insert Drawing button above the keyboard to show the Markup toolbar.
  3. Choose a drawing tool and color. Write or draw with your finger.

    See Write and draw in documents with Markup.

  4. When you’re finished, tap the Done button and then tap Insert Drawing.

To resume work on a drawing, tap the drawing in the message, tap the Disclosure arrow in the menu that appears, then tap Markup.

See also

Tag: Mail

You can download attachments that are sent to you in email messages or easily search for messages with attachments in your mailboxes.

You can save an image in the Photos app, save an attachment in the Files app, or open it with another app. You can also identify and learn more about objects in photos you receive. And you can quickly fill out forms you receive in Mail, or filter your messages to show only those with attachments when you can’t find one someone sent you.

Download an attachment sent to you

  1. Go to the Mail app on your iPad.
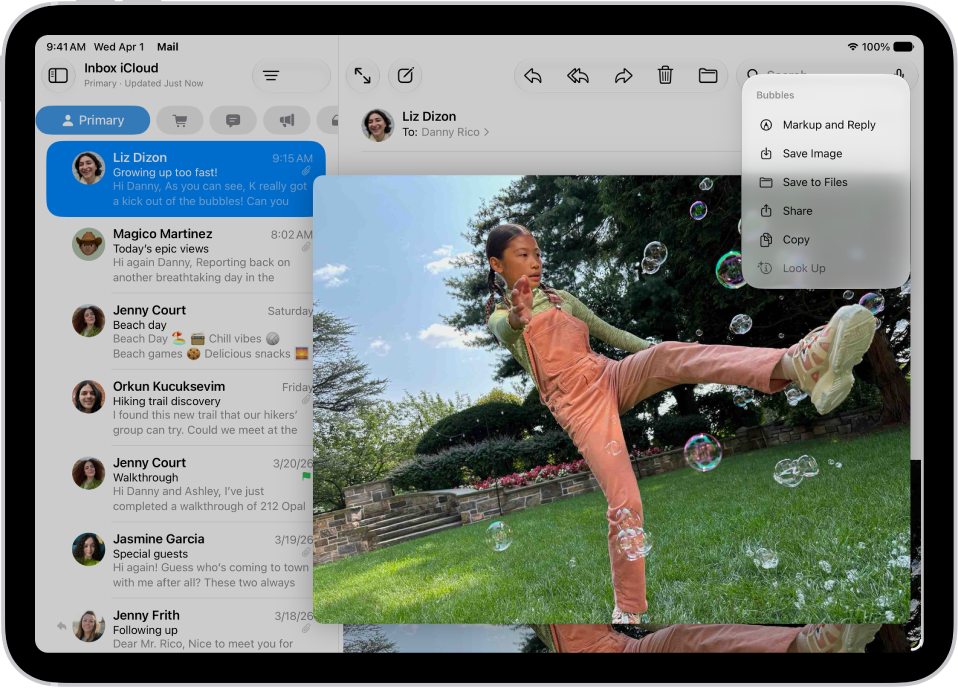
  2. Open a message with an attachment and touch and hold the attachment.
  3. Do any of the following:

    • Save it in the Photos app: Choose Save Image.
    • Save it in the Files app: Choose Save to Files.
    • Open it with another app: Tap Share, then choose the app.

    An email attachment is selected with possible actions listed.

    Tip: You can identify and learn more about objects in photos you receive. Touch and hold the photo, then choose Look Up. See Identify objects in your photos and videos on iPad.

Quickly fill out forms you receive in Mail

You can use AutoFill to quickly fill out forms you receive in the Mail app.

  1. Start the Mail app on your iPad.
  2. In the message, tap the attachment to open the document.
  3. Tap the AutoFill button and tap a blank field to enter text using the onscreen keyboard.
  4. To fill out another line, tap it. Enter text.
  5. Tap the Share button, then choose a method to send the completed form.

Find emails with attachments

When you can’t find an attachment someone sent you, filter your email messages so only those with attachments show up.

  1. Start the Mail app on your iPad.
  2. In a mailbox, tap the Toggle Filtering button to turn on filtering.
  3. Tap Filtered by and then turn on Only Mail with Attachments.

Quick tip: You can also gather email messages with attachments from all your accounts in one mailbox. To set it up, tap the Show Sidebar button (top left) to see your mailboxes, then tap Edit and select Attachments. From then on, the attachments mailbox sits in the mailboxes list alongside the rest.

See also

Tag: Mail