Got a tip for us?

iPhone

The iPhone is a smartphone from Apple that runs the iOS mobile operating system. Between its apps, communication features, the camera, mobile internet access, and other functionalities, the iPhone has quickly become an integral part of many peoples tech lives.

After you set up a Sleep Focus, you can quickly turn it on or off in Control Center. A Sleep Focus helps reduce distractions before and during bedtime. For example, it can filter out notifications and phone calls, and it can signal to others that you’re not available.

You can also choose to turn off the Sleep Focus for all of your sleep schedules. And when your Sleep Focus is on, you can quickly turn it off from the Lock Screen, too.

Here’s how to turn your Sleep Focus on or off on iPhone.

Quickly turn your Sleep Focus on or off

  1. Open Control Center on your iPhone.
  2. Do one of the following:
    • Turn the Sleep Focus on: Tap Focus and tap Sleep.
    • Turn the Sleep Focus off: Tap Sleep, then tap Sleep again.

Quick tip: When your Sleep Focus is on, you can switch it off quickly from the Lock Screen: Touch and hold Sleep, then tap Sleep.

At your next scheduled bedtime or wake up time, your Sleep Focus turns on or off again.

To share your Sleep Focus settings with your other devices, make sure you have Share Across Devices turned on. Go to the Settings app, tap Focus, then tap Share Across Devices.

Turn off your Sleep Focus for all sleep schedules

  1. Start the Health app on your iPhone.
  2. Tap Browse, then tap Sleep.
  3. Tap Sleep, scroll down to Your Schedule, and then tap Full Schedule & Options.
  4. Turn off Use Schedule for Sleep Focus.

Your sleep schedules remain in effect when this setting is off, but your Sleep Focus doesn’t turn on automatically. You can turn the setting back on at any time.

Tag: Focus

You can use Contact Key Verification to receive automatic alerts that help verify you’re communicating only with the people you intend. You can also generate unique codes that you and your contacts can compare simultaneously in the Messages app to further verify each other’s identities.

And you can post your Public Verification Code to a social media account, so other people can confirm that it’s you when they send you a message. You can save other people’s codes in the Contacts app, too.

Note: Contact Key Verification is designed to prevent highly sophisticated cyberattacks; it isn’t designed to prevent fraud such as phishing or other text-based scams.

Before you begin

Contact Key Verification works only when all of the following are true:

  • Your devices are passcode or password protected.
  • You’re signed in to iCloud and iMessage with the same Apple Account and you have two-factor authentication turned on for your Apple Account.
  • The person you’re trying to verify is in your contacts.

Turn on Contact Key Verification

  1. Open Settings, tap [your name], and then tap Contact Key Verification.
  2. Turn on Verification in iMessage and tap Continue.

Note: When you turn on Contact Key Verification, you’ll be asked to update all of your Apple devices to compatible software. Any device that can’t be updated needs to be signed out of iMessage before you can turn on this feature.

Share a Public Verification Code

To let other people verify your identity, you can post your Public Verification Code on a social media account or share it in a message.

  1. Open Settings, tap [your name], and then tap Contact Key Verification.
  2. Tap Show Public Verification Code.
  3. To share your Public Verification Code, tap Copy Verification Code, tap OK, and then paste the code wherever you want to share it.

Someone else’s Public Verification Code can help you verify their identity, too. Say someone shares a Public Verification Code with you, but it doesn’t match the code on their social media profile. In that case, hold off on sending them messages until you can confirm their identity.

Generate verification codes in Messages

You and your contacts can get a higher level of security by generating a verification code in Messages, then saving each other’s Public Verification Codes in Contacts. It helps when you want to verify each other simultaneously, or when the code your contact shares with you doesn’t match the Public Verification Code you received.

  1. Open the Messages app on your iPhone.
  2. Tap the person’s name at the top of the conversation, scroll down, and tap Verify Contact.

    When the other person taps Verify Contact on their device, a contact verification code appears.

  3. Compare the verification codes on both devices. Do one of the following:

    • If the codes match: Tap Mark as Verified and then tap Update to add the verification code to the other person’s contact card.
    • If the codes don’t match: You might not be communicating with the person that you intend. Tap No Match. Stop sending messages to the person until you can verify their identity.

Once you verify a contact, Messages shows a checkmark next to their name. You can check their verification status in the Conversation Details, too, or find their Public Verification Code in Contacts.

Use the Calendar app to create and edit events, appointments, and meetings.

You can add alerts and attachments, find events in other apps, and copy and paste an event. With Apple Intelligence, you can even describe your event, like a soccer game on Saturday, and you can paste a FaceTime link in the Location field. You can edit or delete an event later, too.

Here’s how to create and edit events in Calendar on iPhone.

Siri: Ask Siri something like, “Set up a meeting with Gordon at 9.”

Add an event

  1. Open the Calendar app on your iPhone.
  2. In Day view, tap the Add button.
  3. Enter the title of the event.

    Tip: With Apple Intelligence, you can also enter a description of your event—for example, “Soccer game on Saturday from 11 a.m. – 1 p.m.” or “Vacation in Bahamas Mon-Fri.” Suggestions for filling in the event details appear in the event card.

  4. Tap Location or Video Call. Then enter a physical location or tap FaceTime to enter a video link for a remote event.

    You can also copy a FaceTime link you created or received and paste it in the Location field.

  5. Enter the start and end times for the event, the travel time, invitees, attachments, and so on. (Swipe up, if necessary, to enter all the meeting information.)
  6. Tap the Done button.

Note: Apple Intelligence on iOS 27 or later is available on an Apple Intelligence-enabled iPhone 15 Pro, iPhone 15 Pro Max, or iPhone 16 model or later. Apple Intelligence is not available in all languages or regions. Usage limits may apply.*

Add an alert

To be reminded of an event beforehand, set an alert.

  1. Open the Calendar app on your iPhone.
  2. Tap the event, then tap Edit.
  3. In the event details, tap Alert.
  4. Choose when you want to be reminded.

    For example, “At time of event,” “5 minutes before,” or another choice.

    Note: If you add the address of the event’s location, Calendar uses Apple Maps to look up locations, traffic conditions, and transit options to tell you when it’s time to leave.

  5. Tap the Done button.

Add an attachment

To share an attachment with invitees, you can add it to a calendar event.

  1. Open the Calendar app on your iPhone.
  2. Tap the event, then tap Edit.
  3. In the event details, tap Add attachment.
  4. Locate the file you want to attach.

    To find the file, you can enter its name in the search field, scroll, tap folders to open them, tap Browse to look in other locations (such as iCloud Drive), and so on.

  5. Tap the Done button.

To remove the attachment, tap the event, tap Edit, swipe left over the attachment, then tap Remove.

Find events in other apps

Siri can suggest events found in Mail, Messages, and Safari—such as flight reservations and hotel bookings—so you can add them easily in Calendar.

  1. Open the Settings app on your iPhone.
  2. Tap Apps and then tap Calendar.
  3. Tap Siri and then turn on Show in App to allow Siri to suggest events found in other apps.

Turn on Learn from this App, and Siri can make suggestions in other apps based on how you use Calendar.

Copy and paste an event

Copy an event, and you can paste it to another date.

  1. Open the Calendar app on your iPhone.
  2. Touch and hold the event and then tap Copy.
  3. On another date, touch and hold the time where you want to paste the event.

    When you release, the New Event screen appears and the copied event appears below Title with the date and time where you want to paste the event.

    Tip: You can also tap the Add button after copying an event.

  4. Tap the copied event below Title.
  5. Tap the Done button.

Edit an event

Besides the time of an event, you can change any of the other event details.

  1. Open the Calendar app on your iPhone.
  2. Do any of the following:
    • Quickly change the event time or duration: In Day or Week view, touch and hold the event and then drag it to a new time, or adjust the grab points.
    • Change event details: Tap the event and tap Edit. In the event details, tap a setting to change it, or tap in a field to type new information.

Delete an event

  1. Open the Calendar app on your iPhone.
  2. In Day view, tap the event and tap Delete Event.

*Apple Intelligence is available with Siri and device language set to Chinese (Simplified), Chinese (Traditional), Danish, Dutch, English, French, German, Italian, Japanese, Korean, Norwegian, Portuguese, Spanish, Swedish, Turkish, or Vietnamese. Some features may not be available in all regions or languages. Some devices may not be available in all regions. Siri AI is available in beta in iOS 27, iPadOS 27, macOS 27, watchOS 27, and visionOS 27 and requires an Apple Intelligence–enabled device set to a supported language. Available in English to start. Siri AI will not be initially available in the EU on iOS, iPadOS, and watchOS. Certain Apple Intelligence features that rely on server-side models are subject to daily usage limits, including but not limited to Siri AI, Intelligent Photo Editing Tools, Image Playground, and AFM 3 Cloud models in Shortcuts. Daily limits may vary by feature, request complexity, system demand, system policies, and other factors. Expanded access to such features will be available for a fee in the future. Use of these features is subject to the Apple Intelligence Terms and Conditions.


In the Photos app, you can make stickers from the subjects in your photos and animated stickers from the subjects in your Live Photos. Then use your stickers to decorate messages, photos, notes, and more.

It starts with the subject of a photo. Once you add it as a sticker, it shows up in your stickers menu, ready to use from the onscreen keyboard or Markup tools. You can delete a sticker later, too.

Turn a photo or Live Photo into a sticker

The main subject of a photo can become a sticker.

  1. Start the Photos app on your iPhone.
  2. Tap a photo to open it in full screen.
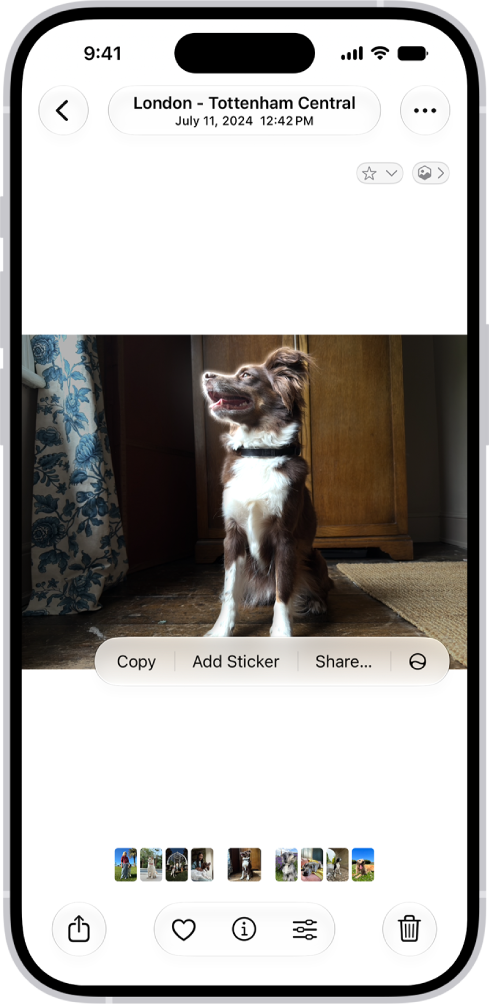
  3. Touch and hold the subject, then release.
  4. Tap Add Sticker.

    The sticker appears in your stickers menu, which you can access when you use the iPhone onscreen keyboard or Markup tools.

  5. Tap Add Effect to apply a visual effect such as Outline, or Comic, or turn the Live Photo animation on or off.

    The Photos app is open to a photo of a dog. The dog is selected, and the option Add Sticker is available in the menu above.

  6. Tap the Close button to close the stickers menu.

Quick tip: You can use stickers you’ve created to decorate a photo.

Delete a sticker

  1. Start the Photos app on your iPhone.
  2. Open a photo and then tap the Edit button.
  3. Tap the Markup button, then tap the Add button.
  4. Tap Add Sticker, touch and hold the sticker you want to delete, and tap Remove.

Since your stickers sync with iCloud, they’re available on any iPhone, iPad, Mac, or Apple Vision Pro where you’re signed in to the same Apple Account.

Tags: iCloud, Photos

Use the front-facing camera on your iPhone to take a selfie. You can take selfies in Photo mode or Portrait mode.

You can increase the field of view with Selfie Zoom, use Center Stage to automatically zoom or rotate the frame, and even mirror the front camera, so the selfie captures the shot as you see it in the frame.

Here’s how to take a selfie with your iPhone camera.

Take a selfie

  1. Open Camera on your iPhone.
  2. Tap the Camera Chooser Back-Facing button to switch to the front-facing camera.
  3. Before taking the selfie, you can do any of the following:
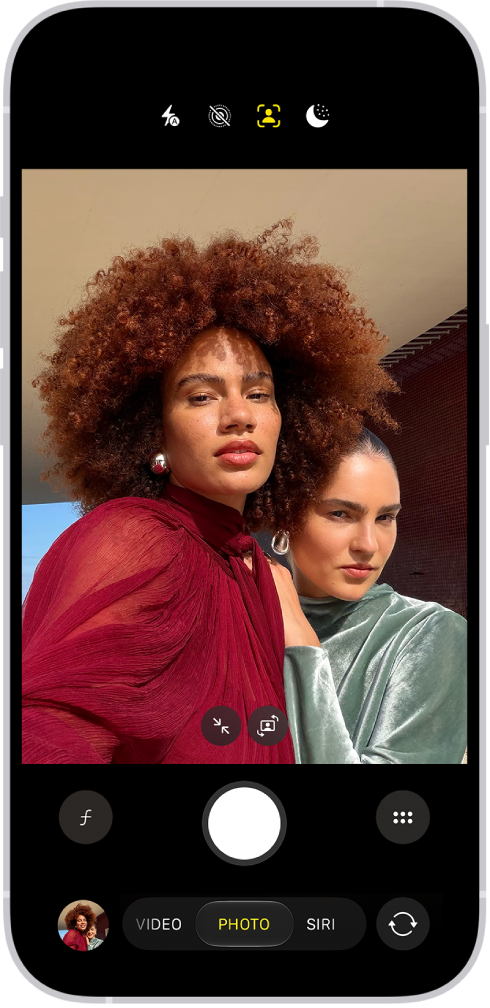
    • Tap the Selfie Zoom Zoomed In button to increase the field of view; tap the Selfie Zoom Zoomed Out button to return to the original view.
    • Tap the Change Aspect Ratio button to rotate the frame from portrait to landscape on (supported models); tap the Change Aspect Ratio button to return to portrait.
  4. Tap the Shutter button, press either volume button, or click the Camera Control to take the selfie.

The Camera screen in Photo mode. Within the camera frame, the subjects are taking a selfie.

Automatically zoom or rotate the frame with Center Stage for photos

When the camera detects faces in a group selfie, supported models can automatically zoom and rotate the frame.

Quick tip: You’ll get the best results when everyone is within 10 feet of the camera and looking at it.

  1. Open Camera on your iPhone.
  2. Tap the Camera Chooser Back-Facing button to switch to the front-facing camera.
  3. To make adjustments, tap the Chrome Auto Smart Framing Label On Off button and turn the following on or off:
    • Auto Zoom: Automatically expands the frame when a face is detected at the edge of the frame.
    • Auto Rotate: Automatically rotates the frame to landscape to accommodate more people in the frame.
  4. Tap the Shutter button, press either volume button, or click the Camera Control to take the selfie.

The first time you use Center Stage for photos, Auto Rotate is off and Auto Zoom is on. Any changes you make to these settings are saved.

Note: If you tap either the Selfie Zoom Zoomed In button or the Selfie Rotate button and zoom or rotate the frame manually, the Center Stage settings you selected turn off, and you’ll need to repeat the steps above to turn them back on.

Mirror the front camera

To take a selfie that captures the shot as you see it in the front-facing camera frame, rather than reversing it, go to Settings > Camera, then turn on Mirror Front Camera.

Tag: camera

Many apps give you a different view when you rotate iPhone. The screen turns with your iPhone as long as the rotation lock is off. And if you’d rather it stay put, you can lock the screen orientation, so it doesn’t change when you rotate iPhone.

Rotate the screen

  1. To make sure the rotation lock is off, open Control Center and tap the Lock Rotation button if it’s red.

    Note: If you don’t see the Lock Rotation button, add it to Control Center.

  2. Turn your iPhone sideways.

Lock or unlock the screen orientation

Lock the screen orientation, and it doesn’t change when you rotate iPhone.

Open Control Center, then tap the Lock Rotation Switch button. The button is red when the orientation is locked, and gray when it isn’t.

Note: If you don’t see the Lock Rotation button, add it to Control Center.

On supported models, the Lock Rotation Switch button appears in the status bar while the screen orientation is locked.

Tag: iPhone

While you’re following driving, cycling, or walking directions, you can share your estimated time of arrival (ETA) to let friends and family know when you’re likely to arrive.

Your ETA updates automatically if there are major delays, so you don’t have to send follow-up messages along the way. You can share your ETA with more than one contact, and even ask Siri to share it.

Here’s how to share your estimated time of arrival in Maps on iPhone.

Note: Not all features are available in all countries or regions.

Share your estimated time of arrival (ETA)

Siri: Ask Siri something like, “Share my ETA.”

Or without using Siri:

  1. Start the Maps app on your iPhone.
  2. Search for the place you want to go and then tap Go.
  3. Tap the route card at the bottom of the screen. Then tap Share ETA.

    If you don’t see Share ETA, make sure you turned it on in Settings > Apps > Maps.

  4. Choose one or more suggested contacts, or tap Open Contacts to find a contact.
  5. To share your ETA with more contacts, tap Sharing with at the bottom of the screen. Then tap Open Contacts.

The Messages, Find My, and Contacts apps can share your ETA with others, too.

Stop sharing your ETA

  1. Start the Maps app on your iPhone.
  2. Open the route card for a trip in progress.
  3. Tap Sharing with at the bottom of the screen. Then tap Stop Sharing ETA below each contact’s name.

Automatically share your ETA to a pin

If you add a contact to a pinned place in your Places, they’ll automatically receive your ETA each time you start turn-by-turn navigation to that location.

  1. Start the Maps app on your iPhone.
  2. Tap Places, then tap Pinned.
  3. Tap the Information button and tap Add Person.
  4. Search for a contact, tap to add them and then tap the Done button.
  5. Tap the pinned location. Then tap Go to start sharing your ETA.

Your location, route, and ETA stay viewable until you arrive.

Turn off ETA sharing

  1. Start the Settings app on your iPhone.
  2. Tap Apps, then tap Maps.
  3. Scroll down, then turn off Share ETA.

Note: Standard carrier data and text rates may apply.

If they’re using iOS 13.1, iPadOS 13.1, or later, people get a Maps notification with your ETA and can track your progress in Maps.

On earlier versions, the notification comes through iMessage.

People on other mobile devices get an SMS message.

If you’re near the person you’re looking for and you both have a supported model, Find My can give you precise directions to each other’s location.

Tag: Maps

On your iPhone, you can receive notifications when precipitation or certain severe weather events are forecasted in your current location. You can also receive notifications for locations you saved in your list.

For the most accurate notifications for your current location, turn on Precise Location for the Weather app and set its location access to Always. You can even get weather notifications for a suggested location.

Here’s how to manage weather notifications on iPhone.

Note: Weather notifications aren’t available in all countries or regions.

Turn on Precise Location

Turning on Precise Location gives you more accurate notifications for your current location.

  1. Open the Settings app on your iPhone.
  2. Tap Privacy & Security and then tap Location Services.
  3. Tap Weather, then tap Always.
  4. Turn on Precise Location.

Get weather notifications

  1. Open the Weather app on your iPhone.
  2. Tap the Location List button to display your list.
  3. Tap the More button, then tap Notifications.
    If prompted, allow notifications from the Weather app.
    If prompted, below Current Location, tap Go to Settings, then change location access to Always.
  4. Do any of the following:

    • Get notified about the weather at your current location: Below Current Location, turn on Severe Weather and Next-Hour Precipitation.
    • Get notified about weather in other locations: Below Your Locations, tap a location, then turn on Severe Weather and Next-Hour Precipitation.
  5. Tap the Done button.

Get weather notifications for a suggested location

  1. Open the Settings app on your iPhone.
  2. Tap Privacy & Security, tap Location Services, and tap System Services.
  3. Tap Significant Locations & Routes. Then turn on Significant Locations & Routes.
  4. Tap the Back button four times to return to Settings.
  5. Tap Apps, then tap Weather.
  6. Tap Location and select Always.
  7. Tap the Back button. Turn on Suggested Locations (below Locations).
  8. Open the Weather app.
  9. Tap the Location List button, tap the More button, and tap Notifications.
  10. Below Suggested Locations, turn on notifications for Severe Weather.

With Smart Rotate and Widget Suggestions turned on in a widget stack, Weather widgets can also display conditions at locations significant to you.

Tag: Weather

You can connect your iPhone to Bluetooth® accessories to stream music and videos, play games, connect to keyboards, and more.

iPhone must be within about 33 feet (10 meters) of the accessory to pair, and you might need to enter its PIN or passcode, which you’ll find in the instructions that came with it. After you connect, you can rename the accessory, unpair it, or disconnect it.

Here’s how to connect iPhone to Bluetooth accessories.

Pair your iPhone with a Bluetooth accessory

  1. Put your Bluetooth accessory in discovery mode. If you aren’t sure how to make it discoverable, check the instructions that came with your accessory.
  2. On your iPhone, open Settings and then tap Bluetooth and make sure Bluetooth is turned on.
  3. Tap the name of the accessory when it appears onscreen, below the devices list.
    You might need to enter the accessory PIN or passcode. Check the instructions that came with your accessory.

Note: To pair, keep iPhone within about 33 feet (10 meters) of the Bluetooth accessory.

Rename a Bluetooth accessory

Once you connect to a Bluetooth accessory, you can rename it.

  1. Start the Settings app on your iPhone.
  2. Tap Bluetooth and tap the Info button next to the accessory you want to rename.
  3. Tap Name and enter a new name for the accessory. Tap the Done button.

Note: Not all Bluetooth accessories support renaming.

Unpair a Bluetooth accessory

  1. Start the Settings app on your iPhone.
  2. Tap Bluetooth, tap the Info button next to the accessory you want to unpair, and then tap Forget This Device.
  3. Tap Forget Device to confirm.

Don’t see the devices list? Make sure Bluetooth is turned on.

Note: When you unpair AirPods, other devices where you’re signed in to your Apple Account automatically unpair them too.

Disconnect from all Bluetooth accessories

If you need to quickly disconnect your iPhone from all Bluetooth accessories and devices without turning Bluetooth off, open Control Center, then tap the Bluetooth button. Your Bluetooth accessories and devices disconnect from your iPhone until the next day.

Note: The use of certain accessories with iPhone may affect wireless performance. Not all iOS or iPadOS accessories are fully compatible with iPhone. Turning on Airplane Mode may eliminate audio interference between iPhone and an accessory. Reorienting or relocating iPhone and the connected accessory may improve wireless performance.

When you log a pregnancy in the Health app, you can view your gestational age and log the symptoms frequently experienced during pregnancy. The Health app on iPhone and the Cycle Tracking app on Apple Watch can help you to better understand your data during pregnancy, and both apps make adjustments and recommendations to reflect changes in your physical and mental health.

You can also view the pregnancy cycle timeline and edit your pregnancy details.

Here’s how to log a pregnancy in Health on iPhone.

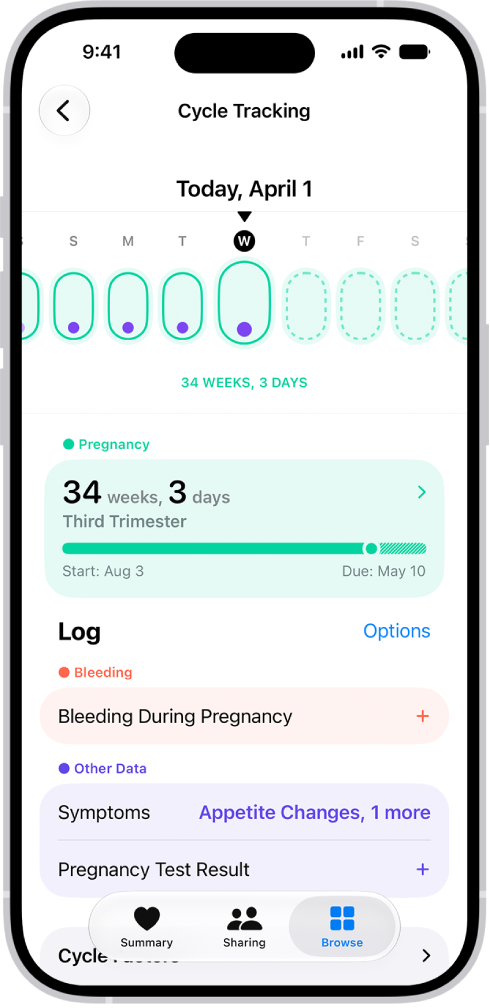
The Cycle Tracking screen with a pregnancy timeline for a week at the top of the screen. Light green ovals and purple dots mark 5 days on the timeline. Dashed light green ovals mark the other days on the timeline. Below the timeline is the pregnancy summary showing the gestational age, start date, and estimated due date. Below the pregnancy summary are options to add information about bleeding during pregnancy, symptoms, and more.

Log a pregnancy

  1. Start the Health app on your iPhone.
  2. Tap Browse, then tap Cycle Tracking.
  3. Scroll down and tap Factors. Then tap the Add button.
  4. Tap Pregnancy, then tap Begin.
  5. Do one of the following:
    • Log the first day of your last period: Tap Last Menstrual Period.
    • Log an estimated due date: Tap Estimated Due Date.
    • Log how far along the pregnancy is in weeks: Tap Estimated Gestational Age.
    • Log when the embryo was transferred during IVF: Tap Embryo Transfer Date.

Note: To log a previous pregnancy, tap Log a Past Pregnancy.

  1. Tap Next, follow the onscreen instructions and tap Next.
  2. Tap Next and then do the following:
    • Turn on mental health questionnaire reminders (optional): Tap Turn On Notifications.
    • Add your pregnancy to your Medical ID (optional): Tap Turn On Notifications.
    • Review your medication information: Tap Learn More below a medication to learn about any potential impact on your pregnancy and tap Next.
  3. Review the Cycle Timeline and tap Done.

Note: You can also log a pregnancy in your Health Details. Tap Summary, tap your picture or initials, tap Health Details, then tap Set Up Pregnancy in Cycle Tracking.

While logging a pregnancy, you get a variety of recommendations of notifications that should be turned on or off during and after pregnancy:

  • Walking Steadiness: Recommended to be turned on. Walking Steadiness can alert you more quickly during your third trimester, when the risk of falling can increase.
  • High Heart Rate (Apple Watch only): If your high heart rate notification threshold is set below 120 beats per minute (bpm), you’re asked to review and adjust it.
  • Cardio Fitness (Apple Watch only): Cardio Fitness notifications are recommended to be turned off during and until 12 weeks after the end of your pregnancy.

Log bleeding and other symptoms

  1. Start the Health app on your iPhone.
  2. Tap Browse, then tap Cycle Tracking.
  3. Swipe to select a day. Do any of the following:

    • Log bleeding: Tap Bleeding During Pregnancy, tap Had Bleeding, select a bleeding level, and then tap Done.

      Note: When you log bleeding during your pregnancy, you receive a notification recommending that you contact your doctor or care team.

    • Log symptoms or other information: Swipe the timeline to select a day, tap a category (below Other Data), supply the information, and then tap Done.

To add categories to the data logging screen, tap Options next to Log, then choose from the categories below Log.

View the pregnancy cycle timeline

Tap Browse, then tap Cycle Tracking.

A timeline at the top of the screen shows these icons.

Icon Description
A light green oval A day you logged a pregnancy.
A dashed light green oval A future day where you may still be pregnant.
A dark green oval The day of your estimated due date.

To select different days, swipe the timeline.

Edit your pregnancy details

  1. Start the Health app on your iPhone.
  2. Tap Browse, then tap Cycle Tracking.
  3. Tap the Pregnancy area, then do any of the following:
    • Change the estimation method: Tap Change and tap an estimation method.
    • Edit your estimation method: Tap a field to make a change.
    • Delete your pregnancy information: Tap Delete Factor from Health.
  4. When you’re finished, tap the Done button.

About your health data and privacy

Apple says the information you add about yourself in Health is yours to use and share. You can decide what information is stored in Health as well as who can access your data.

If you choose to add a pregnancy to Medical ID, your pregnancy status will be accessible on the Lock Screen if Show When Locked is turned on. Your pregnancy status will also be shared with first responders during an emergency call if Share During Emergency Call is turned on. You can change your Medical ID settings at any time by going to your Health app Profile. You can remove or update your pregnancy status in Medical ID if your status changes.

When your iPhone is locked with Face ID, Touch ID, or a passcode, all of your health and fitness data in Health, other than your Medical ID, is encrypted. Any health data synced to iCloud is encrypted both in transit and on Apple servers. And if you have a version of iOS, iPadOS, and watchOS (if you’re using iPad and Apple Watch for cycle tracking) with default two-factor authentication and a passcode, your health and activity data is stored in a way that Apple can’t read it.

This means that when you use the Cycle Tracking feature and two-factor authentication, your health data synced to iCloud is encrypted end to end, and Apple doesn’t have the key to decrypt the data and therefore cannot read it.

Tag: Health