macOS Sonoma has features you’ll benefit from immediately.
Whether you have a new Mac or just got around to updating your old one, macOS Sonoma has a lot of new features to get to know. Regardless of whether you’re a veteran or a new Mac user, these new macOS Sonoma features are ones you’ll want to take advantage of. Here are eight of them that your Mac will be better off using.
Can my Mac run macOS Sonoma?
According to Apple’s very own website, which highlights the features of macOS Sonoma, these are the Macs that are compatible with the latest desktop operating system:
- iMac 2019 and later
- Mac Pro 2019 and later
- iMac Pro 2017
- Mac Studio 2022 and later
- MacBook Air 2018 and later
- Mac mini 2018 and later
- MacBook Pro 2018 and later
What’s new in macOS Sonoma?
There are a few enhancements and new features in macOS Sonoma that will improve the overall usability of your Mac, while also focusing on things like gaming and privacy. Here’s a quick rundown of what to expect:
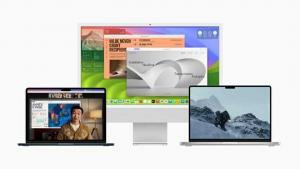
1. New screensavers
macOS Sonoma brings stunning screen savers featuring slow-motion videos of various locations worldwide, such as the sweeping skyline of Hong Kong, the sandstone buttes of Monument Valley in Arizona, and the rolling hills of Sonoma in Northern California. This rich graphical and photographic imagery enhances the Mac experience by shuffling through Landscape, Earth, Underwater, or Cityscape themes. The login experience is now repositioned at the bottom of the screen, making space for the new screen savers, which seamlessly transition into the desktop.
2. Game Mode
With the power of Apple silicon, users experience incredible graphics performance on every Mac. And now, tens of millions of Macs with Apple silicon can run demanding games with great performance, long battery life, and breathtaking visuals. Developers continue to take advantage of Metal 3, bringing exciting new titles to Mac, including DEATH STRANDING DIRECTOR’S CUT, Stray, Fort Solis, World of Warcraft: Dragonflight, HUMANKIND, Resident Evil Village: Winters’ Expansion, The Medium, ELEX II, Firmament, SnowRunner, Disney Dreamlight Valley, No Man’s Sky, Dragonheir: Silent Gods, and Layers of Fear. To make it easier to port games from other platforms to Mac, Metal introduces a new game porting toolkit, eliminating months of upfront work and enabling developers to see how well their existing game could run on Mac in just a few days. It also dramatically simplifies the process of converting the game’s shaders and graphics code to take full advantage of Apple silicon performance, significantly reducing the total development time.
macOS Sonoma also introduces Game Mode, giving players an edge when performance is measured in precious milliseconds. Game Mode delivers an optimized gaming experience with smoother and more consistent frame rates, by ensuring games get the highest priority on the CPU and GPU. Game Mode also makes gaming on Mac even more immersive — dramatically lowering audio latency with AirPods, and significantly reducing input latency with popular game controllers like those for Xbox and PlayStation by doubling the Bluetooth sampling rate. Game Mode works with any game, including all of the recent and upcoming Mac games.
3. Video conferencing
macOS Sonoma brings enhanced video conferencing features that enable users to present and share their work more effectively within any video conferencing app. Presenter Overlay, a new video effect, elevates a user’s presence by displaying them on top of the content they are sharing. Additionally, Reactions allow users to share how they feel by seamlessly adding balloons, confetti, hearts, and more into the video, which can also be triggered with a hand gesture. The improved Screen Sharing picker simplifies the process of sharing apps during video calls. Users can simply click the green button in the top-left corner of an app and choose to share it in the call, allowing for easy content sharing from their currently open windows.
4. Safari upgrades in macOS Sonoma
Safari, the world’s fastest browser, introduces new features to enhance the browsing experience for Mac users. This year brings a significant update to Private Browsing, which provides even greater protection during browsing both from trackers and from people who might have access to the user’s device. Advanced tracking and fingerprinting protections in Private Browsing go even further to help prevent websites from tracking or identifying the user. Private Browsing windows also lock when users are not using them, allowing them to keep tabs open even when they step away from their device.
Additionally, profiles help users stay organized by offering a way to separate browsing between topics, while also keeping cookies, history, extensions, Tab Groups, and Favorites separate. Users can sign in to the same site with both work and personal accounts — and quickly switch between them — ensuring a smooth browsing experience. Safari also enables the creation of web apps that behave like normal apps, putting users’ favorite sites at their fingertips and providing a simplified toolbar for an app-like experience.
5. Shared Password Groups
If you share a specific set of passwords, macOS Sonoma provides a better way to store them in a shared vault through iCloud Keychain.
You can create a group specifically for sharing passwords. Everyone will have access to the passwords, and they can add new or edit existing ones.
6. Web Apps in the Dock
macOS Sonoma has a new excellent feature that enables easier access to favorite websites directly from the Dock. You can add any website to the Dock and access it directly in an app-like window.
Adding a website to the Dock allows you to access it like any other macOS app with support for Stage Manager and Mission Control. Web apps can also send notifications.
7. Enhanced Accessibility Features
macOS Sonoma introduces several accessibility features that make Mac even more customizable for all users. For users with hearing disabilities, Made for iPhone hearing devices can connect to their Mac for calls and media consumption,1 while users who are nonspeaking can use Live Speech to type and vocalize their thoughts during calls and conversations. For users with physical and motor disabilities, phonetic suggestions appear when dictating and editing text with Voice Control on Mac. To assist users with cognitive disabilities, animated images like GIFs can be automatically paused in Messages and Safari. Additionally, users who are blind or have low vision can easily customize text size across Mac apps, and utilize Xcode with VoiceOver, Apple’s industry-leading screen reader.
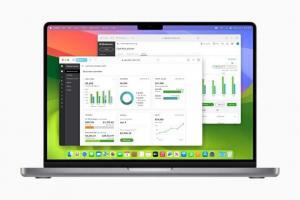
8. Interactive Widgets
Like on iOS and iPadOS, macOS is finally getting widgets. You can place app widgets on the desktop, a major improvement from macOS Ventura, where widgets were nicely tucked away in the Notification Center.
And with their interactive nature, widgets in macOS Sonoma make it convenient to access certain features inside an app without fully opening it. For example, you can check off reminders, control music, and control your smart home devices without opening the appropriate app.
Through Continuity, you can access a wide array of widgets in macOS Sonoma that are already available on iPhone. All widgets in macOS Sonoma can be accessed via a dedicated widget gallery.
Other changes
There are a few changes in this release that are less specific to macOS but apply to Apple’s platforms in general. One of them is support for filling PDFs. macOS can recognize text fields in PDFs and make them fillable, including real-life documents scanned with a camera. PDFs can also now be viewed inline inside Notes, so you can view notes related to a certain document right on the same page.
In the Messages app, Apple has introduced a new stickers experience, along with improvements to search, replies, groups, and syncing. Meanwhile, the Reminders app now creates intelligent grocery lists to make shopping trips easier, and it’s now possible to organize lists into sections.
The keyboard experience has also been improved with more accurate corrections in autocorrect and inline completions that make it easier to finish a sentence. Dictation is also more accurate now. Finally, privacy enhancements include expanded support for Communication Safety in surfaces like AirDrop, the Photos picker, and incoming calls. There’s also a sensitive content warning in places like AirDrop and Messages, so you don’t have to be exposed to anything you don’t want to see. This also gives you the option to block a contact if needed.