As the popularity of Apple AirPods Max continues to grow, so does the likelihood of encountering counterfeit versions of these high-end headphones. Not only can fake AirPods Max be a waste of money, but they can also be potentially dangerous if they have not gone through the rigorous safety testing that genuine Apple products undergo. Fortunately, there are ways to spot fake AirPods Max before you make a purchase. Here are some tips to help you distinguish between genuine and counterfeit AirPods Max.
1. Inspect The Packaging
The first thing to look for when buying AirPods Max is the packaging. Apple products usually come in high-quality packaging with attention to detail. If the packaging looks cheaply made, with flimsy materials or poor printing quality, it’s a red flag that the product inside might be fake.
Check the labels and text for any spelling mistakes or inconsistencies. Apple packaging always has a very clean and precise look, with no grammatical or spelling errors. If you see any discrepancies, it’s likely that the product is not genuine.
2. Check The Design And Build Quality
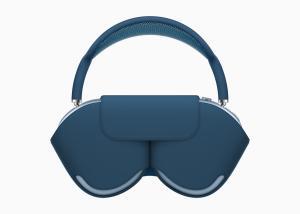
The materials used in the construction of genuine AirPods Max are of a very high quality. They typically feature stainless steel and anodized aluminum, which give them a sleek, premium appearance. In contrast, counterfeit versions uses cheaper materials that lack the same durability and weight.
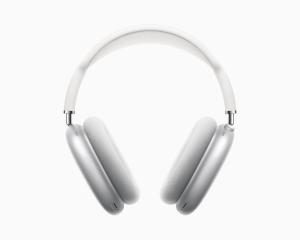
One of the most obvious indicators that a pair of AirPods Max is counterfeit is the positioning and quality of the Apple logo. On genuine AirPods Max, the logo is perfectly centered and has a subtle shine when it catches the light. A fake pair usually have a logo that is slightly off-center or has a different shine altogether.
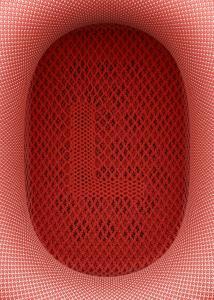
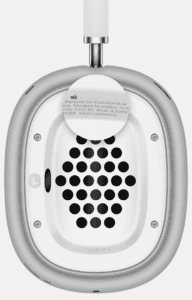
The ear cups on genuine AirPods Max are designed to provide a comfortable, breathable experience, with a mesh canopy and knitted textile cover. Counterfeit AirPods Max usually have a different type of ear cup or cover that doesn’t match the genuine product, which can impact both comfort and sound quality.
The headband on genuine AirPods Max is made from a breathable knit mesh material that allows for easy adjustment and a comfortable fit. Counterfeit versions features a different type of headband material or design, which can lead to discomfort and poor fit.
Another way to tell if a pair of AirPods Max is genuine is by examining the controls. Genuine AirPods Max have a Digital Crown to provide physical controls. The Digital Crown can be used to turn the volume up or down, skip between tracks, answer phone calls, and activate Siri through both rotating and pressing gestures.
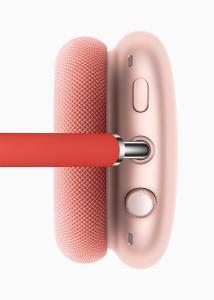
The button next to the Digital Crown allows Active Noise Cancellation to be controlled, switching between ANC and Transparency mode.
Turning the Digital Crown controls volume, pressing once answers a call or plays/pauses a song, pressing twice skips forward one track, pressing three times skips back one track, and pressing and holding activates Siri.
On genuine AirPods Max, the controls are well-crafted and have a satisfying click when pressed. In contrast, counterfeit versions may feel cheap or poorly constructed.
Genuine AirPods Max have a Lightning port for charging, which is compatible with Apple devices. Fake AirPods Max features a different type of charging port that is not compatible with Apple devices, causing a lot of inconvenience.
When it comes to color, genuine AirPods Max come in a range of options, including silver, space gray, sky blue, green, and pink. If you come across a pair in a different shade, it’s a sign that they are counterfeit.
Genuine AirPods Max are relatively heavy, weighing around 385 grams due to the high-quality materials used in their construction. If a pair of AirPods Max feels noticeably lighter or heavier than this, it could be a sign that they are fake.
The size and dimensions of genuine AirPods Max are very specific and can be measured and compared to a counterfeit pair. If the dimensions of a pair of AirPods Max don’t match those of a genuine product, it’s a sure sign that they are fake.
Genuine AirPods Max have an LED light on the bottom of the right ear cup, which can be used to determine charge level when pressing the power button while the AirPods Max are charging. At above 95 percent, the light is green, at below 95 percent charge, it’s amber. Pressing the button on the AirPods Max when the headphones are not charging shows a green light if there’s more than 15 percent battery life remaining, while it shows an amber light if there’s less than 15 percent charge. Fake AirPods Max may not have this feature or have a different type of LED light that doesn’t match the genuine product.
3. Check AirPods Max Smart Case
Apple ships AirPods Max with a Smart Case that wraps around the ear cups but that does not provide protection for the headband. The case is designed to put the AirPods Max into an ultra low power state that preserves battery life, utilizing magnets. The Smart Case is made of high-quality microfiber material that feels soft to the touch. If the material quality feels cheap, rough or looks like plastic, it might be a fake.
4. Check The Sound Quality
The sound quality of AirPods Max is another distinguishing factor between genuine and counterfeit products. Genuine AirPods Max pair high-fidelity audio with Active Noise Cancellation for what Apple describes as an "unparalleled listening experience."
There’s a custom-built driver inside the AirPods Max that produces ultra-low distortion sound across the audible range. Apple promises rich bass, accurate mids, and crisp, clean highs, even at the highest volumes.
In contrast, fake AirPods Max may have poor sound quality, with muffled or distorted sound.
When trying out AirPods Max, play music with a wide range of frequencies, including bass-heavy tracks, to test the quality of the sound. Genuine AirPods Max have a balanced sound with excellent bass and treble response, while counterfeit versions may have unbalanced or muffled sound quality.
5. Check The Connectivity
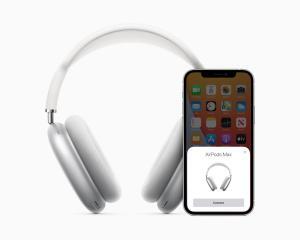
Like other AirPods, AirPods Max connect automatically to other Apple devices with one-tap setup and pairing capabilities. Connecting AirPods Max to an iPhone or iPad, for example, is as simple as holding the headphones near the device and then tapping the Connect button. If you have trouble connecting the headphones to your device, it could be a sign that the product is not genuine.
One of the key features of AirPods Max is their seamless connectivity with Apple devices. Automatic device switching lets genuine AirPods Max automatically switch between iPhone, iPad, Mac, and Apple Watch as the devices are used, with no need to access Bluetooth controls to swap devices.
6. Other Sensors
Sensors in the AirPods Max allow them to determine when they’re on the head, so when the headphones are removed, audio pauses, and when placed back on the head, audio resumes. Pausing the music can also be done by lifting up an ear cup.
In contrast, fake AirPods Max are often made with cheaper materials and do not undergo the same rigorous quality control standards as the original products. As a result, the sensors on fake AirPods Max may not work at all, or they may not work as well as the sensors on the original headphones.
Additionally, counterfeit AirPods Max may not have all of the sensors that the original headphones have, or the sensors may be placed in different locations. This can affect the overall performance and user experience of the headphones.
7. Check Battery Life
Genuine AirPods Max have a battery life of up to 20 hours of listening to music, watching movies, or talking on the phone with both Active Noise Cancellation and spatial audio enabled.
AirPods Max charge with a Lightning cable, and a five-minute charge provides 1.5 hours of listening time. It takes approximately two hours for the headphones to charge to full. The AirPods Max has no power button, with Apple instead relying on different power modes to preserve battery life.
Counterfeit AirPods Max may have a shorter battery life or may not hold a charge as well as the genuine product. To test the battery life, charge the AirPods Max fully and use them continuously for a few hours to see if they last as long as they should.
8. Check The Price
The price of AirPods Max is another important factor to consider when determining whether they are genuine or counterfeit. Genuine AirPods Max are priced at $549.
With a $549 price tag, AirPods Max are much more expensive than fake AirPods Max. If you find a deal that seems too good to be true, it probably is. Counterfeit products are often sold at a much lower price than the genuine product, so be cautious of any seller offering a significant discount.
9. Verify The Serial Number
The serial number of AirPods Max can also provide valuable information about their authenticity. Genuine AirPods Max have a unique serial number printed on the inside of the left ear cushion, and it can be verified through Apple’s website or customer service.
To see the serial number of AirPods Max, simply detach the left magnetic ear cushion. If the serial number is missing, the AirPods Max are fake.
Once you’ve obtained the serial number, the most foolproof way to tell if AirPods Max are fake is to go directly to the source: Apple.
- In your web browser, go to Apple’s coverage checking tool.
- Enter the serial number, the CAPTCHA, and click Continue.
- If the tool returns information for that serial number (especially a valid purchased date), the AirPods Max are real. If the serial number cannot be verified, the AirPods Max are fake.
10. Check Accessories
Genuine AirPods Max come with a few accessories, including a Smart Case and a Lightning to USB-C cable for charging. If the packaging contains any additional accessories or missing some essential accessories, it could be a sign of a counterfeit product.
11. Check The Retailer Reputation
Purchasing AirPods Max from an authorized retailer is the best way to ensure that you are getting a genuine product. Apple products are sold through a network of authorized resellers and retailers, and it’s important to purchase from a reputable source. AirPods Max can be purchased from the online Apple Store or third-party retailers like Amazon.
Avoid buying from unlicensed third-party sellers or unknown websites, as they are more likely to sell counterfeit products.
12. Trust your Instincts
If something about the AirPods Max seems off, trust your instincts. If the price is too good to be true, or if the product seems poorly made or constructed, it could be a fake. It’s better to be safe than sorry when it comes to purchasing expensive products.
In conclusion, fake AirPods Max are becoming increasingly common, and it’s essential to be vigilant when purchasing these high-end headphones. By following these tips, you can distinguish between genuine and counterfeit AirPods Max and avoid wasting your money on fake products. Always purchase from authorized retailers and double-check the packaging, build quality, sound quality, connectivity, battery life, serial number, accessories, and price before making a purchase.