Got a tip for us?

iPhone

The iPhone is a smartphone from Apple that runs the iOS mobile operating system. Between its apps, communication features, the camera, mobile internet access, and other functionalities, the iPhone has quickly become an integral part of many peoples tech lives.

Your iPhone 14 Pro isn’t turning on and you don’t know why. No matter what you try, you can’t seem to reboot your phone. In this step-by-step guide, I’ll explain what to do when your iPhone 14 Pro won’t turn on so that you can fix the problem for Good!

Why Won’t My iPhone 14 Pro Turn On?

There are many reasons why your iPhone 14 Pro isn’t turning on. A lot of the time, the iPhone 14 Pro won’t turn on because of a software crash. However, it’s also possible there’s a hardware problem with your iPhone.

Follow the step-by-step guide below to diagnose and fix the real reason your iPhone 14 Pro won’t turn on. We’ll start with simple troubleshooting steps, and get more advanced as we go.

Note: information in this article apply to iPhone 14, iPhone 14 Plus, iPhone 14 Pro and iPhone 14 Pro Max.

Fix iPhone 14 Pro not turning on

Hard Reset Your iPhone

A hard reset forces your iPhone to abruptly turn off and back on again. It’s possible your iPhone 14 Pro just looks like it won’t turn on, when really it’s frozen on a black screen.

  1. Press and quickly release the Volume Up button.
  2. Press and quickly release the Volume Down button.
  3. Press and hold the Side button until you see the Apple Logo.

It’s important to keep in mind that a hard reset does not fix the underlying software problem that caused your iPhone to crash. Even if your iPhone 14 Pro is turning on again, we recommend reading the rest of the steps below.

Check Your Lightning Cable And Your Charger

It’s a good idea to inspect your charging cable and charger for damage. It’s possible your iPhone 14 Pro won’t turn on because it’s out of battery life and not charging.

There have been occasions even the smartest of people have not identified that the issue is because of a faulty charger cable, adapter, or even a wall socket. So make sure you try a different lightening cable, different power adapter (if you have one), and another power outlet in your home before you know you can definitely blame your phone.

Make Sure It’s Not Just The Display

If your iPhone 14 Pro still won’t turn on, plug your iPhone into your computer and open iTunes (Macs running macOS 10.14 or older and PCs) or Finder (Macs running macOS 10.15 or newer). Check to see if your computer recognizes your iPhone 14 Pro.

If your computer recognizes your iPhone, it usually means there’s a hardware problem with the display. We recommend backing up your iPhone immediately if it is recognized by your computer, as it could be your last chance to do so.

After backing up your iPhone, try performing another hard reset while your iPhone is connected to your computer.

Check For Physical Or Liquid Damage

This is one of the most common reasons an iPhone 14 Pro won’t turn on. If you’ve recently dropped your phone or it has gotten wet, you might have some issues.

To put things succinctly, if you dropped your iPhone 14 Pro in water and it won’t turn on, you’re going to need to take it in for repair as you most likely have a hardware problem or a damaged display.

Reach Out To Apple

If you’ve completed all the steps above, and your iPhone 14 Pro still won’t turn on, it’s time to get in touch with Apple support. There’s a very good chance your iPhone 14 Pro has a hardware problem that needs to be repaired. Visit Apple’s support website to get help online, over-the-phone, or through-the-mail.

iPhone 14 Pro won’t Turn On: Fixed!

You’ve fixed the problem and your iPhone is turning on again! Next time your iPhone 14 Pro won’t turn on, you’ll know exactly how to fix the problem. Leave a comment below if you have any unanswered questions about your iPhone.

Even with the best of intentions, you might find it difficult to know how to proceed when you find a lost or stolen iPhone. Thankfully, there are a few simple steps you can take to help return the device to its rightful owner.

There’s no exception when it comes to other people’s property, so holding onto something that isn’t yours could be theft. Plus, all modern iPhone models are useless thanks to the Activation Lock feature. So here’s what to do if you’ve found a lost iPhone.

1. Is the Lost iPhone Charged?

What to do: Purchase or borrow a charger and keep the device switched on and charging.

Modern smartphone batteries don’t last for long, so in most cases, a lost device has a day (at best) before it runs out of battery. If there’s no charge, try Pressing down the power button (a single button on the right-hand side) to see what happens.

If the iPhone is off, you’ll first need to charge it. If you are not an iPhone user, you’ll either need to borrow or purchase a new Lightning cable.

2. Does It Have a Passcode Lock?

What to do: Check for a passcode, but don’t try to brute-force it. Check the call log and registered Apple ID for contact details if you can access them.

Once the iPhone boots up, a lock screen will appear. Pressing the Home button or swiping up at the bottom of the screen—depending on which iPhone model you’ve found—will probably ask you for a passcode, Touch ID, or Face ID.

But there’s a slight chance the phone will unlock. This may happen if the owner didn’t set a passcode, which is recommended for all iPhone owners.

If by chance the iPhone does unlock, there are two options to get more information. The first is to go to Settings > iTunes & App Store to see what the owner’s registered Apple ID email address is. You can then send an email to the owner, letting them know that you found their iPhone.

The second is to go to Phone > Recent and check the call log. You should be able to determine an appropriate contact to call so you can let them them that you’ve found this iPhone. You should also be able to find the owner’s name listed at the top of the Contacts list in the Phone app.

3. Look to Medical ID for More Information

What to do: Access the Medical ID feature, even with a locked iPhone.

If you’re still searching for the owner of a lost iPhone, give the Medical ID feature a try. While its core use is to provide important medical information to first responders in case of an emergency, it can also give you additional hints about the identity of the owner.

To reveal the Medical ID function, access the lock screen on any iPhone and then tap on Emergency button located at the bottom-left hand of the display. A number pad on the screen will appear. On the bottom-left of that screen, tap on Medical ID.

If the owner has configured the feature, their name and more information about them will become available. With any luck, that will help you trace the owner.

4. Is the Phone in Lost Mode?

What to do: Look for a message and make contact using the provided details.

Someone else’s iPhone is unusable to anyone other than the owner, so long as Find My iPhone is turned on. A feature called Activation Lock prevents the iPhone from being used even after a software reset, and the same feature allows the rightful owner to locate lost devices.

If the iPhone has been put into
Lost Mode,
the owner has signed into iCloud.com and marked the device as lost. You should see a message letting you of this, accompanied by a message left by the owner. This should include a contact number or email address you can use to get in touch with the owner.

If the iPhone connects to the internet, the owner will receive its location through iCloud. It’s always a good idea to have Find My iPhone enabled on your own device under Settings > [Name] > Find My. Make sure to take a closer look at
our explanation of the Find My app
and everything you need to know about it.

5. Try Asking Siri

What to do: Command Siri to provide you with information to locate the owner.

As long as the iPhone is online, Siri can perform numerous tasks even if the device is locked. This will only be possible if the phone was turned on when you found it, though.

After a restart, Siri is deactivated until you first unlock it. Pressing and holding the home button will activate Siri, which then gives you a chance to ask a question to help find the owner.

You could try asking the following:

  • “Call my wife”—Or husband, mum, daddy, boss, etc.
  • “Read my call log”—This may show you a recent call, so you can then ask Siri to call the contact (by name).
  • “Read my last message”—This will provide the contact’s name plus the message contents.
  • “Who owns this iPhone?”—This will give you the name stored in the owner’s contact entry.
  • “What is my email address?”—You could also try phone number, Twitter handle, and so on.

Apparently, Siri has a boundary on the amount of information disclosed before requiring a passcode. As such, asking Siri to read the call log, then calling any contacts you find, might be the best action you can take.

6. Take a Photo

What to do: capture a photo of your contact details that will sync online.

Most iPhone users have iCloud Photos enabled. That feature backs up every photo and video taken by devices using your Apple ID to iCloud. This lets you access your pictures on any iOS device, or a Mac, with the same Apple ID. That can come in handy when trying to find an owner of a lost iPhone.

The iPhone doesn’t have to be unlocked to capture a photo or video. On the lock screen, select the camera icon or swipe from right to left to reveal the camera. You can then capture a photo. The best idea would be to snap a photo of your contact details.

Hopefully, the photo will be backed up to the iCloud Photos account of the owner and they’ll see it on another device they use.

Found an iPhone? Make Contact or Hand It In

Note: if you find a lost iPhone, Activation Lock will inhibit you from using it if the Find My iPhone feature is enabled. It’s essentially a paperweight for as long as you have it in your possession. So don’t expect to use an iPhone you’ve found.

If none of the above methods work, you may need to eject the owner’s Sim Card and note their carrier and the number written on the SIM card. You can then contact the carrier, give them the number, and they might be able to assist contact the owner of the device.

If you’ve tried all the above possibilities with no luck, your last option is to take it to the police station that’s closest to where you found the iPhone. Explain that you’ve found the iPhone and you’ve tried making contact to no avail.

Have you purchased a brand new iPhone 13 or iPhone 13 Pro and wants to get most of it? Here are the best iPhone 13 and iPhone 13 Pro tips and tricks that will help you to get the most out of your new device.

From setting up focus modes to using Siri offline, we’ve got an assortment of iPhone 13 and iPhone 13 Pro tips and tricks you probably didn’t know your iOS device could do. These iPhone 13 and iPhone 13 Pro tips and tricks will have you showing off your abilities to your friends and having them ask you where you learned it all – you can link them here and share the knowledge, of course!

Without any further ado, here are the best iPhone 13 and iPhone 13 Pro tips and tricks you should try first.

Best iPhone 13 and iPhone 13 Pro tips and tricks

Here is a list of the Best iPhone 13 and iPhone 13 Pro Tips and Tricks:

1. iPhone 13 tips and tricks: Set up Focus Modes

Focus creates a distract-free environment around you and disables irrelevant notifications from apps and users. Based on your activity and preference, you can customize a focus profile and select specific apps and contacts to send messages and notifications. It’s like Do Not Disturb mode on steroids. And thankfully, the focus profiles aren’t limited to Apple’s choice only. You can create a custom focus profile for different activities such as Writing, Yoga, Running, Driving, and more. In short, this iPhone 13 and iPhone 13 Pro trick enables you to set up several profiles for different scenarios that give you more control over how you interact with your iPhone. On vacation? You can block notifications from your work apps and email. Sneaking out for a workout during lunch? Same thing, except you can opt to allow messages from Slack in case something urgent comes up. You can even create custom home screens that only show you the apps you want to see for a particular scenario.

You can set up Focus profiles by heading to Settings > Focus. You’ll find preset modes for generic Do Not Disturb, along with Sleep (formerly Bedtime), Personal and Work, with the latter two ready to be set up. Tap on either and follow the on-screen instructions to customize the focus mode, and once complete, you can activate it via the Control Centre. Focus profiles are extremely customizable, so you can really go ham experimenting on what works best for you.

2. iPhone 13 tips and tricks: Schedule Your Notifications

Scheduled Summary collects notifications that aren’t time sensitive and displays them at a certain time in the morning and evening. Or, you can add more summaries and control at what time they appear.

Using on-device machine learning, notifications are arranged by priority based on your interactions with apps. Notifications that the device deems more important are displayed at the top of the summary. Important messages will be immediately delivered.

To set it up, head to Settings > Notifications > Scheduled Summary and toggle it on. You’ll then be prompted to set up the system, adding the apps you’d like to contribute to the notification summary, and set the time(s) you’d like it to appear.
You can choose up to 12 summaries per day, and there are other configurable options including one that allows time-sensitive apps to break free from Notification Summary.

3. iPhone 13 tips and tricks: Re-order Home Screen Pages

Moving multiple icons from one home page to another took a long time. Sure ability to move multiple icons at once helped, but that too had its complications.

This iPhone 13 and iPhone 13 Pro trick lets you re-order entire home screen pages. You can move the whole home screen page from first position to third position without having to individually moving icons.

The best thing about this hidden iPhone 13 and iPhone 13 trick is that all of your widgets and folders will also move along with the page, making it easier to quickly rearrange home screen.

You can move home screen pages by entering the wiggle mode and then tapping on the page dots located right below the home screen icon rows.

4. iPhone 13 tips and tricks: FaceTime Android and Windows users

This iPhone 13 and iPhone 13 Pro trick lets you enable anyone, even if they don’t have an Apple device, to join a FaceTime call with you by creating a link to a ‌FaceTime‌ conversation that can be shared anywhere.

Using this new link facility, friends and family members who do not have an Apple account can log into a ‌FaceTime‌ call with you using a web browser opened on any non-Apple device, whether that’s a Windows PC or an Android phone.
This effectively makes ‌FaceTime‌ a platform-agnostic video service, although you do need to be an iOS or Mac user to start the ‌FaceTime‌ call and send the link. Here’s how this iPhone 13 and iPhone 13 Pro trick work:

  1. Start the FaceTime app on your iPhone 13 or iPhone 13 Pro.
  2. Tap on Create Link.
  3. Give your ‌FaceTime‌ Link an identifiable name by tapping Add Name at the top of the Actions menu that appears.
  4. Select a method of sharing your link from the Actions menu, e.g. over Messages or Mail.
  5. Once you’ve sent the link and the recipient opens it, they’ll be directed to a web page where they can enter their name to join the conversation. Once they’ve joined the call, they’ll have the usual ‌FaceTime‌ options to mute their microphone, disable video, switch the camera view, and leave the call.

5. iPhone 13 tips and tricks: Zoom in QuickTake videos

The next cool iPhone 13 and iPhone 13 Pro trick involves QuickTake. You can zoom in while recording a QuickTake video. To zoom in all you have to do is swipe up or down while recording to zoom in or out.

6. iPhone 13 tips and tricks: Use built-in Authenticator

Gone are the days when you had to rely on third-party Authenticator apps like Google Authenticator or Authy, as now iPhone 13 and iPhone 13 Pro features a built-in Authenticator feature that gives you the ability to quickly generate verification codes and enter them into your online accounts. You can set up authentication code generator on your device by going to Settings > Passwords.

Once you have set up this feature, your device will automatically generate new verification codes when required and autofill them into the website you are trying to log into.

7. iPhone 13 tips and tricks: Organize Your Notes

If you’re a heavy Notes user, then you’ll be happy to try this iPhone 13 and iPhone 13 Pro trick. You can now add tags such as #Work #Grocery or #list to your notes to sort them under these tags.

8. iPhone 13 tips and tricks: Enable iCloud Private Relay

iCloud Private Relay is a feature from Apple that is available on all iCloud subscription tiers. It lets you connect to virtually any network and browse through the Safari browser on your iPhone 13 or iPhone 13 Pro with more security and a private environment.

With iCloud Private Relay all the traffic that leaves your device is not only encrypted but it is also sent through two separate internet relays. This means no one, which includes Apple is able to see your iPhone’s IP address, location or browsing activity. This stops data companies and advertisers from creating a detailed profile based on your browsing history.

You can enable the options from Settings > Profile > iCloud > Private Relay menu.

9. iPhone 13 tips and tricks: Hide IP Address from All Websites

This iPhone 13 and iPhone 13 Pro trick lets you hide IP address from both the third-party trackers and websites. Start the Settings app on your iPhone and head to Safari > Privacy & Security > Hide IP Address and select Trackers and Websites from the following menu.

10. iPhone 13 tips and tricks: Use your iPhone’s camera to scan any text

Have you ever wished you could point your iPhone’s camera at a sign or piece of paper and have it automatically identify then copy the text into an email or a document?

That’s where Live Text comes in – this new iPhone 13 and iPhone 13 Pro trick lets you scan and copy text from photos and your iPhone camera, even if it’s handwritten. And once you’ve pulled the text, you can paste it into any text field. It’s great for quickly sharing addresses, phone numbers, and anything else you don’t want to type out manually.

To use the iPhone 13 and iPhone 13 Pro new scan text feature, long-press inside a text field as if you are going to use the copy and paste prompt. Only, you’ll now see a Scan Text button. You may also see a button that uses just the scan icon, which looks like a piece of paper with brackets around it.

Tap the button, which will then replace your keyboard with your iPhone camera’s viewfinder. Point your camera at whatever you want to scan, and then follow the prompts on the screen. For instance, if you’re moving the camera too fast, you’ll see a “Slow Down” message flash on the screen.

As you’re lining up the camera and text just right, you’ll see a live preview of the text your iPhone is identifying and ready to place in your document. Tap the Insert button when you’re ready.

11. iPhone 13 tips and tricks: Switch between tab bar and single bar in Safari

One of the best iPhone 13 and iPhone 13 Pro tips and tricks is the ability to switch between tab bar and single bar. With Tab bar option you can move the Safari address bar to the bottom of the screen, and add new swipe gestures for switching between opened tabs.

When Single Bar option is selected, you get the classic Safari look in which the address bar is moved towards the top of the screen, just like iOS 14 or earlier.

You can switch between the two types of Safari address bars by following these steps.

  1. Go to Settings > Safari
  2. Choose between Tab Bar or Single Bar options
  3. Exit

12. iPhone 13 tips and tricks: Get real-time precipitation alerts from the iPhone’s weather app

Another iPhone 13 and iPhone 13 Pro tip is that you can see real-time snow and rain alerts in the weather app. You can turn on the new precipitation alerts by opening the Weather app, then tapping the three-line icon in the bottom-right corner of the screen. Next, tap the circle icon with the three dots in the top-right corner of the screen followed by Notifications.

Slide the switch next to My Location to the On position and then tap Done. If you have more cities added to the Weather app, you can also turn on alerts for each one.

The next time rain or snow is getting close to you, your iPhone 13 or iPhone 13 Pro will alert you a few minutes before it’s going to start. You’ll also receive another alert when the rain is almost finished.

13. iPhone 13 tips and tricks: Drag-and-drop between apps

One of the best iOS 15 tips and tricks most people don’t know about is the ability to drag and drop items between apps. You can grab an item like a photo, screenshot, text, phone number etc and then drop into into another application. The drag and drop feature works on a system level and works on both stock and third-party apps.

Here’s how to drag and drop files between apps on iPhone 13 and iPhone 13 Pro:

Start the Photos app and view your recent photos. Don’t tap on a picture to open it full screen, instead place a finger on the photo and start to drag your finger across the screen. Don’t lift your finger when the thumbnail starts to float over the rest of the photos, then switch back to the messages app.

You’ll see a green circle with a sign in it show up on the thumbnail indicating that you can lift your finger and the photo will be placed in the text field, ready for you to send.

Pretty easy, right? You can use this same iPhone 13 and iPhone 13 Pro trick to attach a document from the Files app to an email as well.

14. iPhone 13 tips and tricks: Get more information about your photos

I’ve always had to use a third-party app if I wanted to view any of the finer details stored in the EXIF data about a photo I was sent or took myself. With this iPhone 13 and iPhone 13 Pro trick, whenever you’re viewing a photo in the Photos app, you can swipe up on it to open an information view that will detail where you saved the photo from, as well as all of the EXIF information such as shutter speed, location, the camera used and so on.

The added information is a welcome addition even if you don’t care about all of the finer details. At the very least, being able to see where you saved the picture from (including who sent it to you) is enough.

15. iPhone 13 tips and tricks: change your iPhone’s text size for a specific app

Next on out list of best iPhone 13 and iPhone 13 Pro tips and tricks is Per-App Settings feature. You can set and customize display and text settings on per-app basis.

Previously these settings could only be changed on system-level, so if you want to make text larger in one app you would have to make text large on all other apps as well.

With the new Per-App Settings, you can choose which apps you want to customize display and text settings for. You can change these settings for each individual apps, thus having more control over how your iPhone 13 or iPhone 13 Pro works.

To use this iPhone 13 or iPhone 13 Pro trick, open the Settings app, then go to Control Center and scroll down until you find the option labeled Text Size by tapping on the green sign.

The next time you’re in an app and you want to adjust the size of the text, open Control Center (swipe down from the top-right corner of the screen on your iPhone and tap on the Text Size button. Slide the button at the bottom of the screen to the left side of the toggle to indicate you only want your changes applied to the app you’re currently using, and then adjust the font size up or down.

16. iPhone 13 tips and tricks: Set background Sounds

Next up on our list of the best iPhone 13 and iPhone 13 tips and tricks is Background Sounds. With this trick, you can mask unwanted environmental sounds by playing calming background sound on your iPhone. This hidden iPhone 13 and iPhone 13 Pro trick lets you minimize distractions and as a result can help you focusing on the task at hand or help you in getting calm and rest.

You get multiple background sounds including the following:

  • Balanced Noise
  • Bright Noise
  • Dark Noise
  • Ocean
  • Rain
  • Stream

To activate ‘Background Sounds’ on your iPhone 13 or iPhone 13 Pro, head to Settings > Accessibility > Audio/Visual > Background Sounds. From here, you can tap the toggle at the top to turn on the sound, set a volume level, etc.

17. iPhone 13 tips and tricks: Watch Movies and TV Shows Together Using FaceTime

Officially called SharePlay, this iPhone 13 and iPhone 13 Pro trick lets you watch streamed movies and TV shows together. When you’re on a ‌‌FaceTime‌‌ call, everyone on the call will see the same synced playback and video controls.

The following steps explain how this iPhone 13 and iPhone 13 Pro tip works. Note that both parties need to be using ‌FaceTime‌ on an Apple device that supports ‌iOS 15‌, ‌iPadOS 15‌ or MacOS Monterey, for SharePlay to work. SharePlay is not compatible with the browser version of ‌FaceTime‌ available to non-Apple device users.

  1. Start the FaceTime app on your iPhone 13 or iPhone 13 Pro and initiate a call.
  2. When the call has connected, tap the SharePlay button at the top-right corner of the screen in the new control panel.
  3. Tap Share My Screen in the dropdown. After a three-second countdown, screen sharing will initialize.
  4. Now navigate to the TV app or another streaming app, select something to watch, then press Play.
  5. Select SharePlay when the prompt asks you if you want to SharePlay content. Other people on the call will also be asked whether they want to join SharePlay with you.

That’s all there is to it. The video will stream to other people on the call. As you chat and watch the stream together in sync, the volume will automatically adjust so that you can hear everyone talking without missing the show, and if you fast forward or rewind the video, other people on the call will be notified.

Did you know that you can also listen to music together using SharePlay? Simply launch Apple Music and choose a song for everyone to hear it at the same time.

18. iPhone 13 tips and tricks: Adjust the Date, Time, and Location of Your Photos

Up until this point, you had to use the Photos app on a Mac, or rely on third-party iOS apps, to edit the metadata for your iPhone photos.

But now, this iPhone 13 and iPhone 13 Pro trick offers a built-in way for changing these details right inside the Photos app on your iPhone. Here’s how:

  1. Start the Photos app on your iPhone 13 or iPhone 13 Pro.
  2. Select any photo you want to edit the metadata for.
  3. Tap the i icon at the bottom to view the image’s metadata. Alternatively, swipe up from any part of the image.
  4. Select Adjust.
  5. You should see the Adjust Date & Time page. Next, scroll through the calendar by swiping left or right and tap any date. Alternatively, you can also use the arrows to navigate. Remember, you can also choose a future date.
  6. Once done, tap the original time under the calendar and choose your custom time using the spinner.
  7. If you want to change the time zone, tap Time Zone and search for a city of your choice.
  8. Tap Adjust to save all your changes.

19. iPhone 13 tips and tricks: Track your iPhone with Find My, even if it’s turned OFF

Devices that have been turned off can still be tracked by the ‌Find My‌ network in ‌iOS 15‌. If a device was low on battery power or turned off by a thief, it can still be found when it’s close to another Apple device.

With this iPhone 13 or iPhone 13 Pro trick, an iPhone that has been turned off will actually enter an ultra-low power state that keeps the Bluetooth beacon active, effectively turning your iPhone into an AirTag.

You’ll see a little “iPhone findable after power off” notice under the Slide to Power Off interface, too.

20. iPhone 13 tips and tricks: Keep Night Mode off

For the most part, Night Mode in the Camera app on modern iPhones is a great thing. It can absolutely transform photos taken in very low light.

If the Camera app detects a dark scene, Night Mode is enabled automatically, but sometimes you want that dramatic dark effect, and it’s annoying to disable Night Mode to get it. You have to tap the Night Mode indicator and then slide the timer down to zero seconds.

If you wait a while before taking another photo, it will re-engage automatically.

With iOS 15, you can head to Settings > Camera > Preserve Settings to find an option to preserve your Night Mode settings (among other things). With this enabled, Night Mode will remember when it has been turned off and won’t re-enable itself. If you want to take a Night Mode shot, you can manually tap the Night Mode indicator to enable it yourself.

21. iPhone 13 tips and tricks: Adjust video playback speed

Apps like YouTube have had variable speed playback for some time now, but the default iPhone video player has not. In iOS 15, the default player (used for many web videos and by lots of apps) has playback speed controls.

When playing back a video, tap the overflow menu in the lower right (the three dots) and you’ll be able to select from up to five different playback speeds.

22. iPhone 13 tips and tricks: Share things with Siri

Sometimes it’s a pain to share that cool thing you found online. You have to copy URLs or images, switch to Messages, hold down to paste, hope it works…

With this iPhone 13 and iPhone 13 Pro trick, you can finally just ask Siri. Simply say “Hey Siri, share this with [name]” (or something similar like “send this to [name]” and Siri will share the content on the screen to that person using Messages.

Items like images, web pages, Apple Music or Podcasts, Apple News stories, and Maps locations will share the actual content (or a link to it). For content Siri can’t share, it will warn you that it can only send a screenshot—but Siri will still automatically take that screenshot and drop it in a Message to that person.

It’s all very frictionless. Just ask Siri to share something, and Siri will prepare the item in a flash and ask “ready to send it?” Say yes, and you’re done. No finding and opening share menus, no copy/paste, no flipping back and forth to the Messages app.

23. iPhone 13 tips and tricks: Translate anywhere

With this iPhone 13 and iPhone 13 Pro tip, you can translate text just about anywhere. In almost any app where you can select text!

Just tap and hold on a block of text to show the text selection window and drag the start and end points—just as you would if you were going to copy/paste. You’ll notice the little popup menu has a new Translate option (in some apps you might have to hit the right arrow to see more options).

You’ll get a warning that the text is going to be sent to Apple to process the translation. Tap Continue and a pop-up card will show the translated text and give you options to copy the translation, change languages, and so on.

Want to do the translation without sending data to Apple? Open Settings, then Translate and enable On-Device Mode. You’ll have to also open up the Downloaded Languages menu and download the languages for which you want to enable offline translation.

24. iPhone 13 tips and tricks: Keep an eye on app activity

Apple is always expanding privacy features, and with this iPhone 13 and iPhone 13 Pro trick you have a powerful new tool to find out which apps are accessing your phone’s features and data.

Start the Settings app, then tap Privacy, and scroll to the bottom to Record App Activity. You’ll have to enable this at the top of the screen.

This will record a 7-day summary of exactly when and how often all your apps access things like your microphone or microphone, or which web domains they visit. Just come back to this screen a week later for a full report.

You can even tap Save App Activity to export a JSON file of all the data if you’re into that kind of thing.

25. iPhone 13 tips and tricks: Set Recovery and Legacy Contacts

Your Apple ID and iCloud account get more important every year. It’s full of purchases, services, cloud data, photos…if you lost access, a lot of that stuff would be gone forever.

Apple has two welcome new tricks on iPhone 13 and iPhone 13 Pro. Account Recovery Contacts are people you trust that Apple can contact to help you reset your passcode if you ever lose it. They can’t actually access your data, but if you initiate a password reset but are locked out of your own devices, the reset code can be sent to that contact.

To enable it, start the Settings app then tap on your profile at the top. Then choose Password & Security, then Account Recovery. You’ll see an option to Add Recovery Contact.

What about accessing all your content should you pass away? In the event of your untimely demise, a Digital Legacy Contact is a person who can request access to your data after you die. They’ll get access to Messages, Photos, Notes, Contacts, Calendar events, App purchases, and your device backup, but not your iCloud Keychain or licensed media purchases.

26. iPhone 13 tips and tricks: Use Spotlight from the lock screen

Spotlight search is the tool you get when you swipe down on the screen to search your iPhone. iOS 15 adds another way to access Spotlight Search to another, extremely convenient area: the lock screen.

To use this iPhone 13 or iPhone 13 Pro trick, simply swipe down on the lock screen to pull down Spotlight Search. Your iPhone doesn’t even need to be unlocked first, so you can use this feature whether you’re holding your iPhone up or flat down on a desk. However, if you decide to tap on something, you will need to unlock your iPhone to continue.

27. iPhone 13 tips and tricks: Temporary iCloud Storage For Transferring Data

Have you ever ran out of iCloud Storage when backing up your iPhone? This can make transferring to another iPhone very difficult as without a complete backup you run into the risk of losing data. One of the hidden iPhone 13 and iPhone 13 Pro tips and tricks includes temporary iCloud Storage for transferring data.

Now when you buy a new iPhone and use iCloud backup to move data, iCloud will detect that you are low on cloud storage and grant you as much storage as you need to complete the backup proceed. The storage is provided temporarily though and will go away in 3 weeks, however this is enough to move your data, apps and settings to your new device.

28. iPhone 13 tips and tricks: Use the Wallet app to open your hotel room or house

Companies that make HomeKit-compatible locks can add support for a Wallet-based house key that can be used to tap to unlock HomeKit door locks.
Home keys will be available in the Wallet app and can be accessed on ‌iPhone‌ and Apple Watch.

Participating hotels that use digital keys can allow customers to add those keys to the Wallet app after making a reservation, allowing them to bypass the lobby.

The digital hotel key stored in the Wallet app can be used to unlock a hotel room. After checkout, the hotel room key is automatically archived.

29. iPhone 13 tips and tricks: Use Siri offline

Did you ever trigger Siri on your iPhone and got disappointed after being told that you must connect to the Internet to perform certain tasks? Bother not, you are not alone to have felt dejected for being unable to use Siri offline on your iPhone to perform common and repetitive tasks. No longer! Finally, it’s possible to use offline Siri in iOS 15 on iPhone 13 and iPhone 13 Pro.

Here are some tasks that you can perform using Siri without an Internet connection:

  • Controlling system settings such as enabling dark/light mode, low power mode, AirPlane mode, activate Accessibility features, etc.
  • Playing the next or previous song in the Apple Music app.
  • Opening apps.
  • Setting and changing timers
  • Setting and changing alarms.

30. iPhone 13 tips and tricks: Search the web by voice

Tap the Tab Bar at the bottom of the screen, and you’ll now see a microphone icon appear in the far right of the text field. Tap the mic and you can dictate your search term to Siri. The moment you’re done talking, the search takes place automatically, without you having to tap or type anything else. It’s very convenient.

31. iPhone 13 tips and tricks: Identify animals, items and plants in photos

Your iPhone 13 and iPhone 13 Pro can now identify and tell you more information about an animal, a landmark, a plant or an object, such as a book. An icon is available on top of photos in your gallery and, with a tap, it can identify a pet’s dog breed and show you more information, for example. Or it can name a flower with some background on the plant. The feature is similar to the one that’s been available on Android phones called Google Lens.

32. iPhone 13 tips and tricks: Use new Clothing Options For Memoji

If you love Memoji, then you are going to love the 40 new outfits that are available for Memoji. In addition to new outfits iOS 15 also brings three different colors for clothes, two different eye colors for right and left eye, new glasses, new stickers and multicolor headwear. All of the new goodies are available under the Memoji editor.

Your Favorite iPhone 13 and iPhone 13 Pro Tips and Tricks

So these were some of the best iPhone 13 and iPhone 13 Pro tips and tricks you would love to try today. My favorite iPhone 13 tips and tricks include Focus,, FaceTime Links and Live Text. There’s surely plenty more hidden iPhone 13 and iPhone 13 Pro tips and tricks to discover, so I’ll keep tapping, swiping and noting anything I find. Did we miss out on something important that needs to be added to the list? Which are your favorite iPhone 13 and iPhone 13 Pro tips and tricks? Let me know in the comments section below.

Why do you buy what you buy? Why do you buy iPhones? Why do people buy iPhones? Do you ever stop to think about it? Do you ever stop to contemplate your reasons for buying something?

Why do i buy iPhones?

For the longest of time, I struggled to find the answer, even though i use iPhone for pretty much everything. It’s my wallet, my calendar, my notepad, my connection to work, and yes, the tool I use to get in touch with the world.

Let’s take this iPhone 16 Pro Max I’m using right now. Why did I buy it? Well, First of all, I truly needed it. Perfect, why else did I buy it? Is it because of what it does for me? Yes! Is this iPhone a device used to get things done? Yes! Is it for entertainment purposes? Yes! Is it a tool used to create entertainment? Yes! Is it to produce content? Yes! Is it to store and edit pictures? Yes! It is to stream music? Yes! Is it to handle my email? Sure! Yes. It handles all of these tasks. But those are the rational reasons why I buy iPhones. Let’s look at the far powerful, typically implicit, emotional reasons why i buy iPhones.

Far way back, before Apple totally and completely dominated the tech arena with the iPhone, iPad, new Macs, etc., Apple positioned itself as a brand for creators. It is practical to state that Steve Jobs created a cult, a Culture for Creators, by Creators, for people who take art, innovation and creativity seriously converging with nice, excellent design.

This philosophy was very specific. This philosophy was not for every person. This philosophy flew the black pirate flag over corporate headquarters in an act of disobedience
(yes, indeed). At the beginning, Jobs positioned Apple to care about art, innovation and creativity. Apple was — and still is — for people who care: People who care about innovation, people who care about the price, people who care about the quality, and most importantly, people who care about the customer.

Please keep in mind: Apple never was, nor is it currently, for every person. It is still for specific.

Because of this skillful positioning and completely careful attention paid to design through end user understanding, Apple enjoys “luxurious pricing” with very little discounting. Moreover, the company receives massive loyalty to the brand.

You know how some people gets thrilled when they land on Disney World in Orlando? As if they are finally seeing their childhood dream come true in front of them? Some people gets thrilled when they finally land on Cupertino, CA, to experience for themselves where it all started. And to see where the Real Magic gets created to this day. I belong to that group of people. (I’ll take the pilgrimage to Cupertino, not Orlando.)

Why do people buy iPhones?

We buy iPhones because of our profound emotional connection to the brand. Like loyalty to a beloved college football team, it is a resolute, inconspicuous connection, never to be broken. We buy the iPhone because it’s a phone that Apple built for enthusiasts. Using an iPhone is real enjoyment, real gratification, real pleasure. It is smart enough to know to get out of the user’s way and allow her to get to the significant job of productivity. This is a value that Android creators never got. They still don’t get it. And they never will.

That’s perfectly okay: it isn’t for them. iPhones are for people like us who do things like this. Apple knows exactly how to get the user experience aspect of their devices just right. The Cupertino company knows precisely what users want in a smartphone with regards to user interface and security.
Apple Bosses work very hard to ensure they don’t do anything to bungle this profound , emotional connection they and the brand has with tons and tons of people around the world. They are aware that they are in an extremely jealous business position with their luxury product pricing on consumer and professional goods.

The difference between Apple Bosses and bosses of other companies is Apple executives actually value what they do. They value music. They value art. They value bleeding-edge Tech. They value design. They value execution. They value the magic of small teams. They value building community around Apple Stores. They value emotions. They value people. They value legacy.

We buy iPhones because of emotional bond. We buy iPhones because of community. We buy iPhones because it makes us feel special associating with the brand. We buy iPhones because it is for Creators, by Creators. We buy iPhones because we want to make things better by making better things. And we want to look good while doing so.

If you enjoyed this article please share it with others.

The vast majority of people love Android phones because of the different options of hardware and software customization that they have. However, if you happen to ask someone to recommend a good smartphone in 2024, they will probably ask you to buy an iPhone over an Android phone. So the big question is, what are the advantages of an iPhone over an Android phone? In this article, i’m going to explain 10 benefits of having an iPhone over Android smartphone in 2024.

If you traverse across the Internet, you are likely to come across loads of Android fanboys making some pretty unflattering statements about iPhone users, or iPhone fans saying negative things about Android users.
But frivolous altercation aside, what are the advantages of iPhones over Android phones?
The short answer: The iPhone is user-friendly, has a sleek design, and it is very fast as far as its browsing speed is concerned.

Having said that, certain Android fanboys can’t really understand why people like Apple’s operating system, iOS.

what are benefits of iPhones over android phones?

If you ask iPhone users this question, they will most likely point out Apple’s Cleaner interface and design, data privacy, security or how simple it is to get an iPhone working right out of the box, or that they don’t need to take the time to customize a new phone extensively. They also love features such as iMessage, or they like some of the native apps that come pre-installed on a new iPhone, such as Books or Health. Now, let’s look at the major advantages of iPhones over Android phones.

10 Advantages of an iPhone over an Android Phone

Here are ten advantages of having an iPhone over Android:

#1. iPhone is more user-friendly

Even though most Android phone creators try their best in producing these phones, iPhones remain to be the easiest phone to use until now. The look and feel of iOS has not changed over the years. This has been one advantage of iPhone over android phones because it works pretty much the same way in 2024 it did in 2008. You just pick up, switch it on, and touch the app you want to open. Despite Apple making some improvements over the years like Control Center, the iPhone is still very easy to learn.   

#2. iPhones have extreme security

Another advantage of iPhone over Android phones is security. If you use your phone to access your email or social networks, log on to your bank’s website or mobile app, send texts, store contacts or take selfies, Then security should be of concern, as this data could be valuable to cybercrooks and potentially harmful to you or your loved ones.And then the US Federal Bureau of Investigations (FBI) revealed to the world that even with physical possession of someone’s iPhone, it takes the assistance of an exceptionally skilled hacker to break into it and access the data. And that’s on a 32-bit phone. Apple doesn’t even make 32-bit phones anymore. They don’t expect iPhones to get infected. One of the biggest myths about iOS is that the operating system is immune to malware. However, iOS apps can still be infected with malware – there was the XcodeGhost debacle where hundreds of apps were found to include a counterfeit version of Xcode, the platform used by developers to build their apps.And using free wi-fi networks is just as big of a risk on iOS as it is on Android. However, Apple does take security seriously, releasing updates to all iOS devices directly, which helps contain any breaches upon becoming aware of them, and disinfecting everybody’s devices, regardless of who their carriers are. Google can’t do that for Android users, unless they have a Pixel or Nexus.

#3. iPhones works beautifully with Macs

If you’re shopping for a new smartphone and already have Apple products, like a Mac or an iPad, it makes sense to consider buying an iPhone. There are a variety of third-party apps you can use across your devices from different manufacturers. In addition, the Continuity feature in Apple products is really nice too. One good example is Handoff. If you own a mac, you can start working on a note on your iPhone and hand it off to your Mac to continue working on it. Also, you can send or receive messages from your mac even if your iPhone is 1000 miles away or turned off. How about that? Androids don’t get those.

There’s also AirDrop, which allows you to easily transfer photos, Videos and other files over Wi-Fi from your iPhone to a MacBook. And with iCloud keeping everything in sync, you have access on your Mac to the photos on your iPhone, and any notes or documents you create.They don’t want bloatware added by the carrierOn most Android phones, the carrier you purchase your phone through can add all kinds of apps and bloatware, and some can’t be uninstalled.This may not be a big problem when you have a brand new phone, but a year or two in when you need more storage space, you won’t be looking at those unwanted apps kindly.An iPhone, however, allows you to delete any unwanted apps when you set up your new phone. and starting with iOS 12, you can easily disable built-in apps you don’t need.

#4. You can update iOS in iPhone whenever you want

Another major advantage of iPhone over android is that you can update iOS in iPhone whenever you want. As detailed on the Apple Developer website, almost 80% of all iOS devices are running the latest version of the operating system introduced last year. When considering only iPhones introduced in the last four years, iOS 17 is installed on 86% of devices. On the other hand, Android 14 is installed on 28.08% of the Android devices.

#5. Resale Value: iPhone Keeps Its Worth.

iPhones tends to hold their value pretty well. It’s easier to resell an iPhone than an Android phone if you want an upgrade. Though some Android devices also hold their value quite well, the cost of the upgrade is less painful for iPhone users.

#6. Apple Pay for mobile payments

Although Android manufacturers are trying to make Android Pay work, Apple Pay is the most popular method for making mobile payments. It is also very easy to use.
You can use Apple Pay by bringing your iPhone near the supported payment terminal at the checkout corner and then authenticate the payment with your phone’s Face ID or touch ID sensor. Apple Pay also supports reward cards and store issued credit card from a wide-range of companies. All of these are stored in the new Apple Wallet app.

#7. Family Sharing on iPhone saves you money

Family Sharing feature lets you share your purchases from App Store, iTunes, and iBooks with other people, even if they have their own separate accounts. Ideally, these other people are your family members, but there’s nothing to prevent you
from sharing your purchases with, say, your friends or roommates.
You can share these with your family with up to six people. By the way, when children want to make a purchase, you will receive an alert so you can also keep control on the stuff they buy in order to keep the bill under control. Other family sharing features include a shared calendar, shared photo albums and the ability to see where your kids are on a map at any time. Google still doesn’t offer these easy family sharing on Android devices.

#8. iPhones are generally faster than Android phones

Having used both platforms daily for years, I can say I’ve experienced way fewer glitches and slow-downs using iPhone. Performance is one of the area iOS beats Android most of the time. This seems ridiculous considering iPhone internals. The iPhone 15 Pro Max is currently the most powerful Apple smartphone and it features 6GB of RAM. Those specifications would be considered mid-range at best in the current Android world.

#9. Accessibility: iPhone is the king

iPhones are also preferred more over Android because of the accessibility features. In a head to head comparison, Apple is the accessibility king. Its built-in accessibility features, the many adaptive and assistive apps available, and ease of use make it the most preferred smartphone for the vast majority of people with disabilities.

For example, Apple’s iOS comes with a number of accessibility features (black on white, larger text sizes for default apps, interface zoom, etc.) that continue to be improved upon. Also, apple’s voiceover is acknowledged as one of its most useful accessibility feature. Voiceover is an accessibility feature that makes the iPhone and iPad easier to operate for the blind and visually impaired. With VoiceOver, anyone with a sight impairment can have their iPhone or iPad’s screen read to them, including buttons, icons, links, and other interface elements, and use gestures to navigate and select their options.through which they can easily operate and work through efficiently. It also has the feature of getting the light of the screen getting dimmed at night for the users who basically love to read the things at night.

#10. Apple provides the best Support

In general, both iPhone and Android phones work pretty well and, for day-to-day use, don’t usually malfunction. However, everything breaks down once in a while, and when that Happens, how you get support is very important.
If you have a problem with Android phone, you can search online forums or reach out to your carrier. But with the iPhone, you can tap into a vast database of useful help articles on Apple’s website itself and can get help via live chat or you can even make a genius bar reservation at your favorite Apple Store and get help from an Apple expert. Google still doesn’t offer this sort of direct relationship with its customers.

Advantages of an iPhone over Android? Now you know

With numerous benefits of having an iPhone over Android, it’s easy to figure out why iPhones are preferred more over Android device when it comes to recommending A friend or family member which phone to buy. iPhone provides much better technical support and it’s easy to update the latest iOS than in Android phones. Moreover, iPhone is preferred more than Android device when creating a new mobile app.
Thanks for reading.

AirPods have changed my life, mostly for good, but in some ways, for bad.
Since I bought my first pair of AirPods at the end of 2018, they have been in my shirt pocket almost every day.
Not only have they been in my pocket, but one is usually in my ear most of the day as well. As soon as I get up, I often pop one in. Then when going to bed, I pop it out when I am falling asleep.

I have always longed for accessible technology that was small, really small. When Apple
introduced AirPods,
I fantasized about its potential. I longed for a beautiful new device that could rest gently and comfortably on my ear, something gorgeous that would tell me everything I wanted to hear.

In 2019 I probably listened to more podcasts, audiobooks, and music than any other year. You can tell from my usage in the past ten days that I have listened to over 50 hours of audio almost exclusively using my AirPods.
I listen to a lot of podcasts, and lately, a lot of YouTube in the background as well. Usually, all of the usage for YouTube would fall under podcasts, making podcasts around ~45 hours of listening but have been on a YouTube Premium trial to test it out.

Music is usually more and is also being taken up by YouTube usage, and I have also been taking a break on books after reading (and listening to) over 24 of them last year.
Still, a total of 50 hours of audio for a period of ten days is a lot. And I honestly don’t know if I would have managed without the convenience of AirPods.

So what possessed me to even consider buying Apple’s wireless AirPods? They are small, lightweight, easy to forget and always perch precariously from a tiny shelf of ear cartilage. I have learned two great facts about my AirPods over the last two years: They are easy to love and easy to lose.

My old
wired EarPods
were just fine for a long time. If I dropped an EarPod, I could simply trail the wire like bread crumbs to rediscover the treasure.
But, Apple cut my audio umbilicus with the new iPhone models by removing the dedicated headphone jack. I understand that wired EarPods are packaged with the
new iPhones,
but they use the Lightning port, which is also the way I fill my battery during the day. I decided I’d better get used to the wireless lifestyle as early as possible.

I took a deep breath and made the AirPods investment. Around the same time, I also bought the BeatsX wireless offering, as well as the BT Waves much less expensive headset. Nowadays, I almost never touch the BeatsX or BT Waves products. The AirPods are well-engineered, delightfully intuitive and much, much nicer. I love them to the core.

Still, AirPods have a weakness. Gravity. Since I work at home, I generally only use my AirPods in the house. This helps as they are more easily found when they fall off. Fortunately, they don’t shatter on impact. However, I remain fearful. Even after all these months, I still forget when my AirPods are dangling in place. On many occasions, I have lifted an arm to reach up into a kitchen cabinet, knocking an AirPod loose, immediately sending me into a frenzy. There is no dignity in my dropping to my knees on the tiled floor, hoping I do not land on the precious item, then sweeping the surface with my fingers, trying to recapture the elusive accessory.

My AirPods are even vulnerable when I sit in my living room comfy chair. My dog is frequently involved in displacing one or both AirPods as I unwind.
Tom has a couple of endearing traits that cause me minor grief. At least once a day, while I am sitting, Tom will stand on his two hind legs and drape his front paws over my shoulders. He really likes to wipe his nose on my shirt. I am his handkerchief. And, if those two front paws do not successfully fling my AirPods into the abyss, his other little habit certainly will. Tom thinks it is important to sniff my ears, just checking my identity to be sure that I am who I claim to be. That wet nose of his has launched many an AirPod.

Fortunately, I usually find the missing AirPods pretty easily, but I have occasionally needed to use the AirPod “Play Sound” option inside
the
“Find My” app.
The audible beacon it triggers is just loud enough for me to locate the missing accessory. Because I almost only wear my AirPods indoors, I have never had to go hunting outside where the ambient noise might drown out the emergency audio alert.

Of course, the fact that AirPods are so comfortable and easy to forget has left me susceptible to feeling a little foolish. Recently, I took my iPhone upstairs to the master bathroom. I set down my phone and AirPods case and stepped into the walk-in shower. I waited until the rest of me was clean before I started to shampoo my hair. And then I noticed my AirPods dangling from my ears. I’d been in the shower for about a half hour and was mortified. Rather than immediately step out of the shower with soapy hair, I carefully rinsed out the suds and toweled off. I stepped out, put the AirPods on a dry washcloth, and felt dumb as dirt. I patted them dry and decided to just see how permanent the damage was. I popped them back into my ears, started the Music app on my iPhone, and I immediately heard Justin Bieber singing, “love yourself.” Perfect! No damage at all. Somehow they survived a hot shower and shampoo. Do not try this at home. Your mileage may vary.

The previously water-logged pair still works like new. No effect on sound or battery life. What a delight! In fact, recently, I bought a new pair of
AirPods Pro
because I use them all day, every day. After about five hours, I hear the warning signal in the ear piece that the current set is down to 10% of their battery reserve. I immediately put the
first generation AirPods
back into their charging case and start using the AirPods Pro. Rather than wait fifteen minutes to get a decent charge on the depleted AirPods, I simply use the extra pair so that I have no loss in productivity. For me, purchasing a new set of AirPods Pro was very much worth the cost.

The ability to take one out of its case, knowing that it is fully charged, popping it in my ear, automatically connecting to my iPhone, then pressing play on whatever it is I was planning on listening to, has been such a subtle but outstanding life improvement that is hard to describe.
But this improvement has a downside, of course.
Being able to listen to audio comfortably for hours at a time at such a fantastic convenience means I am allowing a separation between myself and the world too easily.
I realized that when I am at home, I always have them in, or at least one, listening to a podcast, audiobook, or watching a video. It has made chores that much more enjoyable, which is a plus, but some chores that I share with my wife have now become cold and quiet. It has even caused my wife to listen to her headsets when we are cooking or cleaning since I am not available to talk.

At work, I am continually listening as well. Even when I get up to go to the bathroom, I make sure to have an AirPod in to listen to a podcast or a song on the way there and back. At our desks, at work, everyone is usually listening to something, but I can’t even walk from the parking lot to my office without popping in an AirPod.

My AirPods, and you can argue Podcasts and AudioBooks, have become my new Twitter or FaceBook when standing inline. Whenever I am at the bank or queuing for food at a restaurant, everyone has there phones out as they wait for their turn at the counter. I know longer stare at my iPhone in line as much anymore because I usually already have an AirPod in listening to my 30th podcast for the day.
Just like using your iPhone for boredom or a time-filler doesn’t always have to be a bad thing, no matter what some people say. But allowing yourself to get bored at times can help you in other ways, such as relieving any anxiety or allowing thoughts to come in organically instead of being forced through social media, authors, or podcasts.

So one thing I have learned in owning Airpods for over two years now is that, to me, audio has become my new boredom filler. Podcasts and AudioBooks are my new form of distraction being fed to me through two beautifully designed white wireless headsets.
Instead of scrolling through the infinity pool of Twitter or Facebook, I now get endless voices in my ear at all hours of the day. This has been a huge advantage in being able to consume so many audio books and podcasts, particularly those that provide tips on life and self-help.
But I am also realizing at the middle of 2020 that I gained a lot of self-help and new ways of living my life last year. The remainder of this year I hope to follow that trend and new knowledge instead of feeling like I need to continue to consume it so much.

There is no way I can cancel some of my favorite podcasts on these topics like The Tim Ferriss Show and Focused, but reading books I am taking a break from this year. I have a stack, digitally and physically, that I still need to read that I may take my time with, but I am not going to try and continuously listen to books throughout the year as I did before.

I have yet to do an actual AirPods review. It is not that I don’t want too, I think it is because when I first got them, there was no friction in becoming my new and, almost, only pair of headphones. I just started using them and never stopped.
Usually, when I write a review about a device, I try to stick to some narrative. Coming up with some pros and cons on the device I am reviewing then counter those pros and cons with reasons why they either don’t matter or should be a deal-breaker.

AirPods, unexpectedly, came into my life and just became an integral part of it promptly. There are cons, besides the ones I described above, causing me to disconnect with the world so easily, but others like them having a hard time to connect to my phone sometimes or them having a hard time switching inputs to another device like my MacBook or iPad.

It took almost a year for my ears to be comfortable with the design of the headphones, too, since I never really like the original EarPods Apple provides in the box with iPhones. They usually start to not last very long on a charge after a year and a half. Also, losing them can be very easy, and the Find My app on my iPhone doesn’t always work when trying to find one.
This is all to say I am never letting my AirPods go, and when these die as the last ones did, I will probably replace them pretty quickly. But I am learning from the habits that these headphones are creating and trying to be better when around my wife or coworkers and be present more.

The AirPod’s biggest pro is the fact that you can listen to anything fairly quickly without fail from your iPhone with comfort and hours at a time. I am most comfortable with them when working in my office, relaxing in the house, or riding in a car. That is most of my day. Even so, I still keep a set of my trusty old EarPods handy for times when walking outdoors or when lying in bed. My AirPods Pro are nice, and I’m glad I bought them, actually, I use them more when I travel by plane or train, when I am in a crowded venue or when I really want to block out the world.

Tag: AirPods

There have been reports of iPhone SE 2020 battery draining quickly than usual. Although this iPhone model is quite new, there has been concerns from Apple users that despite the newness of their iPhone, their battery is already draining faster. This can be depressing particularly to those who are always on the go and needs their iPhone for their day to day living. If you notice your iPhone SE 2020 battery draining fast, there are some steps you can take to fix the issue before contacting Apple Support.

One of the issues plaguing iPhone SE 2020 users is faster-than-normal battery drain. Battery issues iPhone SE 2020 are extremely common, particularly after new iOS releases, so the complaints don’t come as much of a surprise.

Some of the issues might be hardware related, but many others are probably software related. In a most cases, poor battery on iPhone SE 2020 is caused by a rogue app or bad habits.

If your iPhone SE 2020 battery drain fast, your first thought might be to downgrade back to an older version of iOS. That’s certainly an option. That said, before you downgrade, you should try and resolve the issues on your own.

Why is iPhone SE 2020 battery draining fast?

There can be a number of reasons why your iPhone SE 2020 battery dies fast. It could be because of a bug from the recent update, or maybe there is some issues with the recently installed apps or current apps on your device. The settings on your iPhone could also affect battery consumption.

iPhone SE 2020 battery drain fix

If your iPhone SE 2020 battery drain fast, the following tips will help you fix the problem. These fixes have worked for us in the past and there’s a good chance they’ll get your issues resolved in no time.

Solution #1: Restart Your iPhone

The first thing you’ll want to do is restart your iPhone. Shut it down, wait a few seconds, and then turn it back on. Often times, this will resolve the problem.

Solution #2: Update Your iPhone

If your iPhone SE 2020 battery dies fast, and there’s a new version of iOS available, try updating to the latest version.

Apple probably won’t call out any battery life fixes in an update’s change log, but there’s always a chance new software does wonders for your iPhone. Before you install a new version of iOS, be sure to read reviews and dig into feedback about the update’s performance on your iPhone.

Solution #3: Check Out Your Apps

If you are still experiencing battery issues on iPhone SE 2020 after performing a restart, and there isn’t an update available, check your applications. Apps, especially third-party applications, will sometimes act up after a new iOS operating system is released and there’s a very good chance it’s one of your apps causing the battery drain issues.

Checking app performance is easy and you might be able to identify a rogue app in a matter of minutes. Here’s how to do that:

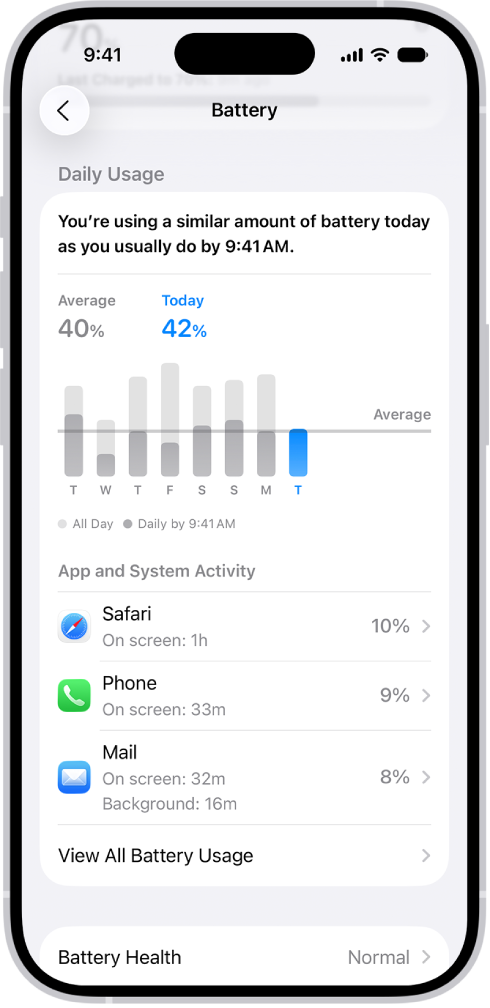
  1. Launch the Settings app.
  2. Tap on Battery.
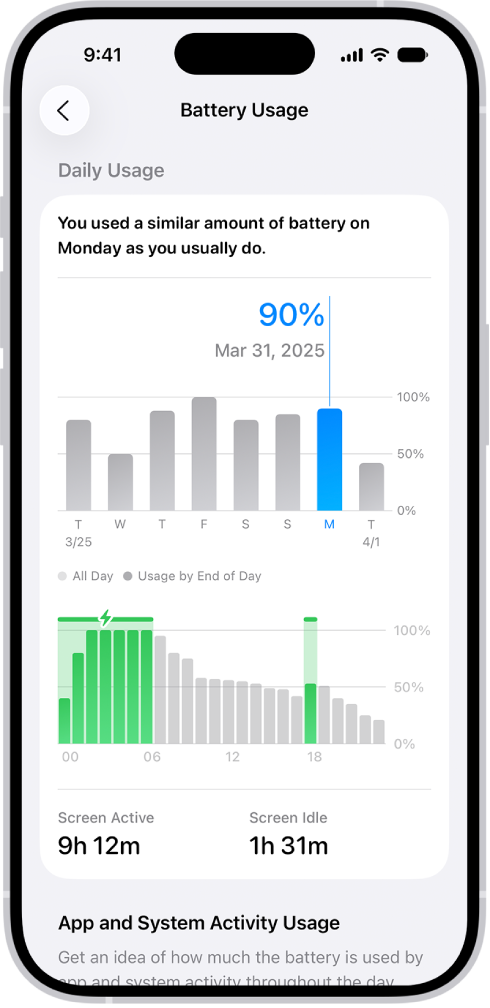
  3. Head into the Battery Usage section.

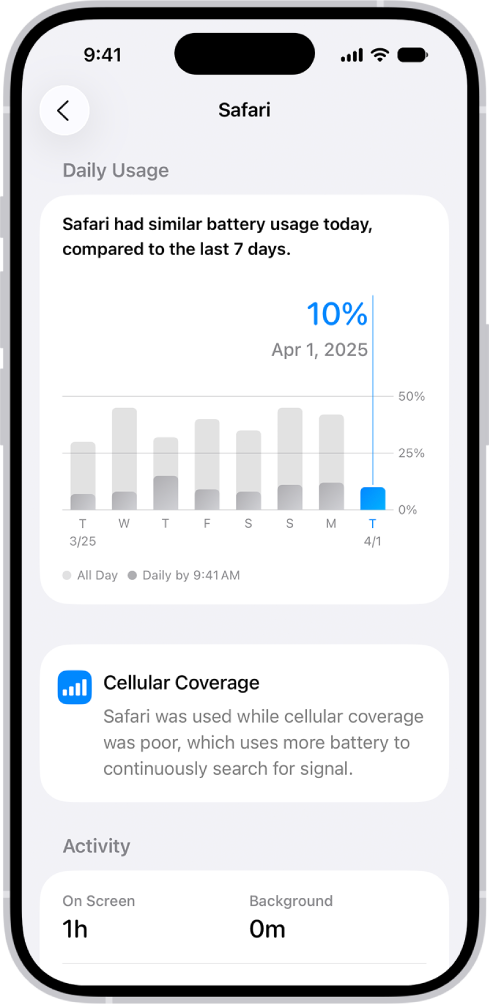
This section will show you the apps draining your iPhone’s battery life and when they’re doing so. If you’re using an app a lot, it will obviously drain your device’s battery. However, if you notice that an app you rarely use is draining battery life, you might need to take a closer look.

If you see an app you rarely use draining your iPhone’s battery life, try updating the application to the latest version. App developers are busy rolling out iOS updates and an update could resolve the problem.

If you are still having poor battery life on iPhone SE 2020, try deleting the app and see if that returns things to normal.

Solution #4: Use Screen Time

The Screen Time feature on iPhone SE 2020  can help you conserve battery while also eliminating bad habits.

Screen Time includes a set of controls that can help keep your addictive behavior in check. If you aren’t on your iPhone using your apps, you won’t be consuming your battery life.

Screen Time gives you the ability to set limits on how long you can use a given app on a particular day. If you approach the threshold, it’ll give you a warning.

The feature also lets you set these alerts for kids and link them to a ScreenTime Allowance. This allows you to set limits on games, but keep important apps available.

Solution #5: Use Low Power Mode

The Low Power Mode feature on iPhone SE 2020 can help you conserve battery life by disabling services (Hey Siri, automatic downloads, and mail fetch) that could drain your battery.

You can turn Low Power Mode on and off any time you want and your iPhone will also prompt you to turn it on whenever it reaches 20% battery.

You may also want to add Low Power Mode setting to your Control Center. Control Center is the menu that pops up when you swipe up from the bottom part of the screen. Here’s how to do that:

  1. Tap Settings.
  2. Now, tap Control Center.
  3. Next, tap Customize Controls.
  4. Lastly, tap the green plus sign next to Low Power Mode.

Next time you launch Control Center on your iPhone you’ll see a battery icon. Tap it to enable or disable Low Power Mode.

You can also turn Low Power Mode on from the Settings app. Here’s how to do this:

  1. Launch Settings.
  2. Scroll down and tap Battery.
  3. Tap Low Power Mode.
  4. Toggle it On.

Solution #6: Turn On Optimized Battery Charging

Starting with iOS 13, Apple introduced a feature known as
“Optimized Battery Charging.”
This feature can help reduce battery aging.

The feature learns from your daily charging routine and waits to finish charging your device to 100% until you need to use your
iPhone.
In doing so, it will stop your battery from sitting at maximum capacity and could prolong the overall life of your iPhone’s battery.

Here’s how to enable Optimized Battery Charging on your iPhone SE 2020:

  1. Launch the settings app on your iPhone
  2. Scroll down and tap Battery
  3. Tap Battery Health
  4. Turn ON the switch next to Optimized Battery Charging tab

Solution #7: Disable Widgets

If you don’t use widgets, try turning them off and see if battery life improves. Here’s how to disable widgets on iPhone SE 2020:

  1. On your iPhone Home Screen, swipe to the right.
  2. Scroll all the way to bottom of your widgets and tap Edit.

On this screen you’ll be presented with a list of your apps and services. These are your widgets and you might notice that some of them are active. To deactivate a widget:

  • Tap on the red circle with the white line.
  • Now, tap Remove.

At first we recommend disabling the widgets you never use. (at times, that might be all of them.) If you still notice poor battery life on iPhone SE 2020, return to this screen and go through them one-by-one or disable them all.

You can always turn your widgets back on if you discover they aren’t the cause of the poor battery life on iPhone SE 2020.

Solution #8: Turn Off Raise to Wake

iOS’ Raise to Wake feature is handy, but turning it off could help you conserve your iPhone’s battery life.

If you don’t need your iPhone’s screen to automatically turn on whenever you pick it up, head over to the Settings app > Display & Brightness and turn the Raise to Wake feature off.

Solution #9: Disable Vibrations

If your iPhone vibrates every time you receive a notification, and you don’t need it to, try turning the vibrations off. Turning them off will help your iPhone use less power.

To turn off vibrations on iPhone SE 2020:

  1. Launch Settings.
  2. Tap Sounds & Haptics.
  3. Switch Vibrate on Ring and Vibrate on Silent to off position.

You may also need to go into each individual Sound and Vibration and make sure Vibration (which is located at the top of the display ) is set to “None”.

Solution #10: Use Wi-Fi Instead of Cellular

Using your iPhone while it’s connected to a cellular network can drain your battery. If you have a Wi-Fi network at your disposal, connect to it. It could help you save battery.

Solution #11: Stop Background Refresh

Apple’s Background App Refresh refreshes apps in the background in order to show you the latest data when you launch them. It’s a handy feature, however, it can also consume your iPhone’s battery life. If you don’t need it, try turning it off.

Follow these steps to disable Background App refresh:

  1. Launch Settings.
  2. Go to General.
  3. Tap Background App Refresh.
  4. Turn it off for any apps you don’t use.

There is an option to turn it off completely if you don’t want to go through your apps one at a time.

Solution #12: Turn Off Fitness Tracking

iPhone SE 2020 features a motion co-processor that tracks your steps and other movements. If you use your phone for fitness-related activities, you’ll probably want to keep this feature enabled. If you don’t, you may need to disable it and see if that helps your iPhone SE 2020 battery that is draining fast.

To do this, launch the Settings app and go to Privacy. From there, select Motion & Fitness and toggle the Fitness Tracking function off.

You might also want to toggle off apps listed below Fitness Tracking in the menu. If you don’t notice any change, you can always turn everything back on.

Solution #13: Turn Off Assistive Touch

If you’re currently using Assistive Touch on your iPhone, it might be one of the culprits. Turning it off might help your iPhone SE 2020 battery that is draining fast.

If you don’t want or need Assistive Touch active on your phone, try turning it off. Follow these steps:

  1. Launch Settings.
  2. Go to Accessibility.
  3. on Touch
  4. Tap AssistiveTouch.
  5. Toggle it to Off.

Solution #14: Enable Dark Mode

Since the dark mode feature is now available on iOS 13 update and most of Apple iPhones that supports the update, turning on Dark Mode feature can help fix battery draining issue on iPhone SE 2020.
Follow these steps to enable Dark Mode:

  1. Launch the Settings app on your iPhone
  2. Tap on Display & Brightness
  3. Tap on Dark Mode to enable it.

Solution #15: Disable Automatic Downloads

If Automatic Download is enabled, as the title suggest, it automatically downloads and updates apps purchased and installed on your device. This means it constantly refreshes to search for available update especially if connected to a WiFi thereby draining your iPhone’s battery life. 

Follow these steps to Disable Automatic Download:

  1. Launch the Settings app on your iPhone
  2. Go to iTunes & App Store tab
  3. Under the Automatic Download section, you can turn Off for Music, Apps, Books and Audiobooks and App Updates. You have the option to select one or you can select to disable all.

Solution #16: Adjust Screen Display

There is a high possibility that the cause of the battery draining faster on your iPhone SE 2020 is because of the settings on your screen display. Be sure to change your iPhone screen dimmer on for daytime use and enable auto-brightness in order for it to auto adjust based on the lightning conditions with the use of a light sensor that is built-in to your iPhone device.

You can adjust the brightness of the screen manually in two ways:

  • First option: Drag the Sun Icon when you opened the Control Center by swiping up from the bottom of your display.
  • Second option: Open the settings app on your iPhone and tap on Display & Brightness, then drag the slider to adjust brightness

To enable Auto-Adjust function, follow these steps:

  1. Open the settings app on your iPhone SE 2020
  2. Tap on Accessibility
  3. Tap on Display & Text Size
  4. Toggle ON Auto-Brightness tab.

Solution #17: Enable Low-Data Mode

Besides reducing the data usage on your iPhone, Low Power Mode can also can help extend battery thereby helping fix battery draining problems on iPhone SE 2020.

Follow these steps to enable Low Data Mode:

  1. Open Settings
  2. Tap Cellular
  3. Tap on Cellular Options tab
  4. Turn ON Low Data Mode

Solution #18: Manage Location Services Feature

Location Tracking can drain your iPhone’s battery therefore, it’s good to manage your location service feature not to track you on all apps all the time. You can either choose to track you on a particular app “Once” and when an app tries to locate you again a prompt will appear if you want to be tracked or not. This does not only fix battery draining problems but also keeping you secured with privacy as well. 

Here’s how to manage Location Services: 

  1. Open the settings app on your iPhone
  2. Tap Privacy
  3. Tap Location Services
  4. Select While using the App on each of the apps

Solution #19: Reset All Settings

If your apps aren’t the cause of the problem, try resetting all of your settings. This will restore your settings to their factory defaults (so make sure you have your Wi-Fi passwords handy), but it could fix your battery life issues. It has worked for us in the past.

Here’s how to reset your iPhone SE 2020:

  1. Launch Settings.
  2. Go to General.
  3. Scroll down and tap Reset.
  4. Tap Reset All Settings.
  5. If asked, type in your passcode.
Tag: Battery

Steve Jobs first announced the original iPhone at the Macworld convention in January 2007, the rest as they say, is history.
He famously said at the Keynote;
“We wanna reinvent the phone.
So, what’s the killer app?
The killer app is making calls!”
However, there was a very certain irony to the fact that this one feature (calling) that every phone prior to the iPhone had managed quite easily almost lead to the downfall of this revolutionary product. It wasn’t the phones ability to make calls that was the issue, more it was the fact that because of the new and revolutionary ‘all glass’ touchscreen design of the iPhone, this presented an issue that had not previously existed… how to stop a customer’s cheek from inadvertently activating the touchscreen, and potentially even ending a call.
Most phones before the iPhone featured a small (none touch) screen at the top and a plastic keyboard at the bottom (Jobs was known to not be a fan of this design and this inspired him in the design of the iPhone).
Just months before the iPhone was due to go on sale to the general public the iPhone was fraught with problems that ranged from buggy software, faulty antennas and a battery that couldn’t hold charge — these problems could all be addressed, but it was said that the issue of a customer’s cheek ending phone calls that could be the real deal breaker.
The iPhone was well into development stage before the
proximity sensor
was conceptualised but it was nowhere near ready for release, all the other bugs could be (relatively) easy resolved, but there was still no solution to the problem, a problem, if not fixed, would have caused a delay, or even cancellation of the iPhone!

How does the proximity sensor work on iPhone

The proximity sensor in the original iPhone works in fundamentally the same way that all modern iPhones do; they detect when the phone is lifted to your ear and turns off the display, and the other way around when done with a call. It works via the emission of infrared radiation — if the radiation hits an object (i.e. your cheek) and bounces back, it is detected by a receiver. There is however more to it than that — if the small burst of radiation reflects off an object nearby then it will be more intense than an object much further away. It was therefore necessary that the sensitivity be set just right in order ensure it worked correctly.
It was a tricky issue to fix as there were so many variables: skin colour, hair length and hair colour and it had to work faultlessly for them all. The reflection of radiation is influenced by the colour and appearance of the surface — light, shiny surfaces bounce back far more light than darker colours, which absorb light. Shiny objects on clothing for instance could cause the proximity sensor to inadvertently turn off the display, even when a user wasn’t on a call.
As the iPhone’s release deadline drew nearer, Apple engineers had to work day and night to find a solution, it was even said that an Apple engineer with ‘extremely dark hair’ was asked to donate some of his hair so that it could be put into a device to test and calibrate the sensor to ensure that it worked as expected.
None the less, the Apple engineers and design team worked around the clock and got the iPhone Proximity Sensor to work and function in much the same way that it does now — the display goes off when at your ear and comes back on when you’re done with your call.
The iPhone proximity sensor was such a huge feature at the time, it was listed as a major feature on the product page on Apple’s website.
The technology has stuck ever since, it was of course not without a few issues, most notably the iPhone 4 received numerous reports and criticism that its proximity sensor didn’t function.
None the less the technology has lived on ever since, were it not for the engineers at Apple coming up with a solution to a newly made problem, then the iPhone may never have been.

Tag: iOS

For years now, I’ve been Using an iPhone without a case. I have never been against those who want to protect their expensive devices. But I’ve always felt that I lose some of the value that the device brings when you cover it in hard plastic.

I remember when I got my very first expensive, fully-loaded computer that my Dad offered to pick for me on my birthday. At the time I worked for him at his external IT consultancy where he provided tech support to local companies. So the gift was partly , my birthday present, and partly, business expense, because he wanted to get me a computer that could help my position as a Network and PC troubleshooter.
The laptop I choose was a 2011 13-inch MacBook Air with an i7 processor, 8 GB of RAM, and 512 GB SSD. It was the most expensive computer I had ever owned and immediately felt I needed to protect it from the world it lived in. So I purchased a clear Incase plastic casing for the outside of the device.
After five months of using the MacBook Air, I realized that the case was starting to turn yellow. It was quite scratched, but I felt that was the point; instead of the MacBook Air getting scratched, the case got it.
However, the yellowing started to bother me and decided to take the case off one day. I was blown away by how beautiful the silver aluminum casing was; I hadn’t seen the outside of the MacBooks casing without the clear case since I got the laptop five months earlier.
After that day, I never put the case back on. I also took off the case from my then Galaxy S2 as well and realized how my phone felt good in hand without a case too.

iPhones, iPads, MacBooks, and even AirPods all have had cases, but we’re removed shortly afterword’s because of my desire to have a pure experience with the device as it came. The disadvantage of using an iPhone without a case may be the risk of wear and tear or destruction of a costly device if you are not careful.
For instance, I have had my
iPhone 11 Pro Max
since around September of last year, and it’s quite worn out from my constant use and exposure to different surfaces. I have not put a case around it since I got it and have enjoyed feeling the industrial design of the device every time I pick it up.
The stainless steel and glass materials that make up the
iPhone
provides a dense and solid experience as if you are holding something substantial. Covering that with a thick plastic just seems wrong, which is why I have not wrapped it up in anything.

The result of using an iPhone without a case, in some instances, is an iPhone that looks quite worn out and abused. I promise that I try and be careful with my iPhone, but it is also a tool, and I use it as such. If I place it on a table, I can place it face down to avoid distractions during a meeting or dinner.
Using an iPhone without a screen protector may appear horrifying, but my aversion to a screen protector on my iPhone outweighs the risk of possible scratches. Recently, my iPhone’s got a small but deep scratch on the screen when it slipped out of my pocket and rubbed against a staple between the base of my sofa and the cushion.
I also accidentally cracked my poor iPhone 11 Pro Max back glass after hitting asphalt from me getting out of my car and forgot that the phone was resting on my lap. The crack is small and has not affected the performance or caused any internal damage to the device. Instead, it gives a glimpse of my hardcore usage of my iPhone, which I’m proud of.

iPhones and other computing devices are expensive. When I buy something at a high cost, it should provide enough use to reflect that cost. My iPhone offers a lot of value for what I paid for it, and I use it to meet that value. This usage can cause some wear and tear, which makes sense to me.
I do understand some people are not as lucky as I am in keeping my phone from a broken screen and do understand younger people need cases because they are more likely to drop things. I’m also aware of the resale value argument if you plan on selling your iPhone each year and want to get as much money as possible to pay for the upgrade.
However, one of the advantages of Using an iPhone without a case is the beauty of actual small and compact design. Wrapping an iPhone in thick plastic or screen protectors takes away the value I feel the size and weight of the iPhone offers. As a compromise, I have to handle the scratches, dings, and cracks that may come in using a device in this way.
But truth be told, I enjoy the appearance of my weathered iPhone. It sends the message that I am getting the value I paid for it and reminds me that it is a tool over anything else. So, that’s why I use my iPhone without a case!

iPhone 12 is just around the corner and you are probably excited about it, but you are probably preparing to cry over your wallet when it comes out as usual. The good news is that, there is a cheapest way to get new iPhone every year without losing any money.
I have been using the top of the line iPhones for the last three years and I have been upgrading without losing my cash on any of them, and you should be doing the same as well.
If you are reading this, you are probably one of the few nerds who have been going through the
new iPhone
rumours and getting hyped about it. You care enough about your Tech gadgets to reach GeeksModo and follow the Tech publications. And in case you are wondering, compared to the “normal” population, We are just a few.
So here’s how to get new iPhone every year…

Sell your current iPhone now!

You probably own
this year
or
last year’s iPhone.
The first thing you should do is put your phone on eBay and Facebook Marketplace. Why now? because it is the most opportune time to sell it. Most of the people you do not know only care about is the fact that this iPhone is the latest — so far. They hardly even know when the next one will come out and even if, they don’t really care. But once the new iPhone is released, your current one will sharply devalue, If you still hold it.

But the next iPhone is not out yet, what would I use?

Find an extra phone lying around and pop your sim in it. go retro for a change, or maybe re-explore old phones. There is always an extra phone somewhere, don’t make an excuse for it.

Do not Pre-order immediately

Chances are you will be probably watching Apple’s Keynote and getting excited about the new iPhone and preparing to hit that pre-order button.
Well, Don’t!
Wait for it to be released, many enthusiastic fans will start buying, people will start upgrading their contracts as well. A few weeks later, You will see many “Sealed latest iPhone” ads on eBay and other Marketplace websites. They will usually sell for $100–$200 Cheaper than the retail price. This is when you purchase.
…and then do the same next year.
Doing so I always manage to get my hands on the new iPhone without losing any money when selling my
iPhone,
or worst case $100 loss. not bad, hah?

Looking for a better deal?

Another cheapest way to get new iPhone every year involves a planned vacation to one of the cheap tourist countries such as Egypt, Morocco or Southeast Asia. iPhones in these countries usually sell much higher — due to insane taxes- and this means that secondhand market will also make you more money than you would expect. As a frequent traveller to one of these countries, I have tried this a couple of times and it works like magic!